How far we’ve come! My first professional job was as a reporter/sportswriter/photographer for a daily newspaper (back when a backslash really meant something), and focusing to achieve a sharp image was a manual process accomplished by turning a ring or knob on the camera or lens until, in one’s highly trained professional judgment, the image was satisfactorily in focus. Manual focus was particularly challenging when shooting sports.
Today, modern digital cameras like the EOS R can identify potential subject matter, lock in on human faces, if present, and automatically focus faster than the blink of an eye. Usually. Of course, sometimes a camera’s AF will zero in on the wrong subject, become confused by background patterns, or be totally unable to follow a fast-moving target like a bird in flight. While autofocus has come a long way in the last 30-plus years, it’s still a work-in-progress that relies heavily on input from the photographer. Your Canon EOS R can calculate and set focus for you quickly and with a high degree of accuracy, but you still need to make a few settings that provide guidance on three Ws of autofocus: what, where, and when. Your decisions in how you apply those choices supplies the fourth W: why. This chapter will provide you with everything you need to put all four to work.
Auto or Manual Focus?
Advances in autofocus technology have given photographers the confidence to rely on AF most of the time. For the average subject, a camera like the EOS R will do an excellent job of evaluating your scene and quickly focusing on an appropriate subject. Interestingly enough, however, the switch to mirrorless technology has actually revived interest in old-school manual focus.
There are five reasons why manual focus is being used more by creative photographers.
- WYSIWYG. What you see (in the viewfinder or LCD monitor) is what you get, in terms of sharp focus. When focusing manually with the EOS R, you’re evaluating the exact same sensor image that will be captured when you press the shutter release. Traditional single-lens reflex (SLR) cameras use a mirror to direct the image to a separate focusing screen (when not in live view mode), which can be coarser, not as bright, and possibly out of alignment.
- WYSIWYW. Focusing manually can mean that what you see is what you want, that is, you can select the precise plane of focus you desire for, say, a macro photo or portrait, rather than settle for what the camera thinks you want. Your camera doesn’t have any way of determining, for certain, what subject you want to be in sharp focus. It can’t read your mind (at least, not yet). Left to its own devices, the EOS R may select a likely object—often the one nearest the camera—and lock in focus with lightning speed, even though the subject is not the one that’s the center of interest of your photograph.
- Less confusion. Canon has given us faster and more precise autofocus systems, with many more options, and it’s common for the sheer number of these choices to confuse even the most advanced photographers. If you’d rather not wade through the AF alternatives for a given shot, switch to manual focus and shoot. You won’t have to worry about whether the camera locks focus too soon, or too late.
- Focus aids. You can zoom in on the sensor image as you focus manually, use split-image comparison of two parts of the image simultaneously, and use a feature called manual focus peaking, which Canon also refers to as “outline emphasis” to accentuate in-focus areas with distinct colored outlines. The camera also has a “focus guide” that helps you judge how much out-of-focus the image is, and which direction you need to focus to achieve a sharp image. I’ll explain all these options later.
- More lenses. All mirrorless cameras—and not just the Canon R-series—have had a limited number of lenses available when they were introduced. But fortunately, the reduced flange-to-sensor distance (which I’ll explain in more detail in Chapter 7) offers plenty of room to insert an adapter that allows mounting an extensive number of existing lenses, including those from manufacturers other than Canon. Many of those third-party optics are inexpensive manual focus lenses, or lenses intended for other camera platforms which function only in manual focus on the R-series models. A whole generation of photographers who grew up using nothing but autofocus have discovered that focusing manually is a reasonable tradeoff for access to this wide range of optics.
How Focus Works
Simply put, focus is the process of adjusting the camera so that parts of our subject that we want to be sharp and clear are, in fact, sharp and clear. We can allow the camera to focus for us, automatically, or we can rotate the lens’s focus ring manually to achieve the desired focus. Manual focusing is especially problematic because our eyes and brains have poor memory for correct focus. That’s why your eye doctor conducting a refraction test must shift back and forth between pairs of lenses and ask, “Does that look sharper—or was it sharper before?” in determining your correct prescription. Too often, the slight differences are such that the lens pairs must be swapped multiple times.
Similarly, manual focusing involves jogging the focus ring back and forth as you go from almost in focus, to sharp focus, to almost focused again. The little clockwise and counterclockwise arcs decrease in size until you’ve zeroed in on the point of correct focus. What you’re looking for is the image with the most contrast between the edges of elements in the image.
The Canon EOS R’s autofocus mechanism, like all such systems found in modern cameras, also evaluates these increases and decreases in sharpness, but it is able to remember the progression perfectly, so that autofocus can lock in much more quickly and, with an image that has sufficient contrast, more precisely. Unfortunately, while the camera’s focus system finds it easy to measure degrees of apparent focus at each of the focus points in the viewfinder, it doesn’t really know with any certainty which object should be in sharpest focus. Is it the closest object? The subject in the center? Something lurking behind the closest subject? A person standing over at the side of the picture? Using autofocus effectively involves telling the EOS R exactly what it should be focusing on.
Learning to use the EOS R’s modern autofocus system is easy, but you do need to fully understand how the system works to get the most benefit from it. Once you’re comfortable with autofocus, you’ll know when it’s appropriate to use the manual focus option, too.
As the camera collects focus information from the sensors, it then evaluates it to determine whether the desired sharp focus has been achieved. The calculations may include whether the subject is moving, and whether the camera needs to “predict” where the subject will be when the shutter release button is fully depressed and the picture is taken. The speed with which the camera is able to evaluate focus and then move the lens elements into the proper position to achieve the sharpest focus determines how fast the autofocus mechanism is. Although your EOS R will almost always focus more quickly than a human eye, there are types of shooting situations where that’s not fast enough. For example, if you’re having problems shooting a sport with many fast-moving players because the EOS R’s autofocus system manically follows each moving subject, a better choice might be to switch Autofocus modes, or shift into Manual and prefocus on a spot where you anticipate the action will be, such as a goal line or soccer net.
Autofocus is generally achieved using two different technologies called contrast detection autofocus (CDAF) and phase detection autofocus (PDAF). I’m going to provide a quick overview of contrast detection first, and then devote much of the rest of this chapter to the complexities of the phase detection system used in the EOS R.
Contrast Detection
This is a slower, but potentially more accurate mode, best suited for static subjects, and was originally the only kind of autofocus available for mirrorless cameras and for dSLRs when shooting in their live view and movie modes. The recent innovation of adding phase detection pixels to the sensor itself (as I’ll describe shortly) converted contrast detection from a main system into a fine-tuning option for designers creating a hybrid system that used both. It’s important to note that, unlike the AF systems found on some competing cameras, the EOS R does not use contrast detection at all. Autofocus is achieved entirely using phase detection.
That’s actually a significant achievement on the part of the Canon engineers. I’m going to give you a brief overview of how contrast detection works, which will help you appreciate the sophisticated PDAF system found in your EOS R.
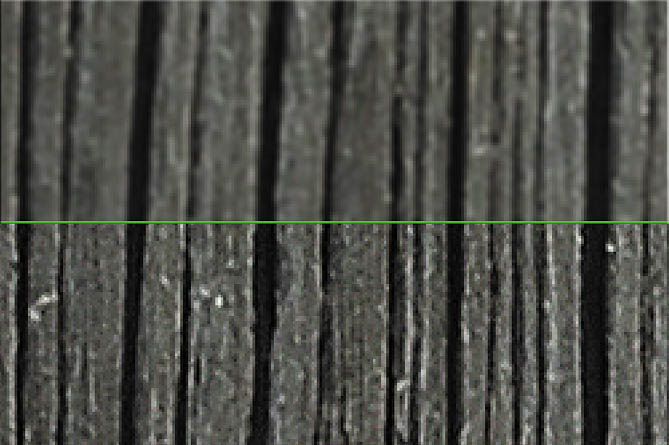
Contrast detection is very easy to understand, and is illustrated by Figure 5.1, a close-up of some weathered wood. At top in the figure, the transitions between the edges found in the image are soft and blurred because of the low contrast between them. Whether the edges are horizontal, vertical, or diagonal doesn’t matter in the least; the focus system looks only for contrast between edges, and those edges can run in any direction at all.
At the bottom of Figure 5.1, the image has been brought into sharp focus, and the edges have much more contrast; the transitions are sharp and clear. Although this example is a bit exaggerated so you can see the results on the printed page, it’s easy to understand that when maximum contrast in a subject is achieved, it can be deemed to be in sharp focus. Although achieving focus with contrast detection is generally quite a bit slower, there are several advantages—and disadvantages—to this method:
- Works with more image types. Any subject that has edges will work with CDAF.
- Focus on any point. With contrast detection, any portion of the image can be used to focus: you don’t need dedicated AF sensors. Focus is achieved with the actual sensor image, so focus point selection is simply a matter of choosing which part of the sensor image to use. It’s easy to move the focus frame around to virtually any location.
Figure 5.1 Focus in contrast detection mode evaluates the increase in contrast in the edges of subjects, starting with a blurry image (top) and producing a sharp, contrasty image (bottom).
- Potentially more accurate. Contrast detection is clear-cut. The camera can clearly see when the highest contrast has been achieved, as long as there is sufficient light to allow the camera to examine the image produced by the sensor. However, some “hunting” may be necessary. As the camera seeks the ideal plane of focus, it may overshoot and have to back up a little, then re-correct if the new focus plane is not optimal. However, once CDAF settles on the ideal focus plane, the results are generally very accurate. Contrast detection is an excellent way of fine-tuning focus that has been achieved through PDAF. However, Canon engineers say the EOS R does not use contrast detection. I’m describing it only because many are more familiar with that type of technology.
Phase Detection
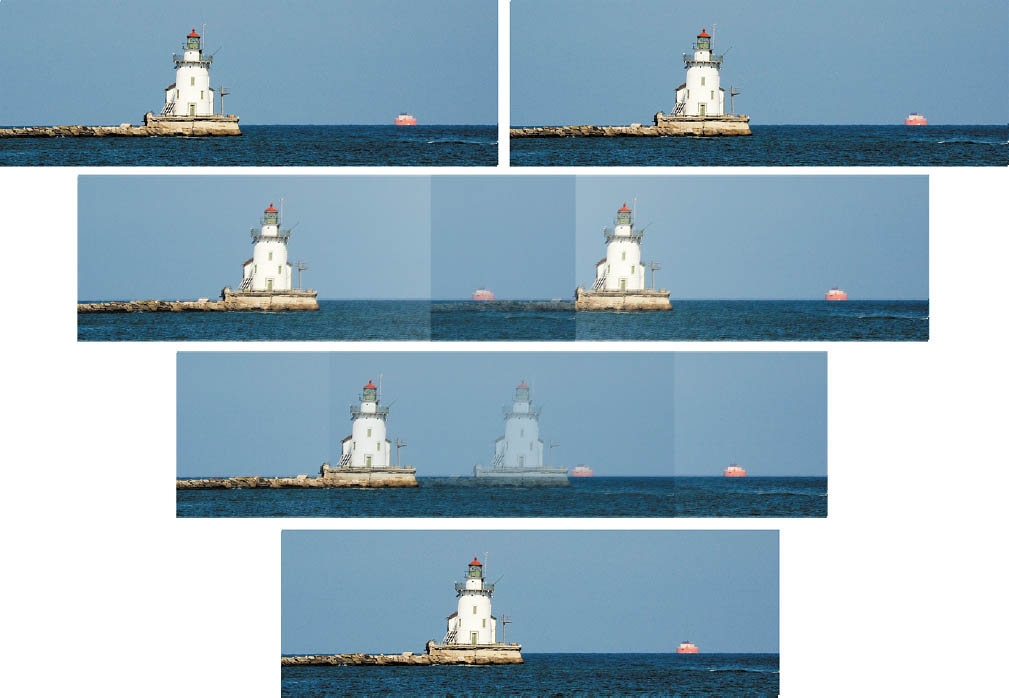
The phase detection pixels in the EOS R’s sensor split incoming photons arriving from opposite sides of the lens into two parts, forming a pair of images, exactly like the rangefinders used for surveying and in rangefinder-focusing cameras like the venerable Leica M series. The dual images are separated when out of focus, and then gradually brought together to achieve sharp focus, as shown from top to bottom in Figure 5.2.
This process tells the camera when the image pair are “in phase” and aligned. The rangefinder approach of phase detection tells the EOS R exactly how out of focus the image is, and in which direction (focus is too near, or too far) thanks to the amount and direction of the displacement of the split image. The camera can quickly and precisely snap the image into sharp focus and match the lines.
Figure 5.2 In phase detection, parts of an image are split in two and compared (top). When the image is in focus, the two halves of the image align, as with a rangefinder (bottom).
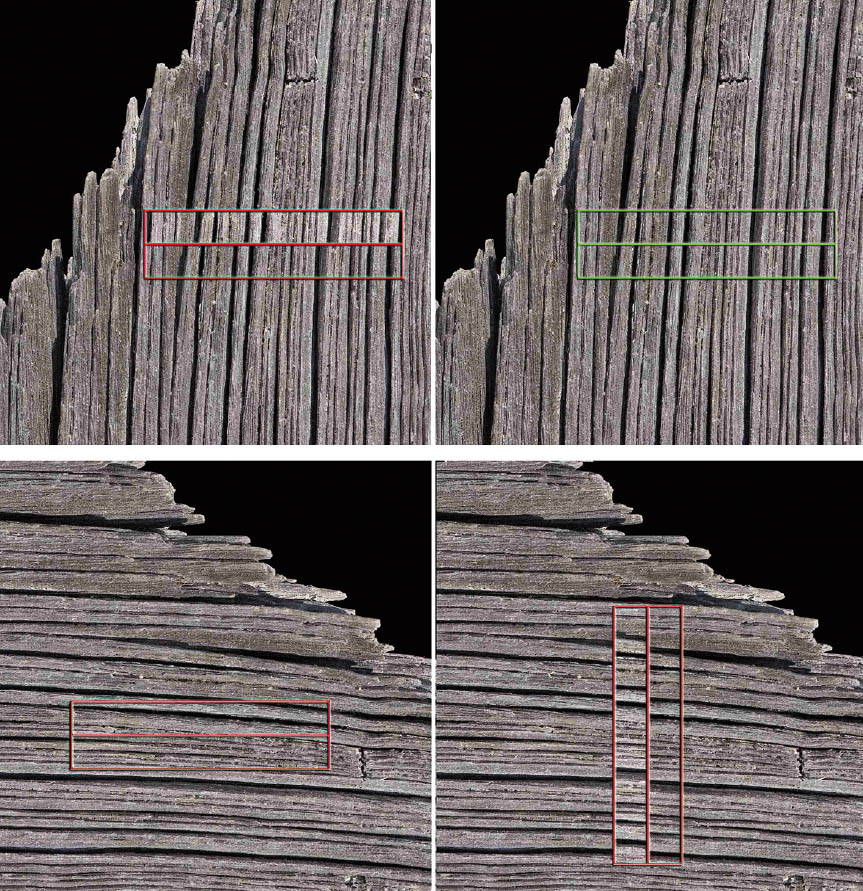
The PDAF sensors in the EOS R are all line sensors, horizontally oriented, which means they work best with features that transect the sensor either perpendicularly or at an angle, as visualized in Figure 5.3, top. It’s easy to detect when the two halves of the vertical lines of the weathered wood—actually a 19th century outhouse—are aligned. However, when the same sensor is asked to measure focus for, say, horizontal lines that don’t split up quite so conveniently, or, in the worst case, subjects such as the sky (which may have neither vertical nor horizontal lines), focus can slow down drastically, or even become impossible. One such scenario is pictured in Figure 5.3, bottom left. A possible solution is to incorporate vertically oriented AF sensors, which can easily focus horizontal subject matter (Figure 5.3, bottom right). The line sensors arranged perpendicularly to each other are called “cross-type” sensors.
However, the EOS R has no cross sensors, as such PDAF pixels are difficult to embed in today’s image sensors. The company feels that the high density of AF positions virtually insures that the line sensors will still find enough detail crossing the sensor at an angle conducive to autofocus. In other cameras, a given sensor pixel must be either a PDAF detector or an imaging pixel—not both. But Canon’s Dual Pixel technology means that any given sensor can include both an AF sensor and an imaging photo diode and perform both tasks, so they have fewer limitations on the placement and number of PDAF detectors included in a sensor like the one found in the EOS R. I’ll tell you more about the Dual Pixel technology later in this chapter.
Figure 5.3 When an image is out of focus, the split lines don’t align precisely (top left). Using phase detection, the EOS R is able to align the features of the image and achieve sharp focus quickly (top right). Horizontal lines aren’t ideal for horizontally oriented sensors (bottom left) and require vertically oriented AF sensors (bottom right).
Of course, as with any rangefinder-like function, phase detection accuracy is better when the “base length” between the two images is larger. (Think back to your high school trigonometry; you could calculate a distance more accurately when the separation between the two points where the angles were measured was greater.) For that reason, phase detection autofocus is more accurate with larger (wider) lens openings—especially those with maximum f/stops of f/2.8 or better—than with smaller lens openings, and may not work at all when the f/stop is smaller than f/8. As I noted, the EOS R is able to perform these comparisons very quickly.
Layout of the EOS R’S AF System
Figure 5.4 is my rough approximation of the layout of the EOS R’s autofocus pixels, based on Canon’s descriptions. Because of the flexibility of the Dual Pixel technology, Canon has been able to spread the AF area to fill nearly 100 percent of the vertical frame, and about 88 percent of the horizontal area, when working with RF (native) lenses. EF-mount lenses attached using a mount adapter may not produce that full coverage; Canon says some may provide only 80 percent horizontal coverage.
The red dots represent the manually selectable positions you can move among when you choose your own focus point, area, or zone. These positions number 5,655, to be exact, allocated in an array 87 positions horizontally and 65 positions vertically. That doesn’t mean that the EOS R’s sensor has 5,655 phase detect pixels. That humongous figure enumerates just the locations you can use to specify your focus point using 1-Point AF. When the camera is choosing an AF area, it will use a smaller number of sections of the sensor, roughly represented by the blue squares.
Figure 5.4 The layout of the EOS R’s autofocus system.
Canon’s PDAF system has many of the strengths formerly the province of contrast detection AF technology:
- Works with all image types. Because it has so many AF point positions on the sensor it’s unlikely that the area being examined will lack the edges needed to achieve sharp focus.
- Focus on any point. While contrast detection can examine virtually any position on the sensor, the large number of AF points on the EOS R’s sensor means it, too, is capable of using almost any area of the sensor to focus, and you can, of course, move the 1-Point AF point almost anywhere you please.
- Just as accurate. The large number of PDAF points means that it can be virtually as accurate as contrast detection, and without the hunting and slowness.
Dual Pixel CMOS AF
Understanding contrast and phase detection helps you appreciate the marvel that is Canon’s Dual Pixel CMOS AF system. Used while shooting both stills and movies, as I’ve noted, it works much more quickly than traditional contrast detection systems.
The sensor’s pixel array includes special pixels that provide the same type of split-image rangefinder phase detection AF that all PDAF modules use. The most important aspect of the system is that it doesn’t rob the camera of any imaging resolution. It would have been possible to place AF sensors between the pixels used to capture the image, but that would leave the sensor with less area with which to capture light. Keep in mind that CMOS sensors, unlike earlier CCD sensors, have more on-board circuitry which already consumes some of the light-gathering area. Microlenses are placed above each photosensitive site to focus incoming illumination on the sensor and to correct for the oblique angles from which some photons may approach the imager. (Older lenses, designed for film, are the worst offenders in terms of emitting light at severely oblique angles; newer “digital” lenses do a better job of directing photons onto the sensor plane with a less “slanted” approach.)
With the Dual Pixel CMOS AF system, the same photosites capture both image and autofocus information. Each pixel is divided into two photodiodes, facing left and right when the camera is held in horizontal orientation (or above and below each other in vertical orientation; either works fine for autofocus purposes). Each pair functions as a separate AF sensor, allowing a special integrated circuit to process the raw autofocus information before sending it on to the EOS R’s digital image processor, which handles both AF and image capture. For the latter, the information grabbed by both photodiodes is combined, so that the full photosensitive area of the sensor pixel is used to capture the image.
While traditional contrast detection frequently involves frustrating “hunting” as the camera continually readjusts the focus plane trying to find the position of maximum contrast, adding Dual Pixel CMOS AF phase detection allows the EOS R to focus smoothly, which is important for speed, and essential when shooting movies (where all that hunting is unfortunately captured for posterity). Movie autofocus tracking is improved, allowing shooting movies of subjects in motion.
An interesting adjunct to the dual pixel autofocus approach is the EOS R’s ability to save Dual Pixel RAW image files, which allow including the rangefinder-like focus information in RAW files that can later be manipulated in Digital Photo Professional to provide focus microadjustment during post-processing, adjustment of bokeh (the out-of-focus regions of a photograph in both foreground and background), and to reduce flare and ghosting effects. The important thing to keep in mind is that while Dual Pixel CMOS AF is active whenever you are using autofocus, only the files captured in Dual Pixel RAW mode can be manipulated.
Dual Pixel RAW Focus Adjustments
My guides emphasize getting great pictures in the camera, rather than through post-processing, so I generally don’t cover software tools like the EOS Utility or Digital Photo Professional in any detail. However, most of you will be curious about the focus enhancements that the Dual Pixel RAW format makes possible, so I’ll provide a brief overview here. A more complete discussion of what you can do with this format can be found in the Digital Photo Professional PDF manual available for download from your country’s Canon website.
Dual Pixel RAW is a special double-size RAW format that can be manipulated in an image editor (as I write this, only Digital Photo Pro has that capability) to make microadjustments to the focus plane, slightly improve bokeh effects (the smoothness of the out-of-focus areas of the image), and make corrections to ghosting and flare. Dual Pixel RAW files also offer the opportunity for advanced users to recover up to one additional stop in the highlights. When activated, Dual Pixel RAW saves, in effect, two different RAW files (and takes twice as long to do so), combined into a single file on your memory card. One half contains information from both sets of pixels (call them Sets A+B) while the other half includes information only from the pixels in Set B.
As I will remind you in Chapter 11, to use Dual Pixel RAW, you must select RAW or C RAW or RAW+JPEG or C RAW+JPEG as your Image Quality, and then enable the dual-pixel feature in the Shooting 1 menu. A DPR alert will then be displayed on the monochrome LCD panel on top of the camera. You cannot use DPR if you want to shoot multiple exposures, use automatic HDR, One-Touch image quality, or the Digital Lens Optimizer. Drive mode is automatically set to Low-Speed Continuous when shooting Dual Pixel RAW. High-speed continuous shooting is not available.
We’re primarily concerned with the focus plane microadjustment feature here. DPR doesn’t improve the resolution of your image: those 30-megapixel split pairs don’t give you 60 megapixels of resolution. What the DPR file does do is make use of the sensor’s phase-detection information.
What you can do is make very small adjustments in the plane of focus, amounting to just a few millimeters in front of or behind the original plane. This is similar to what Lytro’s light field photography did before the company closed in 2018 (Google it for more information), although on a reduced scale. These are micro adjustments. As a practical matter, a portrait photographer who discovers that an image captured wide open with a portrait-friendly lens or focal length that has been focused on the subject’s eyelashes, can move the plane of focus back to the eyes instead.
You’ll locate Start Dual Pixel RAW Optimizer in the Tools menu of Digital Photo Pro, with an image area and tool palette like the one shown in Figure 5.5. There are four palettes, and you can activate only one of them (plus sharpness) at a time for a particular image by putting a check mark in the box at upper left of the palette you want to work with. Your options include:
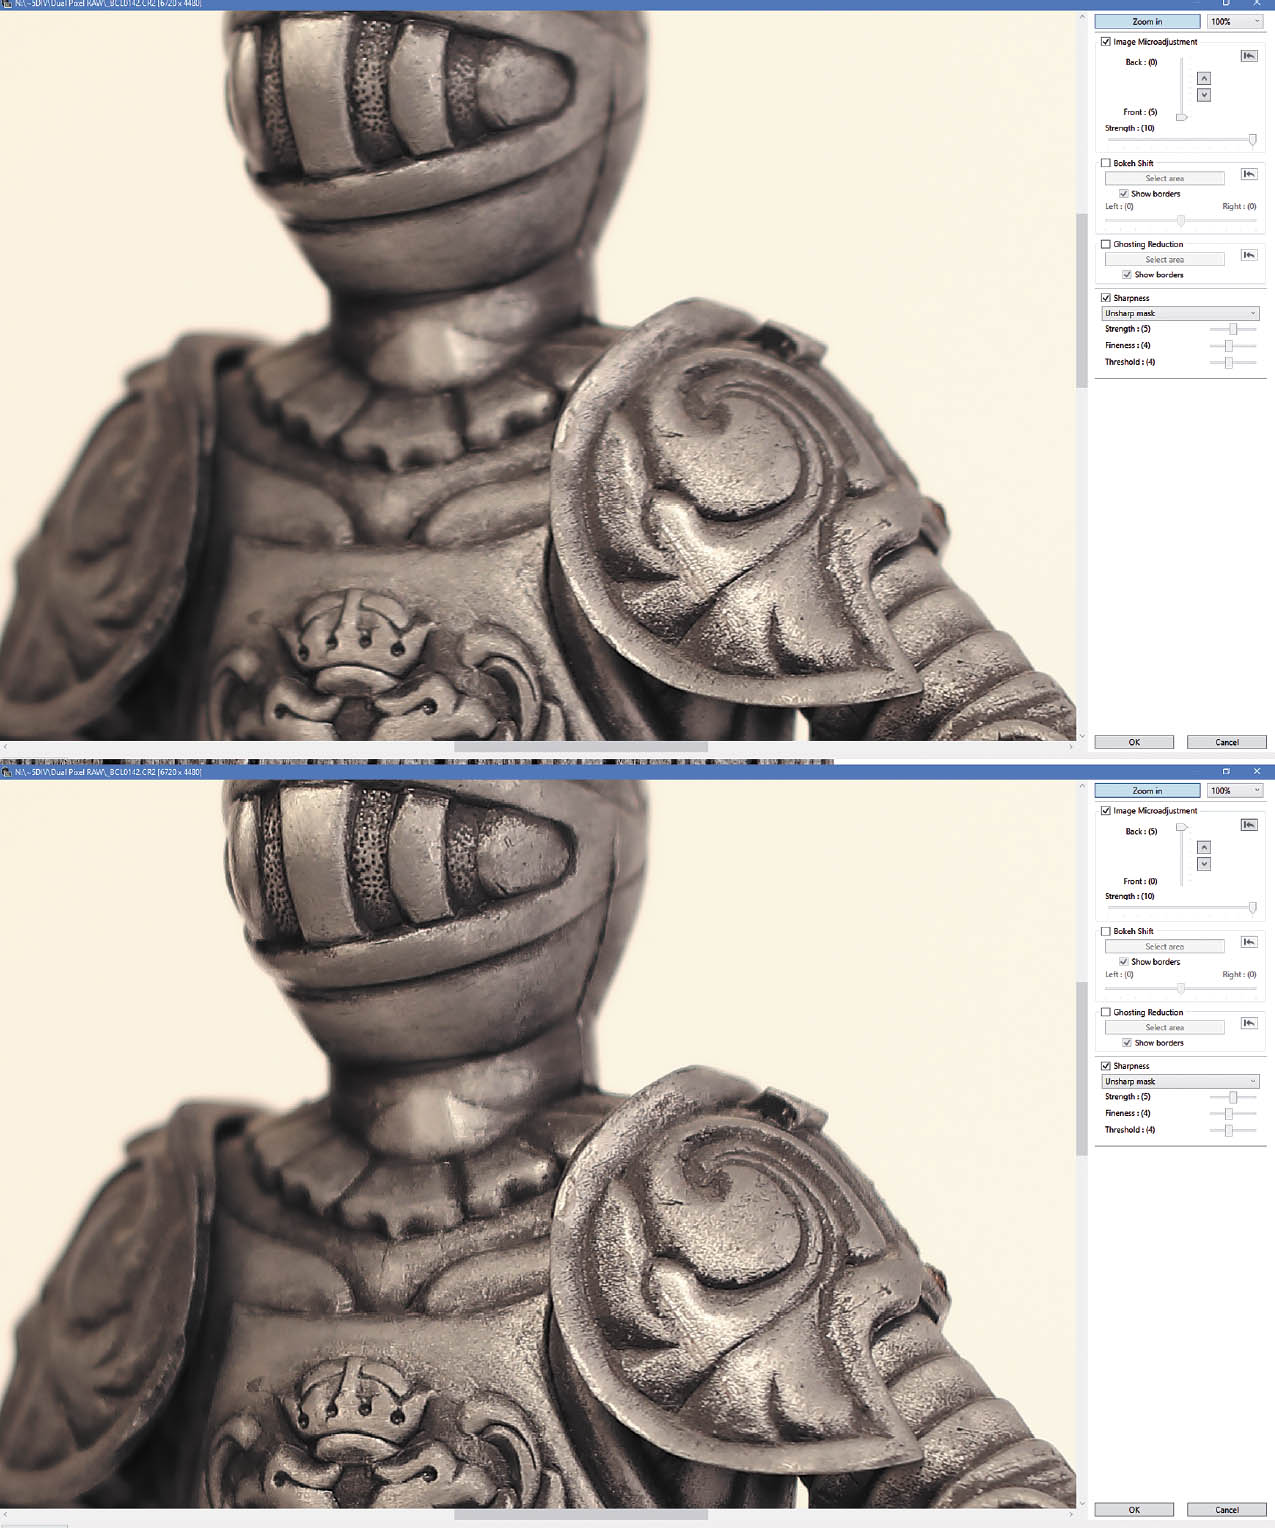
- Image Microadjustment. You can zoom in and out from 100% to 400% to view the focus plane changes you’re making in real time. You’ll generally use some level of zoom because, as I noted, the adjustments are very small. A vertical slider lets you move the focus plane toward the front or back of your subject, in increments of five. You can also specify the strength of the adjustment from 1 to 10. Figure 5.6 shows a zoomed-in view of a Dual Pixel RAW image that has had its focal plane moved to the maximum forward and backward positions.
Figure 5.5 Four palettes are available in the Dual Pixel RAW pane.
Figure 5.6 Focus plane the maximum amount forward (top) and back (bottom).
- Bokeh Shift. You can shift background or foreground “bokeh” left or right, again in values of 1–5 in either direction. Click the Select Area button and you can drag an area the adjustment is applied to. I’ve found the effect to be very subtle.
- Ghosting Reduction. Reduces ghosting superimposed on your subject and flare from bright light sources in the frame. You can select the area affected, but not the amount of correction. Because flare may differ from the light gathered from one side of the lens or the other, the Dual Pixel RAW feature can be an effective way of detecting it and making corrections.
- Sharpness. This feature allows you to adjust overall sharpness or apply an unsharp mask to the image, either alone or in conjunction with the other effects of this tool. Strength, fineness, and threshold can be applied in a manner similar to most other image processing sharpeners, including Canon’s in-camera Picture Styles.
As you might expect, any adjustments you make to a Dual Pixel RAW file are implemented only in the JPEG or other file you save from DPP; the original RAW file remains untouched, so you’re free to play around with this feature as much as you like.
Canon notes that the effects produced can vary depending on the particular lens in use, shooting conditions, and whether the camera is held in vertical or horizontal orientations. For example, the tool is most effective if the lens is used at its maximum aperture. That makes sense, because depth-of-field is less when the lens is wide open, so adjustments in focus plane, bokeh, sharpness, and perhaps ghosting/flare will be more obvious.
Circles of Confusion and Focus
You know that increased depth-of-field brings more of your subject into focus. But more depth-of-field also makes autofocusing (or manual focusing) more difficult because the contrast is lower between objects at different distances. This is an added factor beyond the rangefinder aspects of lens opening size in phase detection. An image that’s dimmer is more difficult to focus with any type of focus system, phase detection, contrast detection, or manual focus.
So, focus with a 200mm focal length may be easier in some respects than at a 28mm focal length (or zoom setting) because the longer lens has less apparent depth-of-field. By the same token, a lens with a maximum aperture of f/1.8 will be easier to autofocus (or manually focus) than one of the same focal length with an f/4 maximum aperture, because the f/4 lens has more depth-of-field and a dimmer view. That’s yet another reason why lenses with a maximum aperture smaller than f/5.6 can give your EOS R’s autofocus system fits—increased depth-of-field joins forces with a dimmer image that’s more difficult to focus using phase detection.
To make things even more complicated, many subjects aren’t polite enough to remain still. They move around in the frame, so that even if the EOS R is sharply focused on your main subject, it may change position and require refocusing. An intervening subject may pop into the frame and pass between you and the subject you meant to photograph. You (or the EOS R) have to decide whether to lock focus on this new subject, or remain focused on the original subject. Finally, there are some kinds of subjects that are difficult to bring into sharp focus because they lack enough contrast to allow the EOS R’s AF system (or our eyes) to lock in. Blank walls, a clear blue sky, or other subject matter may make focusing difficult.
If you find all these focus factors confusing, you’re on the right track. Focus is, in fact, measured using something called a circle of confusion. An ideal image consists of zillions of tiny little points, which, like all points, theoretically have no height or width. There is perfect contrast between the point and its surroundings. You can think of each point as a pinpoint of light in a darkened room. When a given point is out of focus, its edges decrease in contrast and it changes from a perfect point to a tiny disc with blurry edges (remember, blur is the lack of contrast between boundaries in an image). (See Figure 5.7.)
Figure 5.7 When a pinpoint of light (left) goes out of focus, its blurry edges form a circle of confusion (center and right).
If this blurry disc—the circle of confusion—is small enough, our eye still perceives it as a point. It’s only when the disc grows large enough that we can see it as a blur rather than a sharp point that a given point is viewed as out of focus. You can see, then, that enlarging an image, either by displaying it larger on your computer monitor or by making a large print, also enlarges the size of each circle of confusion. Moving closer to the image does the same thing. So, parts of an image that may look perfectly sharp in a 5 × 7–inch print viewed at arm’s length, might appear blurry when blown up to 11 × 14 and examined at the same distance. Take a few steps back, however, and it may look sharp again.
To a lesser extent, the viewer also affects the apparent size of these circles of confusion. Some people see details better at a given distance and may perceive smaller circles of confusion than someone standing next to them. For the most part, however, such differences are small. Truly blurry images will look blurry to just about everyone under the same conditions.
Technically, there is just one plane within your picture area, parallel to the back of the camera (or sensor, in the case of a digital camera), that is in sharp focus. That’s the plane in which the points of the image are rendered as precise points. At every other plane in front of or behind the focus plane, the points show up as discs that range from slightly blurry to extremely blurry until the out-of-focus areas become one large blur that de-emphasizes an unattractive textured white background.
In practice, the discs in many of these planes will still be so small that we see them as points, and that’s where we get depth-of-field. Depth-of-field is just the range of planes that include discs that we perceive as points rather than blurred splotches. The size of this range increases as the aperture is reduced in size and is allocated roughly one-third in front of the plane of sharpest focus, and two-thirds behind it. The range of sharp focus is always greater behind your subject than in front of it.
Working with the AF System
Now that you understand the basics of how the EOS R’s autofocus system works, it’s time to jump into the actual settings and options you have at your disposal. To achieve tack-sharp focus every time, you’ll need to master focus modes (when to evaluate a scene and lock in focus) and focus area selection (you or the camera decides what to focus on).
AF Operation
The AF Operation focus modes tell the camera when to evaluate and lock in focus. They don’t determine where focus should be checked; that’s the function of other autofocus features. Focus modes tell the camera whether to lock in focus once, say, when you press the shutter release halfway (or use some other control, such as the AF-ON button), or whether, once activated, the camera should continue tracking your subject and, if it’s moving, adjust focus to follow it.
The EOS R has manual focus, plus magnified (up to 10X manual focus), and two AF modes: One-Shot AF (also known as single autofocus), and Servo (continuous autofocus). I’ll explain all of these in more detail later in this section. Choosing the right autofocus mode and the way in which focus points are selected is your key to success. Using the wrong mode for a particular type of photography can lead to a series of pictures that are all sharply focused—on the wrong subject.
When I first started shooting sports with an autofocus SLR (back in the film camera days), I covered one game alternating between shots of base runners and outfielders with pictures of a promising young pitcher, all from a position next to the third base dugout. The base runner and outfielder photos were great, because their backgrounds didn’t distract the autofocus mechanism. But all my photos of the pitcher had the focus tightly zeroed in on the fans in the stands behind him. Because I was shooting film instead of a digital camera, I didn’t know about my gaffe until the film was developed. A simple change, such as locking in focus or focus zone manually, or even manually focusing, would have done the trick.
To save battery power, your EOS R doesn’t start to focus the lens until you partially depress the shutter release (unless you’ve activated Continuous AF in the AF1 menu). But, autofocus isn’t some mindless beast out there snapping your pictures in and out of focus with no feedback from you after you press that button. There are several settings you can modify that return at least a modicum of control to you. Your first decision should be whether you set the EOS R to One-Shot or Servo. With the camera set for one of the non-auto modes, use the Q button to summon the Quick Control menu and navigate to AF Operation (second from the top in the left column). Then spin either dial to toggle between One-Shot or Servo. (The AF/M switch on the lens must be set to AF before you can change autofocus mode.)
One-Shot AF
In this mode, also called single autofocus, focus is set once and remains at that setting until the button is fully depressed, taking the picture, or until you release the shutter button without taking a shot. This mode is best for subjects that are not moving around a great deal. So, for non-action photography, this setting is usually your best choice, as it minimizes out-of-focus pictures (at the expense of spontaneity). The drawback here is that you might not be able to take a picture at all while the camera is seeking focus; you’re locked out until the autofocus mechanism is happy with the current setting. One-Shot AF/single autofocus is sometimes referred to as focus-priority for that reason, although you can change the priority using the One-Shot AF Release Prior. option in the AF 4 menu. Because of the small delay while the camera zeroes in on correct focus during focus-priority operation, you might experience slightly more shutter lag. This mode uses less battery power than the other autofocus modes.
When sharp focus is achieved, the selected focus point will flash green in the viewfinder. If you’re using Evaluative metering, the exposure will be locked at the same time. By keeping the shutter button depressed halfway, you’ll find you can reframe the image while retaining the focus (and exposure) that’s been set. You can also use the AE Lock/FE Lock button to retain the exposure calculated from the center AF point while reframing.
Servo AF
This mode, also known as continuous autofocus, is the mode to use for sports and other fast-moving subjects, and is often used with continuous shooting modes. Once the shutter release is partially depressed, the camera sets the focus on the point that’s selected (by the camera or by you manually), but continues to monitor the subject, so that if it moves or you move, the lens will be refocused to suit. Focus and exposure aren’t really locked until you press the shutter release down all the way to take the picture. You’ll find that Servo AF produces the least amount of shutter lag of any autofocus mode: press the button and the camera fires. It also uses the most battery power, because the autofocus system operates as long as the shutter release button is partially depressed.
You’ll often see continuous autofocus referred to as release-priority, because that’s the way it has been traditionally used. In that mode, if you press the shutter release down all the way while the system is refining focus, the camera will go ahead and take a picture, even if the image is slightly out of focus. However, you can specify the priority for the first image in a series, and, if you’re shooting in continuous mode, for the second shot in a series. Select release-priority, focus-priority, or give equal weight to each. Use the AF 2 menu, described in Chapter 12.
Servo AF uses a technology called predictive AF, which allows the EOS R to calculate the correct focus if the subject is moving toward or away from the camera at a constant rate. It uses either the automatically selected AF point or the point you select manually to set focus. AI Servo AF’s characteristics can be fine-tuned for particular types of subjects and scenes, called cases, as I’ll explain later.
Manual Focus
Manual focus is possible if you slide the AF/MF switch on the lens to the MF position. Your EOS R then lets you set the focus yourself. There are some advantages and disadvantages to this approach. While your batteries will last longer in manual focus mode, it will take you longer to focus the camera for each photo, a process that can be difficult. Canon does give you some help in focusing manually.
- Magnification. You can press the Magnify button, followed by the INFO button once or twice to view your image magnified 5X and 10X (respectively). When zoomed in, rotate the Main Dial to move the magnified area horizontally and the vertical position using the QCD. The directional keys also can be used. Press the Trash button to center the magnified area in the middle of the frame.
- Focus peaking. You can also use MF Peaking in the AF 2 menu to emphasize the outlines of your image with a contrasting color. In Chapter 12, I will show you how to choose a color (from red, white, or yellow) so areas that are in focus appear outlined in that hue. You can also select how much peaking is used (from High, Medium, or Low) to get effects like that seen in Figure 5.8. Peaking is not shown during magnified display.
- Focus guide. Turn this feature on and an indicator appears above the current focus frame, showing in which direction focus needs to be adjusted, and the rough degree of adjustment needed. See Figure 5.9. This feature also works in autofocus mode.
Figure 5.8 Focus peaking.
Figure 5.9 Focus Guide frames can help achieve manual focus, and also work in AF mode.
Area Selection Mode
You or the EOS R can select the AF point(s) to be used. There are six modes in which you select the initial point or zone of points (with variations on what additional points will also be used). A seventh mode allows the camera to use all the useable points (up to 5,655 total) to select the initial focus point automatically. You can check focus with 5X and 10X magnified views by pressing the Magnify/Reduce button in all modes except Face+Tracking.
You can quickly switch among any of the AF area selection modes by pressing the AF selection button on the upper-right corner of the camera’s back panel (below the * button), and then pressing the M-Fn button repeatedly while the available modes cycle on the display similar to the one shown in Figure 5.10. If you generally use only a few of the seven total modes, Canon gives you the ability to “hide” the others using the Limit AF Methods entry in the AF5 menu. You’ll find a description of all the options in the five AF menus in Chapter 12.
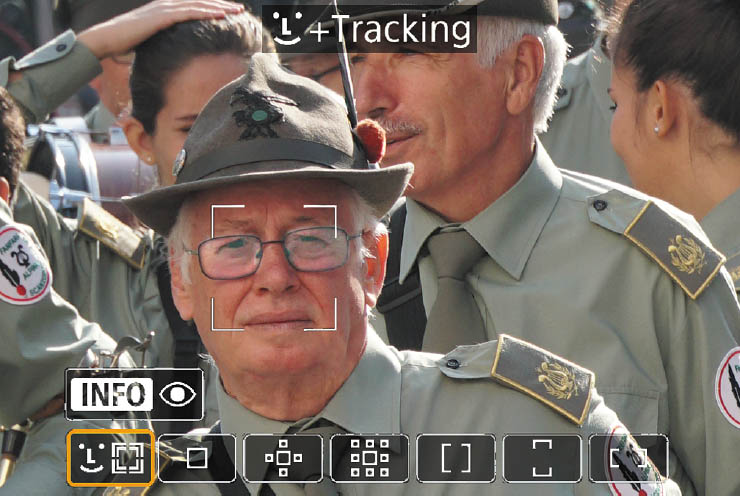
Figure 5.10 Face+Tracking mode.
Face+Tracking AF
If you choose this mode, the camera will search for and focus on faces; if none are found, the entire autofocus area will be used. A box appears around a located face, and the EOS R tracks it as it moves around the frame. If you’ve activated Eye Detection AF in the AF1 menu, in One-Shot mode the camera will display an additional smaller box around an eye (this is called Pupil Detect). You can also tap the LCD screen to select an eye. You can turn eye detection on or off when you activate Face+Tracking by pressing the INFO button to toggle between enable and disable. While using Face+Tracking, you can enable or disable eye detection on the fly by pressing the AF Point Selection button, then the M-Fn button, followed by the INFO button.
When using Servo AF mode, you can specify the initial AF point. The camera will first use the AF point you have set, and if no face is found will search elsewhere in the frame. That could be useful when shooting a series of photos when you know that your main subject will probably be located in a particular area of the frame, but still want the camera to refocus as the subject moves. This helps reduce AF confusion from movement elsewhere in the frame that is not your main subject.
You have three choices for the initial Face+Tracking focus point:
- A point you specify. You can choose a specific position within the frame that will always be used first when working with Face+Tracking, in Servo AF mode using the Initial Servo AF Point for Face+Tracking entry in the AF 5 menu.
- Retain manual point used for 1-Point AF, Expand AF Area, Expand AF Area: Around. If you are using one of these three AF methods, and then switch to Face+Tracking, Servo AF initially uses the AF point you specified in the previous mode.
- Auto. The initial AF point for Servo AF when using Face+Tracking is determined by the camera. This default option is the simplest and least prone to unintended errors.
1-Point AF
In this mode, you can zero in and focus on a small box displayed on the screen (see Figure 5.11). When selecting this mode you can press the INFO button to toggle between a box of the size shown in the figure and a smaller box. Either can be moved in tiny increments to nearly any location on the screen using the directional buttons or QCD and Main Dials. (Figure 5.4 shows the selectable positions.) You can specify the initial size of the 1-point box in the AF Frame Size entry of the AF1 menu, as described in Chapter 12.
This precision can be too much of a good thing, however; camera movement (as when shooting hand-held, especially with a front-heavy long lens) and subject movement can easily move the focus spot away from your primary subject. This mode may be your best choice when you want to focus precisely on a subject that is surrounded by fine detail. It is most practical for scenes where you want to focus on a certain point, but your subject may be moving slowly. Position the active focus point with the controls. You can use 1-Point for everyday shooting where precision is needed, and the subject contains sufficient detail within the area covered by the sensor. If such a small area of your subject is a bit amorphous, you’ll want to use one of the selection modes described next, which allow the AF system to take into account surrounding focus points as well as the manually selected point.
Figure 5.11 Focus on a single area within the frame.
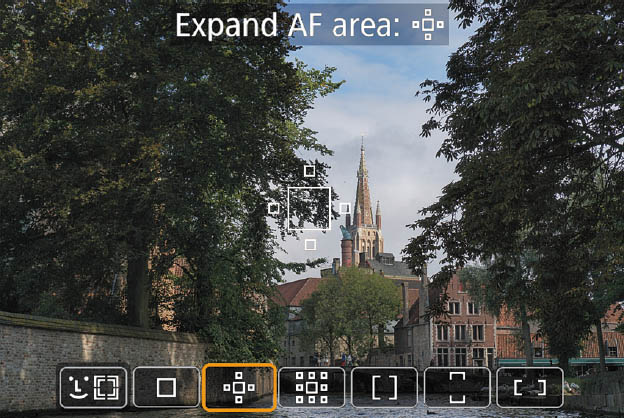
Figure 5.12 A larger AF area when using Expand AF area allows autofocus of moving subjects.
Expand AF Area
In this mode, the focus point you select is used, along with the points immediately above, below, and to either side of it (until the manually selected point reaches the edge of the array and one or more of the additional points scroll off). (See Figure 5.12.) This mode is better for moving objects, because the larger effective zone makes it easier to track subjects that are moving within the frame. As the subject moves outside the area defined by the selected focus point, three to four of the surrounding focus points can pick up and track the movement. In One-Shot AF mode, the manually selected focus point and expanded point used will be displayed.
Expand AF Area: Around
This mode is similar to the one above, except that the four points located diagonally in relation to the manually selected point are included in the focusing array. It is slightly better for subjects that don’t contain a lot of detail at the manually selected focus point, and the additional points surrounding the initial focus point improve your results. This mode is also better for larger moving objects, even though it offers a bit less precision. As always, while the active points are shown in the center of the frame in the figure, you can move the active area around while viewing the display. (See Figure 5.13.)
Figure 5.13 Four additional focus points are active in this mode.
Figure 5.14 Zone AF uses a larger focus area.
Zone AF
This is a zone-oriented point selection method, in which the AF points are divided in a zone, covering roughly one-sixth of the frame. When you move the focus “point” using the controls, you are actually simply moving the zone from one position to the next within the frame. This mode works well when you know the approximate area where your subject will reside, and want to cover a particular zone. This mode usually focuses on the nearest subject, and so lacks the precision of the other AF methods described so far. However, the camera will attempt to focus on any faces detected within the AF frame. (See Figure 5.14.)
Large Zone AF (Vertical)/(Horizontal)
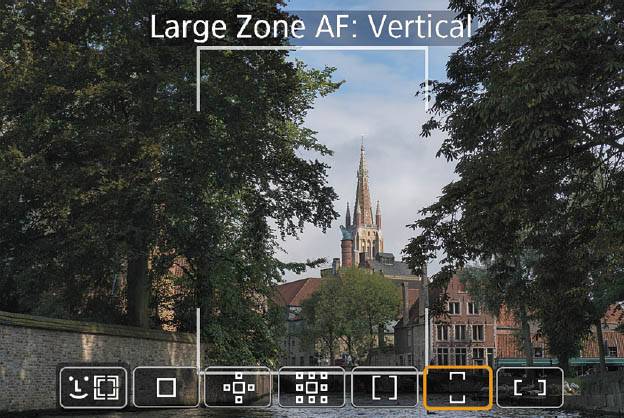
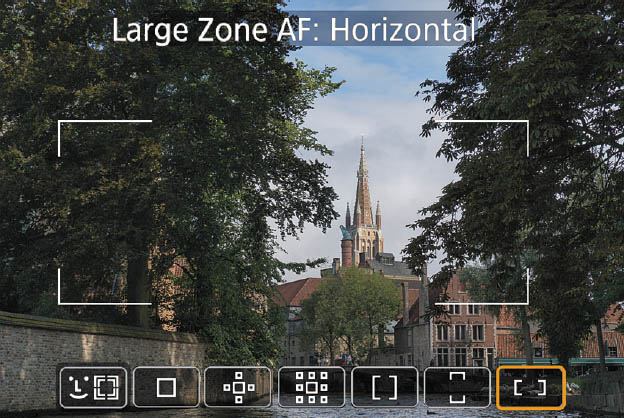
These last two methods use large rectangular zones oriented in the vertical and horizontal directions. Each might be useful for tall subjects (basketball action) or wide areas (motor sports or boat racing). The appropriate AF points within the frame will be selected automatically, generally from among those covering the closest subject. Both methods will search for and focus on any faces detected within the frame. See Figures 5.15 and 5.16.
Fine-Tuning Your Autofocus
The options available for the Canon EOS R’s autofocus can be overwhelming at times, which is why I’m devoting two full chapters to explaining them, this one, and Chapter 12, which deals exclusively with autofocus menu options. I’ll list some of the options here; you can see how to make those settings in Chapter 12.
Figure 5.15 Large Zone (Vertical).
Figure 5.16 Large Zone (Horizontal).
Here are your options:
- Continuous AF. The EOS R will constantly refocus, even when using One-Shot mode, until you press the shutter release halfway. Then, focus in One-Shot mode locks, and will continue refocusing in Servo AF mode, until you press the shutter release all the way to take a picture. This setting’s pre-focus activity can speed up AF as you take pictures, at the expense of some battery drain.
- Touch & Drag. You can use the touch screen to position the focus point even while composing your image in the viewfinder. In Chapter 12, I’ll show you how to specify the most useful positioning method, and whether the entire LCD screen is active, or only a portion of the panel is used.
- Tracking sensitivity. This determines how quickly the AF system switches to a new subject entering the focus area. Your choices are –2 (Locked On) to +2 (Responsive). Negative numbers allow you to retain focus on the original subject even if it briefly leaves the area covered by the focus points, making tracking easier. The drawback is that if the camera selects the wrong subject, there is a longer delay before the correct subject is captured. Positive numbers cause the AF system to more quickly switch to a new subject. However, such a quick response can cause the camera to focus on the wrong subject.
- Acceleration/deceleration tracking. This parameter determines how the AF system responds to sudden acceleration, deceleration, or stopping. Your choices are 0 (for subjects that move at a constant speed) to 2 (for faster reactions to subjects that suddenly change speed). Lower values can cause the camera to be “fooled” if a subject that was moving consistently suddenly stops; focus may change to the position where the subject would have been if it’d kept moving. A higher value may cause inconsistent focus with subjects that move at a constant speed.
- AF point auto switching. This setting determines how quickly the AF system changes from the current AF point to an adjacent one when the subject moves away from the current point, or an intervening object moves across the frame into the area interpreted by the current point. Your choices are 0 (switch more slowly so focus is stable, with slower tracking response) to 2 (switch to an adjacent point quickly).
- AF-assist beam firing. This setting determines when bursts from a compatible external electronic flash or the camera’s built-in LED are used to emit a pulse of light that helps provide enough contrast for the EOS R to focus on a subject.
- One-Shot AF Release-priority. By default, One-Shot AF uses focus-priority; that is, the camera will not take a picture until the subject is deemed by the camera to be in sharp focus. Servo AF uses release-priority, which means a picture is taken as soon as you press the shutter down all the way, even if perfect focus is not achieved. If getting a picture—even if possibly not quite in focus—is most important, you can set One-Shot AF to perform the same way.
- When focus is difficult. Low-contrast scenes and dim light levels can give the EOS R’s autofocus fits. This is often the case with long telephotos or lenses with a relatively small maximum aperture. The Lens Drive When AF Impossible setting can tell the EOS R either to keep trying to focus, or to stop.
- Limit AF methods. If you don’t use every AF method, you can make them invisible in the selection screen, so that switching among the ones you do use is faster. As described in Chapter 12, you can enable any or all methods, or have only one or two available. The 1-Point AF mode cannot be disabled.
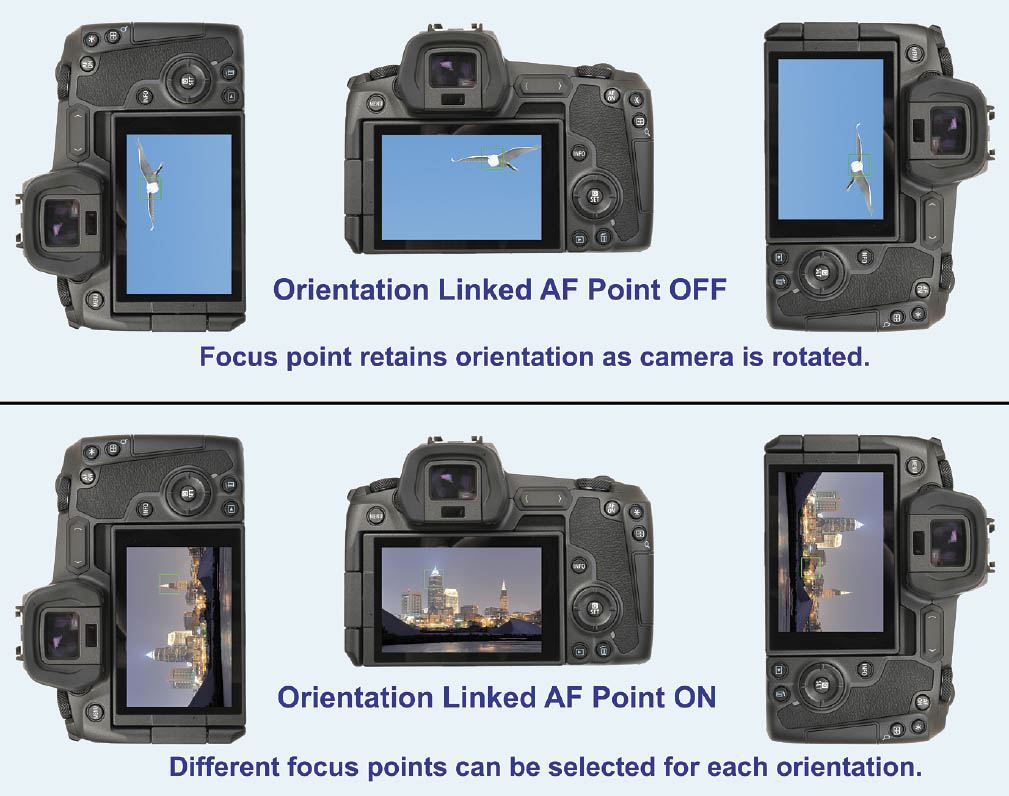
- Orientation Linked AF point. If you have a preference for a particular manually selected AF point when composing vertical or horizontal pictures, you can specify that preference using this menu entry, by choosing Separate AF Points. Or, you can indicate that you want to use the same mode/point in all orientations (Same for Both Vert/Horiz). (See Figure 5.17.) If you’d like to differentiate, the Separate AF Points: Point Only option gives you different orientations to account for, one horizontal and two vertical:
- Same for both vertical and horizontal. The AF point or zone that you select manually is used for both vertical and horizontal images.
- Separate AF points: Point Only. You can specify a different AF point in manual point selection modes for each of three orientations. The specified point will remain in force even if you switch from one manual selection mode to another. The orientations are:
- Camera held horizontally. This orientation assumes that the camera is positioned so the viewfinder/shutter release are on top.
- Camera held vertically with the grip/shutter release above the Mode Dial.
- Camera held vertically with the Mode Dial above the grip/shutter release.
Figure 5.17 Orientation-linked AF point: Same for vertical and horizontal (top); separate AF points for horizontal and two vertical orientations (bottom).
FOCUS GUIDE
The Focus Guide mentioned under Manual Focus above works in Autofocus and Manual focus mode. Turn this feature on in the AF2 menu tab (AF1 if using Scene Intelligent Auto mode), and an indicator appears above the current focus frame, showing in which direction focus needs to be adjusted, and the rough degree of adjustment needed. The guide frame can be moved by tapping the screen, pressing the AF Point button first, and then using the cross keys, or centered by pressing the Trash button. If the AF Method is Face+Tracking and Eye Detection AF has been enabled, the guide frame will appear near any eyes that are detected for the main subject person.
Back-Button Focus
Once you’ve been using your camera for a while, you’ll invariably encounter the terms back focus and back-button focus, and wonder if they are good things or bad things. Actually, they are two different things, and are often confused with each other. Back focus is a bad thing, and occurs when a particular lens consistently autofocuses on a plane that’s behind your desired subject. This malady may be found in some of your lenses, or all your optics may be free of the defect. Theoretically, it should not happen with a mirrorless camera at all. The good news is that if the problem lies in a particular lens (rather than a camera misadjustment that applies to all your lenses), it can be fixed. Back-button focus, on the other hand, is a tool you can use to separate two functions that are commonly locked together—exposure and autofocus—so that you can lock in exposure while allowing focus to be attained at a later point, or vice versa. It’s a good thing, although using back-button focus effectively may require you to unlearn some habits and acquire new ways of coordinating the action of your fingers.
As you have learned, the default behavior of your EOS R is to set both exposure and focus (when AF is active) when you press the shutter release down halfway. When using One-Shot AF mode, that’s that: both exposure and focus are locked and will not change until you release the shutter button, or press it all the way down to take a picture and then release it for the next shot. In Servo AF mode, exposure is locked and focus set when you press the shutter release halfway, but the EOS R will continue to refocus if your subject moves for as long as you hold down the shutter button halfway. Focus isn’t locked until you press the button down all the way to take the picture.
What back-button focus does is decouple or separate the two actions. You can retain the exposure lock feature when the shutter is pressed halfway, but assign autofocus to a different button. So, in practice, you can press the shutter button halfway, locking exposure, and reframe the image if you like (perhaps you’re photographing a backlit subject and want to lock in exposure on the foreground, and then reframe to include a very bright background as well).
But, in this same scenario, you don’t want autofocus locked at the same time. Indeed, you may not want to start AF until you’re good and ready, say, at a sports venue as you wait for a ballplayer to streak into view in your viewfinder. With back-button focus, you can lock exposure on the spot where you expect the athlete to be, and activate AF at the moment your subject appears by pressing the AF-ON button. That’s where the learning of new habits and mind-finger coordination comes in. You need to learn which back-button focus techniques work for you, and when to use them.
Back-button focus lets you avoid the need to switch from One-Shot to Servo AF when your subject begins moving unexpectedly. You retain complete control. It’s great for sports photography when you want to activate autofocus precisely based on the action in front of you. It also works for static shots. You can press and release your designated focus button, and then take a series of shots using the same focus point. Focus will not change until you once again press your defined back button. (See Figure 5.18.)
Want to reframe after focus is achieved? Use back-button focus to zero in focus on that location, then reframe. Focus will not change. Don’t want to miss an important shot at a wedding on a photojournalism assignment? If you’re set to focus-priority your camera may delay taking a picture until the focus is optimum; in release-priority there may still be a slight delay. With back-button focus you can focus first, and wait until the decisive moment to press the shutter release and take your picture. The EOS R will respond immediately and not bother with focusing at all.
Figure 5.18 Lock your exposure for the garden by pressing the shutter release halfway, then activate autofocus when the butterfly decides where to land.
Here are some things to consider when using back-button focus:
- Great for unwanted subjects in action photography. Earlier in this chapter I talked about using the tracking sensitivity settings in the AF 3 menu to minimize the camera locking onto an intervening object (in football, that might be a yard line marker, another player, or a ref) during an action shot. With back-button focus, you can not only initiate focus whenever you want, you can pause focus temporarily by releasing the back button and then pressing it again when the intervening subject is no longer in the frame.
- Exact timing of focus. Sports photographers also like the ability of back-button focus to allow them to focus at a decisive moment. You may be following the action through the viewfinder, seeking a subject to capture, and decide to capture an image of a wide receiver reaching out for the ball. Frame the receiver in the viewfinder and press the back button to lock in focus, and then press the shutter release all the way to actually take the picture.
- Reframing. As I mentioned earlier, you can lock focus with the back button, then release the button and reframe before taking the picture with the shutter release button. The camera will not refocus when the shutter button is pressed.
- Fine-tuning focus. Many Canon lenses allow you to fine-tune focus even when the lens is set for autofocus. With those lenses, you can go ahead and initiate autofocus using the back button; then, if you want to fine-tune focus manually, release the button and rotate the focusing ring. The camera will not refocus when you press the shutter release button, and you won’t have to switch the lens’ AF/MF switch to Manual. This technique works particularly well for macro photography, which often benefits from precise manual focusing on the exact plane that you want to be sharpest. Go ahead and pre-focus using the autofocus feature, then release the back button and manually set your focus. It’s faster than focusing entirely in manual focus mode.
Activating Back-Button Focus
The EOS R implements back-button focus slightly differently from some other cameras, because it doesn’t allow you to assign AF Start (only) to a button like the AF-ON button. When you press AF-ON, the camera focuses and meters. But there’s a way to work around that.
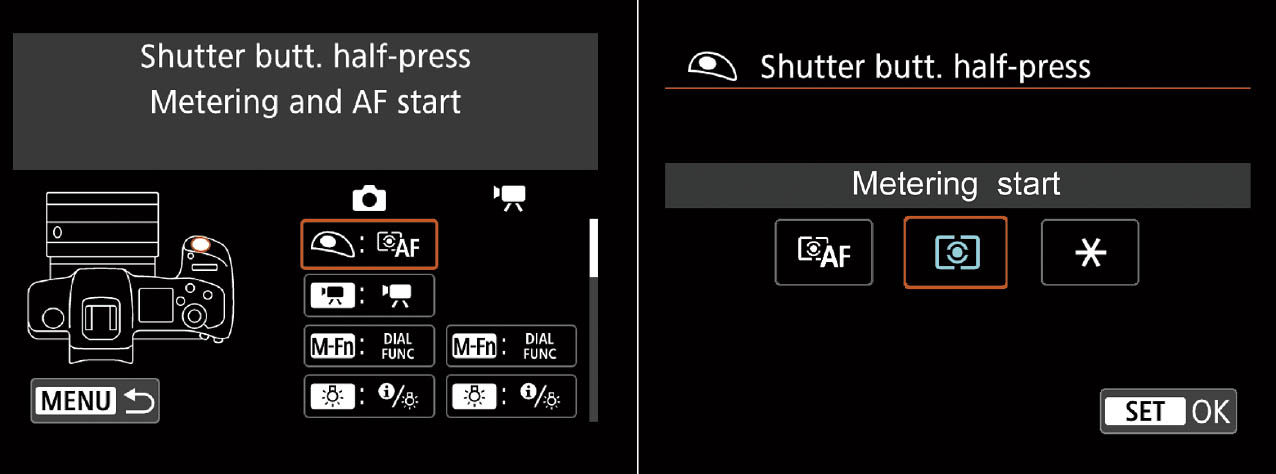
The easiest way to activate back-button focus is to make a quick trip to the Customize Buttons entry in the Custom Functions 4 menu, as described in Chapter 14. Once you’ve activated this feature, you press the shutter release down halfway to lock exposure, and the AF-ON button when you’re ready to autofocus. Here’s what you need to do:
- 1. Redefine the shutter release button. In Custom Controls, highlight the Shutter Button entry, as shown at left in Figure 5.19. Press SET.
- 2. Choose Metering Start. When selected, pressing the shutter release button down all the way meters and locks exposure, but not autofocus as the shutter is tripped. Press SET to confirm. (See Figure 5.19, right.)
- 3. Select Back Button. The default value for the AF-ON button works fine. When you press the AF-ON button, autofocus will initiate and metering will be performed, continuously updating both until you release the button. When the shutter release button is pressed, metering will take place and the exposure will be locked. If you want to lock exposure before the picture is taken, press the AE Lock (*) button.
Alternatively, you can define some other button with the Metering and AF Start function and use that for back-button focus instead, if you find it more comfortable to access with your thumb.
- 4. Turn off continuous focus. You’ll be using One-Shot AF with back-button focus, and you’ll also want to turn off Continuous AF in the AF 1 menu.
Figure 5.19 Activating back-button focus.
