Chapter 2: Introducing API Connect
In the previous chapter, you were briefly introduced to API Connect and how it can support your adoption of digital transformation and modernization. Now is a good time to learn, in greater detail, the full capabilities of API Connect along with specific highlights in terms of how it can impact digital transformation and/or your modernization effort.
In this chapter, we are going to cover the following main topics:
- The components of API Connect
- Deployment models
- Introduction to the Command-Line Interface (CLI) commands
Some of the new skills you will learn in this chapter include the following:
- Properly describe the components of API Connect and how they provide you with all the tools you need to successfully create, manage, secure, and govern your APIs.
- Understand the different deployment options of API Connect to fit your digital strategy.
- Learn how to run CLI commands that perform the API configuration and deployments of your DevOps pipeline.
As you might have gathered, API Connect has several valuable components, and having a better understanding of each of them will be helpful in your understanding of how best to take advantage of their capabilities.
Technical requirements
In this chapter, you will be referencing a number of Swagger definition files to assist you with your learning experience. You can find these files in the Git repository at https://github.com/PacktPublishing/Digital-Transformation-and-Modernization-with-IBM-API-Connect.
You should copy the files for Chapter02 to your development environment.
In addition, you should download the API Connect toolkit by visiting IBM Fix Central and searching on API Connect: https://www.ibm.com/support/fixcentral/.
API Connect
In the previous chapter, you learned about several API-led responsibilities. In order to accomplish API activities (such as applying security, establishing rate limits, building and deploying using DevOps pipelines, and socializing your APIs), you need to be familiar with how API Connect makes those tasks easy to accomplish.
Currently, IBM supports three versions of API Connect (that is, version 5, version 2018, and version 10). At the time of writing, support for version 5 will be removed in April 2022. Version 2018 was released in April 2018. At that time, IBM was using release numbers based on the year of release. In 2020, they changed it back again to use a version number of 10, so v10.0.1.5 is the current latest version. IBM uses a version number strategy (VRMF - Version, Release, Modification, Fix pack) based on the following:
- Version: Major feature changes
- Release: The release of minor feature changes
- Modification: Manufacturing refresh also known as Mod Pak – full release with functionality updates
- Fix Pack: Releases with cumulative fix packs
There is also a special release called an iFix. These are special updates that do not modify the VRMF versioning. They have the _iFix<number> text appended to the version. An example of a previous iFix is v10.0.1.2_iFix002.
You can learn more about this terminology at https://www.ibm.com/support/pages/vrmf-maintenance-stream-delivery-vehicle-terminology-explanation.
Note
IBM refers to supported versions of API Connect as Long-Term Support (LTS). As new features are developed, IBM releases a Continuous Deployment (CD) version so that customers can try out the new features. These CD releases are not supported but are a way for customers to test out new functionality before their official release. The CD versions of the v10.0.2.0 and v10.0.3.0 enhancements were packaged into v10.0.1.5 as a new LTS version.
Since this book is focused primarily on developing APIs, you will not be learning much about the installation and cloud administration of API Connect. However, there are a few things you should be aware of to help with your overall understanding of API Connect and its components.
The most important change you should be aware of is that beginning with version 2018, all of the implementations of API Connect are now built on microservices. This means all servers (including VMware implementations of OVA files) are running on Kubernetes. As discussed in Chapter 1, Digital Transformation and Modernization with API Connect, containerization might be one of your company's goals in modernization. With API Connect running containerized components, you are already on your way. You have multiple options in which to deploy API Connect running Kubernetes, such as the following:
- Kubernetes on bare metal (Ubuntu and RHEL)
- VMware
- OpenShift or as part of IBM's Cloud Pak for Integration (CP4I)
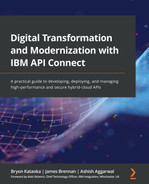
To check the requirements for installing API Connect, please refer to the IBM Software Product Compatibility Report at https://www.ibm.com/software/reports/compatibility/clarity/softwareReqsForProduct.html.
As shown in the following screenshot, you can choose various tabs to obtain additional details about the system requirements:
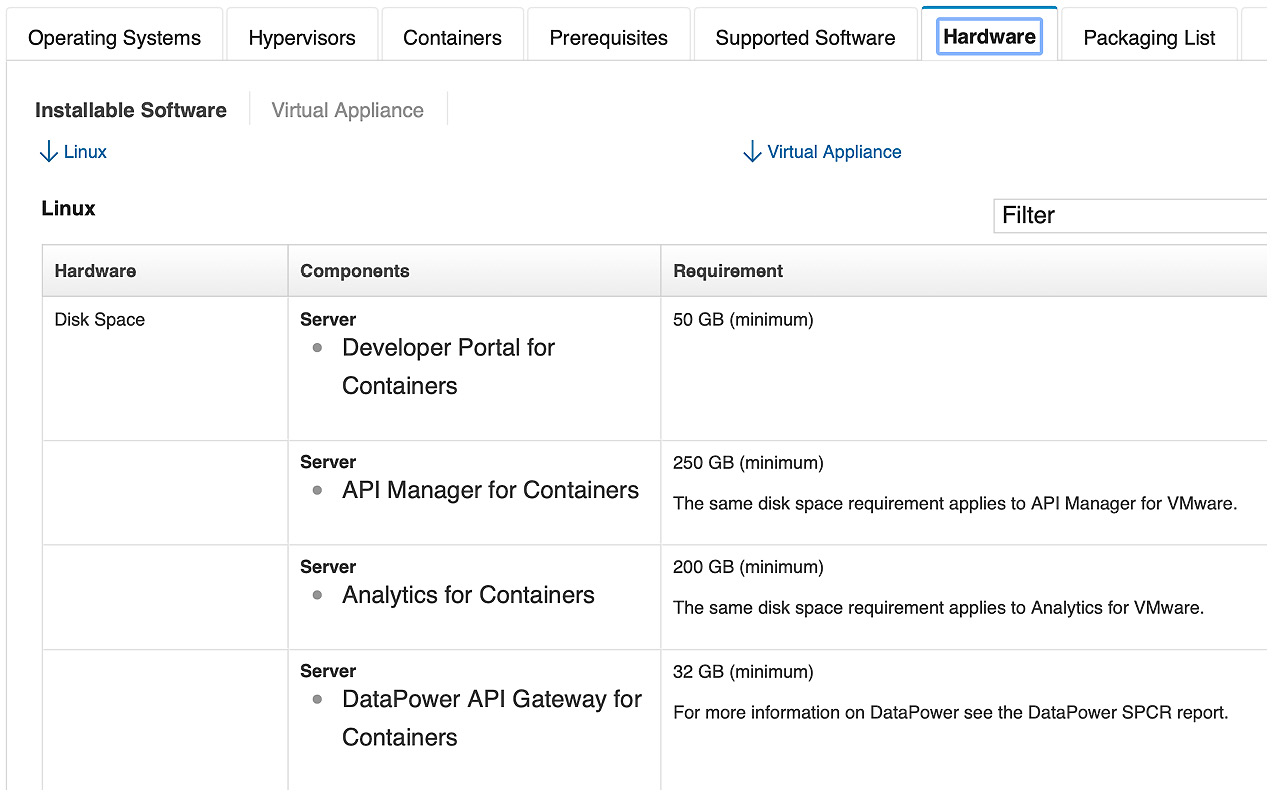
Figure 2.1 – Software compatibility report
Note
One excellent resource is the deployment white paper on API Connect. You can locate it here:
Now that you have been introduced to the various deployment implementations, we'll move on to the components of API Connect.
The components of API Connect
There are four major components of API Connect and two additional add-on components that integrate and provide added value to developers. Those components are as follows:
- Cloud Manager
- API Manager Server
- The Developer Portal service
- Gateway
- The Analytics subsystem
- Local Testing Environment (LTE; an add-on)
- API Connect Test and Monitoring (an add-on)
The two add-on components are discussed, in greater detail, in Chapter 4, API Creation, and Chapter 13, Using Test and Monitor for Unit Tests.
Note
Cloud Manager and API Manager can be considered separate components, but when you deploy the API Connect cloud, these two components are part of the same service. These two components comprise a management cluster. We'll discuss these separately in the coming sections because each has different capabilities and responsibilities that require different roles from users.
The following diagram gives you a high-level picture of the components and their relationships:
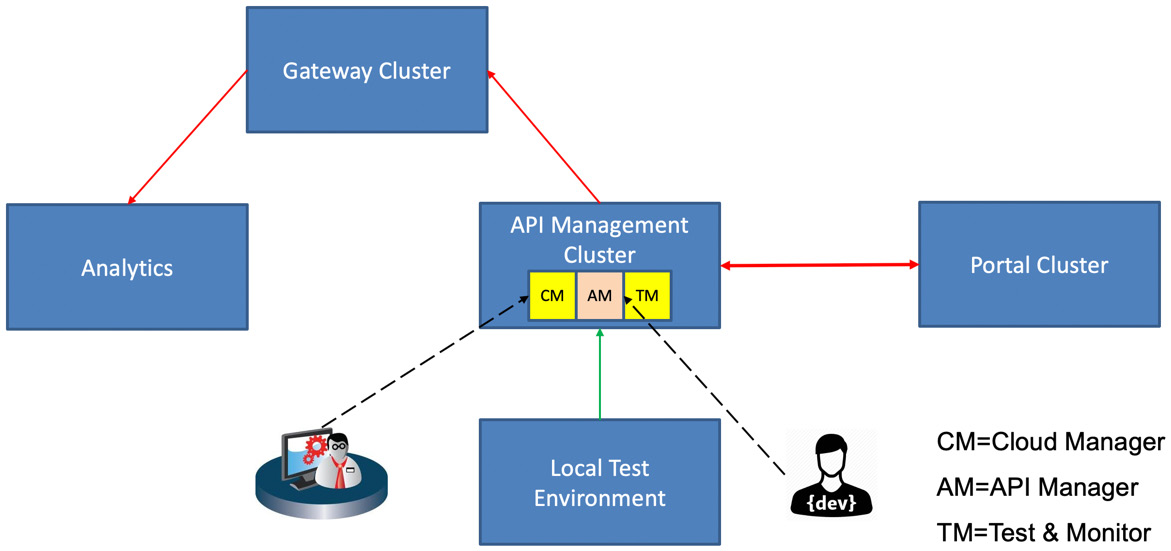
Figure 2.2 – The API components
Here, the solid lines represent the integration between the components. The dashed lines represent users interacting with the Cloud Manager user interface and the API Manager user interface. You will learn, in the Introduction to the CLI commands section, all about the CLI interface, which also allows administrators and developers access to the Cloud Manager and API Manager components.
You are probably wondering how you will be able to take all that you learn here and put it into practice. There are several places where you can get access to API Connect:
- Your company's implementation of API Connect, whether it's on-premises or a part of CP4I.
- If you are an IBM business partner, then you can download the full API Connect product and/or the LTE.
- Utilize the IBM Cloud platform and subscribe to an API Connect service.
You should be aware that the IBM Cloud version might be some levels behind and not on the same version as this book.
Understanding the integration between the individual components will be very helpful. You'll learn about this next.
Cloud Manager
Cloud Manager is where the administrator will construct the cloud topology. The administrator is responsible for configuring the cluster, which comprises the Gateway, Portal, and Analytics services:
Figure 2.3 – Cloud Manager
Setting up High Availability (HA) and Availability Zones (AZs) is also a part of the responsibilities of the administrator. These can be very simple or very complex depending on the desired implementation. For instance, gateways can be placed in different zones (such as west, east, and other designations), and these zones can be in different clouds, providing the capability to put host runtimes closer to user communities or provide compliance standards for situations such as Payment Card Industry (PCI) security compliance.
The cloud topology is where you set up the AZs for API Connect. Additionally, this is where you establish which services are within the AZ. Figure 2.4 shows the default AZ with three components registered (the Analytics service, DPGatewayV5, and Developer Portal):
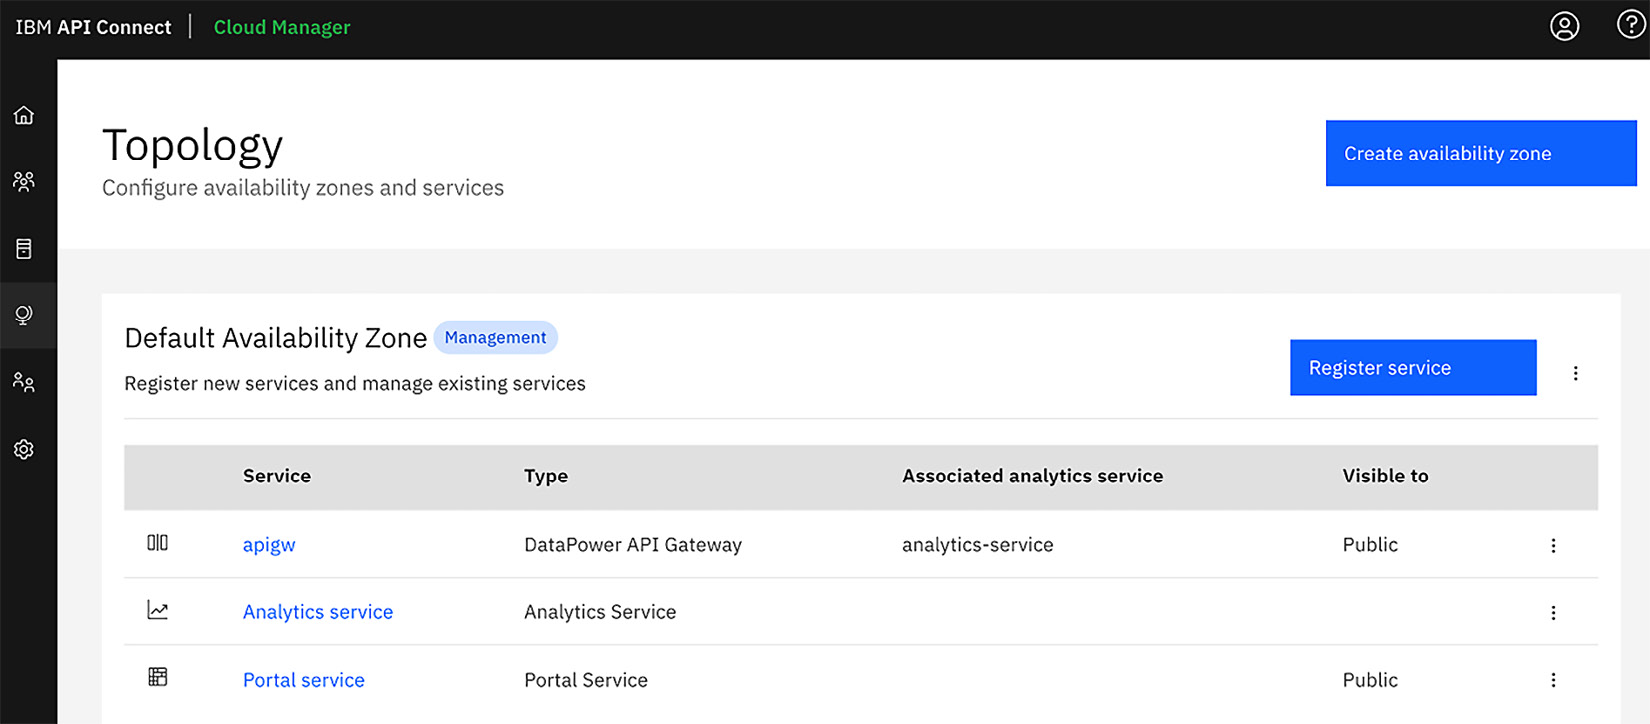
Figure 2.4 – Cloud Topology for API Connect
Additional responsibilities include creating Provider organizations. Provider organizations are the creators of APIs, and they manage the deployment and life cycles of the APIs that are created.
In addition to this, the administrators set roles for other activities within the cloud along with the setup of alternative administrators. All administrators are responsible for the health of the API Connect cloud.
Other activities that the administrators might configure include the following:
- The Simple Mail Transport Protocol (SMTP) server for notifications (along with default email templates)
- User registries such as local registries, the Lightweight Directory Access Protocol (LDAP), Uniform Resource Locator (URL), common services, and more
- Roles
- Catalog gateway defaults
- Audit settings
- Notification and timeout settings
From a developer's perspective, you won't be interacting with Cloud Manager, but there are areas you should be aware of. For instance, you should have a solid understanding of the following:
- Provider organizations enable your team to work on API Connect.
- If you have special requirements for gateway implementations (for example, if you are building APIs on AWS), you can have a gateway service deployed in AWS that is associated with the API Connect Management service to improve performance.
- If you have the need for external registries, you can have facilities such as Okta or Ping registries associated by your administrator.
Important Note
The minimum configuration requires a topology comprising a gateway service, a portal service, and an analytics service. In order to utilize that configuration, first, you must add an email server and define it in the notification settings.
Once your Provider organization has been established, the owner of that organization can invite users to API Manager to start developing and managing APIs.
API Manager
API Manager is where you manage the packaging and deployment of APIs and their life cycles. The following screenshot is of a logged-in user in API Manager:
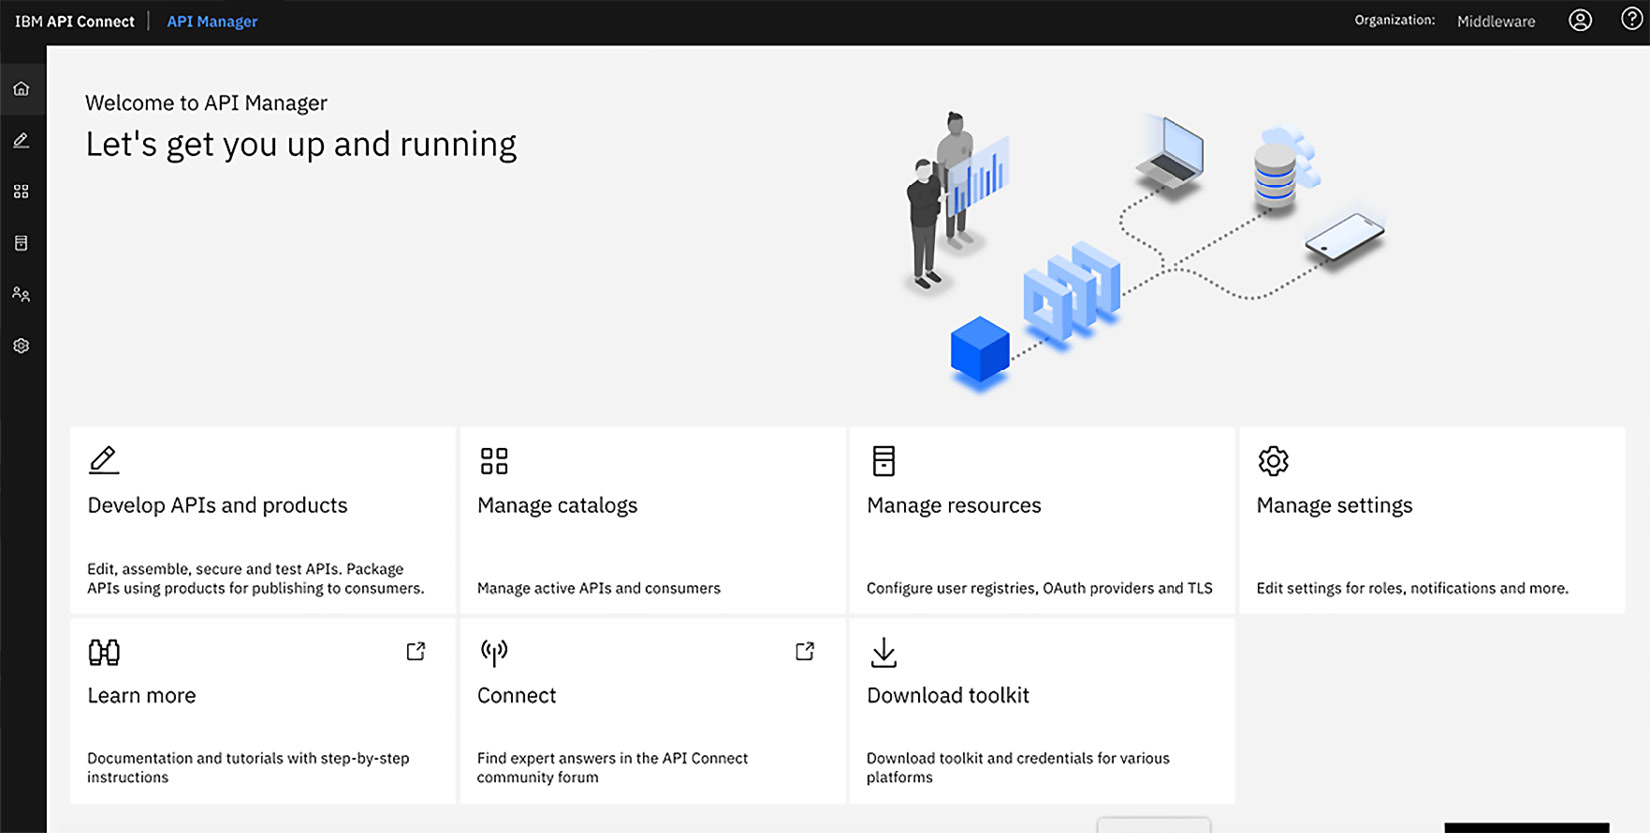
Figure 2.5 – API Manager
When you access API Manager, you represent the user of a Provider organization. As a member of the organization, you have the ability to develop APIs and products, manage Catalogs, manage resources, and manage other supplemental settings depending on your role.
Roles
Roles can vary and are initially assigned by the owner of the Provider organization. You have choices that enable or limit permissions for the organization. These permissions allow various actions to be performed. The following predefined roles are available in API Connect. A short description is provided for each of these roles to enhance your learning:
- Organization owner: They have full permissions, by default, for all of the API Connect manager functions.
- Administrator: They have the same functions as the owner but can be updated.
- API administrator: They manage API life cycles and the publishing of APIs to the Developer Portal.
- Community manager: They manage the relationship between the Provider organization and the app developers, provide API analytics, and provide support to the app developer teams within the community.
- Developer: They design and create APIs and products with the ability to stage and publish those products to a Catalog or space within the Provider organization. These permissions do not apply when a developer is assigned to a specific Catalog or Space. Those users can only manage products within the Catalog or Space assigned.
- Member: They are a read-only member of the Provider organization.
- Viewer: They are a read-only member of the Provider organization.
Tip
For more details regarding these roles, please refer to the v10.0.1.5 API Connect Knowledge Center at https://www.ibm.com/support/knowledgecenter/SSMNED_v10/com.ibm.apic.overview.doc/overview_apimgmt_users.html#overview_apimgmt_users__apim_manager_roles.
Knowing who is assigned to what role is something that should be decided from the outset. You can create a custom role by using the Manage Settings option and then adding a new role. Generally, one out-of-the-box role should suffice, but if you desire more granular roles, you have that capability through a custom role.
Important Note
API Manager holds a database that keeps track of the APIs, products, life cycles, subscriptions, and other relevant information. When a backup of API Connect is conducted, it is this database that maintains the state of the environment.
Developing APIs and products
Of course, the reason you have API Connect is to create APIs and manage them. You will be creating various types of APIs and publishing them through a packaging mechanism called a product. Similar to the product that you learned about in the 4 Ps of Marketing, in the Chapter 1, Digital Transformation and Modernization with API Connect, this product is what consumers subscribe to. A product is the packaging of the services your consumers will use within their user experience APIs. How you create an API definition is shown in Figure 2.6:
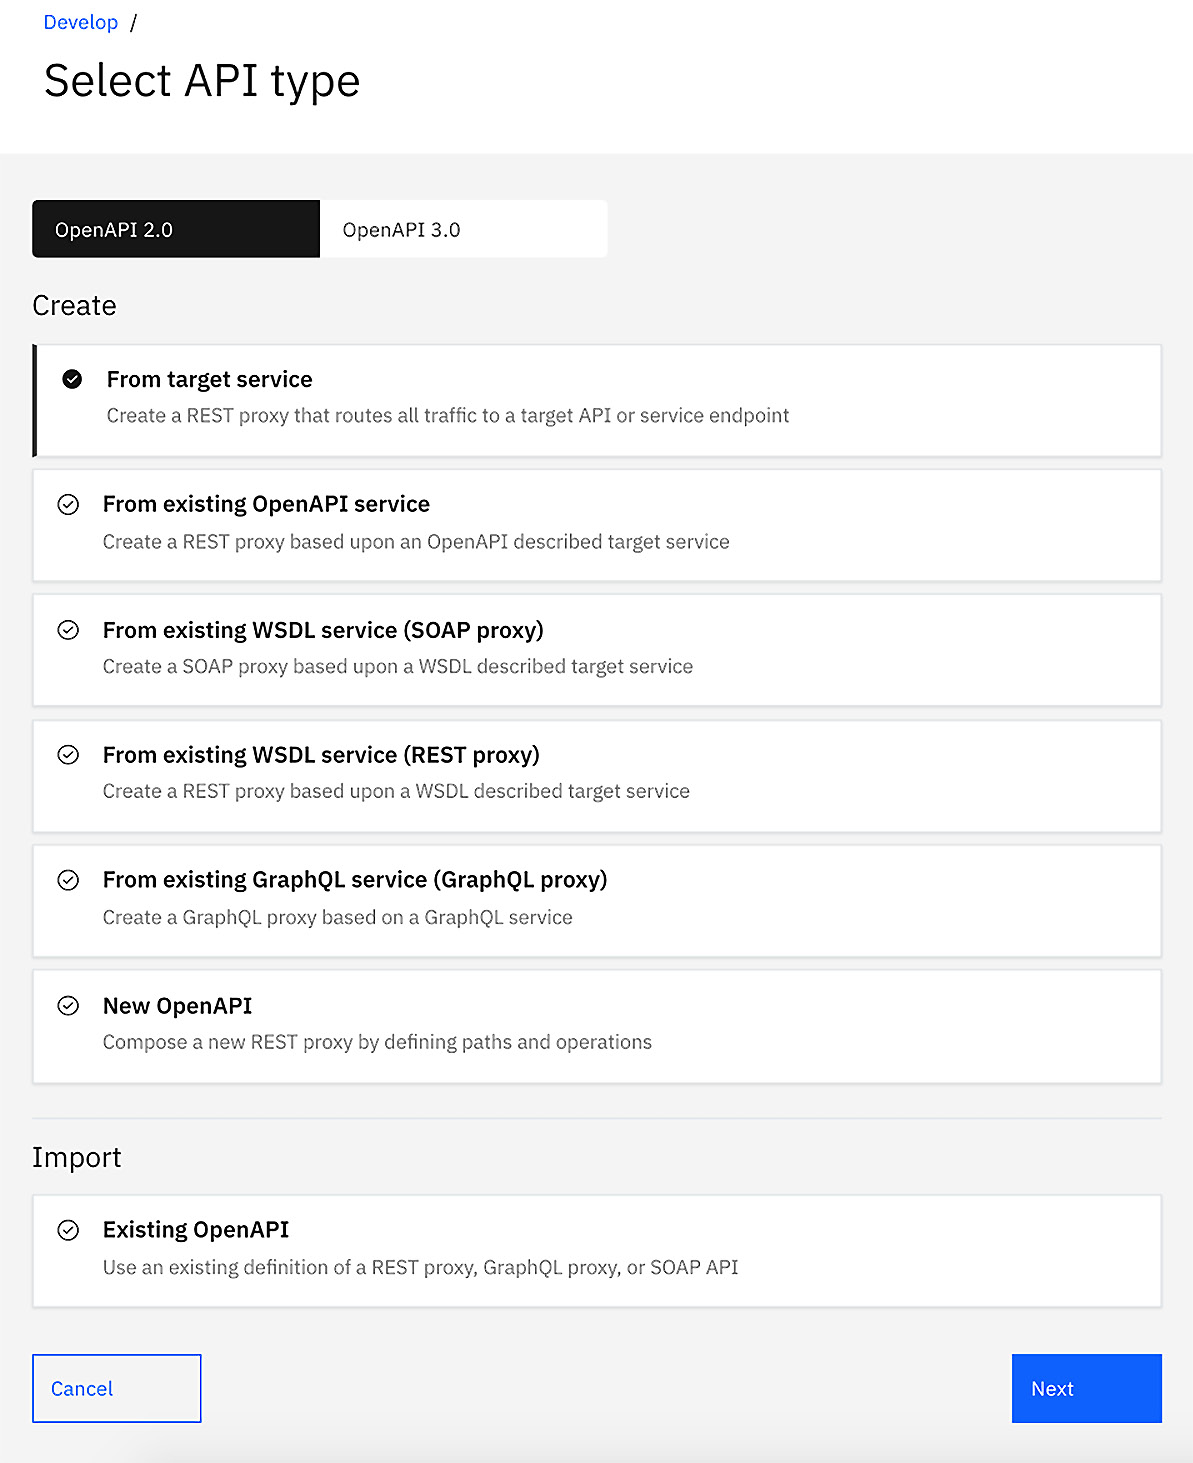
Figure 2.6 – Creating APIs and products
As you might have gathered, there are various ways and types of APIs that you can create. You will learn how to create these APIs in a three steps, in Chapter 4, API Creation.
Catalogs
A Catalog is a target for deploying APIs where it has a gateway and (if desired) a Developer Portal service. A Catalog is a logical partition; therefore, you can have many Catalogs for a Provider organization. With the proper permissions within the Provider organization, you can create additional Catalogs to represent various environments. It's not uncommon to see environments such as Test, QA, and even Production created for a Provider organization.
As mentioned earlier, Developer Portal services can be created for a given Catalog. This is not a requirement. So, why would you not want a portal for every Catalog? Well, Catalog Developer Portals are really tenants of the portal service. If your Developer Portal service is limited in capacity, having multiple portal tenants might stretch your resources. In addition, Catalog Developer Portals require configuration, so if you would rather not have to configure a Developer Portal service for each of your Catalogs, then you can decide not to have a Developer Portal. You will learn about Catalogs in greater detail in Chapter 3, Setting Up and Getting Organized. Additionally, in the same chapter, you will learn how to create a portal tenant for a Catalog.
That was a quick introduction to the Cloud Manager and API Manager components along with their capabilities. Next, you'll learn about the portal service.
The Developer Portal service
In this section, you will learn about the portal service. As mentioned earlier, the Developer Portal service is a multi-tenant portal server that holds the Developer Portal tenants created by the Catalogs. In version 5 of API Connect, the Developer Portal was based on Drupal 7; however, in version v10.0.1.5, it is now based on Drupal 9. The benefit of using Drupal is that it is a content manager that enables you to create incredible digital experiences. What you should know is that this is an enterprise-enhanced version of Drupal that includes plugin components of API Connect. These allow integration between the Developer Portal service and API Manager.
The following screenshot shows the default Developer Portal home page. The components of the Drupal Developer Portal service are also containerized, so this Drupal instance is running under Kubernetes:
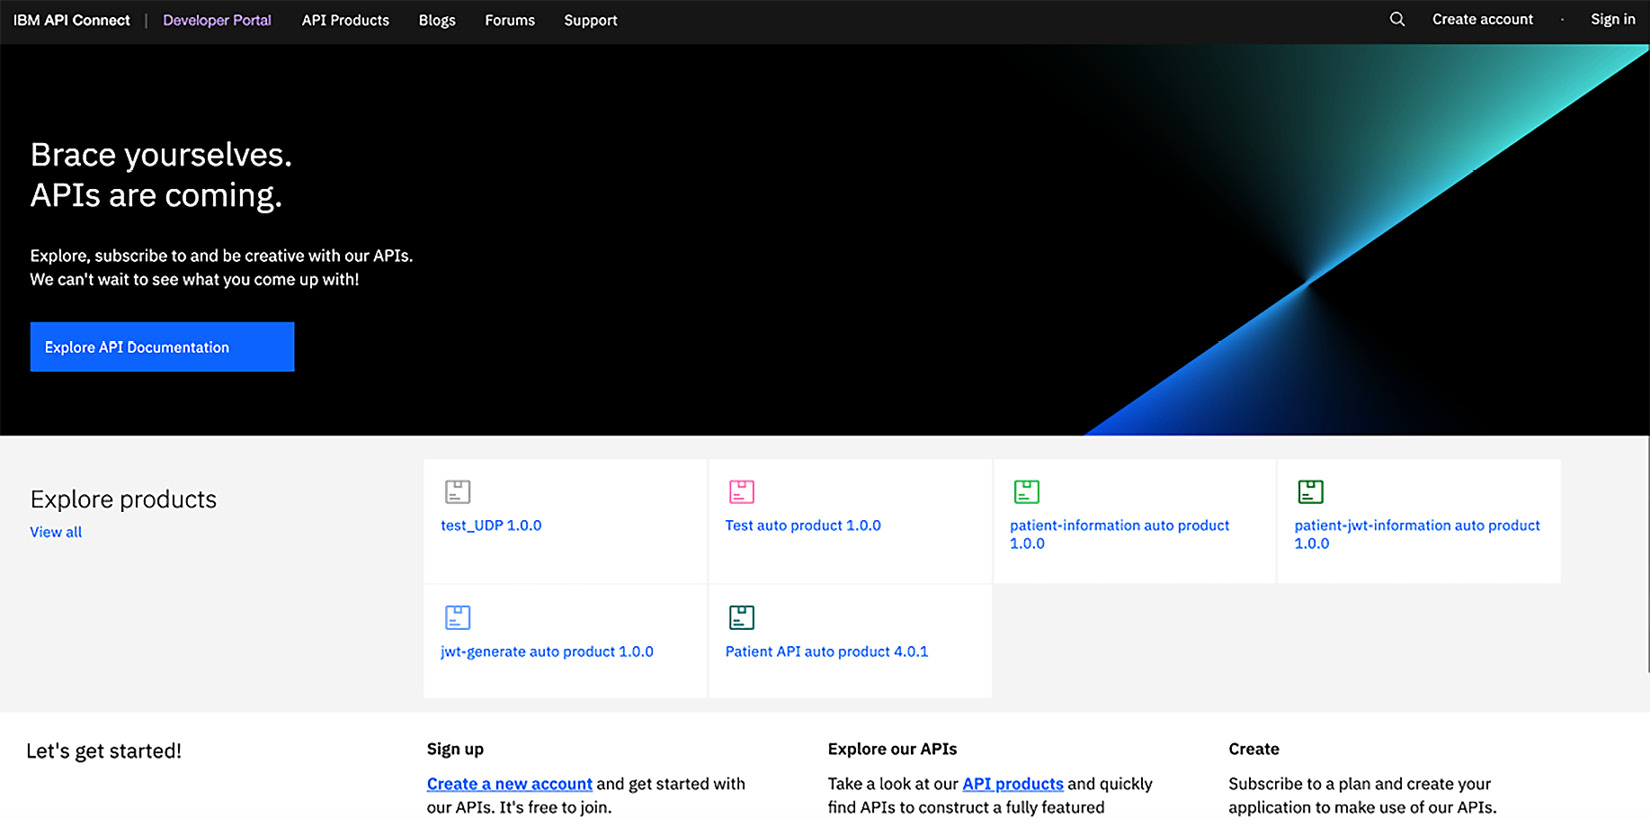
Figure 2.7 – The Portal instance home page
As mentioned earlier, Drupal is packed with additional functionality for API Connect. So not only is it an awesome content manager, but it's also a full-fledged API socialization platform for APIs. From a digital transformation viewpoint, it fits right within the plan.
You'll learn more about the customization capabilities of the Developer Portal service in Chapter 15, API Analytics and the Developer Portal.
In the meantime, you should attempt to understand the API Connect capabilities that are incorporated in the Developer Portal.
Digital transformation portal API Advertising
The subheading is a fancy way of introducing the capabilities of API Connect, but in a nutshell, you can simply refer to it as the Developer Portal. The Developer Portal can be used to discover APIs and develop new applications. This utilization is not just for external consumers and business partners, but it is also a perfect way to integrate internal applications. In fact, many API Connect enterprises utilize it internally as part of their initial digital transformation effort. Making their internal applications successful provides them with the confidence to extend their API effort beyond the firewall.
So, what are the capabilities of the Developer Portal? First and foremost, it has the ability to showcase your APIs. This is accomplished with the content manager by providing a Product page. The Product is the packaging for your APIs. A consumer will visit the portal and peruse the Product page, review the documentation for the product and its APIs, and, finally, determine whether the product is something they would like to try out.
With the Developer Portal, you can configure it to only allow logged-in users the ability to view these products. That will depend upon your business requirements. Can anyone see them? Or do you want to implement a mechanism that requests the user to log in? If that is the desired behavior, you can set up self-service registrations where a new user registers and creates a consumer organization. A consumer organization is an external organization or developer. One marketing strategy is to capture the consumer organization information as a means of doing more business. There is a built-in workflow that can be initialized to verify self-registering consumers to your Developer Portal. This can be accomplished via an email to a community manager who can then authorize the new registration request. That gatekeeper can accept or reject that person and/or use the information provided to reach out to the person to sell your APIs as the best in the world – this is a powerful capability.
Regardless of which method is used to get the consumer on board, once the consumer has access, they can review the Product and APIs and choose to subscribe to the Product. When subscribing, the user selects a plan to subscribe to. Plans set limits regarding the utilization of your APIs. Similar to a healthcare plan, the user chooses options that give them the capabilities within the multiple plans your Provider organization has agreed to. Once subscribed, the consumer can begin testing the APIs. This is similar to a test drive of your API. Try it out. See how it behaves; see what type of security is required and what return codes are provided – everything you need as a developer to build a robust application.
It is important to note that we have mentioned a few capabilities that are provided by the portal. You have heard about Consumer organizations, consumers, Products, APIs, subscriptions, and plans. All of this information is part of the API Connect additions to the Drupal portal software, and it's all persisted. Beneath the covers, the portal is communicating with API Manager. It's the API Manager component that contains the database that holds all of API Connect's critical assets.
Important Note
When you do a backup on API Manager, you are backing up the configuration of API Connect and all APIs along with the portal subscriptions and consumers.
As you learned in the previous chapter, your customers love to express their passion for your products. The Developer Portal provides you with that option along with out-of-the-box capabilities for blogs and forums. If you are interested in hearing from your customers, leave the capabilities enabled. If you don't desire them, you have the option to disable them.
The world is at your fingertips with the Developer Portal. With the help of a Drupal developer, you can customize the look and feel; and with API Connect's built-in capabilities, you can build a fantastic portal. Make sure you take full advantage of it:
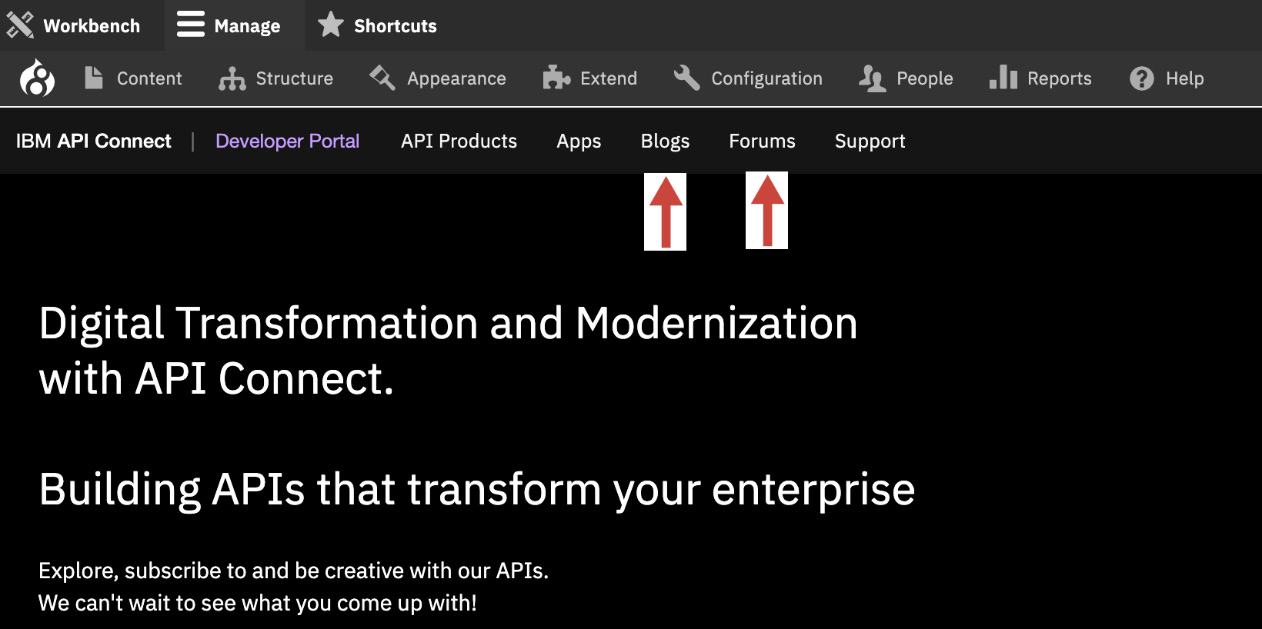
Figure 2.8 – Portal admin customization
You have just learned, in depth, about the Developer Portal component of API Connect. Next, you will learn where the APIs are actually executed. The API runtime of API Connect is all handled in the gateway. You'll learn about that next.
Gateway
The gateway within API Connect is critical for ensuring your APIs are securely executed, highly available, measured, and performant. The gateway in API Connect is called DataPower. DataPower has been an IBM product since 2005 and is considered one of the best gateways on the market. For years, customers have been using DataPower in SOA environments within the DMZ or inside the firewall providing security, routing, transformation, supporting multiple protocols and capturing metrics for analytics. These are all the capabilities that are important to the success of your digital transformation.
Important Note
The gateway runtime is where the rubber meets the road. When defining your API Connect topology, the placement of your API gateway is critical. The API gateway can be associated with the Analytics subsystem in the topology to provide valuable statistics to you and your consumers.
If your APIs are deployed in the cloud, having a gateway within the same cloud will improve performance. You should note that with API Connect, you can place multiple gateways in different clouds, on-premises, or within a hybrid architecture (both the cloud and on-premises). In addition to this, you can configure HA with the gateway and spread them between data centers if you wish.
As you might have gathered, the gateway is very important. Because it can be deployed in heterogeneous environments, it must also support many form factors. The DataPower gateway is available in four different form factors:
- Physical: For example, a hardware appliance with multiple network interfaces and significant CPU/memory.
- Virtual: The same capabilities in the gateway also run as OVA files for VMware.
- Linux: You can install the Linux form factor of DataPower on-premises and/or in cloud environments.
- Docker: DataPower is also containerized and can be part of your API Connect Kubernetes installation. The container version is also useful for testing your APIs when you are using the LTE:
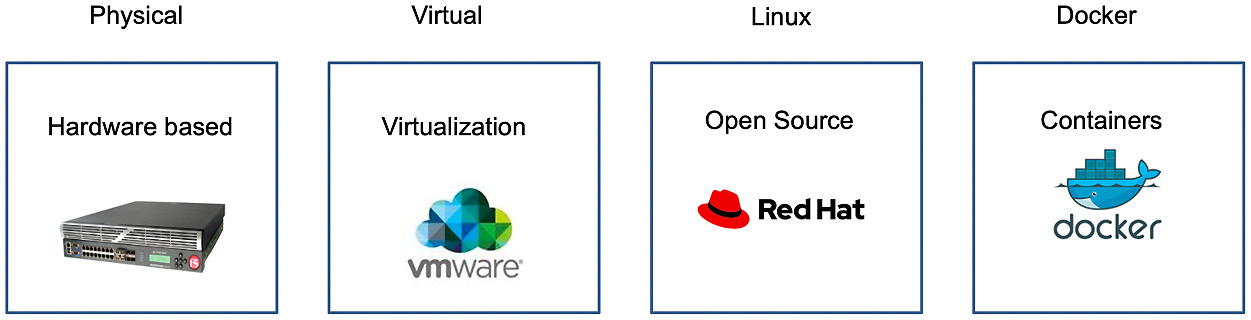
Figure 2.9 – DataPower has four form factors
You can mix and match multiple form factors within your hybrid cloud environment to adhere to your infrastructure needs and corporate standards. Note that cost might also play a role in your decision.
Important Note
Bear in mind that these form factors can be deployed on most common cloud vendors' cloud infrastructures such as AWS, Azure, IBM Cloud, and GCP. The appropriate form factor you pick will depend on the capabilities of the vendor.
So, now that you are aware of the various form factors, you should have a good understanding of how the DataPower gateway can be clustered to provide scale, self-healing, and autonomous gateway management.
DataPower gateway clustering
Gateway clustering is essential to support HA and resiliency. When you add a gateway to the Cloud Manager topology, it is actually referring to a gateway cluster. You can always have a single DataPower gateway within your cluster in non-HA environments, but in general, for all HA environments, you must have a minimum of three DataPower appliances.
Important Note
Having three DataPower gateways for HA is mandatory to establish a quorum. In version 5 of API Connect, the only component that required a quorum was the Developer Portal. Now, with versions v2018 and v10, all components (such as Cloud/API Manager, Gateway, Developer Portal, and Analytics) require a quorum for HA.
You can configure gateway clustering by grouping gateways together in an on-premises implementation, or you can spread them out across data centers, AZs, or within cloud implementations. The loss of a gateway in one data center will be picked up by another member of the cluster without any impact. This is all possible because of the quorum.
Briefly, we will discuss why gateway clustering is important. However, for additional details about how to set it up, please refer to the IBM Knowledge Center on this subject. It can be located at https://www.ibm.com/support/knowledgecenter/SSMNED_v10/com.ibm.apic.install.doc/tapic_install_datapower_gateway.html.
A properly setup gateway cluster provides you with the ability to scale your gateways to handle spikes in requests and meet predefined Service-Level Agreements (SLAs). When your gateways establish a quorum, a primary gateway is elected and the other two become secondary gateways. As requests are made (including OAuth token requests), the gateways synchronize. So, if the primary gateway goes down, the secondary gateway kicks in. When the primary gateway becomes available again, resynchronization will occur so that all gateways are available and up to date.
Figure 2.10 depicts a three-instance quorum where there is a primary gateway and two secondary gateways. The disks represent the synchronization of the runtime data:
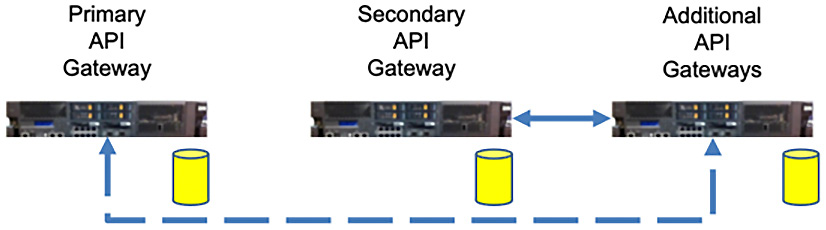
Figure 2.10 – API gateways are scalable
Important Note
Remember that the gateway is the runtime. In the event that other cluster members experience an outage due to a lost quorum, as long as the gateway is still running, your API calls will be processed. You will have to encounter a loss in capability between the interaction of gateways to managers and analytics, but business processing will continue.
Before we move on to the other components of API Connect, there is one important aspect of the gateway that solution architects and developers should be aware of. In version 5 of API Connect, the gateway service was built using the existing DataPower multi-protocol gateway service With v10.0.1.5, an additional API gateway service was created that is built as an out-of-the-box native service. This new service is dramatically faster.
Important Note
The new gateway service is called the API Connect Gateway Service (apigw). It can increase performance by 10 times, and possibly even more, depending on your APIs. Version 5 customers should be aware that during the migration to version 10, you have the choice to convert to this new API Connect Gateway Service.
With API Connect version 10, there are two options to add gateways to your topology. You just learned about the API Connect Gateway Service, which is one of those options. The other option is called the Version 5 Compatibility (v5c) gateway. This gateway was also slightly modified to help improve performance, but it is primarily available to support existing version 5 APIs. If your company is migrating from version 5 and is not ready to move to the new API Connect Gateway Service, then you would utilize the v5c gateway instead.
However, there might be legitimate reasons not to move to the latest and faster gateway. There were changes in the API Connect Gateway Service that could hinder the way you code your APIs. While the version 5 to version 10 migration would convert as much as possible, certain custom code might not migrate successfully. So, for migration efforts from version 5 to version 10, you should clearly evaluate the ramifications of converting all of your APIs into the gateway service type. Coding changes of previously running APIs could lead to negative results, rendering your APIs useless.
Important Note
Another important consideration to bear in mind when migrating to version 10 is if you have created user-defined policies based on version 5. There are new methods of supporting user-defined policies, and you might have to update those in order for your APIs to continue using them.
You have just learned about the two types of gateways that are available. If you are new to API Connect version 10 and are not migrating to version 5, you should default to using the API Connect Gateway Service.
As mentioned earlier, the gateway will capture transactional information to route to the Analytics subsystem. The Analytics subsystem is the final of the four components that comprise API Connect. You will learn about it next.
Analytics
The Analytics subsystem is what receives the transaction details from the gateway cluster. After you install the Analytics service, you can then associate the Analytics subsystem with a defined gateway cluster. Once associated, the gateway will begin sending transaction data to the Analytics subsystem:
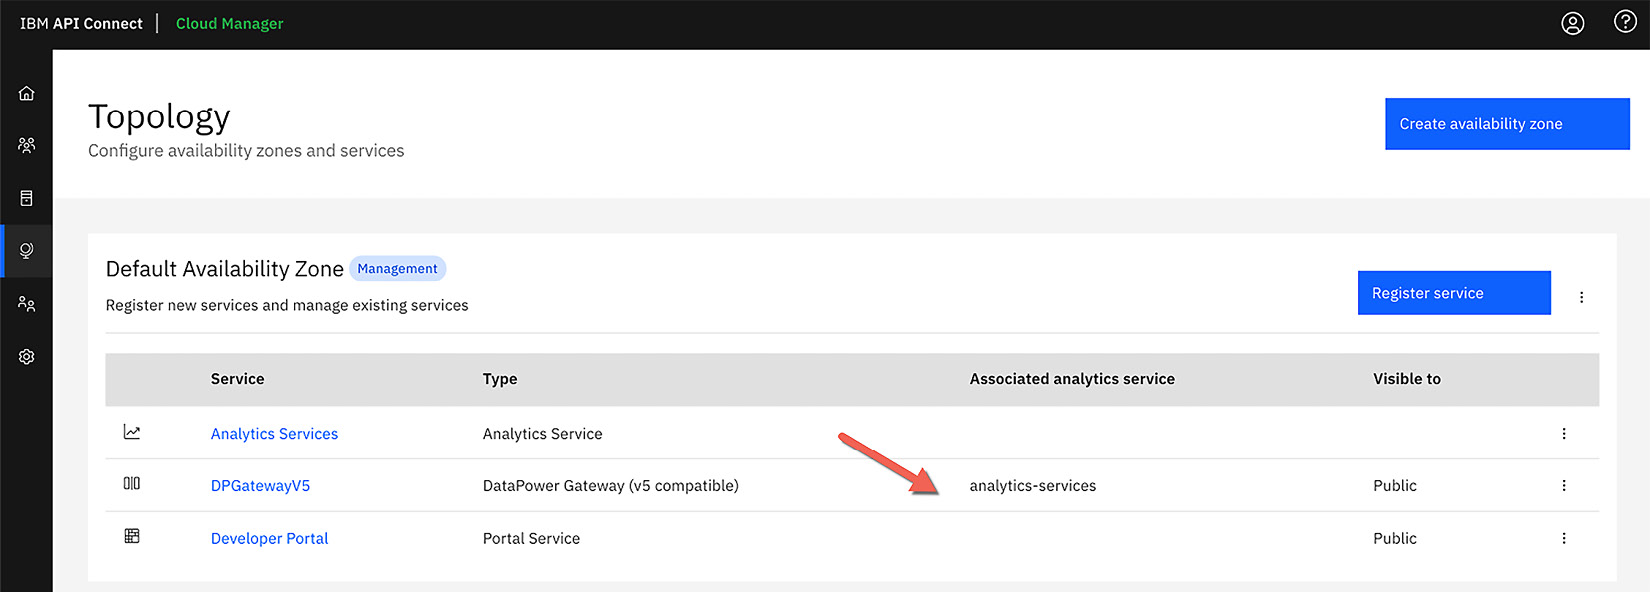
Figure 2.11 – Associating the Analytics service to a gateway
Following this, the analytics data can be reviewed by the Analytics user interface that is displayed in API Manager and Developer Portal. The Analytics capabilities that come with API Connect are based on the open source products from the Elastic Stack (Elasticsearch, Logstash, and Kibana or ELK). Here, the user interface is using Kibana.
As an API developer, users can view analytics within the Provider organization Catalogs they are associated with. This includes spaces that they have been added to.
You can only customize analytics from the Provider organizations. Whenever you click on the Analytics tab, you are presented with the choice of preconfigured dashboards:
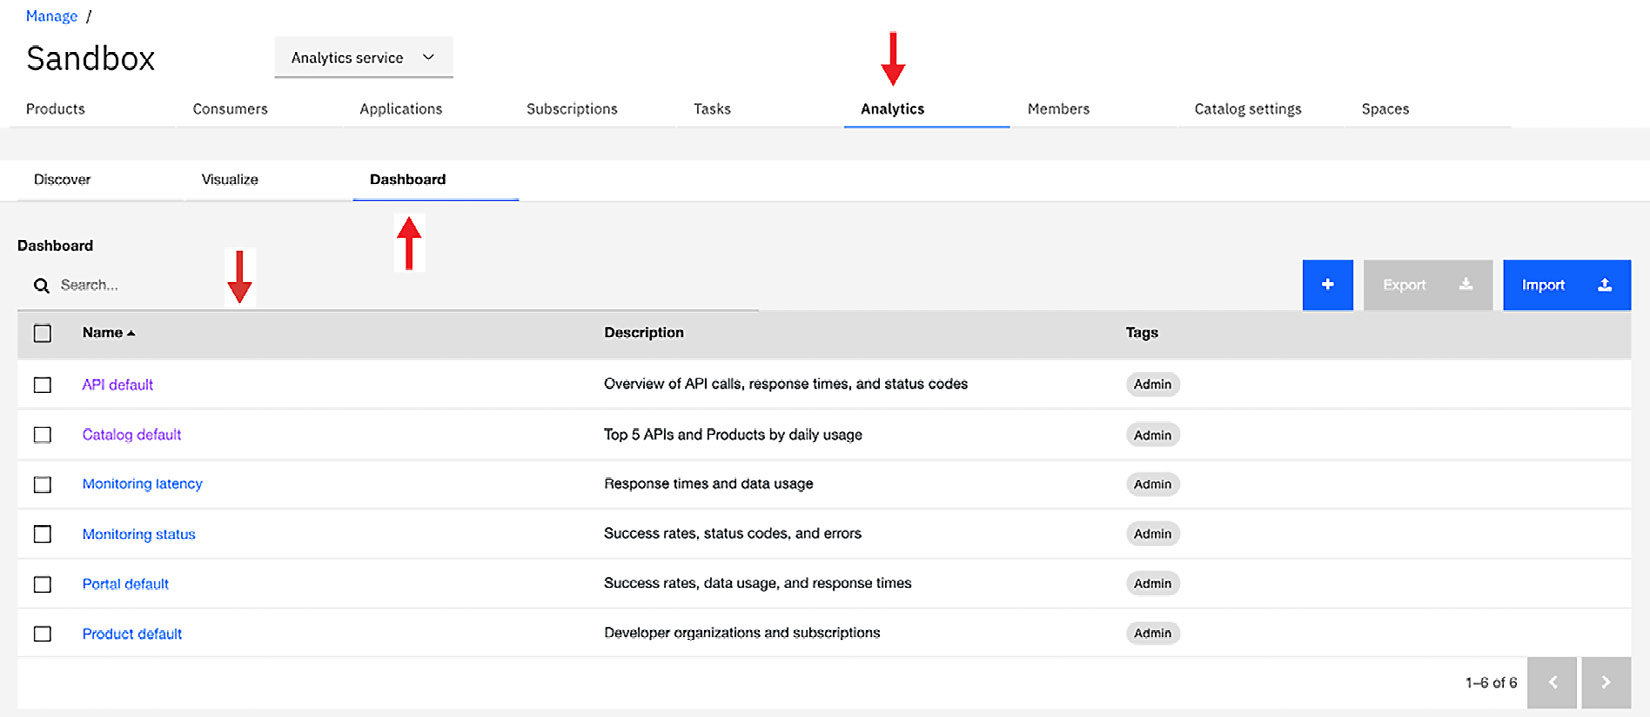
Figure 2.12 – The Analytics tab within a Catalog
Within each dashboard, there is a preconfigured visualization of the metric data. The screenshot that follows shows you the visualization for the default dashboard. You have the capabilities to modify the visualizations and/or create your own:
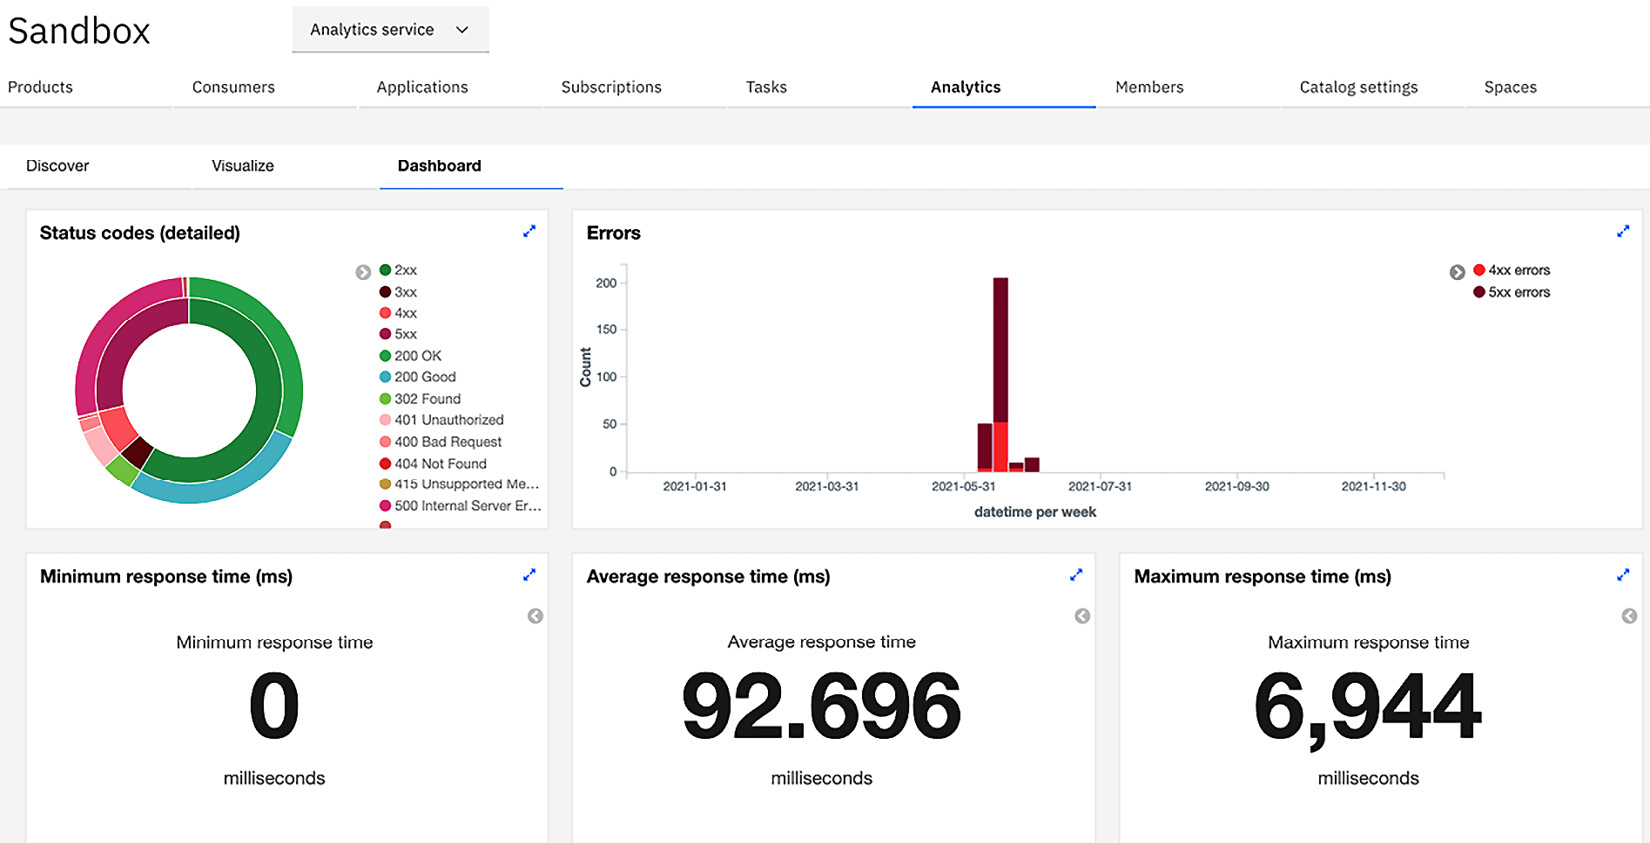
Figure 2.13 – Visualizations for the dashboard
With Analytics, you can also search for analytics produced from a different period of time. On the right-hand side, you can find the default time period of Last 15 Minutes. As shown in the following screenshot, if you click on that link, you will be given the option to select a different time period:
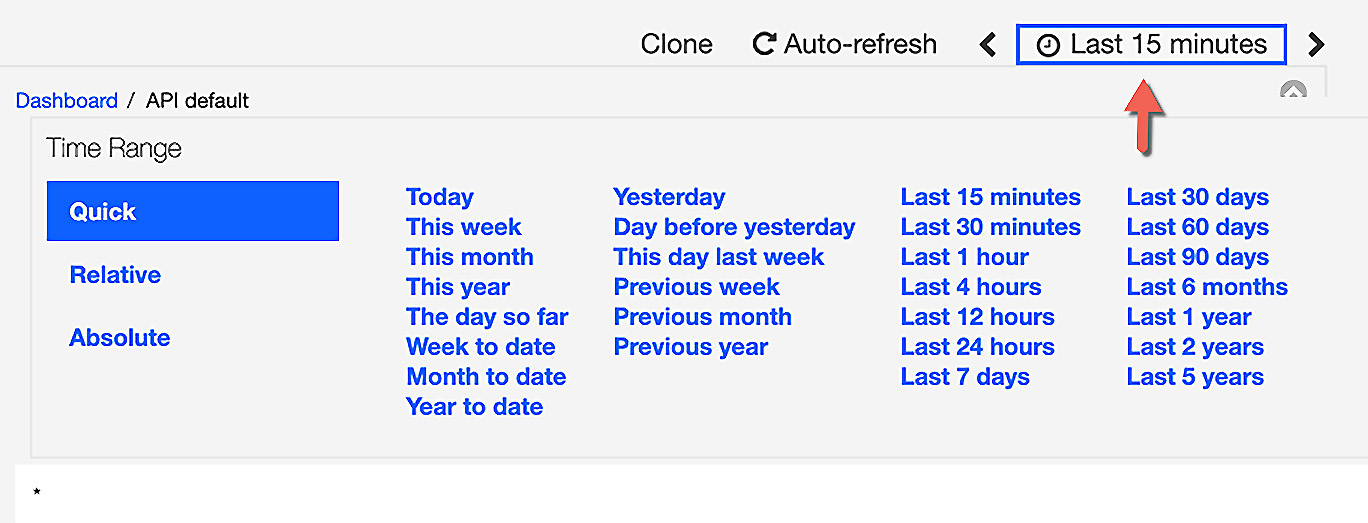
Figure 2.14 – Changing the time range
You might have noticed a dashboard called Portal default. This is where you can view and modify the analytics that are available for the Developer Portal.
Within the Developer Portal, API consumers can view analytics under two categories (consumer apps and consumer organizations). They can view analytics under the Apps tab for the consumer apps that have been created. The apps are the implementations of the subscribed product and APIs. The analytics that can be viewed include API stats, total calls, and total errors.
The other place in which to view them is based on the consumer organization. The consumer organization is the organization of the developers subscribing to your Product APIs. The information categories are the same (that is, API stats, total calls, and total errors) but rolled up just for that consumer organization.
There is a lot more you can learn about the Analytics subsystem. You can learn how to configure the Analytics dashboards and visualizations by referring to the documentation on the web about the Elastic Stack.
Important Note
While not covered in this section, you should be aware that the analytics data can be exported from the Analytics subsystem. Additionally, you can configure API Connect to send the analytics to another server for analysis and reporting, such as Splunk. If you would like to do so, please refer to the IBM Documentation web page.
So, you have learned about the four major components of API Connect. You learned that Cloud Manager is where you configure the API Cloud topology and link the components. Additionally, you discovered that API Manager is where you create products and APIs. The Developer Portal is the second component where you can publicize your products and APIs as well as allow subscriptions to consumers to develop applications. We introduced the DataPower gateway where your APIs actually run, and we described how analytics are sent from the gateway to the Analytics subsystem for analysis and reporting.
By now, you should be familiar with the various components that comprise an API Connect cloud. Next, you will learn about the deployment models for an API Connect hybrid cloud.
Deployment models
When it comes to the hybrid cloud implementation for API Connect, you will find it difficult to find another API Management product that deploys to as many cloud platforms as IBM API Connect. In this section, you will be provided with information regarding how API Connect is packaged to run on-premises and on cloud platforms using various methods of deployment.
So, how is it that API Connect can be deployed to so many different destinations? Well, it all has to do with how the product was developed. Since version v2018, API Connect has to be built from the ground up as microservices running in containers. To manage these containers, IBM utilizes Kubernetes and, now, Red Hat OpenShift.
You'll start learning about the models, beginning with the most prominent one – the on-premises model.
The on-premises implementation
You have three choices when you want to implement API Connect on-premises within your data center:
- VMware ESX
- Bare-metal Kubernetes
- OpenShift Container Platform (OCP)
While the implementation using VMware utilizes an OVA file to install each of the components, beneath the covers, it is still Kubernetes managing the API Connect microservices. This model of implementation is suited for customers who are in the initial stages of modernization and would rather use platforms their teams are familiar with. Since prior versions of API Connect were based on VMware installations, many customers are already familiar with the VMWare and OVA installations. Learning a new API platform along with Kubernetes can be a challenge for many companies, and the VMware option is preferred in such cases.
Installing your own master and worker nodes on bare metal or VMware and implementing Kubernetes requires more skill for the administrator. This requires a good understanding of how Kubernetes is configured and all of its dependencies, just to get started. The installation has been made easier with the addition of Kubernetes operators. In this scenario, operators install the API Connect components. However, administrators still need to have experience of Kubernetes commands, load balancers, ingress controllers, and how to troubleshoot Kubernetes issues.
The third option is to use OCP. So, what is the benefit of OCP? First, OCP has a browser-based interface that makes managing Kubernetes easier. It enables DevOps and corporate-wide collaborations, making deployments easier. Additionally, OCP provides a CLI, providing multiple ways to interface with the platform.
Setting up an OCP platform has similar requirements to getting the cluster configured. You still have master and worker nodes that need to be configured. You will install OCP using the User Provisioned Infrastructure (UPI). To learn about OpenShift and UPI, please visit the Red Hat website at https://docs.openshift.com/container-platform/4.1/installing/installing_bare_metal/installing-bare-metal.html.
As you have learned, you have multiple options in which to deploy API Connect on-premises. Each has its pros and cons based on your skillset and budget. Cloud deployments are another deployment model. Let's learn about those options next.
Cloud implementations
Choices, choices, and more choices. The draw toward cloud computing with multiple vendors providing Infrastructure as a Service (IaaS) and Platform as a Service (PaaS) is compelling.
The discussion regarding installing on-premises is very similar to when installing using IaaS. The differences will be in each cloud vendor's implementation of setting up the environment. For instance, each of the major cloud vendors has its own implementation and setup for networking, LDAP, DNS, and storage. Of course, cost is also important, as all vendors have different cost models. Another slight difference between the vendors is that each might have slightly different versions of Kubernetes.
Despite all the differences, API Connect can be installed on major cloud providers such as Azure, GCP, AWS, and IBM Cloud. All of these implementations allow you to install API Connect; however, only IBM Cloud offers a SaaS implementation of API Connect. The API Connect for IBM Cloud provides an instance of API Connect to allow you to build products and APIs. This implementation provides you with access to API Manager to carry out development and other Provider organization activities. What you do not have access to is Cloud Manager:
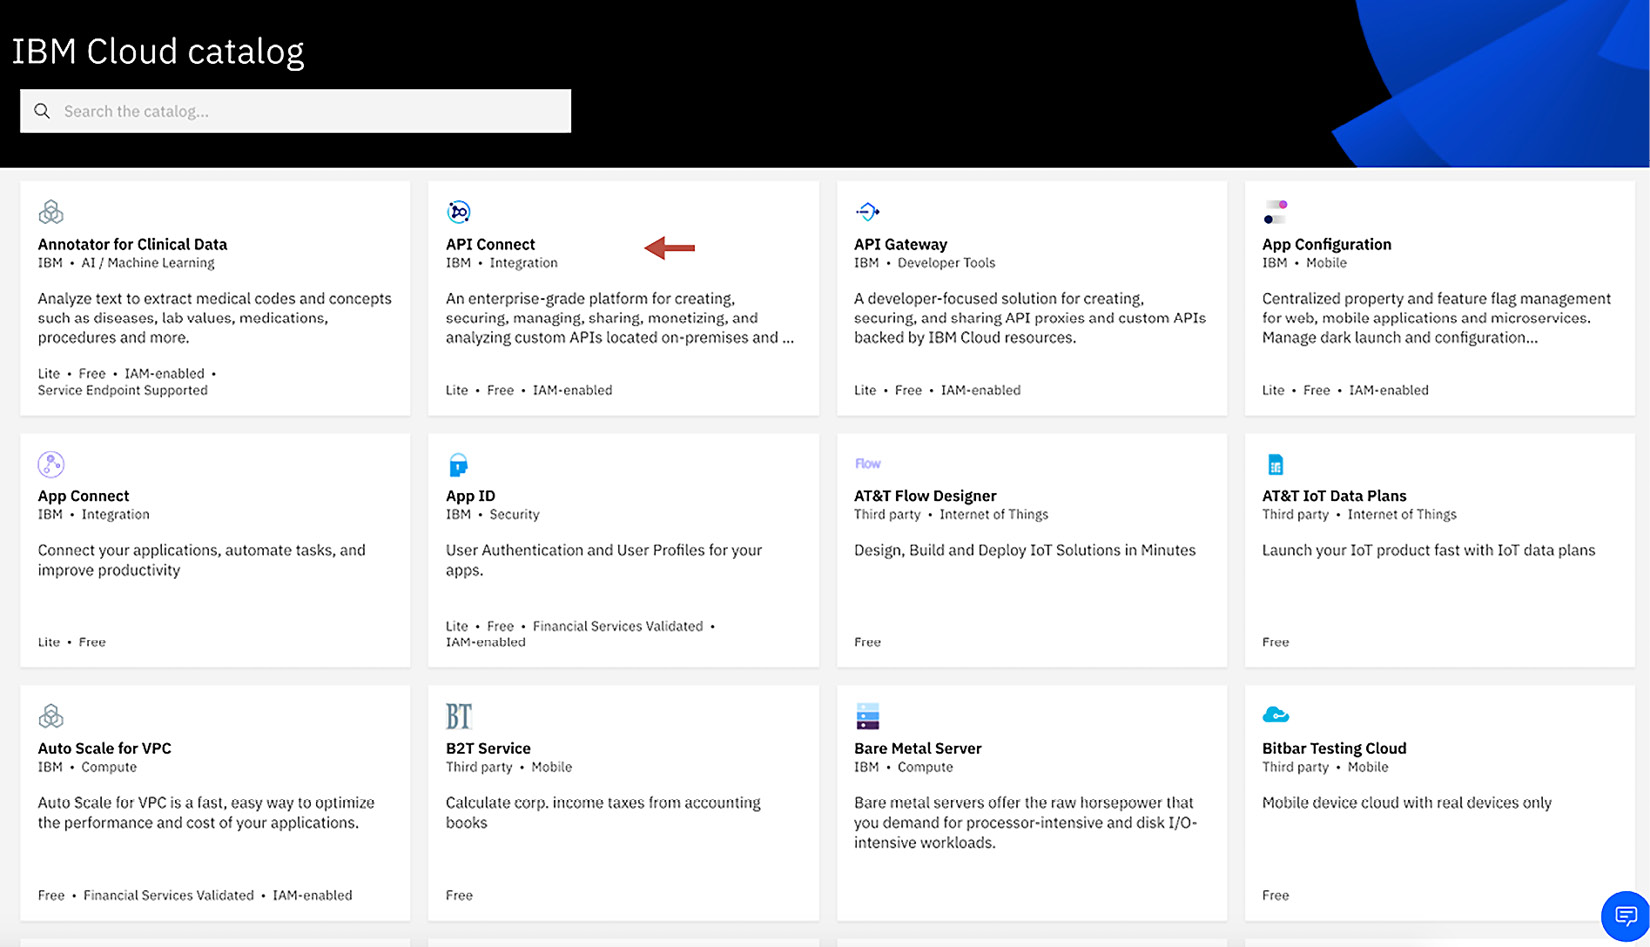
Figure 2.15 – API Connect on IBM Cloud
Important Note
API Connect for IBM Cloud is expected to be migrated to API Connect version 10. At present, API Connect may not be at the latest fix pack.
Earlier, you learned that each cloud vendor has slight differences when it comes to installing and supporting Kubernetes. One option is to mitigate, that is, to implement API Connect on OCP. OpenShift is supported on Azure, GCP, and AWS. Azure and AWS each provide self-service managed implementations of OpenShift. Now you can merely choose to stand up OpenShift on one of these platforms and deploy API Connect using operators in order to have an API Connect environment up and running in no time.
IBM CP4I
Another cloud offering from IBM is CP4I. CP4I is a platform that runs on OpenShift and offers IBM integration products that have been containerized to run on top of OCP. One of those products is API Connect.
CP4I has the following capabilities:
- API management: This capability is the API Connect implementation.
- Application integration: This is App Connect Enterprise, and it allows you to integrate a system of record, SaaS, B2B, and more.
- Event streaming: This enables you to build responsive applications using Kafka and integrate with the other capabilities listed.
- Enterprise messaging: This allows asynchronous messaging for the enterprise that extends into hybrid architecture.
- End-to-end security: The containerized DataPower form factor has been implemented to support your security needs.
- High-speed data transfer: This capability allows extremely fast secure file transfer using a product called Aspera.
Referencing the hybrid reference architecture you learned about earlier in Chapter 1, Digital Transformation and Modernization with API Connect, the features in CP4I provide all of the necessary toolings to address your digital modernization.
Important Note
The AWS marketplace has now added CP4I as one of its offerings: Quick Start for IBM Cloud Pak for Integration. This is a great addition for organizations that want to use IBM integration products on AWS. To learn more, please visit https://aws.amazon.com/quickstart/architecture/ibm-cloud-pak-for-integration/.
IBM Cloud (reserved instance)
You already know that you can quickly spin up an instance of API Connect on IBM Cloud. If you recall, this instance provides you with the ability to create and manage APIs using API Manager. Since it's a managed service instance, what is transparent to you is that you are part of a shared deployment. For customers who would prefer to have their own segregated instance, there is also a reserved instance for API Connect.
The reserved instance also runs version 10 of API Connect. The value customers get with the reserved instance is that it is managed and monitored by the IBM team, so your operations teams need not be involved. Additionally, since it's an isolated environment, you do not need to worry about users who are using the same IBM Cloud public service.
When you visit IBM Cloud and review the offers, you will see the reserved instance option, as shown in Figure 2.16:
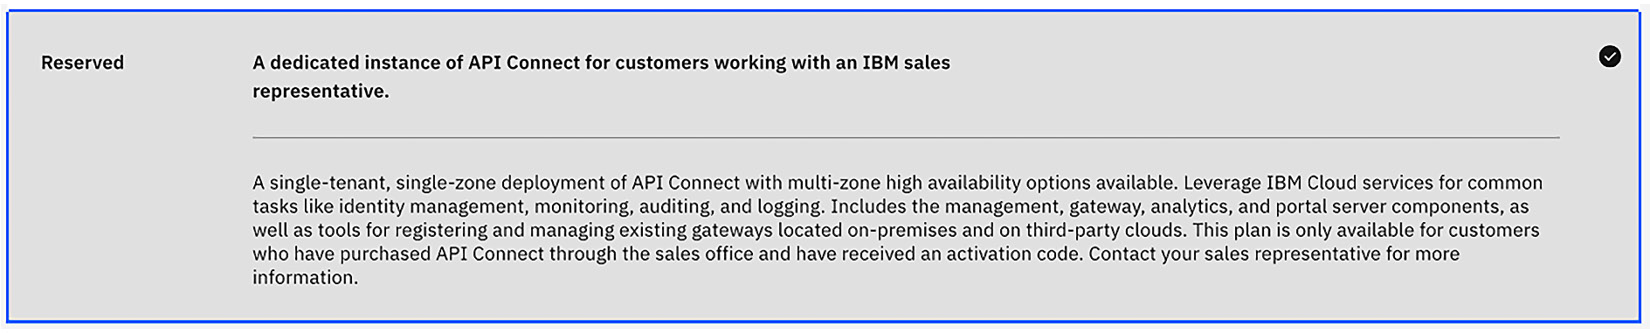
Figure 2.16 – A Reserved instance of API Connect
As you can see, there are many cloud deployment models. You now have the ability to choose how and where you want to implement API Connect based on cost, skillset, digital modernization directives, and tooling. The one model that we haven't discussed yet is hybrid cloud. Let's discuss that next.
Hybrid cloud
The last deployment model is Hybrid cloud. As you review the following diagram, you should be able to view where the separation between on-premises and the cloud is demarcated. While the diagram specifies any cloud, an example might be helpful for you:
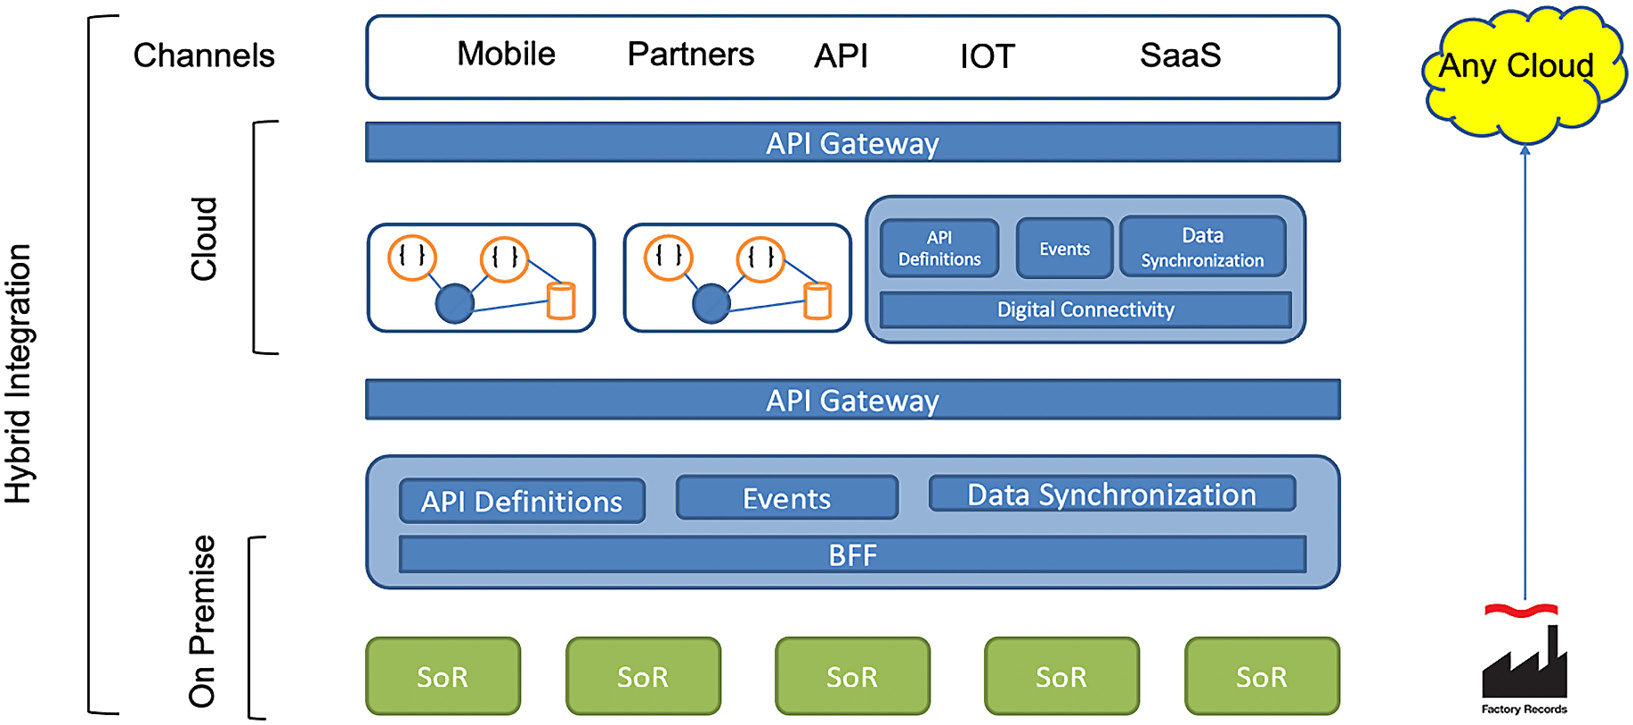
Figure 2.17 – The Hybrid cloud reference architecture
As an example, let's use a company that is building new APIs in support of Fast Healthcare Interoperability Resources (FHIR). The company has decided to use AWS to develop the APIs, but the data is still within the on-premises data center. This group of providers is autonomous. Perhaps it is a newly acquired software company. The challenge is how to make this work seamlessly.
If you have deployed API Connect in AWS, you can manage all of the FHIR APIs to the FHIR server. Your backend to the data and system of records is on-premises, but you also have API Connect implemented on-premises to accept calls from the AWS APIs and support API integration between various departments.
Of course, having multiple deployments of API Connect is not necessary. You can implement your API Connect on-premises and still have the APIs developed on AWS. With the configuration options within API Connect, you can place your gateways in AWS to improve performance while still having gateways in your DMZ and inside the firewall to support other APIs.
The benefit of this is that you are no longer hindered by preexisting infrastructure and antiquated legacy applications. You can mix and match your deployment to match your digital modernization as you wish.
We can't wrap up this section without a brief discussion on HA in API Connect. So, let's review that next.
HA
HA is an advanced topic and deserves a lot of planning. Here, you'll learn just the basics, as there is much to consider when setting up HA, and there are various options you would need to bear in mind based on cost, SLA, and effort.
To achieve HA in API Connect, the API Manager, Developer Portal, Analytics, and gateway components all require a quorum. A quorum is a minimum of three instances or nodes in a cluster. Both Kubernetes and API Connect components require a quorum to support HA. So, whether you are using a deployment model of API Connect on VMware or API Connect using Kubernetes, the requirement is still the same.
The condition the quorum is trying to prevent is referred to as a split brain. In this scenario, your cluster believes there are two primaries within the HA cluster quorum. Normally, there is one primary synchronizing with secondaries. When the primary goes down, the secondary usually takes over as the primary. However, what if the primary is functioning but the network link goes down?
Well, a secondary could believe the primary has gone down, so it makes itself the primary so that it can continue processing. Sound good? Not really. The original primary believes it is still functioning. So, now we have two primaries, which means database synchronization is running independently. When the network link becomes active, we have two primaries. So, who's the boss? When you have two primaries, this is called a split-brain scenario. It can lead to data inconsistencies.
Quorums aren't unique to API Connect. You can find them with databases (such as MySQL and MariaDB) or with Kafka, where ZooKeeper requires a quorum.
In API Connect, the way to calculate the node failure tolerance is N/2+1. So, in our minimal case of three nodes, we require two instances to form a quorum. Some examples are as follows:
- 4 nodes = 4/2+1 = 3 nodes for a quorum
- 5 nodes = 5/2+1 = 3 nodes for a quorum
- 7 nodes = 7/2+1 = 4 nodes for a quorum
So, what split-brain scenario happens to API when a quorum is not achieved? We'll review by each component:
- Gateway: APIs will continue to run, but API configurations are constrained. Additionally, you will be unable to store or share revoked OAuth refresh tokens and rate limiting in the API Connect Gateway (apigw) service.
Important Note
Rate limiting will continue if you are using the v5c gateway service.
- Manager: API Manager will continue to work but only in read-only mode. You will not be able to publish APIs nor create applications.
- Analytics: You can view existing analytics, but new data from the gateway is stopped.
- Developer Portal: The Developer Portal cannot be accessed. You will not be able to register new consumers nor register new applications.
You now have a good understanding of the various deployment models and how API Connect handles HA. Having this information puts you in the best position to enable you to architect your hybrid cloud infrastructure so that it is highly available, resilient, and performant.
Before beginning to work with API Connect, it is a good time to introduce you to another valuable capability of API Connect. That is the ability to execute many of its features via the command line.
Introduction to the CLI commands
In this section, you will learn how to use the basic CLI commands. The examples shown here have been initiated from a Mac but will be the same for Windows environments.
The CLI commands come with the API Connect toolkit. You can download the toolkit from the web on Fix Central (https://www.ibm.com/support/fixcentral/). Alternatively, if your company has API Connect installed and you have access to API Manager, then you can download it from there. In fact, you are guaranteed to get the correct version if you do it in that manner:
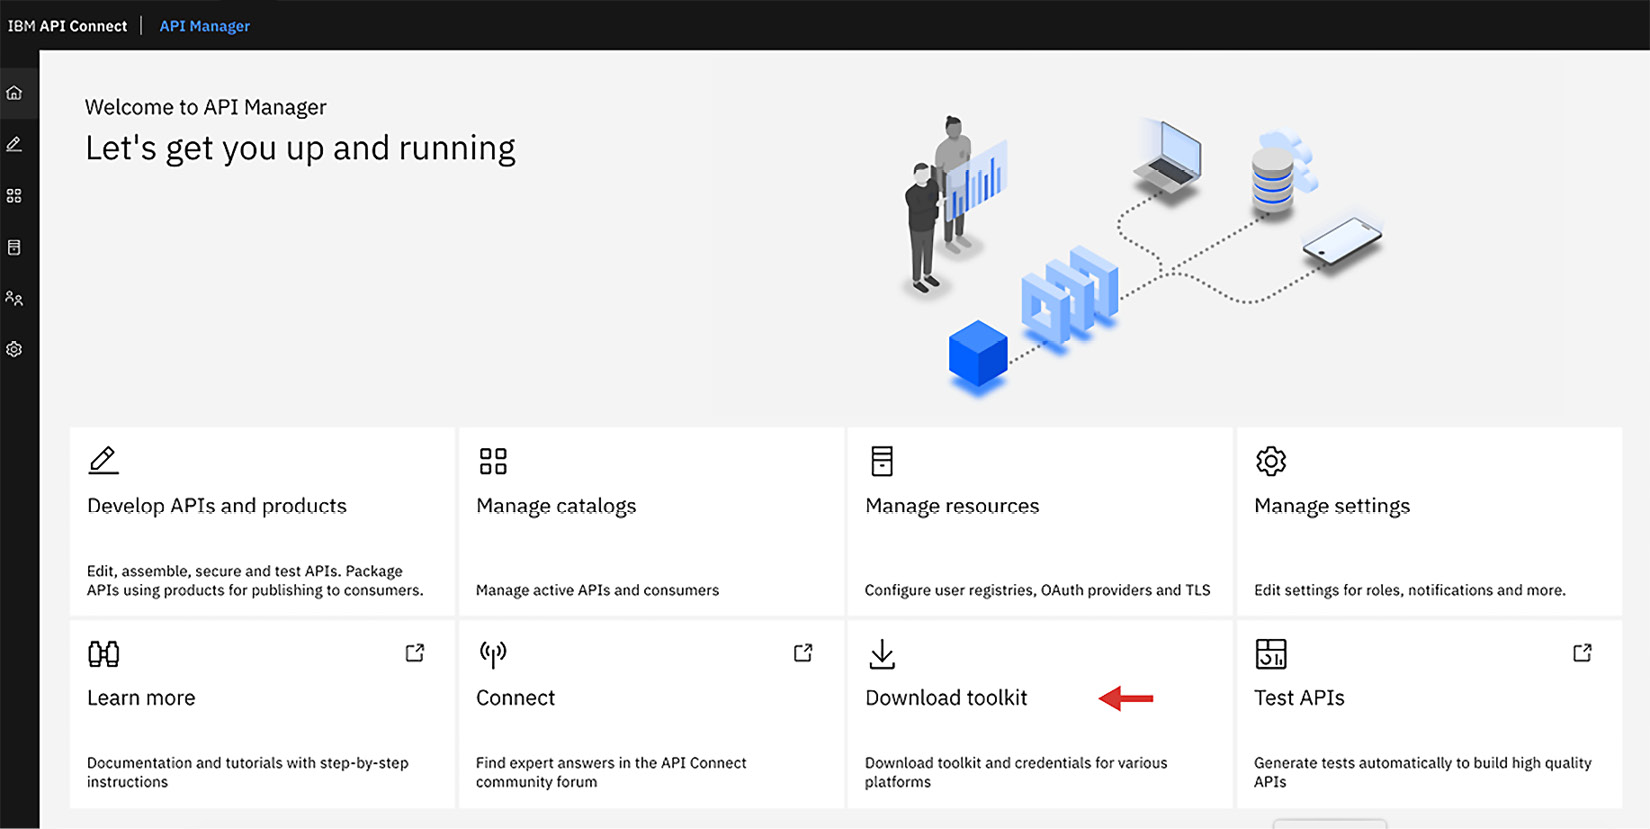
Figure 2.18 – Downloading the toolkit from API Manager
For what reasons would you want to use the CLI? Most of the time, the CLI is incorporated within your DevOps pipeline. However, before you start learning how to call the CLIs, you should try to understand the capabilities that are available within the CLI. One thing you should be aware of is the target of your CLI commands. When executing the commands, the location of the output can be either of the following:
- Local filesystem: This is for creating APIs and products locally. It uses general-purpose commands.
- API management: Here, commands are executed toward managing resources on the API Manager server, including draft APIs.
These distinctions are important because some commands might seem similar but have different implementations. On the one hand, you are generating APIs from the command line, and on the other hand, you are deploying and managing those same APIs against API Manager.
You have been briefly introduced to the development capabilities of API Connect. As a developer, you understand that you start by creating APIs. Then, you package them in a product, stage or publish them to a Catalog, and, finally, maintain a life cycle of revisions and updates. Figure 2.19 shows the flow you could take to create an API and deploy it to API Connect.
The CLI API development flow has a series of steps that are required to promote your locally defined API (or an API that is checked into a source code manager such as Git) and published within API Connect's management component. These steps are very similar to what you need to introduce into your DevOps pipeline:
- Determine which Identity Provider (IDP) you will be accessing.
- Log in to the API Connect using the login CLI command.
- Identify the Provider organization you will be updating.
- Set a Catalog within the Provider organization as the target for the command.
At this point, you have an established destination for publishing. Next, you can create your API.
- Create an OpenAPI file using your favorite OpenAPI tool or the create CLI command.
- Using the draft option in the CLI, create a draft API that moves the API into API Manager.
- Create a draft product that establishes a relationship between the APIs and the plan(s) that will be contained within the product and moves that into API Manager.
- Once your draft is ready to promote to a testing environment, you can use the CLI to establish the connection to the environment and publish the product.
The flow you just learned is shown in Figure 2.19:
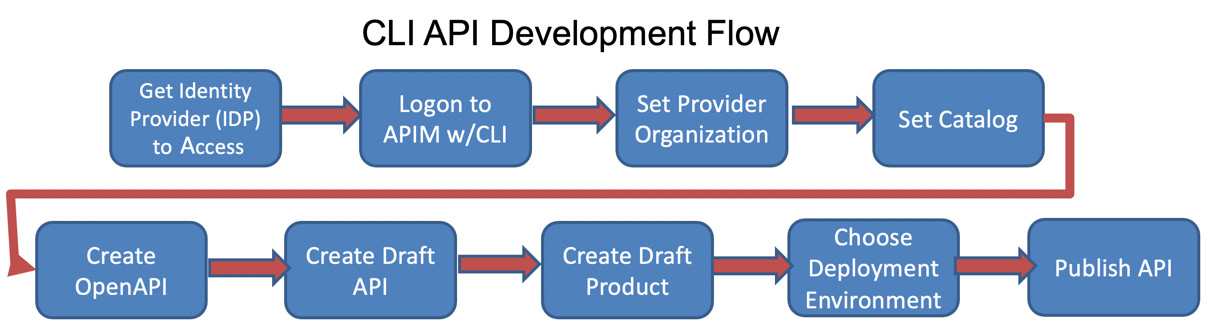
Figure 2.19 – Development process using the CLI
Your administrators have different tasks to perform. Often, their role is to provision new Provider organizations, update TLS certificates, and configure user registries. They will use other CLI commands to perform those activities. In the new world of automation, you can see these are perfect examples of tasks that can be streamlined for greater agility.
Greater agility leads to greater productivity, which leads to greater success in your digital transformation. You'll learn more about how the CLI participates in the DevOps process in Chapter 14, Building Pipelines on API Connect. With this background introduced, now is a good time to get you started with some simple CLI commands to whet your appetite.
Having fun playing with FHIR
FHIR is an emerging standard that many healthcare companies are moving to as they digitally modernize. FHIR is based on serving up REST APIs with JSON and is a good case study to begin our introduction into CLI.
To set the context of how the CLIs work, it's important to understand how an executed command integrates with API Connect. API Manager maintains the database of all the artifacts and resources that comprise the API Connect cloud. When you issue a command that will interface directly with API Connect, the call will pass through the Platform-API interface. For that to happen, you need to log in to API Manager. Additionally, your credentials need to have the appropriate role and permission to execute the CLI commands.
To make this introduction more interesting, we'll take a typical workflow scenario and issue the appropriate commands to achieve the goal. We'll assume you have downloaded the toolkit highlighted in the Technical requirements section and ensured that it's within the path.
You, as a developer, have been tasked to take an existing OpenAPI FHIR swagger file and create an API definition within the APIC healthcare organization. You must upload the FHIR API into API Connect and stage and publish it to the Sandbox Catalog. Your goal is to take what you have learned and teach the DevOps team, so they understand how to get started on building a future deployment pipeline. Here is what you will learn:
- How to get your IDP; you need to know what registry to log in to.
- How to supply the required parameters to log in to API Manager
- Set the command configuration to specify a Catalog for deployment.
- Create an FHIR API draft by using an existing OpenAPI document.
- Run a stage deployment of your FHIR API to that Catalog.
- Publish the FHIR API to the Catalog that also pushes it to the portal.
To identify the arguments that you will need to provide for each CLI command, you can use this guide to identify the required parameters. For these examples, we present arguments that can be used in a fictitious environment. As you run CLI commands that specify a server name, you will need to replace those with your server name. The use of the Sandbox Catalog will be throughout these examples because the Sandbox Catalog is always created for you, by default, when you create a new Provider organization. To provide some context regarding the target environment, Figure 2.20 depicts the API Connect Manager's relationship with the Provider organization and Catalogs:
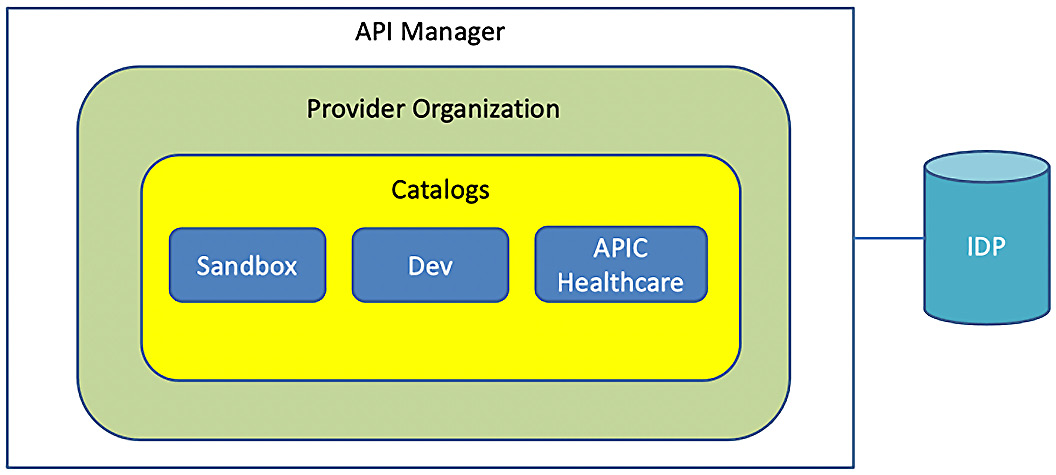
Figure 2.20 – An example target API Connect environment
The < > symbols signify a field, and you must supply a value for these fields. Inside the symbols will be example values to give you some context. Some examples include the following:
<api manager host> = api-manager-ui.apicisoa.com
<userid> = isoadeveloper
<catalog> = sandbox
<organization> = middleware
Now that you understand how to provide the variable arguments, you can begin with the CLI development flow. Open up a Terminal window/Command Prompt, and we will go ahead and learn how to interact with the IDP.
Determining realms and IDPs
There is a concept called realms. If you recall, the management server comprises two user interfaces: Cloud Manager and API Manager. When you use the CLI commands, you need to specify which target environment (either Cloud Manager or API Manager) you want the commands to apply to. Here are the realms:
- For Cloud Manager, the scope is called admin.
- For API Manager, the scope is called provider.
You need to find out which user registry points to the realm you desire. API Connect can have many user registries for different realms, so finding the correct one is important.
You will use the apic identity-providers:list command to obtain a list of registries used for Cloud Manager. To do that, you will have to pass the scope argument, specifying admin. Additionally, you need to provide the hostname, following the –server argument. As mentioned earlier, <api-manager-ui.apicisoa.com> represents the hostname that you will substitute with the hostname of your API Connect environment:
apic identity-providers:list --scope admin --server <api-manager-ui.apicisoa.com>
default-idp-1
Notice that default-idp-1 is returned. This means that when you log in to Cloud Manager, you must specify this user registry.
So, what about getting Providers? You can use the same command, but this type provides a scope of provider:
apic identity-providers:list --scope provider --server <api-manager-ui.apicisoa.com>
default-idp-2
Once again, it returns the user registry. This time, it is telling you that default-idp-2 is what you will be using when you log in to API Connect to work with API Manager. Now that you have that important data, it's time to log in.
Logging in to API Manager
The first thing you must do to interact with API Connect is to log in. You will be logging in as a Provider. The last command you ran provided you with the user registry to use (that is, default-idp-2). You will use that registry in the login command. You can run the apic login command by passing in all of the arguments or by issuing it interactively:
apic login --username <isoadeveloper> --password <password> --server < api-manager-ui.apicisoa.com > --realm provider/default-idp-2
You can choose either. Doing it interactively is shown here:
apic login
Enter your API Connect credentials
Server? <api-manager-ui.apicisoa.com>
Realm? provider/default-idp-2
Username? <isoadeveloper>
Password?
Warning: Using default toolkit credentials.
Logged into api-manager-ui.apicisoa.com successfully
All of the arguments are pretty straightforward. Only with realms can you specify it a little differently. Here, you provide the realm with the scope value and registry demarcated with a slash: provider/default-idp-2.
If done properly, you will get a successful message. If you are planning on working within a particular Catalog for multiple commands, it's useful to set your configuration to point to a Catalog as the default.
Setting the target Catalog and Provider organization for deployments
Often, you might be deploying several products to the same Catalog. By setting a configuration setting for Catalogs, you can omit the need to specify a Catalog when deploying. You can also do the same for Provider organizations:
- To set configurations, you can use the apic config:set command. To set a Catalog, you specify a URL. This restful format is useful to remember for the future. The format is as follows:
[Hostname of the API Manager]/api/catalogs/[name of organization]/[catalog name]
You must know the Provider organization and Catalog name ahead of time. Executing the command will set the Catalog in the configuration:
apic config:set catalog=<https://api-manager-ui.apicisoa.com>/api/catalogs/<middleware>/<sandbox>
catalog: https://api-manager-ui.apicisoa.com/api/catalogs/middleware/sandbox
- Setting the Provider organization follows the same format, but the first argument changes from a Catalog to an organization. Now you can set the middleware organization as the default in the configuration:
apic config:set org=<https://api-manager-ui.apicisoa.com>/api/orgs/<middleware>
org: https://api-manager-ui.apicisoa.com/api/orgs/middleware
Since both of the commands returned successfully, everything is fine. However, you can validate that they are set if you wish to.
- Check the configuration settings that you applied. To do so, you simply issue the apic config:list command:
apic config:list
catalog: https://api-manager-ui.apicisoa.com/api/catalogs/middleware/sandbox
org: https://api-manager-ui.apicisoa.com/api/orgs/middleware
So far, you have learned some general commands that are useful to you, the developer, and other roles, such as the DevOps engineer. They will be using the same commands to orchestrate the DevOps pipeline in the future.
With the basics out of the way, it's time to draft some FHIR APIs and Products. You will do this with the draft CLI commands. Those commands take the form of apic draft-products:create and draft-apis:create.
You can use the apic draft-products:publish command to publish a product that's already present in the drafts. First, create and upload a draft API.
Creating and uploading a draft FHIR API
You can view API drafts in API Connect when you are undergoing development. A draft is an API that is currently being worked on. You can find draft APIs on API Manager under Develop API and products. This is where you perform the development of API definitions and other functions such as deploying products, changing life cycles, and applying security to your APIs:
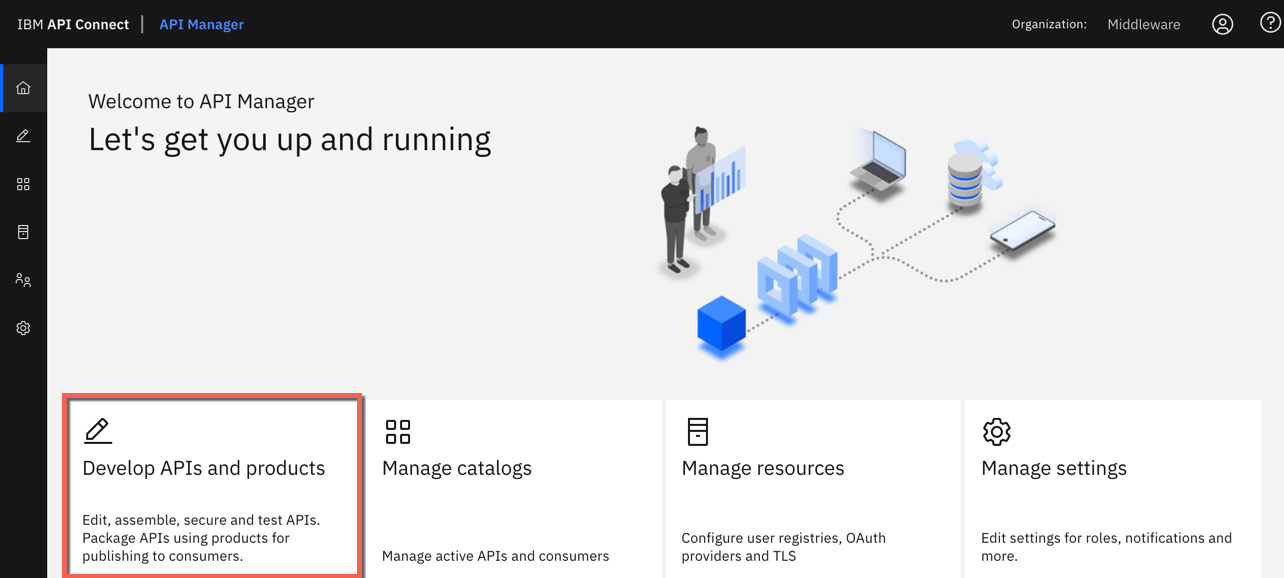
Figure 2.21 – Developing APIs and products
You can log in to API Manager to investigate how APIs are shown under Develop APIs and products. However, for now, we will continue with using commands to drive the flow:
- On the GitHub site, as noted in the Technical requirements section, you will find two FHIR swagger files that you can play with. They fully support version 4.0.1 of the FHIR specification. Copy those files to your workstation so that you can try out the commands using these files.
- Bring up Command Prompt and navigate to the folder where you copied the FHIR swagger files. You can view the files if you want to see more of what is contained, but for now, assume the files are fine. Let's convert one of the swagger files into an API Connect draft.
- Creating a draft of an existing file is very easy. You will use the apic draft-apis:create command and pass in the appropriate arguments. There are only three required arguments:
- The filename
- The organization where the draft will reside
- The server
- Since we have already set the configuration for the organization, you only need to pass the filename and server. Run the following command:
apic draft-apis:create <Condition-swagger.json> -s <api-manager-ui.apicisoa.com>
condition-api:4.0.1 https://api-manager-ui.apicisoa.com/api/orgs/7c642f84-5028-43a7-89df-6cf2a5b7adc8/drafts/draft-apis/17c10964-35a2-4010-ac73-fe92d312d8b4
The results are displayed along with a unique identifier. This identifier can be used to reference this API if we need to automate some behavior that can access this file in the future.
- You can now log in to API Manager and review what just occurred:
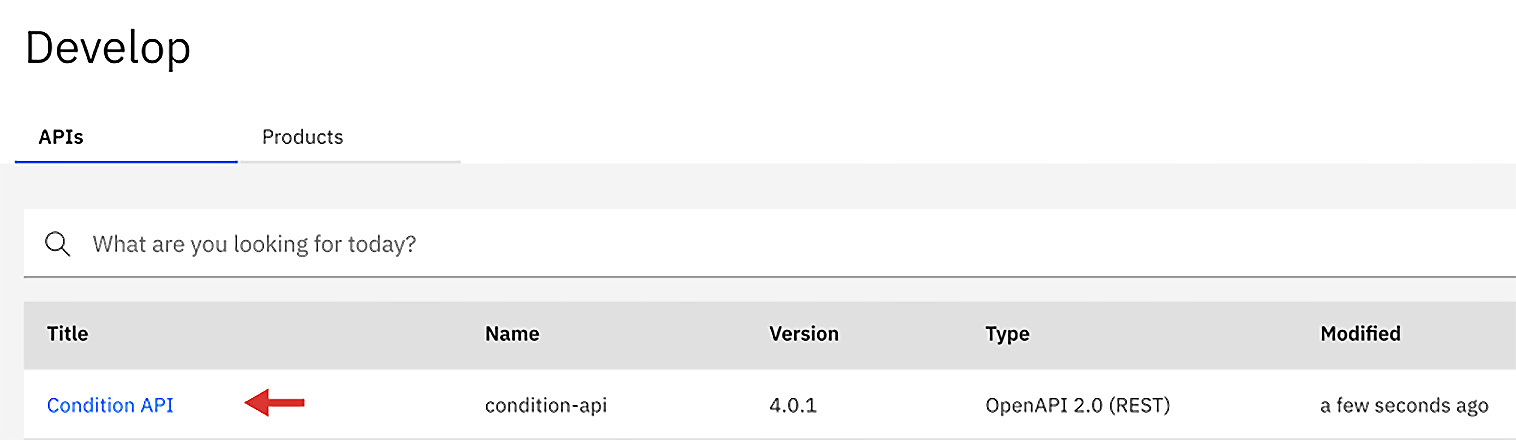
Figure 2.22 – The draft created by the CLI
When you navigate to API Manager and select Develop APIs and products, you will find the newly created condition API, which is ready for customization. Next, you need to create a product so that you can publish it to a Catalog. You can certainly use the apic draft-products:create command to create a product and place it in the Develop APIs and products section within API Manager, but that will rely on a user working with the user interface, adding the APIs, and promoting them manually. That is one way many people do it, but you should be able to take APIs and products and deploy them directly from your build server. This is what you will learn how to do next.
Creating a Product with APIs
If you have an inventory of APIs and understand how you want to package them in a Product, using a command to do that is perfect. The apic create:product command works on your workstation or build server, not on the API Manager when using drafts.
When you run this command, it sets a version number of the Product and chooses the APIs you wish to package within it. Although we use the same apic command, the arguments are slightly different. You will provide a title of the Product, a specified version, and a list of APIs.
The Observation-swagger.json file was one of the two files you downloaded from GitHub. Run the command as demonstrated in the following code snippet. Notice that there is no server argument. The output will be on your local machine:
apic create:product --title "ObservationProduct" --version 1.0.0 --gateway-type "datapower-api-gateway" --apis "Observation-swagger.json"
Created observationproduct.yaml product definition [observationproduct:1.0.0]
Tip
Be mindful of the quotation marks in this command.
A successful creation will create the Product YAML file that you can now deploy. Let's do that next.
Publishing to a Catalog
When you publish your Product, you are publishing to a Catalog. You can publish it by using the apic products:publish command to pass the Product YAML filename, the Catalog, the organization, and the server. If you haven't set the configuration file within your organization and Catalog, you will need to supply them. Run the apic config:list command to verify:
- Let's publish your product by running the apic products:publish command:
apic products:publish observationproduct.yaml -c <sandbox> -o <middleware> -s <api-manager-ui.apicisoa.com>
observationproduct:1.0.0 [state: published]
https://api-manager-ui.apicisoa.com/api/catalogs/7c642f84-5028-43a7-89df-6cf2a5b7adc8/7aa487b3-d215-48aa-a0a3-703053bb6a72/products/759842ca-2379-4b92-8769-c4dbd58fb850
- Once successful, you should be able to view the unique identities of the Catalog and Product. Now you can log in to API Manager and navigate to Manage. Then, click on the Sandbox tile and review the published Product:
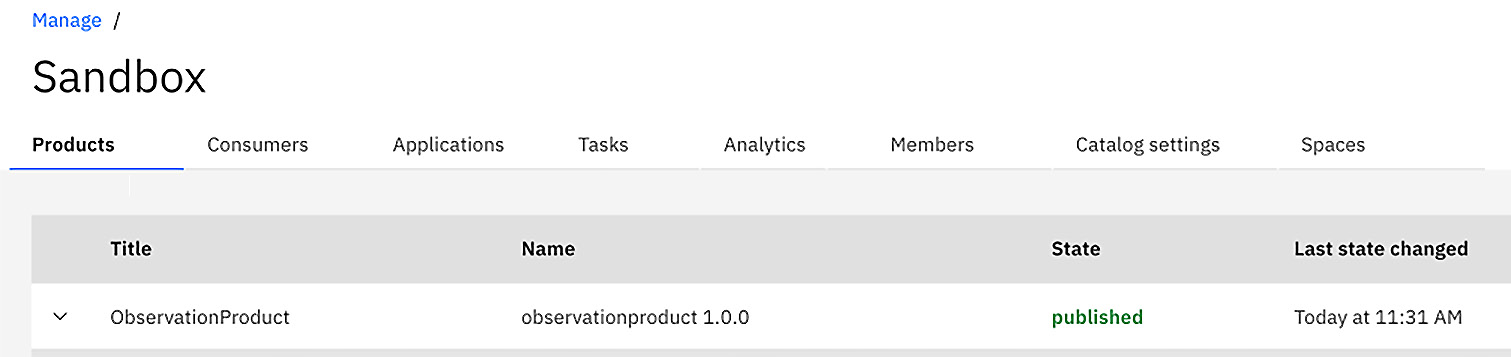
Figure 2.23 – The published Product in Sandbox
As you can see in Figure 2.23, the Product is published with the version number specified. There is a lot more you can do with CLI, and you will learn more about that in Chapter 14, Building Pipelines in API Connect.
Tip
You might encounter errors when executing commands, and being able to troubleshoot them is important. There is the –debug argument that you can append to your commands to get information. But be prepared to get a lot of output.
Summary
In this chapter, you learned a lot about API Connect. You should now be familiar with the components of API Connect and the various deployment models. You have a lot of choices in terms of where to deploy API Connect, and it will certainly get you moving in the right direction on your digital journey.
You were also introduced to the API Connect CLI. The basic commands were provided so that you can utilize them and assist others such as the DevOps team. With the addition of some FHIR swagger files, you were able to walk through an API development flow from its setup to its publication.
You are now ready to learn more about preparing your API Connect topology and organizations so that you can begin building APIs for real. In the next chapter, you will learn how to configure your API Connect environment.