
![]()
A JavaScript Primer for Drupal
So now you know what HTML (HyperText Markup Language) and CSS (Cascading Style Sheets) are, and you’ve come to know all the different CSS selectors and HTML elements available to you to create very rich web pages. So now let’s add some JavaScript to make your pages dynamic and very “Web 2.0.” JavaScript lets you program your web page to respond to users moving their mouse, or clicking a particular HTML element, or maybe you want some time-based events to occur. JavaScript is very exciting and can add lots of cool features to your site. In this chapter you’ll learn to add JavaScript to web pages; then in Chapter 8 you’ll learn to add JavaScript to custom-created Drupal pages. Remember that HTML, CSS, and JavaScript can all run independently of Drupal, but the Drupal system does use these same building blocks to create pages.
Getting Started with JavaScript
JavaScript can bring your page alive, allowing you to respond to user clicks and other events on the page, without the need to reload the page. I believe that JavaScript and jQuery can really make for a great user experience, minimizing the need to reload the page to get your users the information they need. JavaScript also allows you to create some really great features where your users can drag items, click items, and create entire intricate interactive games. Google’s e-mail interface at http://www.gmail.com has hundreds of thousands of lines of JavaScript and is one of the world’s most intricate examples of how much you can do with JavaScript.
For now, though, let’s start with a simple Hello World script (a ubiquitous way programmers teach how to get a programming language to speak its first words to your screen—which inevitably are “Hello World”). Get ready to start the JavaScript “Hello World” exercise.
- Put the following line of code into the HTML page you’ve been working on, within the <head> tags and before the <style> tag:
<script>
alert("Hello World!");
</script>
Here’s what the basic JavaScript code (highlighted in bold) looks like in the larger HTML page:
<html>
<head>

<script>
// Below line will show a popup stating "Hello World!"
// The alert command in JavaScript creates a popup box showing
// whatever is in the quotation marks and parentheses that
// directly follows the alert command.
alert("Hello World!");
</script>

<style>
body {
  background-image:url('ocean.jpg');
}

h1 {
  color: blue;
}

body #my-id-name h1{
  color: purple;
}

#the-title {
  text-align: center;
}

.to-the-right {
  margin-left: 200px;
}
</style>

</head>
<body>
  <title> HELLO WORLD </title>
  <div id="my-id-name"><h1>HELLO WORLD!</h1></div>
  <p>  This is a paragraph. </p>
  <div class="to-the-right"><b> This is bold text. </b></div>
  <i> This is italicized text. </i>
</body>
</html>
Notice the lines that begin with //. Comments in JavaScript are denoted by starting a line with a double forward slash: //. Or for multiline comments, you would write the comment as follows, wrapping your comment text in a forward slash and an asterisk, and closing the comment with an asterisk and a forward slash:
/* Here is my sample comment. */
Notice each line of JavaScript must end with a semicolon (well you can omit them but it is not recommended).
When you display your HTML page in your web browser, you should get an annoying pop-up that says “Hello World!” It should look like the one shown in Figure 7-1. This is one easy way of including just a bit of JavaScript in your HTML page. When you click OK, the alert will close, and you’ll return to your web page.

Figure 7-1. A basic JavaScript alert
While it is possible to include JavaScript within your HTML file, just like you might include CSS directly within the file, it’s also possible to include a reference to the JavaScript file. We’ll do that next.
Adding Basic JavaScript to a Web Page
An even better way to include JavaScript in your pages, just as in CSS, is to put all your JavaScript code in an included JavaScript file rather than directly in your HTML file. Again, this will provide you with better code organization, which becomes essential when your code base gets to be over 10,000 lines of code in a big collaborative project with many other developers! In this section, you’ll create a basic JavaScript file and call it from within the HTML file.
- Create a file with a .js extension. I’m going to call mine basic_javascript.js. (You can use your code editor to create the file.)
- Add the following code to your HTML file. You can discard the previous JavaScript code you entered.
<html>
<head>

  <script type="text/JavaScript" src=
  "basic_javascript.js"></script>

  <style>
    body {
      background-image:url('ocean.jpg');
    }

    h1 {
      color: blue;
    }

    body #my-id-name h1{
      color: purple;
    }

    #the-title {
      text-align: center;
    }

    .to-the-right {
       margin-left: 200px;
    }
  </style>

</head>
<body>
  <title> HELLO WORLD </title>
  <div id="my-id-name"><h1>HELLO WORLD!</h1></div>
  <p>  This is a paragraph. </p>
  <div class="to-the-right"><b> This is bold text. </b></div>
  <i> This is italicized text. </i>
</body>
</html>
Notice the preceding highlighted code. The purpose of this code is to include the file basic_javascript.js for use by your web page. It pulls in the JavaScript, which you type into this file next.
- In the file called basic_javascript.js (or whatever you decided to call it), put in the following line:
alert("Hello World!"); - Save your file.
Normally, at this point, I’d have you load your web page in a browser. Instead, I’m going to take a moment to introduce you to Firebug, which is a Firefox add-on that many developers use on a daily basis to makes their coding lives easier.
![]() Note Chrome also has a very good equivalent to Firebug, which is built into the chrome web browser, if you right-click and choose Inspect Element, you’ll be able to use that one instead of Firebug if you prefer Google Chrome.
Note Chrome also has a very good equivalent to Firebug, which is built into the chrome web browser, if you right-click and choose Inspect Element, you’ll be able to use that one instead of Firebug if you prefer Google Chrome.
Installing Firebug
Firebug is an add-on that enables you to debug your web pages within the web browser itself. Before you can use Firebug (which works on a Mac or in Windows), you need to download the latest version of Firefox (if you don’t have it on your computer already) and install Firebug.
- On a Mac, open Firefox. In the upper menu, click Tools, then click Add-ons, then click Get Add-ons. Search for the Firebug add-on and follow the directions to install it. Restart Firefox.
- In Windows, open Firefox. Click the little white arrow at the top of the browser within the little orange box that says “Firefox,” then click Add-ons, then click Get Add-ons and search for the Firebug add-on. Follow the directions to install Firebug. Restart Firefox.
Now, when you use Firefox, you will see a little bug icon in the top right corner. You’ll also see the Firebug tools, which display at the bottom of the Firefox window. (See Figure 7-2.)
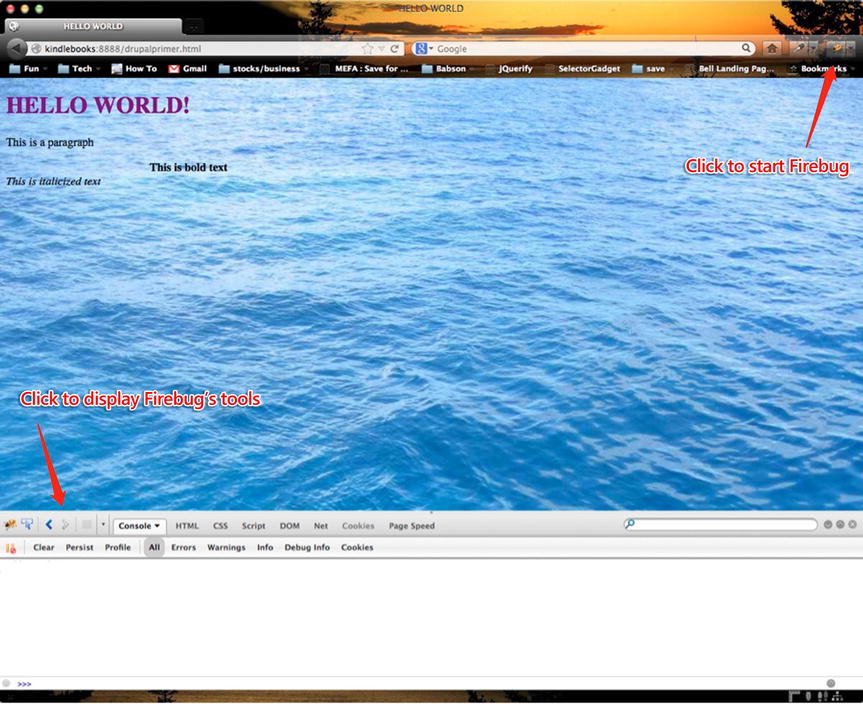
Figure 7-2. The Firefox browser with Firebug installed
Using Firebug
To practice using Firebug, redisplay your web page (your HTML file) in Firefox. Then complete the following steps:
- Click the Net tab. You can use this tab to make sure all your files are loading, such as your JavaScript file or your CSS external file, as shown in Figure 7-3. Note that it shows that your drupalprimer.html, basic_javascript.js, and ocean.jpg files all load successfully. If they didn’t, the missing file(s) would show up in red, and under the Status column, you would see an error code.

Figure 7-3. The Firebug Net tab
The Net tab is also great for looking at the timeline, to see what assets are taking a long time to load. The onload time for this page was 1.45 seconds. Onload refers to how long it took for Firefox to load your CSS, JavaScript, and images.
- Locate the Firebug tools and then click the icon that displays a small rectangular box with an arrow in it. Now, when you click any piece of HTML, this tool will show you all the CSS styles associated with that HTML in a pane on the right-hand side of the window. (See Figure 7-4.)
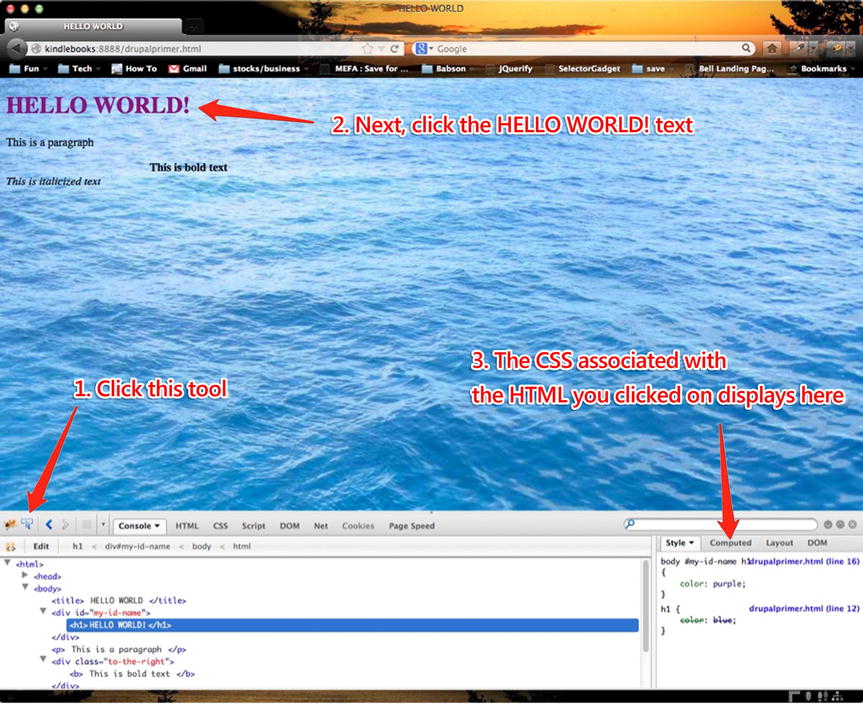
Figure 7-4. Using Firebug to help with your CSS
You can see Firebug is extremely useful for quickly seeing what CSS is within a web page. But you can do more than just look at the styles. Within the pane that displays on the right-hand side, you can actually modify the CSS to alter the web page in real time. If a web page does not look exactly like you want it to, this pane provides the perfect way to modify the CSS—you can edit the CSS and try out different styles to get things looking the way you want them to. After experimenting to your liking in Firebug, you can go back and edit your CSS file to make the changes permanent. Firebug is a fabulous debug tool for CSS and really helps you tweak your CSS to be the perfection you’re aiming for. And as you’ll see, it’s just as fabulous for debugging JavaScript.
Modifying JavaScript Code
In this section you modify your JavaScript from the earlier exercise so that instead of showing alert('Hello World'); it shows console.log('Hello World');. This change allows you to see how to use Firebug’s Console tab.
- Load your HTML page and modify the JavaScript from alert('Hello World'); to console.log('Hello World!');. Save your file.
- If your Firebug debugger is not already open, open it. In Firebug click the Console tab.
- Load the revised web page (see Figure 7-5). This time you won’t see that annoying pop-up that says “Hello World.” Instead, you’ll see “Hello World” show up as a message within the Console tab.

Figure 7-5. Using Firebug’s console to output debug log messages from your JavaScript code
The area below the Console tab will show you if you have any JavaScript errors. This is going to help you quite a bit! As well, you can put in console messages to print out values of variables to make sure they are the values you’re expecting. (You explore variables and some basic JavaScript programming structures later in this chapter. For now, just keep this tool in mind because it’s one you’re going to need.)
![]() Note Do not leave in those console.log messages when you move your code into a production (live) environment. Internet Explorer browsers have problems with it and will show JavaScript errors unless the user presses F12 and opens his or her browser’s developer tools (not something an average user would do, of course).
Note Do not leave in those console.log messages when you move your code into a production (live) environment. Internet Explorer browsers have problems with it and will show JavaScript errors unless the user presses F12 and opens his or her browser’s developer tools (not something an average user would do, of course).
Working with JavaScript Programming Constructs
So now I’m going to start introducing basic programming constructs (essential elements of programming languages). I’ll be teaching you basic JavaScript, but the basic concepts apply to any programming language (PHP, JAVA, Ruby, etc.).
Variables
Let’s start with what variables are. Remember basic algebra, where you learned 1 + x = 3 and solved for x? Well, x is a variable. In programming languages, variables can store information, and they are often modified and retrieved for use within the flow of a page (or pages) of programming.
Now let’s use JavaScript with variables to look at similar basic math.
y=5;
z=2;
x=y+z;
console.log('the value of y + z is ' + x);
If you plug the preceding code into your JavaScript file (you can just put the code in after the code already in there), the output in your Firebug console will be: the value of y + z is 7.
![]() Note If you are copying and pasting into your code editor, you may have to delete the quotation marks and then replace them. The fonts used in Microsoft Word or other nonprogramming utilities use quotation mark characters that are commonly incompatible with programming.
Note If you are copying and pasting into your code editor, you may have to delete the quotation marks and then replace them. The fonts used in Microsoft Word or other nonprogramming utilities use quotation mark characters that are commonly incompatible with programming.
ADDITION VERSUS CONCATENATION
Notice in the console.log line in the previous section that I used the + sign not for addition but to concatenate (join together) the words “the value of y + z is” and the value of x. When a variable consists of text, or a series of characters (any mix of letters, numbers, and symbols), it is called a string. You define a string within quotes, either single or double quotes
When a variable consists of numbers, it is considered an integer—but only if you do not put quotes around the number. For example, I may want to just talk about the number “1234” and not treat it as an integer. In fact, you can “cast” (make) “1234” as a string or an integer in programming languages. Sometimes the computer just figures out if you intend it to be an integer or string based on context and what you’re trying to do, and sometimes you have to actually tell the computer (known as “casting” the variable) how you want to treat your variable (as a string or integer). Just to clarify, if you put quotes around a number, it will be treated as a string; if you don’t, it will be treated as a number and you’ll be able to do arithmetic with numeric (non-string) variables.
In the preceding case, the computer knew in JavaScript when you coded x=y+z that you wanted to compute the value of 5+2, (the values of y and z, respectively). When you wrote + x next to the string 'the value of y + z is' the computer knew you just wanted to concatenate the first string with the value of x. String concatenation is used quite often in programming.
Variables as Integers/Numbers
Following are two examples of using variables as basic integers/numbers:
x = 7;
y = 236;
Variables as Strings
Here are some examples of variables that store strings.
x = 'Here is my string, which can be any sequence of characters,
which can be letters, numbers, or symbols'

myString = "I am a string also, notice you can call your string
anything you like, this time the variable’s name is myString";
Note that if you enclose the string with double quotes, you cannot write something like the following within the string:
myString = "Hello I cannot use "quotes" within my string without
escaping (putting a forward slash in front of them) them";
You cannot use the double quotes within the string again because the browser will get confused and not know where your string begins and ends, the opening and closing quotes tell the web browser where your string begins and ends.
The same holds true if you wrap your string with single quotes—you cannot use single quotes again in the string. Here’s how you get around this.
myString = "I can use a single quote in this string because I'm
wrapping my string in double quotes";
So you can do it that way or you can “escape” your quotes like this and it tells the browser not to apply any special meaning to your use of this quote character—the quote is simply a quote. Escaping the quote characters in a string would look like the following:
myString = "I can use my single quote again in this string I'm
very happy!";
Notice the forward slash “escaped” the single quote, making it usable again within the string. Usually if I’ve created my string by putting double quotes around it, then I use single quotes within the string for apostrophes. Also the reverse is true—if you enclose your string in single quotes, then double quotes can be used within the string.
Strings and numbers are two different data types that are pretty straightforward. In the next section I introduce you to arrays, objects, and Booleans, which I indent to make just as straightforward.
Arrays
Think of arrays as a compartmentalized container with slots for each item so you can easily reference and find each item, kind of like a file cabinet with as many drawers (rows in the array) as you need. So . . . an array is a single variable that can store more than one piece of information.
Consider the following car variable, which is declared as an array:
car = new Array();
car[0] = "Nissan";
car[1] = "Ford";
car[2] = "Volvo";
You can also write the preceding array as follows:
cars = new Array("Nissan", "Ford", "Volvo");
All three car types are data elements of the car array variable.
Arrays are zero based, so even when you declare it the way I did, cars[0] is equal to the string "Nissan". You’ll find in computer languages, you usually will start counting from zero, and not one.
To reference an item from the car array, you would do this:
console.log('I think I am going to buy a  ' + car[0] + ' when
I need a new car');
The preceding line will print out this text in your Firebug console: I think I am going to buy a Nissan when I need a new car.
Arrays are a nice way to pass along lots of data in a single variable. Another way to do the very same thing is with objects.
Objects
Objects are another way to store data. Just like an array, one object can contain many “properties.” Take a look at the following:
user = new Object();
user.firstname = "Jimmy";
user.lastname = "Greyson";
/* Note below there are no quotes around 45 so it's treated as
an integer and not a string. */
user.age = 45;
All the preceding data elements—"Jimmy", "Greyson", and the age of 45—belong to the single object stored in the user variable.
Now, in your JavaScript file—after declaring the preceding object—you can type the following:
console.log("Hello fictitious person " + user.firstname + " " +
user.lastname);
Sure enough, if you load these lines in your Firefox browser, you’ll see in the Firebug console that it reads: Hello fictitious person Jimmy Greyson.
Booleans
Booleans, like those shown here, simply define a variable as true or false:
myVar = TRUE;
myVar = FALSE;
The preceding variables are Booleans. Boolean variables are often used in conditional statements and can be used as a flag to check if a condition was true or false. For example, the following bit of code will evaluate the variable flag as true and will run the code within the if statement. As a result, an alert box will appear with the message “Good day to you!”
var flag = true;
if (flag) {
    alert("Good day to you!");
}
Now that you are equipped with some of the basics, I can show you why JavaScript is very, very cool.
Creating JavaScript Events
JavaScript can respond to what the user is doing in the browser, responding to “events.” Here is a list of some of the more frequently used events.
- The user clicks a particular HTML element—a button, for example—in the browser. You might use this event so that if the user clicks a button, some other text or another section of the page becomes visible. By hiding elements until a click event occurs, you can minimize clutter on the screen, showing certain elements only on demand.
- The user’s web page has finished loading. With this event you run some additional code after the user’s web page fully loads. This event gives users a good experience—fast-loading pages. Because the additional code runs only after the page load, it doesn’t interfere with the user being able to see the full page in his or her browser as fast as possible.
- The mouse moves over (hovers over) an HTML element. This event can be useful, for example, when you want to display additional help text about an element when a user hovers over that element.
- A user presses a key (could be any key or a particular key on the keyboard). One common use case might be showing users, as they are typing within a text area, how many characters they have to left to type (if you are limiting the length of the text they are allowed to type).
Now that you know more about using events in JavaScript, it’s time to put that knowledge to work.
In a new HTML file, type the following code. Save it as event_lab.html.
<!DOCTYPE html>
<html>
  <head>
  </head>
  <body>

    <p>Click the button to say hello. </p>

    <!-- the next line will create a button on the web page --!>
    <button id="myButton">Click Me</button>

    <!-- in area below within the paragraph tags that have the
    id of targetId we’ll upon button click insert the word
    "Hello!!!!!" -->
    <p id="targetId"></p>

  <script>
  // The line below says: When the user clicks on the element
  // with the id of "myButton", run the function sayHello. A
  // function is a block of code you can invoke. Notice the
  // sayHello function's block of code is within the
  // brackets "{}" and that code says make the HTML of the
  // element with an id of "targetId" be "Hello!!!!!"
  document.getElementById("myButton").onclick=function()
  {sayHello()};
  function sayHello() {
    document.getElementById("targetId").innerHTML="Hello!!!!!";
  }
  </script>
  </body>
</html>
Figure 7-6 shows how the page would display in a browser prior to clicking the Click Me button.

Figure 7-6. Clicking the Click Me button causes an event in the browser
Figure 7-7 shows what the page would look like after clicking the Click Me button.

Figure 7-7. The browser says hello after responding to a JavaScript click event
The key line in the preceding code is shown again here.
document.getElementById("targetId").innerHTML="Hello!!!!!";
This line of code says to look in the document for the id of targetId, and then replace the HTML (innerHTML just refers to the HTML for this id area) with “Hello!!!!!”. The string “Hello!!!!!” could have contained HTML like <p>Hello!!!!</p> with paragraph tags or other HTML tags, but I chose to just put text in this area, which works also. Replacing the innerHTML of the area with this id also means you can put whatever text you like in that area—I just put in “Hello!!!!!”
You now understand the basic idea behind enabling user interaction in web pages.
Using the jQuery Library
In the preceding section, you saw an example with getElementById. You can also reference a class with getElementByClassName, and you can reference regular HTML elements like paragraph <p> tags or table elements with the getElementByName function. In this section, I introduce an even easier way to do this using a JavaScript Library called jQuery. There are other libraries, but this is by far the most popular, and it allows you to do some really cool stuff with very little coding.
![]() Note For more examples of reacting to browser events, be sure to check out my favorite WC3 tutorial: http://www.w3schools.com/js/js_htmldom_events.asp.
Note For more examples of reacting to browser events, be sure to check out my favorite WC3 tutorial: http://www.w3schools.com/js/js_htmldom_events.asp.
A JavaScript library is essentially a bunch of JavaScript that another programmer has made time to abstract for you to hide its complexity, and instead offers himself and others the luxury of just using his or her hard work in a very simple manner. You’ll see this idea in programming over and over again—reusable code, and abstraction to simplify the use of code.
By including the jQuery library (http://jquery.com/), you can quickly do some really cool things. For example, you can use the accordion effect on your HTML. To see this effect in action, refer to the jQuery documentation, which includes a live demo: http://jqueryui.com/accordion/.
To include the accordion effect in your web page, put the following code into your HTML file and save it:
<html lang="en">
<head>
<title>jQuery UI Accordion</title>
  <link rel="stylesheet"
  href="http://code.jquery.com/ui/1.10.2/themes/smoothness/
  jquery-ui.css" />
  <script src="http://code.jquery.com/jquery-1.9.1.js"></script>
  <script src="http://code.jquery.com/ui/1.10.2/jquery-ui.js">
  </script>
    <script>
  $(function() {
    $( "#accordion" ).accordion();
  });
  </script>
</head>
<body>

<div id="accordion">
  <h3>Section 1</h3>
  <div>
    <p>
    Lorem ipsum dolor sit amet, consectetur adipiscing elit.
    Sed dictum tempus lacus ut gravida. Donec ut malesuada
    magna. Sed id lectus justo. Praesent at neque eget nulla
    porttitor auctor non a magna. Nullam interdum venenatis
    massa in rhoncus. Suspendisse potenti. Phasellus sit amet
    purus nec arcu faucibus sollicitudin vitae id ante. Duis
    viverra, elit ac aliquam facilisis, erat augue luctus nibh,
    eget fermentum nunc mi at tortor.
    </p>
  </div>
  <h3>Section 2</h3>
  <div>
    <p>
    Lorem ipsum dolor sit amet, consectetur adipiscing elit.
    Sed dictum tempus lacus ut gravida. Donec ut malesuada
    magna. Sed id lectus justo. Praesent at neque eget nulla
    porttitor auctor non a magna. Nullam interdum venenatis
    massa in rhoncus. Suspendisse potenti. Phasellus sit amet
    purus nec arcu faucibus sollicitudin vitae id ante. Duis
    viverra, elit ac aliquam facilisis, erat augue luctus nibh,
    eget fermentum nunc mi at tortor.
    </p>
  </div>
  <h3>Section 3</h3>
  <div>
    <p>
    Lorem ipsum dolor sit amet, consectetur adipiscing elit.
    Sed dictum tempus lacus ut gravida. Donec ut malesuada
    magna. Sed id lectus justo. Praesent at neque eget nulla
    porttitor auctor non a magna. Nullam interdum venenatis
    massa in rhoncus. Suspendisse potenti. Phasellus sit amet
    purus nec arcu faucibus sollicitudin vitae id ante. Duis
    viverra, elit ac aliquam facilisis, erat augue luctus nibh,
    eget fermentum nunc mi at tortor.
    </p>
  </div>
  <h3>Section 4</h3>
  <div>
    <p>
    Lorem ipsum dolor sit amet, consectetur adipiscing elit.
    Sed dictum tempus lacus ut gravida. Donec ut malesuada
    magna. Sed id lectus justo. Praesent at neque eget nulla
    porttitor auctor non a magna. Nullam interdum venenatis
    massa in rhoncus. Suspendisse potenti. Phasellus sit amet
    purus nec arcu faucibus sollicitudin vitae id ante. Duis
    viverra, elit ac aliquam facilisis, erat augue luctus nibh,
    eget fermentum nunc mi at tortor.
    </p>
  </div>
</div>

</body>
</html>
Notice the lines of code highlighted in bold at the beginning of this code. By calling these two JavaScript files (the jQuery libraries), you then can do: $("#accordion").accordion(); and the jQuery user interface (UI) library defines that accordion should take what’s in your <div> tags that has an id of accordion in your HTML and makes the accordion behavior you should be seeing. jQuery allows you to select elements by CSS selectors. As you can see here, the id with the value accordion was selected using #accordion. Remember in CSS that ids are selected with the “#” character, and classes are selected with the "." character. So to select a class in jQuery with the value accordion, you would use .accordion, and to choose the id with the value of accordion, you would use #accordion.
The basic way this accordion functionality works is that it looks for a pattern of HTML and then the accordion jQuery library knows to collapse the HTML at certain points in the HTML. The following pattern uses a <div> with an id of accordion and then includes a series of <h3> tags, <p> tags, and <div> tags in a specific order. The text between the tags (the content) can be anything you like.
Now, fire up the code in your browser and click the arrow next to Section 2 (see Figure 7-8). When you click Section 2, you’ll see that Section 1 folds up, much like an accordion.

Figure 7-8. jQuery accordion affect
The accordion is a free effect you get from invoking the jQuery UI JavaScript library. Because the jQuery UI JavaScript library is dependent on code in the basic jQuery library, you see the following two lines in the preceding code:
<script src="http://code.jquery.com/jquery-1.9.1.js">
</script>
<script src="http://code.jquery.com/ui/1.10.2/
jquery-ui.js"></script>
It’s important that you write these lines in this order because, as I said, the jQuery UI library depends on the core jQuery library.
![]() Note These query scripts are hosted at http://code.jquery.com. Microsoft, Google, and other content delivery networks (CDNs) also host jQuery for developers to invoke the JQuery code. You could download the JQuery code, host it locally, and call these JQuery scripts just like any other JavaScript files, or you can invoke them as shown here by referencing them from their CDNs.
Note These query scripts are hosted at http://code.jquery.com. Microsoft, Google, and other content delivery networks (CDNs) also host jQuery for developers to invoke the JQuery code. You could download the JQuery code, host it locally, and call these JQuery scripts just like any other JavaScript files, or you can invoke them as shown here by referencing them from their CDNs.
Notice you had to wrap your code in the $(function() {});. You’re establishing jQuery to be called with the $ character. Just remember you need to wrap your code with the $() characters to let the browser know you’re going to use jQuery. $() is actually the most basic jQuery function—it is the function that invokes jQuery itself. To use jQuery you need to use the $ character a lot, but don’t get confused. You can actually change from using the $ character to using any set of characters to wrap jQuery. Although I don’t cover that here, you need to know this is possible because you’ll likely come across it. You can read more about how to change how to invoke jQuery at http://learn.jquery.com/using-jquery-core/avoid-conflicts-other-libraries/.
Using the jQuery Library with Events
This section provides you with the basics about jQuery. Just as you were able to handle events in JavaScript, you can also use jQuery for events.
Consider the following, which contains HTML and JavaScript. Be sure to read the comments to understand how this code works.
<!doctype html>

<html lang="en">
<head>
  <title>jQuery UI Accordion</title>
  <link rel="stylesheet"
  href="http://code.jquery.com/ui/1.10.2/themes/smoothness/
  jquery-ui.css" />
  // First we include the JQuery libraries with the 2 lines
  // below as we’ve done previously.
  <script src="http://code.jquery.com/jquery-1.9.1.js"></script>
  <script src="http://code.jquery.com/ui/1.10.2/
  jquery-ui.js"></script>
  <link rel="stylesheet" href="/resources/demos/style.css" />
  <script>
  $(function() {
    // This line below says, when you click on the element
    // with the id of "click-me" you'll run the code listed
    // in the function that follows.
    $( "#click-me" ).click(function() {
     // After the user has clicked on the line with the
     // click me id, the punchline is placed after the HTML
     // element with the id of "click-me"
     // Remember an id in JavaScript is referenced with the
     // "#" sign, and a class would be referenced with a ".".
      $("#click-me").after("A penguin rolling down a hill!!!!!");
    });
  });
  </script>
</head>
<body>

<div id="click-me">What is black and white over and over
and over again? Click me for the punch line!!!</div></h2>

</body>
</html>
When you load this code into your browser, your page should look similar to the one shown in Figure 7-9.

Figure 7-9. JavaScript events with jQuery
If you click the text “Click me for the punch line!!!” you’ll see the punch line, as shown in Figure 7-10. My kids find this hilarious!

Figure 7-10. Response on the screen after using jQuery to code a response to a user click event
jQuery has many cool effects and behaviors that you can use to quickly and easily impress your clients and customers. To learn more about the other jQuery UI effects you now have at your fingertips, visit http://jqueryui.com/demos/.
Summary
This chapter covered some of the basics of JavaScript and jQuery. You first learned about variables, and the different values variables can hold: strings, integers, and Booleans. Next, you explored arrays and objects, which are variables that can hold one or many values, much like a filing cabinet can hold lots of information. You then took a look at events and how you can make your pages come alive for your users by responding to events. For example, JavaScript can respond to mouse clicks, mouse movement, page load events, and more. The chapter also covered jQuery, which is a bunch of JavaScript libraries packaged up so you can include really cool effects on your pages without needing to write much code. Because the difficult code has been written for you, all you need is to call the already-prepared jQuery functions. jQuery is a great example of how the programming community shares code and allows others to build on the backs of others to do great things. Building on the backs of others is a core idea of Drupal and all open source programming.
The next chapter continues the JavaScript discussion, showing you how to add JavaScript to your Drupal module.