
![]()
Theming Your Site Part 1: Theme Functions and a Twig Primer
This chapter focuses on the proper way to theme your site, using a markup language called Twig, using theme functions, using theme template files, and using subthemes. Within the pages of this chapter, you’ll take a look at theming the output from a module by using theme functions and a theme template. This chapter also includes an in-depth Twig primer. (Chapter 13 will introduce you to creating a new theme and a subtheme.) Knowing Drupal programming without knowing how to make your web site look good is not going to go over so well with your clients, employer, or end users. Giving users a great-looking site with a great user experience is why theming your site is an important skill set.
Theming Output from a Module
Theme functions provide a way to customize any module’s output. Lets look again at the output you produced with the Hello World module up to this point. You created the output just fine, but you did not yet put the output of the module into a theming function, which allows your users to “override” the output without hacking your module. Overriding the output refers to tailoring how the module’s output looks for your site, so you can pick your own layout, colors, and other CSS (Cascading Style Sheets) to your liking.
First, let’s look at where we left the custom .../hello/world page, the code from HelloWorldController.php from the with_install_file branch’s version.
![]() Note The code for this Drupal module is on Github: https://github.com/barnettech/drupal8_book/blob/with_install_file/hello_world/src/Controller/HelloWorldController.php.
Note The code for this Drupal module is on Github: https://github.com/barnettech/drupal8_book/blob/with_install_file/hello_world/src/Controller/HelloWorldController.php.
<?php
/**
 * @file
 * Contains Drupalhello_worldHelloWorldController.
 */

namespace Drupalhello_worldController;
/**
 * Provides route responses for the hello world page example.
 */
class HelloWorldController {
  /**
   * Returns a simple hello world page.
   *
   * @return array
   *   A very simple renderable array is returned.
   */
  public function myCallbackMethod() {
    $element = array(
      '#markup' => '<p><b>Saying Hello World in Drupal 8
      is cool!</b></p>',
    );
    return $element;
  }
}
At the end of the function public function myCallbackMethod, the value of $element array is returned. The array has the entire markup, which spits out directly to the screen.
Now let’s look at what the module will look like with proper theme functions (see Figure 12-1).

Figure 12-1. The output of the Hello World module at the URL ...hello/world, which will go into a theme function
Using a Theme Function
Here is the code for Hello World with the theme function. Notice the hello_world.module file now has a new function called hello_world_theme, which implements hook_theme. Remember, whenever implementing a hook, just replace the word “hook” with your module’s name.
![]() Note The code for the Hello World module with a theme function in place lives in Github at https://github.com/barnettech/drupal8_book/tree/with_theme_function/.
Note The code for the Hello World module with a theme function in place lives in Github at https://github.com/barnettech/drupal8_book/tree/with_theme_function/.
<?php

     /**
      * @file
      * A basic Drupal 8 Hello World Module.
      */

     /**
      * Implements hook_permission().
      */
     function hello_world_permission() {
       $permissions = array(
         'administer hello world' => array(
           'title' => t('Administer Hello World module'),
           'description' => t('Change the settings for Hello
            World module.'),
         ),
       );
     return $permissions;
     }

     /**
      * Implements hook_theme().
      */
     function hello_world_theme() {
       return array(
         'hello_world_primary_page' => array(
           'function' => 'theme_hello_world_primary_page',
           'variables' => array(
             'items' => NULL,
           ),
           'file' => 'hello_world.theme.inc',
         ),
       );
     }
You can see in the function hello_world_theme that you declare the theme function hello_world_primary_page for use later in the function. The actual definition of the function is located in the file hello_world.theme.inc and you set up a variable named items to pass to the function. You’ll pass in as many rows from the hello_world table you’d like to have returned from the theme function.
Next let’s take a look at the theme function itself in the hello_world.theme.inc file. You could have put the theme function in the hello_world.module file, but it clutters the primary module file to do this. Also the system will need to parse through the whole hello_world.module file often looking for hooks, so it just slows things down. Because this function will do just fine in the separate file hello_world.theme.inc, following is hello_world.theme.inc:
<?php

     /**
      * Generates the output for the hello/world page.
      *
      * @param $item
      *   How many items to show from the hello_world database.
      *
      * @return
      *   HTML-formatted output from the hello_world table
      *   in the database.
      */
     function theme_hello_world_primary_page($items) {
       $content = '<p><b>Here are all the messages recorded in
       the hello_world custom table!!!!! </b></p>';
     hello_world custom table!!!!! </b></p>';
       if (isset($items['items'])) {
         $results = db_query('SELECT * from hello_world
         limit ' . $items['items']);
       }
       else {
         $results = db_query('SELECT * from hello_world');
       }
       foreach($results as $row) {
         $content .= 'Row: ' . $row->hid . ', Message: ' .
         $row->message . ', Timestamp: ' . $row->timestamp . '</br>';
       }
       return $content;
     }
![]() Caution In hello_world.theme.inc, the theme function has the function name theme_hello_world_primary_page, but when defining the theme function name, the theme_ part of the function name was omitted. You need to follow this convention to get your theme function “wired up” and working correctly.
Caution In hello_world.theme.inc, the theme function has the function name theme_hello_world_primary_page, but when defining the theme function name, the theme_ part of the function name was omitted. You need to follow this convention to get your theme function “wired up” and working correctly.
The preceding code, with its comments, is simple enough to understand—we put our theme function named theme_hello_world_primary_page in the hello_world.theme.inc file. This theme function takes the variable $items as an argument, as mentioned earlier, so you can limit the number of rows returned from the theme function from the hello_world table in the database.
Then, in HelloWorldController.php, you can see that the hello_world_primary_page theme function is invoked, returning its output as the result instead of returning the contents of the variable $content as we did previously, which had been directly defined with the HTML results. I include the version of HelloWorldController.php here for your convenience.
![]() Note You can find this code on Github: https://github.com/barnettech/drupal8_book/blob/with_theme_function/hello_world/src/Controller/HelloWorldController.php.
Note You can find this code on Github: https://github.com/barnettech/drupal8_book/blob/with_theme_function/hello_world/src/Controller/HelloWorldController.php.
<?php
     /**
      * @file
      * Contains Drupalhello_worldHelloWorldController.
      */

     namespace Drupalhello_worldController;

     use SymfonyComponentDependencyInjectionContainerAware;

     class HelloWorldController extends ContainerAware {

       /**
        * Page Callback Method to Print out Hello World Text
          to the Screen.
        */
       public function myCallbackMethod() {
         return array(
           '#theme' => 'hello_world_primary_page',
           '#items' => 100,
         );
       }
     }
The preceding code provides a theme function to be called to produce the output for the module. The hello_world_primary_page theme function will be called to produce the output on the page for the end user (see Figure 12-2).
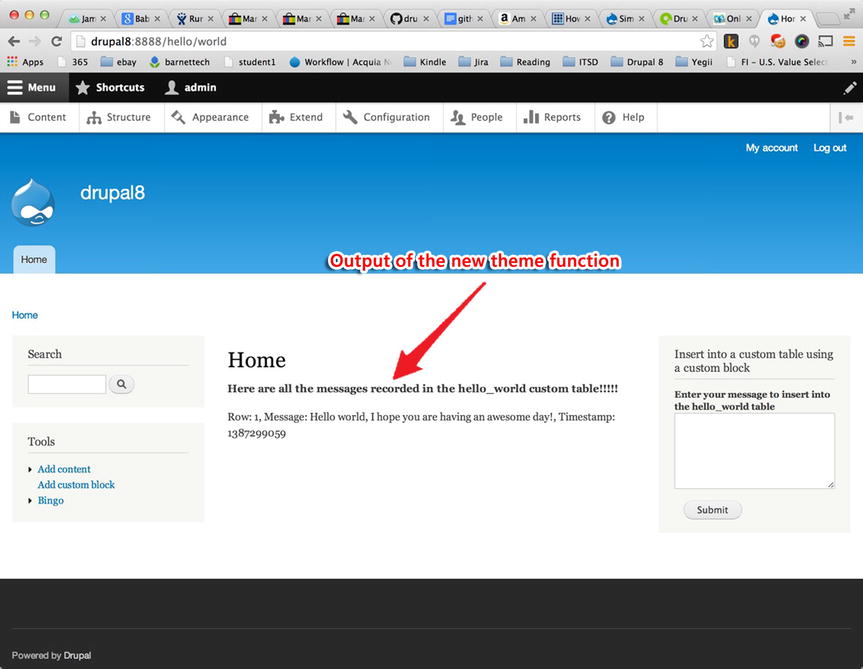
Figure 12-2. The output of the theme function on the hello world page, limiting the number of rows to return from the hello_world table to just 1 by passing an argument to the theme function
You have now completed one version of the theme function. Next, you will add a template to the theme function.
Using a Theme Template
In this section you add a template to the theme function.
![]() Note The version of Hello World that uses a theme template lives here on Github: https://github.com/barnettech/drupal8_book/tree/with_theme_template.
Note The version of Hello World that uses a theme template lives here on Github: https://github.com/barnettech/drupal8_book/tree/with_theme_template.
The hook_theme function now has a template file defined as hello_world_primary_page. This means that you need to create a templates directory within the hello_world root directory. Then, within the templates directory, you will place the template file, which will be named hello_world_primary_page.html.twig.
Here is the modified hello_world.module file, with the modified hook_theme function adding the template.
/**
 * @file
 * A basic Drupal 8 Hello World Module.
 */

/**
 * Implements hook_permission().
 * Hook permission sets up a permission to gate content
 * on the admin/people/permissions page.  In the
 * hello_world.routing.yml file you'll see we gate our
 * content by requiring the user's role have the 'Administer
 * Hello World module' permission to view the content
 * the module creates.
 */
function hello_world_permission() {
  $permissions = array(
    'view hello world' => array(
      'title' => t('View Hello World module'),
      'description' => t(View the Hello World module page.'),
    ),
  );
 return $permissions;
}

/**
 * Implements hook_theme().
 */
function hello_world_theme() {
  return array(
    'hello_world_primary_page' => array(
      'template' => 'hello_world_primary_page',
      'variables' => array(
        'items' => array(),
      ),
    ),
  );
}

/**
 * Preprocess variables for the primary hello world page.
 *
 * @param array $variables
 *  An associative array containing:
 *  - items: Array of participant names.
 */
function template_preprocess_hello_world_primary_page
(&$variables) {
  if (isset($variables['items'])) {
    $results = db_query('SELECT * from hello_world limit ' .
    $variables['items']);
  }
  else {
    $results = db_query('SELECT * from hello_world');
  }
  $variables['results'] = $results;
  $variables['test_var'] = 'We can set as many variables in
  the preprocess function as we like, this variable called
  test_var simply passes this text itself to the theme template';
}
The preceding code implements the hook_permission() function, which sets up a permission to gate content on the admin/people/permissions page. The code then implements hook_theme and preprocesses the variables for the primary Hello World page.
I’ve also added the preprocess function (covered in just a bit) in the preceding code, but for now, focus on the following function:
/**
 * Implements hook_theme().
 */
function hello_world_theme() {
  return array(
    'hello_world_primary_page' => array(
      'template' => 'hello_world_primary_page',
      'variables' => array(
        'items' => array(),
      ),
    ),
  );
}
You can now see in the array that you defined the template filename in the array with the following line:
'template' => 'hello_world_primary_page',
Next, and already introduced in the preceding code, you’ll see the preprocess function template_preprocess_hello_world_primary_page.
/**
 * Preprocess variables for the primary hello world page.
 *
 * @param array $variables
 *  An associative array containing:
 *  - items: Array of participant names.
 */
function template_preprocess_hello_world_primary_page
(&$variables) {
/* In the preprocess function we establish values in the
$variables array which we'll be able to use within the
 hello_world_primary_page. */
  if (isset($variables['items'])) {
    $results = db_query('SELECT * from hello_world limit ' .
    $variables['items']);
  }
  else {
    $results = db_query('SELECT * from hello_world');
  }
  $variables['results'] = $results;
  $variables['test_var'] = 'We can set as many variables
  in the preprocess function as we like, this variable
  called test_var simply passes this text itself to
  the theme template';

}
This function is a preprocessor for the template, and it is here that you should do any of the logic, database queries, and complexities that would require PHP. The template itself should just be for the presentation layer, and within the template you can use the defined variables created in the preprocess layer. Consider the following function: template_preprocess_hello_world_primary_page.
Here you define two variables for use by the theme template: the results array and the string test_var. In the results array, you put the results of the query of the hello_world table. In the test_var string, you just put in a text message that you will later display on the screen.
Next, in the templates directory, you look at the template file you registered in the hook_theme function hello_word_theme. The template’s name, as was defined in hello_world_theme, is hello_world_primary_page.html.twig. You defined the name as hello_world_primary_page in the hello_world_theme function, but in Drupal 8, which uses Twig, the filename then, by convention, becomes hello_world_primary_page.html.twig.
![]() Note The contents of the hello_world_primary_page.html.twig file are on Github: https://github.com/barnettech/drupal8_book/blob/with_theme_template/hello_world/templates/hello_world_primary_page.html.twig.
Note The contents of the hello_world_primary_page.html.twig file are on Github: https://github.com/barnettech/drupal8_book/blob/with_theme_template/hello_world/templates/hello_world_primary_page.html.twig.
<div class="hello_world">

  <ul class="hello-world-items">
    {% for item in results %}
      <li class="hello-world-item">{{ item.message }} This
      message was written by the user with a uid of
      {{ item.uid }} </li>
    {% endfor %}
  </ul>

  Here is another variable I created in the theme
  preprocessor function called test-var:
  {{ test_var }}

</div>
Twig Explained
Before diving into understanding the code in ...templates/hello_world_primary_page.html.twig, let’s talk about Twig, which is new to Drupal 8.
Drupal 8 has moved toward using a Twig-based template engine. Twig is its own markup language for templating. Twig is also from the Symphony project that Drupal 8 has incorporated into many layers of Drupal 8 core. Using Twig means not putting PHP directly into templates. The modern paradigm MVC (“Model,” “View,” “Controller”) aims to put the logic and data model into the controller and model layers of a project and then the view should not contain these pieces—and the view in this case is the Twig template file. By having a view without PHP, logic, and database calls, themers can just work on the theming side, and developers can hand off all the logic and data encapsulated into the variables passed to the Twig templates. This approach creates a more pure separation between developers and themers. Themers generally have more skills in tweaking the front end and developers generally are stronger with the back-end logic and programming. Without Twig, as it was in Drupal 7 and prior versions, it is very easy to start putting lots of PHP code directly in templates. I have committed this sin as well, but now Twig is here to keep the peace.
The hello world Twig Template Explained
In the ...templates/hello_world_primary_page.html.twig file, you can see that some HTML markup remains—you can still use straight HTML. The first two lines of the file use of some basic HTML elements, including a <div> tag and an unordered list tag.
<div class="hello_world">

  <ul class="hello-world-items">
Then this line
{% for item in results %}
This is Twig’s syntax for looping through what’s in the results array. Each row of results is put into the item variable within each iteration through the loop.
Then you have the following line:
<li class="hello-world-item">{{ item.message }}  This
message was written by the user with a uid of
{{ item.uid }} </li>
Here you see that Twig, to spit out the value of a variable, wraps the variable name not with a dollar sign but with double curly brackets. So you see that you output the value of item.message variable with {item.message}. In PHP you would output an array with this syntax $item['message'], and in PHP you would use this syntax for an object $item->message. In Twig you have the same syntax whether the variable passed into the Twig template was an array originally or an object: you use the dot syntax. In this case, with item.message, it didn’t matter if in the preprocessor, the results variable was an object or an array.
You next access the element of the array results from the preprocessor, uid, with the same dot syntax with {{item.uid}}. Later in the hello_world_primary_page.html.twig file, you access a standard variable (an array) with {{ test var }} to output the value of this string in the template. Following is the line in the file that outputs the value of {{ test var }}:
Here is another variable I created in the theme preprocessor
function called test-var:
{{ test_var }}
Accessing all the elements of the results array, we end the loop with the following line:
0
I’ll speak more about Twig and what you’ll need to know shortly, but with the lines of the new Twig template explained, let’s take a look at the output the browser, as seen in Figure 12-3.

Figure 12-3. The output of the hello_world module using a Twig template file
In Depth with Twig: A Twig Primer
Twig has its own markup language, and it forces you to keep PHP out of your templates. By allowing PHP in templates, it was just too tempting to quickly put logic right into the view of our data. Instead, Drupal 8 forces us to put our logic in the preprocessor functions, something we were supposed to all be doing in Drupal 7 and prior. John Albin, who created the Zen theme in Drupal and has created lots of other great code for the Drupal project, was at the Drupalcon Denver conference and said, “We hand themers a loaded gun and tell them to hammer in a nail with it. Oh, and be careful.”
One of the primary benefits of using Twig is security. By keeping PHP of the templates, there is less of a chance of injecting code through the theme layer. Often templates are written by developers, but often they are written by themers and folks who lack in-depth programming knowledge and are just trying to tweak the visuals of the web site. Separating PHP from the templates will keep nonprogrammers out of trouble and will allow for better separation of roles, allowing themers to be hired to muck around in the theme without needing to know PHP or programming, This will help with team morale, as themers aren’t as able to break the complex logic that programmers have laid as a framework for the themers to utilize.
Here is the Twig home page: http://twig.sensiolabs.org/ (see Figure 12-4).

Figure 12-4. The TWIG home page at http://twig.sensiolabs.org/
The Twig documentation home page lives here: http://twig.sensiolabs.org/documentation. Some of the documentation is for using Twig directly in the Symphony framework. Drupal has incorporated some pieces of Symphony as I’ve said, and looking through the documentation we’ll need to just focus on understanding Twig markup. The page http://twig.sensiolabs.org/doc/templates.html explains some of the basics of Twig, and the rest of this chapter gives you a tour of this documentation. I encourage you to go directly to the Twig documentation on the Internet for the complete documentation.
A string or integer variable would be expressed in double curly brackets as follows:
{{ foo }}
An object or array is expressed with dot syntax “.” as we spoke of before, as follows:
{{ foo.bar }}
This code will allow access to an array element defined in a Drupal preprocessor function as, say, $foo['bar'] or $foo->bar—the first being an array element in PHP, the second being an object property.
If you use special characters in the variable name, with Twig you need to access the variable a bit differently, as follows (to access the variable $data-foo which has a dash in the variable name which is considered a special character):
{{ attribute(foo, 'data-foo') }}
You can set the values of variables directly in your Twig template. Look at the following three examples from the Twig documentation:
{% set foo = 'foo' %}
{% set foo = [1, 2] %}
{% set foo = {'foo': 'bar'} %}
You can use the pipe symbol to act directly on data and filter it. Consider the following example from the Twig documentation:
{{ name|striptags|title }}
The preceding line will take the name variable and then strip any HTML tags from it. Then it will apply title casing to the text of the name variable. In the following example, the list array will be filtered, changed into a list separated by commas:
{{ list|join(', ') }}
This page has more on the join filter http://twig.sensiolabs.org/doc/filters/join.html. Take a look at the following example, taken from this documentation page:
{{ [1, 2, 3]|join('|') }}
{# outputs 1|2|3 #}
This code shows another example of an array of values being transformed into a list separated by the pipe character, |.
The following snippet of code wraps the text “This text becomes uppercase” in the filter upper filter, making the text, as you are guessing, in uppercase letters:
{% filter upper %}
    This text becomes uppercase
{% endfilter %}
In this section I introduce you to some control structures you can use in your Twig files. These include for loops, if statements, and such—concepts you’ll already be familiar with from studying JavaScript and if statements.
Twig has some built-in functions, like the Twig equivalent of the foreach loop in the hello_world module earlier in this chapter. You saw how to use the following snippet of code to loop through the results array:
{% for item in results %}
      <li class="hello-world-item">{{ item.message }} This
      message was written by the user with a uid of
      {{ item.uid }} </li>
{% endfor %}
Looping through the results array, each row is placed in the item variable for Twig to use in the template.
You can use if statements in Twig, just like in PHP. Here’s an example.
<ul>
{% if message|length > 5 %}
  <li>A message with a character length of greater
  than 5 is: {{ message }}</li>
{% endif %}
</ul>
This section describes some essential Twig functions, including dump, date, and include.
There’s a dump function in Twig to dump (or look at) the content of a variable, which is very helpful in debugging. Here’s how it works.
<pre>
    {{ dump(user) }}
</pre>
This snippet of code will dump the contents of the user variable to see on the screen. Wrapping the output in the <pre> HTML tag makes it more readable.
You can compare dates using the Twig date function. Here’s an example.
{% if date(user.modified) < date('-5days') %}
    {# do something #}
{% endif %}
You can use the include function to include another template, and the output of the included template will get inserted into the template that uses the include statement. By default variables in the included template will be available to the template issuing the include statement. Following is an example:
{% include 'sidebar.html' %}
The include function documentation page is located here: http://twig.sensiolabs.org/doc/functions/include.html. This page includes more information on how to choose to include or exclude variables in the included template. More Twig functions can be found in the official Twig documentation: http://twig.sensiolabs.org/doc/functions/index.html.
Twig comments will not get rendered in the output on your web page; they serve merely as documentation for yourself or others. To create comments in Twig, use the syntax in the following example:
{# We are within comment tags so nothing will get rendered
      that I put within the comments tag.
    {% for winner in winners %}
        the winner is {{ winner }}
    {% endfor %}
#}
Even though I had some legitimate Twig markup within the comment tags, it doesn’t get rendered. Comments, besides allowing a place to put in documentation (which is very important), allows you to comment out some code to try out how a page looks or works with or without the commented-out section of code.
A really cool feature of Twig is template inheritance. You can have a base template, then have another template that inherits and extends the base template. Take the following example from http://twig.sensiolabs.org/doc/templates.html.
In the following code example, base.html is the base Twig template.
<!DOCTYPE html>
<html>
<head>
{% block head %}
<link rel="stylesheet" href="style.css" />
<title>{% block title %}{% endblock %} - My Webpage</title>
{% endblock head %}
</head>
<body>
<div id="content">{% block content %}{% endblock %}</div>
<div id="footer">
{% block footer %}
© Copyright 2011 by <a href=
"http://domain.invalid/">you</a>.
{% endblock footer %}
</div>
</body>
</html>
Another Twig template is defined, as shown.
{% extends "base.html" %}

{% block title %}Index{% endblock %}
{% block head %}
    {{ parent() }}
    <style type="text/css">
        .important { color: #336699; }
    </style>
{% endblock head %}
{% block content %}
    <h1>Index</h1>
    <p class="important">
        Welcome to my awesome homepage.
    </p>
{% endblock content%}
Notice the following line:
{% extends "base.html" %}
This is the key line that sets base.html as the base template. Any block that isn’t defined in the template that extends base.html gets inherited from the base template. This way you can use the base.html template and override any block you like. You can also, using the parent() function, bring in the content of the parent base template any time you like. Following is an example:
{% block main_content %}
    <h1>Here is my content</h1>
    ...
    {{ parent() }}
{% endblock main_content %}
The official Twig documentation on template inheritance can be found at http://twig.sensiolabs.org/doc/tags/extends.html.
Blocks can be nested, and blocks in a template have access to variables even from other blocks.
Blocks can be called with the use of variables.
{% extends some_var %}
If the some_var variable is defined as sidebar_right, then the template will extend the sidebar_right base template.
You can provide a list of templates to extend, and the first in the list that exists will be used.
{% extends ['first_layout.html', 'second_layout.html'] %}
You can also conditionally extend a template:
{% extends mytemplate ? "base1.html" : "base2.html" %}
In this example, if the variable mytemplate evaluates to true, then you use the base1.html template; otherwise you use base2.html.
To clarify, if a template extends a template and the base template had blocks within it, and the template extending the base template has a block or blocks named the same as in the parent template, then the child blocks are named the same as the parent’s and will override the blocks with the same name in the parent. Blocks are a way to allow child templates to use the parent template, parent template logic, and markup, while making certain sections (the block) overrideable. For more information see the section “How Blocks Work” in the official Twig documentation pages: http://twig.sensiolabs.org/doc/tags/extends.html#how-blocks-work.
Whenever you use a variable in Twig, there’s the chance that the variable value might affect the output of your HTML. You can escape just one variable like the following:
{{ myvar|e }}
By default the “ | e “ way of escaping a variable in Twig converts all characters that could affect the HTML markup of your web page. You can also escape characters that would affect your JavaScript, CSS, URL, or HTML attribute coding respectively, as follows:
{{ myvar|e('js') }}
{{ myvar|e('css') }}
{{ myvar|e('url') }}
{{ myvar|e('html_attr') }}
You can also autoescape everything in a section of your template, as follows:
{% autoescape %}
    Everything in between the autoescape tags will be escaped
    with the default mode of preventing HTML conflicts.
{% endautoescape %}
You can also use the autoescape tags to prevent conflicts with JavaScript or any of the other possible conflicting markup.
{% autoescape 'js' %}
    Everything in between the autoescape tags will be escaped
    with the JavaScript mode of preventing JavaScript conflicts.
{% endautoescape %}
Likewise you can replace 'js' with 'css', 'url', or 'html_attr' to prevent conflicts with autoescape tags.
You can also mark a whole block of text as “just text,” and it ends up escaping the whole block. So what usually would be parsed as a variable, or a control loop, and so on, is just treated as plain text. You use the following verbatim tag for this:
{% verbatim %}
    <ul>
    {% for item in items %}
        <li>{{ item }}</li>
    {% endfor %}
    </ul>
{% endverbatim %}
Hashes and Arrays, Strings, Integers, and Null and True/False Values
To create an array in Twig, you use the following syntax:
["foo", "bar"]
To create a hash (an “associative array” in PHP speak), you use the following syntax:
{"foo": "bar"}
You can have hashes within an array and or an array within a hash. That is, you can nest these elements.
Here are some more examples that work.
{ 'one': 'foo', 'two': 'bar' }

{ foo: 'foo', bar: 'bar' }

{ 1: 'foo', 2: 'bar' }

{ (1 + 1): 'foo'}
The Booleans true and false are used as they are in other languages. You can also use the null keyword to define something as undefined.
You can do math in Twig:
{{ 1 + 1 }}
The result is, of course, 2.
The normal comparison operators, ==, !=, <, >, >=, and <=, all work as would be expected, but in addition you can use “starts with” or “ends with,” as follows:
{% if 'Drupal' starts with 'D' %}
{% endif %}

{% if 'Drupal' ends with 'l' %}
{% endif %}.
You can use regular expressions as in other programming languages.
{% if cellphone matches '{^[d-]+$}' %}
{% endif %}
You can check if something contains or doesn’t contain another value.
{% if 2 not in [2, 3, 4] %}

{{ 1 in [1, 2, 3, 4] }}

{{ 'de' in 'abcdefghi' }}
All three of the preceding examples will return true.
There are some built-in tests in Twig, testing if something is null, odd, even, same as, iterable, empty, divisible by, defined, or constant.
You can read the official documentation on the test functions at http://twig.sensiolabs.org/doc/tests/index.html. Following is an example from these documentation pages:
{# evaluates to true if the foo variable is null, false,
an empty array, or the empty string #}
{% if foo is empty %}
    ...
{% endif %}
If you put a variable or math, for example, within a double quoted string, Twig will allow you to use a variable, math, and so on. Here’s the syntax.
{{ "foo #{bar} baz" }}
{{ "foo #{1 + 2} baz" }}
In the first case the variable bar is inserted into the text of the string. In the second case the result of the advanced addition 1 + 2 is inserted into the text of the string.
Twig can also be extended and new tags, functions, and filters can be found at https://github.com/fabpot/Twig-extensions. You can also learn to create your own extensions by going to the following page: http://twig.sensiolabs.org/doc/advanced_legacy.html.
Summary
This chapter covered quite a bit. You learned to add theme functions to your custom modules. Knowing how to do this is quite useful even if you’re just learning how to override a function from another contributed module you downloaded from drupal.org. You also learned how to create templates for your theme functions, and you learned that Drupal 8 now uses a Twig-based template engine. Twig has its own markup, and by using Twig in Drupal 8, you keep PHP out of your theme templates, allowing your logic to be encapsulated by programmers and your view and front-end look and feel of the site to be worked on by themers, who don’t necessarily need to be programmers. This separation of theming and programming logic provides for more security and prevents front-end work from breaking complex business code and logic.