
![]()
Other Ways to Install Drupal
Another common way of installing Drupal on a Mac, probably more common, is using MAMP. MAMP is a way to set up Apache, MySQL, and PHP on a Mac with one installer. The Mac comes with these items pre-installed, but they’re not always up to date. I find that most developers will use MAMP or something just like it (another top developer I know uses something called Homebrew, which is also very good).
I’ve used the free version of MAMP for years, and it works perfectly even for professional development needs. Installation with MAMP is a bit more complicated than using DAMP, but it is useful to learn to install it this way because on a production Linux box, you won’t be able to install Drupal with Acquia Dev Desktop—and setting up Drupal on MAMP is much more like setting up Drupal on a Linux box. You’ll need to configure virtual hosts, you’ll need to know a bit of how to navigate the Linux command line, and you’ll need to manually create a MySQL database. The setup is not exactly the same as on Ubuntu (see Chapter 18), which is a popular Linux distribution for production-grade Drupal sites, but there are many steps in common.
Installing Drupal with MAMP on a Mac
To begin, go to www.mamp.info/en/index.html and download MAMP to your Mac. Then double-click the downloaded file, which will end with .dmg. At this point, run through the installer, accepting the defaults and clicking “Next” until the install is complete. When you have MAMP up and running, you’ll see a screen that looks like the one in Figure A-1.

Figure A-1. MAMP control panel
If the lights (circles) next to MySQL Server and Apache Server are red, then Apache and MySQL have not been started yet, and the top button on the right will display “Start Servers.” You can click this Start Servers button to start Apache and MySQL. After everything starts up successfully, click “Open start page.” You’ll see a web page pop up that looks like the one shown in Figure A-2.

Figure A-2. MAMP web page on your localhost with useful links to MAMP tools and info
Notice that the top tab includes useful links. The link that I use most often is a link to my system’s phpinfo file, which provides the status of PHP, what libraries are installed for PHP, memory configuration stats for PHP, and more. In addition to the top tabs is a link to phpMyAdmin, which is an easy-to-use admin tool for managing your MySQL database. These are useful links. To bring up this MAMP start page at any given time, you can click “Open start page” from the MAMP control panel, as shown earlier in Figure A-1.
Now that MAMP is installed and PHP and MYSQL are set up, we can continue to get the Drupal install set up using MAMP.
Next we’ll create a database. There are two ways to quickly create a MySQL database. First you can do it through the command line. To do this, open a terminal window on your Mac (by going to Launchpad to view all your installed applications and then type “terminal”). Figure A-3 should assist you in opening the terminal from Launchpad.

Figure A-3. Opening the Mac terminal application
You can also use the Spotlight on your Mac to find and open the terminal, as shown in Figure A-4.

Figure A-4. Opening the Mac terminal application from Spotlight
Once you have the terminal open, type mysql –u root –proot at the command prompt, which is the default root password for MySQL in MAMP. (See Figure A-5.) Then once you’ve logged into MySQL, after typing the previous command, type create database drupal8;. You can call the database anything you like, but this example uses drupal8.

Figure A-5. Using the Mac terminal application to log in to MySQL and create a database
You should receive a response from MySQL that the database was created successfully.
The other way to easily create a MySQL database is with phpMyAdmin. Recall that you can open the MAMP welcome page from the MAMP control panel. In the MAMP control panel, click “Open start page.” Then along the top tabs, click “phpMyAdmin.” Once you click the phpMyAdmin link, you’ll see a page that looks like the one in Figure A-6.

Figure A-6. PhpMyAdmin databases tab
Click the Databases tab and you’ll see the screen shown in Figure A-7, where you can easily create the database.

Figure A-7. Creating a new database with PhpMyAdmin
As Figure A-7 shows, you’ll type the name of your new database and click “create.” Then you’ll find your database in the list of databases, ready to use.
Next we’ll need to set up a virtual host. Basically a virtual host allows you to have multiple web sites all running using the same web server. Each web site will be set up with a domain name and the Apache configuration will tell the system which web files to use to serve up to that web site. Additional configuration files in Drupal will point the web site to the correct database to use.
To begin, we’ll need to edit our /etc/hosts file. Because we’ll need to use sudo access to edit the file—this means we’ll need to edit the file as an administrator—we’ll edit the file using vi editor, which comes with all Linux and OS X distributions. In the terminal application, type sudo vi /etc/hosts and type your Mac password (you’ll need to be an administrative user of your Mac). You’ll see a file that looks similar to the following:
##
# Host Database
#
# localhost is used to configure the loopback interface
# when the system is booting. Do not change this entry.
##
127.0.0.1 localhost
Just add the following to the bottom of the file: 127.0.0.1 drupal8. You move to the bottom of the screen using the arrow keys. Next, press the “I” key to go into insert mode, and type 127.0.0.1 drupal8. Press the escape key (the “esc” key). Then type :wq. When you pressed the escape key, you left insert mode and went into command mode; then you issued the command after the colon (wq), which stands for “write” and “quit.” So you saved/wrote the file to disk and then quit back to the terminal application command prompt. So not only did you edit the file, but you also learned some basic vi editor skills.
Now there is just one more configuration file to edit. Type sudo vi /Applications/MAMP/conf/apache/httpd.conf and again type your Mac user password, if prompted. You’ll be editing your MAMP httpd.conf file. At the end of the file add the following:
<VirtualHost *:8888>
DocumentRoot "/Users/your-user-name/Sites/drupal8/drupal"
ServerName drupal8
</VirtualHost>
The hosts file and httpd.conf file configuration we just entered will make it so that when you go to http://drupal8:8888 in your web browser, you’ll be pointing that URL to your new Drupal installation.
Replace your-user-name above with your username on your Mac.
Now you’re ready to install Drush and download and install Drupal.
You can find the official instructions to install Drush at http://docs.drush.org/en/master/install/. There’s also a video on how to install Drush using Composer: www.youtube.com/watch?v=eAtDaD8xz0Q&feature=youtu.be.
Once Drush is installed on your system, you can go to your /Users/your-user-name/Sites/drupal8/ directory and type drush dl drupal. As an alternative, you can go to drupal.org and manually download the file to your local machine; then unzip it into the drupal8 directory.
Now all the Drupal files will be in place. You can go to the URL you set up in your httpd.conf file—http://drupal8:8888/install—and run through the Drupal installation screens, filling out the installation forms by inputting the Drupal database name you created earlier, the database password, a username for your administrator account, and a password for the administrator account (refer to Chapter 1 for more detailed directions).
Next we’ll take a look at installing Drupal on a Windows machine using a LAMP package called XAMPP. Many of the steps are exactly the same as you’ve seen for installing MAMP.
Installing Drupal with XAMPP on a Windows Machine
To install XAMPP on your Windows machine, go to www.apachefriends.org/index.html and click the link to download XAMPP for Windows. There is an installation package for OS X as well, but my personal preference is to use MAMP on a Mac. Run through the installer for XAMPP once you’ve downloaded the installer.
Once you’ve installed XAMPP, go to the Start menu in the lower left of your Windows GUI (graphical user interface), and click to open the XAMPP control panel (see Figure A-8).
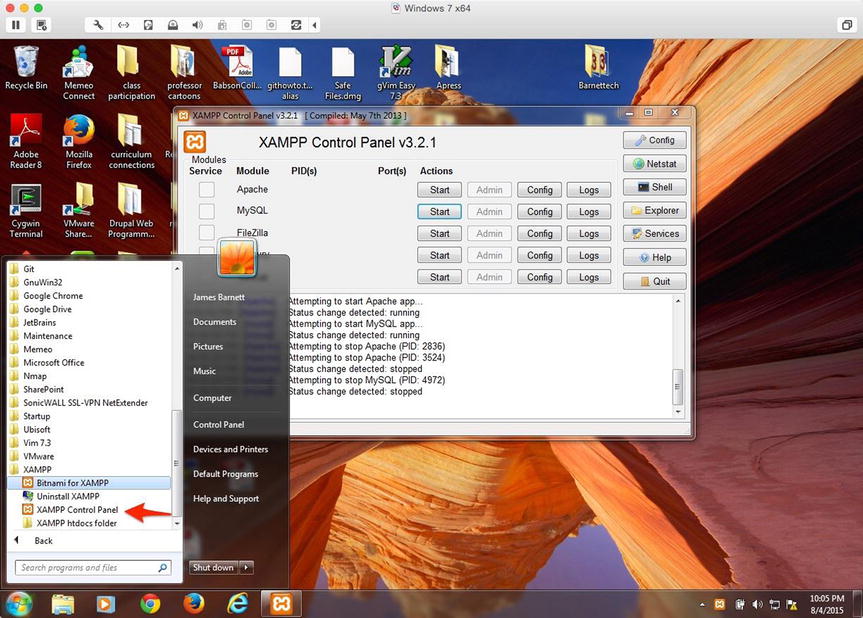
Figure A-8. Opening the XAMPP control panel
Once the control panel is open, you’ll see the screen shown in Figure A-9. Click the Start button next to Apache and MySQL.

Figure A-9. Starting the Apache and MySQL servers in the XAMPP control panel
Once the two servers are started, click the Admin button next to the Apache Start button you just clicked. You’ll be taken to the basic Apache start page, as shown in Figure A-10.
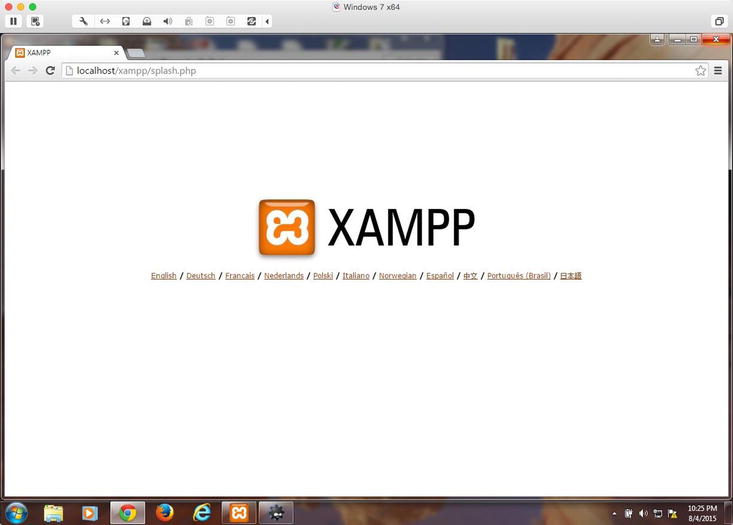
Figure A-10. The XAMPP Apache start page
Now that XAMPP is set up, any web pages that you put in the c:xampphtdocs directory (the Apache docroot directory—the base directory within Apache to serve up web files from) will be served up by XAMPP’s Apache server. Figure A-11 shows a simple PHP script I created and had served up on the web server.

Figure A-11. The XAMPP Apache server, serving up a simple PHP file placed in the c:xampphtdocs directory
Now that you have XAMPP running, installing Drupal is as simple as downloading it from drupal.org into the c:xampphtdocs directory. Alternatively, you can install Drush from this URL and install Drupal using Drush: https://github.com/drush-ops/drush/releases/download/6.0.0/Drush-6.0-2013-08-28-Installer-v1.0.21.msi. Drush is an easy-to-use Windows installer; it may be slightly out of date but is still usable. You can find the most up-to-date link with instructions to install Drush on Windows at http://docs.drush.org/en/master/install/#windows-zip-package.
You’ll notice that there’s a warning on the docs.drush.org page that Drush does work better on a Linux-based system, a Mac, or other Linux installation. In general Drupal is a LAMP-based system, and it will be easier to use on a Linux-based operating system.
Summary
These are just two ways to install Drupal: using MAMP for the Mac or XAMPP for Windows (yes, you can use XAMPP on a Mac; I haven’t tried it, but I bet it works quite well). Chapter 1 covered installing Drupal using Acquia Dev Desktop, and Chapter 10 covered installing Drupal in the cloud on an Ubuntu Linux box. If you’ve followed along, you will be well on your way toward being very adept at installing Drupal in any environment you may encounter.