
![]()
Publishing Your Site to a Production Linux Box
Let’s imagine you’ve set up your site locally and it’s running great. But now you would like to move your site to a production box in the cloud at Amazon, Rackspace, Linode, Digital Ocean, or any number of other cloud-hosting providers. These vendors will, out in cyberspace (out in the cloud), set up a Linux box for you on which to run your web site. Often to really follow best practices you’ll set up at least two Linux boxes and a load balancer to balance traffic between the two (or more) Linux boxes. This setup will also give you redundancy in case one of the Linux servers has any problems.
This chapter shows how to set up Drupal on a Linux (Ubuntu) box, including how to set it up in the cloud, but much of the instruction is applicable to any Ubuntu Linux box. For this chapter you’ll be setting up a fictitious site to run on a single Linux box. The single Linux box will run Apache and MySQL. Most smaller sites run using only a single web server. Larger sites often will move the database off of the box running the web server to alleviate competition for resources between the web server and the database.
![]() Note In this chapter I’ll spin up a box out in the cloud using Linode.com. The process for setting up a Linux box at Linode is very much like it is at Amazon, Rackspace, or any other cloud-hosting service. Recently I trolled drupal.org pages, looking for a better cloud service, and I saw a lot of Drupalers raving about Linode and Digital Ocean. The reviewers were saying these two vendors were dirt cheap, and comparatively this is absolutely true. I’ve been using Linode for my personal blog for almost a year, and it beats the pants off of a larger, more famous competitor. Going through how to set up a Linux box at Linode should prepare you to understand the process whenever you decide to spin up a Linux box in the cloud. I’ve had great luck with Linode—it’s very reliable, and pretty fast hardware is available for a fraction of the cost.
Note In this chapter I’ll spin up a box out in the cloud using Linode.com. The process for setting up a Linux box at Linode is very much like it is at Amazon, Rackspace, or any other cloud-hosting service. Recently I trolled drupal.org pages, looking for a better cloud service, and I saw a lot of Drupalers raving about Linode and Digital Ocean. The reviewers were saying these two vendors were dirt cheap, and comparatively this is absolutely true. I’ve been using Linode for my personal blog for almost a year, and it beats the pants off of a larger, more famous competitor. Going through how to set up a Linux box at Linode should prepare you to understand the process whenever you decide to spin up a Linux box in the cloud. I’ve had great luck with Linode—it’s very reliable, and pretty fast hardware is available for a fraction of the cost.
Setting Up the Linux Box in the Cloud
Before you can begin the setup process, you need to go to www.linode.com and create an account. This process is fairly simple.
I already have a Linode account, but for the purposes of this chapter, I’m going to pay for a new Linux box ($20 a month as of the time of this writing for 1 GB of RAM, a pretty good price). As you can see in Figure 18-1 Linode has a few choices of what size Linux box to spin up. I’ve chosen Linode 1024, which is the cheapest option and comes with 1 GB of memory (1,024 mb) and 48 GB of hard-drive storage.

Figure 18-1. Choosing how large a Linux box to spin up at www.linode.com
I run my simple blog (www.barnettech.com) using Linode’s service. My blog has only one authenticated user (one user who needs to log in); I log in as the admin, and I use a Linode Linux box with 1 GB of ram. It’s been pretty speedy, and I’ve had no performance problems. If you get tons of traffic or have a lot of traffic especially for authenticated users, you will need a beefier box.
After you select your plan, click Continue. You’ll then see screens similar to those shown in Figures 18-2 and 18-3.

Figure 18-2. The status of this newly purchased Linux box (Linode box) is “Being Created”

Figure 18-3. The new Linux box successfully created with “Brand New” status
In Figure 18-3 you can see the newly created Linux box is in “Brand New” status and there is a link to select a location. I’ll pick Atlanta, GA because most of my users are on the East Coast. Actually I’ve looked at Google Analytics and I get a lot of traffic from California, not surprising with Silicon Valley being such an active technological hub. I’ve actually heard from expert sources that the infrastructure connecting the East Coast to the West Coast (in the United States) is so good using speed-of-light fiber communications that often you’re better off serving the West Coast with a server in an East Coast server farm. I know my Linux box in Atlanta will do fine serving up web pages fast even to Californian visitors to my web site.
As you can also see in Figure 18-3, you can turn on site backups, which I recommend. Although Linode charges an extra $5 a month for its nightly backup service, this is still an excellent price for 1 GB of RAM and a private Linux server; most other services charge much more. One disadvantage, at the time of this writing, is that Linode only accepts support tickets submitted through the Web; Linode doesn’t have a phone number, and it doesn’t have an instant chat support service, something some other services have (usually the more support you get, the higher the price, understandably). For me this is fine; I’d rather pay less, and I prefer to get paid to support Drupal and Linux rather than pay someone else.
After choosing the location of your Linux box, you’ll be prompted with the screen shown in Figure 18-4. You need to choose the Linux flavor to use, and you need to set the root (the primary administrator user on a Linux box is called the root user) password. There are some other options, but you can leave the defaults for most of the fields. In this case I will choose Ubuntu as my Linux flavor, and I’ll set my root password.

Figure 18-4. Configuring a Linux box to use Ubuntu and setting the root password
After you click the Rebuild button, shown in Figure 18-4, the box starts to get built (rebuilt) on the Linux flavor you chose and with the root password you chose.
After the screen shown in Figure 18-4 you’ll be taken to your Linode dashboard (see Figure 18-5). Toward the top, on the dashboard, click the Boot button to power on your Linux box. Once the box has booted you’ll see graphs on your dashboard and other stats showing the health of the box.
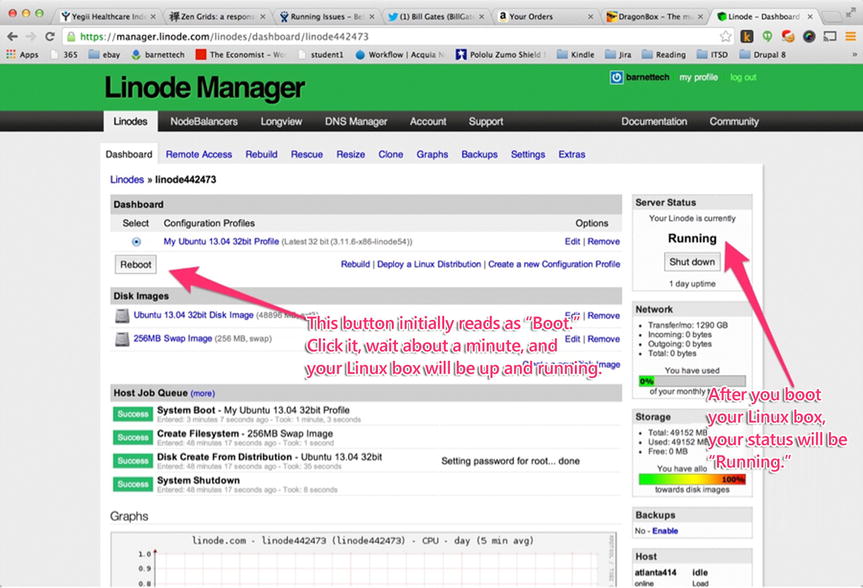
Figure 18-5. Your Linode dashboard—you’ll “boot” the box to turn it on
With your Linux box now turned on, it’s time to focus on how to connect to the Linux box in the cloud via ssh.
Connecting to a New Linux Box Via SSH
In this section you use ssh to connect to the command line of the newly created Linux box. Notice in Figure 18-6 that the Linodes tab lists the IP addresses of your Linux boxes. In this case, my new Linux box has an IP address of 23.92.31.153.

Figure 18-6. Finding the IP address of your Linux box
Using the Terminal application on a Mac or Putty on a Windows machine, locate the command line and ssh to the IP address you located (see Figures 18-7 and 18-8). In this case, I typed ssh [email protected].
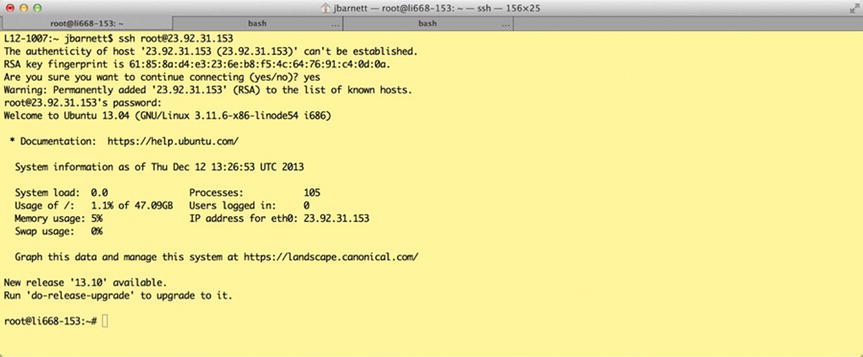
Figure 18-7. Connecting to the Linux box using the IP using the ssh protocol

Figure 18-8. Using the Putty program—configure as shown and then click Open
Now that you’ve learned to connect to a Linux box in the cloud via ssh, in the next section you’ll learn to set up the full LAMP stack on your Linux box using commands on the command line.
Setting Up the LAMP Stack on an Ubuntu Linux Box
Once you’ve connected to the Linux box as root, you can set up the full LAMP stack and install Apache, PHP, and MySQL. Apache will serve up your web pages, MySQL will be your back-end database to store your back-end data, and PHP will be the programming language used in creating your web sites. This is, of course, the basic infrastructure that Drupal uses to function.
To set up Apache, MySQL, and PHP you will need to run each of the commands shown in the following bulleted list, one at a time. Press “Y” for yes to continue at any time when prompted on the command line after running one of these commands. When installing the mysql-server package you’ll be prompted to enter the root (primary administrator account) password for MySQL; make sure you remember or write down whatever password you choose here.
- apt-get update
- sudo apt-get install apache2
- apt-get install mysql-server
- apt-get install php5 libapache2-mod-php5
- /etc/init.d/apache2 restart
Now, open your favorite web browser and type the IP address of your new Linux box. You can buy a domain name and map it to this IP address so you can view your web site via the domain name rather than the corresponding IP address. You can buy a domain name from godaddy.com, dreamhost.com, or any number of other service providers; those vendors will have instructions to map your domain name to you IP address. For now you’ll just bring up the web pages using the IP address. You should see a screen similar to the one shown in Figure 18-9, which confirms that Apache is set up and running.

Figure 18-9. Putting the IP address of your new Linux box in a web browser brings up this default Apache web page, confirming Apache was set up correctly to serve up web pages
Next, type the following to confirm that the MySQL database installed correctly:
mysql –u root –ppassword
Use the root password you configured when prompted while installing the mysql-server package. This will connect you to your MySQL database from the Linux command line (see Figure 18-10).

Figure 18-10. Connecting to the newly installed MySQL database and confirming it’s operational
Installing git for Version Controlling Your Code Base
Installing git is fairly simple. On the Linux command prompt, simply type the following and press the “Y” key to confirm you want to proceed with the installation when prompted:
apt-get install git
Installing Drush
Now it’s time to install Drush on your Ubuntu Linux box. Drush is the Drupal command-line tool which provides many operations to make Drupal much easier to administer and interact with, all from the command line. Drush allows you from the command line to create users, add roles to user accounts, clear the cache, etc. Drush code is managed using Github: https://github.com/drush-ops/drush/. The true Drupal geek will, in my opinion, tell you to install Drush by first cloning the git repository. This way you can always easily update to the latest version of git and still check out an older branch of git as well. (This approach can be useful if the latest cutting-edge version is something you want to try but is still buggy and you want to revert later to a more stable version.) Although there are other ways to install Drush, you’re going to get the Drush code using git.
Run the following commands in order:
cd /usr/share
git clone https://github.com/drush-ops/drush/ drush
cd drush
ln -s /usr/share/drush/drush /usr/bin/drush
Now when you go to any directory as root and type drush, you can confirm it’s working. You’ll see a screen that looks like the one shown in Figure 18-11 with the Drush usage information.

Figure 18-11. Confirmation that Drush is running
When I typed drush | more and drush help, usage information came up, as you can see in Figure 18-11. When you type a Linux command and “pipe” it to more (you type in | more), it will paginate the results, so it doesn’t scroll off the screen too quickly to read. The | character is called a “pipe,” and it allows you to chain Linux commands together to have commands after the pipe character act on the previous pieces of the Linux command.
Now that you’ve set up your Linux box with LAMP, in the next section you’ll take a look at getting your first web pages served up on the Linux server.
Putting Up Your First Web Pages
Now you’re ready to put up your first simple web page. Change directories to the Apache root directory, where you put your files to be served up as web pages by Apache, by typing the following:
cd /var/www
Now type in the ls command, and you’ll see there’s one file in there called index.html. Edit this file (using vi or another editor). And, yes, we found the file that Apache serves up by default, showing that Apache is indeed set up correctly (see Figure 18-12).

Figure 18-12. The index.html file that we saw earlier in a web browser saying “It works!”
This index.html file is the HTML code behind what you saw in the browser, as seen earlier in Figure 18-9. So now, play around if you like with changing the text of this index.html file. If you bring up the IP address of this Linux box in your browser, you’ll see that you’ve successfully been able to make changes to this web page. I’ve simply added the text “James Barnett was here in 2013” to the index.html file found in the .../var/www directory which is the root folder of the Apache web server installation (see Figure 18-13).

Figure 18-13. I’ve edited the index.html file to show that my changes will also show up in my web browser
You’ve now served up your first simple web page. The next section covers setting up Drupal on the Linux server.
Installing Drupal
In this section you’ll learn how to install Drupal on your Ubuntu Linux box. This process is definitely more involved than simply using the DAMP installer, which was created specifically to make it much simpler for local development work. Make sure you’re still in the .../var/www directory—you can type pwd to see what present working directory you’re within to confirm it. Then simply type the following:
drush dl drupal
Now, type ls. You should see the directory drupal-8.24 and, within this new directory, all of your Drupal files. Don’t worry if your directory name is slightly different; the 8.24 in the directory name represents the current version of Drupal. The number “8” represents which major version of Drupal it is, and the numbers after the period represent which minor version of Drupal 8 it is.
After Drupal is downloaded by Drush, it’s helpful to rename the directory to something meaningful. In this case I’m calling the directory drupaltest, so I issue this command:
mv drupal-8.24 drupaltest
This command allows me to set up other instances of Drupal on this web server without worrying about using Drush to download Drupal and then overwriting my already existing Drupal directory, which would blow away any changes I’d made to the already existing instance of Drupal within its code base. Later you’ll rename this directory to match the name of the domain name you’ll hook up to this web site.
Now go to the URL (uniform resource locator) http://23.92.31.153/drupaltest (your IP address number will vary). You should see the screen shown in Figure 18-14, waiting for you to start the Drupal installation process via the GUI (graphical user interface).

Figure 18-14. With Drupal downloaded to the Linux box, the installation setup process can begin
I chose English as my language, and then I chose to set up the “standard” installation profile.” Easy so far. But then I get to a screen showing any requirements problems. And as I tell my students, errors or alerts like these are your friends; they make it easy to know what you need to do next to succeed. Take a look at Figure 18-15, and then we’ll address each problem to get Drupal up and running.

Figure 18-15. Requirements problems that must be addressed to finish the setup process
First, next to the alert on missing PHP extensions, it says we need to install the gd library. To do this, type apt-get install php5-gd and then press “Y” to confirm you want to install the extension.
Next, type apt-get install php5-gd php-db php5-mysql to clear up the error about database support problems. I also edited the .../etc/php5/apache2/php.ini file. I found the line memory_limit = 128M, and added two lines under it.
memory_limit = 128M
extension="pdo.so"
extension="pdo_mysql.so"
Then, to solve the last two requirements problems, I first changed directories to the ...site/default directory in my Drupal installation. I then created a settings.php file by copying the default.settings.php.default file. Next I created a files directory for Drupal to store files within (pictures, attachments to nodes, etc.). And finally I changed the permissions of the settings.php and files directories.
Run the following commands as described in the order shown:
cd /var/www/drupaltest/sites/default
cp default.settings.php settings.php
mkdir files
cd /var/www/drupaltest
chmod a+w sites/default
chmod a+w sites/default/settings.php
chmod a+w sites/default/files
Now when you refresh your screen or click “try again” on the web page that showed the requirements problems, you should be able to move on to the next step. You’ll see the screen shown in Figure 18-16.

Figure 18-16. Installing Drupal and configuring which MySQL database to use
Next you’ll need to create a database for Drupal to use. On the command line, log in to MySQL with the command you issued earlier.
mysql –u root –ppassword
Use the root password you created earlier (notice “password” is the password and is appended right after –p with no space in between when issuing this command). Now, create a new database, which Drupal will use, by typing the following command:
create database drupaltest;
Then type
use drupaltest;
You can name your database anything you like; I’ve named mine drupaltest.
Now you’re going to create a new user for MySQL so your Drupal instance doesn’t have to connect using the root user account. Issue the following command at the MySQL command prompt:
GRANT SELECT, INSERT, UPDATE, DELETE, CREATE, DROP, INDEX, ALTER
on drupaltest.* To drupaluser@localhost IDENTIFIED by
'mypassword';
This will create the user named drupaluser, with this user’s password set to mypassword. It also grants this user rights to the drupaltest database.
Next, log in as this user to make sure all went well. First type exit, press the Enter key, and then log in again to MySQL with the following command:
mysql –u drupaluser –pmypassword
Now you are logged in using the drupaluser account. You can make sure this user has access to the drupaltest database by typing the following:
use drupaltest;
Now you’re ready to plug in your database name and database username into the Drupal installation GUI, as seen in Figure 18-17. You don’t need to touch anything in the Advanced Options section.

Figure 18-17. Put the Drupal database name and MySQL username you just created into the GUI to continue the installation process
Drupal will begin installing itself (see Figure 18-18).

Figure 18-18. Drupal proceeding to install itself once everything is configured properly
Figure 18-19 shows you the last page of input needed to complete the configuration of your Drupal installation. You’ll input the site name, and you’ll set the admin account name and password (make sure to write this down!).
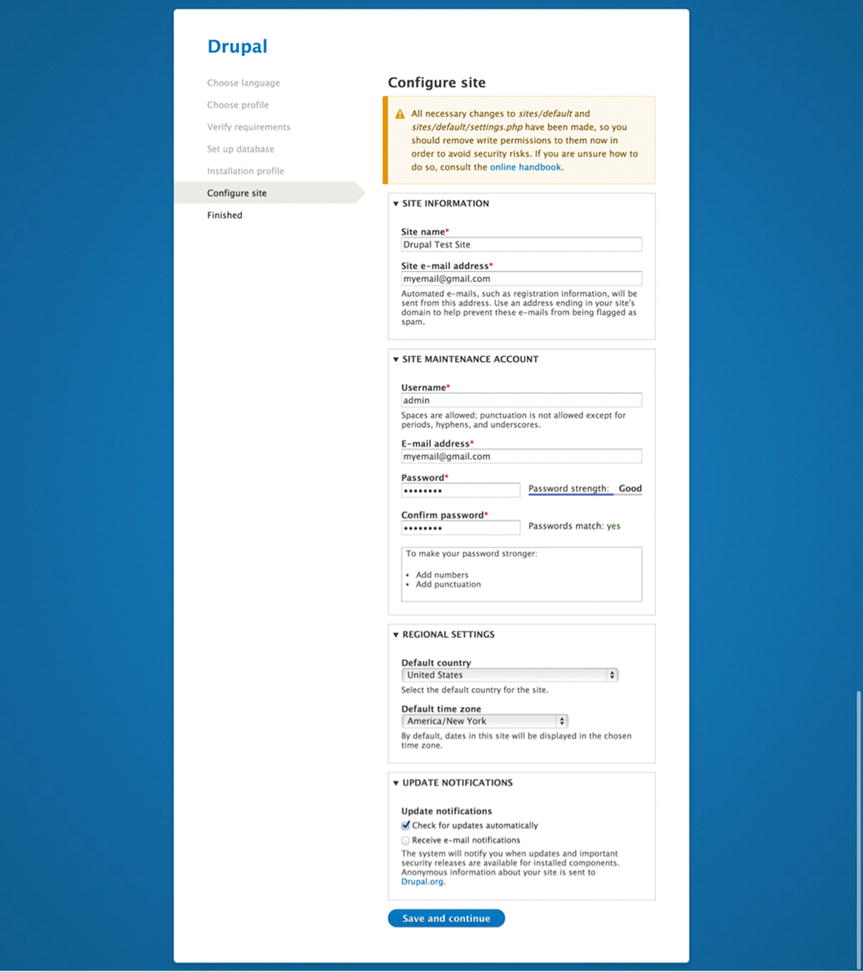
Figure 18-19. Last installation configuration screen, asking for you to set the name of the site, an admin maintenance password, country settings, etc
![]() Caution For better security, don’t choose an admin username of admin or administrator or anything that someone might guess to try to break into your site. For most sites this isn’t much of a worry. Most of us just have to worry more about spammers and annoying marketing firms trying to post links to their clients’ products.
Caution For better security, don’t choose an admin username of admin or administrator or anything that someone might guess to try to break into your site. For most sites this isn’t much of a worry. Most of us just have to worry more about spammers and annoying marketing firms trying to post links to their clients’ products.
Finally, you can click the “Save and continue” button. You should now see the screen shown in Figure 18-20, verifying that installation of Drupal is complete.

Figure 18-20. The Drupal installation is now complete
When you click the “Visit your new site” link, you’ll be taken to the front page of your new Drupal site (see Figure 18-21).

Figure 18-21. The front page of the new Drupal site
Before proceeding, let’s secure a few of the files we changed permissions on earlier so that Drupal could install itself. Changing these permissions back to being more secure is an essential security step, so I want to make sure to mention that you should run a few commands before continuing. Run the following commands from the Drupal docroot directory (.../var/www/drupaltest in our example site):
chmod go-w sites/default
chmod go-w sites/default/settings.php
So now you’ve set up Drupal on a Linux box in the cloud, but there is still a big problem: your URL is currently http://23.92.31.153/drupaltest/ (your IP address will differ), which isn’t very user friendly. To fix this, you’ll set up a domain to point to your Drupal installation so folks can visit the site using a nice pretty URL, rather than an IP address followed by the subdirectory where you’ve put your Drupal files.
Getting a URL for Your New Drupal Site
In order to get a URL for your new Drupal site, you’ll need to have a domain. It so happens that I already have a domain (which I haven’t had time to build a site for): www.mypersonalvillage.com.
![]() Note If you want to buy a domain there are plenty of sites that sell them, including godaddy.com and dreamhost.com. If you google “Buy domain name,” you’ll be inundated with links to vendor sites where you can buy a domain.
Note If you want to buy a domain there are plenty of sites that sell them, including godaddy.com and dreamhost.com. If you google “Buy domain name,” you’ll be inundated with links to vendor sites where you can buy a domain.
Using the domain I set up at DreamHost, www.mypersonalvillage.com, I will show you how to configure that domain to connect to my Linode Linux box out in the cloud, so that my Drupal site will load up not only a visitor who goes to http://23.92.31.153/drupaltest/ but also when the visitor goes to www.mypersonalvillage.com.
When I log in to my DreamHost account, I see the screen shown in Figure 18-22.

Figure 18-22. The dashboard at DreamHost
We’re now going to configure the DNS (domain name service) for our domain. (DNS is a mapping service for computers to map domain names to computers and their IP addresses where files are served.) From the DreamHost dashboard, I click Manage Domains. Then on the next screen, I click the DNS link next to the domain I’m interested in—in this case, that domain is http://mypersonalvillage.com.
Then I see the screen in Figure 18-23. I put in the DNS nameservers for Linode, which I researched on its site. They are ns1.linode.com, ns2.linode.com, ns3.linode.com, and ns4.linode.com. (Each site usually has instructions.) At Linode on the dashboard, there’s a DNS tab with lots of info; we’ll be going to that tab shortly to configure things on the Linode side as well.

Figure 18-23. Putting the Linode DNS server names into the DNS configuration screens at DreamHost
In the .../etc/apache2/apache2.conf file, add the following line at the bottom of the file using your IP address for your new Linux box, not mine of course (see Figure 18-24):
NameVirtualHost 23.92.31.153:80

Figure 18-24. Adding the line NameVirtualHost 23.92.31.153:80 to the end of the apache2.conf file
Make sure to put :80 after your IP address in this new line you add to apache2.conf, which sets the system to look at port 80.
Next, change your directory to ...etc/apache2/sites-available. In this directory make a file called mypersonalvillage.com—be sure to replace this domain name with the one you’re using. In this file put in the following:
<VirtualHost *:80>
  ServerName mypersonalvillage.com
  DocumentRoot /var/www/mypersonalvillage.com
   <Directory /var/www/mypersonalvillage.com>
      Options +Indexes +FollowSymLinks +ExecCGI
      DirectoryIndex index.php
      AllowOverride All
      Order allow,deny
      Allow from all
    </Directory>
</VirtualHost>

<VirtualHost *:80>
  ServerName www.mypersonalvillage.com
  DocumentRoot /var/www/mypersonalvillage.com
   <Directory /var/www/mypersonalvillage.com>
      Options +Indexes +FollowSymLinks +ExecCGI
      DirectoryIndex index.php
      AllowOverride All
      Order allow,deny
      Allow from all
    </Directory>
</VirtualHost>
Make sure you save the file. You’ll notice we pointed the domain to pull files from the directory .../var/www/mypersonalvillage.com, but we named our directory .../var/www/drupaltest originally. I like to name my directory the same as the domain name so I can find it easily, especially if I host more than one domain on a single Linux box (which I often do for development boxes, not production boxes).
Rename this directory .../var/www/drupaltest to .../var/www/mypersonalvillage.com with the following command (modify the command to work with your domain name):
mv /var/www/drupaltest /var/www/mypersonalvillage.com
Now we will issue the command from within the .../etc/apache2/sites-available directory.
a2ensite mypersonalvillage.com
After issuing the preceding command, I get the following response from the server:
Enabling site mypersonalvillage.com.
To activate the new configuration, you need to run:
service apache2 reload
Next, type
service apache2 reload
Then, at Linode.com, I go to https://manager.linode.com/dns and see the screen shown in Figure 18-25. Click the “Add a domain zone” link.

Figure 18-25. Click to add a domain zone
Here are the settings for the new domain zone mypersonalvillage.com, which in edit mode looks like Figure 18-26.

Figure 18-26. The new domain zone at Linode.com for mypersonalvillage.com
Whenever you make DNS changes, it can take a half hour or more for the changes to propagate over the Internet, so be patient. At the command prompt. I kept typing
nslookup www.mypersonalvillage.com.
Once the changes were in effect, I received the correct response that the IP address associated with the domain was in fact 23.92.31.153.
L12-1007:linode jbarnett$ nslookup mypersonalvillage.com
Server:             192.168.2.1
Address:     192.168.2.1#53

Non-authoritative answer:
Name:    mypersonalvillage.com
Address: 23.92.31.153
So now my web site comes up using the pretty URL http://mypersonalvillage.com/ or www.mypersonalvillage.com/. We no longer need to access the site using the IP of the web site at http://23.92.31.153/mypersonalvillage.com/.
In Figure 18-27 you can see the site loading nicely using a normal URL, www.mypersonalvillage.com, the domain name, which you’re more used to using to access Internet sites, rather than using a site’s IP address.
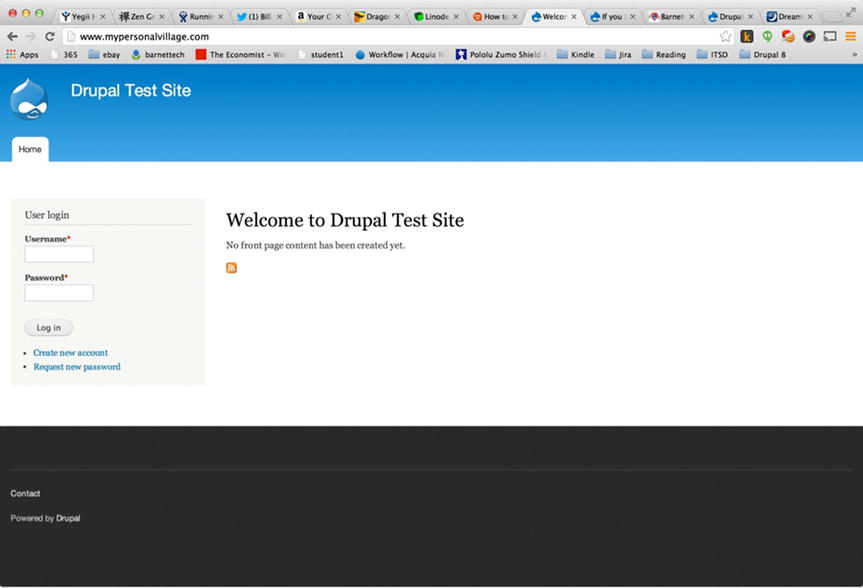
Figure 18-27. The domain name www.mypersonalvillage.com working correctly to bring up the Drupal site
Summary
This chapter covered a lot of ground with regard to learning how to set up an Ubuntu Linux box in the cloud. You set up the LAMP stack to prepare the box to run Drupal. You then installed all the packages you needed to run the Drupal stack, and you installed and set up MySQL. You created a new MySQL user to have Drupal log in as that user to connect to its MySQL back-end datastore. In MySQL you set up the new database for Drupal to use. You also handled some of the permissions problems that arise when setting up Drupal to be able to access and write to the files it needs (settings.php, for instance). You set up a domain name and configured the DNS on the site where you purchased the domain, and you set up the DNS in the hosting service’s GUI where your Linux web server lives in the cloud.
The setup is not simple, but the reward for understanding how this all works is that you have a very valuable skill set. The skills to set up a Drupal site from start to finish in the cloud are considered the work of a system administrator, but I often find Drupal geeks know quite a bit about both the programming side and the system administration side, although certainly there are engineers who develop their career focusing on one side or the other. I would recommend that you know how to set up a Linux box in the cloud, and for highly secure sites, or sites that need performance tuning, let someone who’s specialized in sys admin work button down the site for optimal performance and higher security—something beyond the scope of this book.