
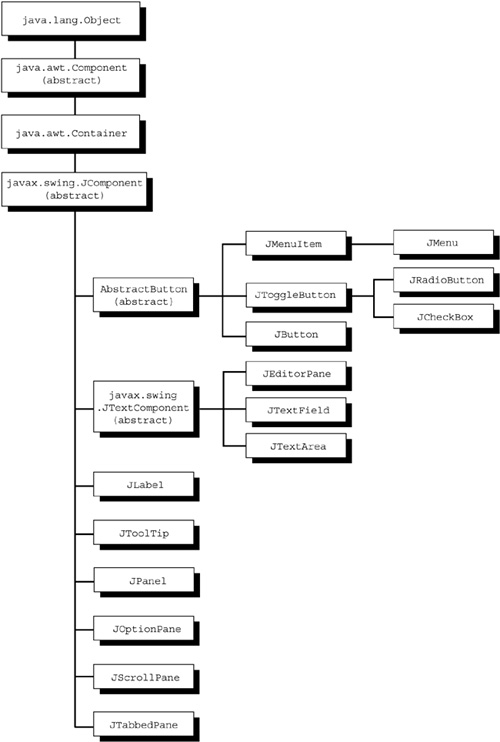
We now have enough knowledge to start looking at individual controls in detail and to describe the kinds of events they can generate. Most of window programming is learning about the different controls that you can put on the screen and how to drive them. This section describes some individual controls. The controls shown in Figure 21-1 are all subclasses of the general class JComponent that we have already seen.
These classes are the controls or building blocks from which you create your GUI. You can perform the following actions with these components:
-
Add them to a container (often
JFrameorJApplet) with a call such as the following example:MyJContainer.add( myJComponent );
Up until JDK 1.5 you could not add a component directly to a container. You had to add it to an object called the content pane of the container, as shown in the following example:
MyJContainer.getContentPane().add( myJComponent );
The content pane is a layer within a container whose purpose is to have controls added to it. It was always a terrible idea. Sun actually added a special check for this at run-time. If you add to a container instead of a container's content pane, it throws an exception and the message reminds you of the “right” way to do it! Sun finally fixed it. We'll use both approaches here, to get you accustomed to seeing both.
-
Register your event handler using the
addSomeListener()method of the control. This tells the window system which routine of yours should be called when the user presses buttons or otherwise makes selections to process the event.
Fortunately, both of these activities are quite straightforward, and we'll cover them here in source code, words, and pictures. The add method can be applied to a JFrame in an application similar to the following example:
JFrame jf = new JFrame();
...
jf.add( something );
// or jf.getContentPane().add( something );
It can also be applied to the JApplet's panel, as shown in the following example:
public static void init () {
this.getContentPane().add( something );
In the Applet/JApplet life cycle, there is an init() method which your applet code should override. It is called when the applet is loaded, and it is a good place to place the code that creates these GUI objects. We will use init() for that purpose. If you are writing an applet with Swing components, you must use JApplet (not Applet) as your parent class to ensure that all drawing and updates take place correctly.
Whenever a user operates a JComponent (presses a button or clicks a choice), an event is generated. The source code for the event class can be seen in the $JAVAHOME/src/java/awt/event directory. It contains information about the coordinates of the event, the time it occurred, and the kind of event that it was. If the event was a key press, it has the value of the key. If the event was a selection from a list, it has the string chosen.
As we saw in Chapter 20, the run-time library creates one of these event objects for each occurrence of an event and queues them up on the event queue. The event dispatching thread takes event objects off the queue and calls your appropriate event handlers with the event object as an argument.
Containers are the objects that are displayed directly on the screen. Controls must be added to a container if you want to see them. The container in this example driver program is called JFrame. JFrame will be the main window for most of your Swing applications.
Let's create a JFrame, set its size, set it visible, tell it how to arrange JComponents that are added, and add some event-handler code to exit the program when it detects that you have clicked on the JFrame to close it. That's quite a list of tasks, so we'll split them off into a separate method. Make everything static. In this way, we can use it from the main() method, and we get the following:
import java.awt.*;
import java.awt.event.*;
import javax.swing.*;
public class Demo {
static JFrame jframe = new JFrame("Example");
public static void setupJFrame() {
jframe.setSize(400,100);
jframe.setVisible(true);
jframe.setLayout( new FlowLayout() );
WindowListener l = new WindowAdapter() {
public void windowClosing(WindowEvent e) {
System.exit(0);}
};
jframe.addWindowListener(l);
}
public static void main(String[] args) {
setupJFrame();
JButton jb = new JButton("pressure");
jframe.getContentPane().add( jb );
jframe.setVisible(true);
}
}
The JButton Component that we are demonstrating is printed in bold type. The line that follows adds the JComponent to the JFrame's content pane. To cut down on the extraneous code in the pages ahead, I'll show only the statements that directly deal with the JComponent. That means I'll show only the two bold statements in the example above. You should supply all the missing code when you compile and run the examples. Next, a thread caution, and then on to the first example!