
We come now to the third of the three ideas common to all Java GUI programs: grouping together controls and arranging them neatly by adding them to a container.
We've seen this when we added the JComponents to the content pane of a JFrame, and the JFrame showed up on the screen. The piece that is new is that a container can have different layout policies for where components go on the screen when you add them. A layout policy might be, “Add components from left to right across the container. When you reach the right-hand margin, start a new line of them.” Another layout policy might be, “Components can go to the north, south, east, west, or in the center of the component. You have to tell me where you add one.” There are a number of classes, called Layout Managers, that implement layout policies like these. We are going to describe them at length in this chapter. Before we do, we'll look at containers a bit more closely.
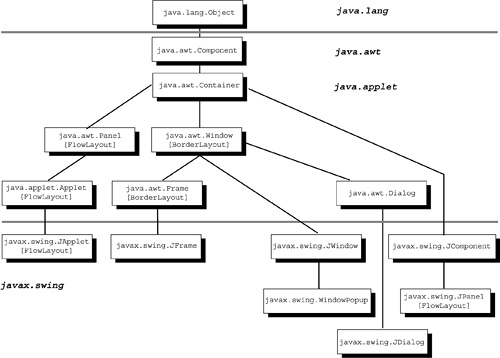
The previous chapter described many controls of JDK 1.2. Now let's take a look at the containers that hold them. Figure 22-2 shows the class hierarchy for containers. Notice that most of the Swing containers are not JComponents, but are specializations of existing AWT containers.
On the following pages, we will outline these containers, suggest typical uses, and show code examples. Container is the class that groups together a number of controls and provides a framework for how they are positioned on the screen.
Container has fields and methods to deal with the following items:
-
The layout manager used to automatically position controls.
-
Forcing the layout to be done.
-
The thickness of any lines or insets (Borders) around its edges.
-
Adding a ContainerListener for ContainerEvents.
-
Adding, removing, and retrieving a list of any of the controls.
-
Size (current, preferred, minimum, and maximum).
-
Requesting the keyboard focus.
-
A
paint()routine that renders it on the screen.
The AWT class called Container is the superclass for components whose purpose is to hold several controls. A Container is essentially a rectangular portion of the screen that allows you to treat several individual controls as a group. You don't display a control directly; you add it to a Container, and it is the container that is displayed.
Container also has methods to get and set many attributes and to add and remove Components from itself. Containers must have either their pack() method called or have their initial size set before they will show up on the screen. Set their size by using the following code:
public void setSize(int width, int height)
The units are pixels (dots on the screen). Since a Container is a subclass of Component, it also has all the Component fields. You should review the Container methods by running javap java.awt.Container.
When you have finished adding or changing the components in a Container, you typically call the first three of these methods on the container.
myContainer.invalidate(); // tell AWT it needs laying out
myContainer.validate(); // ask AWT to lay it out
myContainer.show(); // make it visible
myContainer.pack(); // squeeze it down smaller
In this section, we look at what a Swing container has that an AWT container doesn't, and why you must use a Swing container to contain Swing components. Most of it comes down to the difference between lightweight and heavyweight components and making lightweight components work properly.
You add a component to an AWT container with a statement similar to the following:
Swing containers are different. They have several layers, as Figure 22-3 shows. The different layers are used for different effects.
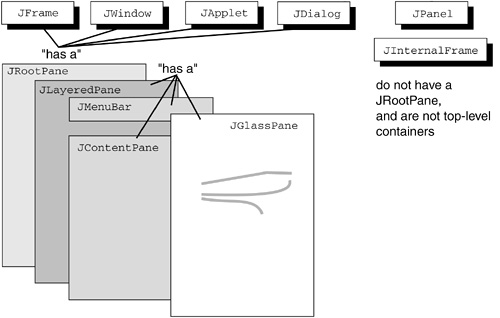
The JRootPane is the data structure that holds all the various other panes that Swing containers have. The JLayeredPane manages the JMenuBar and the content pane. It also maintains a notion of z-order (which components are on top of other components within the container). It has several default depth ranges, including one for floating toolbars, one for modal dialogs, one for things being dragged, and so on. The JLayeredPane does the right thing by default, but also allows you to “get under the hood” and set things explicitly where you want them.
The JContentPane is the object within a Swing container to which you add your JComponents and set layout policies. The default layout policy is border layout. Border layout components are added around the four edges and in the center of the container. The JMenuBar is an object that keeps track of any menus associated with the container. In many cases there won't be any.
The JGlassPane is a transparent pane that lays over everything and allows you to intercept mouse events or draw over the whole container without getting distracted by the components within it.
A JPanel is a lightweight container whose purpose is to be drawn on, and to group controls together. The Swing containers have methods to get and adjust these individual pane layers. We saw many times in the previous chapter how you add components to a Swing container. You add them to the container's content pane with the following code:
mySwingContainer.getContentPane().add(child);
Now we'll look at some individual Swing containers.
A JFrame is a window that also has a title bar, a menubar, a border (known as the inset), and that can be closed to an icon. JFrame is the Swing version of frame. You should avoid mixing Swing and AWT controls and containers.
We've seen the code to create, resize, and show a JFrame throughout the previous chapter. That was done as an application, but frames can also be displayed from an applet. When you create a JFrame, it is not displayed physically inside the applet or other container but is a separate free-floating window on the monitor.
A JFrame is a specialization of frame in the Swing package. It has more refined default behavior on closing the frame, and it adds a number of methods for getting the different “layers” of a Swing container. Following is how you associate a file containing an icon with a frame so that when you close the frame, it collapses to the icon.
// load the image from a file Toolkit
Toolkit t = MyFrame.getToolkit();
Image FrameIcon = t.getImage(filename);
MyFrame.setIconImage(FrameIcon);
The file name should point to a GIF or JPEG file that is the icon you want to use. Typically, this image will be thumbnail-sized, 32 x 32 pixels or so.
A JPanel is a generic container that is always in some other container. It does not float loose on the desktop, as JWindow and JFrame do. A JPanel is used when you want to group several controls inside your GUI. For example, you might have several buttons that go together. Adding them to a panel can treat them as one unit, display them together, and lay them out on the screen under the same set of rules (more about this later).
Note that the Swing JPanel isn't descended from the AWT panel. They still fulfill the same kind of role: to be a generic non-top-level container. By being a JComponent, JPanel can also provide other support not present in AWT. It can provide automatic double buffering and the accessibility help. Double buffering is a technique that uses more memory to obtain flicker-free updates to components that are being updated frequently on the screen.
Applet is a subclass of Panel. This means that applets come ready-made with some GUI features. JApplet is the Swing subclass of Applet. Figure 22-4 shows an applet.
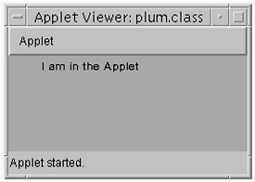
Following is the code that created that applet:
// <applet code=plum.class height=100 width=200> </applet>
import java.awt.*;
import javax.swing.*;
public class plum extends JApplet {
public void init() {
setBackground(Color.green);
resize(250,100);
}
public void paint(Graphics g) {
g.drawString("I am in the Applet", 35,15);
}
}
As with Panel and JPanel, JApplet adds some Swing conveniences and is required when your applet consists of Swing components. Since JApplet is a subclass of Applet, it has all the Applet methods described in Popular Applet methods.
One advantage of an applet over an application for a GUI program is that you can start adding and displaying components without creating an underlying backdrop. With an applet, one already exists.
Here are some popular methods of Applet:
public URL getDocumentBase() //the URL of the HTML page
// containing the applet
public URL getCodeBase() //the URL of the applet code
public String getParameter(String name)
public void resize(int width, int height)
public void showStatus(String msg)
public Image getImage(URL url) //bring in an image
public Image getImage(URL url, String name)
public static AudioClip newAudioClip(URL url) // NEW in 1.2
public AudioClip getAudioClip(URL url) //bring in a sound file
public void play(URL url)
The following four methods are used for the stages in the applet life cycle:
public void init()
public void start()
public void stop()
public void destroy()
As you can see, Applet has several methods that deal with sounds and pictures. For both of these, it uses a URL to pinpoint the file containing the goodies. You can now obtain an audio clip from a URL with a static method. That means you can do it in an application, not just in an applet. You do not have to do anything special to make an applet retrieve media from its server over the Internet—it is a built-in method. A URL can locate something that is local to your system or anywhere on Internet.
The DocumentBase referred to in the first method is simply the directory containing the HTML page that you are currently visiting. Similarly, the CodeBase is the directory that contains the applet you are currently executing. For security purposes, the machine with the codebase is regarded as the server. Often, these two directories will be the same, but since the codebase is a URL, it can be anywhere on the Internet.
This container is a totally blank window. It doesn't even have a border. You can display messages by putting Labels on it. Typically, you don't use Window directly but instead use its more useful subclasses, Frame and Dialog. The Swing class JWindow is really only there to help with pop-up menus.
Windows can be modal, which means they prevent all other windows from responding until they are dealt with (e.g., dismissed with a checkbox). Window has a few methods for bringing it to the front or back, packing (resizing to preferred size), or showing (making it visible). Now that we've met containers, we are ready to move on to the next section and tackle layouts!