
Chapter 15. Advanced Scripting
Familiarity with FileMaker’s lengthy list of script steps is a great foundation, but putting together a workable script takes practice. Although some scripts are simple five-line affairs, sometimes a script requires a lot of forethought, planning, and organization. FileMaker gives you tools to help you write scripts and to troubleshoot them when they aren’t working. Plus, you can organize and document your work as you go. In this chapter you’ll pull these concepts together to learn how to write and manage complex scripts.
Commenting Scripts
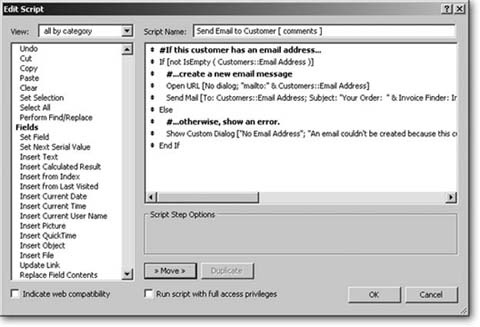
When you look at a script someone else created—or you created a long time ago— it isn’t always obvious what it’s trying to do. To help keep things clear, add comments to your script. You add each comment via a Comment script step. This step has just one option: the text of the comment itself. The comment step is special for two reasons. First, it doesn’t do anything except say whatever you tell it to say. Second, it shows in bold when you view your script in the Edit Script window. You can see a commented script in Figure 15-1.
Asking and Telling the User
Sometimes a script needs to tell your users something—“There are no records to include in this report”—or ask the user a question—“How many copies of the report do you want?” To this end, the Show Custom Dialog script step can display a dialog box that you control. Calling it a “Custom” dialog box might be a bit too generous (you don’t have much say in how it looks), but you do get to give information to people using your database, and ask them simple questions.
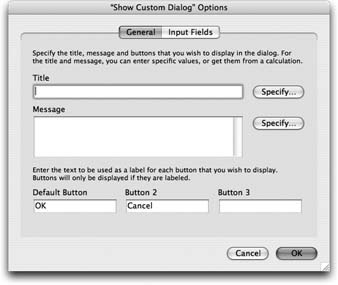
When you add the Show Custom Dialog step to your script and click its Specify button, you see the window shown in Figure 15-2.
Note
There’s another way to help people understand what your scripts are doing: Put comments in any embedded calculations. When a script has an If statement that uses a complex calculation for its condition, you’re free to put comments in the calculation itself.
The Show Custom Dialog script step has three basic purposes. First, it can display a simple message. In a script that finds all overdue invoices, for example, you can have a message that says, “No invoices are overdue” if FileMaker finds nothing. Second, you can create a dialog box that asks a simple question. Say you have a script that posts a customer payment. Before launching into the process, your custom dialog box can ask, “Are you sure you want to post a payment?” and include Post Payment and Cancel buttons for your users’ feedback. Finally, you can use this script step when you need to ask your users to enter some data, not just click a button. For example, a script that runs a sales report might start by asking what date range to report on. Here’s how to create all three types:
Showing a Simple Message
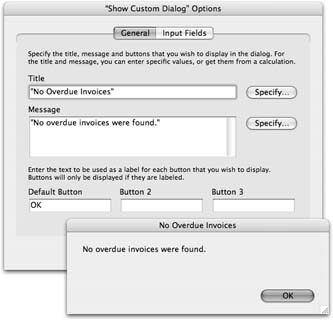
In its simplest form, the Show Custom Dialog script step just delivers a message to the user. Figure 15-3 shows how to configure a box like this, and how the final result looks.
You can generate the title and message from a calculation to make it more dynamic. For instance, if someone wants to see all open invoices for a particular client, but there aren’t any, you can show a calculated custom message that says, “Lucy Pevensie’s account is paid in full,” instead of something equally true, but less helpful, like “No records were found.”
Using a custom dialog box like this in a script is simple. Just use the Show Custom Dialog step wherever you want in your script. When the dialog box pops up, your script waits for the user to click the button, and then continues with the next step.
Asking a Simple Question
To ask the user a simple question (one with either two or three possible responses), just add more buttons to the dialog box by filling in the Button 2 and Button 3 boxes in the Show Custom Dialog Options window. You can see this process in action in Figure 15-4.

When a dialog box like this appears, your script waits for a click of one of its buttons, then continues. Although FileMaker knows whether button 1, 2, or 3 got clicked, you have to add logic to your script to tell the program what to do in each case. For that, you use the Get ( LastMessageChoice ) function and If statements based on its results. (The function returns 1 for the default button, 2 for Button 2, and 3 for Button 3.) The script in Figure 15-5 uses Get ( LastMessageChoice ) to take some steps only when someone clicks a custom dialog box’s default button.

Asking a Not-so-simple Question
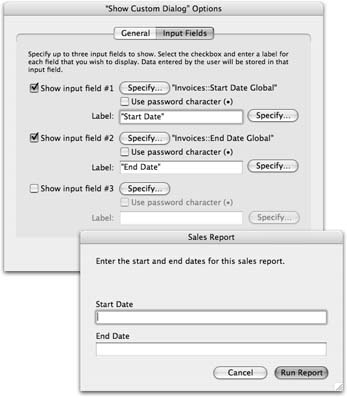
If you need user input that goes beyond two or three simple choices, you can venture into the second tab—Input Fields—in the Show Custom Dialog script step (Figure 15-6). The Show Custom Dialog Options window’s Input Fields tab lets you add fields to your custom dialog box. To add a field to a custom dialog box, turn on one of the “Show input field” checkboxes in the Input Fields tab of the Show Custom Dialog Options window. When you do, FileMaker shows a Specify Field dialog box, in which you can pick the field to use. (If you want to change the field later, click the Specify button).
You can also give the field a label (like Start Date and End Date in Figure 15-6). The label can be the result of a calculation. Finally, if you turn on “Use password character” for an input field, the field works like a typical Password box: It shows * or • instead of the letters you type, so someone watching over your shoulder can’t see what you’re entering.
The fields you add to a custom dialog box have some limitations, including the ones listed below. (For other alternatives, see the box on Section 15.3.)
As far as data entry goes, Show Custom Dialog can have only free-entry fields like those shown in Figure 15-6. You can’t use radio buttons, checkboxes, or pop-up menus. You also have no control over the size of the field, so short fields for dates, or tall fields for lots of text, aren’t an option.
Figure 15-6. You can have, at most, three fields, each of which corresponds to a real field in your database. The window in the front shows how the dialog box looks when the script runs. When the user types something in one of the fields and then clicks the default button, FileMaker puts the entered value into the real field on the current record. If the user clicks Button 2 or Button 3, on the other hand, FileMaker leaves your record’s fields alone.“Data-entry only” validation doesn’t apply to fields in custom dialog boxes. If you use a dialog box to gather data for a record, either use the Always option in the field validation, or check the validity of the data in your script (Section 15.5.1).
You must use the OK button as the default when you’re using input fields in a custom dialog box. Consequently, you have to trust people to read the dialog box when they need to enter data in it.
Organizing Complex Scripts
Sometimes you need a script that does a lot. At the end of this chapter you’ll build a script that generates an invoice for a selected job. As you’ll see, this process involves a lot of steps across several tables. To do all this work in one long script can be cumbersome, especially when several levels of If and Loop steps get mixed up with one another.
In other situations, you might need two or more scripts that do similar things. In fact, sometimes entire sections of two scripts are identical. You might have a script that finds unpaid invoices so it can print a statement, and another that finds unpaid invoices to send email payment reminders.
If you build these two scripts independently, you have two problems. First, you have to write all the “find the unpaid invoices” stuff twice, which is a waste of time. More importantly, next month when you realize you need to exclude voided invoices from the list, you’ll have to remember make the change in both places. A database that’s been growing for years can be a real bear to manage if the same general business logic is implemented over and over in dozens of different scripts.
In both these situations, you can improve your prospects by dividing your scripts into smaller parts. That way, you can break up a complex script into four simpler scripts that each do part of the job. By the same token, you can make one script that finds unpaid invoices and use it both when you print a statement and when you send an email payment reminder.
The Perform Script Script Step
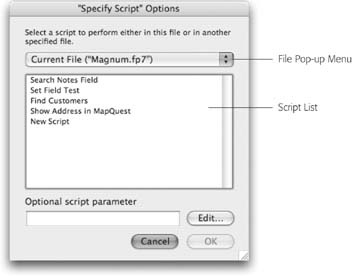
The key to each of these techniques is the Perform Script script step. It lets one script run another script—a subscript, in programming lingo. When you add the Perform Script step to your script, you get only one option: a Specify button. Figure 15-7 shows how to use the Specify Script dialog box to tell your script which subscript script you want to run and what file to find it in.
Halt Script and Exit Script
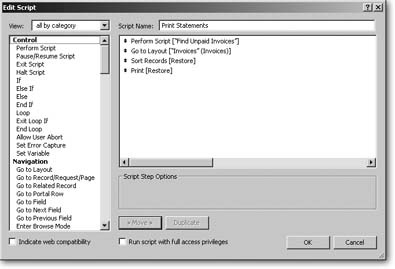
When one script runs another, it waits for the subscript to finish before continuing. Imagine you have a script called Find Unpaid Invoices and you want to make a new script to print statements for all your customers. The Print Statements script might start off by performing the Find Unpaid Invoices script. It would then go to the appropriate layout, sort the records, and print them. The script might look like the one shown in Figure 15-8, which performs the Find Unpaid Invoices script, goes to the Statement layout, and then sorts and prints the invoices.
When you perform a script in another file, FileMaker uses that file’s front most window (which is behind the user’s window). If it doesn’t have any windows, FileMaker automatically creates one. In either case, you’re in a unique scripting situation: The window you’re working with in your script isn’t the one in front. Here is where the Current Window option in the Select Window script step comes in handy.
Normally a script ends when its last step runs. For example, the script in Figure 15-8 ends as soon as the Print step finishes. But you can force a script to end early if you want to. FileMaker actually has two script steps that end a script prematurely: Exit Script and Halt Script. These two steps do exactly the same thing if you run a script yourself directly. But if the current script was run by another script—via the Perform Script step—then they do different things. The Exit Script step tells FileMaker to stop the current script and continue the script that ran it. Halt Script, on the other hand, causes all script execution to stop immediately, no matter how the current script was started. (To learn more about these ominously powerful steps and when to use them, see the box on Section 15.3.3.)
Exit Script (Result)
Their behavior is different when subscripts are involved, but Exit Script also has a powerful option that Halt Script doesn’t have. You can tie all the power of the calculation dialog box to Exit Script. Then your main script can check the script result and decide how to proceed based on the results of the test.
The Halt Script and Exit Script steps are convenient when you want to abort a script’s execution because some problem has come up. But more often than not, you’re better off without them. Take, for example, the two scripts shown here. The top script first performs a find. If no records are found, it shows a custom dialog box and moves on to an Exit Script step. The bottom version does the same thing, but doesn’t exit the script afterwards. Instead, it puts all the remaining script steps in the Else section of the condition. The result is the same—the extra steps run only if some records were found—but the bottom script always ends after the last step. The top script, on the other hand, can end in two different places, depending on what it finds.
Suppose you revisit this script later and want to add some more steps to the end that you want to happen last, every time the script runs—not just when records are found.
If your script looks like the one on top, you have a problem. You either have to add your new steps to the script twice (once before the Exit Script, and again at the end of the script) or reorganize the entire script to support the changes. But the script on the bottom is easy to fix—just add the new steps to the end. In general, if a script ends in more than one place, it will come back to bite you later.
You’re much better off organizing your script so that it always reaches the same ending place.
Halt Script has an even bigger downside. Since scripts can run other scripts, and most databases grow and change over time, you never know for sure if the script you’re writing today is going to be run by another script some day in the future. But it’s rarely acceptable to run another script that may potentially halt. It gives your new script no opportunity to recover if something goes wrong

Script Parameters
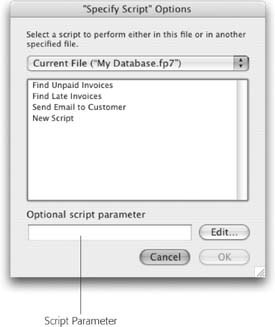
When a script or button runs a script, the Specify Script window shows a box labeled “Optional script parameter.” As you can see in Figure 15-9, you can use script parameters to influence a script’s behavior when you run it. For example, you might make a script that can sort the records in four different ways. The script parameter you specify when you run the script tells it which sort order to use.
Your script accesses its parameter using the Get ( ScriptParameter ) function. This function returns whatever value you specified in the “Optional script parameter” box in the button or Perform Script step.
Tip
A script can have only one parameter. If you really want to send it more than one value, you can put them all together in some way, and then pull them apart again in the script. For example, you could use this for a script parameter:
| Stacey |
| Van Tassell |
| 555-2121 |
| [email protected] |
The script could then use the MiddleValues function to grab each unique value.
Suppose you wanted buttons to sort your Customer records by Name, City and State, or Zip Code. You might think each button needs its own script, but using script parameters, you can get the job done with just one script. Each button passes a different parameter to the script, which takes the appropriate action. Before you can create the buttons, you need to create the script they’ll run:
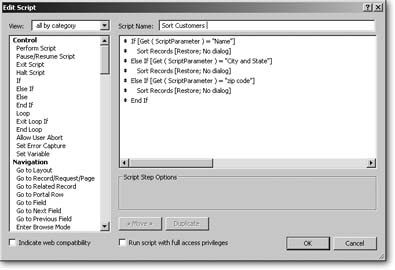
Create a new script called Sort Customers (see Section 13.1.3 for a refresher on creating scripts). Add the If step to the script.
FileMaker adds two new lines (If and End If) to your script.
Click the Specify button. From the View pop-up menu, choose Get functions.
The function list now shows all the Get functions.
Find Get ( Script Parameter ) in the list and add it to your calculation.
You can choose “Get Functions” or “all functions by name” from the View menu to help you narrow the search. The Get ( ScriptParameter ) function returns the parameter value specified when this script was called. If the parameter was a calculation, it returns the result of the calculation. It’s now in the calculation box.
After Get (ScriptParameter) in the calculation box, type = “Name”, and then click OK.
You’re back in the Edit Script window, where the If step shows your calculation. Your calculation should look like this: Get ( ScriptParameter ) = “Name”. Its result is true if the parameter sent to this script is “Name” and false otherwise.
Add the Sort Records script step to the script and turn on the “Perform without dialog” option.
Insert it after the If step and before the End If step. (If yours is somewhere else, move it between these two steps.)
Turn on the “Specify sort order” checkbox, add the Last Name, then First Name fields to the Sort Order list, and then click OK.
Your script now looks like the one shown in Figure 15-10.
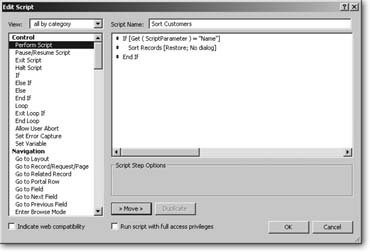
Figure 15-10. This is how your sort script should look after you’ve added the Sort Records step and specified a sort order (step 5 above). In its current form, it sorts the records (by last name, then first name) if “Name” is given as a parameter when the script is run. As described on Section 15.3.3, you need to add support for the other sort orders.Add the Else If script step to the script.
You want Else If to come after the Sort Records step. (If it doesn’t land there, move it there.)
Click Specify. In the Specify Calculation box, enter Get ( ScriptParameter ) = “City and State,” and then click OK.
You’re setting up a new test, this time checking to see if “City and State” is the script parameter. If so, you want a Sort step following this parameter to sort by—you guessed it—City and State.
Add another copy of the Sort Records script step to the script. Turn on “Perform without dialog.” Set the sort order to State, then City, and then click OK.
Your second test, and what to do if that test is true, is now complete.
Add one more copy of the Else If script step, this time with Get ( ScriptParameter ) = “Zip Code” as the calculation.
If the first two tests fail, your script makes this third test.
Add another Sort Record step, this time set to sort by the Zip Code field. Then click OK until you’re back in the database.
Your finished script should look something like Figure 15-11.
Note
When you’re making a series of tests like the ones in this script, it’s more efficient to put the condition that most often test as true at the top. That way, the script doesn’t have to test conditions that usually fail.
Now it’s time to add buttons to the Customers layout to make it easy for your users to run the script. You need three buttons, one for each sort in the script you just wrote.
Add a new button to the Customers layout.
Quickest way: Use the button tool (you know, the one that looks like a finger pushing a button). FileMaker shows you the Specify Button dialog box.
Choose the Perform Script button command, and then click Specify. In the “Specify Script” Options list, select Sort Customers .
This is the script you created on Section 15.5.3.
In the “Optional script parameter” box, type Name, and then click OK until you’re back on the Customers layout.
The first test of the Sort Customers script (Get ( ScriptParameter ) = “Name”) is true when the users run it by clicking this button. Back on the layout, your button awaits its new name.
Note
If you check the text in the Optional script parameter box, you see that FileMaker put double quotes around Name for you. That’s because it considers “Name” a text constant. If you click the Edit button beside the Optional script parameter field, you see the Specify Calculation dialog box, which signals that you can use any value you can calculate as a script parameter.
Name the button Sort by Name .
You now have one button on your layout. Test it. It always sorts by name.
Time to work on the second button. To do so, you can save time by starting from a copy of the one you already have.
Duplicate the Sort by Name button and double-click the new copy. In the dialog box’s Options section, click the Specify button.
The Specify Script Options window pops up.
Change the “Optional script parameter” box so it contains City and State .
Type carefully, since you’re telling the script to exactly match what’s in the Else If statement. The second test of the Sort Customers script (Get ( ScriptParameter ) = “City and State”) is true when the users run it by clicking this button.
Click OK until you’re back on the Customers layout and can rename your button.
Now you have two appropriately named buttons and you can switch the sort order back and forth by clicking each button in turn.
To add the third button, follow steps 1 through 3 again. This time, set the parameter to “Zip Code” and name the button Sort by Zip Code.
These three buttons each call the same script, but the script parameters attached to each button allow the script to do double, even triple duty. To make this script even more flexible, you could keep adding Else If and Sort steps, and then make a button with a script parameter that matches each new test. See the box below for a way to use script parameters to extend the flexibility of the Notes Separator script you wrote back in Chapter 14.
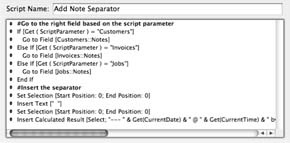
In the previous chapter, you learned how to make the Insert Notes Separator script work with any field (Section 14.2.6). The only drawback was that you had to click the field you wanted to work with before running the script. With script parameters, though, you can easily fix this problem. Just add a series of If and Else If script steps to the top of the script. Each one checks for one of the Notes field types (Invoice, Job, Customer, and so on) in the script parameter.
For instance, if the script parameter is “Invoice,” then the script should use the Go to Field script step to go to the Invoices::Notes field first.
With these conditions in place, you just need to pass the right parameter from your Add Notes button. The picture here shows the finished script. Now if you want to add a new Notes field, you just need to add an Else If and a Go to Field step to this script. If you want to change the way the note separators look, you can change it in one place and the change applies to every Notes field in the database.
Handling Errors
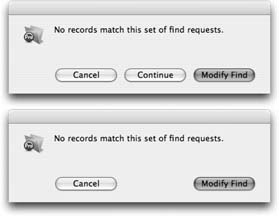
As discussed on Section 9.2.2.2, when an error occurs during a script (a Perform Find finds no records, for instance), FileMaker shows an error message almost like the one it would if you were doing the steps manually. The one difference is a button called Continue, as Figure 15-12 explains.
If the user clicks a Cancel button in an error message, the script stops immediately, and leaves the user wherever the script was when it stopped. If he clicks Continue instead, FileMaker ignores the error and moves on with the script. In the Perform Find example, for instance, the script continues with no records in the found set. Some errors (like the one in Figure 15-12) give the user a third choice. If the user clicks Modify Find, for instance, FileMaker takes him to Find mode on the current layout and pauses the script.
Sometimes this error-handling approach is just fine. If the script is simple and everyone using it knows a little about FileMaker, it isn’t too big a problem. But often, you simply need more control:
If your system is complex and/or your users inexperienced with FileMaker, all sorts of confusion can result. First, the error message may make absolutely no sense to the user. The message complains, for instance, about not finding any records. But the user thinks, “I just wanted to create a new invoice for this job. Who said anything about finding records?” Even worse, if the user clicks Cancel, he could wind up just about anywhere: some layout in some window on some record. It could be a layout (like the Line Items layout) that he’s never even seen before.
If an error happens in the middle of a larger multi-step process, it might be really important that the script know about it and deal with it appropriately. But it’s the user, not the script, which decides whether to continue or cancel. You might want to make sure the script always continues, so it can get on with important work.
Luckily, you can opt for more control over error handling if you want it. FileMaker gives you three functions for finding and dealing with errors that may occur when scripts run.
The Set Error Capture Script Step
The Set Error Capture script step lets you turn on error capture. That way, instead of displaying potentially confusing error messages to your database’s users, FileMaker keeps track of error information (captures it) so you can pull it into your script and handle it there. Although error capturing is a great feature, it’s not part of FileMaker’s normal behavior. You have to activate it by adding the Set Error Capture step to your script, and choosing the On option. At any time in the script, you can turn it back off again by using the step a second time and switching the option off.
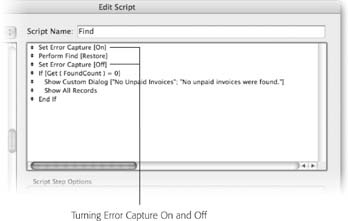
If a script turns error capture on, and then uses the Perform Script step to run another script, the second script also runs with error capture on. In other words, the error capture setting sticks around as long as scripts call other scripts. But as soon as script execution stops for good, FileMaker turns off error capture. Understanding this behavior helps you determine when you need an Error Capture script step and when it would just be redundant. Figure 15-13 shows a script that turns error capture on before performing a find, then turns it back off when it’s done.
As discussed in the box on Section 15.4.2, you could just turn error capture on so that your script ignores any and all errors—but that’s not good script writing. The best way to use Set Error Capture is hand-in-hand with the Get ( LastError ) function, described next, to achieve error-free results.
The Get ( LastError ) Function
When error capture is on, FileMaker doesn’t just ignore the errors. Rather, it remembers which error occurred and gives you the chance to ask about it if you’re interested. The script in Figure 15-13, for example, isn’t interested. It doesn’t ask if an error occurred at all. Instead, it just checks to see if the find worked by counting the records in the found set.
But sometimes you can use such error information within your script, much like any other value, to trigger other script steps. To check an error, use the Get ( ErrorLastError ) function to find out what happened. This function returns an error code, which is always a number. If there was no error in the previous step, Get ( LastError ) returns a zero. In other words, it doesn’t return the number of the last error that occurred. Instead, it returns the error number for the last step that ran. You wouldn’t, therefore, put a comment step before the step that checks the last error, since the comment step itself always sets the last error back to zero. The same goes for End If and even Set Error Capture [Off].
In FileMaker, just about everything that could possibly go wrong has its own error number. This feature gives you a lot of flexibility, but it also makes it a real pain to figure out which errors you should check for. A complete list of error numbers is found in Appendix B. Luckily, most of these errors are pretty obscure, and chances are you’ll never have to worry about them. Here’s a list of the more common error numbers you might actually be interested in:
Error 9, 200 - 211, 723 - 725: Assorted security-related errors (see Chapter 16).
Error 112: Window is missing (you get this error if you try to select, close, or move/resize a window that doesn’t exist).
Error 301: Record is in use by another user (you get this error when you try to modify a record that is locked in another window or by another user).
Error 400: Find criteria are empty (if you let the user enter find criteria during a script, the Perform Script step gets this error if they don’t enter anything).
Error 401: No records match this request (this is the actual error that happens when no records are found; most people choose to check Get ( FoundCount ) instead since it’s easier to understand).
Errors 500 -507: Assorted field validation errors (you get these errors when you try to modify a field in a way that violates its validation setting and it is set to “always” validate).
Errors 718 and 719: XML processing errors (see Chapter 17).
Errors 1200 -1219: Calculation-related errors (you see these errors in conjunction with the EvaluationError and Evaulate functions).
Errors 1400 - 1408: Assorted ODBC errors (see Chapter 17).
Tip
If you’re seeing an error when you run a script, and you want to capture it instead, but you’re unsure which error number it is, try this: Turn on error capture before the step that’s producing the error. Then add a Show Custom Dialog step right after the offending step. Set the dialog box to show Get ( LastError ). When you run the script, instead of the error message you’ve been seeing, you’ll see a custom dialog box with the real error number. You can then modify the script to handle this particular number.
The Allow User Abort Script Step
One more script step has ramifications when dealing with errors: Allow User Abort. This step lets you turn off a user’s ability to cancel the script. Allow User Abort only has two options: on and off. Its normal state is to be turned on, unless you specifically turn it off with the script step. Like Set Error Capture, when you turn user abort off or back on within a script, the setting carries through any subscripts called by the main script. Allow User Abort always turns back on again when the script finishes running.
If you turn user abort off, but leave error capture on, the Cancel button in error messages is removed, so the user is forced to continue the script. Turning off user abort also prevents the user from pressing Escape (Windows) or ⌘-period (Mac OS X) to cancel a running script. Finally, if the script pauses, the user doesn’t get a Cancel button in the status area. Instead, the only choice is to continue.
Putting a Complex Script Together
Building a complicated script takes time and planning. Given the flexible nature of scripting, you could script a given process many different ways, and outside the artful application of your business’s rules to your database, there is no one way. Your job is to find a good way.
In this section, you’ll make a script that generates an invoice for a job. It gathers all the unbilled expenses and timeslips for the job and adds appropriate line items for them to the invoice. To make a script like this you need to cover all your bases:
Planning. Without writing the actual script, what will your general approach be? Can you outline all the things your script will do, and in the right order? This process usually evolves from very general to somewhat specific. The most specific version is the script itself, when you’ll tell FileMaker exactly what to do.
Exceptions. What kinds of things can go wrong? How do you check for, and prevent, those problems?
Efficiency. Are you doing the same things several places in the script? Are there other reasons to break your script into multiple smaller scripts?
Tip
The rest of this chapter is one long excercise. It’s best digested if you work straight through from here to the end—without skipping parts or jumping around.
Planning the Script
Planning a big script is usually an iterative process. You start by outlining the steps the script will take in very general terms. You can then go in and fill in more and more detail with each pass. When you’re done adding detail, you know exactly what steps your script will use. Using the invoicing script as an example, you’ll see how FileMaker gives you the tools to plan and execute your new script.
You can do this planning on paper, or in a word processor, or any other tool you choose. But one good place you might not think of is ScriptMaker itself. Since the planning process involves a series of steps, and since it naturally produces the finished script when it’s done, ScriptMaker is an ideal candidate. Just start with comments explaining each general step. You can then replace a comment line with some real script steps, and perhaps more comments. When you’re done, the script is written. As an added bonus, you never get lost because you always have a comment to tell you exactly what you still need to add, and exactly where it should go.
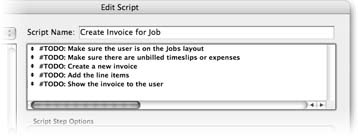
For this script, begin your planning by creating the script in Figure 15-14.
Considering Exceptions
Many people forget one of the most critical steps in scriptwriting—planning for exceptions. The old saw, “A stitch in time saves nine,” truly applies. Spend a few minutes now, thinking ahead to what might go wrong and planning how to prevent problems. These minutes can save you hours of troubleshooting and repair work on your data later.
Look at what your script is supposed to do and try to think of reasonable exceptions—situations where your script might not be able to do its job. Thinking of exceptions is important for two reasons:
If your script always assumes ideal circumstances, it can wreak havoc if your assumptions are wrong when it runs. The last thing you need is a wild script running amok in your data, changing and deleting the wrong things.
If a script gets halfway through its job, and then discovers that it can’t continue, you might be left with half-finished work. It’s usually best to look for the problems up front so the script can simply refuse to run if it won’t be able to finish. (For more detail, see the box on Section 15.5.3.)
For example, the Invoice creation script could run into two potential problems. The problems and fixes, if you haven’t already guessed, are as follows:
How does the script know which job to create an invoice for? This problem is easy to solve. You just make sure the user is on the Jobs layout when the script runs. Then the script runs on the current Job record. If another layout is selected, the script should just do nothing at all. Add an If script step and the Get ( LayoutName ) function. Since you don’t want the script to do anything if the user’s on a different layout, put all the other steps inside the If block.
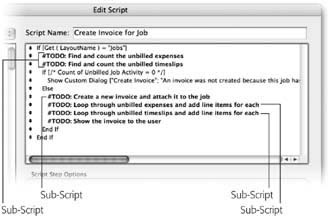
What if the job has no timeslips or expenses that haven’t been billed? You’d wind up with an invoice that has no line items, and you don’t want to send that to your customer. You could go ahead and create the invoice, and then delete it if it’s empty. But this approach uses up an invoice number, and it means your script has to go through all the work of creating an invoice only to throw it away when it’s done. Your script should check first to be sure there’s something to bill. Then, it can show the user an informative message and skip all the hard work when there’s nothing to bill. Here’s how to add the If test, as shown in Figure 15-15.
Add an If step just below the TODO item that finds unbilled expenses. Put a commented calculation (Section 9.7) as your test for now, just to remind yourself what needs to be tested. You can put the real test in later.
Add feedback for the user by putting a custom dialog step in the true part of the If step. If you don’t give the user feedback here, he may become confused, since nothing happens. The dialog box should tell your user why FileMaker doesn’t create any invoice.
Add an Else step. Since you don’t want to create an invoice if there aren’t any billable items for the Job, put the last three TODO items in an Else step. The End If for this test should be just above the final End If in the script.

After you’ve made these changes, the first three TODO comments now suggest that you find some records, then make a decision based on whether any records were found (Figure 15-16, top). In order to do this, you need to store the counts somewhere. In other words, you need a new tool called a script variable, which you’ll learn about later in this chapter.
However, one of the remaining TODO comments is a bit broad. How are you going to “Add the line items?” Since you need to create line items from two different tables—expenses and timeslips—you handle them separately. First, you process expenses, and then you process timeslips. To “process” the expenses, you loop through the unbilled Expense records and add a line item for each one. Ditto for the timeslip records. Edit your script to match Figure 15-16, bottom.

Creating Subscripts
Now that you’ve tested for exceptions in your script, you’ve come to a fork in the road. You could write a script containing all the necessary steps, but it would be long and hard to follow. For example, the End If steps at the end of the script would be a long way from their If and Else counterparts, making it hard to figure out where they belong. Alternatively, you might decide to break this script into pieces. Either way, you should make this decision before going any further.
You might consider a few other things: If you have several small scripts, you can run any one of them individually. This method gives you the chance to try out parts of the script to see if they work properly. Also, since you can pass parameters to scripts when you run them, using subscripts to do some jobs often saves you the trouble of adding another script variable. But in the end, either approach is perfectly valid. Some people really like short simple scripts, even if it means more of them and more opening and closing of the Edit Script window. Others find this multiple-script song and dance far worse than a script that needs a little scrolling.
For this example, you’ll be creating subscripts. Figure 15-17 shows a repeat of your script-in-progress with places for subscripts clearly identified. Each of these scripts are relatively short and easy to understand, but you’ll have five scripts in all. (See the box on Section 15.5.4 for some tips for breaking up long scripts into subscripts.)
Now that you know what subscripts you need, you can create them. And you already know how to do that because a subscript is just another script. To help you keep track of what you’re doing, you should create all the subscripts you’ll need first—but that doesn’t mean writing them all yet. You just need to create scripts in the Define Scripts window and make some placeholder comments to remind you what they should do.
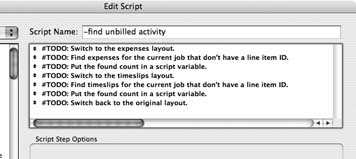
Start by adding a new script called “-find unbilled activity.” This script name starts with a dash, and is in all lowercase. These clues help to remind you later that this script is a subscript used by another script, and not one you should expect to work all by itself. You can see the “-find unbilled activity” script in its planning stage form in Figure 15-18.
Tip
Using naming conventions like this can really help keep your script list organized and easy to work with. Which convention you use, though, is up to you. In this book, all subscripts start with a dash and use all lowercase.
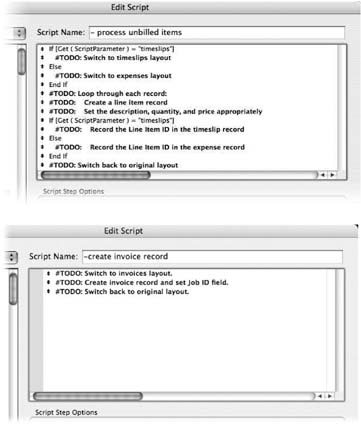
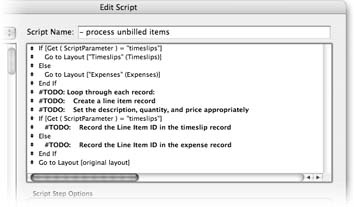
The “- process unbilled expenses” and “- process unbilled timeslips” scripts are almost exactly the same. The only difference is that each script starts by going to a different layout, and sets a different Line Item ID field. It’s more efficient to combine them, and use a script parameter to decide between the two sets of behavior. Figure 15-19 shows the new “- process unbilled items” script, which works equally well for expenses and timeslips. Create the two subscripts shown in Figure 15-19 now.
With the three final subscripts defined, you’re ready to revise the original Create Invoice for Job script. Now, you can delete the TODO comments that served as placeholders for your subscript and replace them with the new subscripts, even though they’re made up of placeholder comments themselves.
The last TODO comment doesn’t need a subscript. It can just use the Go to Layout script step. In Figure 15-20, you can see the result.

Adding a Script Parameter to a Perform Script Step
You already know that you can set a script parameter for a button as it runs a script. You can also set a script parameter when you run a script with a Perform Script step. Take a look at Figure 15-21 to see an example of how that can be helpful: The “-find unbilled activity” script needs to find all the activity for the current job. Since the Create Invoice for Job script is performing this script from the Jobs layout, it can set the Job ID in a script parameter.
Here’s how to set a script parameter on a Perform Script step:
In ScriptMaker, double-click the Create Invoice for Job script to edit it. Select the second script step, Perform Script [”- find unbilled activity"] .
The Script Step Options area shows a Specify button.
Click Specify. In the “Optional script parameter” box, enter Jobs::Job ID .
If you don’t like typing field names, click Edit instead and add the field in the Specify Calculation window. Then close the Specify Calculation window by clicking OK.
Click OK until you’re back in the database.
The first Perform Script step shows the proper parameter value.
The Create Invoice for Jobs script calls all the proper subscripts and sends script parameters to the subscripts where it’s appropriate. Now it’s time to finish writing your subscripts.
Finishing the Subscripts
You’ve created a series of subscripts that have placeholder comments to remind you what process the script will perform. Just as you did with the main Create Invoice for Job script, you’ll finish each subscript and turn them into working scripts by replacing those comments with real script steps.
The “- find unbilled activity” subscript
Now that a script parameter is passing the Job ID to the "- find unbilled activity” script, you can write steps to find the right expense and timeslip records. The first TODO item is a cinch: Just use the Go to Layout script step to switch to the appropriate layout. Next, you need to find expenses for the current job that don’t have a line item ID. This request is one of those find requests that you can’t enter directly in the Perform Find script step because you need to use the script parameter, whose value you don’t know until the script runs. Instead, you have to use Enter Find Mode, Set Field, and Perform Find together to build and perform the right find request:
1. In ScriptMaker, double-click the “-find unbilled activity” script to edit it. Add the Go to Layout script step to the script.
If necessary, drag the Go to Layout step to the top of the script. If a script step is selected, any new step you create lands just below it. But there’s no way to make a new step appear right at the top of a script that already has steps in it.
From the Go to Layout Script Step Options area’s Specify pop-up menu, choose Expenses. Select the first TODO comment, click Clear, and then click Go to Layout again.
FileMaker removes the step from the list. You select Go to Layout so the next script step you create lands below Go to Layout and becomes the second script step.
Add the Enter Find Mode script step to the script. Turn off the Pause checkbox and turn on the “Specify find requests” option.
The Specify Find Requests dialog box pops up. One part of the find request you’ll be using is the same every time: You need to find expenses with nothing in the Line Item ID field. You’ll add this to the find request here, and then insert the Job ID in the next script step.
If any requests are showing in the list, click Delete until they’re all gone. Click the New button.
The Edit Find Request window appears.
From the “Find records when” pop-up menu, choose Expenses, and then click the Line Item ID field.
The selected field is now highlighted.
Click the Insert Symbol button and choose “== Field Content Match” from the resulting menu. Click the Add button. Then click OK, and then OK to get back to your script.
FileMaker puts “==” in the Criteria box. If you prefer, you can just type “==.” Two equal signs, used alone, tell FileMaker you want records where the Line Item ID field matches nothing. These are all your expenses that haven’t been billed.
Add the Set Field script step to the script, and then turn on the “Specify target field” checkbox. Select the Expenses::Job ID field and click OK.
The step should appear after the Enter Find Mode step. If it doesn’t, move it there now. Make sure you get the right Job ID field: You need to pick the Expenses table from the pop-up menu first.
Click the Specify button to the right of “Calculated result.” In the calculation box, enter “==” & Get ( ScriptParameter ). Click OK.
This calculation puts the Job ID (from the script parameter) into the field, with “==” before it, telling FileMaker you want to find records that match this ID exactly. Together with the find request above, the script finds unbilled activity for the current Job.
Add the Set Error Capture script step to the script and make sure its “On” option is selected.
You’re about to perform a find, and you don’t want the user to see an error message if there are no unbilled expenses.
Add the Perform Find script step to the script.
The script step belongs below the Set Error Capture step. Make sure you don’t select Perform Find/Replace by accident.
Add another copy of the Set Error Capture step to the script, this time with the “Off” option selected.
You can select the existing Set Error Capture step, then click the duplicate button, then drag the new step into place and set the option to “Off.” Once the Perform Find step is finished, you want FileMaker to stop capturing error messages.
Your script should now look like the one in Figure 15-21.
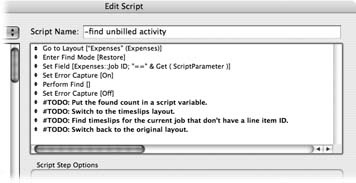
Since it isn’t exactly obvious what this script’s doing, it’s a good idea to add a comment to the top explaining it in plain English. So far, your script finds unbilled items in preparation for creating an invoice. But you need to count the number of records the script has found and store that value. That’s where script variables come in.
Script variables
Global fields are great for storing a value that’s not tied to a specific record in a table. Script variables are similar—you need to store a value for your script to use, usually when you’re testing a condition. Use the Set Script Variable script step to set a variable. There are three options available for this script step:
Give your variable a name. Choose a short, descriptive name. All script variable names require a “$” prefix. If you forget to type the prefix, ScriptMaker adds it for you. But you should get in the habit of typing the prefix because it determines how long the value in the variable is available. A single $ means that the variable is “local” and lasts only while your script is running. If you set a local variable, then perform a subscript, the local variable isn’t sent to that subscript. But if you need a global variable, (the value persists through subscriptsand even after all scripts have finished running), prefix the variable’s name with “$$.” Global variables are cleared when you close the file.
Assign a value. This is the value you want to store in the variable. Values can be text or the result of a calculation.
Set a repetition. Repetitions are optional. You can make a variable store multiple values, similar to the way a repeating field stores multiple values. Most of the time, though, you don’t set a repetition.
Adding a Set Variable script steps is easy. Open your “- find unbilled activity” script in ScriptMaker:
Select the second Set Error Capture script step, then create a Set Variable script step. Click its Specify button (Figure 15-22).
You want to capture the number of records the script just found, so it makes sense to set the script variable as soon as possible after the find was performed.
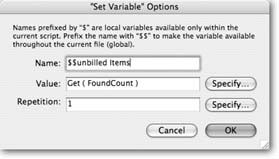
Figure 15-22. The “Set Variable” Options dialog box lets you define variables that you can use in functions throughout your scripts. The two dollar signs at the beginning of “$$unbilled Items” in the name field indicate a global variable—one whose value persists until it’s reset or until the file is closed.In the Name field, type $$unbilled Items .
You need to check this value after the current script is finished running, so use the “$$” prefix to make the variable available globally.
Click the Specify button beside the value field. In the View list, choose “Get Functions.” Choose Get (FoundCount) from the list, and then click OK until you’re back in your database.
If you prefer not to rummage through the Specify Calculation dialog box, you can type Get (FoundCount) in the Value field. You’re telling ScriptMaker to grab the found count from the find and hold it in a variable so you can test that value later on.
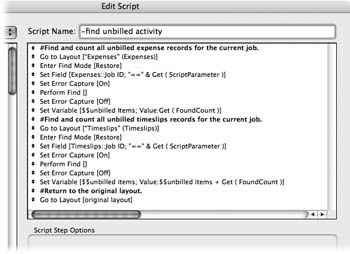
Your script finds all the unbilled expenses in your database and remembers how many records it’s found. Now you have to repeat the process for timeslips. First, though, add a comment to the top of the script that says, “Find and count all unbilled expense records.” In the next section, you’ll see why this comment makes sense.
Tip
Script variables can be mysterious because unlike the Set Field script step, you can’t really see the value that’s set in them. But if you have FileMaker Pro Advanced, there’s a great tool for monitoring variables. See Section 19.1.1.4 to see how the Data Viewer can make your life a whole lot easier.
Copying and editing existing script steps
Since the timeslips half of the script is almost a duplication of what you’ve done in the past two tutorials, you could repeat all those steps above and you’d be done. But it’s a lot faster to duplicate those steps, then make a few changes so that your duplicated steps operate on the timeslips table, not expenses. Here’s how:
Click the first line in the script (the comment you just added). With the Shift key held down, click the last Set Field step, and then click Duplicate.
FileMaker creates an exact copy of the selected steps. They all wind up below the first set.
Double-click the second comment step in the script (the first line of the new set of duplicated steps). Change the word expense in the comment to timeslip. Click OK when you’re done.
The comment shows that this section finds and counts unbilled timeslips. It’s also an easy way to spot where the second half of your script starts.
Select the next step—Go to Layout—and, from Script Step Options area’s popup menu, choose Timeslips.
This time you want to work with Timeslips records, so you need to go to the Timeslips layout.
Double-click the next step: Enter Find Mode. Double-click the find request in the list. Select the only criterion in the list. From the “Find records when” popup menu, choose Timeslips and in the field list, select Line Item ID. Finally, click Change.
You’re changing the find request so that it searches for empty Line Item IDs in the Timeslips table instead of in Expenses. The line in the criteria list changes to show Timeslips::Line Item ID instead of Expenses::Line Item ID.
Click OK, and then OK again.
These two clicks close the Edit Find Request and Specify Find Requests windows, respectively. You’re back in the script.
Double-click the next Set Field step and change the targeted field to Timeslips:: Job ID instead of Expenses::Job ID .
The Set Error Capture and Perform Find steps don’t need to be changed at all, so you skip ahead to the last step.
Select the next Set Variable step (the last non-comment step), and click the Specify button. Change the value calculation to read: $$Unbilled Items + Get ( FoundCount ). Then click OK.
This time you don’t want to replace the value in the script variable, so this calculation simply adds your new count to it.
Select the remaining TODO calculation steps and clear them.
You can do this in one shot by clicking the first one, Shift-clicking the last, and the clicking the Clear button.
Add a Go to Layout step to the end of the script and set it to go to “original layout.”
Once the script is done finding things, it needs to return to the layout it started on so the script that ran this one won’t be surprised by a layout change. It’s usually best when a sub-script puts things back the way they were when it started. If you want, you can also add a comment before this step to separate it from the previous block of steps.
Whew! Finally, the “- find unbilled activity” script is finished. It should look just like the one in Figure 15-23. When you’re done looking, click the OK button.
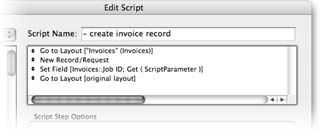
The “- create invoice record” subscript
The "- create invoice record” script needs to switch to the Invoices layout, create a new record, attach it to the job (by filling in its Job ID field) and then switch back to the original layout. Just like the last script, you send it the right Job ID in its script parameter, so your first job is to edit the Create Invoice for Job script, and get it to send the Job ID when it performs the “- create invoice record” script.
Now you’re ready to polish off the “- create invoice record” script itself:
Double-click the “-create invoice record” script in ScriptMaker to edit it. Select the first line: “TODO: Switch to invoices layout.”
The next step you add appears after this comment.
Add the Go to Layout script step to the script. From the Specify pop-up menu, choose Invoices.
You can’t add an invoice record from the Jobs layout, so you’re switching to a layout attached to the Invoices table first.
Select the second comment step: “TODO: Create invoice record and set Job ID field.” Add the New Record/Request step to the script.
The step appears after the second comment.
Add the Set Field step to the script. Turn on the “Specify target field” checkbox. From the pop-up menu at the top of the dialog box, choose Invoices. Then select the Job ID field in the list and click OK.
You want to be sure you’re setting the right-hand Job ID field. When you make this choice, the fields from the Invoices table appear in the list.
Click the Specify button to the right of “Calculated Result.” Set the calculation to Get ( ScriptParameter ) and click OK.
You’re matching the new Invoice to the Job number that was set as the script’s parameter way back when the script began running.
Add the Go to Layout step to the script.
Subscripts should always return the database to its previous state, so the main script doesn’t get confused about its context.
Clear the TODO comment steps from the script and click OK.
Your finished script creates a new Invoice record and sets the proper Job ID in it.
You can see the finished “- create invoice record” subscript in Figure 15-24. Now that your script creates a new invoice, you’re ready to write the subscript that creates its line items.
The “- process unbilled items” script
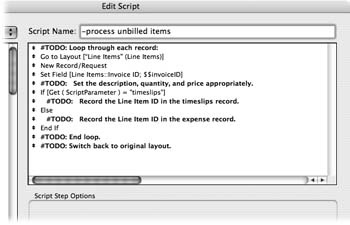
Last up is the "- process unbilled items” script. It’s time to look through its TODO steps and see what’s in store. The first two—“Switch to timeslips layout” and “Switch to expenses layout”—are easy. Just replace them with appropriately configured Go to Layout steps. Figure 15-25. shows how it should look. The last TODO step is just as easy. You should replace it with a Go to Layout step, with the “original layout” option selected.
Retrofitting a prior subscript.
The next item left in the TODO list is “Create a line item record.” This one requires some thinking about what your script knows and when it knows it. Adding a record to the Line Items table is easy:
Switch to a layout attached to the Line Items table.
Create a record with a New Record/Request step.
But these two steps aren’t enough. You need to make sure the new line item record is related to the invoice created by the “- create invoice record” step. To do that, you need to put the right Invoice ID in the Line Items::Invoice ID field.
So where can you find the Invoice ID? It’s back there on the invoice record, but when you’re on the Line Items layout you can’t see the current invoice record because you don’t have the right context.
Here’s one approach. You could:
Hop back to the Invoice table.
Perform a find to make sure the current Invoice record didn’t change while you were gone.
Grab the Invoice ID (wait a minute—how did you find the right record if you didn’t know what it was?).
Then hop back to Line Items.
Find the new record you just made (hope it’s the right new record).
Shove the Invoice ID into the new record.
It’s possible to do all that hopping around reliably, but it’d be a mess. It’s much easier to plan ahead and bring the proper Invoice ID with you when you first get to Line Items. This scenario happens often in scripting. You think you have a script completed, but in order to finish a different script, you’ve to come back to it and add a step or two. So, open the “- create invoice record” script” and add a Set Variable step so the Invoice ID is ready and waiting for you when you need it:
Select the Set Field script step in the “-create invoice record” script. Add a Set Variable script step just below the Set Field step. Click the Specify button.
The value you’re setting needs to persist past the end of this subscript, so you create a global variable, using the $$ prefix in the variable’s name.
Type $$Invoice ID in the Name field. Type Invoices::Invoice ID in the Value field, and then click OK until you’re back in your database.
You can use the Specify button to pick the field from the list, but if you do, make sure you get the Invoice ID field from the Invoices table.
Now, as soon as your script creates a new invoice, it stores the Invoice ID in a script variable for later use.
Getting data from a script variable.
The "- process unbilled items” script now has what it needs to add line items to the invoice. You can go back to it and add steps that create a Line Item and relate it to an Invoice now:
Select the “TODO: Create a line item record” comment step, and then add the Go to Layout script step to the script.
The new step appears after the highlighted comment.
From the Specify pop-up menu, choose Line Items.
This layout is associated with the table you want to add records to.
In order, add a New Record/Request step and a Set Field step to the script. For Set Field, turn on the “Specify target field” checkbox.
The Specify Field window makes another visit.
From the pop-up menu above the field list, choose Line Items. Then select the Invoice ID field, and click OK.
The Set Field step shows it will set the Line Items::Invoice ID field.
Click the Specify button to the right of “Calculated result.” In the Specify Calculation window, set the calculation to $$InvoiceID, and then click OK.
This puts the invoice ID from the script variable into the new line item’s Invoice ID field.
Remove the “TODO: Create a line item record” comment step.
You’re done with it, so clear it away.
Now the "- process unbilled items” script can create a Line Item that’s related to the appropriate Invoice.
Making a script more efficient.
When you’re writing complex scripts, you often find that your game plan changes. The steps you outlined in the TODO comments made sense when you wrote them, but now that you’re implementing the final script, you see things need to be changed. Take a look at your next TODO comment.
After it creates a Line Item, your script needs to return to the layout it came from. You might be tempted to use Go to Layout with the “original layout” setting, but that won’t do it, because the “original layout” is the layout that was current when the script first started. You need to get back to the layout that the If test switched to at the beginning of this script.
You might decide to repeat the same logic you used at the top of the script: Switch layouts based on the script parameter. That method certainly works, but think about what happens when your script runs, using “timeslips” as its parameter:
Switch to the Timeslips layout.
Switch to the Line Items layout.
Add a line item.
Switch to the Timeslips layout.
You’ve discovered that it doesn’t make sense to switch layouts at the top of the script after all. You can let the If test at the bottom handle the switching all by itself. Go ahead and remove those first five script steps (from If to End If). The script now looks like the one in Figure 15-26.
Pulling data through a relationship.
The next TODO comment says you need to “Set the description, quantity, and price appropriately.” That was good enough for a rough sketch, but now it’s time to fill in the detail. You have to think about where that data’s coming from and where it needs to go:
A new timeslip line item. The line item description should match the timeslip description, and its start date and time. The quantity should be the number of hours worked, and the price should be your hourly rate (for now, pretend it is $20).
A new expense line item. The description comes from the expense description. Add “Expense:” to the front, just to make it clear this is an expense. The price should be the amount of the expense, and the quantity should always be 1.
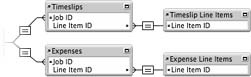
Clearly, then, you need access to two different tables and you may need to do a lot of layout hopping to get back and forth. You already have an If set that lets you update the right Line Item ID field, and there’s no reason you can’t update the line item record from inside this If block. To figure out the best way to move your data around, take a look at Figure 15-27. It shows the relevant portion of the relationship graph for your database.
If you were doing this process manually, it’d make perfect sense to switch layouts, so you could actually see the record you’re modifying. But a script doesn’t need to see a layout to edit data because it’s using a field reference to make sure the data goes into the right field. Think of it this way: If your script’s context has a relationship to the table you need to edit, then you can use the relationship to pull the data through without switching layouts. That’s just what you do to finish this writing the "- process unbilled items” script:
Select the Set Field script step in the script.
You need to grab the Line Item ID before you start the If test.
Add a Set Variable script step. Click the Specify button. Type $LineItemID in the Name field and Line Items::Line Item ID in the value field.
You want to store the Line Item ID in a variable while you’re here, so you can set in your Timeslips or Expenses record later on in the script. Since you won’t need the value after the subscript has run, you can use a local variable (the kind with a single $ prefix). Now the script creates a new blank line item, attaches it to the right invoice, and puts the line item ID in a global field. Your next job is to get this line item ID into the expense or timeslip record.
Select the “TODO: Record the Line Item ID in the timeslip record” comment step.
You’ll tackle this one first.
Add a Go to Layout step, and set it to go to the Timeslips layout.
You can’t work on a timeslip if you’re not on the Timeslips layout.
Add another Set Field step to the script.
Set the options for the Set Field step so it targets the Timeslips::Line Item ID field and uses the calculation, $LineItemID.
Click the Duplicate button. Drag that second copy of the Set Field step down and position it under the last TODO comment line.
It’s now in the right place, but it sets the wrong field. Time to fix that. (You don’t need to change the calculation because in both cases you’re grabbing the value from the same global field.)
Click the Specify button to the right of “Specify target field” and set it to target the Expenses::Line Item ID field.
If your field names match exactly, FileMaker keeps the Line Item ID field highlighted for you. If it doesn’t, select it yourself.
Tip
This saves you a little work, and a lot of hassle remembering which field you’re supposed to be setting. So while you might have thought it was a little confusing to have fields with the same names in different tables, you get a payoff in increased efficiency when you’re rummaging around in dialog boxes.
Add another Go to Layout step, this time targeting the Expenses layout, and put it above the Set Field step you just added.
Again, you need to make sure you’re on the right layout.
Delete the two TODO steps that start with “Record the Line Item ID.”
Isn’t it nice to knock things off your to-do Figure 15-28 shows how your script should look now.

You’ve now created a Line Item record that’s related to another record in either Timeslips or Expenses (remember, that depended on your script parameter). Next, you need to pull three fields worth of data from the related record, so you need three set field steps. You need one set for Timeslips and one for Expenses, so you’ll add six Set Field steps.
The only hard part—and it isn’t that hard—is figuring out what to put in each field. Here goes:
Select the Set Field step that targets the Timeslips::Line Item ID field (it’s the one just after the If step).
This step makes the link to the line item. So your new Set Field steps go after it.
Add a Set Field step to the script. Turn on the “Specify target field” checkbox.
The Specify Field window arrives on cue.
Note
You’re about to set the Description field on the line item record. You’re going to do this by accessing the line item related to the current timeslip. To accomplish it, you need to pick the Timeslip Line Items table occurrence, not Line Items itself. The relationship graph (as shown in Figure 15-28) tells you this.
From the pop-up menu above the field list, choose Timeslip Line Items.
The fields from the Line Items table show in the list. (Remember, this is just another occurrence of the same Line Items table.)
Select Description and click OK.
You’re now targeting the right field. As explained before, you want to put the timeslip date, time, and description in it.
Set the calculation for this step to Timeslips::Date Time & “: " & Timeslips:: Description .
Don’t worry if the box cuts off a bit of the end. Click the Duplicate button when you’re done.
For this next copy of the Set Field step, click Specify (to the right of “Specify target field”), and choose the Price Each field.
You want to set the price to $20.
Set the calculation for this step to, simply, 20. Click Duplicate again.
For this third Set Field step, target the Timeslip Line Items::Quantity field.
Since you duplicated the previous step, the Timeslip Line Items table occurrence is already selected; you just need to pick the field.
Note
Now you need to calculate the number of hours worked. The Timeslips::Duration field is a time field, so it holds the number of seconds worked. To convert seconds to hours, just divide by 60 twice (once gets you to minutes, the second gets you to hours). You should also round the result to two decimal places so you don’t get ugly or truncated numbers on your invoice. The final calculation looks like this:
Round ( Timeslips::Duration / 60 / 60 ; 2 )
Set the calculation for this step to Round ( Timeslips::Duration / 60 / 60 ; 2 ) .
The three Set Field steps are in place for timeslip records. Now you need to add similar steps to the expenses half of the script.
Select the Set Field step that is below the Else step in your script, and add another Set Field step to the script.
This is the same sort of maneuver you took in step 5.
Set the step options to target the Expense Line Items::Description field and use this calculation: “Expense: " & Expenses::Description.
Easy enough. On to number two.
Duplicate the script step, set it to target the Price Each field, and use this calculation: Expenses::Amount .
One more to go.
Duplicate the step again. This time target the Quantity field and set the calculation to, simply, 1 .
Expenses always have a quantity of one.
Creating a looping script.
Your script works great now—if you have only one Line Item to process. But you may have a dozen unbilled items that need to go on your invoice. So you’ll create a loop that repeats for all your Line Items. The toughest thing about creating a loop is getting the steps in the right places:
Add a Loop step to the script.
That’s right: Both Loop and End Loop appear in the script. Your goal is to wrap the Loop and End Loop steps around everything that should happen over and over. That means everything except the Go to Layout step at the end.
Drag just the Loop step to the very top, so that it’s first step. Drag the End Loop step down so that it’s positioned between End If and the last Go to Layout step.
When you’re done, you can remove the “TODO: Loop through each record” comment line.
Add a Go to Record/Request/Page step just before the End Loop step. In the Specify pop-up list, choose Next. Click the “Exit after last” option.
You don’t have to use an Exit Loop If step in this script, because you have a finite set of records to flip through.
If you know ahead of time that you’ll be processing a set of records, you can always start writing your script with a loop. But for testing a script, it’s often easier to figure out what’s happening if you don’t add the loop until you know the core of the script works. Figure 15-29 shows the final script.
To test your script, first go to a job record that has unbilled timeslips and expenses (or create a new one if necessary). Once you’re on the job record, run your Create Invoice for Job script. In a flash, you should see a new invoice, properly assigned to the customer and containing line items for each unbilled item. You might be a little miffed that it took you hours to build the script, and FileMaker runs the whole thing in seconds. Cheer up, though; think how much time it will save you in the future.
Tip
If the script doesn’t work, you have a few options. First, you can look below to see the complete text of each script and make sure yours match. But if you have FileMaker Advanced, you should also read about the Debug Scripts and Data Viewer tools in Chapter 19. These gems can make hunting down script problems a breeze.
The Finished Scripts
To help you hunt down problems, here are the four scripts you just created, with all options fully specified (you can also get them at www.missingmanuals.com).
Create Invoice for Job
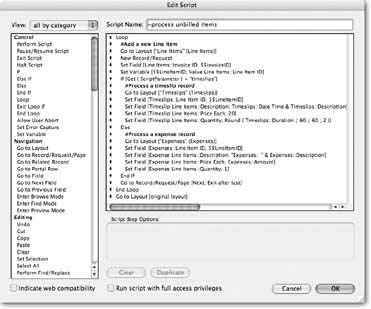
	If [ Get ( LayoutName ) = "Jobs" ]
	Perform Script [ Script: "- find unbilled activity";
	Parameter: Jobs::Job ID ]
	If [ $$unbilled Items = 0 ]
	Show Custom Dialog [ Title: "Create Invoice"; Message: "This job has no
	unbilled activity, so no invoice was created."; Buttons: "OK" ]
Else
	Perform Script [ Script: "- create invoice record"; Parameter: Jobs::Job ID ]
	Perform Script [ Script: "- process unbilled items"; Parameter: "timeslips" ]
	Perform Script [ Script: "- process unbilled items"; Parameter: "expenses" ]
	Go to Layout [ "Invoices" ]
	End If
	End If
-find unbilled activity
#Find and count all unbilled expense recordsGo to Layout [ "Expenses" (Expenses) ] Enter Find Mode [ Specified Find Requests: Find Records; Criteria: Expenses:: Line Item ID: "==" ] [ Restore ] Set Field [ Expenses::Job ID; "==" & Get ( ScriptParameter ) ] Set Error Capture [ On ] Perform Find [ ] Set Error Capture [ Off ] Set Variable [ $$Unbilled Items; Value:Get ( FoundCount ) ]#Find and count all unbilled timeslip recordsGo to Layout [ "Timeslips" (Timeslips) ] Enter Find Mode [ Specified Find Requests: Find Records; Criteria: Timeslips: :Line Item ID: "==" ] [ Restore ] Set Field [ Timeslips::Job ID; "==" & Get ( ScriptParameter ) ] Set Error Capture [ On ] Perform Find [ ] Set Error Capture [ Off ] Set Variable [ $$Unbilled Items; $$Unbilled Items + Get ( FoundCount ) ]#Return to the original layoutGo to Layout [ original layout ]
- create invoice record
	Go to Layout [ "Invoices" (Invoices) ]
	New Record/Request
	Set Field [ Invoices::Job ID; Get ( ScriptParameter ) ]
	Set Variable [ $$invoice ID; Invoices::Invoice ID ]
	Go to Layout [ original layout ]
- process unbilled items
	Loop
	#Add a new empty line item
	Go to Layout [ "Line Items" (Line Items) ]
	New Record/Request
	Set Field [ Line Items::Invoice ID; $$Invoice ID ]
	Set Variable [ $LineItemID; Value:Line Items::Line Item ID ]
	If [ Get ( ScriptParameter ) = "timeslips" ]
	#Process a timeslip record
	Go to Layout [ "Timeslips" (Timeslips) ]
	Set Field [ Timeslips::Line Item ID; $LineItemID ]
	Set Field [ Timeslip Line Items::Description; Timeslips::Date Time & ": " &
	Timeslips::Description ]
	Set Field [ Timeslip Line Items::Price Each; 20 ]
	Set Field [ Timeslip Line Items::Quantity; Round ( Timeslips::Duration / 60 /
	60 ; 2 ) ]
	Else
	#Process an expense record
	Go to Layout [ "Expenses" (Expenses) ]
	Set Field [ Expenses::Line Item ID; $LineItemID ]
	Set Field [ Expense Line Items::Description; "Expense: " & Expenses::
	Description ]
	Set Field [ Expense Line Items::Price Each; Expenses::Amount ]
	Set Field [ Expense Line Items::Quantity; 1 ]
	End If
	Go to Record/Request/Page [ Next; Exit after last ]
	End Loop
	Go to Layout [original layout]
Congratulations! You’ve just made it through a long, hard slog. Perhaps it seemed like you didn’t know where you where going, but that’s often the case when you’re writing scripts. In this chapter, you learned a system for breaking down a complicated task into manageable pieces. When you’re writing your first few complex scripts, you’ll probably want to follow the same procedure fairly closely. But as you gain experience, you’ll find that planning, finding exceptions, and subscripting will start to feel natural. You’ll start envisioning scripts of increasing complexity and making them your own way, without following a rigid plan.