
From its inception, the joystick has been used chiefly as an input device for game systems. Admittedly, its name alone limits its usage to the entertainment industry, as I doubt too many accountants would purchase a “joystick” for crunching numbers in a spreadsheet. At any rate, joysticks and game pads both play an important role in modern video games of all kinds, including computer games. For this reason, it’s important for you to have an understanding of how to interpret and respond to joystick input in your own games. This hour introduces you to joysticks and what makes them tick, along with providing you with the knowledge and source code to handle joystick input in games.
In this hour, you’ll learn:
The basics of responding to joystick input in games
How to properly calibrate a joystick in Windows XP
How to add joystick support to the game engine
How to use the new and improved game engine to create interesting programs that respond to a joystick
The concept of a joystick is straightforward, although you might be surprised by how loosely a joystick is defined in terms of Windows programming. In Windows, a joystick is a physical input device that allows variable movement along different axes with multiple pushbuttons. That’s the geeky description of a joystick. What it means is that a joystick is an input device that can move in several different directions. Notice that I said several directions, not just two. Although a traditional joystick is thought of in terms of two axes (X and Y), a joystick in Windows can actually go up to six axes. Fortunately, we aren’t going to worry about more than two joystick axes in this hour, which helps simplify things considerably.
Note

The six possible joystick axes supported by Windows can be arranged in many different ways. A traditional joystick has two axes that correspond to moving the joystick handle side to side (one axis) and forward and back (another axis). A third axis of movement can be added by allowing the joystick handle to be pushed and pulled vertically. A fourth axis can be the twisting of the joystick handle. The fifth and sixth axes apply to more advanced input devices, and are typically used for keeping track of moving the entire joystick in space, like an input glove.
Because a traditional joystick has only two axes of motion, you can think of the joystick in much the same way as you think of the mouse. Although a mouse can be moved in any direction, its movement is limited to a single plane. In other words, you can always resolve mouse movement into an XY value. Joysticks are similar in this manner because you can identify their movement according to how far the handle is being pushed along each axis. If side to side movement is along the x axis and forward and back movement is along the y axis, a joystick can be tracked in a manner similar to the mouse by using an XY value.
Also similar to the mouse are the buttons on a joystick. Just as mice are capable of supporting multiple buttons (typically three), joysticks are also capable of having several buttons. In fact, joysticks are much more flexible than mice in terms of how many buttons they can have; joysticks in Windows are allowed to have up to 32 buttons. I personally wouldn’t want to try and figure out how to use a joystick with that many buttons, but the option is there if someone wants to make a joystick for super humans. A more realistic number for joystick buttons is six, which is still a lot to keep track of for the average game player. Similar to mouse button presses and keyboard key presses, handling joystick button presses is relatively straightforward, as you learn a little later in the hour.
Before getting into the details of how to handle joystick input from a programming perspective, it’s worth addressing an important issue related to joysticks: calibration. Calibration is the process of fine-tuning the settings for a joystick so that the handle is properly centered. Joystick calibration is kind of like having your car aligned; when a joystick isn’t properly calibrated, it has a tendency to pull to one side. Fortunately, joystick calibration is easy to perform, and is readily available from the Windows Control Panel. To access joystick settings, just follow these steps in Windows XP:
Click the Start button, and select Control Panel.
Click Printers and Other Hardware.
Click Game Controllers.
Select the joystick (game controller) to calibrate, and then click the Properties button.
Note
Even if you aren’t using Windows XP, you’ll still find some kind of joystick or controller icon in the Control Panel for calibrating and testing your game controllers. The specifics of calibrating your joystick might be a little different from the steps I’ve listed, but the general idea is the same.
After following these steps, you’ll be presented with a window that is specific to your particular joystick. In my case, I’m using a Microsoft SideWinder game pad, so the window I see is shown in Figure 7.1.
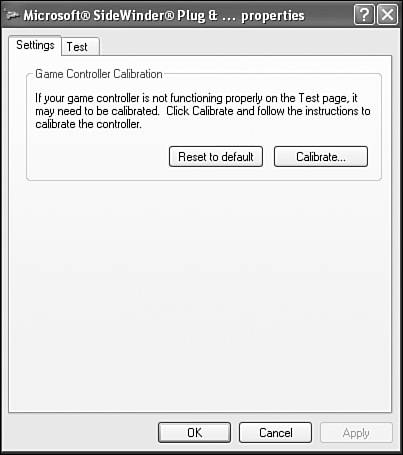
Figure 7.1. The Properties window for your joystick should provide a means of calibrating the joystick.
To calibrate my joystick (game pad), I just click the Calibrate button. This starts the Device Calibration Wizard, which is shown in Figure 7.2.
Click the Next button to get started calibrating the joystick (see Figure 7.3).
Figure 7.3. Calibrating a joystick first involves pressing a button on the joystick without touching the joystick handle (or control pad for game pads).
The first step in calibrating a joystick is to leave the handle centered and press a button, as shown in Figure 7.3. In the case of a game pad, you simply don’t touch the control pad (D-Pad) and then press a button. You are then prompted to calibrate the axes of the joystick by moving the handle or control pad in all of its directions, followed by pressing another button (see Figure 7.4).
Figure 7.4. The Device Calibration Wizard determines the range of each joystick axis by asking you to move the handle or control pad in each direction.
The final step is to leave the handle (control pad) alone once more and press a button. After performing these steps, you can click the Finish button to wrap up the calibration process. Although the steps to calibrating a joystick or game pad might seem kind of pointless, the idea is that your computer is analyzing the range of movement along each axis and properly determining the center point of each. Once the center point and maximum extents are determined, the joystick can then be accurately centered. Again, it’s very much like aligning a car so that it steers straight when you aren’t touching the steering wheel.
I encourage you to calibrate your joystick any time it starts acting strange because it is possible for a joystick to lose calibration over a period of time as it begins to wear mechanically. Your joystick’s Properties window usually provides a test option for testing the joystick after you’ve calibrated it; this helps to make sure that the calibration worked properly. Figure 7.5 shows an example of a test window for the Microsoft SideWinder game pad.
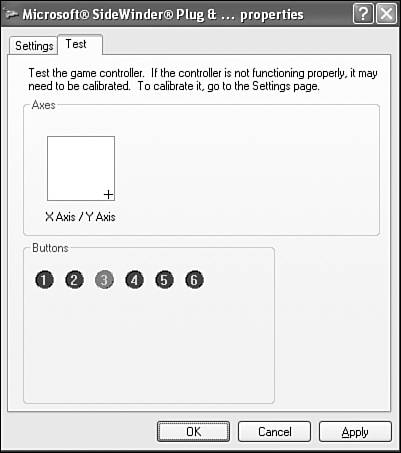
Figure 7.5. The test window for the Microsoft SideWinder game pad allows you to test out the control pad as well as the game pad’s buttons.
The test window for a joystick or game pad is great because it quickly allows you to see if the device is working properly. If you get no response when testing a device, you know that something is wrong with the installation. You can also use the test window to see if a joystick or game pad is properly calibrated.
As you might have guessed, joysticks are a little more complicated to deal with than other input devices such as the keyboard and mouse. This primarily has to do with the fact that joysticks aren’t exactly considered standard devices, as well as the fact that there is a fair amount of variance when it comes to joystick features. The added complexity doesn’t have so much to do with handling specific joystick events as it does with determining if a joystick is connected and available for use. You also have to concern yourself with the concept of capturing a joystick, which gives your program exclusive control over the joystick.
The first step in handling joystick input is checking to see if a joystick driver is installed and available on the computer system. Without the proper hardware driver in place, a physical joystick device is no good. Fortunately, Windows includes built-in drivers for most popular joysticks. However, it’s good to perform the check anyway. This is made possible by a call to a Win32 API function called joyGetNumDevs(). The joyGetNumDevs() function tells you how many joysticks are capable of being used on the computer system. Following is an example of how you might call the joyGetNumDevs() function to determine the number of joysticks available for use on the system:
UINT uiNumJoysticks = joyGetNumDevs();
You now know how many joysticks can be used on the system, but that doesn’t tell you much about how many joysticks are actually present. To see if a real joystick is actually plugged in and ready to use, you call the joyGetPos()
function, which provides a lot of information about a joystick. You must pass this function an ID that identifies the joystick you’re interested in; standard joystick IDs include JOYSTICKID1, JOYSTICKID2, and so on. So, to check for the presence of a single joystick, you can use code like this:
JOYINFO jiInfo;
if (joyGetPos(JOYSTICKID1, &jiInfo) != JOYERR_UNPLUGGED)
  // the joystick is plugged in and ready to go!
In this code, the joyGetPos() function is called to retrieve joystick information for a single joystick in the form of a JOYINFO structure.
You learn how to use the JOYINFO structure to analyze the state of the joystick in just a moment. For now, you’re simply providing it because the joyGetPos() function requires it. All you’re looking for in this code is the return value of joyGetPos(), which indicates whether the joystick is plugged in and responding to user input. If the function doesn’t return JOYERR_UNPLUGGED, you’re in good shape.
When working with joysticks in the Win32 API, you always reference a joystick using a unique ID. This ID must be one of the built-in joystick IDs (JOYSTICKID1, JOYSTICKID2, and so on). In the case of the previous sample code, the JOYSTICKID1 ID checked out okay, so it’s the ID you must use to continue interacting with the same joystick.
The joyGetPos() function is the function you call to check the status of the joystick, which is how you determine if the user has interacted with your game via the joystick. The status of the joystick is stored in the JOYINFO structure, which is defined as follows:
typedef struct {
  UINT wXpos;
  UINT wYpos;
  UINT wZpos;
  UINT wButtons;
} JOYINFO;
You’ll notice that the JOYINFO
structure is designed to accommodate joysticks with up to three axes of movement: x, y, and z. The first three members of the structure (wXpos, wYpos, and wZpos) indicate the position of the joystick with respect to each of these axes. The final member, wButtons, indicates the state of the joystick buttons. The wButtons member supports up to four buttons, as indicated by the following constants: JOY_BUTTON1, JOY_BUTTON2, JOY_BUTTON3,
and JOY_BUTTON4.
Note
Earlier, I mentioned that Windows supports up to six axes and 32 buttons on joysticks, but the JOYINFO structure is obviously more limited than that. The reason for this disparity is because the full range of joystick features are only available through the DirectX game API, which is significantly more complex to use than the built-in Win32 joystick support. If you’re planning on supporting a gyroscopic nuclear-powered virtual reality game helmet in your games that takes advantage of all the axes and buttons possible, you definitely need to get to work learning DirectX. Otherwise, I think you’ll find the Win32 approach to joystick handling to be sufficient.
In order to examine a JOYINFO structure to see what’s happened to a joystick, you must first obtain the joystick state using the joyGetPos() function, which is the same function you used to see if a joystick was plugged in. Following is a code example that examines a JOYINFO structure to see if the first joystick button is being pressed:
JOYINFO jiInfo;
if (joyGetPos(JOYSTICKID1, &jiInfo) == JOYERR_NOERROR)
  if (jiInfo.wButtons & JOY_BUTTON1)
    // Button 1 was pressed!
This code calls the joyGetPos()
function to fill a JOYINFO structure with information about the
current joystick state. If the return value of the function is JOYERR_NOERROR, there was no problem retrieving the information and we can continue. The bitwise AND operator (&) is then used with the wButtons member of the JOYINFO structure and the JOY_BUTTON1 constant to see if button 1 on the joystick is being pressed. You can use the same approach to look at other joystick buttons.
You’re probably wondering why I’ve avoided talking about the other members of the JOYINFO structure,
and how they are used to determine the position of the joystick handle. The reason for this has to do with the fact that you need to understand the range of values possible for these members before you can make sense of them. More specifically, you need to find out the minimum and maximum values for each axis of movement that you’re interested in checking. For example, if you want to see if the joystick has been moved left, you first need to find out the range of values for the x axis of the joystick. You can then use this range to see how far left the joystick handle is being pushed, if at all.
You can determine the ranges of joystick axes by calling the Win32 joyGetDevCaps()
function. This function fills a JOYCAPS structure with more information about a joystick than you’ll probably ever want to know. For that reason, I won’t go into all the details of the JOYCAPS structure. Instead, I’d like to focus on how to use it to determine the range of the two primary axes, x and y. Following is a code snippet that determines the center point of the x and y axis, which reveals the ranges of each:
JOYCAPS jcCaps;
joyGetDevCaps(JOYSTICKID1, &jcCaps, sizeof(JOYCAPS));
DWORD dwXCenter = ((DWORD)jcCaps.wXmin + jcCaps.wXmax) / 2;
DWORD dwYCenter = ((DWORD)jcCaps.wYmin + jcCaps.wYmax) / 2;
The minimum and maximum values for the x axis are wXmin and wXmax, whereas the y axis is bound by wYmin and wYmax. Adding these pairs of numbers and dividing by 2 gives you the center point of each axis, which is the point at which the joystick handle is at rest. With these values in hand, you can now determine a certain value that must be tripped in order to consider the joystick handle as having been moved in a given direction. This simplifies joystick movements into standard directions such as up, down, left, right, and so on. If you want to provide for very fine joystick control in your game, you might consider taking advantage of the full range of movement along each axis.
The discussion of joysticks has been leading to a task that you probably knew was coming: another enhancement to the game engine. The idea is to continue beefing up the game engine with features so that the unique code for each game remains as minimal as possible. Knowing this, it’s important to place as much joystick handling code in the game engine as possible. Before showing you the code, however, it’s important to clarify a compile-time issue related to the Win32 joystick functions and data structures.
Although joystick support is now a standard part of Win32, this wasn’t always the case. Once a multimedia subsystem was added separately to the Win32 API—of which joystick support is a part. For this reason, the joystick functions and data structures are not defined in the standard windows.h header file, and instead are located in the mmsystem.h header file, which is provided as part of the Win32 API. Following is an example of how you include this file in your code:
#include <mmsystem.h>
Okay, there’s nothing tricky there. However, just importing the header file isn’t enough because the executable code for the joystick support is located in a separate library that you must link into your games. This library is called winmm.lib, and it is included with all Windows compilers. Before you attempt to compile a Windows program that takes advantage of joystick features of the Win32 API, make sure that you change the link settings for the program so that the winmm.lib library file is linked into the final executable. Refer to the documentation for your specific compiler for how this is done, or follow these steps if you’re using Microsoft Visual Studio:
Open the project in Visual Studio (Visual C++).
Right-click on the project’s folder in Solution Explorer, and click Properties in the pop-up menu.
Click the Linker folder in the left pane of the Properties window, and then click Input.
Click next to Additional Dependencies in the right pane, and type a space followed by
winmm.lib. You should already have the msimg32.lib library entered here, which is why it is necessary to type a space before entering winmm.lib.Click the OK button to accept the changes to the project.
After completing these steps, you can safely compile a program and know that the winmm.lib library is being successfully linked into the executable program file.
As you now know,
games interact with the game engine primarily through a series of functions that are called by the game engine at certain times throughout a game. In order to add joystick support to the game engine, it’s important to add a new function that is going to receive joystick notifications. This function is called HandleJoystick(), and its prototype follows:
void HandleJoystick(JOYSTATE jsJoystickState);
The HandleJoystick() function accepts as its only argument a custom data type called JOYSTATE. The JOYSTATE
data type is a custom type used to convey the state of a joystick at any given time. Listing 7.1 contains the code for the JOYSTATE data type.
The JOYSTATE data type is a WORD value capable of containing one or more constant flags that indicate the state of various aspects of a joystick. For example, if the joystick handle is currently in the left position, the JOY_LEFT flag will appear in a JOYSTATE value. Multiple flags can be combined in the JOY_STATE data type, which makes sense when you consider that a joystick could simultaneously be in several of the states listed in the code.
You learned earlier that a joystick is identified by a unique ID, which is basically a number. You also learned that a joystick movement can be simplified into a simple direction by analyzing the range of motion for the joystick handle. This is accomplished by establishing a trip rectangle for the joystick, which is an area that determines how far the joystick handle must move in order for it to count as a directional event (up, down, left, right, or a combination). The purpose of the trip rectangle is to only cause joystick movement events to be generated if the handle moves so far, as shown in Figure 7.6.
Figure 7.6. A trip rectangle for the joystick helps to ensure that a joystick movement event is only generated if the joystick handle moves a certain minimum distance.
You now know that the game engine needs to keep track of two pieces of information in order to support a joystick: the joystick’s ID and a trip rectangle for interpreting joystick movement. Following are the two member variables added to the game engine that account for this information:
UINT m_uiJoystickID;
RECT m_rcJoystickTrip;
In addition to these member variables, the game engine also requires some support methods for managing joystick input. More specifically, it needs to properly initialize the Win32 joystick input system, which involves making sure that a joystick is connected and retrieving its ID, as well as calculating the trip rectangle. You also need methods to capture and release the joystick, which you learn about in a moment. And finally, you need a method to check the state of the joystick and convert numeric joystick movements into more meaningful directions. Following are the methods added to the game engine that accomplish all of these tasks:
BOOL InitJoystick();
void CaptureJoystick();
void ReleaseJoystick();
void CheckJoystick();
The InitJoystick() method
must be called by a game in order to initialize the joystick, retrieve its ID, and determine the trip rectangle. Its code is shown in Listing 7.2.
Example 7.2. The GameEngine::InitJoystick()
Method Checks to Make Sure That a Joystick Is Present, and Then Initializes It
 1: BOOL GameEngine::InitJoystick()
 2: {
 3:   // Make sure joystick driver is present
 4:   UINT uiNumJoysticks;
 5:   if ((uiNumJoysticks = joyGetNumDevs()) == 0)
 6:     return FALSE;
 7:
 8:   // Make sure the joystick is attached
 9:   JOYINFO jiInfo;
10:   if (joyGetPos(JOYSTICKID1, &jiInfo) != JOYERR_UNPLUGGED)
11:     m_uiJoystickID = JOYSTICKID1;
12:   else
13:     return FALSE;
14:
15:   // Calculate the trip values
16:   JOYCAPS jcCaps;
17:   joyGetDevCaps(m_uiJoystickID, &jcCaps, sizeof(JOYCAPS));
18:   DWORD dwXCenter = ((DWORD)jcCaps.wXmin + jcCaps.wXmax) / 2;
19:   DWORD dwYCenter = ((DWORD)jcCaps.wYmin + jcCaps.wYmax) / 2;
20:   m_rcJoystickTrip.left = (jcCaps.wXmin + (WORD)dwXCenter) / 2;
21:   m_rcJoystickTrip.right = (jcCaps.wXmax + (WORD)dwXCenter) / 2;
22:   m_rcJoystickTrip.top = (jcCaps.wYmin + (WORD)dwYCenter) / 2;
23:   m_rcJoystickTrip.bottom = (jcCaps.wYmax + (WORD)dwYCenter) / 2;
24:
25:   return TRUE;
26: }
The code in this method should look reasonably familiar from the discussion earlier where you found out how to interact with joysticks. The joystick driver is first queried to make sure that it exists (lines 4–6). A test is then performed to make sure that the joystick is plugged in and ready to go (line 10)—after which, the ID of the joystick is stored in the m_uiJoystickID member variable (line 11). The trip rectangle is then calculated as a rectangle half the size of the joystick bounds in each direction (lines 16–23). This size is somewhat arbitrary, so you could feasibly tweak it if you wanted, meaning that the user has to push the joystick handle half of its total possible distance in a given direction in order for it to register as a directional move.
Listing 7.3 contains the code for the CaptureJoystick() and ReleaseJoystick() methods, which are quite important. In order for a program to receive joystick input, it must first capture the joystick, which means that the joystick is only going to communicate with that program. When a program is deactivated, it’s important to release the joystick so that it is no longer captured; this allows another program to capture the joystick if necessary.
Example 7.3. The GameEngine::CaptureJoystick()
and GameEngine::ReleaseJoystick() Methods Are Responsible for Capturing and Releasing the Joystick, Respectively
 1: void GameEngine::CaptureJoystick()
 2: {
 3:   // Capture the joystick
 4:   if (m_uiJoystickID == JOYSTICKID1)
 5:     joySetCapture(m_hWindow, m_uiJoystickID, NULL, TRUE);
 6: }
 7:
 8: void GameEngine::ReleaseJoystick()
 9: {
10:   // Release the joystick
11:   if (m_uiJoystickID == JOYSTICKID1)
12:     joyReleaseCapture(m_uiJoystickID);
13: }
Capturing and releasing a joystick is as simple as calling the joySetCapture() and joyReleaseCapture() Win32 functions, as shown in lines 5 and 12. Keep in mind that it’s up to a program to call these two methods at the appropriate time (upon activation and deactivation) in order for joystick input to work properly.
Listing 7.4 contains the last of the new game engine joystick methods, CheckJoystick(),
which is the method that is repeatedly called by a program to analyze the current joystick state and see if anything interesting has happened.
Example 7.4. The
GameEngine::CheckJoystick() Method Checks the State of the Joystick and Passes It Along to the HandleJoystick() Function
 1: void GameEngine::CheckJoystick()
 2: {
 3:   if (m_uiJoystickID == JOYSTICKID1)
 4:   {
 5:     JOYINFO jiInfo;
 6:     JOYSTATE jsJoystickState = 0;
 7:     if (joyGetPos(m_uiJoystickID, &jiInfo) == JOYERR_NOERROR)
 8:     {
 9:       // Check horizontal movement
10:       if (jiInfo.wXpos < (WORD)m_rcJoystickTrip.left)
11:         jsJoystickState |= JOY_LEFT;
12:       else if (jiInfo.wXpos > (WORD)m_rcJoystickTrip.right)
13:         jsJoystickState |= JOY_RIGHT;
14:
15:       // Check vertical movement
16:       if (jiInfo.wYpos < (WORD)m_rcJoystickTrip.top)
17:         jsJoystickState |= JOY_UP;
18:       else if (jiInfo.wYpos > (WORD)m_rcJoystickTrip.bottom)
19:         jsJoystickState |= JOY_DOWN;
20:
21:       // Check buttons
22:       if(jiInfo.wButtons & JOY_BUTTON1)
23:         jsJoystickState |= JOY_FIRE1;
24:       if(jiInfo.wButtons & JOY_BUTTON2)
25:         jsJoystickState |= JOY_FIRE2;
26:     }
27:
28:     // Allow the game to handle the joystick
29:     HandleJoystick(jsJoystickState);
30:   }
31: }
The CheckJoystick() method looks kind of complicated, but it’s really not too bad. Understand that the idea behind this method is to quickly look at the state of the joystick, determine if enough movement has occurred to qualify as a directional movement (based on the trip rectangle), and then pass the results along to the HandleJoystick()
function for game-specific joystick processing.
The standard JOYINFO structure is used to retrieve the joystick state via the joyGetPos() function (line 7). Different members of this structure are then compared against the trip rectangle to see if the joystick movement qualifies as a directional movement. If so, the appropriate directional flag is set on a JOYSTATE variable that is eventually passed to the HandleJoystick() function. The joystick buttons are also checked, and appropriate flags are set for those as well. The bottom line is that the HandleJoystick() function gets called with information that is easily analyzed by game-specific code to determine how to react to the joystick.
Hour 6, “Controlling Games with the Keyboard and Mouse,” guided you through the design and development of an interesting little program that allowed you to control a flying saucer using the keyboard and mouse. The remainder of this hour focuses on adding joystick support to the UFO program example to create a new version of the program called UFO 2. In addition to providing joystick support, you also enhance the program a little by adding a thrust image to the flying saucer and a hyperspace feature. “Thrusting” in this case simply involves drawing a flying saucer with a flame shooting out of the bottom, whereas going into hyperspace involves repositioning the saucer at a random location on the game screen.
The code for the UFO 2 program starts with the UFO.h header file, which includes a couple of changes from its previous version:
Bitmap*     _pSaucer[2];
BOOL        _bSaucerFlame;
The first change to this code from the previous version of the program is the modification of the _pSaucer global variable to being an array of two bitmaps, as opposed to one. This is necessary because the thrust bitmap has now been added to show the flying saucer with a flame shooting out. The other change to the code involves the addition of the _bSaucerFlame variable, which keeps track of whether the saucer is to be displayed with a flame.
The GameInitialize() function
is the first game function to revisit for the UFO 2 program. The only change to this code from the previous version is the addition of the call to the game engine’s InitJoystick() method, which is necessary to get the joystick primed and ready for action:
pGame->InitJoystick();
The GameStart() function also has changed a little, as shown in Listing 7.5.
Example 7.5. The GameStart()
Function Initializes the Background and Flying Saucer Bitmaps
 1: void GameStart(HWND hWindow)
 2: {
 3:   // Seed the random number generator
 4:   srand(GetTickCount());
 5:
 6:   // Create and load the background and saucer bitmaps
 7:   HDC hDC = GetDC(hWindow);
 8:   _pBackground = new Bitmap(hDC, IDB_BACKGROUND, _hInstance);
 9:   _pSaucer[0] = new Bitmap(hDC, IDB_SAUCER, _hInstance);
10:   _pSaucer[1] = new Bitmap(hDC, IDB_SAUCERFLAME, _hInstance);
11:
12:   // Set the initial saucer position and speed
13:   _iSaucerX = 250 - (_pSaucer[0]->GetWidth() / 2);
14:   _iSaucerY = 200 - (_pSaucer[0]->GetHeight() / 2);
15:   _iSpeedX = 0;
16:   _iSpeedY = 0;
17: }
Because the hyperspace feature of UFO 2 requires the calculation of a random location on the screen, it’s necessary to seed the random number generator (line 4). This function also loads the new flaming saucer image (line 10).
Earlier, I mentioned that it’s important for any program that supports joysticks to properly capture and release the joystick in response to the main program window being activated and deactivated. In the case of UFO 2, this takes place in the GameActivate() and GameDeactivate()
functions, which are shown in Listing 7.6.
Example 7.6. The GameActivate() and GameDeactivate()
Function Captures and Releases the Joystick in Response to the Main Program Window Being Activated and Deactivated
The GameActivate() function simply calls the CaptureJoystick() method of the game engine to capture the joystick (line 4). Similarly, the joystick is released in GameDeactivate() with a quick call to the ReleaseJoystick() method.
If you’re curious as to how the thrusting flying saucer is drawn, well wonder no more! The GamePaint()
function handles drawing the appropriate flying saucer depending on the value of the _bSaucerFlame global variable, as shown in Listing 7.7.
Example 7.7. The GamePaint()
Function Draws the Background and Flying Saucer Bitmaps, Making Sure to Determine Which Flying Saucer Bitmap to Draw
As the listing reveals, the _bSaucerFlame variable directly determines which flying saucer is drawn (line 5). Of course, you’re probably still curious as to how this variable gets modified in the first place; that’s where the joystick enters the picture.
If you recall from earlier, a program that uses our super slick game engine to process joystick input must provide its own HandleJoystick()
function to perform its own processing of joystick input. In this case, the HandleJoystick() function is responsible for altering the speed of the flying saucer in response to directional joystick movements, as well as controlling the thrust and hyperspace features of the flying saucer when the two joystick buttons are pressed. Listing 7.8 shows how the HandleJoystick() function carries out these tasks.
Example 7.8. The HandleJoystick()
Function Takes Care of Processing Joystick Input and Altering the Flying Saucer Appropriately
 1: void HandleJoystick(JOYSTATE jsJoystickState)
 2: {
 3:   // Check horizontal movement
 4:   if (jsJoystickState & JOY_LEFT)
 5:     _iSpeedX = max(-_iMAXSPEED, _iSpeedX - 2);
 6:   else if (jsJoystickState & JOY_RIGHT)
 7:     _iSpeedX = min(_iMAXSPEED, _iSpeedX + 2);
 8:
 9:   // Check vertical movement
10:   if (jsJoystickState & JOY_UP)
11:     _iSpeedY = max(-_iMAXSPEED, _iSpeedY - 2);
12:   else if (jsJoystickState & JOY_DOWN)
13:     _iSpeedY = min(_iMAXSPEED, _iSpeedY + 2);
14:
15:   // Check primary joystick button
16:   _bSaucerFlame = (jsJoystickState & JOY_FIRE1);
17:
18:   // Check secondary joystick button
19:   if (jsJoystickState & JOY_FIRE2)
20:   {
21:     // Force the flying saucer into hyperspace
22:     _iSaucerX = rand() % (500 - _pSaucer[0]->GetWidth());
23:     _iSaucerY = rand() % 320;
24:   }
25: }
Seeing as how the HandleJoystick() function is essentially your only real communication link to the joystick in the UFO 2 program, it’s really quite simple. The first block of code in the function checks to see if a horizontal movement has occurred—in which case, the X component of the flying saucer’s speed if modified (lines 4–7). Similarly, the second block of code performs the same processing on vertical joystick movement (lines 10–13). The _bSaucerFlame global variable is then set using the state of the first joystick button (line 16). And finally, the hyperspace feature is carried out in response to the second joystick button being pressed (lines 19–24).
If you haven’t done so already, I encourage you to plug in your joystick and take the UFO 2 program for a test spin. You’ll hopefully find that the joystick controls for the program have a surprisingly good feel considering that the joystick handling code in the program is relatively simple. Try pressing the two primary buttons on the joystick to get a feel for the thrust and hyperspace features of the program. Figure 7.7 shows the flying saucer as it appears with the flaming thrust beneath it.
Note
If the flying saucer immediately starts moving without you touching the joystick, it’s a pretty good sign that your joystick needs to be calibrated. Please revisit the earlier section “Calibrating Joysticks,” to find out how to calibrate your joystick and eliminate this problem.
Granted, you might have a valid concern as to why the flying saucer visually thrusts but doesn’t seem to have any additional lift when you press the thrust button. This is something I challenge you to solve as an exercise at the end of the hour. You might also have noticed that hyperspace is quite sensitive. In fact, the hyperspace feature reveals how fast the game engine’s joystick processing actually is.
Although joysticks don’t quite share the widespread acceptance on PCs that keyboards and mice do, they are the quintessential user input device for games. There aren’t too many serious gamers out there who don’t have a joystick. However, you don’t have to be serious about games to enjoy the benefits of playing games with a joystick. For this reason and more, it’s a good idea to try and support joysticks in games that make sense to use a joystick as input. This hour gave you the nuts and bolts of Windows joystick handling, and even showed you how to build it into the ever evolving game engine. You also saw how easy it is to add joystick support to an existing program.
Mark your calendar because Hour 8, “Example Game: Brainiac,” represents a significant milestone in your game programming career—you develop your first complete game. In other words, I’ve now deemed you knowledgeable enough about game development to turn you loose on a complete game project. Okay, I don’t exactly turn you loose, but you work through the design and development of a complete game, nonetheless.
The Workshop is designed to help you anticipate possible questions, review what you’ve learned, and begin learning how to put your knowledge into practice. The answers to the quiz can be found in Appendix A, “Quiz Answers.”
Modify the UFO 2 program so that the thrust button not only causes the flying saucer to appear with thrust, but also so that it acts like it has thrust. In other words, alter its vertical speed in response to the thrust button so that the saucer actually thrusts upward. It might be a good idea to make the thrust button have more of an impact on the saucer’s lift than simply pressing up on the joystick; the second exercise will make this feature more important.
Experiment with adding gravity to the UFO 2 program by slightly changing the flying saucer’s vertical speed in the
GameCycle()function.