
If you’ve ever watched an animated movie, you are familiar with the importance of backgrounds. If you pay careful attention the next time you watch an animated movie, notice how the characters move on top of a background that doesn’t tend to change much. This is because the characters are overlaid on the background, very much like sprites. Although you’ve already seen how to use an image as a background, this hour shows you how to create a general background class that you can use in your games. Not only that, but you learn how to create animated backgrounds that can be used to display a starry night complete with twinkling stars.
In this hour, you’ll learn:
Why backgrounds are so important in games
About the three main types of backgrounds
How to add support for backgrounds to the game engine
How to use an animated background with animated sprites to simulate an asteroid field
It’s hard to argue the significance of backgrounds in games, especially when you consider the example games that you’ve seen thus far. For example, picture the Henway game without the highway background, or the Battle Office game without the office background. Both of these backgrounds are critical in supporting the sprites in both games, and giving them context. Without the backgrounds, neither of the games would be as entertaining, and they certainly wouldn’t make as much sense from a game play perspective.
In the two examples I mentioned, both backgrounds were created directly from bitmap images. The background image was drawn just before drawing the sprites, which gave the effect that the sprites appeared on top of the background. Although a stationary image was perfectly acceptable for these games, there are situations in which an animated background makes more sense. For example, consider a driving game where a sense of movement needs to be associated with objects passing by as you’re driving. These objects could certainly be represented by sprites, which might even make more sense than using an animated background, but there are still aspects of the background that would need to be animated. For example, the lines painted on the road would need to move to some degree to give the illusion of movement.
Another good example of an animated background is the background of a space game, which might consist of a solid black region with stars drawn on it. The animation comes into play when you make the stars twinkle, which is a subtle but compelling enhancement to the background. A space background with twinkling stars adds considerably to the realism of a space game, and helps to immerse the player in the setting.
I could go through countless examples of how important backgrounds are in improving the visual feel of a game, but hopefully you’re starting to get the idea. Most of the more interesting background effects involve animation of some sort. However, this animation typically isn’t as simple as frame-based sprite animation; you typically must write custom animation code to handle each specific background. For example, a frame-based animation approach is overkill in the twinkling star background. For that background, it makes more sense to write custom code that varies the color of the stars over time. This is not only efficient, but also yields a more realistic effect than cycling through the same series of frame images over and over.
Now that you have a basic understanding of how backgrounds fit into games, as well as why they are important, I’d like to spend a moment exploring the basic kinds of backgrounds that you’ll encounter in game programming. Following are the three primary types of backgrounds:
Solid backgrounds
Image backgrounds
Animated backgrounds
Scrolling backgrounds
The next few sections explore these different types of backgrounds in more detail.
A solid background is a background consisting only of a solid color. This is by far the simplest of all backgrounds, and requires very little code to pull off. Not surprisingly, solid backgrounds are also the dullest of all backgrounds, and aren’t used very often in games. Generally speaking, any time you could use a solid background, you could also use an image background and get a much better result. For example, if you were developing a football game, it might make sense to create a solid green background to represent the grass on the field. However, a grassy textured image would look much better in the same context, without a whole lot more development effort. So, although it’s important to have the option of using a solid background, it’s usually not your best option.
Note

One situation in which you might find a solid background useful is in testing a game. For example, if you have a game that has a complex background image in which the sprites tend to blend in well, you might find it easier to fine-tune the sprites while viewing them against a stark background. By temporarily replacing a background image with a solid background of a contrasting color, you can easily make out what the sprites are doing and fix any problems with them.
Image backgrounds are a
step beyond solid backgrounds in that they use a bitmap image to represent the backdrop for a game, as opposed to a solid color. You’ve already used image backgrounds in the games you’ve developed throughout the book, so hopefully you can appreciate their usefulness. The primary work involved in using an image background is creating the image itself; from a programming perspective, the Bitmap class in the game engine already handles most of the details of using an image background.
The problem with image bitmaps is that they are static, which means that they don’t move or do anything interesting to convey that they are real. For example, the forest image background used in the Fore example from Hour 10, “Making Things Move with Sprites,” would have been infinitely more realistic if the trees swayed a little and maybe dropped a leaf every now and then. Of course, such subtleties aren’t always easy to add to a game, and you have to carefully weigh adding complexity for the sake of including small details in a game—sometimes it’s worth it, sometimes not. One way to improve on the basic image background is to use an animated background.
An animated background is a background that somehow changes its appearance over time, which is similar in some ways to an animated sprite. However, an animated background doesn’t necessarily have to involve a series of frame images. It’s entirely possible to create an animated background whose animation is derived from custom code. The key to making an animated background work is providing some kind of mechanism for updating and drawing the background. Again, this is similar to sprites in that they must be updated periodically to convey a sense of motion.
Another reason why I hesitate to draw too close of a comparison between an animated background and an animated sprite is because backgrounds are usually much larger than sprites. Therefore, using a series of frame images for a background could quickly hog a lot of memory when you consider that backgrounds are typically hundreds of pixels in width and height. It is much more efficient to focus on coming up with interesting and more efficient ways of animating backgrounds. For example, the starry background I mentioned earlier could be created by changing the color of individual pixels in a background image.
Another approach to creating an animated background involves using several smaller images that are capable of moving around on the background. For example, if you wanted to enhance the starry background, you could feasibly add a few planets that are animated on the background by slightly changing their appearance every so often. It’s debatable whether you should create these planets as sprites, as opposed to creating them as part of the background, but these are the kinds of decisions you have to make when creating a game.
The final type of background is the scrolling background, which involves an image or set of graphical objects that are capable of being shifted, or scrolled around on the screen. The best way to understand a scrolling background is to picture a background that is much larger than the game screen, which means that the game screen provides a view onto part of the background. To see other parts of the background, you have to scroll the view to another part. Figure 18.1 shows what I mean by a “view on a background.”
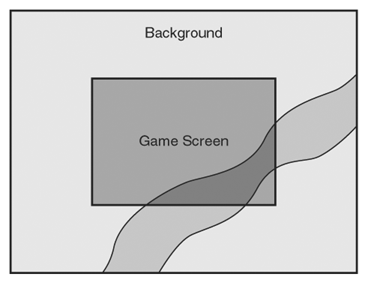
Figure 18.1. When you use a scrolling background, the game screen provides a view on a portion of the background.
The figure shows how the game screen shows only a portion of a larger background. This type of background is used a lot in adventure games in which you control a character around a large virtual world. As you might have guessed, scrolling backgrounds are considerably more complex to develop than the other types of backgrounds because they involve a lot more game logic. For example, the background must respond to you moving the player, not to mention the fact that sprites have to be moved so that they appear to scroll with the background. Not only that, but scrolling backgrounds often must be capable of wrapping so that you don’t encounter a boundary.
Note
An interesting type of scrolling background that is commonly used in 2D games is a parallax scrolling background, which is a background that scrolls at differing rates. Parallax scrolling involves the use of multiple layered background images, such as buildings in the foreground, trees in the mid-ground, and mountains in the background. The idea is to provide the illusion of depth by moving each image at a different speed. So, the mountains move slowest because they are furthest away, while the trees move a little faster, and the buildings move fastest. This simulates the effect of movement we perceive in the real world when passing by objects that are at different distances.
Creating a scrolling background certainly isn’t impossible, but it is a formidable challenge when you approach it from the perspective of still learning the ropes of game development. Therefore, you won’t be tackling scrolling backgrounds in this book. However, you do learn how to create animated backgrounds, which I think you will find to be plenty interesting for adding some pizzazz to your games.
Because you’re not going to worry about creating scrolling backgrounds, that leaves three types of backgrounds you’re going to incorporate into the game engine: solid backgrounds, image backgrounds, and animated backgrounds. The first two background types can easily coexist in a single class, whereas the third requires a custom class of its own. So, you’re going to be creating two new classes that will become part of the game engine. The first class is a basic background class that encompasses solid backgrounds and image backgrounds, whereas the second is a specific type of animated background that displays a starry night sky with twinkling stars. The starry background will serve as a good enough demonstration of how to create an animated background that you should be able to create your own custom animated backgrounds without any trouble.
The basic background that supports both solid and image backgrounds is contained within the Background
class. The Background class is flexible in that the same class can be used to create both kinds of backgrounds—the decision regarding which kind of background you’re creating is decided by which constructor you use. Listing 18.1 shows the code for the Background class, which reveals its overall design.
Example 18.1. The Background
Class Is Used to Create Both Solid and Image Backgrounds
 1: class Background
 2: {
 3: protected:
 4:   // Member Variables
 5:   int       m_iWidth, m_iHeight;
 6:   COLORREF  m_crColor;
 7:   Bitmap*   m_pBitmap;
 8:
 9: public:
10:   // Constructor(s)/Destructor
11:           Background(int iWidth, int iHeight, COLORREF crColor);
12:           Background(Bitmap* pBitmap);
13:   virtual ~Background();
14:
15:   // General Methods
16:   virtual void  Update();
17:   virtual void  Draw(HDC hDC);
18:
19:   // Accessor Methods
20:   int GetWidth()  { return m_iWidth; };
21:   int GetHeight() { return m_iHeight; };
22: };
The Background class contains
several member variables that support both solid and image backgrounds. The m_iWidth and m_iHeight member variables keep track of the width and height of the background (line 5), which applies to any kind of background. The m_crColor variable stores the color of the background (line 6), and only applies to solid backgrounds. Similarly, the m_pBitmap variable stores a pointer to a Bitmap object (line 7), which is used to draw the bitmap image for an image background.
The Background class includes
two constructors—each of which corresponds to one of the two basic background types. The first constructor accepts a width and height, along with a color for the solid background (line 11). The second constructor accepts a bitmap image (line 12), which it uses as the basis for calculating the width and height of the image background.
Two familiar methods are included in the Background class for updating and drawing the background. The Update()
method is called to update the appearance of the background (line 16), and in the case of the solid and image backgrounds, this method does nothing. The purpose for having the Update() method is to allow derived animated background classes to use it to update themselves. The Draw() method applies to all kinds of backgrounds, and simply accepts a device context on which to draw the background (line 17). The last two methods in the Background class are the GetWidth() and GetHeight() accessor methods, which simply return the width and height of the background (lines 20 and 21).
Now that you have an understanding of how the Background class is assembled, you can take a look at the specific code that makes it work. Listing 18.2 shows the code for the Background() constructors.
Example 18.2. The Background::Background()
Constructors Are Used to Create and Cleanup After a Background
 1: Background::Background(int iWidth, int iHeight, COLORREF crColor)
 2: {
 3:   // Initialize the member variables
 4:   m_iWidth = iWidth;
 5:   m_iHeight = iHeight;
 6:   m_crColor = crColor;
 7:   m_pBitmap = NULL;
 8: }
 9:
10: Background::Background(Bitmap* pBitmap)
11: {
12:   // Initialize the member variables
13:   m_crColor = 0;
14:   m_pBitmap = pBitmap;
15:   m_iWidth = pBitmap->GetWidth();
16:   m_iHeight = pBitmap->GetHeight();
17: }
The constructors for the Background
class are pretty straightforward in that they simply initialize the member variables for the class based on the arguments provided. It is important to note that the bitmap pointer is set to NULL in the first constructor (line 7), which indicates that the background is a solid background, as opposed to an image background. Similarly, the background color is set to 0 in the second constructor (line 13) because an image background doesn’t have a background color.
The Update() and Draw()
methods in the Background class are responsible for updating and drawing the background. However, because neither a solid or image background is animated, the Update() method serves as more of a placeholder for future derived background classes. Listing 18.3 shows the code for these two methods.
Example 18.3. The Background::Update()
and Background::Draw() Methods Handle the Updating and Drawing of a Background
 1: void Background::Update()
 2: {
 3:   // Do nothing since the basic background is not animated
 4: }
 5:
 6: void Background::Draw(HDC hDC)
 7: {
 8:   // Draw the background
 9:   if (m_pBitmap != NULL)
10:     m_pBitmap->Draw(hDC, 0, 0);
11:   else
12:   {
13:     RECT    rect = { 0, 0, m_iWidth, m_iHeight };
14:     HBRUSH  hBrush = CreateSolidBrush(m_crColor);
15:     FillRect(hDC, &rect, hBrush);
16:     DeleteObject(hBrush);
17:   }
18: }
As I mentioned earlier, the Update() method is designed to be overridden with animation code in derived background classes, so it makes sense to leave it blank in this class (line 3). However, the Draw() method makes up for this lack of action by drawing a solid background or image background, depending on the state of the bitmap pointer (line 9). If the bitmap pointer is not NULL, you know that this is an image bitmap, so the Draw() method is called on the Bitmap object (line 10). Otherwise, you know this is a solid bitmap so a solid rectangle is drawn in the color of the background (lines 13–16). The code in the Draw() method reveals how two types of backgrounds are supported in a single class.
If the Background class
didn’t get you too excited, hopefully you’ll be intrigued by the StarryBackground
class, which represents an animated background of a starry sky. The starry sky could also be interpreted as a starry view of outer space, which makes the background more flexible in terms of how you use it in games.
The StarryBackground class is derived from the Background class, which means that it inherits member variables and methods from the Background class. However, the StarryBackground class requires its own constructor, as well as its own version of the Update() and Draw() methods.
The StarryBackground class also adds some new member variables to the equation, which are used to manage the twinkling stars in the background. Listing 18.4 contains the code for the StarryBackground class.
Example 18.4. The StarryBackground
Class Is Used to Create an Animated Background of a Starry Sky
 1: class StarryBackground : Background
 2: {
 3: protected:
 4:   // Member Variables
 5:   int       m_iNumStars;
 6:   int       m_iTwinkleDelay;
 7:   POINT     m_ptStars[100];
 8:   COLORREF  m_crStarColors[100];
 9:
10: public:
11:   // Constructor(s)/Destructor
12:           StarryBackground(int iWidth, int iHeight, int iNumStars = 100,
13:             int iTwinkleDelay = 50);
14:   virtual ~StarryBackground();
15:
16:   // General Methods
17:   virtual void  Update();
18:   virtual void  Draw(HDC hDC);
19: };
The most important member variable in the StarryBackground class is m_iNumStars, which keeps track of how many stars appear on the background (line 5). This number is stored as a variable as opposed to a constant because you might want to vary the number of stars in different games. The m_iTwinkleDelay member variable is used to control how fast the stars twinkle (line 6)—the longer the delay, the slower they twinkle. So, setting a small value for the twinkle delay causes the stars to twinkle rapidly, which isn’t very realistic. You’ll find out in a moment that there is a default twinkle delay that I’ve found to be reasonably realistic in most situations.
The stars themselves are
stored in two different member variables, m_ptStars and m_crStarColors. The m_ptStars variable is an array of points that stores the location of each individual star (line 7). You still need to keep track of the color of each star, which is a shade of gray that can vary between black and bright white. The m_crStarColors array stores the color of each star and corresponds directly to the stars stored in the m_ptStars array (line 8). Notice that both arrays are created with 100 elements, which means that you can’t have more than 100 stars in the starry background.
Moving right along, the constructor for
the StarryBackground class accepts several arguments to describe the starry background. More specifically, it allows you to provide the width, height, number of stars, and twinkle delay for the background (lines 12 and 13). It’s important to note that the number of stars and twinkle delay arguments have default values, which you might find suitable for your games. You can also use your own trial and error approach to deciding exactly how many stars you like, as well as what kind of twinkle delay results in a good look for the twinkling stars.
The constructor for the StarryBackground class is shown in Listing 18.5 and reveals how the stars are created.
Example 18.5. The
StarryBackground::StarryBackground() Constructor Is Used to Create a Starry Background
 1: StarryBackground::StarryBackground(int iWidth, int iHeight, int iNumStars,
 2:   int iTwinkleDelay) : Background(iWidth, iHeight, 0)
 3: {
 4:   // Initialize the member variables
 5:   m_iNumStars = min(iNumStars, 100);
 6:   m_iTwinkleDelay = iTwinkleDelay;
 7:
 8:   // Create the stars
 9:   for (int i = 0; i < iNumStars; i++)
10:   {
11:     m_ptStars[i].x = rand() % iWidth;
12:     m_ptStars[i].y = rand() % iHeight;
13:     m_crStarColors[i] = RGB(128, 128, 128);
14:   }
15: }
The StarryBackground()
constructor first initializes the m_iNumStars member variable, making sure not to allow it to be set any higher than 100 (line 5). The twinkle delay is then set (line 6), and the star creation process begins. The creation of the stars involves looping through the number of stars (line 9), and then setting the position of each star to a random value (lines 11 and 12), as well as setting the color of each star to a neutral color (line 13). By neutral color, I mean a shade of gray that isn’t too bright or too dark.
Once the stars are created in the constructor, you can turn your attention to the Update() and Draw() methods, which are really the most important part of the StarryBackground class. Listing 18.6 contains the code for these methods.
Example 18.6. The StarryBackground::Update()
and StarryBackground::Draw() Methods Handle the Updating and Drawing of a Starry Background
 1: void StarryBackground::Update()
 2: {
 3:   // Randomly change the shade of the stars so that they twinkle
 4:   int iRGB;
 5:   for (int i = 0; i < m_iNumStars; i++)
 6:     if ((rand() % m_iTwinkleDelay) == 0)
 7:     {
 8:       iRGB = rand() % 256;
 9:       m_crStarColors[i] = RGB(iRGB, iRGB, iRGB);
10:     }
11: }
12:
13: void StarryBackground::Draw(HDC hDC)
14: {
15:   // Draw the solid black background
16:   RECT    rect = { 0, 0, m_iWidth, m_iHeight };
17:   HBRUSH  hBrush = CreateSolidBrush(RGB(0, 0, 0));
18:   FillRect(hDC, &rect, hBrush);
19:   DeleteObject(hBrush);
20:
21:   // Draw the stars
22:   for (int i = 0; i < m_iNumStars; i++)
23:     SetPixel(hDC, m_ptStars[i].x, m_ptStars[i].y, m_crStarColors[i]);
24: }
The Update() method in this
code is responsible for causing the stars to twinkle. This is accomplished by randomly changing the color of each star to a different shade of gray. The stars are looped through (line 5), and the twinkle delay is used as the basis for determining if the color of a star should be changed (line 6). If so, a random number is selected between 0 and 255 (line 8), and this color is used for each of the three color components to establish a new color for the star (line 9).
Note
When the three different components of a color (red, green, and blue) are set to the same number, the resulting color is a shade of gray. For example, the color (128, 128, 128) is medium gray. On the other hand, the color (0, 0, 0) is black, whereas (255, 255, 255) is white.
The Draw() method for the StarryBackground class is used to draw the background, and involves first drawing a solid black rectangle, followed by drawing the individual stars. The black rectangle is drawn with a call to FillRect() (line 18), which you saw earlier in the book. The more interesting code occurs near the end of the method, and consists of a loop that draws each individual star with a call to SetPixel() (lines 22 and 23). The SetPixel() function is a Win32 function that sets an individual pixel to a specified color.
As with every new improvement to the game engine, new concepts only fully make sense when you see them in action. The remainder of the hour shows you how to put the new background classes to use in a program example called Roids.
The Roids program example simulates an asteroid field by displaying several animated asteroid sprites over an animated starry background. Not surprisingly, the StarryBackground class is used as the basis for the background in the Roids program.
The Roids program begins with the Roids.h header file, which declares global variables that are important to the program. Take a look at Listing 18.7 to see these variables.
Example 18.7. The Roids.h Header File Imports Several Header Files and Declares Global Variables Required for the Background and Asteroid Sprites
 1: #pragma once
 2:
 3: //-----------------------------------------------------------------
 4: // Include Files
 5: //-----------------------------------------------------------------
 6: #include <windows.h>
 7: #include "Resource.h"
 8: #include "GameEngine.h"
 9: #include "Bitmap.h"
10: #include "Sprite.h"
11: #include "Background.h"
12:
13: //-----------------------------------------------------------------
14: // Global Variables
15: //-----------------------------------------------------------------
16: HINSTANCE         _hInstance;
17: GameEngine*       _pGame;
18: HDC               _hOffscreenDC;
19: HBITMAP           _hOffscreenBitmap;
20: Bitmap*           _pAsteroidBitmap;
21: StarryBackground* _pBackground;
The first variable unique to the Roids program is _pAsteroidBitmap (line 20), which is a bitmap for an asteroid image. This image is actually a series of frame images for an asteroid that appears to be tumbling when it is animated. A total of 14 frames are in the asteroid image, as you find out in a moment when you create the asteroid sprites. The other important global variable in the Roids program is the _pBackground variable, which stores a pointer to a StarryBackground object (line 21). This object serves as the background for the program, as you soon find out.
The GameStart() function
is where the Roids program really gets rolling because it is responsible for creating bitmaps and sprites, not to mention the starry background. Listing 18.8 shows the code for this function.
Example 18.8. The GameStart()
Function Creates and Loads the Asteroid Bitmap, the Starry Background, and the Asteroid Sprites
 1: void GameStart(HWND hWindow)
 2: {
 3:   // Seed the random number generator
 4:   srand(GetTickCount());
 5:
 6:   // Create the offscreen device context and bitmap
 7:   _hOffscreenDC = CreateCompatibleDC(GetDC(hWindow));
 8:   _hOffscreenBitmap = CreateCompatibleBitmap(GetDC(hWindow),
 9:     _pGame->GetWidth(), _pGame->GetHeight());
10:   SelectObject(_hOffscreenDC, _hOffscreenBitmap);
11:
12:   // Create and load the asteroid bitmap
13:   HDC hDC = GetDC(hWindow);
14:   _pAsteroidBitmap = new Bitmap(hDC, IDB_ASTEROID, _hInstance);
15:
16:   // Create the starry background
17:   _pBackground = new StarryBackground(500, 400);
18:
19:   // Create the asteroid sprites
20:   RECT    rcBounds = { 0, 0, 500, 400 };
21:   Sprite* pSprite;
22:   pSprite = new Sprite(_pAsteroidBitmap, rcBounds, BA_WRAP);
23:   pSprite->SetNumFrames(14);
24:   pSprite->SetFrameDelay(1);
25:   pSprite->SetPosition(250, 200);
26:   pSprite->SetVelocity(-3, 1);
27:   _pGame->AddSprite(pSprite);
28:   pSprite = new Sprite(_pAsteroidBitmap, rcBounds, BA_WRAP);
29:   pSprite->SetNumFrames(14);
30:   pSprite->SetFrameDelay(2);
31:   pSprite->SetPosition(250, 200);
32:   pSprite->SetVelocity(3, -2);
33:   _pGame->AddSprite(pSprite);
34:   pSprite = new Sprite(_pAsteroidBitmap, rcBounds, BA_WRAP);
35:   pSprite->SetNumFrames(14);
36:   pSprite->SetFrameDelay(3);
37:   pSprite->SetPosition(250, 200);
38:   pSprite->SetVelocity(-2, -4);
39:   _pGame->AddSprite(pSprite);
40: }
The first few sections of code in the GameStart() function should be familiar to you from other program examples, so I’ll spare you a recap. Instead, let’s jump straight to the line of code that creates the StarryBackground object (line 17). As you can see, the starry background is set to a size of 500 by 400, which is the same size of the game screen. Because no other arguments are provided to the new object, the default values of 100 for the number of stars and 50 for the twinkle delay are assumed.
The remainder of the GameStart() function focuses on the creation of the asteroid sprites. Notice that the number of frames for each of these sprites is set to 14 (lines 23, 39, and 35), which indicates that 14 frame images are stored in the image for the asteroid. Also, the frame delay of each sprite is set differently so that the asteroids appear to tumble at different speeds (lines 24, 30, and 36). Beyond those settings, nothing is tricky or otherwise noteworthy regarding the asteroid sprites.
The GamePaint()
function is responsible for drawing the graphics in the Roids program, as shown in Listing 18.9.
The important line of code worth paying attention to here is the line that calls the Draw() method on the StarryBackground object (line 4). As long as the background is drawn before the sprites, everything works great.
The final function on the Roids agenda is GameCycle(),
which takes care of updating the animated graphics in the program. Because the background is animated, it too must be updated in GameCycle() function, as
shown in Listing 18.10.
Example 18.10. The GameCycle()
Function Updates the Starry Background and Asteroid Sprites, and then Repaints the Game Screen
 1: void GameCycle()
 2: {
 3:   // Update the background
 4:   _pBackground->Update();
 5:
 6:   // Update the sprites
 7:   _pGame->UpdateSprites();
 8:
 9:   // Obtain a device context for repainting the game
10:   HWND  hWindow = _pGame->GetWindow();
11:   HDC   hDC = GetDC(hWindow);
12:
13:   // Paint the game to the offscreen device context
14:   GamePaint(_hOffscreenDC);
15:
16:   // Blit the offscreen bitmap to the game screen
17:   BitBlt(hDC, 0, 0, _pGame->GetWidth(), _pGame->GetHeight(),
18:     _hOffscreenDC, 0, 0, SRCCOPY);
19:
20:   // Cleanup
21:   ReleaseDC(hWindow, hDC);
22: }
The background is the first thing updated in the GameCycle() function (line 4), and this simply involves a call to the Update() method on the StarryBackground class. This call is sufficient enough to cause the entire background to come alive with twinkling stars. If you don’t believe me, try commenting out this line of code and see what happens to the background—no animation, and therefore not much excitement!
Granted, the Roids program example isn’t quite up to par with the classic Asteroids game. In fact, Roids isn’t a game at all. The reason for this is because I wanted to focus on the specific task of using an animated background without the distraction of trying to assemble a complete game. If you’re dying to build another complete game, your wishes will be answered in the next hour. But for now, take a look at Figure 18.2 to see the Roids program in action.
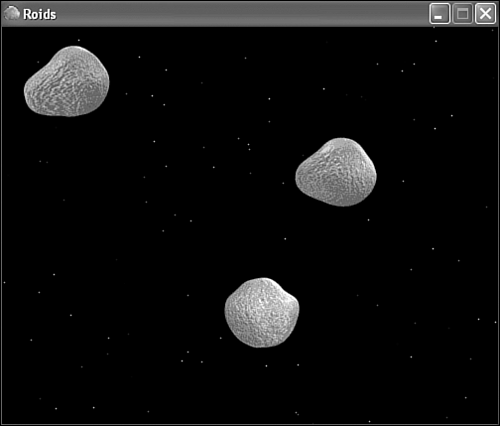
Figure 18.2. The asteroid sprites in the Roids program tumble over an animated starry background thanks to the new background classes in the game engine.
In addition to noticing how effective the twinkling stars are at presenting an interesting space background, hopefully you’re now appreciating the power of animated sprites. This has to do with the fact that the animated asteroids in the Roids program are considerably smoother and more detailed than the animated guys in the Battle Office 2 game where you first learned about animated sprites. It’s starting to become clear that you can get some surprisingly powerful visual effects out of the game engine when you combine an animated background with high quality sprite graphics.
Although you’ve certainly included backgrounds in several of the program examples and games that you’ve developed throughout the book thus far, this hour took a closer look at the role of backgrounds and why they are so important to games. You also found out about the main types of backgrounds, and what kinds of games demand each of them. The remainder of the hour focused on adding background support to the game engine in the form of two new classes, Background and StarryBackground. You now have a few classes you can reuse in your own games, as well as the knowledge to create custom animated backgrounds of your own.
The next hour accumulates much of what you’ve learned throughout the book in an example game called Meteor Defense. If you’re familiar at all with the classic Missile Command game, you’ll no doubt appreciate the Meteor Defense game.
The Workshop is designed to help you anticipate possible questions, review what you’ve learned, and begin learning how to put your knowledge into practice. The answers to the quiz can be found in Appendix A, “Quiz Answers.”
Change the number of stars in the Roids program example to see how they impact the appearance of the starry background.
Try a few different values for the twinkle delay in the Roids program example to see how they change the twinkling of the stars. You might decide that a different delay looks more realistic to you.