
The previous hour mentioned that sprite animation is the predominant form of animation used in two-dimensional games. This hour moves from theory to practicality by showing you how to design and build an all-purpose sprite class that will allow you to incorporate sprite animation into any program. You will end up reusing the Sprite class developed in this hour in every program example and game throughout the remainder of the book, so it’s safe to say that it represents one of the most significant programming milestones in the book. Fortunately, the Sprite class is not very complex, and it serves as a great example of how sprite animation doesn’t have to be complex. In fact, once you create the Sprite class, sprite animation becomes extremely straightforward to use.
In this hour, you’ll learn:
How sprites are used in games
How to design a sprite class
What it takes to develop a sprite class
How to use sprite animation in the context of a real program
Sprites are incredibly important in virtually all two-dimensional games because they provide a simple, yet effective means of conveying movement while also allowing objects to interact with one another. By modeling the objects in a game as sprites, you can create some surprisingly interesting games in which the objects interact with each other in different ways. The simplest example of a sprite used in a game is Pong, which involves a total of three sprites: the ball and the two paddles (vertical bars) along each side of the screen. All these objects must be modeled as sprites because they all move and interact with each other. The ball floats around on its own and bounces off the paddles, which are controlled by each of the two players.
As games get more complex, the role of sprites changes slightly, but their importance only increases. For example, a tank battle game would obviously use sprites to model the tanks and bullets that they shoot at each other. However, you could also use sprites to represent stationary objects such as walls and buildings. Even though the stationary objects don’t move, they benefit from being modeled as sprites because you can detect a collision between them and a tank and limit the tank’s movement accordingly. Similarly, if a bullet strikes a building, you would want to kill it or make it ricochet off the building at an angle; modeling the building as a sprite allows you to detect the bullet collision and respond accordingly.
It’s important to point out that
sprites are closely linked with bitmap images. Although it’s certainly possible to create a sprite that is drawn out of graphics primitives, sprites are typically based on bitmap images. So, in the example of the tank game, each type of sprite corresponds to a bitmap image that is used to draw the sprite on the screen. The sprite’s job is to keep track of the position, velocity, Z-order (depth), and visibility of a tank, whereas the bitmap keeps track of what the tank actually looks like. From a programming perspective, the Bitmap class is responsible for the appearance of a tank, whereas the Sprite class is responsible for how the tank moves and behaves with other objects.
Speaking of the Sprite class, there is no such existing class for us to borrow and use. Apparently, sprites represent a unique enough programming challenge that few standard programming libraries, such as Win32, support them directly. For this reason, you’ll have to create your own Sprite class. The remainder of this hour focuses on the design, development, and testing of this class.
As you know by now, the primary
purpose of a sprite is to model a graphical object in a game that is capable of moving over time. It takes several pieces of information to manage such an object. The following list reveals the specific properties of a sprite that must be accounted for in the Sprite
class:
Position
Velocity
Z-order
Bounding rectangle
Bounds action
Hidden/visible
The most important property of
a sprite is its position on the game screen, followed by its velocity. The idea is that the velocity of a sprite will be used in each cycle of the game to change the sprite’s position. So, if a sprite has an X velocity of 1 and a Y velocity of -2, it will move 1 pixel to the right and 2 pixels down the game screen in every game cycle. Obviously, setting higher values for the velocity of a sprite makes it move faster.
Although it’s logical to think of a sprite’s position in terms of a single coordinate, typically the upper left corner of the sprite, it’s actually more useful from a programming perspective to keep track of a rectangular position for the sprite. In other words, the position of a sprite is a rectangle that basically outlines the sprite as it appears on the game screen. This allows you to factor in the width and height of a sprite when you work with its position.
In addition to position and
velocity, it is also helpful to assign a Z-order to every sprite in a game. If you recall from the previous hour, Z-order is the depth of a sprite with respect to the screen. If two sprites are sharing the same space on the screen, the sprite with the higher Z-order will appear to be on top of the other sprite. The neat thing about Z-order is that it isn’t as difficult to develop as you might think. When you think about it, sprites are naturally drawn on top of each other if you draw them in the proper order. So, establishing the Z-order for a system of sprites is all about ordering the drawing of the sprites so that sprites with a higher Z-order are drawn last. You don’t actually learn how to write
code to handle Z-order until Hour 11, “Managing a World of Sprites,” but you’re going to go ahead and build Z-order into the Sprite class in this hour so that it will be ready.
A less obvious sprite property that is very useful is a bounding rectangle, which is a rectangle that determines the area in which a sprite can travel. Generally speaking, the bounding rectangle would be assumed to be the entire game screen, but there are situations in which you might want to limit the movement of a sprite to a smaller area. For example, maybe you’ve created a bee sprite that you want to see buzzing around a flower. You could easily accomplish this by setting the bounding rectangle for the bee to be a rectangle that encompasses the flower. Taking the bounding rectangle concept a step further, you can also establish bounds actions, which determine how a sprite acts when it encounters a boundary. More specifically, in a billiards game you would probably want the balls to bounce when they hit the pool table boundary. On the other hand, in an Asteroids type game you would probably want the asteroids to wrap around the edges of the game screen boundary. There are four primary bounds actions worth considering for any given sprite: Stop, Wrap, Bounce, and Die. You’ll learn about these bounds actions in more detail in a moment, but for now just understand that they determine what happens to a sprite when it encounters a boundary such as the edge of the game screen.
The last sprite property worth considering in the design of a sprite class is the sprite’s visibility. Although you could certainly delete a sprite from memory in order to hide it from view, there are situations in which it is better to simply hide a sprite rather than deleting it. As an example, you might want to create a game along the lines of the traditional carnival Whack-A-Mole game in which plastic moles pop-up out of holes and you smash them with a mallet. In this type of game, you would only need to hide the mole sprites after they are hit (clicked with the mouse), as opposed to deleting them from memory and recreating them over and over. For this reason, it is helpful to have a property that determines whether a sprite is hidden.
Although you’ve learned about several different sprite properties, my goal isn’t to explore every property a sprite might ever need; it’s just a starting point. In fact, you’ll be adding to the Sprite class over the course of the book, so you can think of this as version one of your sprite design. In fact, you will hopefully add to the Sprite class and make your own enhancements after you finish the book.
The Sprite class is designed
to model a single sprite that uses the familiar Bitmap class
to represent its appearance. Listing 10.1 contains the code for the Sprite class definition, which shows the overall design of the Sprite class, including its member variables and methods.
Example 10.1. The Sprite Class
Definition Shows How the Design of a Game Sprite Is Realized in Code
 1: class Sprite
 2: {
 3: protected:
 4:   // Member Variables
 5:   Bitmap*       m_pBitmap;
 6:   RECT          m_rcPosition;
 7:   POINT         m_ptVelocity;
 8:   int           m_iZOrder;
 9:   RECT          m_rcBounds;
10:   BOUNDSACTION  m_baBoundsAction;
11:   BOOL          m_bHidden;
12:
13: public:
14:   // Constructor(s)/Destructor
15:   Sprite(Bitmap* pBitmap);
16:   Sprite(Bitmap* pBitmap, RECT& rcBounds,
17:     BOUNDSACTION baBoundsAction = BA_STOP);
18:   Sprite(Bitmap* pBitmap, POINT ptPosition, POINT ptVelocity, int iZOrder,
19:     RECT& rcBounds, BOUNDSACTION baBoundsAction = BA_STOP);
20:   virtual ~Sprite();
21:
22:   // General Methods
23:   virtual void  Update();
24:   void          Draw(HDC hDC);
25:   BOOL          IsPointInside(int x, int y);
26:
27:   // Accessor Methods
28:   RECT&   GetPosition()             { return m_rcPosition; };
29:   void    SetPosition(int x, int y);
30:   void    SetPosition(POINT ptPosition);
31:   void    SetPosition(RECT& rcPosition)
32:     { CopyRect(&m_rcPosition, &rcPosition); };
33:   void    OffsetPosition(int x, int y);
34:   POINT   GetVelocity()             { return m_ptVelocity; };
35:   void    SetVelocity(int x, int y);
36:   void    SetVelocity(POINT ptVelocity);
37:   BOOL    GetZOrder()               { return m_iZOrder; };
38:   void    SetZOrder(int iZOrder)    { m_iZOrder = iZOrder; };
39:   void    SetBounds(RECT& rcBounds) { CopyRect(&m_rcBounds, &rcBounds); };
40:   void    SetBoundsAction(BOUNDSACTION ba) { m_baBoundsAction = ba; };
41:   BOOL    IsHidden()                { return m_bHidden; };
42:   void    SetHidden(BOOL bHidden)   { m_bHidden = bHidden; };
43:   int     GetWidth()                { return m_pBitmap->GetWidth(); };
44:   int     GetHeight()               { return m_pBitmap->GetHeight(); };
45: };
You might notice that the
member variables for the Sprite class (lines 5–11) correspond one-to-one with the sprite properties you learned about in the previous section. The only real surprise in these variables is the use of the BOUNDSACTION data type (line 10), which is a custom data type that you learn about in a moment. This data type is used to describe the bounds action for the sprite.
The Sprite class offers several constructors
that require differing amounts of information in order to create a sprite (lines 15–19), as well as a destructor that you can use to clean up after the sprite (line 20). There are three general methods in the Sprite
class that are extremely important when it comes to using the Sprite class. The first of these is Update(),
which updates the sprite by applying its velocity to its position and carrying out any appropriate reactions to the sprite movement (line 23). Next, the Draw() method
is responsible for drawing the sprite at its current position using the bitmap that was specified in one of the Sprite() constructors (line 24). Finally, the
IsPointInside() method is used to see if a point is located within the sprite’s position rectangle (line 25). This method basically performs a hit test, which is useful if you want to determine if the sprite has been clicked with the mouse.
The remaining methods in the Sprite class are accessor methods that get and set various properties of the sprite. Some of these methods come in multiple versions to make it more convenient to interact with sprites. For example, the SetPosition() methods allow you to set the position of a sprite using individual X and Y values, a point, or a rectangle (lines 29–32). You might notice that most of the accessor methods include their code directly in the class definition, whereas a few of those do not. The accessor methods whose code isn’t directly included next to the method definition are defined as inline methods, and their code appears in the Sprite.h header file below the Sprite class definition.
Earlier, I mentioned that a custom data type called BOUNDSACTION was used as the data type for the m_baBoundsAction member variable. This custom data type is defined in the Sprite.h header file as the following:
typedef WORD        BOUNDSACTION;
const BOUNDSACTION  BA_STOP   = 0,
                    BA_WRAP   = 1,
                    BA_BOUNCE = 2,
                    BA_DIE    = 3;
If you recall, the bounds actions described in the BOUNDSACTION data type correspond directly to those that were mentioned in the previous section when I first explained bounds actions and how they work. The idea here is that you use one of these constants to tell a sprite how it is to react when it runs into a boundary. If you’re creating an Asteroids game, you’d want to use the BA_WRAP constant for the asteroids. On the other hand, a game like Breakout would rely on the BA_BOUNCE constant to allow the ball to bounce off the edges of the game screen. Regardless of which bounds action you choose for a sprite, it is entirely dependent on the bounding rectangle you set for the sprite. This rectangle can be as large as the game screen or as small as the sprite itself, although it wouldn’t make much sense to bound a sprite with a rectangle the same size of the sprite.
You’re probably ready to
learn some more about how the Sprite class is actually put together. Listing 10.2 contains the code for the three Sprite() constructors, as well as the Sprite()
destructor.
Example 10.2. The Sprite::Sprite()
Constructors and Destructor Are Used to Create and Clean up After Sprites
 1: Sprite::Sprite(Bitmap* pBitmap)
 2: {
 3:   // Initialize the member variables
 4:   m_pBitmap = pBitmap;
 5:   SetRect(&m_rcPosition, 0, 0, pBitmap->GetWidth(), pBitmap->GetHeight());
 6:   m_ptVelocity.x = m_ptVelocity.y = 0;
 7:   m_iZOrder = 0;
 8:   SetRect(&m_rcBounds, 0, 0, 640, 480);
 9:   m_baBoundsAction = BA_STOP;
10:   m_bHidden = FALSE;
11: }
12:
13: Sprite::Sprite(Bitmap* pBitmap, RECT& rcBounds, BOUNDSACTION baBoundsAction)
14: {
15:   // Calculate a random position
16:   int iXPos = rand() % (rcBounds.right - rcBounds.left);
17:   int iYPos = rand() % (rcBounds.bottom - rcBounds.top);
18:
19:   // Initialize the member variables
20:   m_pBitmap = pBitmap;
21:   SetRect(&m_rcPosition, iXPos, iYPos, iXPos + pBitmap->GetWidth(),
22:     iYPos + pBitmap->GetHeight());
23:   m_ptVelocity.x = m_ptVelocity.y = 0;
24:   m_iZOrder = 0;
25:   CopyRect(&m_rcBounds, &rcBounds);
26:   m_baBoundsAction = baBoundsAction;
27:   m_bHidden = FALSE;
28: }
29:
30: Sprite::Sprite(Bitmap* pBitmap, POINT ptPosition, POINT ptVelocity,
31:     int iZOrder, RECT& rcBounds, BOUNDSACTION baBoundsAction)
32: {
33:   // Initialize the member variables
34:   m_pBitmap = pBitmap;
35:   SetRect(&m_rcPosition, ptPosition.x, ptPosition.y, pBitmap->GetWidth(),
36:     pBitmap->GetHeight());
37:   m_ptVelocity = ptPosition;
38:   m_iZOrder = iZOrder;
39:   CopyRect(&m_rcBounds, &rcBounds);
40:   m_baBoundsAction = baBoundsAction;
41:   m_bHidden = FALSE;
42: }
43:
44: Sprite::~Sprite()
45: {
46: }
The first Sprite() constructor accepts a single argument, a pointer to a Bitmap object, and uses default values for the remainder of the sprite properties (lines 1–11). Although this constructor can work if you’re in a hurry to create a sprite, you’ll probably want to use a more detailed constructor to have more control over the sprite. The second Sprite() constructor adds a bounding rectangle and bounds action to the Bitmap pointer, and uses them to help further define the sprite (lines 13–28). The interesting thing about this constructor is that it randomly positions the sprite within the bounding rectangle (lines 16, 17, 21, and 22). The third constructor is the most useful because it gives you the most control over creating a new sprite (lines 30–42). The Sprite() destructor doesn’t do anything, but it’s there to provide a means of adding cleanup code later should you need it (lines 44–46).
There are only two methods
in the Sprite class that you haven’t seen the code for yet: Update() and Draw().
It turns out
that these are the two most important methods in the class. Listing 10.3 contains the code for the Update() method, which is responsible for updating the sprite.
Example 10.3. The Sprite::Update()
Method Updates a Sprite by Changing Its Position Based on Its Velocity and Taking Action in Response to the Movement
 1: void Sprite::Update()
 2: {
 3:   // Update the position
 4:   POINT ptNewPosition, ptSpriteSize, ptBoundsSize;
 5:   ptNewPosition.x = m_rcPosition.left + m_ptVelocity.x;
 6:   ptNewPosition.y = m_rcPosition.top + m_ptVelocity.y;
 7:   ptSpriteSize.x = m_rcPosition.right - m_rcPosition.left;
 8:   ptSpriteSize.y = m_rcPosition.bottom - m_rcPosition.top;
 9:   ptBoundsSize.x = m_rcBounds.right - m_rcBounds.left;
10:   ptBoundsSize.y = m_rcBounds.bottom - m_rcBounds.top;
11:
12:   // Check the bounds
13:   // Wrap?
14:   if (m_baBoundsAction == BA_WRAP)
15:   {
16:     if ((ptNewPosition.x + ptSpriteSize.x) < m_rcBounds.left)
17:       ptNewPosition.x = m_rcBounds.right;
18:     else if (ptNewPosition.x > m_rcBounds.right)
19:       ptNewPosition.x = m_rcBounds.left - ptSpriteSize.x;
20:     if ((ptNewPosition.y + ptSpriteSize.y) < m_rcBounds.top)
21:       ptNewPosition.y = m_rcBounds.bottom;
22:     else if (ptNewPosition.y > m_rcBounds.bottom)
23:       ptNewPosition.y = m_rcBounds.top - ptSpriteSize.y;
24:   }
25:   // Bounce?
26:   else if (m_baBoundsAction == BA_BOUNCE)
27:   {
28:     BOOL bBounce = FALSE;
29:     POINT ptNewVelocity = m_ptVelocity;
30:     if (ptNewPosition.x < m_rcBounds.left)
31:     {
32:       bBounce = TRUE;
33:       ptNewPosition.x = m_rcBounds.left;
34:       ptNewVelocity.x = -ptNewVelocity.x;
35:     }
36:     else if ((ptNewPosition.x + ptSpriteSize.x) > m_rcBounds.right)
37:     {
38:       bBounce = TRUE;
39:       ptNewPosition.x = m_rcBounds.right - ptSpriteSize.x;
40:       ptNewVelocity.x = -ptNewVelocity.x;
41:     }
42:     if (ptNewPosition.y < m_rcBounds.top)
43:     {
44:       bBounce = TRUE;
45:       ptNewPosition.y = m_rcBounds.top;
46:       ptNewVelocity.y = -ptNewVelocity.y;
47:     }
48:     else if ((ptNewPosition.y + ptSpriteSize.y) > m_rcBounds.bottom)
49:     {
50:       bBounce = TRUE;
51:       ptNewPosition.y = m_rcBounds.bottom - ptSpriteSize.y;
52:       ptNewVelocity.y = -ptNewVelocity.y;
53:     }
54:     if (bBounce)
55:       SetVelocity(ptNewVelocity);
56:   }
57:   // Stop (default)
58:   else
59:   {
60:     if (ptNewPosition.x  < m_rcBounds.left ||
61:       ptNewPosition.x > (m_rcBounds.right - ptSpriteSize.x))
62:     {
63:       ptNewPosition.x = max(m_rcBounds.left, min(ptNewPosition.x,
64:         m_rcBounds.right - ptSpriteSize.x));
65:       SetVelocity(0, 0);
66:     }
67:     if (ptNewPosition.y  < m_rcBounds.top ||
68:       ptNewPosition.y > (m_rcBounds.bottom - ptSpriteSize.y))
69:     {
70:       ptNewPosition.y = max(m_rcBounds.top, min(ptNewPosition.y,
71:         m_rcBounds.bottom - ptSpriteSize.y));
72:       SetVelocity(0, 0);
73:     }
74:   }
75:   SetPosition(ptNewPosition);
76: }
This method is probably considerably longer than you expected it to be, but on closer inspection you’ll realize that it is doing several important things. The primary purpose of the Update() method is to use the velocity of the sprite to alter its position, which has the effect of moving the sprite. However, simply changing the position of the sprite isn’t good enough because you have to take into consideration what happens if the sprite runs into a boundary. If you recall, every sprite has a bounding rectangle that determines the area in which the sprite can move. A sprite also has a bounds action that determines what happens to the sprite when it runs into a boundary. The Update() method has to check for a boundary and then take the appropriate response based on the sprite’s bounds action.
The Update() method begins by making some temporary calculations involving the new position, the size of the sprite, and the size of the boundary (lines 4–10). The rest of the method handles each kind of bounds action, beginning with BA_WRAP. To handle the BA_WRAP bounds action, the sprite is simply moved to the opposite side of the bounding rectangle (lines 14–24), which gives the effect of the sprite wrapping off one side and on to the other. The BA_BOUNCE action has to look a little closer at which boundary the sprite is crossing because it must correctly reverse the sprite’s velocity in order to yield a bouncing effect (lines 26–56). The final bounds action handled in the Update() method is BA_STOP, which is actually unnamed in this case because it is the default bounds action. This bounds action ensures that the sprite doesn’t cross over the boundary, while setting the sprite’s velocity to zero (lines 59–74).
Throughout all the bounds action handling code, the new sprite position is calculated and stored in a temporary variable of type POINT, ptNewPosition. At the end of the Update() method, this variable is used to actually set the new position of the sprite (line 75).
Note

If you’re the overly observant
type, you might recall that earlier in the hour the Sprite class was designed to support an additional bounds action, BA_DIE, which causes the sprite to be destroyed when it encounters a boundary. Although this bounds action is technically available for the Sprite class to use, it isn’t possible to support the action without some additional code in the game engine to manage a system of sprites. You don’t develop a sprite manager for the game engine until the next hour, so you won’t address the BA_DIE bounds action until then. Fortunately, there is plenty of fun to be had with the three other bounds actions, as you’ll soon see.
The remaining method in the Sprite
class is the Draw() method, which is shown in Listing 10.4.
Example 10.4. The Sprite::Draw()
Method Draws a Sprite by Using the Sprite’s Bitmap and Current Position
If the Update() method surprised you by having too much code, hopefully the Draw() method surprises you by having so little. Because the Bitmap class
includes its own Draw() method, there isn’t much for the Sprite::Draw() method to do. It first checks to make sure that the Bitmap pointer is okay, along with making sure that the sprite isn’t hidden (line 4). If all is well, the Draw() method calls on the Bitmap class with the m_rcPosition member variable used to convey the sprite’s position for drawing the bitmap (line 5). The last argument to the Bitmap::Draw() method is a Boolean that determines whether the sprite’s bitmap should be drawn with transparency, which in this case is TRUE. So, all sprites are assumed to use transparency.
Although the Sprite class is
certainly an engineering marvel, only so much gratification can be gained from staring at its code. For this reason, it’s important to put together a demonstration program to put the Sprite class through its paces. Because I’ve been obsessed lately with improving my golf game, I thought a golf program example might be fitting as a means of demonstrating how to create and use sprites. If you’ve ever had to yell “Fore!” you understand that it is a phrase used to inform someone that you’ve shanked a golf ball in his general direction. The Fore program example uses a woodsy backdrop and several sprite golf balls to get your feet wet with sprite animation.
The idea behind the Fore program is to create several sprite golf balls and let them zing around the game screen. Because it’s not terribly important to factor in real-world physics, I opted to use the golf balls to demonstrate the three bounds actions supported by the Sprite class: Wrap, Bounce, and Stop. So, the program creates three golf balls with each of these bounds actions and then turns them loose on the game screen to see how they react. To make things a little more interesting, you can use the mouse to grab and drag any of the balls around the screen. Let’s get started with the code because you’re no doubt itching to see this program in action.
As you know by now, every Windows program has a header file that includes other important header files, as well as declares global variables used by the program. Listing 10.5 contains the code for the Fore.h header file.
Example 10.5. The Fore.h Header File Imports Several Header Files and Declares Global Variables Required for the Golf Ball Sprites
 1: #pragma once
 2:
 3: //-----------------------------------------------------------------
 4: // Include Files
 5: //-----------------------------------------------------------------
 6: #include <windows.h>
 7: #include "Resource.h"
 8: #include "GameEngine.h"
 9: #include "Bitmap.h"
10: #include "Sprite.h"
11:
12: //-----------------------------------------------------------------
13: // Global Variables
14: //-----------------------------------------------------------------
15: HINSTANCE   _hInstance;
16: GameEngine* _pGame;
17: Bitmap*     _pForestBitmap;
18: Bitmap*     _pGolfBallBitmap;
19: Sprite*     _pGolfBallSprite[3];
20: BOOL        _bDragging;
21: int         _iDragBall;
A quick look at this code reveals two bitmaps—one for the forest background (line 17) and another for the golf balls (line 18). Each ball sprite uses the same bitmap. The golf ball sprites are stored in an array to make it a little easier to access them (line 19). The last two member variables are used to allow you to drag a golf ball around with the mouse. The bDragging variable determines whether a ball is currently being dragged (line 20). If a ball is indeed being dragged, the iDragBall variable keeps track of which ball it is (line 21); this variable is actually an index into the _pGolfBallSprite array.
With the global variables for the Fore program in mind, you can now press on and examine the specific game functions for the program. The GameInitialize() function is virtually identical to the version of it that you’ve seen in other examples. The only point to make is that it sets the frame rate to 30 frames per second, which is relatively standard for the programs that use sprite animation throughout the book.
The GameStart() and GameEnd()
functions are where the interesting things start taking place in the Fore program, as shown in Listing 10.6.
Example 10.6. The GameStart()
Function Creates and Loads the Bitmaps and Sprites, While the GameEnd() Function Cleans Them Up
 1: void GameStart(HWND hWindow)
 2: {
 3:   // Seed the random number generator
 4:   srand(GetTickCount());
 5:
 6:   // Create and load the bitmaps
 7:   HDC hDC = GetDC(hWindow);
 8:   _pForestBitmap = new Bitmap(hDC, IDB_FOREST, _hInstance);
 9:   _pGolfBallBitmap = new Bitmap(hDC, IDB_GOLFBALL, _hInstance);
10:
11:   // Create the golf ball sprites
12:   RECT rcBounds = { 0, 0, 600, 400 };
13:   _pGolfBallSprite[0] = new Sprite(_pGolfBallBitmap, rcBounds);
14:   _pGolfBallSprite[1] = new Sprite(_pGolfBallBitmap, rcBounds, BA_WRAP);
15:   _pGolfBallSprite[2] = new Sprite(_pGolfBallBitmap, rcBounds, BA_BOUNCE);
16:   _pGolfBallSprite[0]->SetVelocity(2, 1);
17:   _pGolfBallSprite[1]->SetVelocity(3, -2);
18:   _pGolfBallSprite[2]->SetVelocity(7, 4);
19:
20:   // Set the initial drag info
21:   _bDragging = FALSE;
22:   _iDragBall = -1;
23: }
24:
25: void GameEnd()
26: {
27:   // Cleanup the bitmaps
28:   delete _pForestBitmap;
29:   delete _pGolfBallBitmap;
30:
31:   // Cleanup the sprites
32:   for (int i = 0; i < 3; i++)
33:     delete _pGolfBallSprite[i];
34:
35:   // Cleanup the game engine
36:   delete _pGame;
37: }
The GameStart() function does several important things, beginning with the loading of the forest and golf ball bitmaps (lines 8 and 9). A bounding rectangle for the game screen is then created (line 12), which is important because it serves as the bounding rectangle for all the golf ball sprites. The three golf ball sprites are then created and stored in the _pGolfBallSprite array (lines 13–15), and their velocities are set to differing values (lines 16–18). The function ends by initializing the global variables that keep track of a sprite being dragged with the mouse (lines 21 and 22). The GameEnd() function simply cleans up the bitmaps and sprites, as well as the game engine itself (lines 25–37).
The GamePaint() function
is next on the agenda, and you might be surprised by its simplicity (Listing 10.7).
The GamePaint() function
simply draws the forest bitmap (line 4) followed by the three golf ball sprites (lines 7 and 8). The Draw() method in the Sprite class makes drawing the sprites painfully easy (line 8).
Of course, the GamePaint() method alone wouldn’t be too helpful in animating the golf ball sprites if the game, screen wasn’t told to repaint itself periodically. This is accomplished in the GameCycle() function which also updates the sprites (Listing 10.8).
Example 10.8. The GameCycle()
Function Updates the Golf Ball Sprites and Then Repaints the Game Screen
This function begins by updating the golf ball sprites, which simply involves calling the Update() method on each sprite (lines 4 and 5). After updating the sprites, the game screen is invalidated so that it gets repainted to show the new sprite positions (line 8). If you didn’t invalidate the game screen, the GamePaint() method wouldn’t get called and you wouldn’t see any changes on the screen even though the sprites are being moved behind the scenes. In other words, in addition to changing the position of sprites, you must also make sure that they get repainted so that the changes are visualized.
I mentioned earlier in the hour that the Fore program allows you to click a golf ball sprite with the mouse and drag it around. This functionality is established in the MouseButtonDown(), MouseButtonUp(), and MouseMove() functions,
which are shown in Listing 10.9.
Example 10.9. The MouseButtonDown(),
MouseButtonUp(), and MouseMove() Functions Use the Left Mouse Button to Allow You to Click and Drag a Golf Ball Sprite Around on the Game Screen
 1: void MouseButtonDown(int x, int y, BOOL bLeft)
 2: {
 3:   // See if a ball was clicked with the left mouse button
 4:   if (bLeft && !_bDragging)
 5:   {
 6:     for (int i = 0; i < 3; i++)
 7:       if (_pGolfBallSprite[i]->IsPointInside(x, y))
 8:       {
 9:         // Capture the mouse
10:         SetCapture(_pGame->GetWindow());
11:
12:         // Set the drag state and the drag ball
13:         _bDragging = TRUE;
14:         _iDragBall = i;
15:
16:         // Simulate a mouse move to get started
17:         MouseMove(x, y);
18:
19:         // Don't check for more balls
20:         break;
21:       }
22:   }
23: }
24:
25: void MouseButtonUp(int x, int y, BOOL bLeft)
26: {
27:   // Release the mouse
28:   ReleaseCapture();
29:
30:   // Stop dragging
31:   _bDragging = FALSE;
32: }
33:
34: void MouseMove(int x, int y)
35: {
36:   if (_bDragging)
37:   {
38:     // Move the sprite to the mouse cursor position
39:     _pGolfBallSprite[_iDragBall]->SetPosition(
40:       x - (_pGolfBallBitmap->GetWidth() / 2),
41:       y - (_pGolfBallBitmap->GetHeight() / 2));
42:
43:     // Force a repaint to redraw the golf balls
44:     InvalidateRect(_pGame->GetWindow(), NULL, FALSE);
45:   }
46: }
The MouseButtonDown() function starts the drag process by first checking to see if the left mouse button is being pressed, while making sure that a drag isn’t somehow already in progress (line 4). The next check is to see if the mouse click actually occurred within a sprite. This involves looping through the sprites and seeing if the mouse coordinates
lie within a sprite (lines 6 and 7). If so, the mouse is captured so that its input is routed to the Fore program even if it strays outside the game window (line 10). The drag state and ball being dragged are then stored away because the other mouse functions need to know about them (lines 13 and 14). The MouseMove() function is then called to simulate a mouse move so that the sprite is centered on the mouse cursor position (line 17). Finally, the sprite loop is broken out of because you don’t want to check for more balls when one has been clicked with the mouse (line 20).
The MouseButtonUp() function ends a sprite drag by releasing the mouse capture (line 28), and then clearing the _bDragging global variable (line 31). This is sufficient to stop the sprite drag, while also allowing the user to initiate another drag by clicking a sprite and starting the process over.
The last of the mouse functions is MouseMove(), which moves a golf ball sprite so that it follows the location of the mouse cursor. The _bDragging global variable is first checked to make sure that a drag is taking place (line 36). If so, the position of the appropriate golf ball sprite is set to correspond to the position of the mouse cursor (lines 39–41). The program window is then invalidated so that the game screen is repainted (line 44), which is necessary so that the sprite is redrawn in the new position.
Although it isn’t a game, the Fore program example is a quite interesting sample program in the sense that it demonstrates how powerful and straightforward sprite animation can be. After the Sprite class was created, it only took a few lines of code to create a few sprites and get them moving around the game screen. Figure 10.1 shows the golf ball sprites flying around on the forest background in the Fore program example.
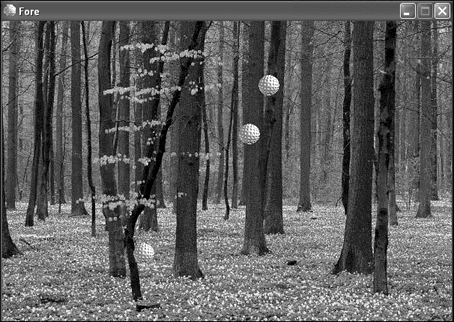
Figure 10.1. The golf ball sprites in the Fore program move around thanks to the handy Sprite class that you created in this hour.
If you watch the sprites carefully, you’ll notice that each of them responds differently when encountering the edge of the game screen, which happens to serve as their bounding rectangle. One of the balls will wrap around to the other side of the screen, another will bounce off the side of the screen like a game of Pong, whereas the last ball stops at the edge of the screen. The really neat thing about the program is that you can click and drag any of the balls on the screen, including the ones that are moving.
Granted, clicking and dragging a golf ball isn’t exactly my idea of an exciting “game,” but it does provide a good demonstration of the new Sprite class that you’ve now added to your game development toolkit.
This hour explained the basic kinds of animation used in games, including sprite animation, which is also known as cast-based animation. This hour took a significantly closer look at sprite animation by guiding you through the development of a sprite class that can be used to inject sprite animation into your games. The Sprite class that you created supports standard sprite features such as a bitmap, position, and velocity, as well as a handy bounding rectangle feature for controlling the area in which a sprite is allowed to travel. The hour concluded by putting the Sprite class to work in a program example that demonstrated how to create and use sprites.
Hour 11 builds on your newly created sprite code by beefing up the game engine to support interactions between sprites. More specifically, you develop a sprite manager that is capable of detecting and responding to collisions between sprites. You also improve upon the paint mechanism you’ve been using so that your future games don’t suffer from the flicker that is inherent in sprite animation.
The Workshop is designed to help you anticipate possible questions, review what you’ve learned, and begin learning how to put your knowledge into practice. The answers to the quiz can be found in Appendix A, “Quiz Answers.”
Try modifying the velocities of the golf ball sprites in the Fore program example to see how it changes their movements.
Create a new sprite of a bird that flies across the top of the screen in the Fore program example. (Hint: This isn’t as hard as it sounds—just study the code for the golf ball sprites and take note of what it takes to incorporate a new sprite into the mix.)