
Well here you are, ready to embark on your third complete game. At this point in the book, you’ve successfully added wave sound effects and MIDI music programming to your repertoire of game development skills. What better way to celebrate than to design and develop another game to put the skills to good use? This hour leads you through the construction of a game called Battle Office that chronicles an interoffice war between co-workers. Don’t worry: It’s not as violent as it sounds. The job of the player in the game is to use the mouse to fire at co-workers as they appear in various places on the game screen. The game makes interesting use of the sprite classes, as well as wave sound effects and music.
In this hour, you’ll learn:
How to design a game called Battle Office that simulates a battle between co-workers within an office
How to write the code for the Battle Office game
About the joys of testing a completely new game
I once worked at a software company where it was fairly common for balls and other objects to be thrown around for fun while taking a break from the seriousness of programming. On some rare occasions, the speed of the throws would increase to the point where an all-out game of dodge ball erupted. Sometimes the games were friendly, and sometimes they progressed to being almost dangerous. In fact, prior to me joining the company, there was a story of a guy being knocked out because someone threw a small bag of change that caught him in the head. Not a good idea! And in case you’re thinking about starting your own interoffice dodge ball game, I encourage you to use soft balls and make sure that everyone is up for it before firing the first shot.
My experience hurling balls and other objects at people in my former job serves as the inspiration for the Battle Office game, which involves firing at co-workers in an office environment. The game screen in Battle Office consists of an office space with several desks and a doorway in the back. Co-workers will periodically pop up from behind their desks, as well as run by in the background through the doorway. Your job is simple: bean every co-worker who appears onscreen.
Note

Although the Battle Office game does simulate a battle, it’s safe to say that it’s a friendly battle. In fact, the specifics of what is being fired at the co-workers are deliberately left vague so that the player can imagine what is being fired. It could be paper wads, Koosh balls, rubber bands, or dinner rolls—it’s up to your imagination to fill in the blank here.
If the object of the game is to shoot every person who appears on the screen, you might be wondering how you lose. Well, the Battle Office game is all about efficiency and perfection, so you are only allowed so many misses. In other words, each time a person on the screen escapes, it is considered a miss because he got away. When you run out of misses, the game ends. On the other hand, the game keeps track of how many people you successfully hit, so there is a score to keep track of how well you’re playing.
The design of the Battle Office game flows fairly smoothly from the overview of the game that you just went through. You know that there is a background image required to show the office inhabited by the people you’re shooting at. You also know that the people themselves can probably be represented by sprites. Granted, not all the people are moving, but keep in mind that sprites can be used in a variety of different ways. For example, you can use a sprite to simply show and hide an image of a person, as well as perform hit testing on the sprite to see if it has been clicked with the mouse. This approach works well for the people hiding behind desks. Similarly, sprites can be used to represent the people running in the back of the office.
To help you get a feel for how the Battle Office game is laid out, take a look at Figure 16.1.
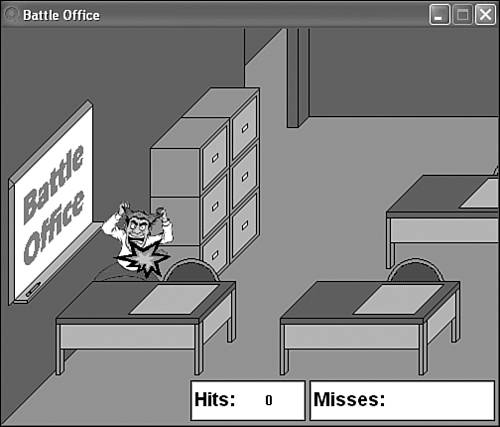
Figure 16.1. The Battle Office game consists of an office with desks that people can hide behind, as well as a hallway that people can run back and forth through.
Notice that the office in the figure includes three desks that are suitable for people to hide behind, along with a hallway. The hallway provides a way for people to run back and forth, which provides you with moving targets to shoot at. Again, the main premise of the game is to shoot at the office workers as they pop up from behind desks and run back and forth down the hallway. In the lower right corner of the game screen, you’ll notice that there are boxes to display the number of hits and misses in the game.
As I mentioned earlier, your weapon is up to your imagination; all you use to shoot people is a special bull’s-eye sprite designed to follow the mouse pointer. It’s probably a little healthier to think in terms of using a “friendly” weapon such as a wad of paper, but this is ultimately up to each individual player. Rather than focus on a weapon, the game instead displays a red bull’s-eye that you control with the mouse and use to shoot the people in the office. When you score a hit, a “pow” image is displayed to indicate that you hit the target.
Now that you understand the basics of the game and how it is played, it’s time to examine what kinds of sprites need to be used. Following is a list of the sprites that go into the Battle Office game:
Five office worker sprites
Target sprite
Pow sprite
The five office worker sprites represent the people in the office who you are shooting at when you play the game. Three of these people sprites are stationary behind desks and simply appear and disappear, while the two others run across the hallway near the back of the office. The target sprite is the bull’s-eye that you use to aim with the mouse. Finally, the pow sprite is used to indicate that you’ve scored a hit, and it is placed directly over the person you’ve hit. Although you can certainly score multiple hits throughout the game, a single pow sprite is sufficient to represent each hit; the sprite is simply moved to the new hit location when a new hit occurs.
Beyond the sprites, the Battle Office game also requires several bitmaps. Following are the ten bitmap images required of the game:
Background office image
Bull’s-eye target image
Pow image
Five office worker images
Small office worker image
Game over image
Most of these images should be pretty obvious given the game design thus far. However, you’re probably curious about the small office worker image, which is used to indicate how many people you’ve missed. When the game begins, there are no misses, so none of the small worker images are displayed. As the game progresses and some of the people get away, the small worker image is drawn repeatedly to indicate each miss. Five misses results in the game ending; in which case, the game over image is displayed.
Now that you have a feel for the graphical objects involved in the game, let’s consider other data that must be maintained by the game. First, it’s pretty obvious that you’ll need to keep track of how many misses you’ve had because it determines when the game ends. It’s also important to keep track of the number of hits so that you’ll have a means of keeping score—the number of hits is the score in the Battle Office game. A Boolean variable to keep track of whether the game is over is also required.
A couple of other pieces of information that aren’t immediately obvious involve the manner in which the office workers are displayed. By the way, when you see the bitmaps, you’ll realize that all the workers are men, so I’ve opted to refer to them as “guys” in the game code. So, I might as well start using the same terminology in this discussion. The game displays the five different guys at random time intervals, which gives the game a more spontaneous feel. In order to establish these intervals, you need to keep track of each guy’s time delay. Additionally, the game is much better if it gradually gets harder the longer you play. So, a master delay is used to provide a means of slowly reducing the length of time that the stationary guys appear on screen. In other words, the guys behind the desks slowly begin appearing for shorter periods of time, which makes it harder to shoot them.
To recap the data requirements of the Battle Office game, the game design has led us to the following pieces of information that must be managed by the game:
The number of guys missed
The number of guys hit
A Boolean game over variable
A delay variable for each guy
A master delay variable for controlling the game’s difficulty level
With this information in mind, you’re now ready to move on and assemble the code for the Battle Office game.
The construction of the Battle Office game follows the same pattern you’ve grown accustomed to in other programs’ examples and games. The next few sections guide you through the development of the game’s code and resources.
The code for the Battle Office game begins in the BattleOffice.h header file, which is responsible for declaring the global variables used throughout the game. Listing 16.1 contains the code for this file.
Example 16.1. The BattleOffice.h Header File Declares Global Variables That Are Used to Manage the Game
 1: #pragma once
 2:
 3: //-----------------------------------------------------------------
 4: // Include Files
 5: //-----------------------------------------------------------------
 6: #include <windows.h>
 7: #include "Resource.h"
 8: #include "GameEngine.h"
 9: #include "Bitmap.h"
10: #include "Sprite.h"
11:
12: //-----------------------------------------------------------------
13: // Global Variables
14: //-----------------------------------------------------------------
15: HINSTANCE   _hInstance;
16: GameEngine* _pGame;
17: HDC         _hOffscreenDC;
18: HBITMAP     _hOffscreenBitmap;
19: Bitmap*     _pOfficeBitmap;
20: Bitmap*     _pTargetBitmap;
21: Bitmap*     _pPowBitmap;
22: Bitmap*     _pGuyBitmaps[5];
23: Bitmap*     _pSmallGuyBitmap;
24: Bitmap*     _pGameOverBitmap;
25: Sprite*     _pTargetSprite;
26: Sprite*     _pPowSprite;
27: Sprite*     _pGuySprites[5];
28: int         _iGuyDelay[5];
29: int         _iGuyMasterDelay;
30: int         _iHits;
31: int         _iMisses;
32: BOOL        _bGameOver;
As the listing reveals, the global variables for the Battle Office game largely consist of the different bitmaps that are used throughout the game. The offscreen device context and bitmap are declared first (lines 17 and 18), as well as the different bitmaps that make up the game’s graphics (lines 19–24). The sprite variables for the game are declared after the bitmaps, and include the target sprite, the pow sprite, and the five guy sprites (lines 25–27). The delays for each of the five guys are then declared (line 28), along with the master delay that controls the game’s difficulty level (line 29). Finally, the number of hits and misses are declared (lines 30 and 31), as well as the familiar game over Boolean variable (line 32).
The initialization of the game variables primarily takes place in the GameStart() function, which is shown in Listing 16.2.
Example 16.2. The GameStart()
Function Initializes the Bitmaps, Sprites, and Game State Variables
 1: void GameStart(HWND hWindow)
 2: {
 3:   // Seed the random number generator
 4:   srand(GetTickCount());
 5:
 6:   // Create the offscreen device context and bitmap
 7:   _hOffscreenDC = CreateCompatibleDC(GetDC(hWindow));
 8:   _hOffscreenBitmap = CreateCompatibleBitmap(GetDC(hWindow),
 9:     _pGame->GetWidth(), _pGame->GetHeight());
10:   SelectObject(_hOffscreenDC, _hOffscreenBitmap);
11:
12:   // Create and load the bitmaps
13:   HDC hDC = GetDC(hWindow);
14:   _pOfficeBitmap = new Bitmap(hDC, IDB_OFFICE, _hInstance);
15:   _pTargetBitmap = new Bitmap(hDC, IDB_TARGET, _hInstance);
16:   _pPowBitmap = new Bitmap(hDC, IDB_POW, _hInstance);
17:   _pGuyBitmaps[0] = new Bitmap(hDC, IDB_GUY1, _hInstance);
18:   _pGuyBitmaps[1] = new Bitmap(hDC, IDB_GUY2, _hInstance);
19:   _pGuyBitmaps[2] = new Bitmap(hDC, IDB_GUY3, _hInstance);
20:   _pGuyBitmaps[3] = new Bitmap(hDC, IDB_GUY4, _hInstance);
21:   _pGuyBitmaps[4] = new Bitmap(hDC, IDB_GUY5, _hInstance);
22:   _pSmallGuyBitmap = new Bitmap(hDC, IDB_SMALLGUY, _hInstance);
23:   _pGameOverBitmap = new Bitmap(hDC, IDB_GAMEOVER, _hInstance);
24:
25:   // Create the target, pow, and guy sprites
26:   RECT    rcBounds = { 0, 0, 500, 400 };
27:   _pTargetSprite = new Sprite(_pTargetBitmap, rcBounds, BA_STOP);
28:   _pTargetSprite->SetZOrder(4);
29:   _pGame->AddSprite(_pTargetSprite);
30:   _pPowSprite = new Sprite(_pPowBitmap, rcBounds, BA_STOP);
31:   _pPowSprite->SetZOrder(3);
32:   _pPowSprite->SetHidden(TRUE);
33:   _pGame->AddSprite(_pPowSprite);
34:   _pGuySprites[0] = new Sprite(_pGuyBitmaps[0], rcBounds);
35:   _pGuySprites[0]->SetPosition(92, 175);
36:   _pGuySprites[0]->SetZOrder(2);
37:   _pGuySprites[0]->SetHidden(TRUE);
38:   _pGame->AddSprite(_pGuySprites[0]);
39:   _pGuySprites[1] = new Sprite(_pGuyBitmaps[1], rcBounds);
40:   _pGuySprites[1]->SetPosition(301, 184);
41:   _pGuySprites[1]->SetZOrder(2);
42:   _pGuySprites[1]->SetHidden(TRUE);
43:   _pGame->AddSprite(_pGuySprites[1]);
44:   _pGuySprites[2] = new Sprite(_pGuyBitmaps[2], rcBounds);
45:   _pGuySprites[2]->SetPosition(394, 61);
46:   _pGuySprites[2]->SetZOrder(2);
47:   _pGuySprites[2]->SetHidden(TRUE);
48:   _pGame->AddSprite(_pGuySprites[2]);
49:   rcBounds.left = 340;
50:   _pGuySprites[3] = new Sprite(_pGuyBitmaps[3], rcBounds, BA_WRAP);
51:   _pGuySprites[3]->SetPosition(500, 10);
52:   _pGuySprites[3]->SetVelocity(-3, 0);
53:   _pGuySprites[3]->SetZOrder(1);
54:   _pGuySprites[3]->SetHidden(TRUE);
55:   _pGame->AddSprite(_pGuySprites[3]);
56:   rcBounds.left = 385;
57:   _pGuySprites[4] = new Sprite(_pGuyBitmaps[4], rcBounds, BA_WRAP);
58:   _pGuySprites[4]->SetPosition(260, 60);
59:   _pGuySprites[4]->SetVelocity(5, 0);
60:   _pGuySprites[4]->SetZOrder(1);
61:   _pGuySprites[4]->SetHidden(TRUE);
62:   _pGame->AddSprite(_pGuySprites[4]);
63:
64:   // Initialize the remaining global variables
65:   _iGuyMasterDelay = 50;
66:   _iHits = 0;
67:   _iMisses = 0;
68:   _bGameOver = FALSE;
69:
70:   // Play the background music
71:   _pGame->PlayMIDISong(TEXT("Music.mid"));
72: }
I know; that’s a heck of a lot of code for a function whose only job is to get the game started. However, you have to consider what all it takes to start a game like this. The bitmaps must be loaded (lines 14–23) and the sprites created (lines 26–62)—not to mention initializing the other global variables in the game (lines 65–68) and starting the background music (line 71). Of course, a few specific parts of this function are worth closer attention.
First, notice that the target sprite is set so that it stops when it reaches the boundary of the game screen (line 27). This ensures that the bull’s-eye target is always visible on the screen no matter where you drag the mouse. Similarly, the pow sprite is also given the stop bounds action, as well as being hidden when the game first starts (line 32). This sprite is only displayed when a successful hit is made, which is why it begins the game hidden. At this point it’s worth pointing out that the Z-order of the target sprite is set higher than the pow sprite (line 28), whereas the pow sprite’s Z-order is set higher than the guy sprites (line 31). This results in the target sprite always appearing on top of the other sprites, while the pow sprite appears on top of the guys.
The first three guy sprites are created at fixed positions on the screen and are also hidden (lines 34–48). The fixed positions are already calculated to display each guy so that he appears to be standing behind the desks in the background office image. The remaining two guy sprites are designed to move across the hallway section of the office background. For this reason, the sprites are given velocities that cause them to move horizontally across the screen (lines 52 and 59). These sprites are also hidden, which allows the game to start with no guys in the office.
The other global variables
in the Battle Office game are initialized with values suitable for the game’s start. For example, the master delay for the guys is set to 50 (line 65), which is a value that you’ll get a better understanding of a little later in the hour. The hits and misses are then zeroed out (lines 66 and 67), and the game over variable is set to FALSE (line 68). Finally, the PlayMIDISong() method of the game engine is used to start playing the background music for the game (line 71).
Although it is longer than what you’ve seen in most of the examples throughout the book thus far, the
GameEnd() function is still much smaller than the GameStart() function that you just saw. Listing 16.3 contains the code for the GameEnd() function.
Example 16.3. The GameEnd()
Function Cleans Up After the Game
 1:  void GameEnd()
 2:  {
 3:    // Close the MIDI player for the background music
 4:    _pGame->CloseMIDIPlayer();
 5:
 6:    // Cleanup the offscreen device context and bitmap
 7:    DeleteObject(_hOffscreenBitmap);
 8:    DeleteDC(_hOffscreenDC);
 9:
10:    // Cleanup the bitmaps
11:    delete _pOfficeBitmap;
12:    delete _pTargetBitmap;
13:    delete _pPowBitmap;
14:    for (int i = 0; i < 5; i++)
15:      delete _pGuyBitmaps[i];
16:    delete _pSmallGuyBitmap;
17:    delete _pGameOverBitmap;
18:
19:    // Cleanup the sprites
20:    _pGame->CleanupSprites();
21:
22:   // Cleanup the game engine
23:   delete _pGame;
24: }
As you can see, this function is responsible for performing a variety of different cleanup tasks for the Battle Office game. The first step is to close the MIDI player (line 4). The bitmaps and sprites are then wiped away (lines 7–20), and the game engine is deleted (line 23).
Because the Battle Office game plays MIDI music, you know that it’s important to pause and resume the music appropriately when the game is deactivated and reactivated. This takes place in the familiar GameActivate()
and GameDeactivate() functions, which you’ve already seen performing this task in other examples.
The game screen in the Battle Office game is painted entirely by the GamePaint() function, which is shown in Listing 16.4.
Example 16.4. The GamePaint()
Function Draws the Office Background Bitmap, the Sprites, and the Number of Hits and Misses
 1: void GamePaint(HDC hDC)
 2: {
 3:   // Draw the background office
 4:   _pOfficeBitmap->Draw(hDC, 0, 0);
 5:
 6:   // Draw the sprites
 7:   _pGame->DrawSprites(hDC);
 8:
 9:   // Draw the number of guys who were hit
10:   TCHAR szText[64];
11:   RECT  rect = { 237, 360, 301, 390 };
12:   wsprintf(szText, "%d", _iHits);
13:   DrawText(hDC, szText, -1, &rect, DT_SINGLELINE | DT_CENTER | DT_VCENTER);
14:
15:   // Draw the number of guys who were missed (got away)
16:   for (int i = 0; i < _iMisses; i++)
17:     _pSmallGuyBitmap->Draw(hDC, 389 + (_pSmallGuyBitmap->GetWidth() * i),
18:       359, TRUE);
19:
20:   // Draw the game over message, if necessary
21:   if (_bGameOver)
22:     _pGameOverBitmap->Draw(hDC, 120, 110, TRUE);
23: }
This GamePaint() function is responsible for drawing all the game graphics for the game. The function begins by drawing the background office image (line 4), and then it draws the game sprites (line 7). The remainder of the function primarily draws the number of hits and misses in the lower right corner of the game screen. The hits are drawn as a number using the Win32 DrawText() function (lines 10–13). The misses, on the other hand, are drawn using small guy bitmaps (lines 16–18). A small guy is drawn for each guy who was missed, which helps you to know how many guys can escape before the game ends.
The GameCycle() function
controls most of the game play in the Battle Office game, and also works closely with GamePaint() to update the game’s sprites and reflect the changes onscreen. Listing 16.5 shows the code for the GameCycle() function.
Example 16.5. The GameCycle()
Function Randomly Controls the Guys in the Office and Determines if the Game Has Ended
 1: void GameCycle()
 2: {
 3:   if (!_bGameOver)
 4:   {
 5:     // Randomly show and hide the guys
 6:     for (int i = 0; i < 5; i++)
 7:       if (_pGuySprites[i]->IsHidden())
 8:       {
 9:         if (rand() % 60 == 0)
10:         {
11:           // Show the guy
12:           _pGuySprites[i]->SetHidden(FALSE);
13:
14:           // Start the countdown delay
15:           if (i == 3)
16:           {
17:             // Start the guy running left
18:             _iGuyDelay[i] = 80;
19:             _pGuySprites[i]->SetPosition(500, 10);
20:           }
21:           else if (i == 4)
22:           {
23:             // Start the guy running right
24:             _iGuyDelay[i] = 45;
25:             _pGuySprites[i]->SetPosition(260, 60);
26:           }
27:           else
28:             // Start the stationary guys
29:             _iGuyDelay[i] = 20 + (rand() % _iGuyMasterDelay);
30:         }
31:       }
32:       else
33:       {
34:         if (--_iGuyDelay[i] == 0)
35:         {
36:           // Play a sound for the guy getting away
37:           PlaySound((LPCSTR)IDW_TAUNT, _hInstance, SND_ASYNC |
38:             SND_RESOURCE);
39:
40:           // Hide the guy
41:           _pGuySprites[i]->SetHidden(TRUE);
42:
43:           // Increment the misses
44:           if (++_iMisses == 5)
45:           {
46:             // Play a sound for the game ending
47:             PlaySound((LPCSTR)IDW_BOO, _hInstance, SND_ASYNC |
48:               SND_RESOURCE);
49:
50:             // End the game
51:             for (int i = 0; i < 5; i++)
52:               _pGuySprites[i]->SetHidden(TRUE);
53:             _bGameOver = TRUE;
54:
55:             // Pause the background music
56:             _pGame->PauseMIDISong();
57:           }
58:         }
59:       }
60:
61:     // Update the sprites
62:     _pGame->UpdateSprites();
63:
64:     // Obtain a device context for repainting the game
65:     HWND  hWindow = _pGame->GetWindow();
66:     HDC   hDC = GetDC(hWindow);
67:
68:     // Paint the game to the offscreen device context
69:     GamePaint(_hOffscreenDC);
70:
71:     // Blit the offscreen bitmap to the game screen
72:     BitBlt(hDC, 0, 0, _pGame->GetWidth(), _pGame->GetHeight(),
73:       _hOffscreenDC, 0, 0, SRCCOPY);
74:
75:     // Cleanup
76:     ReleaseDC(hWindow, hDC);
77:   }
78: }
The GameCycle() function
is one of the heftiest functions you’ve seen thus far in the book, and there’s a good reason for it. This function is carrying out a great deal of the Battle Office game logic by determining when and how the office guys appear. The function first loops through the five guy sprites (line 6), checking to make sure that each one is hidden before attempting to show it (line 7). If the guy is hidden, he is first made visible (line 12). And then some interesting things take place, depending on which guy is being shown. If one of the moving guys is being shown, which is indicated by an array index value of 3 or 4, a countdown delay is started and the sprite position is set (lines 15–26). The position makes sure that the guy starts moving from the edge of the game screen, while the delay gives them just enough time to run across the hallway before being hidden again. If the guy sprite is not one of the moving guys, a delay is set that is based on the master delay, which gets shorter as the game progresses (line 29). The idea is that the stationary guys will be displayed for shorter and shorter periods of time as the game continues.
If the first sprite check inside the loop showed that the guy sprite was already being displayed, the delay is decreased and checked to see if the guy has been shown long enough to hide him again (line 34). In other words, this is the part of the game logic that counts down the delay and results in each guy only being on the screen for a limited amount of time before hiding again. If the delay gets to 0 before the guy is shot, he gets away. If a guy gets away, the first step is to play a sound effect to let the player know (lines 37 and 38). The guy sprite is then hidden (line 41), and the number of misses is increased by one (line 44).
Because the number of misses is being increased, this is a good spot to check and see if the game is over (line 44 also). If there have been five misses, the game is over. A sound effect is played to let the player know that the game is over (lines 47 and 48), and the guy sprites are all hidden (lines 51 and 52). Ending the game also involves setting the _bGameOver variable (line 53), as well as stopping the MIDI music (line 56). In this case, the music is only paused—there is no reason to close the MIDI device just yet because the player might decide to start another game.
The remaining code in the GameCycle() function should be familiar to you because it is fairly generic game code. More specifically, it updates the sprites (line 62), and then draws the game graphics using double-buffer animation (line 65–76).
You survived the GameCycle() function, which was about as messy as the code in this book gets. Listing 16.6 contains another important function in the Battle Office game,
MouseButtonDown().
Example 16.6. The MouseButtonDown()
Function Checks to See if a Guy Was Clicked with the Mouse
 1: void MouseButtonDown(int x, int y, BOOL bLeft)
 2: {
 3:   // Only check the left mouse button
 4:   if (!_bGameOver && bLeft)
 5:   {
 6:     // Temporarily hide the target and pow sprites
 7:     _pTargetSprite->SetHidden(TRUE);
 8:     _pPowSprite->SetHidden(TRUE);
 9:
10:     // See if a guy sprite was clicked
11:     Sprite* pSprite;
12:     if ((pSprite = _pGame->IsPointInSprite(x, y)) != NULL)
13:     {
14:       // Play a sound for hitting the guy
15:       PlaySound((LPCSTR)IDW_WHACK, _hInstance, SND_ASYNC | SND_RESOURCE);
16:
17:       // Position and show the pow sprite
18:       _pPowSprite->SetPosition(x - (_pPowSprite->GetWidth() / 2),
19:         y - (_pPowSprite->GetHeight() / 2));
20:       _pPowSprite->SetHidden(FALSE);
21:
22:       // Hide the guy that was clicked
23:       pSprite->SetHidden(TRUE);
24:
25:       // Increment the hits and make the game harder, if necessary
26:       if ((++_iHits % 5) == 0)
27:         if (--_iGuyMasterDelay == 0)
28:           _iGuyMasterDelay = 1;
29:     }
30:
31:     // Show the target sprite again
32:     _pTargetSprite->SetHidden(FALSE);
33:   }
34:   else if (_bGameOver && !bLeft)
35:   {
36:     // Start a new game
37:     _bGameOver = FALSE;
38:     _iHits = 0;
39:     _iMisses = 0;
40:
41:     // Restart the background music
42:     _pGame->PlayMIDISong();
43:   }
44: }
The MouseButtonDown() function responds to mouse clicks in the game and serves as a means of determining if the player scored a hit on one of the office guys. The function first checks to make sure that the game isn’t over and that the player clicked the left mouse button (line 4). If so, the target and pow sprites are temporarily hidden so that they don’t interfere with performing a hit test on the mouse position (lines 7 and 8). This is necessary because the next task in the function is to see if the mouse position lies within any of the guy sprites. Because the target and pow sprites have a higher Z-order than the guys, they would always supercede the guys. In other words, the hit test would always return either the target or pow sprites and would never detect any of the guys.
The MouseButtonDown()
function checks to see if one of the guy sprites was clicked by calling the IsPointInSprite() method on the game engine and passing in the mouse coordinates (line 12). If one of the guys was hit, a sound effect is played (line 15) and the pow sprite is positioned and displayed to indicate the successful hit (lines 18–20). The guy sprite who was hit is then hidden (line 23), which makes sense considering that he’s been shot. The number of hits is then increased and checked to see if the difficulty level of the game needs to increase (line 26). The difficulty level is raised by decreasing the master delay for the guys (lines 27 and 28), which determines how long the stationary guys appear on the screen. Regardless of whether a hit was detected on a guy sprite, the target sprite is made visible after performing the test (line 32).
The last block of code in the function allows you to right-click to start a new game (lines 34–43). A new game is started by resetting the game state variables (lines 37–39) and restarting the background MIDI music (line 42).
Another mouse-related function used in the Battle Office game is MouseMove(),
which is used to move the target sprite so that it tracks the mouse pointer. This is necessary so that you are always in control of the target sprite with the mouse. Listing 16.7 shows the code for the MouseMove() function.
The target sprite is made to follow the mouse pointer by simply calling the SetPosition() method on the sprite and passing in the mouse coordinates (lines 4 and 5). The position of the target sprite is actually calculated so that the mouse pointer points at the center of the sprite.
The last function of interest in the Battle Office game is the SpriteCollision()
function, which is called in response to sprites colliding. Listing 16.8 shows how uneventful the SpriteCollision() function is in this game.
Example 16.8. The SpriteCollision()
Function Does Nothing Because There is No Need to Respond to Sprite Collisions
When you think about how the Battle Office game works, there is no reason to respond to any sprite collisions. Therefore, the SpriteCollision() function simply returns FALSE to indicate that nothing special is to take place in response to a collision (line 3).
You’ve finally arrived at the most fun step in the construction of a game: testing! Testing the Battle Office game is quite interesting because a fair amount of things are going on in the game. Figure 16.2 shows the game at the start, with one guy jumping from behind his desk to give you a quick scare. Notice that your bull’s-eye target is near the guy ready for you to click and fire at him.

Figure 16.2. The Battle Office game gets started quickly with a guy jumping from behind an office desk.
Clicking the mouse with the target over the guy results in a hit, which causes the pow sprite to be displayed on the screen, as shown in Figure 16.3.
It won’t take long for one of the moving guys to appear in the hallway near the top of the game screen. These guys are a little tougher to hit because they are moving, but it’s still not too hard. Of course, the game doesn’t really get tough until all the guys start appearing at the same time. Figure 16.4 shows an example of how the guys can start getting overwhelming.
Figure 16.4. As the game progresses, the guys will start overwhelming you, which makes it harder to hit them all.
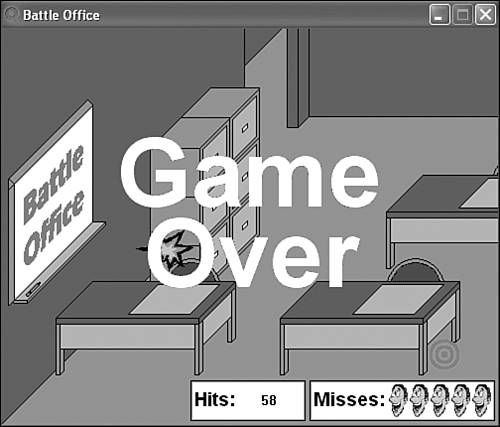
Once five guys get away, the game ends. Figure 16.5 shows the end of the game, which involves displaying the game over image on the screen on top of the other game graphics.
I really don’t encourage you to think of office co-workers as targets, but hopefully you can see the humor in the Battle Office game. If not, at least you can appreciate the game development techniques that went into making the game a reality.
Any time you’re learning a new skill, it’s helpful to put it into practice as much as possible to reinforce what you’ve learned. This hour helped to reinforce the game programming knowledge you’ve learned thus far throughout the book by guiding you through the design and development of the Battle Office game. The game made interesting use of the sprite features in the game engine—not to mention wave sound effects and MIDI music. Hopefully you’re starting to get some confidence that you’re capable of constructing a complete game of your own creation.
This hour concludes this part of the book. The next part revisits animation and explores some ways to enhance the animation features in the game engine so that you can create even more interesting games than those you’ve seen thus far.
The Workshop is designed to help you anticipate possible questions, review what you’ve learned, and begin learning how to put your knowledge into practice. The answers to the quiz can be found in Appendix A, “Quiz Answers.”
Modify the
_iGuyMasterDelayglobal variable in the Battle Office game, and notice how it impacts the difficulty level of the game. Keep in mind that this variable only affects the period of time that the stationary guys appear in the game.Modify the Battle Office game so that the velocities of the moving guys increase as the game progresses, effectively making them harder to shoot. You’ll find out that you’ll also have to modify the delay for each of the moving guys as you modify their velocities because their delay keeps them from wrapping around the screen and appearing again on the other side.