
In the previous hour, you learned how important it is to display a splash screen that serves as a title for your games. This hour continues in the theme of making a game more complete by demonstrating the importance of demo mode. Demo mode is an animated sequence displayed when you’re not playing the game that demonstrates how the game is played. Demo mode can be as simple as showing some of the game creatures moving around, or as complex as showing an entire simulated game being played. Demo mode is important because it gives a player a glimpse at how a game actually plays, which is a considerable step beyond the role of a splash screen.
In this hour, you’ll learn:
Why demo mode is useful in showing people how a game works
What is involved in adding a demo mode to a game
How to add a demo mode to the Space Out game
If you’ve ever been hesitant to buy a product, you might have been offered an opportunity to “try before you buy,” which allows you to try out a product before you spend any money on it. This sales technique is particularly useful in the automotive industry, where it is virtually impossible to justify purchasing a car without taking it for a test drive. In the early days of video games, it was important to convince game players that a game was worthy of spending a quarter for a play, so demo mode was invented. Demo mode is sort of like “try before you buy” applied to video games—you get to see how a game plays before you invest any time or money playing it. In regard to computer games, “try before you buy” now typically involves downloading a limited version of the game that you really can play. However, demo mode is still a useful and worthwhile feature to consider adding to your games.
The main idea behind demo mode is that it goes beyond a splash screen by showing more than just a title or stationary game graphics. Demo mode attempts to show the game actually being played, or at least show some of the main characters in the game going through the motions as you’ll see them in the game. Demo mode can be as simple or as complex as you choose, but the idea is to provide a hook to convince someone to play the game. In other words, you’re attempting to sell the game so that it looks fun and inviting. Demo mode can also be informative, similar to a splash screen. In fact, it’s not a bad idea to design demo mode so that it serves as a more interesting splash screen.
Unlike a splash screen, demo mode is not something that appears at the beginning of the game, never to be seen again once the game starts. Instead, demo mode is displayed in between every game, and helps fill the space between games with interesting animations from the game. So, when a game ends, there should be a brief pause while the player is able to take in that the game is actually over, and then the game should return to demo mode. Of course, the game also starts in demo mode. In this way, demo mode replaces the splash screen for a game, and also goes a few steps beyond the role of a splash screen.
Similar to a splash screen, demo mode is a distinct mode that a game enters when a game is not underway. This mode is different from “game over” and “game not over” modes, and is entered when the game program first starts, as well as in between games. A single Boolean global variable is sufficient to keep track of when a game is in demo mode. This sounds very much like how the splash screen was managed in the previous hour. Demo mode differs from a splash screen in that it involves demonstrating the game, which means that sprites must be allowed to move around. If you recall, the splash screen for the Space Out 2 game deliberately disallowed sprites to be drawn.
The key to making demo mode work in a game is to simulate a game being played without actually involving a human player. One way to do this is to start up a new game as normal, and simulate key strokes using code that is somehow timed. Of course, this also involves disabling the real keys used in the game so that the player can’t suddenly jump into a demo mode game. Although this approach can work very well, and is ultimately the ideal approach to creating a demo mode because it shows how the player interacts with other characters in a game, it is more difficult to create. The coding to replace a human player with a computer player can get tricky, and usually involves some degree of artificial intelligence programming. One work-around for this approach is to “record” the keystrokes made by a player during a real game, and store them in a file. You can then “play” the keystrokes back to recreate the demo game. This technique obviously requires some extra work, but will most likely be a lot simpler than trying to establish realistic AI for the computer player.
A simpler approach to creating a demo mode for a game is to simply show how the characters in the game move around without attempting to simulate the human player in the game. In other words, you aren’t actually trying to make it look as if a human player is guiding his character through the game or otherwise interacting with the game. Instead, you’re just demonstrating how the computer-controlled characters within the game move around and interact with one another. This approach simplifies things considerably because you aren’t in a situation in which you have to try and control an otherwise human player using computer logic. Keep in mind that the whole premise of demo mode is to show off a game and make it look appealing. In many cases, it is sufficient to just show a few characters within the game to achieve this goal.
Creating a demo mode that shows a few characters and doesn’t actually simulate play is still somewhat of a challenge because you have to create and use sprites just as if you were starting a real game. However, in this case, the idea is to disable any interaction from a human player other than initiating a new game. If you think about it, creating a demo mode for a game such as Space Out involves several changes throughout the game to allow it to appear somewhat as if the game is being played even though there is no user interaction. The remainder of the hour focuses on how to add a demo mode to this game.
You’ve already learned that in some ways demo mode is similar to a splash screen because it appears in a game when the game is not actually being played. Unlike a splash screen, however, demo mode is responsible for displaying sprites and enabling them to interact to some degree. Adding a demo mode to the Space Out game represents a programming challenge, but one that isn’t too terribly difficult to solve. The next few sections lead you through the modifications required in the game to add a demo mode. The new version of the game you’ll be creating is called Space Out 3.
The best place to
start with the code for the Space Out 3 game is the SpaceOut.h header file, which includes a couple of new global variables. Demo mode for the game requires two new global variables; one of which replaces the _bSplash global variable that you added in the last hour for the splash screen. Following are the new global variables necessary to support demo mode in the Space Out 3 game:
BOOL _bDemo;
int  _iGameOverDelay;
The first variable, _bDemo, is very similar to the _bSplash variable in the Space Out 2 game from the previous hour. In fact, it serves virtually the same purpose in this game, except that demo mode impacts more code than the splash screen. The _iGameOverDelay global variable is used to provide a delay between when a game ends and when the game enters demo mode. This allows the player to take a moment and realize that the game is over before it cuts back to demo mode.
The first function of particular interest in the Space Out 3 game is the GameStart() function,
which shouldn’t come as too much of a surprise. The only change to the
GameStart() function is the initialization of the _bDemo variable.
The GamePaint() function
is where the code for the Space Out 3 game starts to diverge more significantly from the Space Out 2 game. However, the change is still somewhat subtle in that all the same code is here, it’s just organized a little differently. Take a look at Listing 23.1 to see what I mean.
Example 23.1. The GamePaint()
Function Draws the Game Graphics While Taking into Consideration Demo Mode
 1: void GamePaint(HDC hDC)
 2: {
 3:   // Draw the background
 4:   _pBackground->Draw(hDC);
 5:
 6:   // Draw the desert bitmap
 7:   _pDesertBitmap->Draw(hDC, 0, 371);
 8:
 9:   // Draw the sprites
10:   _pGame->DrawSprites(hDC);
11:
12:   if (_bDemo)
13:   {
14:     // Draw the splash screen image
15:     _pSplashBitmap->Draw(hDC, 142, 100, TRUE);
16:   }
17:   else
18:   {
19:     // Draw the score
20:     TCHAR szText[64];
21:     RECT  rect = { 460, 0, 510, 30 };
22:     wsprintf(szText, "%d", _iScore);
23:     SetBkMode(hDC, TRANSPARENT);
24:     SetTextColor(hDC, RGB(255, 255, 255));
25:     DrawText(hDC, szText, -1, &rect, DT_SINGLELINE | DT_RIGHT |
26:       DT_VCENTER);
27:
28:     // Draw the number of remaining lives (cars)
29:     for (int i = 0; i < _iNumLives; i++)
30:       _pSmCarBitmap->Draw(hDC, 520 + (_pSmCarBitmap->GetWidth() * i),
31:         10, TRUE);
32:
33:     // Draw the game over message, if necessary
34:     if (_bGameOver)
35:       _pGameOverBitmap->Draw(hDC, 170, 100, TRUE);
36:   }
37: }
The GameCycle()
function in Space Out 3 looks a lot like its predecessor, but there is a significant change you should pay close attention to. The change I’m talking about involves the fact that the sprites are drawn regardless of whether the game is in demo mode (line 10). In fact, all that is not drawn in demo mode is the score (lines 20–26), the number of remaining lives (lines 29–31), and the game over message (lines 34 and 35). Also notice that the same splash screen image is displayed when the game is in demo mode (lines 12–16), which means that the game is combining demo mode with the splash screen. This isn’t a problem, but it does mean that the game is being demonstrated behind the splash screen image.
The GameCycle() function must be modified to accommodate demo mode as well. In fact, the GameCycle() function is where the timing delay is established that displays the game over screen for a period of time before reverting back to demo mode when a game ends. Listing 23.2 shows the code for the new version of the GameCycle() function.
Example 23.2. The GameCycle()
Function Establishes a Timing Delay Before Moving to Demo Mode from the Game Over Screen
 1: void GameCycle()
 2: {
 3:   if (!_bGameOver)
 4:   {
 5:     if (!_bDemo)
 6:     {
 7:       // Randomly add aliens
 8:       if ((rand() % _iDifficulty) == 0)
 9:         AddAlien();
10:     }
11:
12:     // Update the background
13:     _pBackground->Update();
14:
15:     // Update the sprites
16:     _pGame->UpdateSprites();
17:
18:     // Obtain a device context for repainting the game
19:     HWND  hWindow = _pGame->GetWindow();
20:     HDC   hDC = GetDC(hWindow);
21:
22:     // Paint the game to the offscreen device context
23:     GamePaint(_hOffscreenDC);
24:
25:     // Blit the offscreen bitmap to the game screen
26:     BitBlt(hDC, 0, 0, _pGame->GetWidth(), _pGame->GetHeight(),
27:       _hOffscreenDC, 0, 0, SRCCOPY);
28:
29:     // Cleanup
30:     ReleaseDC(hWindow, hDC);
31:   }
32:   else
33:     if (--_iGameOverDelay == 0)
34:     {
35:       // Stop the music and switch to demo mode
36:       _pGame->PauseMIDISong();
37:       _bDemo = TRUE;
38:       NewGame();
39:     }
40: }
In addition to changing
the _bSplash variable to _bDemo (line 5), the GameCycle() function establishes a timing delay for the game over screen (lines 33–39). When this delay finishes counting down, it means that the game over message has been displayed long enough and it’s okay to go ahead and put the game in demo mode. This is accomplished by setting the _bDemo variable to TRUE (line 37), and then calling the NewGame() function to add a few alien sprites to demo mode (line 38). Notice that the MIDI music isn’t actually stopped until the game switches to demo mode (line 36), which makes sense when you consider that the game over screen is still a reflection on the last game played.
Demo mode also impacts the HandleKeys()
function in the Space Out 3 game, as you can see in Listing 23.3.
Example 23.3. The HandleKeys()
Function Supports Demo Mode by Changing the Value of the _bDemo Variable if the Game Is Exiting Demo Mode to Start a New Game
 1: void HandleKeys()
 2: {
 3:   if (!_bGameOver && !_bDemo)
 4:   {
 5:     // Move the car based upon left/right key presses
 6:     POINT ptVelocity = _pCarSprite->GetVelocity();
 7:     if (GetAsyncKeyState(VK_LEFT) < 0)
 8:     {
 9:       // Move left
10:       ptVelocity.x = max(ptVelocity.x - 1, -4);
11:       _pCarSprite->SetVelocity(ptVelocity);
12:     }
13:     else if (GetAsyncKeyState(VK_RIGHT) < 0)
14:     {
15:       // Move right
16:       ptVelocity.x = min(ptVelocity.x + 2, 6);
17:       _pCarSprite->SetVelocity(ptVelocity);
18:     }
19:
20:     // Fire missiles based upon spacebar presses
21:     if ((++_iFireInputDelay > 6) && GetAsyncKeyState(VK_SPACE) < 0)
22:     {
23:       // Create a new missile sprite
24:       RECT  rcBounds = { 0, 0, 600, 450 };
25:       RECT  rcPos = _pCarSprite->GetPosition();
26:       Sprite* pSprite = new Sprite(_pMissileBitmap, rcBounds, BA_DIE);
27:       pSprite->SetPosition(rcPos.left + 15, 400);
28:       pSprite->SetVelocity(0, -7);
29:       _pGame->AddSprite(pSprite);
30:
31:       // Play the missile (fire) sound
32:       PlaySound((LPCSTR)IDW_MISSILE, _hInstance, SND_ASYNC |
33:         SND_RESOURCE | SND_NOSTOP);
34:
35:       // Reset the input delay
36:       _iFireInputDelay = 0;
37:     }
38:   }
39:
40:   // Start a new game based upon an Enter (Return) key press
41:   if (GetAsyncKeyState(VK_RETURN) < 0)
42:     if (_bDemo)
43:     {
44:       // Switch out of demo mode to start a new game
45:       _bDemo = FALSE;
46:       NewGame();
47:     }
48:     else if (_bGameOver)
49:     {
50:       // Start a new game
51:       NewGame();
52:     }
53: }
The only changes in
this function involve renaming the _bSplash variable to _bDemo (lines 3, 42, and 45).
The new code in the SpriteCollision()
function involves the timing delay for the game over screen. More specifically, the _iGameOverDelay variable is set to 150, which means that the game screen will be displayed for 150 cycles before the game returns to demo mode:
if (--_iNumLives == 0)
{
  // Play the game over sound
  PlaySound((LPCSTR)IDW_GAMEOVER, _hInstance, SND_ASYNC |
    SND_RESOURCE);
  _bGameOver = TRUE;
  _iGameOverDelay = 150;
}
Any idea how much time 150 cycles is? You know that the frame rate for the game is set at 30 frames per second, which is the same thing as saying that the game goes through 30 cycles per second. Knowing this, you can divide 150 by 30 to arrive at a delay of 5 seconds for the game over screen. Pretty neat, right?
The SpriteDying()
function involves an interesting change related to demo mode that you might not have thought about. Analyze Listing 23.4 and see if you can figure out why the change is necessary.
Example 23.4. The SpriteDying()
Function Makes Sure Not to Play the Sound of Exploding Alien Missiles When the Game Is in Demo Mode
 1: void SpriteDying(Sprite* pSprite)
 2: {
 3:   // See if an alien missile sprite is dying
 4:   if (pSprite->GetBitmap() == _pBMissileBitmap ||
 5:     pSprite->GetBitmap() == _pJMissileBitmap ||
 6:     pSprite->GetBitmap() == _pTMissileBitmap)
 7:   {
 8:     // Play the small explosion sound
 9:     if (!_bDemo)
10:       PlaySound((LPCSTR)IDW_SMEXPLODE, _hInstance, SND_ASYNC |
11:         SND_RESOURCE | SND_NOSTOP);
12:
13:     // Create a small explosion sprite at the missile's position
14:     RECT rcBounds = { 0, 0, 600, 450 };
15:     RECT rcPos = pSprite->GetPosition();
16:     Sprite* pSprite = new Sprite(_pSmExplosionBitmap, rcBounds);
17:     pSprite->SetNumFrames(8, TRUE);
18:     pSprite->SetPosition(rcPos.left, rcPos.top);
19:     _pGame->AddSprite(pSprite);
20:   }
21: }
When you
think about it, demo mode for a computer game shouldn’t be something that annoys you, which means that it’s probably best for it to not make a bunch of noise. Because the aliens in demo mode will be firing missiles that explode when they hit the ground, it’s necessary to quiet the missiles in the SpriteDying() function so that they don’t make noise in demo mode (lines 9–11).
The NewGame() function
is the last of the functions impacted by the switch to demo mode in the Space Out 3 game, and it’s also the most interesting. Listing 23.5 shows the code for the NewGame() function.
Example 23.5. The NewGame()
Function Adds a Few Aliens to the Game When It Is in Demo Mode
 1: void NewGame()
 2: {
 3:   // Clear the sprites
 4:   _pGame->CleanupSprites();
 5:
 6:   // Initialize the game variables
 7:   _iFireInputDelay = 0;
 8:   _iScore = 0;
 9:   _iNumLives = 3;
10:   _iDifficulty = 80;
11:   _bGameOver = FALSE;
12:
13:   if (_bDemo)
14:   {
15:     // Add a few aliens to the demo
16:     for (int i = 0; i < 6; i++)
17:       AddAlien();
18:   }
19:   else
20:   {
21:     // Create the car sprite
22:     RECT rcBounds = { 0, 0, 600, 450 };
23:     _pCarSprite = new Sprite(_pCarBitmap, rcBounds, BA_WRAP);
24:     _pCarSprite->SetPosition(300, 405);
25:     _pGame->AddSprite(_pCarSprite);
26:
27:     // Play the background music
28:     _pGame->PlayMIDISong(TEXT("Music.mid"));
29:   }
30: }
Although you might
think of the NewGame() function as only being used to start a new game that you’re going to play, it is also used to start a new demo game. A demo game is a “game” that includes a few aliens and nothing else. In other words, there is no car, which eliminates the difficulty of trying to simulate a human player in code. Fortunately, the aliens in the Space Out game are interesting enough that they do a pretty good job of conveying the premise of the game without having to throw in the car.
The NewGame() function actually adds six alien sprites to the game engine when the game is in demo mode (lines 13–18). One neat thing about this code is that the AddAlien() function is designed to add a random alien, which means that demo mode is different each time the game goes into it; the six aliens added are always different. Granted, this demo mode could have been made more interesting by adding the car sprite and having it fight back with the aliens, but for the sake of simplicity, you can’t help but like the approach of just adding a few aliens and letting them cruise around the game screen firing missiles on their own.
Testing demo mode in the Space Out 3 game is a little like testing the splash screen in Space Out 2—just launch the game and watch it go! Figure 23.1 shows the Space Out 3 demo mode with the aliens flying around having a good time.
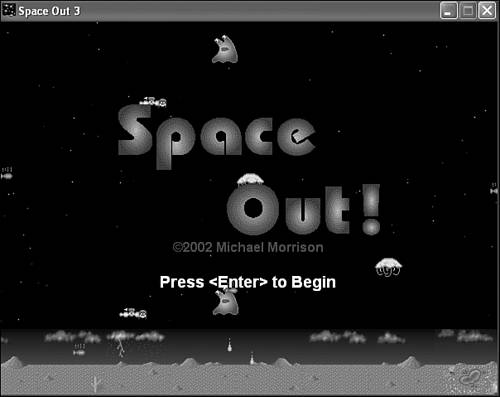
Figure 23.1. Demo mode in the Space Out 3 game involves several aliens flying around the game screen behind the splash screen image.
As you can see, the aliens in demo mode help to demonstrate how the game is played even though they aren’t interacting directly with a simulated player through the car sprite. Like I said earlier, the car sprite would be a very nice improvement for demo mode, but the idea here is to keep things simple. Any time you can achieve a desired effect with less code, and therefore less complexity, it is a good thing.
Figure 23.2 shows a game that has just ended in Space Out 3. In this figure, the game over screen is shown while the time delay is ticking away.
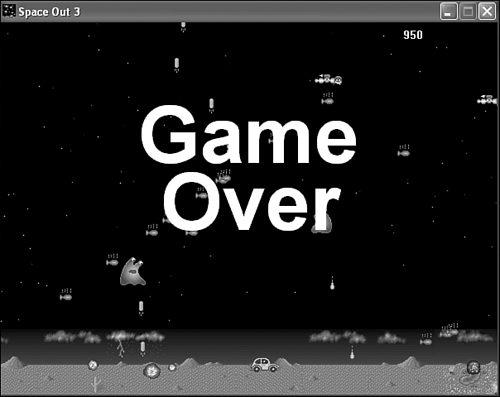
Figure 23.2. When a game finishes in Space Out 3, the game over screen is displayed for a few seconds.
The game over screen in Space Out 3 is displayed for a few seconds before the game goes back to demo mode, as shown in Figure 23.3.
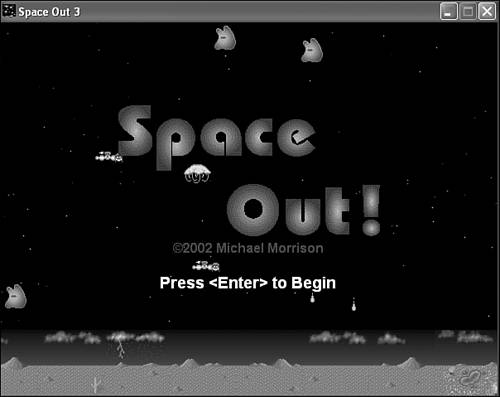
Figure 23.3. After the game over screen has been shown for a few seconds, the Space Out 3 game reverts back to demo mode, although each demo mode is a little different.
I’m showing a shot of demo mode one more time just to demonstrate how it varies each time the game goes into it. If you compare this figure with Figure 23.1, you’ll notice that the aliens are distributed a little differently. This is a subtle detail of demo mode that helps to make the game a little more interesting.
This hour demonstrated an interesting feature of many commercial games that you now know how to add to your own games. I’m referring to demo mode, which allows a game to present to the game player a glimpse of how the game plays. Demo mode was a critical feature in arcade games, where a game needed to sell itself in order to convince someone to spend a quarter on a play. Computer games don’t rely as heavily on demo mode because they don’t live on quarters, but it’s nonetheless an important touch on a game that might otherwise do nothing in between plays.
The next hour wraps up the book by showing you one last game feature that we’ve all grown to love: the high score list. The high score list is an important part of most classic video games because it provided a means of measuring your skill at a game and saving it for others to see.
The Workshop is designed to help you anticipate possible questions, review what you’ve learned, and begin learning how to put your knowledge into practice. The answers to the quiz can be found in Appendix A, “Quiz Answers.”
Experiment with adding more or less aliens to demo mode in the Space Out 3 game to get a different effect. You might also consider changing the
AddAlien()function so that the aliens behave a little differently when in demo mode.Add the car sprite to demo mode in the Space Out 3 game, and just have it move randomly back and forth on the screen to simulate a human player who isn’t too smart.