You got it buddy: the large print giveth and the small print taketh away. | ||
| --Tom Waits | ||
As Tom Waits points out in the quote, the size of the print determines a whole lot about what you’re getting into, at least when it comes to marketing. This chapter isn’t about marketing but it does address print size. It’s about XSL-FO, an XML stylesheet technology that is in some ways akin to a supercharged CSS. XSL-FO is the other half of the XML stylesheet equation, with XSLT being the original half that you learned about in Hour 11, “Getting Started with XSL,” and Hour 12, “Transforming XML with XSLT.” XSL-FO is a very high-powered style language that is particularly well suited to print. It allows you to take exacting control over every little detail of the printed page, including margins, headers, footers, and so on. XSL-FO could also be applied to the Web as a high-end replacement for CSS but browsers have yet to adopt it as a page formatting and layout standard. So, for now you have to consider XSL-FO as a technology primarily useful for print. Fortunately, there is a need for such a technology. This hour introduces you to the XSL-FO language, and how it is used to render highly formatted printed pages based upon XML code.
In this hour, you’ll learn
What XSL-FO is and how it came to be
About the nuts and bolts of the XSL-FO language
How to validate XSL-FO documents
How to convert an XSL-FO document to a PDF document that can be viewed in Adobe Acrobat Reader
Back in Hour 11 you learned about the various technologies that enter into the picture with respect to XML stylesheets. You found out that XSL-FO, which stands for XSL Formatting Objects, is the formatting component of the XSL stylesheet technology and is designed to be a functional superset of CSS. This means that XSL-FO contains all of the functionality of CSS, even though it uses its own XML-based syntax. Like its transformation counterpart, XSLT, XSL-FO is implemented as an XML language, which is beneficial for both minimizing the learning curve for XML developers and easing its integration into existing XML tools. Also like XSLT, XSL-FO operates on a tree of XML data, which can either be parsed directly from a document or transformed from a document using XSLT.
XSL-FO began back in the late 1990s when the W3C set out to create a page description language that could be used to format and display XML data. The idea behind this page description language is that it would allow XML developers to completely separate XML content from the details of how that content is rendered on a page for display. To facilitate the translation of raw XML data into a styled format, the W3C also began creating a transformation language. This transformation language became XSLT, while the descriptive formatting language became XSL-FO. However, XSLT caught on much quicker, and ultimately became the standard stylesheet mechanism for XML document processing and transformation. Many web developers now regularly use XSLT in combination with CSS to transform and style XML documents.
This scenario has fallen short of the W3C’s initial goal of having XSLT and XSL-FO be the one-two transformation/style punch. The reality is that CSS was already widely supported and understood, so it only made sense for it to represent the first wave of style XML documents. XSL-FO offers everything CSS has to offer and much more, so we may eventually see XSL-FO begin to make its way into web pages at some point in the future. For now, however, XSL-FO is relegated to more of a specialized role in helping to layout and format very specific types of print documents.
By the Way
Comparisons are often made between XSL-FO and CSS, and for the most part they are valid. One critical distinction between the two technologies is that CSS styles are always attached to an existing document tree, whereas XSL-FO establishes its own document structure. In other words, you apply CSS styles to XML data, whereas XSL-FO represents a complete merger of data and styles. In practice, XML data is typically still maintained separately from its XSLT stylesheet, which is then used to combine the data and XSL-FO styles into a complete XSL-FO document.
The good news is that aside from web browsers, there is actually a great deal of support for XSL-FO in back-end XML development tools. You learn about one such tool later in this lesson when you find out how to convert XSL-FO documents to PDF documents.
The XSL-FO language is an XML-based language that serves as a functional superset of CSS. This means that XSL-FO can do everything CSS can do, and much more. It doesn’t mean, however, that XSL-FO uses the same syntax as CSS—it does not. Because XSL-FO code is XML code, it should be immediately familiar to you, at least in its general structure and syntax.
Before you actually get into the guts of XSL-FO code, you might be curious as to how you go about manipulating and using XSL-FO. Because web browsers aren’t really a viable option just yet, you have to look to other tools for XSL-FO document processing. One popular XSL-FO tool is called FOP, which stands for Formatting Objects Processor. FOP is a freely available open source tool that you can download from the Apache XML Graphics Project at http://xmlgraphics.apache.org/fop/. A good commercial option for XSL-FO processing is XEP, which is available for purchase from the RenderX web site at http://www.renderx.com/. You learn more about both of these tools, especially FOP, later in the hour.
By the Way
Stylus Studio is another popular commercial tool that supports XSL-FO. Check it out at http://www.stylusstudio.com/xsl_fo_processing.html.
The remainder of this section introduces you to the tags and attributes that make up the XSL-FO language, and ultimately give you the power to format and style XML content to your heart’s desire.
Strangely enough, the W3C hasn’t made available an official DTD for XSL-FO, so I can’t just show you a DTD in order to explain the language. And in fact, even if such an official DTD existed, it would be far too complicated to make out the language in one sitting, or 10 sittings for that matter! It turns out that XSL-FO is a very “deep” language, supporting numerous objects and options. All of the inner workings of the XSL-FO language could easily fill an entire book. Because our goal here is to knock out XSL-FO in an hour, I’ll focus instead on the core language components that allow you to perform basic XML document formatting.
By the Way
An “experimental” DTD for XSL-FO does exist, although it wasn’t created by the W3C. It was created by RenderX, the makers of the XEP XSL-FO processor. Later in the lesson you learn how to use the RenderX XSL-FO DTD to validate XSL-FO documents.
So without further ado, Listing 14.1 contains the code for a skeletal XSL-FO document.
Example 14.1. A Skeletal XSL-FO Document
 1: <?xml version="1.0" encoding="utf-8"?>
 2:
 3: <fo:root xmlns:fo="http://www.w3.org/1999/XSL/Format">
 4:   <fo:layout-master-set>
 5:     <fo:simple-page-master master-name="skeleton">
 6:       <fo:region-body margin="1in"/>
 7:     </fo:simple-page-master>
 8:   </fo:layout-master-set>
 9:
10:   <fo:page-sequence master-reference="skeleton">
11:     <fo:flow flow-name="xsl-region-body">
12:       <fo:block>Howdy, world!</fo:block>
13:     </fo:flow>
14:   </fo:page-sequence>
15: </fo:root>
Perhaps the first thing to notice in this code is the XSL-FO namespace, which is assigned the prefix fo (line 3). The namespace itself is located at http://www.w3.org/1999/XSL/Format. Throughout the remainder of the document, the fo prefix is used in front of every XSL-FO tag; this is typically how XSL-FO documents are coded. You may also notice that the root element of the skeletal document is fo:root—this is the standard root element for all XSL-FO documents.
The next element is where things get interesting. I’m referring to fo:layout-master-set, which encloses one or more page masters (line 5). Although it may sound imposing, a page master is just a description of a formatted page. For example, a page master describes the size and orientation of a page, along with its margins and other pertinent layout details. Every XSL-FO document must contain at least one page master that is coded as a child of the fo:layout-master-set element. Each page master is coded using the fo:simple-page-master element or the fo:page-sequence element, the latter of which is used to code a sequence of page masters as opposed to a single page master. An example of where you might want to have multiple page masters is a report where there is a cover page that is formatted differently than the internal pages; the cover page would have its own page master, while the internal pages would use a different page master.
By the Way
An XSL-FO document can only have one fo:layout-master-set element, which houses all of the page masters and page master sequences for the document.
In the skeleton sample document, a single page master is created that simply sets the margin of the page to one inch (lines 5 to 7). The fo:simple-page-master element is used to declare the page master (line 5), and within it the fo:region-body element is used to define the primary content region on the page. You’ll notice that the fo:simple-page-master element is given an attribute named master-name, which in this case is assigned the value skeleton (line 5). This attribute serves as a unique ID for the master page, which is used later in the document to associate content with the page.
Getting back to the fo:region-body element, its purpose is to define the main content region of the master page. This element has other parameters that you can use to carefully control how it is laid out on the page but in this example its margins are collectively set to one inch (line 6).
At this point you now have an XSL-FO document with a master page arranged as shown in Figure 14.1.
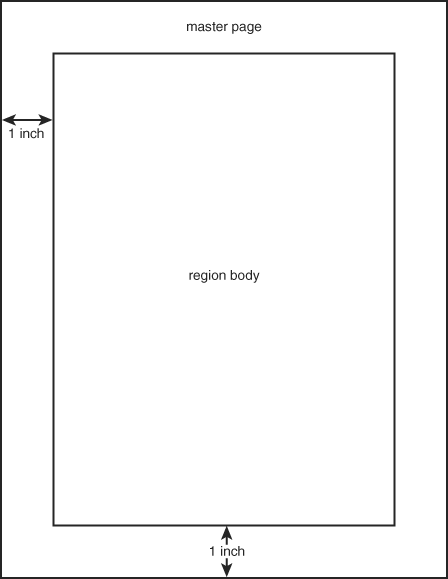
Figure 14.1. The skeletal XSL-FO document’s master page consists of a content region with oneinch margins.
By the Way
Although the page in the figure is accurate, it doesn’t tell the entire story in terms of margins. The region body margins specified in the skeleton document only apply to the region body content area, which is typically inset on the page. To control the margins at the edges of the page, you will typically set margins for the master page itself. Because no master page margins were set in the example, the region body margins effectively serve as general page margins.
But you’re not finished with the code in the skeleton document just yet. The last block of code in the document describes a page sequence, which is where formatted content actually enters the picture. The fo:page-sequence element is used to house content in an XSL-FO document, and can be thought of as roughly similar to the body element in an HTML document. The key thing to note about the fo:page-sequence element is how it is associated with a master page via its master-reference attribute (line 10). This is very important because a page sequence must be associated with a master page in order to be laid out. In this way, you can think of a master page as somewhat of a layout template, while the content that gets placed in the template is contained within a page sequence.
Continuing along, the fo:flow element within the fo:page-sequence element is used to flow content onto the page. Just as HTML content flows onto the page in the order it is specified in an HTML document, so does content in an XSL-FO document. The term “flow” is used with this element because content is allowed to flow across multiple pages. Contrast this with static content, which resides on a single page. The specific elements within a flow determine exactly how the flow commences.
By the Way
When content in a flow is too large to fit on one page, it automatically flows onto another page.
In the skeleton example, the fo:block element is used to flow a block of text onto the page. The fo:block element is conceptually similar to div in HTML in that it represents a rectangular region of text. So if you string along a sequence of fo:block elements within a flow, they will be laid out one below the next. The opposite of the fo:block element is the fo:inline element, which is comparable to span in HTML.
The only piece of code in the skeleton XSL-FO document that you haven’t learned about is the flow-name attribute of the fo:flow element (line 11). This attribute determines where the content of the flow will go on the page. Each page is actually divided into several standard regions, one of which is the region body (xsl-region-body), which is the main content area. Other possible values for the flow-name attribute include xsl-region-before, xsl-region-after, xsl-region-start, and xsl-region-end, to name a few. The region-before area is typically used to set header information for a page, whereas region-after similarly applies to footer information. Figure 14.2 shows how these different regions factor into the content area of a page.
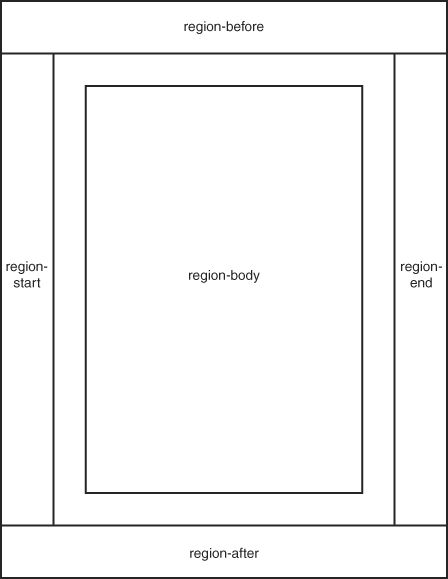
Figure 14.2. The content area of a page in XSL-FO is divided into multiple regions that can be targeted with individual flows.
In the skeleton sample document, only the region-body area of the page is used to place content, which means the other areas just collapse to nothing.
I realize I’ve thrown a lot of XSL-FO information at you quickly, so allow me to quickly summarize the skeleton document in terms of the tags that it uses:
<fo:root>— The root of the document, responsible for declaring the XSL-FO namespace<fo:layout-master-set>— Stores one or more page master layouts<fo:simple-page-master>— Represents a simple page master, which serves as a template for a specific type of page<fo:region-body>— The main content area within a master page layout<fo:page-sequence>— A container for content that gets laid out on a page<fo:flow>— A more specific container for content that is allowed to flow from one page to another as necessary<fo:block>— A rectangular content region that resides on its own line on the page; similar to<div>in HTML<fo:inline>— A rectangular content region that appears inline with other content; similar to<span>in HTML
Although XSL-FO is admittedly a little tricky to get the grasp of initially, you now understand the basics of a minimal XSL-FO document. Let’s push forward and learn a few more specifics about how to use the XSL-FO language.
Finally, it’s time to see where XSL-FO has some similarity with other technologies that you may be more familiar with. I’m talking about CSS, in which case XSL-FO’s text styling properties are very similar to those used in CSS. In XSL-FO, you set the font specifics for text using attributes on the <fo:block> and <fo:inline> tags. More specifically, the font-size, font-family, and font-weight attributes can all be used to set the font for a block or inline content. These attributes are set just like their CSS counterparts.
Following is an example of setting the font size and font family for a block in XSL-FO:
<fo:block text-align="end" font-size="10pt" font-family="serif"
background-color="black" color="white">
  Great Sporting Events
</fo:block>
In this example, the text content Great Sporting Events is styled using a 10-point, serif font. Furthermore, the alignment of the text is set to end via the text-align attribute, which is equivalent to right-alignment in CSS. There is no concept of left or right in XSL-FO—instead, you use start and end when referring to the alignment of content that you might otherwise think of as being left-aligned or right-aligned. Of course, center is still perfectly legit in XSL-FO when it comes to alignment.
The background-color and color attributes in this code are direct carry-overs from CSS. You can use them just as you would the similarly named CSS styles.
There are a few spacing and border properties that you can set when it comes to XSL-FO content. In fact, there are many more than I have the space to cover, so I’m only going to focus on a couple of them. The space-before and space-after attributes are used to control the spacing before and after a block. Because we’re talking about blocks, the spacing applies vertically to the top (space-before) and bottom (space-after) of the block. In this way, the space-before and space-after attributes work sort of like top and bottom margins, except they apply outside of the margins.
Following is an example of setting the space after a block so that the next content is spaced a little further down the page:
<fo:block font-size="18pt" font-family="sans-serif" space-after="5pt"
background-color="black" color="white" text-align="center" padding-top="0pt">
  Great Sporting Events
</fo:block>
Also notice in this code that the padding-top attribute is set, which controls the padding along the top of the block. All of the standard CSS margin and padding styles are available for you in XSL-FO as attributes of the <fo:block> tag. These attributes include margin, margin-left, margin-right, margin-top, margin-bottom, padding, padding-left, padding-right, padding-top, and padding-bottom. There are also several familiar border attributes that you can use with blocks: border, border-left, border-right, border-top, and border-bottom.
Just to make sure you understand how all these spacing and border properties affect XSL-FO block content, take a look at Figure 14.3.
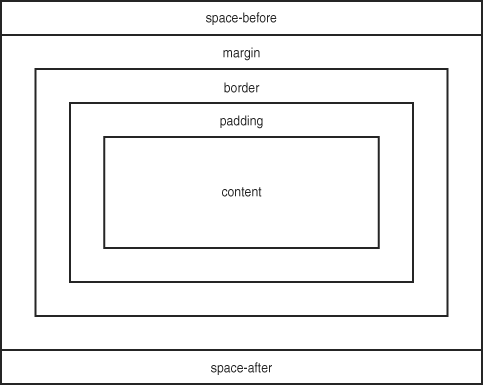
Figure 14.3. The various spacing and border attributes allow you to carefully control the area around XSL-FO block content.
Keep in mind that you will rarely if ever use all of these attributes at once, which means that the others will collapse and not actually affect the spacing of the content.
Earlier when I explained page masters, I mentioned that the size of a page is controlled by a page master but I didn’t actually show you how. The size of a page is set using the page-width and page-height attributes of the fo:simple-page-master element. As with most measurements in XSL-FO, you can use a variety of different units when specifying the page size, such as inches (in), centimeters (cm), and points (pt). The page size refers to the physical size of the printed page in most cases, which you will likely set to either 8.5×11 (inches) or 11×17 (inches), to note a few popular page sizes. Following is an example of specifying an 8.5×11 page size:
<fo:simple-page-master master-name="main" page-width="8.5in"
page-height="11in" margin-left="1in" margin-right="1in"
margin-top="0.5in" margin-bottom="0.5in">
  <fo:region-body margin-top="0.25in" margin-bottom="0.25in"/>
</fo:simple-page-master>
This code also shows how to establish margins for both the master page and the region body within the content area of the page.
Managing pages in an XSL-FO document isn’t just about setting their size. It’s also important to keep up with page numbers and ensure that they are displayed appropriately, if so desired. The <fo:page-number> tag is used to insert the page number into the content of a page. This page number is automatically calculated, meaning that you don’t have to do any more than insert the tag to get automatic page numbering. Of course, you will likely want the page number to be displayed in the header or footer for the page, which means you’ll need to allocate some space via the extent attribute. Following is an example of how to establish a quarter-inch footer to house the page number:
<fo:region-after extent="0.25in" />
This code should be placed in the page master so that the footer gets established. The next step is then to use the <fo:page-number> tag to place the page number in content that results in the displaying of the page number:
<fo:static-content flow-name="xsl-region-before">
  <fo:block text-align="end" font-size="10pt" font-family="serif"
  line-height="14pt" >
    Great Sporting Events - p. <fo:page-number/>
  </fo:block>
</fo:static-content>
Earlier in the lesson I talked about static content but I didn’t show you an example. Here is a perfect example of static content, which means content that doesn’t flow down the page. Static content isn’t static in a sense that it can certainly change, as with the page number, but its position and spacing on the page are static.
This code contains one other new wrinkle that you haven’t learned about yet: the line-height attribute. This attribute is used to establish the minimum height of a block. You can use this attribute to ensure that a block is a certain minimum height regardless of the content contained within it.
As with any XML documents that you create, it’s important to be able to validate XSL-FO documents to ensure that they are coded properly according to the XSL-FO language. The W3C doesn’t offer an official XSL-FO DTD, which is necessary in order to validate XSL-FO documents. However, RenderX, the makers of the XEP XSL-FO processor, offer an experimental DTD that works fine for validating XSL-FO documents. Relying on RenderX’s DTD, you can still use the standard W3C online validation tool to validate your XSL-FO documents. But first you need to wire the RenderX DTD to your XSL-FO documents.
The RenderX XSL-FO DTD is located online at http://xep.xattic.com/xep/resources/validators/dtd/fo.dtd. You wire this DTD into your XSL-FO documents via the following line of code just after the XML processor directive near the top of a document:
<!DOCTYPE fo:root SYSTEM
"http://xep.xattic.com/xep/resources/validators/dtd/fo.dtd">
With this code in place, you can now pass your XSL-FO documents into the standard W3C Markup Validation Service at http://validator.w3.org/.
The point of all this effort in learning about the XSL-FO language is to do something useful, such as generate a highly formatted PDF document suitable for viewing in Adobe’s popular Acrobat Reader application. As I mentioned earlier in the lesson, a handy tool for carrying out the XSL-FO to PDF translation is FOP, which is a free command-line tool made available by the Apache XML Graphics Project at http://xmlgraphics.apache.org/fop/.
After downloading and installing FOP, you need to tweak a setting in a FOP batch file before attempting to run the application. This file is called fop.bat, and it contains a variable called LOCAL_FOP_HOME that you must set to the actual FOP installation folder. As an example, if you install FOP to the folder fop-0.20.5, you’ll need to change the line of code for the LOCAL_FOP_HOME variable in fop.bat to the following:
set LOCAL_FOP_HOME=c:fop-0.20.5
By the Way
The fop.bat batch file is used in Windows versions of FOP. The UNIX/Linux equivalent is fop.sh, which is the shell script for running FOP.
With the FOP batch file configured properly, you’re ready to take FOP for a spin. The quickest way to use it is to just copy the .fo file that you want to process to the main FOP folder. Then open a command-line prompt, navigate to the main fop folder, and issue the following command:
fop fofile.fo pdffile.pdf
The first argument to FOP, fofile.fo, is the name of the XSL-FO file that you want to process, whereas the second argument is the name of the resulting PDF file. Following is how you would process the skeleton.fo document using FOP:
fop skeleton.fo skeleton.pdf
Figure 14.4 shows the resulting skeleton PDF document as viewed in Adobe Acrobat Reader.
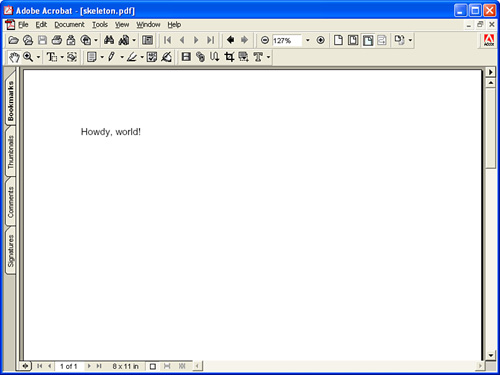
I realize the skeleton PDF document isn’t much to get excited about but it is a full-blown PDF document that was generated straight from an XSL-FO document, which is no small feat. The remainder of the lesson guides you through a more complete XSL-FO example that results in the generation of a much more interesting PDF document.
You really can’t appreciate the power of XSL-FO without applying it to a substantial amount of content, consisting of at least a few pages of text. I thought a good example might be an excerpt from a book that my brother is writing about his crazy life. Without getting off on too much of a tangent, I’ll just say that my brother has experienced quite a lot of extraordinary situations in his life, mostly self-induced. The excerpt I’m using as an example here includes a funny childhood story of my brother along with a clever football ticket caper that he pulled while in high school. Anyway, back to XSL-FO!
By the Way
You’ll need to download the source code for this example to view it in its entirety. Just visit my web site at http://www.michaelmorrison.com/ to download the complete source code for the book.
Listing 14.2 contains the partial code for the Great Sporting Events sample XSL-FO document, which contains plenty of text to flow across several pages.
Example 14.2. The Great Sporting Events XSL-FO Document
1: <?xml version="1.0" encoding="utf-8"?>
2: <!DOCTYPE fo:root SYSTEM
"http://xep.xattic.com/xep/resources/validators/dtd/fo.dtd">
3:
4: <fo:root xmlns:fo="http://www.w3.org/1999/XSL/Format">
5: <fo:layout-master-set>
6: <fo:simple-page-master master-name="main" page-width="8.5in"
7: page-height="11in" margin-left="1in" margin-right="1in"
8: margin-top="0.5in" margin-bottom="0.5in">
9: <fo:region-body margin-top="0.25in" margin-bottom="0.25in"/>
10: <fo:region-before extent="0.25in"/>
11: <fo:region-after extent="0.25in"/>
12: </fo:simple-page-master>
13: </fo:layout-master-set>
14:
15: <fo:page-sequence master-reference="main" initial-page-number="1">
16: <fo:static-content flow-name="xsl-region-before">
17: <fo:block text-align="end" font-size="10pt" font-family="serif"
18: line-height="14pt" >
19: Great Sporting Events - p. <fo:page-number/>
20: </fo:block>
21: </fo:static-content>
22:
23: <fo:flow flow-name="xsl-region-body">
24: <fo:block font-size="18pt" font-family="sans-serif" line-height="26pt"
25: space-after="5pt" background-color="black" color="white"
26: text-align="center" padding-top="0pt">
27: Great Sporting Events
28: </fo:block>
29:
30: <fo:block font-size="16pt" font-family="sans-serif" line-
height="20pt"
31: space-before="10pt" space-after="10pt"
32: text-align="center" padding-top="0pt">
33: by Steve Morrison
34: </fo:block>
35:
36: <fo:block font-size="12pt" font-family="sans-serif" line-height="15pt"
37: space-after="3pt" text-align="start">
38: Sports have always seemed to be a large part of my life either as an
39: athlete participating or as a fan. I was raised in a very sports-
40: oriented environment. My father was still a young man when I was
born.
41: He was very athletic and as a child, I went with him as he played
42: fast-pitch softball, softball, basketball and sometimes was allowed
43: to go to the golf course with him. As I recall, all of these
44: activities were held at public parks and recreation centers. I think
45: my brother and I got our competitiveness directly from our dad. None
46: of us are sore losers, but we love to win and hate to lose.
47: </fo:block>
48:
49: <fo:block font-size="16pt" font-family="sans-serif" line-height="20pt"
50: space-before="10pt" space-after="7.5pt"
51: text-align="start" padding-top="0pt">
52: Missing Gym Rat
53: </fo:block>
54:
55: <fo:block font-size="12pt" font-family="sans-serif" line-height="15pt"
56: space-after="3pt" text-align="start">
57: I remember one occasion at the local recreation center where my dad
58: and his buddies played softball and basketball regularly. On this
59: particular night, they were playing some hotly contested pick-up
60: basketball games and I ran all over the rec. center as the night
61: wore on. I was probably 5 years old and my mom had stayed home that
night.
62: This obviously allowed me quite a bit of freedom as my dad played
63: ball. Near the end of the night, my dad and another player got into
64: a little scrap. A little fighting was not all that dangerous back in
65: 1970. This was not uncommon and would usually end up with the two
66: combatants shaking hands and later having a beer together. I
67: remember being worried as I watched the scuffle. Afterwards,
68: everyone started playing again so I wandered on off to play in the
69: center. After what seemed like a long time, I entered the gym and to
70: my amazement, it was completely empty. I ran to the lobby of the
71: center and the doors were locked and I saw no cars in the parking
72: lot. It wasn't very long before the man that worked at the center
73: unlocked the front doors and my dad was with him.
74: </fo:block>
75:
76: ...
77:
78: <fo:block font-size="12pt" font-family="sans-serif" line-height="15pt"
79: space-after="3pt" text-align="start">
80: We returned to the golf course in time to watch the opening kick-off
81: on T.V. and soon returned all of our "borrowed" items. The
82: failure of that plan still pains me today.
83: </fo:block>
84: </fo:flow>
85: </fo:page-sequence>
86: </fo:root>Similar to the skeleton example earlier in the lesson, this document contains a single master page that applies to all of the pages in the document. However, that’s pretty much where the similarities between the two examples end. The Great Sporting Events document establishes a header and footer, along with a document body region (lines 9 through 11). The page number is displayed in the header along with the name of the document, as is evident in lines 16 through 21 where a static block is created. Notice that the initial page number is established in the fo:page-sequence element via the initial-page-number attribute (line 15).
With the header nailed down, the flowed content then begins with the title of the document, which is created as a block with large white centered text against a black background (lines 24 to 28). The author of the document, Steve Morrison, is then displayed in the next block in smaller centered text (lines 30 to 34). From there, the bulk of document content begins with block after block of story text.
There are two subheadings worth pointing out, one of which isn’t visible in the listing. The subheading that is visible appears as a block on lines 49 through 53, and simply breaks up the text into a sub-story with the heading Missing Gym Rat. One other thing to note is how standard XML conventions are used in terms of referencing quotes as entities ("), as is visible on line 81.
I encourage you to study the Great Sporting Events XSL-FO code to make sure that you understand fully how it works. When you’re satisfied that you follow what’s going on, you’re ready to run the document through FOP to generate a PDF file via the following command:
fop sportsstory.fo sportsstory.pdf
The resulting PDF document is shown in Figure 14.5 as viewed in Adobe Acrobat Reader.
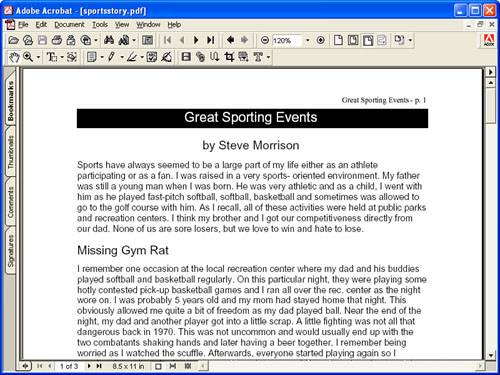
The XSL-FO styles that you carefully analyzed in Listing 14.2 are realized in the PDF document shown in the figure. The resulting PDF document is actually three pages, which means you can use Acrobat Reader’s forward and back page navigation features to view each page in the document.
Although I’d love to tell you that this hour provided a comprehensive introduction to XSL-FO, the truth is that this lesson really only served as a bare bones introduction to XSL-FO. This is because XSL-FO is one of the most detailed XML technologies you are likely to encounter, and therefore requires much more than an hour of your time to truly get to know well. Having said that, this lesson did provide a serviceable introduction to XSL-FO, including the basics of coding XSL-FO documents and converting them to PDF using a handy little tool called FOP. You didn’t see the specifics of how to transform a raw XML document to XSL-FO using XSLT but you have the skills to carry out such a transformation based on earlier lessons in the book. If you find yourself intrigued by the possibilities of using XSL-FO to carefully format XML data for print, I encourage you to further explore XSL-FO on your own. A good place to start is the Wikipedia entry for XSL-FO, which includes several useful links to other XSL-FO resources: http://en.wikipedia.org/wiki/XSL-FO.
The Workshop is designed to help you anticipate possible questions, review what you’ve learned, and begin learning how to put your knowledge into practice.
XSL-FO is a functional superset of CSS but an entirely separate technology. Unlike CSS, XSL-FO is used to code entire documents including both content and formatting, whereas CSS is designed purely for applying formatting styles to existing documents. Also unlike CSS, XSL-FO is an XML-based language, whereas CSS relies on its own unique syntax. | |
The XSL-FO equivalents of the | |
To validate an XSL-FO document, you currently must reference the RenderX experimental XSL-FO DTD in the document, and then pass the document through the standard W3C Markup Validation Service (http://validator.w3.org/). |