Creating Simple MDX Expressions
MDX is a pseudoacronym for multidimensional expressions. MDX was created expressly for use with multidimensional OLAP data sources. MDX is used in two different ways within Microsoft SQL Server 2000 Analysis Services. First, it is a query language—the tool for retrieving reports from an OLAP cube. In other words, MDX is the tool used by client applications (such as the Microsoft Excel 2000 PivotTable report) to retrieve values. Second, MDX is an expression language—the tool used to calculate single values. For example, MDX is what you use to create calculated members in a cube or to create a dynamic default member. In this chapter, you’ll learn how to create MDX expressions based on single values. In Chapter 7, “MDX Sets,” you’ll learn how to create MDX queries and also how to create expressions based on multiple values. In Chapter 8, “Storage Optimization,” you’ll learn how to apply MDX expressions in a variety of contexts within a cube, including calculating default members, calculating custom rollup formulas, and creating custom actions. If you understand MDX, you can create sophisticated expressions that put the A (for analytical) into OLAP.
|
Chapter 7 will show you how to create MDX queries and how to create expressions based on multiple values. |
MDX is not exclusive to Analysis Services. It’s part of a specification called OLE DB for OLAP, which Microsoft has sponsored to industry standards boards as a tool for querying a multidimensional data source. MDX is a standardized language that will soon be supported by several OLAP providers, just as structured query language (SQL) is a standardized language that is supported by many relational database providers. Of course, just as relational database providers make modifications to the SQL standard, so OLAP providers will make minor customizations to the MDX standard. In fact, the MDX implemented in Analysis Services does vary somewhat from the OLE DB for OLAP specification. This book will refer only to the Analysis Services flavor of MDX.
Create a Calculated Member Using Constant Values
One important use of MDX expressions is in creating calculated members. Calculated members add the calculating ability of a spreadsheet to an OLAP database. In a spreadsheet, each cell gets its own value. That value can be a constant that you type into a cell or it can be calculated as a formula. To understand how calculated members work, start by creating calculated members that use constant values.
1. | In the Chapter 6 database, expand the Cubes folder, right-click the Sales cube, and click Edit. Click the Data tab to activate the Preview pane, and drag the Product dimension to the rows area, replacing the Employee dimension. 
| |
2. | ||
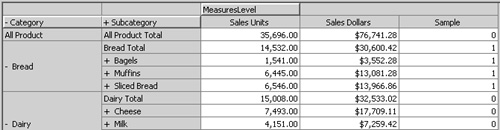
3. | Click OK to create the member.  A new column labeled Sample appears, filled with the value 500. If you think of the grid as a spreadsheet, you can think of a calculated member as a value or formula that automatically fills all the cells of the column. You can change the expression for a calculated member simply by changing the Value property in the Properties pane.
 | |
4. | In the cube tree, select Sample in the Calculated Members folder. Select the Value property, type “Hello”, and press Enter.  The values in the Sample column change to the word Hello. You can use a text string as a constant value in a calculated member as long as you enclose the string in double quotation marks.
 | |
5. | Select the Value property of the Sample member, type Null, and press Enter.  The cells in the Sample column appear empty. You can’t leave the Value property empty; to create an empty cell, use the keyword Null.
 | |
6. | Select the Value property of the Sample member, type 50+17, and press Enter.  The number 67—the result of the expression—appears in all the cells of the Sample column. Again, think of the grid as a spreadsheet where the value or formula you type is automatically copied into all the relevant cells. It’s as if there were four different copies of the formula, each one calculating a value. In an MDX expression, you can use any standard arithmetic operator: plus (+) for addition, minus (-) for subtraction, asterisk (*) for multiplication, slash (/) for division, and caret (^) for exponentiation.
 | |
7. | Select the Value property of the Sample member, type “Hello” + “,” + “World”, and press Enter.  The string Hello, World appears. An MDX expression can combine text strings. Unlike an Excel formula, in which you use an ampersand (&) to combine text strings, in an MDX expression, you must use a plus sign (+). Also unlike an Excel formula, an MDX expression does not automatically convert a number into a text string, so you cannot use an expression such as “The value is” + 45. (Later in this chapter, you’ll learn how to combine text with a number.)
|

Display the Name of the Current Member
An MDX expression can return either a number or a text string. You can use MDX expressions to display member names. Doing so can help you see how MDX expressions and dimension members interact.
 The function appears in the Value Expression box, preceded by the token «Dimension». When you insert a function from the Functions tree, it shows you the syntax for the function, using placeholder tokens enclosed in double pointed brackets. Tokens are easy to replace: simply click anywhere within the token to select it, and then double-click an appropriate item from the Data or Functions tree.
 You need a function that will return a member, so look in the Member group of the Functions tree.
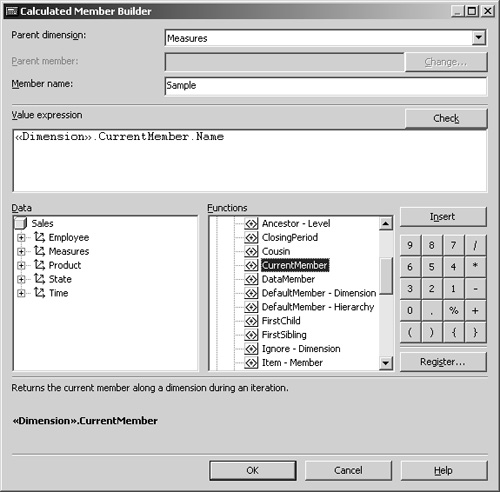
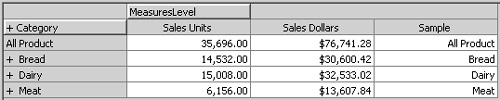 The Sample column displays the name of each member.
 The value in the Sample column changes to All Product for all the rows. That’s because the All Product member is selected in the filter list above the grid. The value in the filter list is the current member for that dimension.
 The value in the Sample column changes to
The current member of a dimension can be at any level of the hierarchy.
Note
MDX has other string functions that behave very similarly to the Name function. The UniqueName function returns a string that includes the entire hierarchy for the member. The UserName function returns the name of the current user, including both the domain name and the user ID. The name of the current user is independent of the current cube, so the UserName function stands completely alone—as if it were a string constant.
Display the Ancestor of a Current Member
CurrentMember is an MDX function. It is a function that returns a member. Once you have a member, you can display that member’s name. There are other functions that return a member, often using the current member of a dimension as a starting point. For example, you can find the ancestor of the current member at any level of the hierarchy.
 Like
Like 
 The parent of a member is just a special kind of ancestor—the ancestor that is only one level away. A second variation of the
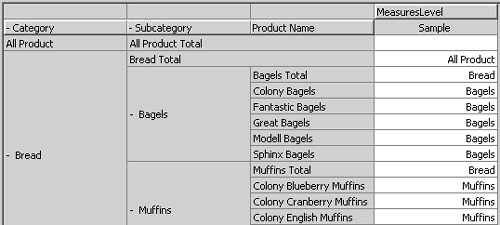
By using the Ancestor function—coupled with the CurrentMember function—you can display the ancestor of the current member, either at a relative position in the hierarchy or at a specific level of the hierarchy.
Note
MDX has other member functions that are very similar to the Ancestor function. The Parent function returns the parent of a member. Therefore, the expression [Product].CurrentMember.Parent is functionally equivalent to Ancestor([Product].CurrentMember,1). The FirstChild and LastChild functions return the first or last member that is a child of the given member. The FirstSibling and LastSibling functions return the first or last member that is a child of the given member’s parent. The expression [Product].CurrentMember.FirstSibling is functionally equivalent to [Product].CurrentMember.Parent.FirstChild.
Test a Member Name against a String
MDX allows you to make comparison tests in an expression. For example, you can test whether a product belongs in a specific category by testing the name of the product’s ancestor.
 The first argument of the
  A conditional test, such as the one used in the
Display a Member Property for a Member
In addition to names, members can have member properties as well. For example, in the Product Dimension, the Subcategory level has a Category Manager member property assigned. You can display the name of that manager.
1. | Select the Value property of the Sample calculated member, and click the ellipsis button. Change the expression to Ancestor( [Product].CurrentMember, [Product].[SubCategory] ).Name. This expression would display the name of the current product’s subcategory. |
2. | |
3. | Click OK, and then expand the levels to show the Product Name level and see the manager change with the subcategory. 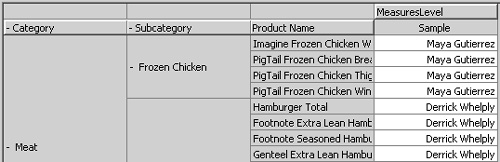
|

Use an External Function to Convert a String to a Number
A member property is always returned as a string, even if the member property stores a number. If you want to use the member property as a number in an expression, you will have to use an external function to convert it.
|
For a more sophisticated example of using a member property as a numeric value in an expression, see the section “Calculate discount dollars by using a member function” in Chapter 7. |
For example, the Product Name level of the Product dimension includes a Price member property that contains the list price for each product. If you try to use the Price member property in a numeric expression, you’ll get a syntax error. To use the member property in an expression, you must convert it to a number. MDX does not have any functions that will convert a string to a number, but MDX does allow you to access functions from other sources. In fact, MDX automatically includes functions from VBA and from Excel. VBA includes a function named CDbl (for “convert to double”) that will convert a string into a number.
As a simple example, try to display what the list price would be after a 10 percent across-the-board price hike. The first step is to display the Price member property.
1. | Replace the Value property of the Sample member with [Product]. CurrentMember.Properties(“Price”), and press Enter.  The prices appear for the individual products, but an error value occurs for each higher-level member. You can use an IIF function to display a value only for the lowest level.
 | |
2. | Change the Value property of the Sample member to IIF(Product. CurrentMember.Level.Name = “Product Name”,Product. CurrentMember.Properties(“Price”),“”), and press Enter. 
The error values are now gone. With the IIF function, if the second argument is a string, the third argument must also be a string. Even though the Price member property is really a number, member properties are always returned as a string. The third argument must, therefore, be an empty string. To multiply the Price by a value, you must convert it to a number. | |
3. | Change the Value property of the Sample member to IIF(Product. CurrentMember.Level.Name = “Product Name”,CDbl(Product. CurrentMember.Properties(“Price”)),Null), and press Enter.
The values in the browser look the same, but now the prices are numbers, not strings. The revised expression required two changes: adding the CDbl function and its parentheses around the member property value, and replacing the empty string with Null. The CDbl function is not an MDX function. It does not appear in the Number group of the Functions tree—in fact, it doesn’t appear anywhere in the Functions tree. The function is a VBA function. You don’t have to do anything special to include it in an MDX expression. All that remains is to multiply the value by 1.1 to get a 10 percent increase in price. | |
4. | Append * 1.1 to the end of the Value expression for the Sample member. The resulting expression will be IIF(Product.CurrentMember.Level.Name =“Product Name”,CDbl(Product.CurrentMember.Properties(“Price”)),Null)*1.1. Then press Enter to see the updated values. 
|
If you attempt to use a member property value in an arithmetic expression, the result is an error unless you first convert the value to a number.
Note
To find the list of available functions from VBA and Excel, go to SQL Server Books Online by clicking Contents And Index on the Help menu. In the Keyword box on the Index tab, type Registered Function Libraries, Visual Basic for Applications or Registered Function Libraries, Excel.
Specifying a Member Name in MDXEach dimension of an OLAP cube contains many members. In an MDX query, you often specify a member from a dimension. Here are the rules for creating a legal member name, using the Colony Bagels member of the Product dimension as an example.
|