Working with a Parent-Child Dimension
The Employee dimension you created in Chapter 2 is an unbalanced, parent-child dimension. The levels of the dimension hierarchy come from recursive columns in a single table, rather than from individual columns in star schema or snowflake schema tables. The Dimension Editor does not allow you to create a parent-child dimension. You must always use the Dimension Wizard to create a new parent-child dimension. Once the dimension is created, you can use the Dimension Editor (if the dimension is shared) or the Cube Editor (if the dimension is private) to modify its properties.
Create a Parent-Child Dimension
The most interesting properties of a parent-child dimension are visible only within the context of a cube. Now that you have a Sales cube in the Chapter 3 database, you can add a private Employee parent-child dimension and learn about advanced parent-child dimension properties.
1. | |
2. | Select the parent-child option, and click Next. |
3. | Select the Employee dimension table, and click Next. |
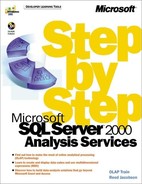
4. | Select Employee_ID in the Member Key list, Manager_ID in the Parent Key list, and Employee_Name in the Member Name list. Then click Next. 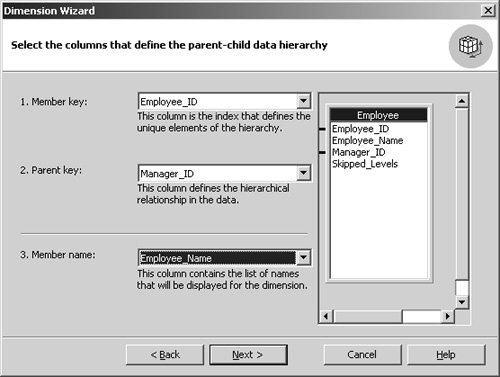
|
5. | |
6. | Click the Data tab, if necessary, to see the Data pane, and drag the Employee dimension down to the row area, replacing the existing dimension. The cube will display sample data because it hasn’t been processed, but you can see the dimension members. |
7. | Expand the Sheri Nowmer, Maya Gutierrez, and Jonathan Murraiin members so that you can see the entire Employee hierarchy. 
|

The labels for the row headings begin with Level 02. That’s because the All level (with All Employee as its member) is in the same column as Sheri Nowmer.
Allow Data for Non-Leaf-Level Members
In a standard dimension, only the leaf-level members can correspond to values in the fact table. For example, in a Time dimension, you can’t have some rows in the fact table with monthly values and other rows with quarterly values. In a parent-child dimension, on the other hand, it’s common to have values in the fact table at both the leaf level and at a parent level. For example, in the Market database, Sheri Nowmer is the CEO of the company, but she was directly responsible for many of the sales in the SalesFact table, as well as being indirectly responsible for the sales of all those below her in the organization. Before processing a cube that has data for non-leaf-level members, you must change a property of the dimension.
1. | In the cube tree, select the Employee dimension, switch to the Advanced tab of the Properties window, and display the drop-down list for the Members With Data property.
|
2. | Select Non-Leaf Data Visible as the value of the Members With Data property, and press Enter. 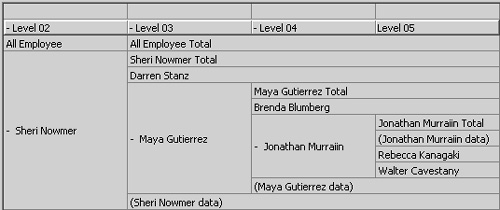 The Data pane refreshes to include new members for the managers’ data. The new member names are in parentheses. Since the total rows for the managers clearly include the word “Total,” you might want to simply display the employee name for the new data fields. You can change the template for how the new member name is generated.
 |
3. | |
4. | Click the Process Cube button, click Yes to save the cube, No to design storage, and OK to fully process the cube. Then close the Process log window, and expand all the levels of the Employee dimension. |

 The managers’ data members now look very similar to those of the other members.
You can now easily compare Sheri Nowmer’s individual sales with those of her entire group and with those of other managers and employees.
Manage Levels within a Parent-Child Dimension
The hierarchy for a parent-child dimension is derived from a single dimension table. As the person building the OLAP dimension, however, you still have a great deal of control over how to display the levels for the dimension. For example, in the Employee dimension, there’s only one manager at the top level of the hierarchy. In consequence, the values for All Employee and Sheri Nowmer are identical. There’s no need to have an All level in this dimension.
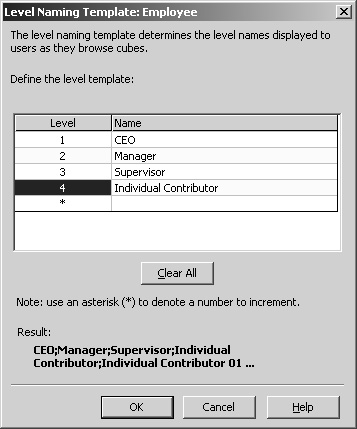
 The preview window refreshes to show a hierarchy with no All level. You can remove the All level from any dimension, not just a parent-child dimension. The Level names now begin with Level 01, and there is no redundant data. Perhaps you don’t want to show Level 01, Level 02, and so forth as the names of the levels. You can assign specific names to as many levels of a parent-child dimension as you like.
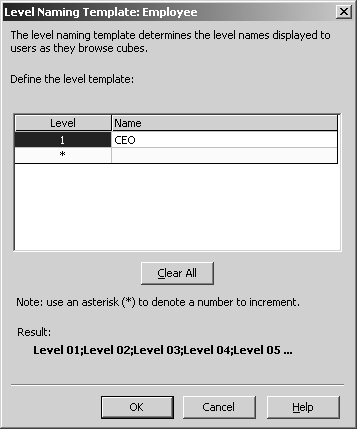
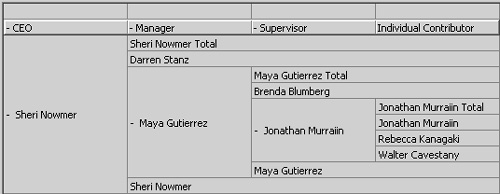 Darren Stanz and Brenda Blumberg are actually individual contributors. They simply report directly to the CEO and Manager, respectively. Ideally, you would like these employees to appear in the Individual Contributor column. For Darren, that would require skipping two levels, and for Brenda, it would require skipping one level. You skip levels in a parent-child hierarchy, provided that the dimension table contains a column indicating how many levels to skip.

Darren and Brenda now appear on the Individual Contributor level, even though they report directly to higher level managers. Within a parent-child dimension, skipping levels creates a ragged hierarchy. In the “Create a ragged hierarchy” section earlier in this chapter, you learned how to create such a hierarchy within a standard dimension. In both a standard and a parent-child dimension, the term ragged means that some members have unusual relationships with their parents. In a ragged standard dimension, a parent is hidden and extra space is removed. In a ragged parent-child dimension, extra space is added in the place of one or more parents. In both cases, Analysis Services gives you a great deal of flexibility in creating dimensions that appropriately describe your business.