
When you work with Microsoft Windows Server 2003, you’ll often need to perform advanced disk setup procedures, such as creating a volume set or setting up a redundant array of independent disks (RAID) array.
With a volume set, you can create a single volume that spans multiple drives. Users can access this volume as if it were a single drive, regardless of how many drives the actual volume is spread over. A volume that’s on a single drive is referred to as a simple volume. A volume that spans multiple drives is referred to as a spanned volume.
With RAID arrays, you can protect important business data and, sometimes, improve the performance of drives. Windows Server 2003 supports three levels of RAID: 0, 1, and 5. RAID arrays are implemented as mirrored, striped, and striped with parity volumes.
You create volumes sets and RAID arrays on dynamic drives, which are accessible only by Windows 2000 Server and Windows Server 2003. Because of this, if you dual boot a computer to a different or previous version of Windows, the dynamic drives are unavailable. However, computers running previous versions of Windows can access the drives over the network—just like any other network drive.
You create and manage volumes in much the same way as partitions. A volume is a drive section that you can use to store data directly.
Note
With spanned and striped volumes on basic disks, you can delete the volume but you can’t create or extend volumes. With mirrored volumes on basic disks, you can delete, repair, and resync the mirror. You can also break the mirror. With striped with parity volumes (RAID 5) on basic disks, you can delete or repair the volume but you can’t create new volumes.
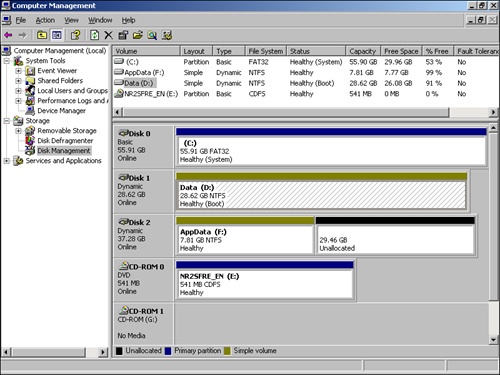
Disk Management color-codes volumes by type, much like partitions. As Figure 12-1 shows, volumes also have a specific:
Layout. Volume layouts include simple, spanned, mirrored, striped, and striped with parity.
Type. Volumes always have the type dynamic.
File System. As with partitions, each volume can have a different file system type, such as FAT, FAT32, or NTFS file system.
Status. The state of the drive. In Graphical View, the state is shown as Healthy, Failed Redundancy, and so on. The next section, "Understanding Volume Sets," discusses volume sets and the various states you might see.
Capacity. Total storage size of the drive.
An important advantage of dynamic volumes over basic volumes is that they let you make changes to volumes and drives without having to restart the system (in most cases). Volumes also let you take advantage of the fault tolerance enhancements of Windows Server 2003. Although you can’t use dynamic drives with previous versions of Windows, you can install other operating systems and dual boot a Windows Server 2003 system. To do this, you must create a separate volume for the other operating system. For example, you could install Windows Server 2003 on volume C and Linux on volume D.
With volumes, you can:
Assign drive letters as discussed in the section entitled "Assigning Drive Letters and Paths" in Chapter 11.
Assign drive paths as discussed in the section of Chapter 11 entitled "Assigning Drive Letters and Paths."
Create any number of volumes on a disk as long as you have free space.
Create volumes that span two or more disks and, if necessary, configure fault tolerance.
Extend volumes to increase the volume’s capacity.
Designate Active, System, and Boot volumes as described in the section of Chapter 11 entitled "Special Considerations for Basic and Dynamic Disks."
With volume sets, you can create volumes that span several drives. To do this, you use free space on different drives to create what users see as a single volume. Files are stored on the volume set segment by segment, with the first segment of free space being used to store files before others. When this segment fills up, the second segment is used, and so on.
You can create a volume set using free space on up to 32 hard disk drives. The key advantage to volume sets is that they let you tap into unused free space and create a usable file system. The key disadvantage is that if any hard disk drive in the volume set fails, the volume set can no longer be used—which means that essentially all the data on the volume set is lost.
Understanding the volume status is useful when you install new volumes or are trying to troubleshoot problems. Disk Management shows the drive status in the Graphical View and Volume List views. Table 12-1 summarizes status values for dynamic volumes.
Table 12-1. Understanding and Resolving Volume Status Issues
Status | Description | Resolution |
|---|---|---|
Data Incomplete | Spanned volumes on a foreign disk are incomplete. You must have forgotten to add the other disks from the spanned volume set. | Add the disks that contain the rest of the spanned volume and then import all the disks at one time. |
Data Not Redundant | Fault-tolerant volumes on a foreign disk are incomplete. You must have forgotten to add the other disks from a mirror or RAID-5 set. | Add the remaining disk(s) and then import all the disks at one time. |
Failed | An error disk status. The disk is inaccessible or damaged. | Ensure that the related dynamic disk is online. If necessary, reactivate the volume. |
Failed Redundancy | An error disk status. One of the disks in a mirror or RAID-5 set is offline. | Ensure that the related dynamic disk is online. If necessary, reactivate the volume. Next, you might need to replace a failed mirror or repair a failed RAID-5 volume. |
Formatting | A temporary status that indicates that the volume is being formatted. | The progress of the formatting is indicated as the percent complete. |
Healthy | The normal volume status. | The volume doesn’t have any known problems. |
Regenerating | A temporary status that indicates that data and parity for a RAID-5 volume are being regenerated. | Progress is indicated as the percent complete. The volume should return to Healthy status. |
Resynching | A temporary status that indicates that a mirror set is being resynchronized. | Progress is indicated as the percent complete. The volume should return to Healthy status. |
Stale Data | Data on foreign disks that are fault tolerant are out of sync. | Rescan the disks or restart the computer, and then check the status. A new status should be displayed, such as Failed Redundancy. |
You create volumes and volume sets by completing the following steps:
In the Disk Management Graphical View, right-click an area marked Unallocated on a dynamic disk and then choose New Volume. This starts the New Volume Wizard. Read the Welcome To The New Volume Wizard page and then click Next.
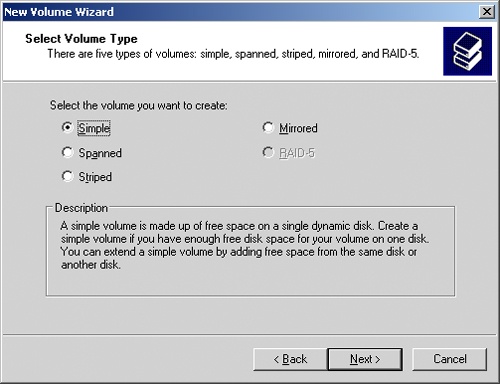
As shown in Figure 12-2, select Simple to create a volume on a single disk or Spanned to create a volume set on multiple disks. You can format simple volumes as FAT, FAT32, or NTFS. To make management easier, you should format volumes that span multiple disks as NTFS. NTFS formatting allows you to expand the volume set if necessary. Click Next.
Tip
If you find that you need more space on a volume, you can extend simple and spanned volumes. You do this by selecting an area of free space and adding it to the volume. You can extend a simple volume within the same disk. You can also extend a simple volume onto other disks. When you do this, you create a spanned volume, which you must format as NTFS.
You should see the Select Disks page shown in Figure 12-3. Use this page to select dynamic disks that are a part of the volume and to size the volume segments on those disks.
Available dynamic disks are shown in the Available list box. If necessary, select a disk in this list box, and then click Add to add the disk to the Selected list box. If you make a mistake, you can remove disks from the Selected list box by selecting the disk and then clicking Remove.
Select a disk in the Selected list box and then use the Select The Amount Of Space In MB combo box to specify the size of the volume on the selected disk. The Maximum field shows you the largest area of free space available on the selected disk. The Total Volume Size field shows you the total disk space selected for use with the volume. Click Next.
Tip
Although you can size the volume set any way you want, you might want to take a moment to consider how you’ll use volume sets on the system. Simple and spanned volumes aren’t fault tolerant, and rather than creating one monstrous volume with all the available free space, you might want to create several smaller volumes to help ensure that losing one volume doesn’t mean losing all your data.
Specify whether you want to assign a drive letter or path to the volume, and then click Next. You use these options as follows:
Assign The Following Drive Letter. To assign a drive letter, choose this option, and then select an available drive letter in the selection list provided.
Mount In The Following Empty NTFS Folder. To assign a drive path, choose this option and then type the path to an existing folder on an NTFS drive or click Browse to search for or create a folder.
Don’t Assign A Drive Letter Or Drive Path. To create the volume without assigning a drive letter or path, choose this option. You can assign a drive letter or path later, if necessary.
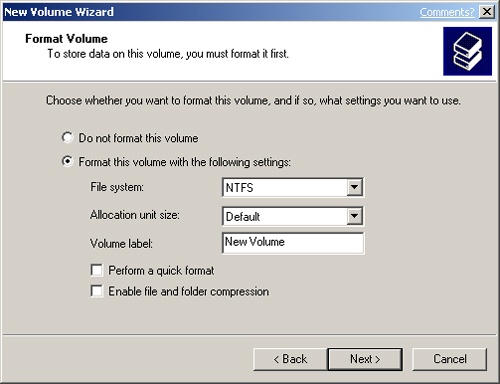
As shown in Figure 12-4, determine whether the volume should be formatted. If you elect to format the volume, use the following fields to set the formatting options:
File System. Specifies the file system type. The NTFS file system is the only option within Disk Management.
Allocation Unit Size. Specifies the cluster size for the file system. This is the basic unit in which disk space is allocated. The default allocation unit size is based on the volume’s size and is set dynamically prior to formatting. To override this feature, you can set the allocation unit size to a specific value. If you use lots of small files, you might want to use a smaller cluster size, such as 512 or 1024 bytes. With these settings, small files use less disk space.
Volume Label. Specifies a text label for the partition. This label is the partition’s volume name.
Perform A Quick Format. Tells Windows to format without checking the partition for errors. With large partitions, this option can save you a few minutes. However, it’s more prudent to check for errors, which allows Disk Management to mark bad sectors on the disk and lock them out.
Enable File And Folder Compression. Turns on compression for the disk. Compression is transparent to users and compressed files can be accessed just like regular files. If you select this option, files and directories on this drive are compressed automatically. For more information on compressing drives, files, and directories, see the section of Chapter 11 entitled "Compressing Drives and Data."
Click Next and then click Finish. If you add volumes to a physical drive that contains the Windows Server 2003 operating system, you might inadvertently change the boot volume’s number. Read the warning prompts and then make any necessary changes to the Boot.ini file as described in the section of Chapter 11 entitled "Updating the Boot Disk."

You delete all volumes using the same technique, whether they’re simple, spanned, mirrored, striped, or RAID 5 (striped with parity). Deleting a volume set removes the associated file system and all associated data is lost. So before you delete a volume set you should back up any files and directories that the volume set contains.
You can’t delete a volume that contains the system, boot, or active paging files for Windows Server 2003.
To delete volumes, follow these steps:
Windows Server 2003 provides several ways to extend NTFS volumes that aren’t part of a mirror set or striped set. You can extend a simple volume and you can extend existing volume sets. When you extend volumes, you add free space to them.
Caution
When extending volume sets, there are many things you can’t do. You can’t extend boot or system volumes. You can’t extend volumes that use mirroring or striping. You can’t extend a volume onto more than 32 disks, either. Additionally, you can’t extend FAT or FAT32 volumes—you must first convert them to NTFS. You can’t extend simple or spanned volumes that were upgraded from basic disks, either. As you work with volume sets, please keep these exceptions in mind.
To extend an NTFS volume, complete the following steps:
In Disk Management, right-click the simple or spanned volume that you want to extend, and then select Extend Volume. This starts the Extend Volume Wizard. Read the Welcome To The Extended Volume Wizard page, and then click Next.
You can now select dynamic disks that are a part of the volume and size the volume segments on those disks as described in Steps 3–5 of the section of this chapter entitled "Creating Volumes and Volume Sets." The size you set for Select The Amount of Space In MB is the amount of space that you want to add to the volume, which is reflected in the Total Volume Size In Megabytes field. For example, if you created a 200-megabyte (MB) volume and then set the Select The Amount Of Space In MB field to 800, the total volume size would be 1000 MB.
Click Next and then click Finish.
You manage volumes much like you manage partitions. Follow the techniques outlined in the section of Chapter 11 entitled "Managing Existing Partitions and Drives."
You’ll often want to give important data increased protection from drive failures. To do this, you can use RAID technology to add fault tolerance to your file systems. With RAID, you increase data integrity and availability by creating redundant copies of the data. You can also use RAID to improve your disks’ performance.
Different implementations of RAID technology are available. These implementations are described in terms of levels. Currently, RAID levels 0 to 5 are defined. Each RAID level offers different features. Windows Server 2003 supports RAID levels 0, 1, and 5.
You can use RAID 0 to improve the performance of your drives.
You can use RAID 1 and 5 to provide fault tolerance for data.
Table 12-2 provides a brief overview of the supported RAID levels. This support is completely software-based.
Table 12-2. Windows Server 2003 Support for RAID
RAID Level | RAID Type | Description | Major Advantages |
|---|---|---|---|
0 | Disk striping | Two or more volumes, each on a separate drive, are configured as a striped set. Data is broken into blocks, called stripes, and then written sequentially to all drives in the striped set. | Speed/performance. |
1 | Disk mirroring | Two volumes on two drives are configured identically. Data is written to both drives. If one drive fails, there’s no data loss because the other drive contains the data. (Doesn’t include disk striping.) | Redundancy. Better write performance than disk striping with parity. |
5 | Disk striping with parity | Uses three or more volumes, each on a separate drive, to create a striped set with parity error checking. In the case of failure, data can be recovered. | Fault tolerance with less overhead than mirroring. Better read performance than disk mirroring. |
The most common RAID levels in use on servers running Windows Server 2003 are level 1 disk mirroring and level 5 disk striping with parity. Disk mirroring is the least expensive way to increase data protection with redundancy. Here, you use two identically sized volumes on two different drives to create a redundant data set. If one of the drives fails, you can still obtain the data from the other drive.
On the other hand, disk striping with parity requires more disks—a minimum of three—but offers fault tolerance with less overhead than disk mirroring. If any of the drives fail, you can recover the data by combining blocks of data on the remaining disks with a parity record. Parity is a method of error checking that uses an exclusive OR operation to create a checksum for each block of data written to the disk. This checksum is used to recover data in case of failure.
Real World
Although it’s true that the upfront costs for mirroring should be less than the upfront costs for disk striping with parity, the actual cost per megabyte might be higher with disk mirroring. With disk mirroring, you have an overhead of 50 percent. For example, if you mirror two 36-gigabyte (GB) drives (a total storage space of 72 GB), the usable space is only 36 GB. With disk striping with parity, on the other hand, you have an overhead of around 33 percent. For example, if you create a RAID-5 set using three 36-GB drives (a total storage space of 108 GB), the usable space (with one-third lost for overhead) is 72 GB.
Windows Server 2003 supports disk mirroring, disk striping, and disk striping with parity. Implementing these RAID techniques is discussed in the sections that follow.
Caution
Some operating systems, such as MS-DOS, don’t support RAID. If you dual boot your system to one of these noncompliant operating systems, your RAID configured drives will be unusable.
RAID level 0 is disk striping. With disk striping, two or more volumes—each on a separate drive—are configured as a striped set. Data written to the striped set is broken into blocks that are called stripes. These stripes are written sequentially to all drives in the striped set. You can place volumes for a striped set on up to 32 drives, but in most circumstances, sets with two to five volumes offer the best performance improvements. Beyond this, the performance improvement decreases significantly.
The major advantage of disk striping is speed. Data can be accessed on multiple disks using multiple drive heads, which improves performance considerably. However, this performance boost comes with a price tag. As with volume sets, if any hard disk drive in the striped set fails, the striped set can no longer be used, which essentially means that all data in the striped set is lost. You’ll need to re-create the striped set and restore the data from backups. Data backup and recovery is discussed in Chapter 15.
Caution
The boot and system volumes shouldn’t be part of a striped set. Don’t use disk striping with these volumes.
When you create striped sets, you’ll want to use volumes that are approximately the same size. Disk Management bases the overall size of the striped set on the smallest volume size. Specifically, the maximum size of the striped set is a multiple of the smallest volume size. For example, if the smallest volume is 50 MB, the maximum size for the striped site is 150 MB.
To maximize performance of the striped set, you can do several things:
Use disks that are on separate disk controllers. This allows the system to simultaneously access the drives.
Don’t use the disks containing the striped set for other purposes. This allows the disk to dedicate its time to the striped set.
You can create a striped set by doing the following:
In the Disk Management Graphical View, right-click an area marked Unallocated on a dynamic disk and then choose New Volume. This starts the New Volume Wizard. Read the Welcome To The New Volume Wizard page, and then click Next.
Select Striped as the volume type and then click Next. Create the volume as described previously in this chapter under "Creating Volumes and Volume Sets." The key difference is that you need at least two dynamic disks to create a striped volume.
After you create a striped volume, you can use the volume just like any other volume. You can’t extend a striped set once it’s created. Because of this, you should carefully consider the setup before you implement it.
RAID level 1 is disk mirroring. With disk mirroring you use identically sized volumes on two different drives to create a redundant data set. Here, the drives are written with identical sets of information and, if one of the drives fails, you can still obtain the data from the other drive.
Disk mirroring offers about the same fault tolerance as disk striping with parity. Because mirrored disks don’t need to write parity information, they can offer better write performance in most circumstances. However, disk striping with parity usually offers better read performance because read operations are spread out over multiple drives.
The major drawback to disk mirroring is that it effectively cuts the amount of storage space in half. For example, to mirror a 5-GB drive, you need another 5-GB drive. That means you use 10 GB of space to store 5 GB of information.
Tip
If possible, it’s a good idea to mirror boot and system volumes. Mirroring these volumes ensures that you’ll be able to boot the server in case of a single drive failure.
As with disk striping, you’ll often want the mirrored disks to be on separate disk controllers. This provides increased protection against failure of the disk controller. If one of the disk controllers fails, the disk on other controller is still available. Technically, when you use two separate disk controllers to duplicate data, you’re using a technique known as disk duplexing. Figure 12-5 shows the difference between the two techniques. Where disk mirroring typically uses a single drive controller, disk duplexing uses two drive controllers.
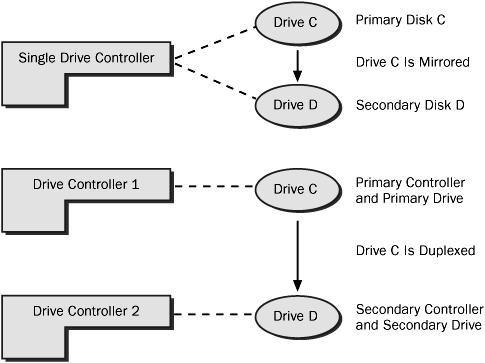
Figure 12-5. Although disk mirroring typically uses a single drive controller to create a redundant data set, disk duplexing uses two drive controllers. Otherwise, the two techniques are essentially the same.
If one of the mirrored drives in a set fails, disk operations can continue. Here, when users read and write data, the data is written to the remaining disk. You’ll need to break the mirror before you can fix it. To learn how, see the section entitled "Managing RAIDs and Recovering from Failures," later in this chapter.
You create a mirror set by completing the following steps:
In the Disk Management Graphical View, right-click an area marked Unallocated on a dynamic disk and then choose New Volume. This starts the New Volume Wizard. Read the Welcome To The New Volume Wizard page, and then click Next.
Select Mirrored as the volume type. Create the volume as described previously under "Creating Volumes and Volume Sets." The key difference is that you must create two identically sized volumes and these volumes must be on separate dynamic drives. You won’t be able to continue past the Selected Disks window until you’ve selected the two disks that you want to work with.
As with other RAID techniques, mirroring is transparent to users. Users see the mirrored set as a single drive that they can access and use like any other drive.
Rather than creating a new mirrored volume, you can use an existing volume to create a mirrored set. To do this, the volume you want to mirror must be a simple volume and you must have an area of unallocated space on a second dynamic drive of equal or larger space than the existing volume.
In Disk Management you mirror an existing volume by completing the following steps:
Right-click the simple volume you want to mirror and then select Add Mirror. This displays the Add Mirror dialog box.
Use the Disks list to select a location for the mirror and then click Add Mirror. Windows Server 2003 begins the mirror creation process and you’ll see a status of Resynching on both volumes.
RAID level 5 is disk striping with parity. With this technique, you need a minimum of three hard disk drives to set up fault tolerance. Disk Management sizes the volumes on these drives identically.
RAID 5 is essentially an enhanced version of RAID 1—with the key addition of fault tolerance. Fault tolerance ensures that the failure of a single drive won’t bring down the entire drive set. Instead, the set continues to function with disk operations directed at the remaining volumes in the set.
To allow for fault tolerance, RAID 5 writes parity checksums with the blocks of data. If any of the drives in the striped set fails, the parity information can be used to recover the data. (This process, called regenerating the striped set, is covered in the section of this chapter entitled "Managing RAIDs and Recovering from Failures.") If two disks fail, however, the parity information isn’t sufficient to recover the data and you’ll need to rebuild the striped set from backup.
In Disk Management you can create a striped set with parity by completing the following steps:
In the Disk Management Graphical View, right-click an area marked Unallocated on a dynamic disk and then choose New Volume. This starts the New Volume Wizard. Read the Welcome To The New Volume Wizard page, and then click Next.
Select RAID-5 as the volume type. Create the volume as described previously under "Creating Volumes and Volume Sets." The key difference is that you must select free space on three separate dynamic drives.
After you create a striped set with parity (RAID-5), users can use the set just like they would a normal drive. Keep in mind that you can’t extend a striped set with parity after you create it. Because of this, you should carefully consider the setup before you implement it.
Managing mirrored drives and striped sets is somewhat different from managing other drive volumes, especially when it comes to recovering from failure. The techniques you’ll need to manage RAID arrays and to recover from failure are covered in this section.
You might want to break a mirror for two reasons:
If one of the mirrored drives in a set fails, disk operations can continue. Here, when users read and write data, these operations use the remaining disk. Still, at some point, you’ll need to fix the mirror, and to do this you must first break the mirror and then reestablish it.
If you no longer want to mirror your drives, you might also want to break a mirror. This allows you to use the disk space for other purposes.
Best Practices
Although breaking a mirror doesn’t delete the data in the set, you should always back up the data before you perform this procedure. This ensures that if you have problems, you can recover your data.
In Disk Management, you can break a mirrored set by following these steps:
Right-click one of the volumes in the mirrored set and then choose Break Mirrored Volume.
Confirm that you want to break the mirror by clicking Yes. If the volume is in use, you’ll see another warning dialog box. Confirm that it’s okay to continue by clicking Yes.
Windows Server 2003 breaks the mirror, creating two independent volumes.
Windows Server 2003 automatically synchronizes mirrored volumes on dynamic drives. However, data on mirrored drives can get out of sync. For example, if one of the drives goes offline, data is written only to the drive that’s online.
You can resynchronize and repair mirrored sets on basic and dynamic disks, but you must rebuild the set using the same disk type. Follow these steps to resolve problems with a mirrored set:
You need to get both drives in the mirrored set online. The mirrored set’s status should read Failed Redundancy. The corrective action you take depends on the failed volume’s status.
If the status is Missing or Offline, make sure that the drive has power and is connected properly. Afterward, start Disk Management, right-click the failed volume, and select Reactivate Disk. The drive status should change to Regenerating and then to Healthy. If the volume doesn’t return to the Healthy status, right-click the volume and then click Resynchronize Mirror.
If the status is Online (Errors), right-click the failed volume and select Reactive Volume. The drive status should change to Regenerating and then to Healthy. If the volume doesn’t return to the Healthy status, right-click the volume and then click Resynchronize Mirror.
If one of the drives shows as Unreadable, you might need to rescan the drives on the system by selecting Rescan Disks from Disk Management’s Action menu. If the drive status doesn’t change, you might need to reboot the computer.
If one of the drives still won’t come back online, right-click the failed volume and then select Remove Mirror. Next, right-click the remaining volume in the original mirror and then select Add Mirror. You’ll now need to mirror the volume on an unallocated area of free space. If you don’t have free space, you’ll need to create space by deleting other volumes or replacing the failed drive.
The failure of a mirrored drive might prevent your system from booting. Typically, this happens when you’re mirroring the system or boot volume, or both, and the primary mirror drive has failed. In previous versions of the Windows operating system, you often had to go through several procedures to get the system back up and running. With Windows Server 2003, the failure of a primary mirror is usually much easier to resolve.
When you mirror a system volume, an entry that allows you to boot to the secondary mirror should be added to the system’s Boot.ini file. The entry will look similar to the following:
multi(0)disk(0)rdisk(2)partition(2)WINNT="Boot Mirror D: - secondary
plex"
Resolving a primary mirror failure is much easier with this entry in the Boot.ini file than without it because all you need to do is select the entry to boot to the secondary mirror. If you mirror the boot volume and a secondary mirror entry is not created for you, you should modify the Boot.ini file to create one.
To correct a failed mirror, follow these steps:
If a system fails to boot to the primary system volume, restart the system and select the Boot Mirror - Secondary Plex option for the operating system you want to start.
The system should start up normally.
After you successfully boot the system to the secondary drive, you can schedule the maintenance necessary to rebuild the mirror, if desired. You’ll need to complete the following steps:
Shut down the system and replace the failed volume or add a hard disk drive. Afterward, restart the system.
Break the mirror set and then re-create the mirror on the drive you replaced, which is usually drive 0. Right-click the remaining volume that was part of the original mirror and then select Add Mirror. Next, follow the technique outlined in the section of this chapter entitled "Mirroring an Existing Volume."
If you want the primary mirror to be on the drive you added or replaced, use Disk Management to break the mirror again. Make sure that the primary drive in the original mirror set has the drive letter that was previously assigned to the complete mirror. If it doesn’t, assign the appropriate drive letter.
Right-click the original system volume and then select Add Mirror. Now re-create the mirror.
Check Boot.ini and ensure that the original system volume is used during startup. You may need to modify Boot.ini to ensure this.
In Disk Management, you can remove one of the volumes from a mirrored set. When you do this, all data on the removed mirror is deleted and the space it used is marked as Unallocated.
To remove a mirror, complete the following steps:
In Disk Management, right-click one of the volumes in the mirrored set and then choose Remove Mirror. This displays the Remove Mirror dialog box.
In the Remove Mirror dialog box, select the disk from which to remove the mirror.
Confirm the action when prompted. All data on the removed mirror is deleted.
Caution
If the mirror contains a boot or system partition, you should check the settings in the Boot.ini file and then remove the mirror from the drive that isn’t needed for system startup. For example, if rdisk(1) is used for startup and you have the choice of removing the mirror from Disk 1 or Disk 2, you’ll usually want to remove the mirror from Disk 2. Removing the mirror from Disk 2 erases the redundant data.
A striped set without parity doesn’t have fault tolerance. If a drive that’s part of a striped set fails, the entire striped set is unusable. Before you try to restore the striped set, you should repair or replace the failed drive. Afterward, you need to re-create the striped set and then recover the data contained on the striped set from backup.
With RAID 5, you can recover the striped set with parity if a single drive fails. You’ll know that a striped set with parity drive has failed because the set’s status changes to Failed Redundancy and the individual volume’s status changes to Missing, Offline, or Online (Errors).
You can repair RAID 5 on basic and dynamic disks, but you must rebuild the set using the same disk type. Follow these steps to resolve problems with the RAID-5 set:
You need to get all drives in the RAID-5 set online. The set’s status should read Failed Redundancy. The corrective action you take depends on the failed volume’s status.
If the status is Missing or Offline, make sure that the drive has power and is connected properly. Afterward, start Disk Management, right-click the failed volume, and select Reactivate Disk. The drive’s status should change to Regenerating and then to Healthy. If the drive’s status doesn’t return to Healthy, right-click the volume and select Regenerate Parity.
If the status is Online (Errors), right-click the failed volume and select Reactivate Disk. The drive’s status should change to Regenerating and then to Healthy. If the drive’s status doesn’t return to Healthy, right-click the volume and select Regenerate Parity.
If one of the drives shows as unreadable, you might need to rescan the drives on the system by selecting Rescan Disks from Disk Management’s Action menu. If the drive status doesn’t change, you might need to reboot the computer.
If one of the drives still won’t come back online, you need to repair the failed region of the RAID-5 set. Right-click the failed volume and then select Remove Volume. You now need to select an unallocated space on a separate dynamic disk for the RAID-5 set. This space must be at least as large as the region to repair, and it can’t be on a drive that the RAID-5 set is already using. If you don’t have enough space, the Repair Volume command is unavailable and you’ll need to free space by deleting other volumes or by replacing the failed drive.