
3
Java SE Desktop Applications
CERTIFICATION OBJECTIVES
• Creating Desktop Applications from Existing Sources
• Managing Classpaths for Compilation and Debugging
• Creating Forms with the GUI Builder
• Packaging and Distributing Java Desktop Projects
Q&A Self Test
Although web applications have been in vogue since the dot-com boom in the late 1990s, desktop applications are just as important as ever. Java initially rose to prominence through its applet technology that provided a rich GUI experience in the web browser. This was long before Google reinvented the Web and set a higher bar for usability. Java’s desktop capabilities have continued to grow and mature over the years. Highly sophisticated desktop applications have been written on the Java platform ranging from Geographical Information Systems (GIS) software packages to imaging packages for biotech and everything in between. NetBeans enhances Java desktop application development by providing an integrated set of tools for developing and deploying robust and feature-rich Java desktop applications.
Java Standard Edition (SE) desktop applications are built using Java’s rich Swing/AWT class library. They can be distributed as applets, via Java Web Start (JNLP), as double-clickable JAR archives, or installed using third-party installers and launchers. NetBeans expedites desktop application development through its graphical Swing/AWT GUI editor, support for Beans Bindings (JSR 295), Swing Application Framework (JSR 296), and packaging/build support. It is, in every sense of the phrase, an integrated development environment. It leverages Java extensions, which are freely available, open source, and standards based. The certification exam will test your proficiency with creating, building, and deploying Java desktop applications using NetBeans.
CERTIFICATION OBJECTIVE:
Creating Desktop Applications from Existing Sources
Exam Objective 3.1 Demonstrate the ability to create NetBeans projects from the source code of an existing Java SE program.
NetBeans provides numerous built-in project types to expedite development. Each project category, Java, Java Web, and Java EE, includes project templates for creating new NetBeans projects from existing sources. Creating a project from existing sources enables existing projects to be imported into NetBeans. Typically projects being imported using this mechanism were either defined in other IDEs, predate NetBeans, or were developed with a custom layout. Another possibility is that the project was created using NetBeans, but the NetBeans project files are not available. These projects are indispensable when trying to understand and debug external libraries or applications.
The exam objective discussed in this section focuses on Java Standard Edition (SE) programs. Java SE programs refer to applets, desktop, or command-line applications. A Java SE program could also be a custom server application that does not depend upon the Java EE APIs or that is an API library. A Java SE application requires only the JRE and not one of the specialized runtime environments such as Java ME or Java EE. Although this chapter focuses heavily upon GUI applications, it is important to remember that creating a Java SE project from existing sources does not automatically imply a GUI application. This project type could be used to import code for a test framework like JUnit or an application container like Spring.
This project type is similar to the free-form project discussed in Chapter 2. Both the free form project type covered in Chapter 2 and the project type from existing sources discussed in this chapter are used for creating projects from existing sources. The primary difference between the two centers on the level of NetBeans integration provided. A free-form project (see Chapter 2) uses the project’s build script (build.xml). This places the onus for managing the maintenance and debugging of the build process upon the developer. If a new dependency is added to the build, the NetBeans project must be updated manually. Debugger and profiler integration requires additional effort. In addition, a free-form project cannot depend upon another NetBeans project. A Java SE project created from existing sources is a standard NetBeans project. In a standard project, NetBeans manages the build and external dependencies. Source code for external dependencies as well as Javadoc can be added. This greatly simplifies the development experience, enabling NetBeans to automate and standardize project maintenance and execution.
A four-step wizard drives the process of creating a new Java SE project with existing sources:
![]() Choose Project
Choose Project
![]() Name And Location
Name And Location
![]() Existing Sources
Existing Sources
![]() Includes & Excludes
Includes & Excludes
The wizard does not configure external libraries, and thus library configuration must be performed post–project creation. Since most projects have external dependencies, most projects will probably not compile successfully once the wizard is dismissed. Configuring libraries for Java SE projects with existing sources is covered in Exam Objective 3.3 and tackled in the next section.
The example application used throughout this chapter is Jmol and is available from http://jmol.sourceforge.net. The exercise at the end of this section takes you through the process of checking out the project and completing the wizard. Jmol is an open source application that renders the 3-D structures of proteins.
Step 1: Choose Project
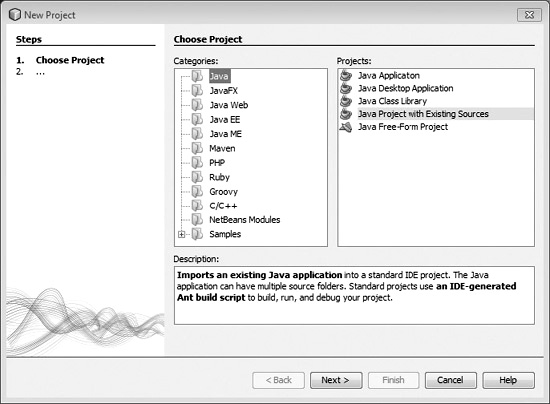
To create a new “Java Project with Existing Sources,” choose File | New Project. This opens the first step in the wizard, shown in Figure 3-1. Under Categories select Java and select Java Project With Existing Sources from the Projects list box on the right. Click Next to move to the next step in the wizard.
FIGURE 3-1 Step 1: Choose Project
Step 2: Name And Location
The next step in the New Project wizard asks for basic project setup information. It is shown in Figure 3-2 and configures the following:
FIGURE 3-2 Step 2: Name And Location
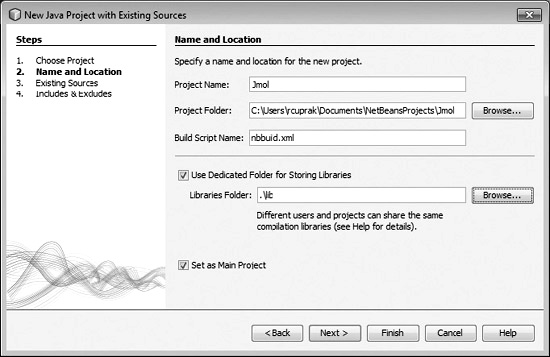
![]() Project Name Name of the project that will appear in the Projects window.
Project Name Name of the project that will appear in the Projects window.
![]() Project Folder Location where the NetBeans project file information should be stored. This is where the nbproject directory will be placed along with the build script.
Project Folder Location where the NetBeans project file information should be stored. This is where the nbproject directory will be placed along with the build script.
![]() Build Script Name Name of the NetBeans build script to be created.
Build Script Name Name of the NetBeans build script to be created.
![]() Use Dedicated Folder For Storing Libraries Enables the storing of libraries in a central location. Facilitates the sharing of projects between users.
Use Dedicated Folder For Storing Libraries Enables the storing of libraries in a central location. Facilitates the sharing of projects between users.
![]() Libraries Folder Location of the libraries—needed if the project is to be shared.
Libraries Folder Location of the libraries—needed if the project is to be shared.
![]() Set as Main Project Sets this project as the main project at the conclusion of the wizard.
Set as Main Project Sets this project as the main project at the conclusion of the wizard.
The project folder is used to store the build script and nbproject directory. If Use Dedicated Folder For Storing Libraries is selected, then project libraries are stored in a dedicated directory. This directory can be shared by placing it under version control. The default settings, when checked, put the libraries into a lib directory under the project folder.
The Build Script Name option enables the name of the script to be customized. This option is not for choosing a build script. NetBeans generates its standard build script. If the project already has a build script and tighter NetBeans integration is not desired, then a free-form project should be used instead.

If you are sharing among a group of developers, the project folder should contain the sources for the project. If the project folder does not contain the sources and is in a “random” location on the hard drive, correctly replicating project paths on different computers might become challenging.
Step 3: Existing Sources
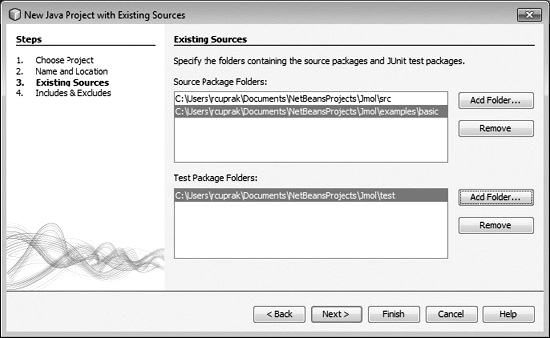
In this step, shown in Figure 3-3, the source and test packages are selected for the project. The Add Folder button displays a file browser for choosing directories. Multiple directories can be configured. Configuration of test sources is optional. The selected directories do not necessarily have to appear below the project folder.
FIGURE 3-3 Step 3: Existing Sources
Step 4: Includes & Excludes
The last step in the wizard, shown in Figure 3-4, configures the packages/folders that are to be either included or excluded. This enables precise control over what classes or resources are processed by NetBeans. Thus, if a project is being created to work on a small part of a code base, only the files pertinent to the task need to be included. Rules for the patterns include:
FIGURE 3-4 Step 4: Includes & Excludes
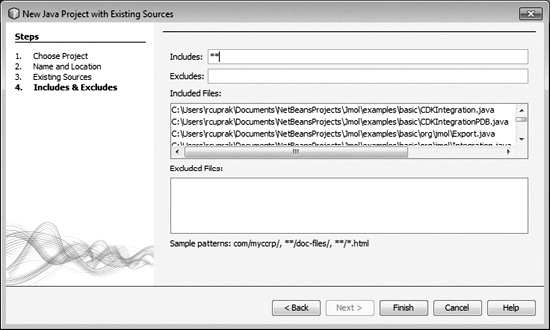
![]() Each pattern is separated by a comma.
Each pattern is separated by a comma.
![]() A single asterisk (*) is a wildcard for a single directory.
A single asterisk (*) is a wildcard for a single directory.
![]() Two asterisks (**) is a wildcard for all possible subfolders.
Two asterisks (**) is a wildcard for all possible subfolders.
The following file structure is used in Table 3-1 to illustrate the effects of different patterns:
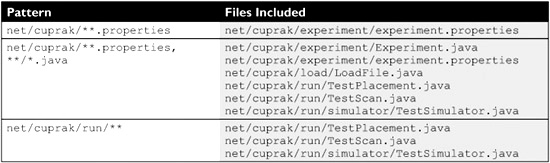
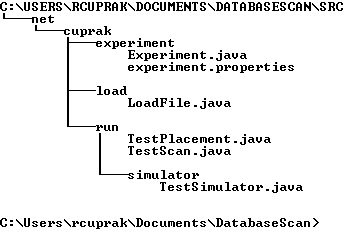
One important caveat with the example above is that **.java will not match all Java files; to match all Java files, the directory wildcard must be used: **/*.java.
After clicking the Finish button, the project is opened in NetBeans. Since the classpath has not been configured yet, the project does not compile. NetBeans automatically detects the version control system being used by the project.
![]()
The Java Free-Form Project and Java Project With Existing Sources both enable NetBeans projects to be created for existing code bases. As mentioned, the free-form project uses the project’s existing build script, and libraries are used only for code completion. A Java Project With Existing Sources is a standard project with the IDE managing the classpaths.
EXERCISE 3-1 Creating a Java Program with Existing Sources
In this exercise, you checkout the open source project Jmol from version control and create a new Java SE project from existing sources. This open source project was the source of the screenshots throughout this section.
Jmol (http://jmol.sourceforge.net/) is an open source viewer for chemical structures. It renders molecules in 3-D and supports real-time manipulation. The application is written entirely in Java. While the sources come with a build script, the application does not include a NetBeans project. The objective of this exercise is to checkout the project and set it up in NetBeans. This exercise also helps to reinforce your version control skills from Chapter 2. In Exercise 3-2 you configure the classpath for the application, thereby enabling you to run the project.
1. Choose Team | Subversion | Checkout.
2. Enter the following Repository URL:
![]()
3. Click Next and pick a local folder to checkout the project into. Accept the defaults for the other options. Make sure the Scan For NetBeans Projects After Checkout option is selected.
4. Click Finish. NetBeans now checks out the project from Subversion.
5. After the checkout is complete, NetBeans asks, “Do you want to create an IDE project from the checked-out sources?” Select the Create Project button.
6. The New Project wizard in Figure 3-1 is displayed. Select Java under Categories and pick Java Project With Existing Sources from the Projects list box. Click Next.
7. On the next screen, Name And Location, shown in Figure 3-2:
a. Change Project Name to Jmol.
b. For Project Folder, select the Jmol directory created by the Subversion checkout.
c. Ensure that Use Dedicated Folder For Storing Libraries is checked. Choose the jars directory under the Jmol directory.
d. Click the Next button.
8. On the Existing Sources screen, shown in Figure 3-3, make the following selections:
a. Click the Add Folder button for the Source Package Folders box and select the src directory.
b. Click the Add Folder button for the Test Package Folders box and select the test directory.
c. Click the Next button.
9. On the Includes & Excludes screen, type ** in the Includes field so that everything in source and test is included in the project.
10. Click Finish.
At this point the project does not compile. In Exercise 3-2 you will configure the classpath and run the project.
CERTIFICATION OBJECTIVE:
Managing Classpaths for Compilation and Debugging
Exam Objective 3.2 Describe how to manage the classpath of a Java SE project, including maintaining a separate classpath for compiling and debugging.
This objective covers managing the classpath for all standard Java SE projects. Specifically this section covers the classpath management for compilation and execution. Although the objective specifically mentions maintaining a classpath for debugging, NetBeans does not possess an explicit debug classpath that is different from the run classpath. At this time it isn’t feasible to set a different classpath for Run Main Project versus Debug Main Project. Having two separate classpaths for running and execution would create significant project maintenance problems. Furthermore most external libraries don’t ship with two versions, with one having debug symbols.
Most of the content for this objective was already covered in Chapter 1 as a part of Exam Objective 1.4. That section covered how to configure a global repository of libraries to be shared among multiple projects and also how to manage library dependencies for a project. This section reviews that information and puts it in the context of the Java SE projects. Comparisons also are made with the other NetBeans project types.
Java SE projects are a specific project category that depends only upon the Java SE APIs and runs on the Java Standard Edition. NetBeans provides excellent classpath management support that is tightly integrated into the IDE and also the build process. This tight integration enables a developer to focus upon writing code without the distraction of implementing a build system to manage the classpath. While writing a build script to compile a project is easy, challenges arise once a project must be debugged.
Java SE projects are created by choosing File | New Project | Java and one of the five Java SE project templates:
![]() Java Application
Java Application
![]() Java Desktop Application
Java Desktop Application
![]() Java Class Library
Java Class Library
![]() Java Project With Existing Sources
Java Project With Existing Sources
![]() Java Free-Form Project
Java Free-Form Project
For these project templates NetBeans manages and leverages the classpath to provide code assistance in the form of syntax checking and auto-completion and also builds the classpath for compiling, testing, and execution. This section covers the following topics:
![]() Understanding Classpath Types
Understanding Classpath Types
![]() Editing Java SE Project Classpaths
Editing Java SE Project Classpaths
![]() Understanding Project Classpath Differences
Understanding Project Classpath Differences
![]() Configuring Classpath Variables
Configuring Classpath Variables
Understanding Classpath Types
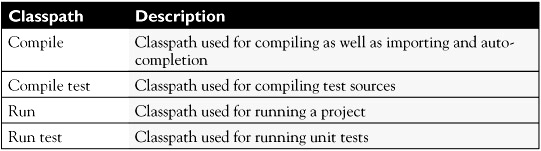
As discussed in Chapter 1, NetBeans supports multiple classpaths for a project. These classpaths are listed again in Table 3-2. Multiple classpaths enforce isolation within a project so that unit test libraries are not accidently used in business logic or implementation classes used instead of interfaces. For example, if junit.jar is added to the compile test classpath, classes under the source directory are unable to import or use the @Test annotation. Adding JUnit annotations to source files, not test source files, would result in a build failure.
The relationships between the classpaths are illustrated in Figure 3-5. In this figure we can see a clear inheritance. Sources and test sources refer to the respective source and test source root directories that get compiled. As mentioned previously in the first section, a project may have multiple source and test roots. The compile classpath includes the sources and any other dependencies such as JAR files and class directories required to compile the project. The run classpath includes the compilation output along with implementation classes. For example, the JPA interfaces would be added to the compile classpath, whereas the implementation, such as Hibernate or TopLink, would be added to the runtime classpath.
FIGURE 3-5 Classpath relationships
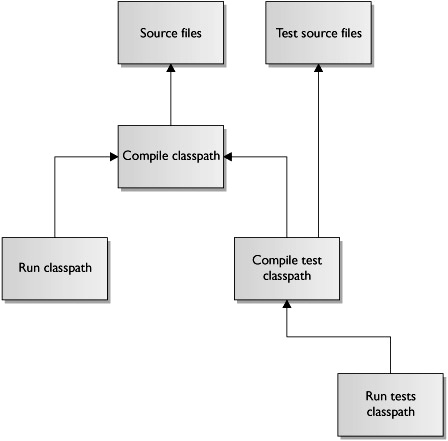
The compile test class depends upon the compile classpath and also the source directories containing the test sources. The compile test classpath also includes any libraries used in the test sources such as JUnit, TestNG, and so on. The run test classpath uses the output from compilation of both the sources and test sources as well as the library dependencies of both compile and test compile. The classpath should closely mirror the runtime classpath. In many cases the run and run test classpath should be identical.
Editing Java SE Project Classpaths
The classpath for a project can be edited by right-clicking the project in the Projects window and selecting Properties | Libraries. Alternatively, right-clicking the Libraries node in the Projects window displays a specialized context menu for editing the classpath. The options on this context menu include Add Project, Add Library, Add JAR/Folder, and Properties. The Properties option displays the Project Properties dialog box with the Libraries category preselected. Classpath additions added from this context menu are appended to the compile classpath. The Libraries node in NetBeans displays only the compile classpath.
The Project Properties dialog box with the Libraries category selected is shown in Figure 3-6. Note that this figure has library dependencies required by the Jmol project covered in Exercises 3-1 and 3-2. The following classpath-related items are configured on this panel:
FIGURE 3-6 Project Properties: Classpath
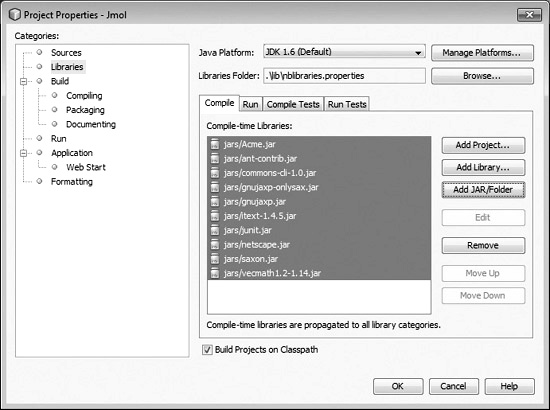
![]() Java Platform The JDK libraries to be used for the project.
Java Platform The JDK libraries to be used for the project.
![]() Libraries Folder Location where libraries are stored to facilitate project sharing.
Libraries Folder Location where libraries are stored to facilitate project sharing.
![]() Classpaths Classpaths for Compile, Run, Compile Tests, and Run Tests.
Classpaths Classpaths for Compile, Run, Compile Tests, and Run Tests.
![]() Build Projects On Classpath Builds projects that this project depends upon.
Build Projects On Classpath Builds projects that this project depends upon.
The Java Platform and Libraries Folder settings were covered in Chapter 1. The Java Platform determines what Java platform classes are available to the project. The libraries folder is a central location for storing project libraries so they may be easily shared among multiple developers.
The tabbed pane with the four classpaths is the target of this objective. On the first two tabs the compile and run/debug classpaths are configured. The last two tabs configure the test classpaths that will be covered in Chapter 9. Along the side of the tabbed pane are seven buttons:
![]() Add Project Adds another project as a dependency.
Add Project Adds another project as a dependency.
![]() Add Library Adds a library, configured in the Library Manager, to the project.
Add Library Adds a library, configured in the Library Manager, to the project.
![]() Add JAR/Folder Adds a JAR or folder of classes to the project.
Add JAR/Folder Adds a JAR or folder of classes to the project.
![]() Edit Edits an entry in the classpath.
Edit Edits an entry in the classpath.
![]() Remove Removes a classpath entry.
Remove Removes a classpath entry.
![]() Move Up Moves a dependency up in ordering.
Move Up Moves a dependency up in ordering.
![]() Move Down Moves a dependency down in ordering.
Move Down Moves a dependency down in ordering.
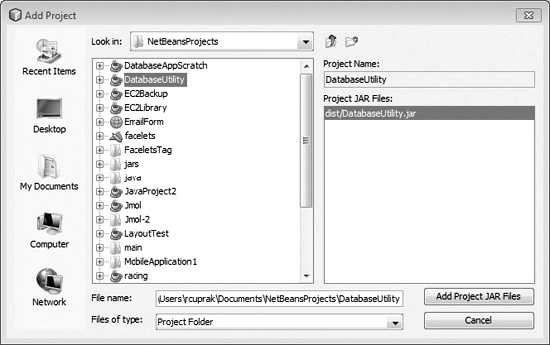
The first button, Add Project, adds another project as a dependency. Selecting this button displays the dialog box shown in Figure 3-7. Selecting another project does not open that project in NetBeans. Instead, the output of the project is added as a dependency. Dependencies from the subproject are not automatically added. In the case of Figure 3-7, the DatabaseUtility.jar project depends upon log4j. For the Jmol project to compile successfully, log4j must explicitly be added to the compile classpath.
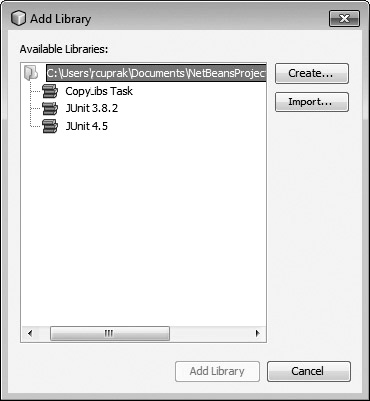
The Add Library button displays the dialog box shown in Figure 3-8, which adds libraries to the current project. The libraries that appear in this dialog box have already been imported into the project and are possibly being used in one of the classpaths. To import a new library, select Import to display a list of all the global libraries. Consult the section on the Library Manager in Chapter 1 for more information on how to configure global libraries. You can also choose the Create button to make a new project-specific library.
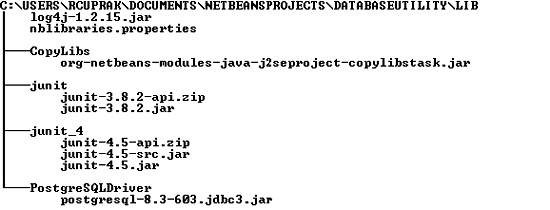
If a libraries folder has been configured for a project, libraries added to the project are placed in that directory. This facilitates sharing of the project between developers. If the default folder name is accepted when creating the Java SE project, NetBeans creates a lib directory under the project folder. Figure 3-9 shows the contents of the directory for a simple project. This project has five dependencies. The log4j-1.2.15.jar file was added as a JAR dependency. CopyLibs, junit, junit_4, and PostgreSQLDriver are all libraries. The nblibraries.properties file is the configuration file for the libraries.
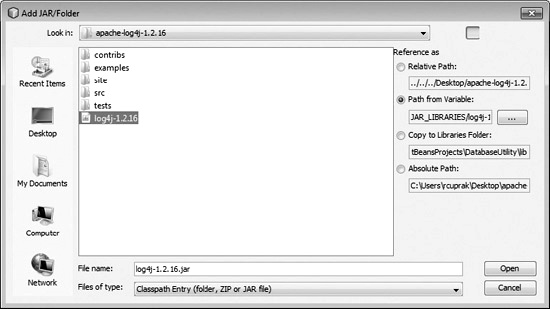
Selecting the Add JAR/Folder button displays the dialog box shown in Figure 3-10. In this dialog box a JAR file can be selected and added to a project. When adding a JAR file to the classpath, there are several options for handling the paths:
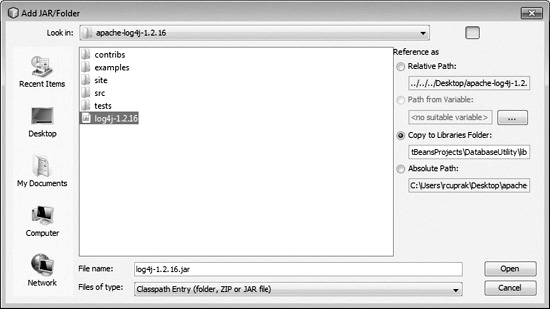
![]() Relative Path Relative path from the project folder to the JAR/folder.
Relative Path Relative path from the project folder to the JAR/folder.
![]() Path From Variable Variable is specified that is used to resolve the path.
Path From Variable Variable is specified that is used to resolve the path.
![]() Copy To Libraries Folder Copies the JAR/folder to the lib directory.
Copy To Libraries Folder Copies the JAR/folder to the lib directory.
![]() Absolute Path An absolute path is used to reference the JAR/folder.
Absolute Path An absolute path is used to reference the JAR/folder.
The Path From Variable and Copy To Libraries Folder options both facilitate sharing of the project between developers. Relative Path can be used if the JAR/folder is already under the project folder. Absolute Path hard-codes the path, thus making the project machine-specific.
The Edit button, shown in Figure 3-6, opens a dialog box for manipulating the library. Which dialog box opens will vary depending upon whether the classpath entry is a JAR/folder or a library. References to other projects cannot be edited. Figure 3-11 shows the Edit Jar Reference dialog box for a JAR/folder dependency. The Javadoc and Sources for the dependency can be optionally specified.
FIGURE 3-11 Edit JAR dependency
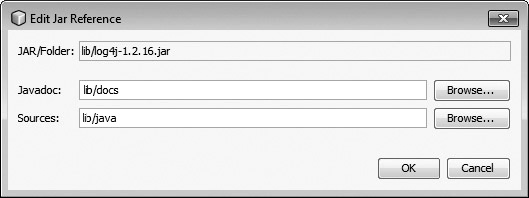
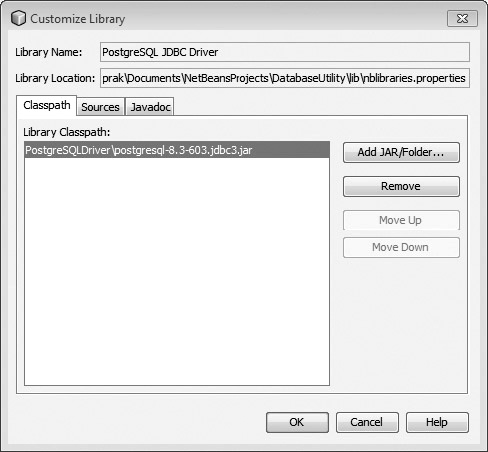
Figure 3-12 shows the Customize Library dialog box for a library. A library can contain multiple JAR files as well as multiple source and Javadoc directories.
FIGURE 3-12 Edit library dependency
Buttons are also present in the dialog box for ordering the classpath entries. The order of the entries controls the sequence in which dependencies are resolved.
![]()
Memorize the different classpaths that can be configured for a project. Also remember that the order in which dependencies are resolved is dependent on the order of the dependencies in the classpath. There are four types of classpaths and four ways in which a path to a dependency can be specified. Experiment with all of them, and try moving the project around to see what types of error occur when paths are broken.
Understanding Project Classpath Differences
For the exam it is important to understand how configuring the classpath for a Java SE project differs between Java SE projects and also other project types. Big differences exist between Java SE projects and Java Web and EJB project types. There are two types of variances—classpaths available and libraries that are pre-populated onto the classpath. Pre-populated classpaths help to bootstrap-develop for specific project types. For example, the Java Desktop Application project type comes in two variants, with one including the necessary JPA libraries and JDBC drivers for creating a database-backed desktop application. Often the biggest hurdle to starting a project is getting the initial set of dependencies on the classpath and configured.
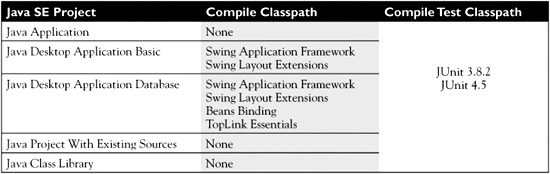
All of the Java SE project types, with the exception of the Java Free-Form Project, have the same set of four classpaths: Compile, Run, Compile Tests, and Run Tests. The Java Free-Form project, discussed in Chapter 2, is significantly different. As mentioned previously, the classpath for a free-form project is used to support only editor functionality such as syntax checking and auto-completion. The other Java SE project types vary only in the libraries that are configured. Differences between these project types are highlighted in Table 3-3.
TABLE 3-3 Java SE Initial Classpath Differences
NetBeans supports many different project types including Java EE, Java Web, Java ME, and JavaFX. For Java EE and Java Web these projects lack the runtime classpath because they are packaged and deployed to application servers. JavaFX projects have only one classpath for dependencies. Java ME projects are significantly different and possess only a single classpath.
Troubleshooting classpath problems can be extremely challenging. The system property, java.class.path, can be retrieved to see the contents of the classpath. The JVM –verbose flag can also be very useful. NetBeans will not check the classpath to see if you have conflicting dependencies. For example, NetBeans will not detect if two libraries use incompatible versions of an XML parser. A Maven-based project would help handle and better manage a project with numerous dependencies.
Configuring Classpath Variables
Starting with version 6.1, NetBeans began supporting path variables. Path variables are configured in the IDE by choosing Tools | Variables. This displays the Manage Variables dialog box, shown in Figure 3-13. These variables are used to abstract the location of resources. This is very useful when it is necessary for resource locations to vary between machines. This obviously isn’t possible with either relative or absolute paths. Copying the resources into a project, while solving the problem, forces a particular project setup.
FIGURE 3-13 Setting path variables

In Figure 3-14 a variable path is used to add the log4j JAR file to a Java SE project. These path variables can be accessed and manipulated from the build.xml script via the property var.JAR_LIBRARIES.
FIGURE 3-14 Adding a resource using variable paths
When the project is moved to another machine or opened in a NetBeans instance that does not yet have the variable defined, NetBeans warns of an unresolved dependency. Right-clicking the project and choosing Resolve Reference Problems prompts you to define the unknown variable.
EXERCISE 3-2 Managing the Classpath
In this exercise, you populate the classpath of the project you created in Exercise 3-1. Once the classpath is configured, the project will successfully compile.
1. Right-click the project in the Projects window and choose Properties.
2. Select the Libraries category.
3. Choose Add JAR/Folder.
4. Browse to the Jmol project, and select all of the JAR files under the jars directory.
5. Click the Run category in the panel on the left.
6. Click Browse, and NetBeans scans the project for all classes containing a main method. Choose org.openscience.jmol.app.Jmol from the list of classes.
7. Close the Properties window.
Choosing Run | Run Main Project or Debug | Debug Main Project compiles and launches Jmol. You can search for files to view using Jmol at www.rcsb.org/pdb. Search for “flu” or “cold” to see chemical structures related to these diseases. Click the download link and then open the file inside of Jmol.
CERTIFICATION OBJECTIVE:
Creating Forms with the GUI Builder
Exam Objective 3.3 Demonstrate knowledge of the NetBeans GUI Builder and the ability to lay out and hook up basic forms using it.
Building user-friendly interfaces for rich client applications is neither trivial nor easy. To simplify Java GUI development, NetBeans includes the powerful NetBeans GUI Builder graphical layout tool for constructing Swing/AWT GUIs. It is a feature-rich tool that addresses many of the challenges of constructing a robust user interface. These challenges include drawing the screen, creating resizable screens leveraging Java layouts, internationalization, and data binding. Such challenges often confound Java developers. Building layouts in Java often requires copious amounts of redundant code to specify layout constraints and copy values between the data model and the screen. Visualizing the effects of constraints is tricky enough when initially coding a screen. However, reorganizing an existing screen with dozens of controls can be downright impossible without a sketch enumerating the overarching design. Internationalization, storing text and warning messages in resource bundles, is often overlooked, especially if the application isn’t initially destined for multiple regions, despite the fact that resource bundles help ensure text consistency across an application. Data binding is often solved in an ad hoc manner and is hard to do correctly.
At the heart of the NetBeans GUI Builder is a WYSIWYG (what you see is what you get) editor. With this editor, components can be dropped on a screen and rearranged. Layout manager constraints, including GridBag, can be visually edited and previewed. NetBeans generates the source code; depending on the layout chosen, no additional libraries are required at runtime. NetBeans also introduces two additional layouts, Free Design and Absolute Layout, to expedite development.
Data binding is the shuttling of values between the screen and the data model. It is a tricky problem to solve because the Swing components vary considerably, and the hooks are not uniform. Here, NetBeans takes a novel approach by integrating Beans Binding (JSR 295) into the IDE. While this requires an additional library at runtime, its value and usefulness cannot be overstated.
GUI internationalization takes two forms: designing a GUI that adapts dynamically as label text changes, and actually pulling the labels from resource bundles. The GUI editor and its support of visually editing constraints tackle the former. The latter, resource bundles, NetBeans supports by automatically synchronizing labels with the resource files. NetBeans also handles escaping of the resource bundles. This means that you can type in i18n characters (for example, Chinese, German, or Korean characters), and NetBeans escapes them properly without having to use the native2ascii utility.
NetBeans takes GUI development a step further with templates for creating an application and database-backed screens. Application templates come with prewired menus and a content pane. The database-backed screens tie the Beans Binding support directly to fields within the database. Thus, CRUD (Create Read Update Delete) operations can be implemented quickly.
This objective is split into the following topics:
![]() Touring the Editor
Touring the Editor
![]() Creating Forms and Adding Components
Creating Forms and Adding Components
![]() Working with Layouts
Working with Layouts
![]() Navigating Generated Code
Navigating Generated Code
![]() Generating Event Listeners
Generating Event Listeners
![]() Understanding Beans Binding
Understanding Beans Binding
![]() Understanding Internationalization Support
Understanding Internationalization Support
Touring the Editor
If you have ever worked with Microsoft Visual Basic or Interface Builder on Mac OS X, then the NetBeans GUI Editor, formerly known as Matisse, will be very familiar. The editor is a graphical tool for dragging GUI widgets onto a panel, arranging them, and binding them to the data model. It contains a component palette, properties panel, and the panel for visually arranging components. While the NetBeans GUI Builder may resemble other editors, it is Java specific and contains additional tools for internationalizing and managing layouts. The NetBeans GUI Builder follows and promotes Java best practices for GUI development.
This section provides an overview of the nuts and bolts of the editor. The following topics are discussed:
![]() Opening the NetBeans GUI Editor
Opening the NetBeans GUI Editor
![]() Understanding Project Dependencies
Understanding Project Dependencies
![]() Navigating the Editor
Navigating the Editor
Opening the NetBeans GUI Editor
To understand how to open the NetBeans GUI Builder, a brief overview of how the builder generates the UI is necessary. The NetBeans GUI Builder takes the approach of generating Java code. As a result, the NetBeans GUI Builder requires a controlled environment with specific hooks. When a Swing control is repositioned on a panel, NetBeans regenerates the code with the requisite constraint or parameter changes. NetBeans generates its code in specific blocks that cannot be edited; code blocks will be covered shortly. What this means is that in order to edit a user interface visually, NetBeans must have initially created the GUI.
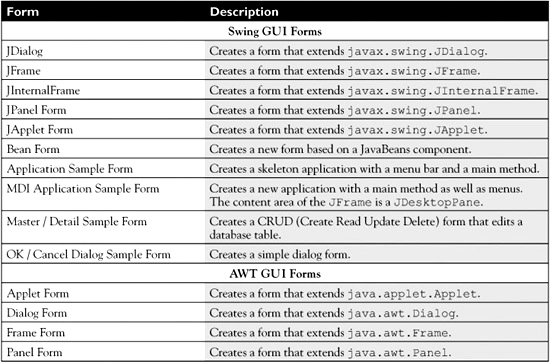
To create a new user interface that is editable by NetBeans, choose File | New File. The categories Swing GUI Forms and AWT GUI Forms contain different starting templates for GUIs. Table 3-4 lists the contents of both categories. AWT is the original GUI technology that shipped with Java in 1995. Unless you have a specific reason for using AWT, create new graphical interfaces using Swing. Since Java version 1.2, Swing has been standard and includes a much larger toolkit of GUI components. AWT uses native widgets and takes the lowest common denominator approach.

When NetBeans creates a new form, a couple of things happen under the hood:
![]() A new class is created for the form.
A new class is created for the form.
![]() An XML file, with the same name as the form and the file extension .form, is created.
An XML file, with the same name as the form and the file extension .form, is created.
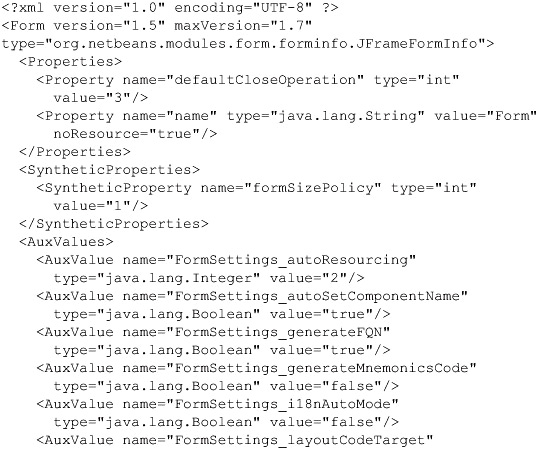
The XML file is used internally by the editor and is completely hidden in both the Projects and Files windows in NetBeans. If the XML form file is missing, NetBeans treats the form as a regular Java class, and the GUI cannot be edited with NetBeans. Listing 3-1 contains the contents of a form file. Since this file is for internal use by the IDE, its contents won’t be discussed here. Many of the elements, however, are self-documenting.
NetBeans will automatically check the XML form file info version control. If you are using Subversion with file locking, both the Java form class and the XML form file must be locked together. Since NetBeans does not support the file-locking attribute and hides the XML form file, this must be done outside of the editor.
LISTING 3-1: Example .form (JFrame)

The previous discussion assumed that a Java project was already open in NetBeans. The NetBeans GUI Builder isn’t tied to a particular Java project type. This means that a form can be created and added to a web project or an EJB project. You can even run the form by right-clicking and selecting Run. Adding a form to a non-Java desktop project can be useful when testing utility methods or troubleshooting code. However, it probably is a better idea to write unit tests.
NetBean provides a template for creating a GUI application. To create a new project using this template, choose File | New Project. Choose the Java category and select Java Desktop Application. The next step in the wizard is shown in Figure 3-15. On this panel a decision must be made under Choose Application Shell as to whether the project will use a Java Persistence API provider and hence pull data from a database. If Basic Application is chosen, the project is immediately created and opened. A Database Application requires additional configuration.
FIGURE 3-15 New Java Desktop Application: Name And Location

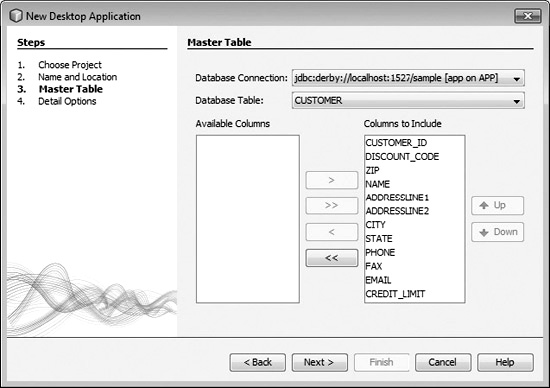
If a database GUI application is chosen, the wizard continues with two additional steps that will result in an application shell with a master/detail user interface for a database table. To create this shell, the wizard prompts for the database connection and also for the columns that are to appear in the master table and that are used for editing an entry. At the conclusion of the wizard, NetBeans generates a user interface for performing basic CRUD operations (Create Read Update Delete).
In Figure 3-16 the Database Connection is chosen along with a table from that database. Selecting a database displays a list of available columns. The connection to the database must be configured prior to creating the project.
FIGURE 3-16 Java Database Desktop Application: Step 1
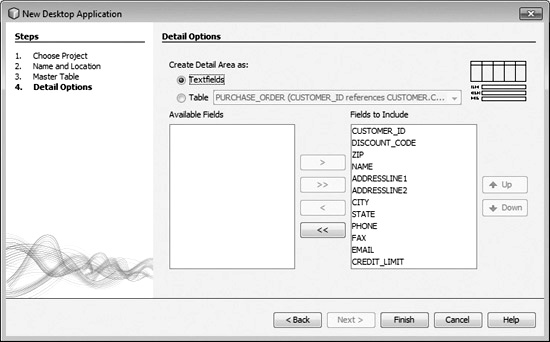
In the next step, shown in Figure 3-17, the detail columns are chosen. These are the columns that the user can edit.
FIGURE 3-17 Java Database Desktop Application: Step 2
After the application concludes, the editor opens with a basic user interface, as shown in Figure 3-18. It must be stressed that this is a starting point for creating a new application. NetBeans has done the hard work of setting up the JPA configuration files, adding the necessary dependencies, and creating an initial form. With this in place you can continue with development.
FIGURE 3-18 Java Database Desktop Application: master/detail interface

Understanding Project Dependencies
Depending upon the project type and the layouts used, additional external library dependencies are added to the project. The libraries added are minimal and used to implement very specific features. These library dependencies are automatically added to the project regardless of the project type. Thus, if you create a Java Web Application and then add a form, NetBeans adds the required supporting JARs without any manual intervention. JAR files are added to support the two additional layouts, data binding, and also to support new Java Desktop Applications.
NetBeans may add two additional JARs for Absolute Layout and Group Layout. The Absolute Layout is an absolute positioning layout. The Absolute Layout requires the Absolute Layout library that contains the JAR file AbsoluteLayout.jar. Group Layout is the layout being used under the hood when the Free Design layout has been selected. This layout requires the Swing Layout Extensions library that contains the swing-layout-1.0.4.jar file (NetBeans 6.8) if deploying or running the JRE 5 or older. Group Layout was added to the platform in Java 6. Both of these libraries can be viewed and added to a project regardless of whether the NetBeans GUI Builder is being used. These libraries can be viewed via Tools | Libraries.
![]()
As of Java SE 6, Group Layout is now part of the JRE. In Chapter 1 the Layout Generation Style setting was discussed. This setting determines whether the Swing Layout Extensions library is included. If the Java Platform is set to JDK 1.6 and the Source/Binary Format is set to JDK 5, the project compiles and might even start on JRE 5; however, at some point the Java 5 JVM attempts to load the GroupLayout class and fails.
To reduce the amount of redundant code that a developer must write to shuttle values between the GUI controls and the data model, NetBeans includes Beans Binding (JSR 295). As soon as a property of a control is bound, NetBeans adds the Beans Binding library to the project. This library includes just one JAR file—beansbinding-1.2.1.jar. This library can also be used independently of the NetBeans GUI Editor.
In March 2009 the Better Beans Binding Project was founded to expand development. More information on the project can be found at http://kenai.com/projects/betterbeansbinding/pages/Home.
Form-based applications created with the Java Desktop Application project template depend upon several different libraries. Library dependencies vary depending upon whether the project is database based and hence includes JPA. At the minimum, form-based applications include the Swing Application Framework library that contains two JAR files: appframework-1.0.3.jar and swing-worker-1.1.jar. The Swing Application Framework, JSR 296, is a standard framework for developing Java applications. More information on it can be found at https://appframework.dev.java.net.
If the Java Desktop Application is database based, two additional libraries are added from the TopLink Essentials library. These JAR files include toplinkessentials.jar and toplink-essentials-agent.jar. A database driver JAR file also is added. The TopLink Essentials JPA implementation is used. Switching to another JPA provider, such as Hibernate, requires manually updating configuration files and adding the requisite libraries. More information on TopLink can be found at www.oracle.com/technology/products/ias/toplink/jpa/index.html.
To summarize, Table 3-5 lists the JAR files that are needed when using the NetBeans GUI Editor and a Java Desktop Application project.
TABLE 3-5 NetBeans GUI Editor JAR Dependencies

Navigating the Editor
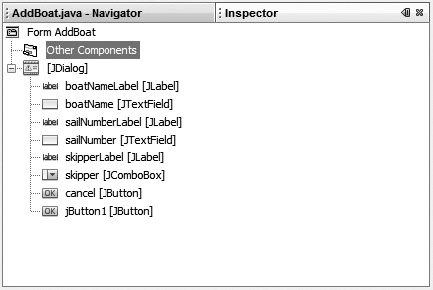
The NetBeans GUI Builder comprises several windows that can be rearranged or detached. The main edit window is where a GUI is built graphically. Figure 3-19 shows the NetBeans GUI Editor editing AddBoat.java. The default window layout includes a Palette window and Properties window on the right. The window on the lower left is the Inspector. These three windows and the main editor window compose the NetBeans GUI Editor. Components are dragged from the palette onto the form with component properties being edited in the Properties window. The Inspector providing a visualization of the component tree.
FIGURE 3-19 NetBeans GUI Builder

The three supporting windows and the main editor are interconnected. Selecting a component in the Inspector window selects it on the form and also causes the Properties window to update. Selecting a component on the form changes the selection on the Inspector and Properties windows. Changing a property, such as Font color for a JLabel, on the Properties window changes how the component is rendered in the editor. Each of these three windows will now be discussed individually.
Understanding the Editor Window The main NetBeans GUI Editor window is composed of a drawing panel and a toolbar. Components are dragged and placed on the main editor window. What happens to a component once it is placed on the editor window is contingent on the layout and is covered in the section on layouts. Across the top of the editor window is the toolbar. The toolbar actions are documented in Table 3-6. Most of the toolbar actions are tied to the Free Design layout, which enables developers to design screens without having to fiddle with layouts.
TABLE 3-6 NetBeans GUI Editor Toolbar

The NetBeans GUI Editor has two modes: Design and Source. It initially opens in the Design mode, which is the visual mode where components can be dragged and dropped onto the editor window. In the other mode, Source, the generated source can be viewed and edited with some restrictions. The section “Navigating Generated Code” later in this chapter will explain in more detail the guard blocks.
Within the Design mode, the mouse pointer can operate in two modes: Selection and Connection. These modes are toggled in the toolbar. Selection mode is the default mode. In this mode components can be visually manipulated and arranged. In the Connection mode, component events and actions can be bound together. When binding, the first component selected is the event source, and the second is the listener or target. For example, JCheckbox (source) can be wired to JTextField (target) such that when JCheckbox is selected, JTextField becomes editable. In the Connection mode, once the two components are selected, a wizard appears to guide you through the process. This is an extremely powerful feature and will be discussed further in the section “Understanding Beans Binding” along with Exercise 3-5.
The other icons in the toolbar pertain to the alignment of components in the Free Design layout. These toolbar icons require two or more components to be selected. For these actions to be enabled, all of the selected components must be in the same container. For example, one component cannot be in JPanel1 and another component in JPanel2. The actions performed by these icons are self-explanatory.
Right-clicking the root panel of a form displays a context menu. The root panel of a form is the form itself—this can be a JPanel, JFrame, JDialog, or some other container. This context menu is shorter than the context menu for a component or a container. The context menu has the following entries:
![]() Preview Design Switches Look & Feel used to preview the layout.
Preview Design Switches Look & Feel used to preview the layout.
![]() Bind Displays bind options that are available and can be bound.
Bind Displays bind options that are available and can be bound.
![]() Set Layout Sets the layout for the container.
Set Layout Sets the layout for the container.
![]() Customize Layout Opens the GridBagLayout Customizer. Only enabled if GridBag is selected as the layout.
Customize Layout Opens the GridBagLayout Customizer. Only enabled if GridBag is selected as the layout.
![]() Add From Palette Adds a component from the palette.
Add From Palette Adds a component from the palette.
![]() Design This Container Opens the container in a new editor window.
Design This Container Opens the container in a new editor window.
![]() Set Default Size Resizes the component to its preferred size.
Set Default Size Resizes the component to its preferred size.
![]() Change Order Changes the order in which the components are instantiated.
Change Order Changes the order in which the components are instantiated.
![]() Copy Copies the selected component(s) to the clipboard.
Copy Copies the selected component(s) to the clipboard.
![]() Paste Pastes the clipboard onto the container. Behavior will vary depending upon the layout of the container.
Paste Pastes the clipboard onto the container. Behavior will vary depending upon the layout of the container.
![]() Customize Code Displays the Code Customizer for a component.
Customize Code Displays the Code Customizer for a component.
![]() Properties Displays the property editor in a modal dialog box.
Properties Displays the property editor in a modal dialog box.
Understanding the Palette The Palette window contains the components that can be dragged onto a form. The components are grouped into seven categories by default. Right-clicking the window displays a context menu for customizing the palette. The default categories are:
![]() Swing Containers Includes Java containers such Tabbed Pane, Scroll Pane, and Panel (aka JPanel).
Swing Containers Includes Java containers such Tabbed Pane, Scroll Pane, and Panel (aka JPanel).
![]() Swing Controls Includes all of the built-in Swing controls such as JLabel, JSlider, and JTextField.
Swing Controls Includes all of the built-in Swing controls such as JLabel, JSlider, and JTextField.
![]() Swing Menus Includes menu bars, menus, and menu separators.
Swing Menus Includes menu bars, menus, and menu separators.
![]() Swing Windows Includes Dialogs, Frame, Color Chooser, File Chooser, and Option Pane.
Swing Windows Includes Dialogs, Frame, Color Chooser, File Chooser, and Option Pane.
![]() AWT Includes built-in AWT controls such as Label, Checkbox, and Text Field.
AWT Includes built-in AWT controls such as Label, Checkbox, and Text Field.
![]() Beans Contains one item, Choose Bean, which opens a wizard for creating a new bean.
Beans Contains one item, Choose Bean, which opens a wizard for creating a new bean.
![]() Java Persistence These beans are used to hook a form up to a JPA provider.
Java Persistence These beans are used to hook a form up to a JPA provider.
Mixing Swing and AWT components should be avoided if possible. AWT components are termed “heavyweight,” while Swing components are “lightweight.” AWT components use the native platform controls and thus do not support transparency and are limited to being rectangular. Z-ordering issues arise because Swing widgets cannot sit on top of AWT components such as scroll panes.
Most of the component categories are self-explanatory with the exception of the Java Persistence category. The entries under this category are not visual components that appear on a form. Instead the contents of this category are elements that you can add to a form for enabling database integration. You would use these components if you were creating a form that displayed the contents of a database table in a Swing table. The entries under Java Persistence include:
![]() Entity Manager Manages the state and life cycle of entities within the persistence context. If a database application is chosen, NetBeans configures an EntityManager.
Entity Manager Manages the state and life cycle of entities within the persistence context. If a database application is chosen, NetBeans configures an EntityManager.
![]() Query JPA Query using EJB-QL and is dependent upon the Entity Manager. EJB-QL is the Enterprise JavaBeans Query Language.
Query JPA Query using EJB-QL and is dependent upon the Entity Manager. EJB-QL is the Enterprise JavaBeans Query Language.
![]() Query Result A list (java.util.List) that contains the results of a query.
Query Result A list (java.util.List) that contains the results of a query.
Understanding the Properties Window The Properties window edits the properties of the current selection in the editor window. The properties for a component are constructed either through introspection or from a BeanInfo object. The Properties window is divided into four categories:
![]() Properties Displays properties, such as background color, font, and number of columns for the selected component. Values entered in here are literals and are not dynamically evaluated expressions.
Properties Displays properties, such as background color, font, and number of columns for the selected component. Values entered in here are literals and are not dynamically evaluated expressions.
![]() Binding Contains many of the same properties from the Properties tab. However, the properties can be bound using expressions that are evaluated at runtime. For example, instead of hard-coding background color on the Properties tab, it could instead be bound to a getBackgroundColor() method on a Java Bean.
Binding Contains many of the same properties from the Properties tab. However, the properties can be bound using expressions that are evaluated at runtime. For example, instead of hard-coding background color on the Properties tab, it could instead be bound to a getBackgroundColor() method on a Java Bean.
![]() Events On the Events tab, listeners can be registered to receive events. Only events supported by the component are listed.
Events On the Events tab, listeners can be registered to receive events. Only events supported by the component are listed.
![]() Code Controls the generation of code by the NetBeans GUI Editor.
Code Controls the generation of code by the NetBeans GUI Editor.
If no cell has focus, typing will display a find sheet that can be used to quickly locate properties.
Understanding the Inspector The Inspector window displays the object graph of the main editor window. At the root of the graph is a form such as JDialog, JFrame, or JPanel. Clicking an entry in the component tree selects the component on the main editor window. Controls can be rearranged by dragging—a blue indicator will flag the insertion point. Right-clicking a component displays the same context menu as in the main editor.
The component name can be set by double-clicking an entry in the tree. The name entered will be used in code generation. Figure 3-20 shows an example where the components have been given descriptive names.
Creating Forms and Adding Components
New forms are created in the NetBeans GUI Editor by choosing File | New File and selecting either Swing GUI Forms or AWT GUI Forms. Table 3-7 lists the forms that are available for each category.
Once the form has been created, controls can be dragged onto it from the component palette. Right-clicking and choosing Add From Palette also adds components.
Working with Layouts
Java layouts are a powerful abstraction for defining the layout and behavior of Java user interfaces. Layout managers determine the size and position of the controls within a container. They take into account the control’s preferred size, minimum size, maximum size, and the available screen real estate. Forms are not static even if their definitions are fixed. Java applications can run on a multitude of devices where the font and control dimensions vary considerably. Even if an application is only targeting Windows, differences exist between versions of Windows such as Windows XP and Vista. Users also have a habit of customizing appearance settings. Changing the locale and presentation language affects the visual layout as well. Using a layout manager, the size and position of the controls are controlled by the layout’s constraints.
Layout managers also tackle the problem of dynamic resizing. A good user interface permits users to resize frames and dialog boxes to suit their needs. A layout manager defines how changes in a form’s dimensions are allocated. For example, when resizing a form, you would expect the text fields to grow while labels remain fixed.
Although layout managers enable the creation of adaptable user interfaces, coding them can be challenging as well as time-consuming. Each layout manager has a different set of constraints to learn and has varying strengths and weaknesses. Constructing a user interface often involves using at least two layouts with some nesting of panels to achieve the desired effect and resize behavior. As we’ve seen, NetBeans expedites GUI development by enabling you to visualize the layout and tweak it without coding. Depending on the layout manager chosen, you may not even have to edit any constraints.
NetBeans supports most of the Java layout managers with the exception of OverlayLayout and SpringLayout. It supports the following layouts:
![]() Free Design This is actually Group Layout. Group Layout was added to Java SE 6 and is available in a stand-alone JAR file for pre–Java 6 applications. It was originally developed for the NetBeans GUI Builder. This layout handles horizontal and vertical arrangement separately.
Free Design This is actually Group Layout. Group Layout was added to Java SE 6 and is available in a stand-alone JAR file for pre–Java 6 applications. It was originally developed for the NetBeans GUI Builder. This layout handles horizontal and vertical arrangement separately.
![]() Absolute Layout An absolute positioning layout manager, it is really no different than passing in null as the layout. Developers are discouraged from using it because NetBeans supports this layout only for historical reasons.
Absolute Layout An absolute positioning layout manager, it is really no different than passing in null as the layout. Developers are discouraged from using it because NetBeans supports this layout only for historical reasons.
![]() Border Layout Divides the container into five regions: north, south, east, west, and center.
Border Layout Divides the container into five regions: north, south, east, west, and center.
![]() Box Layout A layout manager in which components are stacked either vertically or horizontally like boxes.
Box Layout A layout manager in which components are stacked either vertically or horizontally like boxes.
![]() Card Layout Each component is placed on a card, and only one card in the stack of cards is visible at a time.
Card Layout Each component is placed on a card, and only one card in the stack of cards is visible at a time.
![]() Flow Layout Arranges components in a line.
Flow Layout Arranges components in a line.
![]() GridBag Layout Arranges components in a grid. Supports a rich set of constraints with support for spanning cells and controlling space, alignment, and padding.
GridBag Layout Arranges components in a grid. Supports a rich set of constraints with support for spanning cells and controlling space, alignment, and padding.
![]() Grid Layout This layout arranges the components in a grid.
Grid Layout This layout arranges the components in a grid.
![]() Null Layout Results in no layout manager being used. Null is passed into a container’s setLayout() method. Each control must have its coordinates set as well as its dimensions.
Null Layout Results in no layout manager being used. Null is passed into a container’s setLayout() method. Each control must have its coordinates set as well as its dimensions.
To set the layout for a container, right-click the container and select Set Layout. Right-clicking the container in the Inspector can also set the layout. Each panel on a form can have a different layout. By default, NetBeans sets the Free Design layout as the default when a new form is created. Free Design, Null, and Absolute layouts are essentially free form—you can drag components anywhere on the screen. Of these three, only Free Design is a true layout that adapts to look-and-feel changes as well as screen-resizing events. For all other layout managers, the constraints must be manually edited in the Properties window. However, the GridBagLayout Customizer, available through the context menu on a container, is a visual editor for GridBagConstraints.
Control properties can impact how a control renders and appears in a layout. For instance, if a JTextField has no content and the number of columns (characters) hasn’t been configured, then it will shrink to showing only one character. Additionally, to keep a JTextField from dramatically shrinking to one character when a screen is resized smaller, you’ll want to set the minimum size using the preferred size after the screen has been packed. For other controls such as JTextArea, you’ll want to configure the number of rows and columns.
As Free Design and GridBag receive preferential treatment, these will be covered individually.
Free Design
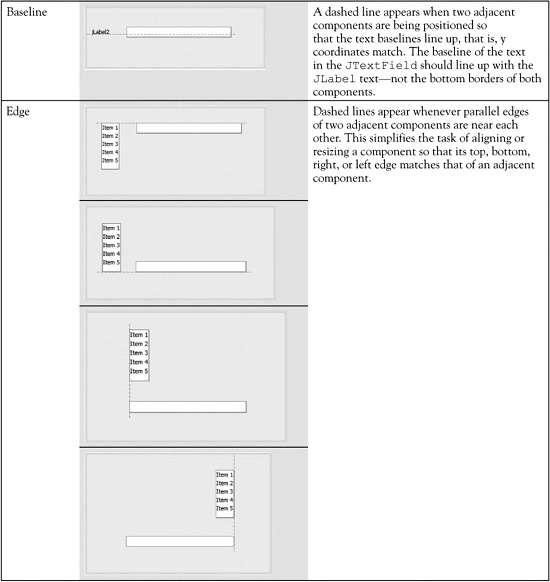
The NetBeans GUI Editor Free Design, which is the Group Layout, is the default layout for new forms. When using this layout, controls can be dragged out onto the screen and positioned as well as aligned without manipulating properties on the Properties window. When placing a component in the form, dashed lines appear and disappear depending upon its proximity to other components. These dashed lines are guides for consistently spacing and aligning components. These guidelines are shown in Table 3-8. Often more than one dashed guideline appears. Note that there is a small preferred distance between two components and a medium preferred distance between two components.
TABLE 3-8 Free Design Guidelines

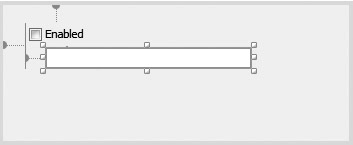
In addition to guidelines, anchors are also present to indicate common alignments. An example of this is shown in Figure 3-21. In this example, the text field is indented from the left edge of the checkbox. The checkbox’s top and left edges are anchored to the top and left edges of the container. Right-clicking the component and choosing Anchor changes these anchors. Four anchor options are presented: Right, Left, Top, and Bottom.
The resize behavior of a component is controlled either from the toolbar or by right-clicking the component and choosing Auto Resizing. Two options are available: Horizontal and Vertical. If resizing is enabled, additional space is apportioned to components that have auto-resizing. The toolbar icons were documented earlier in this chapter.
The dimensions of two or more components can be synchronized. Selecting multiple components and choosing Same Size synchronizes the dimensions. Either width and height or just one or the other can be selected.
The earlier section, “Navigating the Editor,” documents the other toolbar icons that can be used for aligning multiple components on the screen.
![]()
The Free Design layout is one of the chief features of the NetBeans GUI Editor. It is the default layout for all new forms. Pay special attention to this layout, the guides provided in the editor, and the toolbar icons. The exam will ask questions pertaining to the Free Design layout.
GridBag
The GridBag layout manager is one of the most powerful layout managers in Java. While the other layouts, except Free Design, require you to edit the constraints in the Properties window, NetBeans provides the GridBagLayout Customizer. The customizer is shown in Figure 3-22. Right-clicking the container and choosing Customize Layout opens it.
FIGURE 3-22 GridBagLayout Customizer
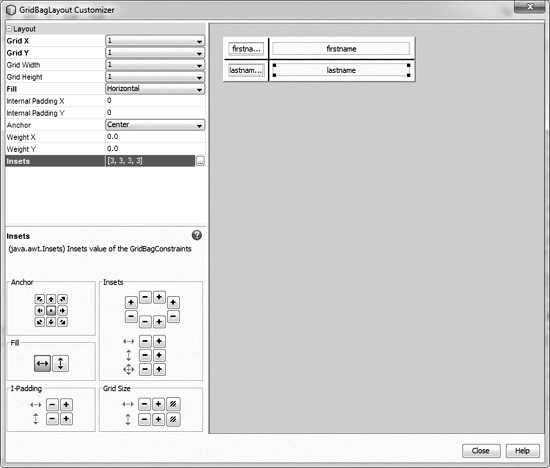
The screen is arranged with two panels: on the left is the constraints editor, while on the right is a visual representation. In the visual representation, gray blocks represent the controls; the actual controls are not drawn. The blocks are identified by their names—if the component names have not been set, then it can be challenging to understand which blocks represent which components.
EXERCISE 3-3 Free Design Layout
In this exercise, you create a new Java Desktop Application and add a form to it. You then populate the form and test resizing.
1. Create a new desktop application by choosing File | New Project and select Java Desktop Application from the Java category. Choose Basic Application as the Application Shell and click Finish.
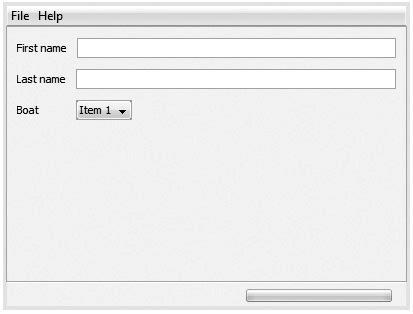
2. Create the form depicted in Figure 3-23. To quickly add the same component multiple times to the form, select the component on the palette, and then click the editor window while holding down the SHIFT key. You need to release the SHIFT key before the last add, otherwise the editor adds the component and then queues another one.
FIGURE 3-23 Form layout exercise
3. Click Preview Design to test the layout and try resizing the form. Notice that the text fields do not resize. Close the preview.
4. In the NetBeans GUI Builder, choose each text field and select Change Horizontal Resizability from the toolbar. Notice the extra anchor that is added.
5. Click Preview Design and try resizing it again.
EXERCISE 3-4 Free Design Layout Using GridBag Layout
In this exercise, you use GridBag Layout to create the same user interface you created in Exercise 3-3.
1. Create a new desktop application by choosing File | New Project, and select Java Desktop Application from the Java category. Choose Basic Applications as the Application Shell and click Finish.
2. Switch layout managers to GridBagLayout by right-clicking on the form and choosing Set Layout | GridBagLayout.
3. Drag out all of the components needed to recreate the UI in Figure 3-23 that you just created using the Free Design layout.
4. Right-click the form and choose Customize Layout.
5. Use the GridBagLayout Customizer to replicate the component arrangement in Figure 3-23. Note that if you haven’t worked with GridBag Layout before, this may take some time.
6. Click Preview Design to test the form.
Navigating Generated Code
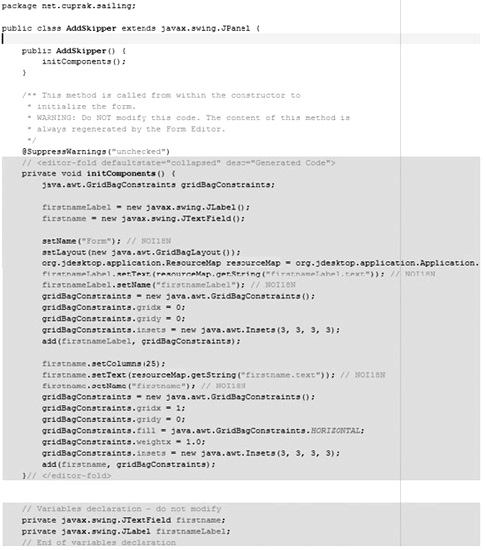
The NetBeans GUI Builder generates code to render the user interface. Each time something is changed in the layout of the screen, NetBeans regenerates the source code. As mentioned earlier, NetBeans stores layout information in an XML file with the extension of .form. Not all of the Java code in the Java class backing the form is regenerated, just specific blocks of code. These are clearly delineated with comments.
NetBeans generates two blocks of code. The first block of code is the initComponents method. This method initializes the components and populates the form. It is invoked from the form’s constructor. The second block of code declares the member variables for the components. Member variable declaration is optional; most of the components such as JLabel probably will be added to the container once and never referenced again. NetBeans locks both of these blocks and prevents you from editing them. However, you can view the code, and there is support for customizing much of the generated code. The “locked” code has a dark gray background color. A code snippet is shown in Figure 3-24.
FIGURE 3-24 Form source code with guarded code
Problems can arise during development if two developers are editing the same form. Even if there are no conflicts, especially with the .form file, the merge may still cause unexpected behavior.
Although NetBeans is generating the layout code and instantiating the components, it provides numerous hooks for customizing and controlling the generated code. These hooks range from modifiers to code snippets that NetBeans inserts for you. The following is a rundown of these hooks:
![]() Variable name Name of the variable for a specific component.
Variable name Name of the variable for a specific component.
![]() Variable modifiers Standard Java access modifier: default, public, private, and protected as well as static, final, volatile, and transient to be used for a class member variable declaration.
Variable modifiers Standard Java access modifier: default, public, private, and protected as well as static, final, volatile, and transient to be used for a class member variable declaration.
![]() Type parameters Type parameters for components that support generics.
Type parameters Type parameters for components that support generics.
![]() Use local variable Swing component is local to initComponents, and a member variable for the class is not created.
Use local variable Swing component is local to initComponents, and a member variable for the class is not created.
![]() Custom creation code Code snippet for instantiating the component. For example, creating the component using a specific constructor.
Custom creation code Code snippet for instantiating the component. For example, creating the component using a specific constructor.
![]() Pre-creation code Code snippet that will be evaluated prior to the creation of the component.
Pre-creation code Code snippet that will be evaluated prior to the creation of the component.
![]() Post-creation code Code that will execute immediately following component instantiation.
Post-creation code Code that will execute immediately following component instantiation.
![]() Pre-init code Code that is executed before bean properties are set.
Pre-init code Code that is executed before bean properties are set.
![]() Post-init code Code that is executed after bean properties are set.
Post-init code Code that is executed after bean properties are set.
![]() Post-listeners code Code that is executed after listeners are executed.
Post-listeners code Code that is executed after listeners are executed.
![]() Pre-adding code Code that is executed before the component is added to the parent container.
Pre-adding code Code that is executed before the component is added to the parent container.
![]() Post-adding code Code that is executed immediately after the component is added to the parent container.
Post-adding code Code that is executed immediately after the component is added to the parent container.
![]() After-all-set-code Code that is executed after the component’s setup is complete.
After-all-set-code Code that is executed after the component’s setup is complete.
![]() Pre-declaration code Code that executes prior to the declaration of the variable for the component.
Pre-declaration code Code that executes prior to the declaration of the variable for the component.
![]() Post-declaration code Code that executes after the declaration of the variable for the component.
Post-declaration code Code that executes after the declaration of the variable for the component.
![]() Code generation Two options are available—this component can either be created from generated code, or it can be serialized out and read back in at runtime.
Code generation Two options are available—this component can either be created from generated code, or it can be serialized out and read back in at runtime.
![]() Serialize to Name of the file to serialize the component.
Serialize to Name of the file to serialize the component.
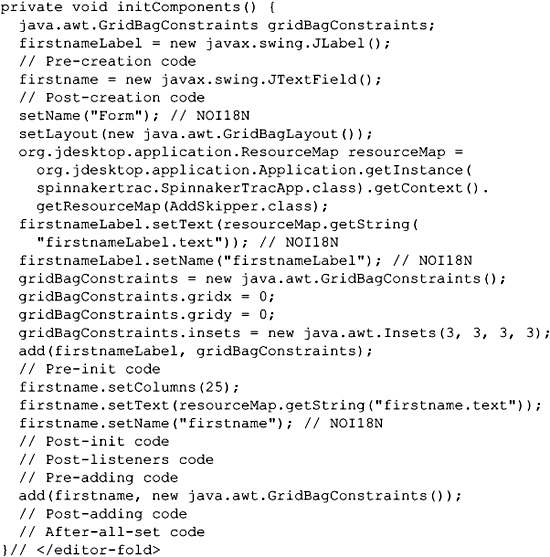
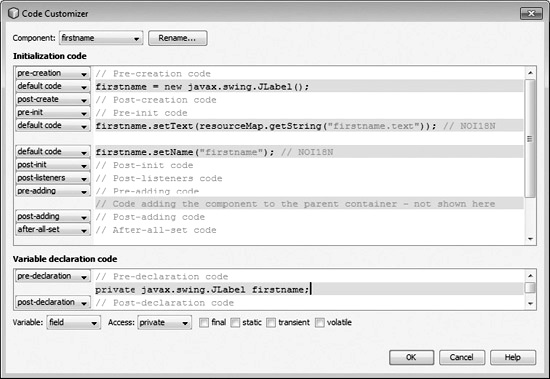
To understand where each of the code blocks fits in, the following listing was created by adding comments to these properties with the name of the property:
There are two approaches to customizing the code. The first approach is to use the Code Customizer. The Code Customizer is shown in Figure 3-25. Right-clicking a component in either the editor or Inspector and choosing Customize Code from the menu displays this dialog box. The main content area contains the code that is generated, interspersed with your custom code. Lines appearing in gray are generated, although they can be edited by choosing Custom from the combo box. Note, auto-completion is available in this dialog box. Any member variables or methods you may have added to the class are available.
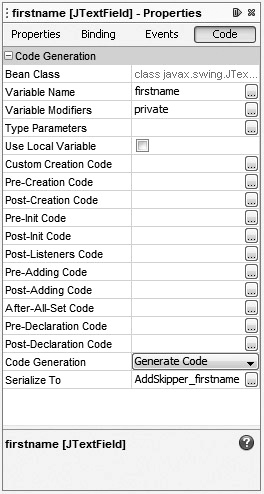
The second approach to customizing the generated code is through the Properties window. Selecting the component in either the editor or Inspector and choosing Binding in the Properties window displays the list of properties in Figure 3-26. The only options available on this property panel but not in the Code Customizer pertain to generating serialized code, that is, generating a binary representation of the component.
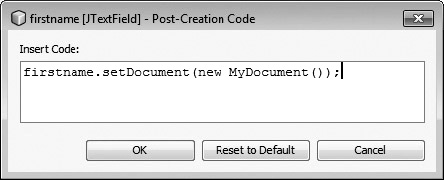
Since the Properties window has limited real estate, clicking the ellipsis (…) button for custom code displays the code editor shown in Figure 3-27. This code editor supports auto-completion.
Generating Event Listeners
Each Swing or AWT component broadcasts numerous events to listeners. Examples of listeners that can be registered on many components include ActionListener, FocusListener, KeyListener, and MouseListener to name a few. Each component can have a slightly different set of listeners. The NetBeans GUI Editor provides a convenient UI for registering and generating code that responds to these events.
There are two ways to register a listener on a component in either the editor or Inspector window. The first is to right-click a component, select Events, and then select the event of interest. The events are grouped into categories to simplify navigation. The event categories for JButton are shown in Table 3-9. The other way is through the Properties window on the Events tab. The Properties window for JButton is shown in Figure 3-28. If the listener is defined in the Properties window, it will use the name provided as the basis for the method. When using the context menu approach, the method name is generated using the name of the component and event. To change the name of the method, click the ellipsis button to the right of the name in the Properties window.
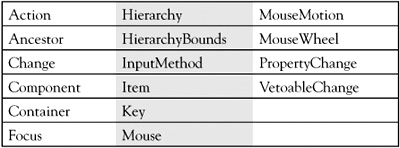
FIGURE 3-28JButton Events property window
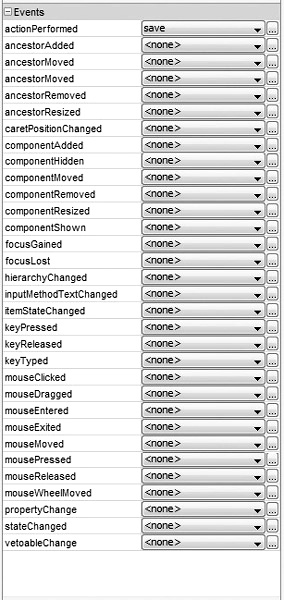
Regardless of the approach used, the code will be generated in the form class. NetBeans immediately switches over to the Source view so that you may edit the generated code. The method name can only be changed through the Properties window. The parameter types and names cannot be changed. Content added to the method is preserved even as components are rearranged on the form. However, if a component is deleted, its listener methods are also deleted. If a component is copied and pasted, its methods also are copied and pasted, albeit with different names.
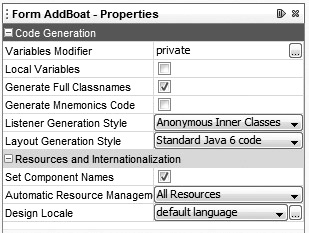
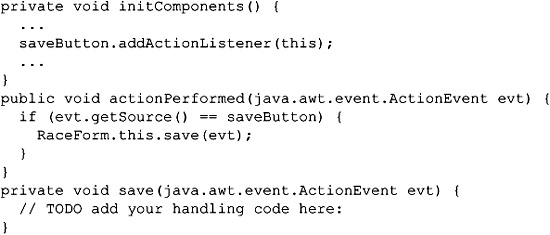
The listener code generated depends upon configuration parameters set on the form. To access the form’s configuration parameters, select the root node in the Inspector window. This displays a Properties window with the same content as Figure 3-29. The Listener Generation Style has the following choices: Anonymous Inner Classes, One Inner Class, and Main Class. The default setting is Anonymous Inner Classes. The default setting for new forms is configured in Tools | Options | Miscellaneous | GUI Builder. This was discussed in Chapter 1.
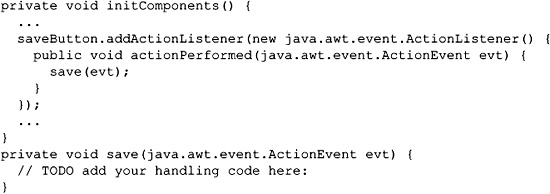
Choosing Anonymous Inner Classes results in the following code being generated for an ActionListener on a Save button:
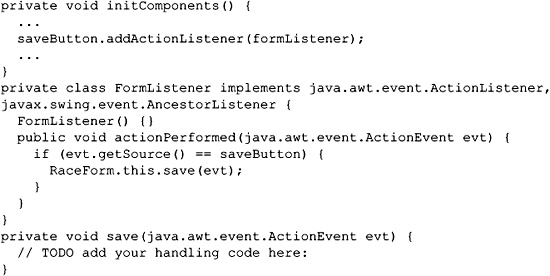
Choosing One Inner Class results in the following code for the same scenario:
Choosing Main Class results in the following code:
Understanding Beans Binding
The NetBeans GUI Builder goes a step beyond generating code for laying out components. NetBeans also integrates with Beans Binding (JSR 295). Beans Binding is a framework for synchronizing properties. It focuses on supporting Swing components and binding Swing components to the data model or to other Swing components. If you have developed applications using Java Server Faces (JSF), this concept should sound familiar. In JSF, the Java Server Faces Expression Language is used to bind JSF components to your beans. You do not have to write code that calls the equivalent get Text()/setText() of a JTextField on a JSFTextField.
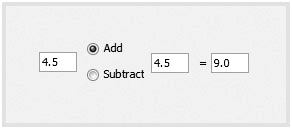
Beans Binding is extremely powerful and saves a significant amount of time. Consider the situation where you are writing a calculator that adds or subtracts two values, as shown in Figure 3-30. If you were coding this without Beans Binding, then the code would be sprinkled with getText()/setText(). Most importantly, you would also have to register listeners to detect when a value has changed or a radio button was selected. Thus, the simple calculator ends up requiring copious amounts of code. To run this example and see the code differences, visit http://www.cuprak.net/BeansBindingCalculator.
FIGURE 3-30 Calculator binding example
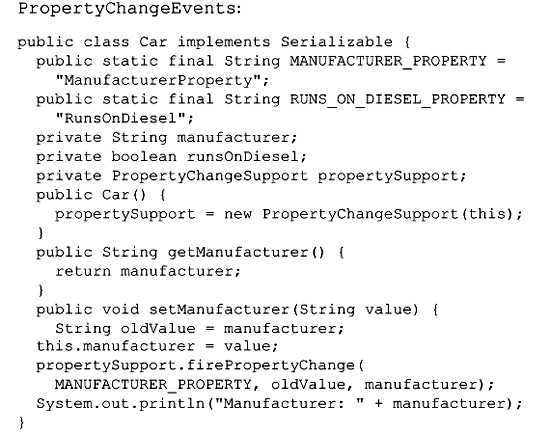
To use Beans Binding, your data model and controls need to fire PropertyChangeEvents. To create a new data model that fires PropertyChangeEvents, create a new bean by choosing File | New File | JavaBeans Object | JavaBeans Component. Doing that generates an initial skeleton object. The skeleton object is a regular Java object with a PropertyChangeSupport instance and several methods for managing listeners. A sample property is included to show how things work. This is standard JavaBeans programming. The following listing shows a typical implementation for the Race class in the SpinnakerTrac application:
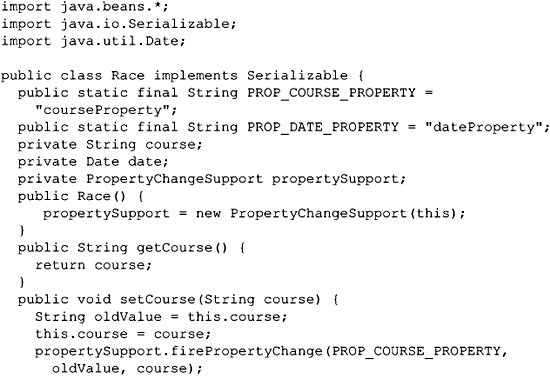
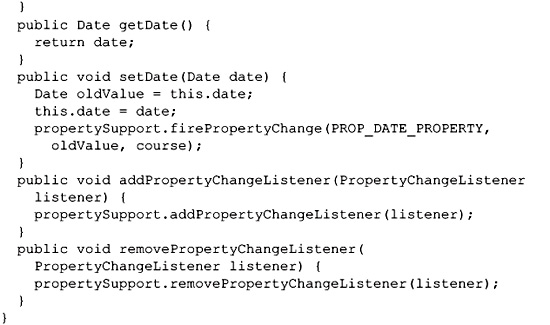
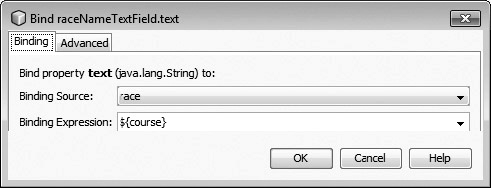
To bind a form to the Race bean instance, the Race class is dragged from the Projects window onto the form. While nothing appears on the form, a new node is created under the form node in the Inspector window for the form. In the generated code for the form, a new member variable of type Race is created. Controls on the form can now be bound to the Race object instance. This is done by either right-clicking and then choosing Bind, or by using the Properties window Binding tab. When the property on the Swing control is selected, the Bind dialog box is displayed. This is shown in Figure 3-31. In Figure 3-31, the text property of a JTextField is being bound to the course property on the Race class. When the application is run, text typed into the text field is automatically pushed to the course property as the user types.
FIGURE 3-31 Text field binding
EXERCISE 3-5 Beans Binding and JavaBeans
In this exercise, you create a bean with a String and Boolean property. A UI for this bean is created and bound to the bean.
1. Create a new Java Desktop Application by using File | New Project and selecting Java Desktop Application from the Java category.
2. Create a new bean, named Car, by choosing File | New File and selecting JavaBeans Component from the JavaBeans Object category.
3. Paste the following content into the bean, noting the use of

4. Create a new JFrame form by choosing File | New File and selecting JFrame from the Swing GUI Forms category. Name the dialog box AddCar.
5. Drag the Car bean from the Projects window onto the AddCar form. In the Inspector window, a node “car1” should be added to Other Components.
6. Drag a Text Field and Check Box onto the AddCar form from the Swing Controls category in the Palette window.
7. Right-click the Text Field and choose Bind | Text. In the Bind dialog box that appears, select the Binding Source as “car1” and select manufacturer from the Binding Expression drop-down list. NetBeans inserts ${manufacturer} into the field.
8. The Text Field dramatically shrinks; in the Properties window set the number of columns to 25.
9. Right-click the Check Box and choose Bind | Selected. Set the Binding Source as “car1” and select runsOnDiesel for the Binding Expression. NetBeans sets the Binding Expression to ${runsOnDiesel}.
10. Run the form by right-clicking and selecting Run File.
11. Notice that as you type, the Car bean will be automatically updated and the current contents dumped into the Output window.
12. To experiment further, add an additional field that also changes the manufacturer property, and watch both of them update in synchrony.
To bind the JTextField and Race class in this example, NetBeans generated the following Beans Binding code:
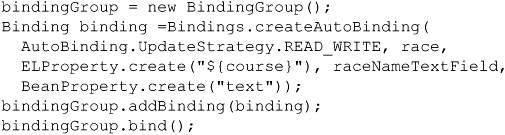
The literal ${course} is a Beans Binding Expression (EL) that is evaluated at runtime.
Since many Swing controls do not conform to the Java Beans Specification, Beans Bindings provides special adapters to fire synthetic properties. These are listed in Table 3-10.
TABLE 3-10 Beans Binding Synthetic Properties
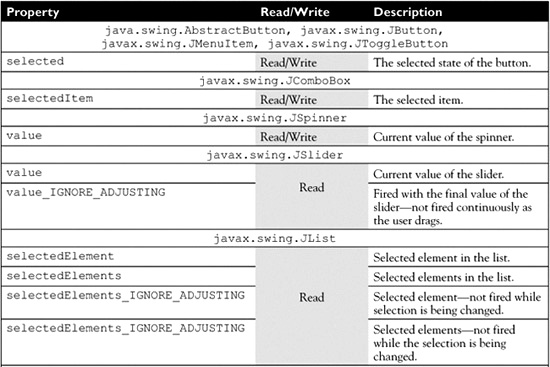
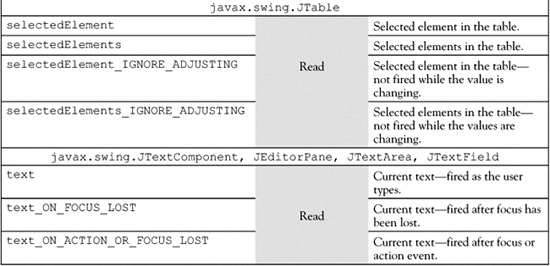
EXERCISE 3-6 Beans Binding and Swing Components
In this exercise, you wire a JCheckBox to the enabled state of a JTextField. When the checkbox is selected, the JTextField will be read-only.
1. Create a new JFrame form in the NetBeans GUI Editor.
2. Drag a Check Box and Text Field onto the form from Swing Controls.
3. Right-click the Check Box and choose Bind | Selected. This opens the Bind dialog box.
4. Select the Text Field in the Binding Source drop-down list.
5. In the Binding Expression drop-down list, select Enabled Boolean. The expression ${enabled} appears in the box.
6. Choose OK to close the dialog box.
7. Right-click the JFrame form in the Projects window and choose Run File. Notice how the checkbox affects the enabled state of the Text Field.
Understanding Internationalization Support
Creating a screen that resizes correctly is only the first step in creating an application that can be localized. The next step is storing the text, font, graphics, and color data in a resource bundle. To simplify the task and promote good GUI development from the start, NetBeans automatically stores these resources in a bundle. By default, a resource bundle is created for each new form created in the IDE. The resource bundle is named after the form.
In Figure 3-32, the net.cuprak.sailing.resources package contains the resource bundles for the forms. NetBeans created the resources package. An additional locale for China was added and appears with the _zh_CN.properties extension. This was added by right-clicking the AddBoat.properties file and choosing Add | Locale. Chinese text was then directly entered into the editor, and NetBeans populated the properties file with boatNameLabel.text=u5E06u8239u8CFD for boatNameLabel.text=![]()
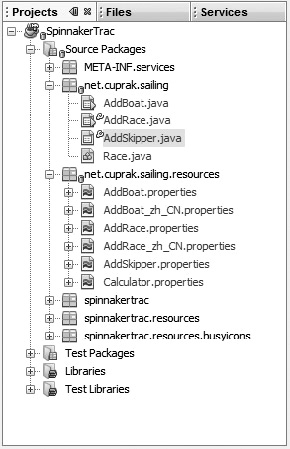
CERTIFICATION OBJECTIVE:
Packaging and Distributing Java Desktop Projects
Exam Objective 3.4 Demonstrate the ability to package and distribute a built Java Desktop project for use by another user.
An application that only runs in the IDE isn’t too useful unless the target audience is only the developer that wrote it. At some point, an application must be released to a nondeveloper who doesn’t have NetBeans installed and who would prefer not to use the command line. Packaging and distributing an application presents many unique challenges including providing a mechanism to distribute and launch an application, resolving application dependencies, and handling application upgrades. An application isn’t useful unless it can be deployed to an end user.
Java provides several different solutions for deploying desktop applications. These solutions vary in complexity and end-user experience. The deployment methods supported for Java desktop applications by NetBeans include:
![]() Executable JAR (double-clickable)
Executable JAR (double-clickable)
![]() Java Web Start
Java Web Start
NetBeans doesn’t produce an installer/launcher combination. There is no support for bundling the output of a project along with its classpath dependencies into a distribution that includes a JRE and native launcher. The two solutions discussed in this section assume that the JVM has already been installed on the end user’s computer.
Creating an Executable JAR
NetBeans packages the output of a Java SE project into a single JAR file. This JAR file includes the compiled code of the project along with any resources such as property files or graphics. A separate directory stores external dependencies used on the runtime classpath. These dependencies are linked via the manifest in the project’s JAR file. This JAR file can then be run either from the command line or by double-clicking it in the file browser. In both cases, a Java virtual machine must be installed on the computer.
One important caveat regarding double-clickable JAR files: there is no way to control JVM settings such as heap space or garbage collection. This means that a double-clickable JAR file must run within the constraints of the default JVM settings.
The target JAR file uses the project name and is placed in the dist directory under the project’s root. A lib directory is also placed in the dist directory. The lib directory contains the project dependencies that are copied to this location. NetBeans automatically sets the Main-Class attribute in the META-INF/MANIFEST.MF and populates the Class-Path property with the project’s runtime classpath. The layout of this directory is shown in Figure 3-33. Listing 3-1 is an example manifest from a database-backed Java SE application.
FIGURE 3-33 The dist directory
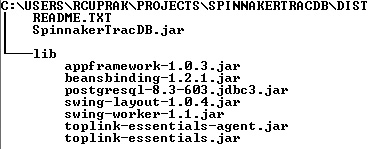
LISTING 3-1. MANIFEST.MF
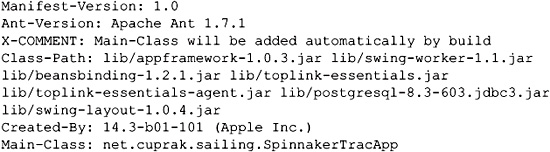
The Main-Class attribute is pulled from the current run configuration. This is configured in Project Properties. Project Properties is displayed by choosing File | Project Properties or by right-clicking the project in the Projects window and choosing Properties. Configuration of the main class is shown in Figure 3-34. Multiple configurations can be created and deleted. The configuration selected in the Configuration drop-down list is used for the Main-Class attribute. The other settings on this screen are used by NetBeans to launch the application, but are not included in the output. If these settings are necessary, a launcher such as a bat or shell script needs to be written to invoke the application.
FIGURE 3-34 Project Properties: Run
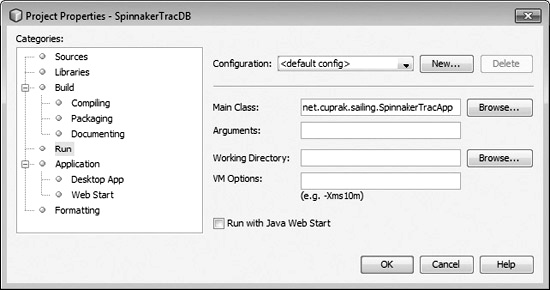
If deployment via Java Web Start is not feasible and a turnkey solution is desired, use a third-party installer. A third-party installer can bundle the application into a native launcher with the JVM. This ensures that your application is isolated from other programs on the system and from JVM versions. There are many good commercial packages as well as open source solutions including Install4j (http://www.ej-technologies.com/) and IzPack (http://izpack.org/). For Mac OS X, Apple provides Package Maker and Jar Bundler. In either case, the output in the dist directory is a good starting point for feeding an installer.
The Packaging category, also in Project Properties and shown in Figure 3-35, configures a few additional parameters including:
FIGURE 3-35 Project Properties: Packaging
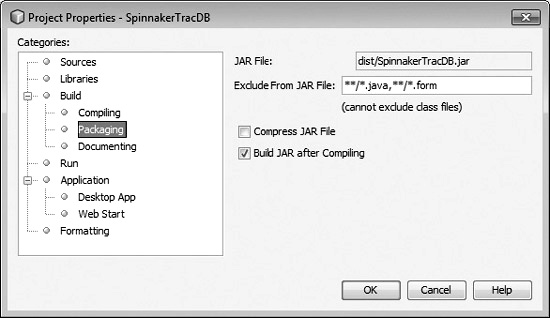
![]() What files are to be excluded from the JAR file
What files are to be excluded from the JAR file
![]() Whether the JAR file is to be compressed
Whether the JAR file is to be compressed
![]() Whether to build the JAR file after compiling
Whether to build the JAR file after compiling
By default, NetBeans excludes Java sources and the form data files used by the graphical editor. The same file pattern is used for exclusions as discussed in the first part of this chapter. Compressing a JAR file speeds up the file downloads. Deselecting the Build JAR After Compiling option stops NetBeans from generating the JAR file.
As mentioned previously, there are two ways to launch a JAR file:
![]() Double-click the JAR file.
Double-click the JAR file.
![]() Run it from the command line using java –jar <JAR name>.
Run it from the command line using java –jar <JAR name>.
Running the application from the command line, cmd.exe on Windows, for example, is useful when debugging because standard out and standard error appear in the console window automatically.
To run the output on another machine, copy the dist directory to the other computer. This can be accomplished by zipping up the directory. A more elegant solution, Java Web Start, is discussed next.
Application distribution ties into a number of different areas in NetBeans. When NetBeans generates the artifacts enabling the application to be distributed as either a double-clickable JAR file or via Java Web Start, it leverages its intimate knowledge of the project. For example, the project’s classpath is used to populate the lib directory and the list of dependencies in the JNLP file. The current Run configuration is substituted in the JNLP file and also in the MANIFEST.MF. This section builds on these topics. The exam will test for interdependencies between exam objectives.
Deploying via Java Web Start
Java Web Start (JWS) is one of the deployment options available for Java SE applications. Java Web Start is a network-based solution for deploying Java applications via the web browser. Unlike applets that run inside of a web browser, JWS applications run as independent applications that can be launched from shortcuts on the desktop. Initially launching an application via JWS requires a network connection unless it is being served up locally. JWS applications can be lazily downloaded and also cached on machines for offline use. Caching also increases performance. In addition, applications deployed via JWS can be easily updated. Java Web Start is a powerful deployment tool.
Java Web Start is enabled on the Web Start node under the Application category in Project Properties. Project Properties is displayed by either choosing File | Properties or right-clicking the project in the Projects window and choosing Properties. Choosing Enable Web Start enables the rest of the controls on the screen, as shown in Figure 3-36. The parameters on this screen are:
FIGURE 3-36 Java Web Start properties
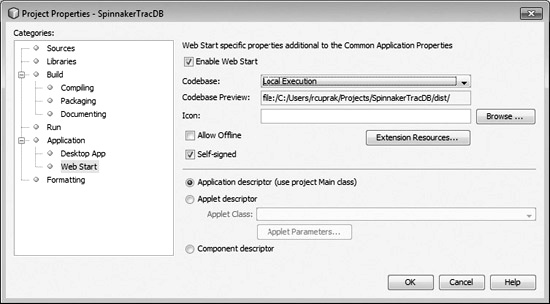
![]() Codebase Represents the location of the application. Three options can be chosen: Local Execution, Web Application Deployment, and User Defined.
Codebase Represents the location of the application. Three options can be chosen: Local Execution, Web Application Deployment, and User Defined.
![]() Codebase Preview Read-only field showing what code base will be used.
Codebase Preview Read-only field showing what code base will be used.
![]() Icon The icon that will be displayed while the application is being loaded, in the Application Manager, and on the desktop.
Icon The icon that will be displayed while the application is being loaded, in the Application Manager, and on the desktop.
![]() Allow Offline Deselect if a network connection is not necessary for the application.
Allow Offline Deselect if a network connection is not necessary for the application.
![]() Self-Signed When this checkbox is selected, NetBeans generates a certificate and signs the JAR files. If no certificate is provided and the application is not signed, the application is unable to access resources on the local machine. A user receives a warning that an application is self-signed.
Self-Signed When this checkbox is selected, NetBeans generates a certificate and signs the JAR files. If no certificate is provided and the application is not signed, the application is unable to access resources on the local machine. A user receives a warning that an application is self-signed.
![]() Application Descriptor Results in the application-desc pointing to the application’s main class specified on the Run panel in Project Properties.
Application Descriptor Results in the application-desc pointing to the application’s main class specified on the Run panel in Project Properties.
![]() Applet Descriptor Enables the deployment of an applet. The drop-down list enables selecting the Applet class. Clicking the Applet Parameters button configures applet parameters such as width and height.
Applet Descriptor Enables the deployment of an applet. The drop-down list enables selecting the Applet class. Clicking the Applet Parameters button configures applet parameters such as width and height.
![]() Component Descriptor The application is deployed as a library for use by another Java application.
Component Descriptor The application is deployed as a library for use by another Java application.
Once the Enable Web Start checkbox is selected, two new files are added to the project:
![]() master-application.jnlp Template JNLP file, which will be populated by the build.
master-application.jnlp Template JNLP file, which will be populated by the build.
![]() preview-application.html Template HTML file for launching the application.
preview-application.html Template HTML file for launching the application.
After the project is built, the dist directory contains a launch.html file and a launch.jnlp file that were created from the two template files. If an icon is selected, the build process copies the icon into the dist directory automatically.
The master-application.jnlp file is a stub file that NetBeans populates during the build process. It appears in the following listing:

For the SpinnakerTrac project, the launch.jnlp file is created and populated in the following listing. Prior to building, the main class must be selected in the Run category in Project Properties. Note that the runtime classpath is used in generating the JAR elements.
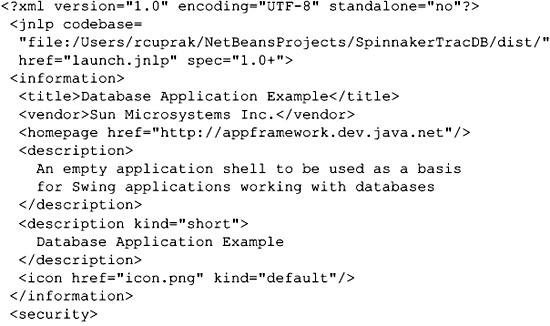
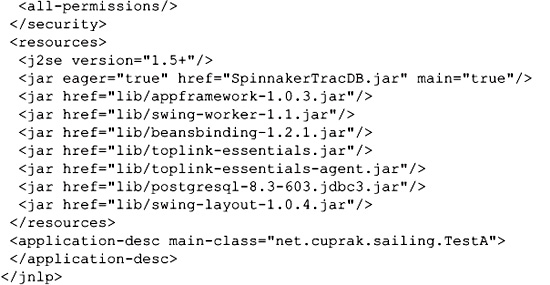
The title, vendor, description, and home page properties are configured in the Application category in Project Properties. A splash screen for the application can also be configured on this panel. This screen is shown in Figure 3-37.
FIGURE 3-37 Application information
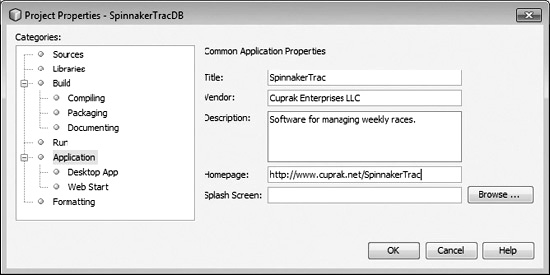
The Scenario & Solution solidifies your understanding of how the contents of a JNLP file are generated for a project when Java Web Start support is enabled.
Configuring the build to use a keystore with a signed certificate requires editing nbproject/private/private.properties and adding the following properties:

These properties can also be stored in nbproject/project.properties, but this isn’t a good solution because this file is checked into version control and thus would reveal the keystore/key password to others.
Selecting Run With Java Web Start in the Run category of Project Properties tests Java Web Start deployment. This setting is shown in Figure 3-38. This provides a quick and easy way to test deployment of the application locally.
FIGURE 3-38 Project Properties: Run With Java Web Start
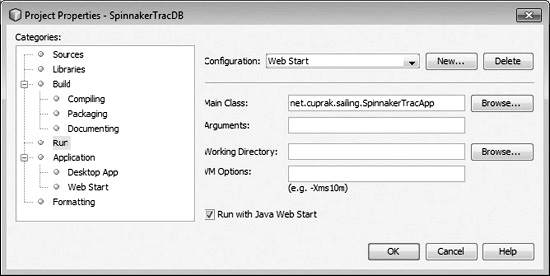
If you receive errors about mismatching certificates, check the JAR dependencies of the project. Some open source and commercial JAR libraries are signed. If this is the case, create a JNLP file for the library with a component descriptor.
Once the application is built, the contents of the dist directory can be uploaded to a server for others to run the application.
SCENARIO & SOLUTION
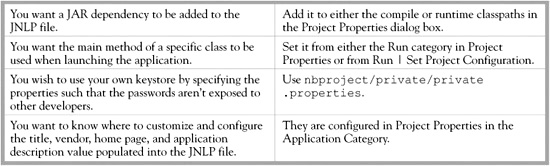
EXERCISE 3-7 Using Java Web Start
In this exercise, you create a Java SE project and run it using Java Web Start.
1. Create a new Java Desktop Application by choosing File | New Project | Java | Java Desktop Application. Click Next.
2. Give the project a name and choose Basic Application as the application shell. Enter a package and class name for the main class, for example, net.cuprak.sailing.SailTrackerApp. SailTrackerApp will contain Java’s main method. Click Finish.
3. Right-click the project name in the Projects window. Choose Properties to edit the project.
4. Under Application, select the Web Start category.
5. Select the Enable Web Start checkbox.
6. Click the Run category.
7. Select the Run With Java Web Start checkbox and choose Self-Signed.
8. Click OK to close the dialog box.
9. Choose Run | Run Main Project to launch the application using Java Web Start.
EXERCISE 3-8 Creating an Executable JAR
In this exercise, you run the Jmol application you created in the first two exercises by both double-clicking it and running it from the command line. Success in this exercise is contingent on having Java properly installed and configured on the PATH. Consult http://java.sun.com for more information.
1. Set the Main Class to org.openscience.jmol.app.Jmol via File | Project Properties | Run. Click OK to accept changes.
2. Build the project: Run | Build Project.
3. Copy the dist directory to another location on the computer or on another computer with Java installed, preferably the same or a new version of the JRE.
4. In the file browser, double-click the Jmol.jar file to run it.
5. To run Jmol from the command line, launch Cmd.exe via Run on Windows. Change to the dist directory. Run Jmol by typing java –jar Jmol.jar
CERTIFICATION SUMMARY
This chapter covered four topics related to Java SE and desktop application development using NetBeans. You are now able to:
![]() Create a new NetBeans project using existing sources.
Create a new NetBeans project using existing sources.
![]() Manage compilation and debugging classpaths of Java SE projects.
Manage compilation and debugging classpaths of Java SE projects.
![]() Create complex user interfaces using the NetBeans GUI Builder.
Create complex user interfaces using the NetBeans GUI Builder.
![]() Deploy applications either as a double-clickable JAR file or via Java Web Start.
Deploy applications either as a double-clickable JAR file or via Java Web Start.
The Project With Existing Sources template is very similar to the Java Free-Form Project discussed in Chapter 2. However, unlike the Java Free-Form Project, Java Project With Existing Sources is built with the NetBeans-provided build script. NetBeans also manages project dependencies.
Managing classpaths for compilation and debugging is a project management feature NetBeans supports for Java Standard Projects. Java Standard Projects use the NetBeans build scripts such as Java Project With Existing Sources. NetBeans partitions the libraries into compile, run, compile tests, and run tests classpaths. Libraries can be stored with a project or can be referenced by a variable or pulled from a NetBeans library.
The NetBeans GUI Builder is a powerful editor for rapidly building Swing or AWT user interfaces. It supports most of the layout managers. Items are dragged out from the palette and onto the screen. Component properties are edited in the Properties window. The Inspector window displays the Swing component hierarchy. Unlike other editors, it can bind controls to Java Beans. The NetBeans GUI Builder also stores all localizable items, such as text and colors, in resource bundles automatically.
The last section of this chapter covered the deployment of Java applications. NetBeans supports either double-clickable JAR files or Java Web Start. For double-clickable JAR files, compiled code as well as a project’s dependencies are copied to the dist directory. The dist directory can be zipped and transferred to another machine. The project’s JAR file can then be double-clicked or run from the command line. Java Web Start can be configured in Project Properties under the Web Start category. The application can be self-signed, not signed, or a valid certificate can be used. NetBeans takes care of creating the JNLP file.
 TWO-MINUTE DRILL
Creating Desktop Applications from Existing Sources
![]() Java Project With Existing Sources is a standard NetBeans project.
Java Project With Existing Sources is a standard NetBeans project.
![]() Standard NetBeans projects use the NetBeans-generated build script.
Standard NetBeans projects use the NetBeans-generated build script.
![]() Java Project With Existing Sources is one of two types of projects for creating a new NetBeans project from an existing code base; the other project type is the Java Free-Form Project.
Java Project With Existing Sources is one of two types of projects for creating a new NetBeans project from an existing code base; the other project type is the Java Free-Form Project.
![]() Specific files/directories can be included or excluded from the project.
Specific files/directories can be included or excluded from the project.
![]() A central directory for sharing libraries can be configured.
A central directory for sharing libraries can be configured.
![]() The New Project wizard does not configure the classpath; the classpath must be configured post–project creation.
The New Project wizard does not configure the classpath; the classpath must be configured post–project creation.
![]() The project directory does not necessarily have to contain the project sources.
The project directory does not necessarily have to contain the project sources.
Managing Classpaths for Compilation and Debugging
![]() Classpath can be configured by right-clicking the project and choosing Properties or by choosing File | Project Properties.
Classpath can be configured by right-clicking the project and choosing Properties or by choosing File | Project Properties.
![]() Classpath entries can be added in the Projects window by right-clicking the Libraries node.
Classpath entries can be added in the Projects window by right-clicking the Libraries node.
![]() Classpath entries can include references to other projects, JAR folders, or libraries.
Classpath entries can include references to other projects, JAR folders, or libraries.
![]() The run classpath inherits from the compile classpath.
The run classpath inherits from the compile classpath.
![]() Interfaces belong on the compile classpath.
Interfaces belong on the compile classpath.
![]() Interface implementations belong on the runtime classpath.
Interface implementations belong on the runtime classpath.
![]() The four classpaths for a Java SE project are compile, run, compile tests, and run tests.
The four classpaths for a Java SE project are compile, run, compile tests, and run tests.
![]() Dependencies can be added to a project by using Relative, Absolute, or Path Variables, or can be copied to a library directory.
Dependencies can be added to a project by using Relative, Absolute, or Path Variables, or can be copied to a library directory.
![]() Path variables are used to abstract the path.
Path variables are used to abstract the path.
![]() Java EE and Java Web projects lack a runtime classpath.
Java EE and Java Web projects lack a runtime classpath.
![]() Java SE projects are pre-populated with library dependencies.
Java SE projects are pre-populated with library dependencies.
![]() The Free-Form web project has only one classpath for supporting the Java editor (code completion, syntax checking, and so on).
The Free-Form web project has only one classpath for supporting the Java editor (code completion, syntax checking, and so on).
![]() Multiple source and test roots can be configured for the project.
Multiple source and test roots can be configured for the project.
Creating Forms with the GUI Builder
![]() The NetBeans GUI Builder has four windows: Editor, Inspector, Palette, and Properties.
The NetBeans GUI Builder has four windows: Editor, Inspector, Palette, and Properties.
![]() Components are dragged from the Palette window onto the main Editor window.
Components are dragged from the Palette window onto the main Editor window.
![]() Properties for components including binding expressions, events, and custom code are managed on the Properties window.
Properties for components including binding expressions, events, and custom code are managed on the Properties window.
![]() New forms are created by choosing File | New File and selecting a form under Swing GUI Forms or AWT GUI Forms.
New forms are created by choosing File | New File and selecting a form under Swing GUI Forms or AWT GUI Forms.
![]() The NetBeans GUI Builder only works for forms created by NetBeans.
The NetBeans GUI Builder only works for forms created by NetBeans.
![]() The NetBeans GUI Builder supports the following layouts: Free Design, Absolute, Border, Box, Card, Flow, GridBag, Grid, and Null.
The NetBeans GUI Builder supports the following layouts: Free Design, Absolute, Border, Box, Card, Flow, GridBag, Grid, and Null.
![]() The Free Design layout is the default layout for new forms.
The Free Design layout is the default layout for new forms.
![]() NetBeans GUI Editor opens in the Design mode for a new form.
NetBeans GUI Editor opens in the Design mode for a new form.
![]() The Free Design layout is javax.swing.GroupLayout that was added in Java SE 6.
The Free Design layout is javax.swing.GroupLayout that was added in Java SE 6.
![]() The Swing Layout Extensions Library is required for projects targeting pre–Java 6 environments. Depending upon configuration, NetBeans will add this library. This library includes the JAR file swing-layout-1.0.4.jar.
The Swing Layout Extensions Library is required for projects targeting pre–Java 6 environments. Depending upon configuration, NetBeans will add this library. This library includes the JAR file swing-layout-1.0.4.jar.
![]() When using the Free Design layout, the toolbar icons for alignment and resizing become enabled.
When using the Free Design layout, the toolbar icons for alignment and resizing become enabled.
![]() For the Free Design layout, NetBeans provides the following guides: Baseline, Edge, Indentation, Inset, and Offset.
For the Free Design layout, NetBeans provides the following guides: Baseline, Edge, Indentation, Inset, and Offset.
![]() For the Free Design layout, anchors are represented by half-circles and show which components are bound to other components and container edges.
For the Free Design layout, anchors are represented by half-circles and show which components are bound to other components and container edges.
![]() GridBagLayout Customizer is used to graphically manipulate GridBagConstraints for a container.
GridBagLayout Customizer is used to graphically manipulate GridBagConstraints for a container.
![]() GridBagLayout Customizer is displayed by right-clicking and choosing Customize Layout.
GridBagLayout Customizer is displayed by right-clicking and choosing Customize Layout.
![]() NetBeans populates a form in the initComponent method of a form.
NetBeans populates a form in the initComponent method of a form.
![]() NetBeans GUI Builder–generated code cannot be edited.
NetBeans GUI Builder–generated code cannot be edited.
![]() Practically all aspects of the generated code can be customized including creation, pre-creation, post-creation, pre-init, post-init, post-listeners, pre-adding, post-adding, after-all-set, pre-declaration, and post-declaration.
Practically all aspects of the generated code can be customized including creation, pre-creation, post-creation, pre-init, post-init, post-listeners, pre-adding, post-adding, after-all-set, pre-declaration, and post-declaration.
![]() NetBeans can generate event listeners. Event listeners can be created using the Events tab in the Properties window or by right-clicking a component and choosing Event.
NetBeans can generate event listeners. Event listeners can be created using the Events tab in the Properties window or by right-clicking a component and choosing Event.
![]() Beans Binding, JSR 295, is used for binding components to other components and also to the data model.
Beans Binding, JSR 295, is used for binding components to other components and also to the data model.
![]() NetBeans automatically adds beansbinding-1.2.1.jar to a project the first time that property is bound in a form.
NetBeans automatically adds beansbinding-1.2.1.jar to a project the first time that property is bound in a form.
![]() To bind one component to another component, switch to the Connection mode and select two components. An editor then appears for configuring the binding.
To bind one component to another component, switch to the Connection mode and select two components. An editor then appears for configuring the binding.
![]() For a bean to work with Beans Binding, the bean should fire PropertyChangeEvents.
For a bean to work with Beans Binding, the bean should fire PropertyChangeEvents.
![]() A bean can be added to a form by dragging it from the Projects window onto the NetBeans GUI Builder editor. The bean must be compiled before this is done.
A bean can be added to a form by dragging it from the Projects window onto the NetBeans GUI Builder editor. The bean must be compiled before this is done.
![]() NetBeans automatically stores all text, fonts, colors, and graphics in resource bundles.
NetBeans automatically stores all text, fonts, colors, and graphics in resource bundles.
![]() By default, a resource bundle is created for each form.
By default, a resource bundle is created for each form.
Packaging and Distributing Java Desktop Projects
![]() Java desktop projects can be distributed as either a zip archive containing an executable JAR file or via Java Web Start.
Java desktop projects can be distributed as either a zip archive containing an executable JAR file or via Java Web Start.
![]() The dist directory can be zipped up and copied to another machine. Double-clicking the project’s JAR file under dist or invoking it from the command line via java –jar <project JAR> launches the application.
The dist directory can be zipped up and copied to another machine. Double-clicking the project’s JAR file under dist or invoking it from the command line via java –jar <project JAR> launches the application.
![]() The application’s runtime classpath is copied into dist/lib.
The application’s runtime classpath is copied into dist/lib.
![]() NetBeans automatically populates the MANIFEST.MF file with the Main-Class and Class-Path properties.
NetBeans automatically populates the MANIFEST.MF file with the Main-Class and Class-Path properties.
![]() To enable Java Web Start, choose File | Project Properties | Web Start. Select Enable Java Web Start.
To enable Java Web Start, choose File | Project Properties | Web Start. Select Enable Java Web Start.
![]() The main class for both Java Web Start and the project’s manifest is pulled from the current Run Configuration.
The main class for both Java Web Start and the project’s manifest is pulled from the current Run Configuration.
![]() The Run Configuration is set in Project Properties in the Run category. It can also be set via Run | Set Project Configuration.
The Run Configuration is set in Project Properties in the Run category. It can also be set via Run | Set Project Configuration.
![]() To specify the certificate to be used to sign the JARs, properties (discussed in the chapter) must be added in either private.properties or project.properties.
To specify the certificate to be used to sign the JARs, properties (discussed in the chapter) must be added in either private.properties or project.properties.
![]() To run a project using Java Web Start, on the Run category in Project Properties choose Run With Java Web Start.
To run a project using Java Web Start, on the Run category in Project Properties choose Run With Java Web Start.
![]() The files master-application.jnlp and preview-application.html are used to generate launch.jnlp and launch.html in the dist directory.
The files master-application.jnlp and preview-application.html are used to generate launch.jnlp and launch.html in the dist directory.
SELF TEST
The following questions will help you measure your understanding of the material presented in this chapter. Read all the choices carefully because there might be more than one correct answer. Choose all correct answers for each question.
Creating Desktop Applications from Existing Sources
1. With respect to the Java Project With Existing Sources template, which statement is false?
A. NetBeans prompts for the existing Ant script that will be used to build the project.
B. The project directory does not have to contain the project sources.
C. Specific classes/files can be excluded from the project.
D. The name of the build script can be selected.
2. Which pattern is invalid and will not include any files?
A. /**
B. **/*.properties
C. *.java
D. org/junit
3. True or False? Java Project With Existing Sources can contain multiple source directories?
A. True
B. False
4. What project setting is not configured in the Java Project With Existing Sources wizard step?
A. Build script name
B. Source directory(s)
C. Path exclusions
D. Classpath
Managing Classpaths for Compilation and Debugging
5. Which of the following is not a Java SE classpath type?
A. Compile
B. Run
C. Debug
D. Compile tests
6. Right-clicking the Libraries node of a project in the Projects window and choosing Add Project will add a project dependency. To what classpath will this dependency be added?
A. Compile
B. Runtime
C. Compile tests
D. Run tests
7. You have three projects, A, B, and C. Project A depends upon B, and B depends upon C. Project A does not use any of the APIs or classes in C. What should the compile and runtime classpath of Project A look like?
A. Compile A; Runtime B
B. Compile B; Runtime C
C. Compile B; Runtime A
D. Compile B
E. Compile A
8. A developer is going to check a project into a version control system that will be shared by all the members of the team. The team stores all JAR libraries in a central version control repository so that the artifacts can be used by multiple projects. Each developer checks this artifact repository out and into a separate location on his or her machine. How should the paths to the dependencies be specified?
A. Relative path
B. Absolute path
C. Variable
D. Configure a libraries folder
Creating Forms with the GUI Builder
9. Which of the following layouts is not supported by NetBeans?
A. Group Layout
B. Free Design
C. Card Layout
D. Spring Layout
10. When creating a new form, in what mode does the form initially open?
A. Source mode
B. Design mode
C. Connection mode
D. Preview
11. An existing form is modified with a new constructor that takes additional parameters. However, when this constructor is first used, the form appears blank. What method should be invoked from the constructor so that the form is populated?
A. initComponents()
B. super()
C. doLayout()
D. repaint()
E. pack()
12. A JTextField and a JLabel are being placed on the same line in a form using the Free Design layout. Which guides should be used to align them?
A. Inset
B. Offset
C. Baseline
D. A and B
E. B and C
13. True or False? An existing application is imported into NetBeans using the Java Project With Existing Sources wizard. The application has an existing Swing GUI. This GUI can be edited with the NetBeans GUI Builder.
A. True
B. False
Packaging and Distributing Java Desktop Projects
14. For a Java SE application, which of the following distribution methods does NetBeans support?
A. Executable JAR
B. Java Web Start
C. WAR
D. EAR
E. Choices A and B
15. The contents of which directory are zipped up for distribution?
A. lib
B. bin
C. build
D. dist
16. How is Java Web Start distribution enabled for a Java SE project within NetBeans?
A. Select Enable Java Web Start under the Web Start category in Project Properties.
B. Select Deploy Using Java Web Start under the Packaging category in Project Properties.
C. Java SE projects are deployed using Java Web Start by default.
D. Select Deploy Using Java Web Start under the Run category in Project Properties.
17. NetBeans copies and performs substitutions on which files for Java Web Start?
A. launch.jnlp and launch.html
B. master-application.jnlp and preview-application.html
C. launch.jnlp and preview-application.html
D. master-application.jnlp and launch.html
SELF TEST ANSWERS
Creating Desktop Applications from Existing Sources
1. With respect to the Java Project With Existing Sources template, which statement is false?
A. NetBeans prompts for the existing Ant script that will be used to build the project.
B. The project directory does not have to contain the project sources.
C. Specific classes/files can be excluded from the project.
D. The name of the build script can be selected.
![]() A. Java Project With Existing Sources prompts for the name of the build script; however, the build script is created by NetBeans. Free-form projects prompt for an existing build script.
A. Java Project With Existing Sources prompts for the name of the build script; however, the build script is created by NetBeans. Free-form projects prompt for an existing build script.
![]() B, C, and D are incorrect. B is incorrect because the project directory does not have to contain the project sources. A directory anywhere else on the machine can be chosen. C is incorrect because files can be included or excluded. D is incorrect because the name of the build script can be selected.
B, C, and D are incorrect. B is incorrect because the project directory does not have to contain the project sources. A directory anywhere else on the machine can be chosen. C is incorrect because files can be included or excluded. D is incorrect because the name of the build script can be selected.
2. Which pattern is invalid and will not include any files?
A. /**
B. **/*.properties
C. *.java
D. org/junit
![]() A. The pattern /** will not produce any match. Patterns do not start with a slash.
A. The pattern /** will not produce any match. Patterns do not start with a slash.
![]() B, C, D are incorrect. B is incorrect because **/*.properties will match all properties files. C is incorrect because all files with the .java extension in the root directory will be matched. D is incorrect because files under org/junit will be matched.
B, C, D are incorrect. B is incorrect because **/*.properties will match all properties files. C is incorrect because all files with the .java extension in the root directory will be matched. D is incorrect because files under org/junit will be matched.
3. True or False? Java Project With Existing Sources can contain multiple source directories?
A. True
B. False
![]() True. A project can contain multiple source roots.
True. A project can contain multiple source roots.
4. What project setting is not configured in the Java Project With Existing Sources wizard step?
A. Build script name
B. Source directory(s)
D. Classpath
![]() D. The classpath is not configured in the wizard.
D. The classpath is not configured in the wizard.
![]() A, B, and C are incorrect. A is incorrect because the “Build script name” is configured in this step. B is incorrect because the “Source directory(s)” are configured in this set. C is incorrect because “Path exclusions” are configured in this step.
A, B, and C are incorrect. A is incorrect because the “Build script name” is configured in this step. B is incorrect because the “Source directory(s)” are configured in this set. C is incorrect because “Path exclusions” are configured in this step.
Managing Classpaths for Compilation and Debugging
5. Which of the following is not a Java SE classpath type?
A. Compile
B. Run
C. Debug
D. Compile tests
![]() C. There is no debug classpath.
C. There is no debug classpath.
![]() A, B, and D are incorrect. A is incorrect because compile is a Java SE classpath. B is incorrect because run is a Java SE classpath. D is incorrect because compile tests is a Java SE classpath.
A, B, and D are incorrect. A is incorrect because compile is a Java SE classpath. B is incorrect because run is a Java SE classpath. D is incorrect because compile tests is a Java SE classpath.
6. Right-clicking the Libraries node of a project in the Projects window and choosing Add Project will add a project dependency. To what classpath will this dependency be added?
A. Compile
B. Runtime
C. Compile tests
D. Run tests
![]() A. Dependencies added via the context menu are appended to the compile classpath.
A. Dependencies added via the context menu are appended to the compile classpath.
![]() B, C, and D are incorrect. B is incorrect because the project dependency will not be added to the runtime classpath. C is incorrect because the project will not be added to the compile tests classpath. D is incorrect because the project dependency will not be added to the run tests classpath.
B, C, and D are incorrect. B is incorrect because the project dependency will not be added to the runtime classpath. C is incorrect because the project will not be added to the compile tests classpath. D is incorrect because the project dependency will not be added to the run tests classpath.
7. You have three projects, A, B, and C. Project A depends upon B, and B depends upon C. Project A does not use any of the APIs or classes in C. What should the compile and runtime classpath of Project A look like?
A. Compile A; Runtime B
B. Compile B; Runtime C
C. Compile B; Runtime A
D. Compile B
E. Compile A
![]() B. Project B is required for compiling while Project B requires Project C at runtime.
B. Project B is required for compiling while Project B requires Project C at runtime.
![]() A, C, and D are incorrect. A is incorrect because Project B needs to be on the compile classpath, and having it on the runtime classpath won’t allow the compiler to resolve Project A’s dependencies on Project B. C is incorrect because Project C needs to be on the runtime classpath. D is incorrect because Project C is required on the runtime classpath. E is incorrect because neither Project B nor Project C is added as a dependency.
A, C, and D are incorrect. A is incorrect because Project B needs to be on the compile classpath, and having it on the runtime classpath won’t allow the compiler to resolve Project A’s dependencies on Project B. C is incorrect because Project C needs to be on the runtime classpath. D is incorrect because Project C is required on the runtime classpath. E is incorrect because neither Project B nor Project C is added as a dependency.
8. A developer is going to check a project into a version control system that will be shared by all the members of the team. The team stores all JAR libraries in a central version control repository so that the artifacts can be used by multiple projects. Each developer checks this artifact repository out and into a separate location on his or her machine. How should the paths to the dependencies be specified?
A. Relative path
B. Absolute path
C. Variable
D. Configure a libraries folder
![]() C. A variable, defined in Tools | Variables, would allow the team to checkout the external libraries anywhere on their computer.
C. A variable, defined in Tools | Variables, would allow the team to checkout the external libraries anywhere on their computer.
![]() A, B, and D are incorrect. A is incorrect because developers can checkout the external dependencies to any location on their computer. Relative paths would not work in this situation. B is incorrect because absolute paths are computer specific. D is incorrect because the libraries are centrally stored, and a libraries folder would have the same problem as a relative path.
A, B, and D are incorrect. A is incorrect because developers can checkout the external dependencies to any location on their computer. Relative paths would not work in this situation. B is incorrect because absolute paths are computer specific. D is incorrect because the libraries are centrally stored, and a libraries folder would have the same problem as a relative path.
Creating Forms with the GUI Builder
9. Which of the following layouts is not supported by NetBeans?
A. Group Layout
B. Free Design
C. Card Layout
D. Spring Layout
![]() D. Spring Layout is not supported by NetBeans.
D. Spring Layout is not supported by NetBeans.
![]() A, B, and C are incorrect. A is incorrect because NetBeans supports Group Layout. B is incorrect because NetBeans supports Free Design. C is incorrect because NetBeans supports Card Layout.
A, B, and C are incorrect. A is incorrect because NetBeans supports Group Layout. B is incorrect because NetBeans supports Free Design. C is incorrect because NetBeans supports Card Layout.
10. When creating a new form, in what mode does the form initially open?
A. Source mode
B. Design mode
C. Connection mode
D. Preview
![]() B. The editor opens in Design mode, enabling you to immediately begin populating the form.
B. The editor opens in Design mode, enabling you to immediately begin populating the form.
![]() A, C, and D are incorrect. A is incorrect because the editor opens in Design mode. C is incorrect because Select mode is the default for the cursor. D is incorrect because Preview is not a mode, and thus the editor does not open in it.
A, C, and D are incorrect. A is incorrect because the editor opens in Design mode. C is incorrect because Select mode is the default for the cursor. D is incorrect because Preview is not a mode, and thus the editor does not open in it.
11. An existing form is modified with a new constructor that takes additional parameters. However, when this constructor is first used, the form appears blank. What method should be invoked from the constructor so that the form is populated?
A. initComponents()
B. super()
C. doLayout()
D. repaint()
E. pack()
![]() A. The initComponents method does the actual work of creating the user interface.
A. The initComponents method does the actual work of creating the user interface.
![]() B, C, D, and E are incorrect. B is incorrect because a constructor of the super class does not call initComponents. C is incorrect because doLayout is a Swing method involved in the component layout. D is incorrect because repaint causes the screen to redraw. E is incorrect because pack() positions and sizes components already added.
B, C, D, and E are incorrect. B is incorrect because a constructor of the super class does not call initComponents. C is incorrect because doLayout is a Swing method involved in the component layout. D is incorrect because repaint causes the screen to redraw. E is incorrect because pack() positions and sizes components already added.
12. A JTextField and a JLabel are being placed on the same line in a form using the Free Design layout. Which guides should be used to align them?
A. Inset
B. Offset
C. Baseline
D. A and B
E. B and C
![]() E. is correct. An offset would help ensure that the components are properly spaced, and a baseline would ensure that the text baselines match.
E. is correct. An offset would help ensure that the components are properly spaced, and a baseline would ensure that the text baselines match.
![]() A, B, C, and D are incorrect. A is incorrect because insets are for spacing a component within its parent container. B is incorrect because you would also use a baseline. C is incorrect because you would also use an offset. D is incorrect because you would not use an inset.
A, B, C, and D are incorrect. A is incorrect because insets are for spacing a component within its parent container. B is incorrect because you would also use a baseline. C is incorrect because you would also use an offset. D is incorrect because you would not use an inset.
13. True or False? An existing application is imported into NetBeans using the Java Project With Existing Sources wizard. The application has an existing Swing GUI. This GUI can be edited with the NetBeans GUI Builder.
A. True
B. False
![]() False. NetBeans generates the source code to render a user interface. It cannot reverse-engineer code with an unknown structure.
False. NetBeans generates the source code to render a user interface. It cannot reverse-engineer code with an unknown structure.
Packaging and Distributing Java Desktop Projects
14. For a Java SE application, which of the following distribution methods does NetBeans support?
A. Executable JAR
B. Java Web Start
C. WAR
D. EAR
E. Choices A and B
![]() E. NetBeans support generates an executable JAR file and also the artifacts required for Java Web Start.
E. NetBeans support generates an executable JAR file and also the artifacts required for Java Web Start.
![]() A, B, C, and D are incorrect. A is incorrect because NetBeans also generates artifacts for Java Web Start. B is incorrect because NetBeans also generates artifacts for an executable JAR file. C is incorrect because NetBeans does not build a WAR file for a Java SE application. D is incorrect because NetBeans does not build an EAR file for a Java SE application.
A, B, C, and D are incorrect. A is incorrect because NetBeans also generates artifacts for Java Web Start. B is incorrect because NetBeans also generates artifacts for an executable JAR file. C is incorrect because NetBeans does not build a WAR file for a Java SE application. D is incorrect because NetBeans does not build an EAR file for a Java SE application.
15. The contents of which directory are zipped up for distribution?
A. lib
B. bin
C. build
D. dist
![]() D. The dist directory contains the generated project JAR file and also the external library dependencies.
D. The dist directory contains the generated project JAR file and also the external library dependencies.
![]() A, B, and C are incorrect. A is incorrect because the lib directory, under dist, only contains the external library dependencies and not the compiled code for the project. B is incorrect because there is no bin directory. C is incorrect because build contains only the compile code for the project.
A, B, and C are incorrect. A is incorrect because the lib directory, under dist, only contains the external library dependencies and not the compiled code for the project. B is incorrect because there is no bin directory. C is incorrect because build contains only the compile code for the project.
16. How is Java Web Start distribution enabled for a Java SE project within NetBeans?
A. Select Enable Java Web Start under the Web Start category in Project Properties.
B. Select Deploy Using Java Web Start under the Packaging category in Project Properties.
C. Java SE projects are deployed using Java Web Start by default.
D. Select Deploy Using Java Web Start under the Run category in Project Properties.
![]() A. Java Web Start is enabled on the Web Start panel in Project Properties.
A. Java Web Start is enabled on the Web Start panel in Project Properties.
![]() B, C, and D are incorrect. B is incorrect because there is no such setting in the Package category of Project Properties. C is incorrect because Java Web Start is not the default deployment strategy. D is incorrect because the Run category has a Run With Java Web Start checkbox that is used for testing and using Java Web Start from the IDE.
B, C, and D are incorrect. B is incorrect because there is no such setting in the Package category of Project Properties. C is incorrect because Java Web Start is not the default deployment strategy. D is incorrect because the Run category has a Run With Java Web Start checkbox that is used for testing and using Java Web Start from the IDE.
17. NetBeans copies and performs substitutions on which files for Java Web Start?
A. launch.jnlp and launch.html
B. master-application.jnlp and preview-application.html
C. launch.jnlp and preview-application.html
D. master-application.jnlp and launch.html
![]() B. These are the template files used to generate launch.jnlp and launch.html.
B. These are the template files used to generate launch.jnlp and launch.html.
![]() A, C, and D are incorrect. A is incorrect because these are the output files. C is incorrect because preview-application.html is an output file. D is incorrect because launch.html is an output file.
A, C, and D are incorrect. A is incorrect because these are the output files. C is incorrect because preview-application.html is an output file. D is incorrect because launch.html is an output file.