
7
Refactoring Support
CERTIFICATION OBJECTIVES
Q&A Self Test
The NetBeans Refactoring module supports the performance of high-level code transformations. These transformations, better known as refactoring processes, change the internal structure of the code without changing its external behavior. Refactoring improves the quality of your software product without changing its functionality.
There are many reasons for refactoring code. Refactoring is the process of reorganizing, renaming, and restructuring code so that the code is easier to read and maintain. It is an integral part of day-to-day development activities. Refactoring does not change functionality or features. It is important to note that while automated refactoring features of code development environments are popular, they sometimes impart undesirable changes that can change the existing code functionality; care and caution must be practiced when using these tools.
Examples of refactoring include renaming classes or fields, encapsulating fields, and changing method signatures. Periodic refactoring is important for the long-term health and viability of any project. The benefits of refactoring are listed in Figure 7-1.
FIGURE 7-1 The benefits of refactoring
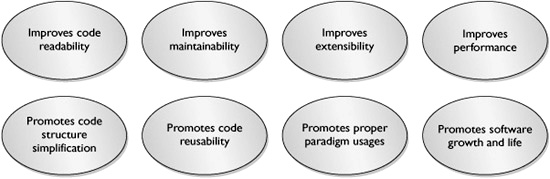
Consider showing Figure 7-1 to your boss and/or coworkers to spark a discussion on adopting periodic refactoring activities. Couple this with reports from software quality tools, and it’ll be a quick sell.
The importance and popularity of refactoring has been recognized for some time now and has been captured in many books and websites. One such book is Refactoring: Improving the Design of Existing Code, by Martin Fowler et al (Addison Wesley, 1999). Author Martin Fowler also hosts a website on refactoring: http://www.refactoring.com. Both his website and book contain a catalog of common refactorings. The catalog is periodically updated on his website: http://refactoring.com/catalog/. Many of the detailed refactorings have been adopted by today’s IDEs such as IntelliJ IDEA, Eclipse IDE, JDeveloper IDE, and the NetBeans IDE. Danny Dig also maintains a refactoring-related website (http://refactoring.info) with an emphasis on providing links to workshops, articles, and papers on refactoring.
The exam focuses on how to use the different refactorings provided by the NetBeans IDE. Therefore, this chapter discusses the basic refactoring architecture applied by NetBeans and the IDE’s refactoring commands, how to configure the processes, and how to invoke them.
NetBeans Refactoring Architecture
NetBeans architecture supports a Refactoring API on which the Refactoring module has been implemented. The API can be referenced at the NetBeans API website covering Javadoc documentation on all NetBeans APIs: http://bits.netbeans.org/dev/javadoc/. You may find this link beneficial if you are interested in contributing and improving the module, or if you are just interested in seeing the underpinnings of the API.
Remember that refactoring does not change the functionality of the code, improve performance, or fix bugs (for example, threading issues). The process does not improve system qualities such as flexibility, security, capacity, or availability. Refactoring simply improves the structure of the code. And as you’ve seen in the introduction and will now see in detailed examples, refactoring is an important part of the development process.
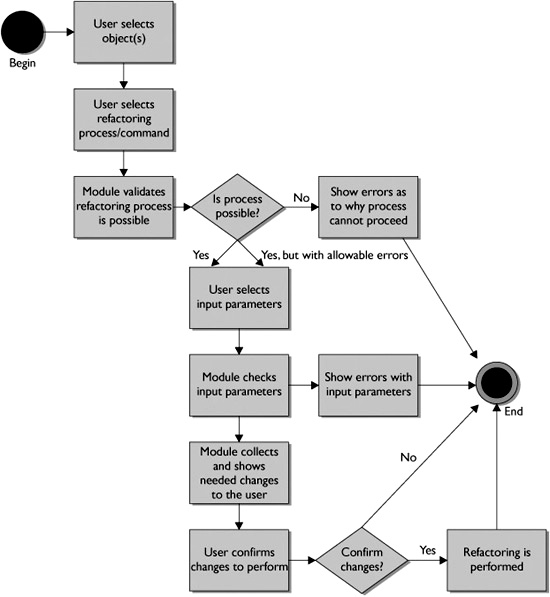
All the refactoring operations are consistent throughout the IDE for each Java element. A series of selections and validations must occur before a refactoring operation is performed. Figure 7-2 details the general flow of a NetBeans IDE refactoring process.
FIGURE 7-2 Basic NetBeans refactoring process flow
EXERCISE 7-1 Understanding the NetBeans Refactoring Process
Each refactoring process follows the same primary flow. In this exercise, you map a NetBeans refactoring with the basic flow.
1. Review and become familiar with Figure 7-2, which shows the basic NetBeans refactoring process flow.
2. Choose any NetBeans refactoring process/command (for example, Rename or Safely Delete).
3. Create a new flow control diagram based on your selected refactoring command and on the basic refactoring process outline provided in Figure 7-2.
CERTIFICATION OBJECTIVE: Refactoring Source Code
Exam Objective 5.1 Describe the purpose and uses of refactoring and demonstrate the ability to perform basic refactoring on Java source code.
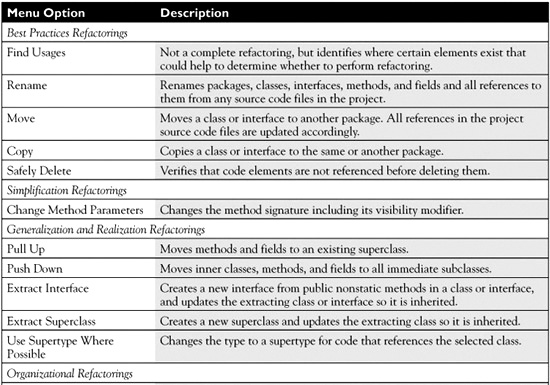
NetBeans IDE refactorings are logically grouped into five categories represented in Table 7-1. The refactoring categories are best practices, simplification, generalization, organizational, and management. Thinking in terms of these categories helps you create a mental map of the operations. These groupings are repeated throughout this chapter to help you memorize the refactorings. These groupings are not standards; they were designed specifically for use in this book.
TABLE 7-1 Refactoring Descriptions
The main refactorings that the IDE supports are structured around key Java elements including packages, classes, interfaces, methods, fields, and inner classes. Table 7-2 shows you what you can do in regard to refactoring with each element.
The information in Table 7-2 is explored further in the Scenario & Solution.
TABLE 7-2 Refactorings and Java Elements


We shall now explore (with the exam-targeted version of NetBeans, 6.1) each refactoring as detailed in Table 7-1 and Table 7-2. We look at each refactoring within the following categorized sections:
![]() Best Practices Refactorings
Best Practices Refactorings
![]() Simplification Refactorings
Simplification Refactorings
![]() Generalization and Realization Refactorings
Generalization and Realization Refactorings
![]() Organizational Refactorings
Organizational Refactorings
![]() Refactoring Management
Refactoring Management
Best Practices Refactorings
Proper packaging, application of naming conventions, and clearance of unused code are all examples of best practices when it comes to coding software applications. Basic refactorings such as Rename, Move, and Safely Delete directly support these operations. You may find yourself turning to these features when you inherit code that has not met best practices. Consider reviewing The Elements of Java Style by Rogue Wave Software (Cambridge University Press, 2000) for more details of proper Java style and practices. This section explores the following refactoring commands to ensure the use and adoption of best practices:
![]() Find Usages
Find Usages
![]() Rename
Rename
![]() Copy
Copy
![]() Safely Delete
Safely Delete
Find Usages
The Find Usages command does not perform refactoring. Instead it can be used as a research tool to see if refactoring is needed. Have you inherited Java code where several instance variables have been misspelled or have used camel case and underscores interchangeably? Or you might have run into code that extensively uses public variables. This may also make you cringe, wondering what other surprises await in lieu of best practices. The Find Usages command could come to your rescue to quickly expose where these misnamed variables are used.
Many developers use the Find Usages command when trying to understand how an application has been constructed. In Figure 7-3, the Find Usages dialog box is used to find all usages of the class Rockfish. The Search In Comments checkbox displays any comments where the string is represented. You may also decide to find only usages based on all or direct subtypes. The scope of the search can be one or all projects.
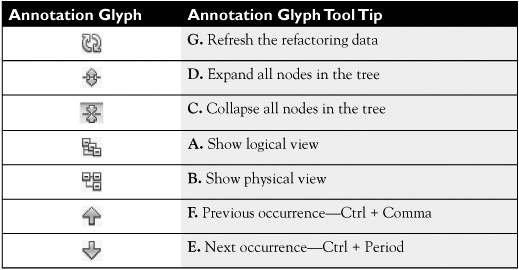
After the user selects the Find button from the Find Usages dialog box, the search is performed, and all usages are displayed in the Usages window, as shown in Figure 7-4. Let’s first look at the glyph gutter on the left. These icons are shared by the Refactoring window that we will cover later. The turning arrows update the data. The facing-arrows glyph expands and collapses all of the nodes in the tree. The next two glyphs show the logical and physical views, respectively. The up arrow glyph moves the selection to the previous occurrence. The down arrow moves the selection to the next occurrence.
FIGURE 7-3 Find Usages dialog box
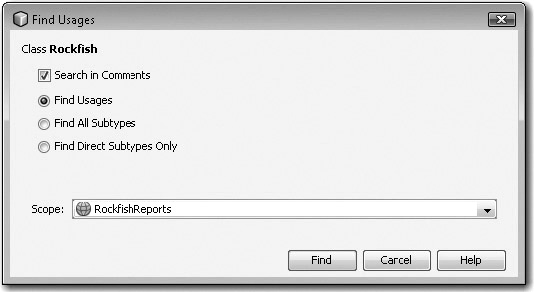
FIGURE 7-4 Usages window within the project
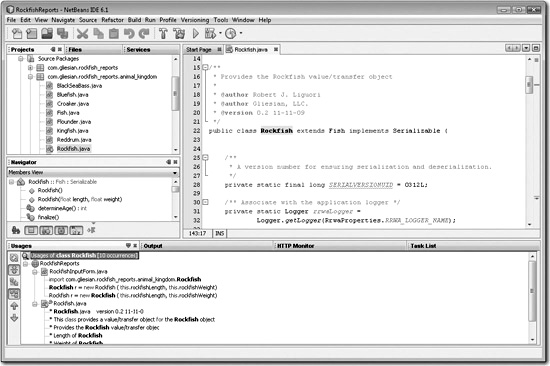
The body of the Usages window shows all of the usages of the selected elements. Among other things, elements that can be searched include packages, classes, methods, and fields.
Rename
The Rename refactoring command has the ability to rename packages, classes, interfaces, methods, and fields as well as all references to them in the source code and associated comments. You can use several ways to get to the refactoring dialog box, but the most commonly used is pressing CTRL-R after selecting the desired element to refactor. The Rename dialog box, as shown in Figure 7-5, provides a means to define the newly desired name. The dialog box only appears for public members. Private members are edited in place.
FIGURE 7-5 Rename Class refactoring dialog box
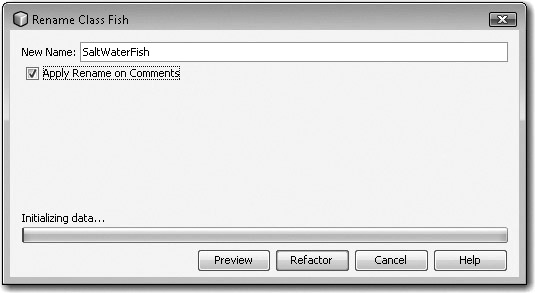
All refactoring of public entities allows you to preview the change first by selecting the Preview dialog box in the initial refactoring dialog box. Figure 7-6 shows all occurrences of changes that occur if the class name Fish is changed to SaltWaterFish. The second and third sections detail the changes by providing a diff of the files. The glyph gutter and refactoring usages list are very similar to those provided with the Find Usages command. The Do Refactoring button moves forward with the refactoring. The Cancel button terminates the refactoring.

Software quality tools such as FindBugs, Checkstyle, and PMD expose many coding deficiencies that can be improved upon through refactoring. Poorly named fields and absent encapsulation are just a couple of items that can be identified. All three of these tools can be incorporated into the IDE via plugins obtained through the online NetBeans Plugin Portal.
FIGURE 7-6 Refactoring window within the project

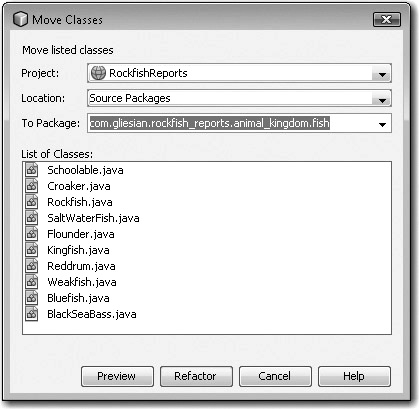
Move
The Move refactoring command allows the developer to move classes or interfaces from one package to another. For example, Figure 7-7 represents the desired move within a UML diagram.
Here, we wish to move all classes and interfaces except the Tagable.java and package.html files. To do so, the files can be selected and the Move refactoring menu option can be invoked upon them, or the files can be selected and dragged into the desired package. Either way, the Move Classes dialog box is opened, as shown in Figure 7-8. But how the moving is done produces different results. When moving the files by dragging to a new location in the Projects window, the checkbox option Move Without Refactoring also appears in the same Move refactoring dialog box. If this option is selected, source code references will not be updated.
FIGURE 7-7 Move refactoring represented with UML
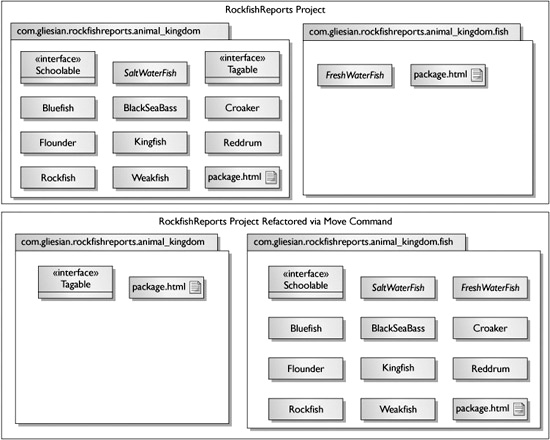
FIGURE 7-8 Move refactoring dialog box
Copy
The copy refactoring copies classes or interfaces either within or between packages, directories or projects. When you copy locally, the filename, class name, constructors, and related elements are updated. When you copy to another package, the same changes are made, but you have the option to keep the same name. Figure 7-9 shows a Copy dialog box where one class is copied from the com.gliesian.rockfish_reports.animal_kingdom.fish package within the Rockfish Reports web project to the com.gliesian.fish_migration_simulator.fish package within the FishMigrationSimulator project.
Many refactoring operations also apply to other source code files such as HTML pages, JavaServer Pages, properties files, and XML files.
Safely Delete
Safely Delete checks for references prior to deleting the file. Most developers have come across code they were pretty certain wasn’t used anymore. They would yank out the code and recompile only to find that it was indeed still used in other files. Safely Delete fixes this problem by taking out the guesswork in just a couple of clicks.
FIGURE 7-9 Copy refactoring dialog box
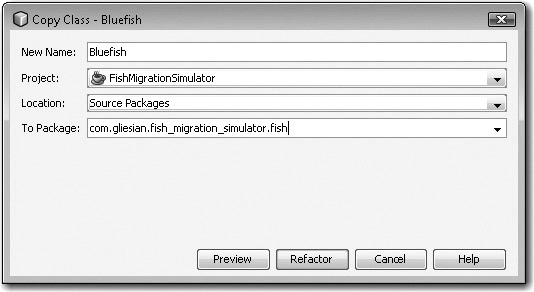
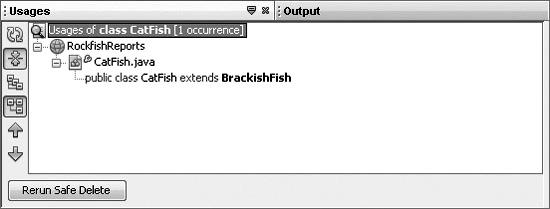
Figure 7-10 shows a very basic inheritance pattern where the class CatFish extends the abstract class BrackishFish. If the developer deletes BrackishFish, the code breaks because CatFish depends on it.
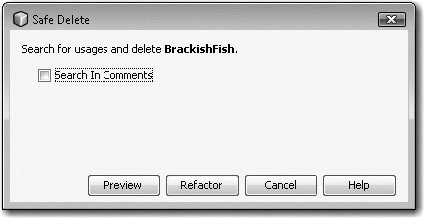
Let’s assume our project has several classes representing fish, and at first glance they look like they may be inheriting only from SaltWaterFish and FreshWaterFish, so we could get rid of BrackishFish. Let’s not make this assumption; instead perform a Safely Delete check on BrackishFish. In the dialog box shown in Figure 7-11 we would click Preview to view any potential dependencies.
FIGURE 7-10 Inheritance shown with UML
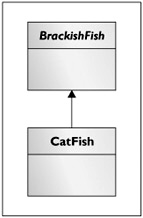
FIGURE 7-11 Safe Delete refactoring dialog box
As you can see in Figure 7-12, there were dependencies, so they came back as errors. NetBeans allows the user to perform refactorings with warnings, but not with errors. Your next step would be to click the Show Usages button to view the dependencies.
The Usages window in Figure 7-13 that appears after you select Show Usages in the Safe Delete dialog box shows the warning and errors. The window also provides a Rerun Safe Delete button that can be clicked after you perform additional changes to your project.
FIGURE 7-12 Safe Delete error and warning dialog box
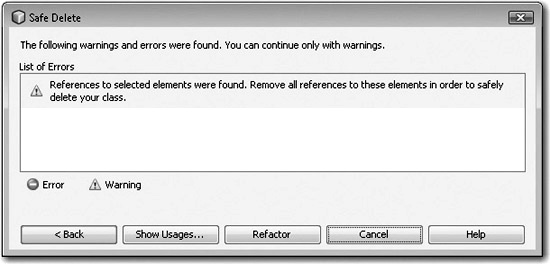
FIGURE 7-13 Usages window for Safe Delete
Simplification Refactorings
Sometimes when we code, we make things more complex than they need to be. Changing the number and even ordering of parameters can greatly simplify the structure and improve readability, usability, and understanding. As such, we examine the Change Method Parameters refactoring in this section.
Change Method Parameters
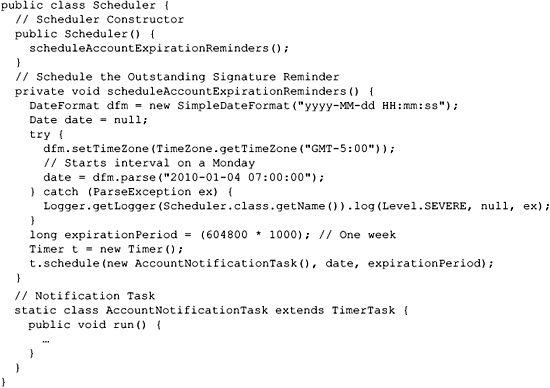
The Change Method Parameters refactoring command is synonymous to changing a method’s signature. Let’s take a look at the following code, where we want to pass the expiration period in as a parameter to the scheduleAccountExpiration Reminders method:
To get to the Change Method Parameters dialog box, invoke the Change Method Parameters refactoring command while the method is selected. Once the dialog box is open, you have the options to add parameters, remove unused methods, change the order of parameters, and change the visibility modifier for the method, as shown in Figure 7-14.
For this specific example, we need to make three changes. The first two are done by the refactoring itself.
First, the parameter name and type are added to the method signature:
![]()
Second, the default argument we selected is filled in for the first parameter by calling scheduleAccountExpirationReminders methods:
![]()
And last, for this specific example, we want to comment out the following line:
![]()
FIGURE 7-14 Change Method Parameters dialog box
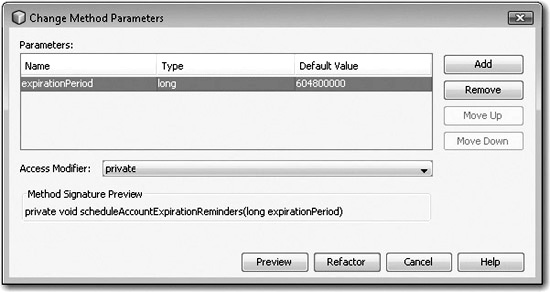
Varargs (variable arguments) can only be used in the final argument position. Within the Change Method Parameters dialog box, if you attempt to add a new parameter in the last argument position or move the vararg argument away from the last position with the Move Up button, the Refactor button is disabled, so the change is not allowed, and an error message is displayed. Here is a valid vararg signature example: public static void format (String pattern, Object… arguments) {}.
Generalization and Realization Refactorings
Generalization exists when a specialized class inherits elements of a more general class. Realization exists when a class implements an interface. NetBeans provides refactoring support of these principles with five refactoring commands:
![]() Pull Up
Pull Up
![]() Push Down
Push Down
![]() Extract Interface
Extract Interface
![]() Extract Superclass
Extract Superclass
![]() Use Supertype Where Possible
Use Supertype Where Possible
Pull Up
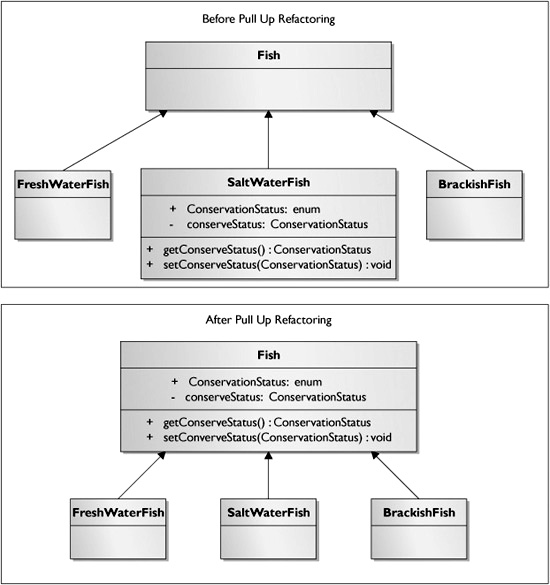
The Pull Up refactoring command supports the movement of methods and/or fields to a class’s existing superclass. Consider the class SaltWaterFish. Two fields and two methods are related to the conservation status of saltwater fish. The superclass of SaltWaterFish is Fish. Also, Fish has other subclasses such as FreshWaterFish and BrackishFish that could make use of the conservation status functionality. It would make sense to move the conservation-related fields and methods up to the Fish class.
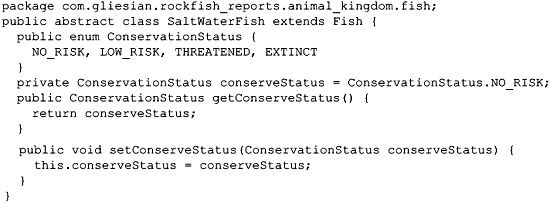
All classes that extend Fish inherit the Fish class’s attributes and operations. Figure 7-15 shows the benefit of Pull Up refactoring in this scenario. The conservation-related functionality is made available to all Fish subclasses after the Pull Up refactoring is completed.
FIGURE 7-15 Pull Up refactoring shown with UML
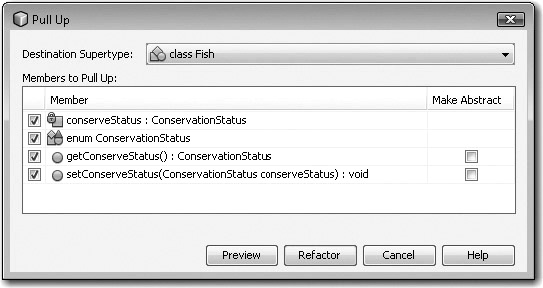
To perform the refactoring, open the Pull Up refactoring dialog box, and select all of the desired fields and methods, as shown in Figure 7-16.
After the Pull Up refactoring has been completed, the conservation-related functionality will have been moved from the SaltWaterFish class to the Fish class:

Just because refactoring can be quick and easy to perform with the NetBeans IDE, doesn’t mean you should rush into performing code refinements. Consider drawing out your refactorings with UML and analyzing what changes you wish to make, before you make them. Take your new design to a team member for review, because you may receive recommendations for better refactorings. You may even receive reasons (for example, political or technical) not to refactor certain code. Note that excessive refactoring can pollute the version control system, making it hard to track changes.
FIGURE 7-16 Pull Up dialog box
Push Down
The Push Down refactoring command moves inner classes, methods, and fields to selected immediate subclasses.
For example, let’s look at the SaltWaterFish class. The instance variable totalNumberOfStripes does not apply to all fish, because all fish do not have stripes.

We wish to push down this variable into subclasses of fish objects that do have stripes such as the rockfish, aka Striper. To do this, we must invoke the Push Down command that brings us to the Push Down dialog box, as shown in Figure 7-17.
By default, the Push Down refactoring pushes down the selected element into all of the subclasses. However, if you preview the refactoring, you can individually deselect refactorings, as shown in Figure 7-18.
Extract Interface
The Extract Interface refactoring command creates a new interface from public nonstatic methods in a class or interface and updates the extracting class or interface so it inherits from the newly created interface.
Programming to an interface helps to decouple implementation from use. Many saltwater fish make a drumming sound. Fish that croak or grunt like this include croakers, red drum, and weakfish. Our project currently only supports playing sounds for the croaker fish in the Croaker class. We have special requirements for using different file types and playback mechanisms depending on the type of fish, so we wanted to program to an interface for the playDrummingSound method.
FIGURE 7-17 Push Down dialog box

FIGURE 7-18 Push Down preview refactoring window
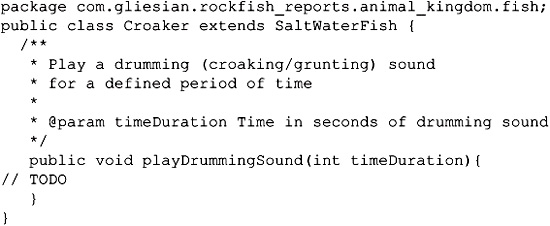
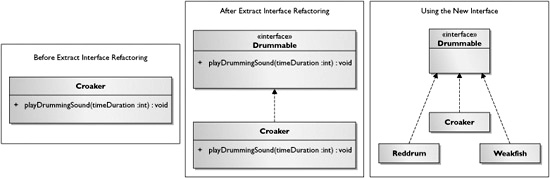
Figure 7-19 shows that once the playDrummingSound method signature is extracted into the interface, it is available to all classes after they implement that interface.
FIGURE 7-19 Extract Interface refactoring shown with UML
The Extract Interface dialog box is rather straightforward, as shown in Figure 7-20. You have the option of selecting the members you want extracted into the new interface as well as of defining the name of the new interface.
Extract Superclass
The Extract Superclass refactoring command creates a new superclass with the selected members and sets the original class to inherit from the newly created class.
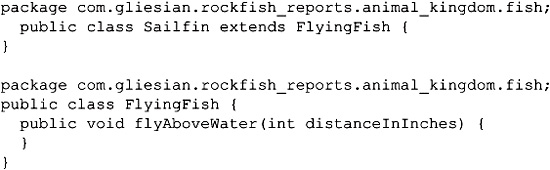
Consider the class Sailfin. A sailfin is a flying fish. The Sailfin class has the method flyAboveWater that could be used by other objects that represented flying fishes.

When you select the flyAboveWater method and invoke the Extract Superclass command, the Extract Superclass dialog box opens, as shown in Figure 7-21.
After the desired methods have been selected, the name of the new superclass has been stipulated, and the Refactor button has been clicked, a new superclass is created with the specified methods and/or fields. In this case the flyAboveWater method has been moved to the new FlyingFish superclass, and the Sailfin class has been modified to extend the FlyingFish class.
FIGURE 7-20 Extract Interface dialog box
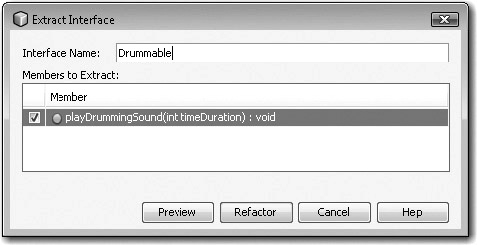
FIGURE 7-21 Extract Superclass dialog box

Use Supertype Where Possible
The Use Supertype Where Possible refactoring command is used to replace a type with one of its supertypes. This refactoring is commonly used when polymorphism is being leveraged.
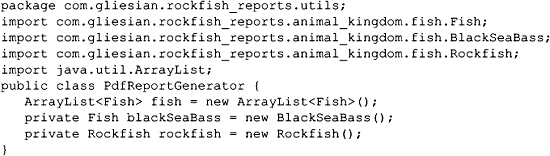
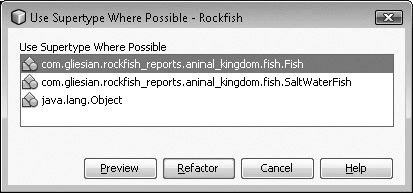
Consider the following code for class PdfReportGenerator. We plan for the rockfish reference to be instantiated against a supertype such as was done for the black sea bass. Our desired refactoring is depicted in Figure 7-22. You could simply just replace the word Rockfish with Fish; however, running the Use Supertype Where Possible command shows all of the acceptable supertypes that may be used in its related dialog box, as shown in Figure 7-23.
FIGURE 7-22 Use Supertype Where Possible refactoring shown with UML
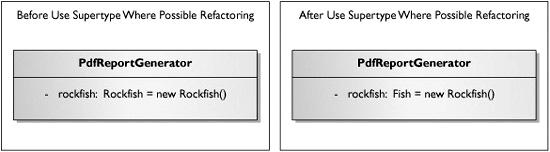
After the refactoring is performed, the affected statement looks like this:
![]()
FIGURE 7-23 Use Supertype Where Possible dialog box
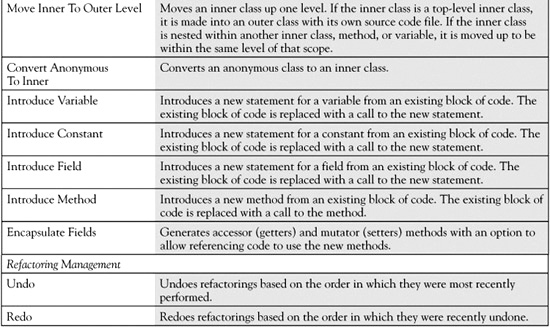
Organizational Refactorings
As developers, we tend to have expectations of where and how code should be structured and organized. When you have to work with projects that are delivered to you, you may find illogical coding situations. With refactoring, you can quickly put things where they belong. NetBeans IDE has seven refactorings that support better organization.
![]() Move Inner To Outer
Move Inner To Outer
![]() Convert Anonymous To Inner
Convert Anonymous To Inner
![]() Introduce Variable
Introduce Variable
![]() Introduce Constant
Introduce Constant
![]() Introduce Field
Introduce Field
![]() Introduce Method
Introduce Method
![]() Encapsulate Fields
Encapsulate Fields
Move Inner To Outer
The Move Inner To Outer refactoring command moves an inner class up one level. If the inner class is a top-level inner class, it is made into an outer class with its own source code file. If the inner class is nested within another inner class, method, or variable, it is moved up to be within the same level of that scope.
Consider the following inner and outer classes:
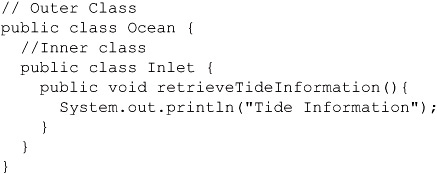
Select the inner class and invoke the Move Inner To Outer refactoring. The Move Inner To Outer dialog box displays, as in Figure 7-24.
The Move Inner To Outer dialog box prompts you for the class name and provides a checkbox for the declaration field of the current outer class. If the checkbox is selected and the Refactor button is clicked, the inner class is removed from the source code, and a new file named Inlet.java is created with the following content:
FIGURE 7-24 Move Inner To Outer refactoring dialog box

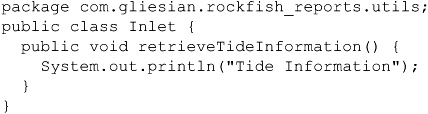
If the checkbox is not selected and the Refactor button is clicked, the inner class is removed from the source code and a new file named Inlet.java is created with the following content:
Convert Anonymous To Inner
The Convert Anonymous To Inner refactoring command converts an anonymous class to an inner class. In NetBeans 6.8, the refactoring has been modified to Convert Anonymous To Member. Since this refactoring is not on the exam and it is still in development, we forego coverage.
Introduce Variable
The Introduce Variable refactoring command introduces a new statement for a local variable from an existing block of code. The existing block of code is replaced with a call to the new statement.
For the following code example, we introduce variable statements for the two integer primitives:
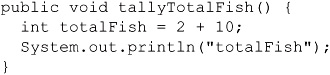
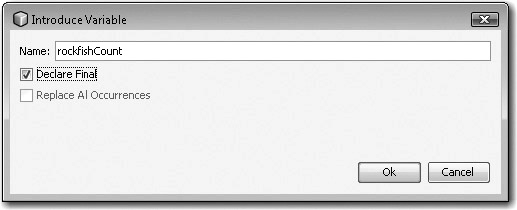
Select the value 2 and invoke the Introduce Variable command. The Introduce Variable dialog box displays, as shown in Figure 7-25. Adding a name, selecting the Declare Final checkbox, and selecting OK updates the source as shown next. Note that a variable statement was added for the 10 value as well, with similar steps.
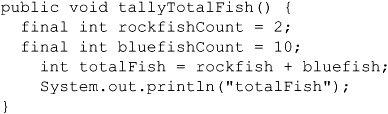
FIGURE 7-25 Introduce Variable dialog box
Introduce Constant
The Introduce Constant refactoring command introduces a new statement for a constant from an existing block of code. The existing block of code is replaced with a call to the new statement.
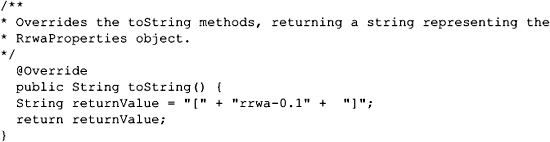
Consider the following block of code, where we include the version name of our application ("rrwa-0.1") in the object’s toString method. This version string is an ideal candidate to represent as a constant.
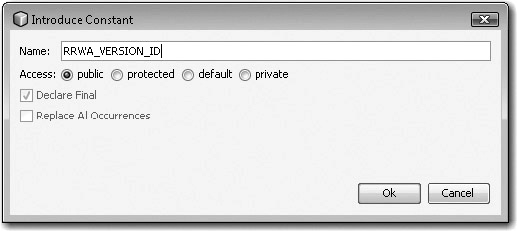
To introduce a new constant for this string, simply highlight the complete string including quotation marks with your mouse, and invoke the Introduce Constant command. The Introduce Constant dialog box displays, as seen in Figure 7-26.
In the dialog box, give the new constant a name and a visibility modifier. Select the OK button, and the following constant string is generated in your source code:
![]()
Also notice that the original string is now replaced with a reference to the constant identifier, RRWA_VERSION_ID.

FIGURE 7-26 Introduce Constant dialog box
Introduce Field
The Introduce Field refactoring command introduces a new statement for a field from an existing block of code. The existing block of code is replaced with a call to the new statement.
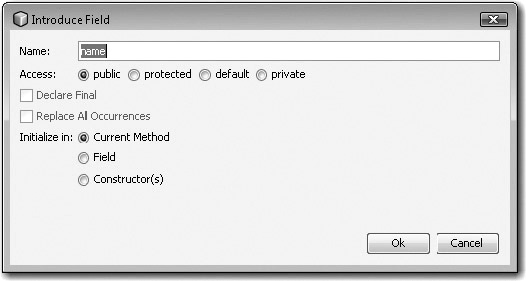
To use this refactoring, you select a block of code and then choose the Introduce Field command, the Introduce Field dialog box opens, as shown in Figure 7-27.
When you introduce a field or instance variable, you have the options of selecting the name, visibility modifier, and whether it should be final. If there is more than one occurrence, the Replace All Occurrences checkbox is active and shows you how many occurrences in parentheses. A really nice feature of this refactoring is the ability to select where you want the new field to be initialized. Radio button selections for this initialization allow you to select between the current method and the field scope, or within the constructor(s).
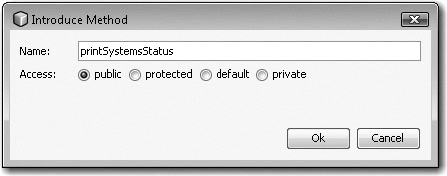
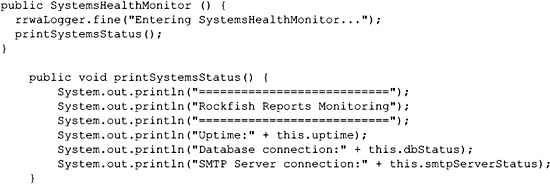
Introduce Method
The Introduce Method refactoring command introduces a new method from an existing block of code. The existing block of code is replaced with a call to the method.
FIGURE 7-27 Introduce Field dialog box
Consider the following code example, where we wish to remove all of the print statements from a constructor to a new method:
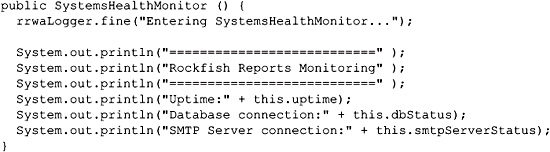
To introduce a method, select the block of code you wish to move, and then invoke the Introduce Method command. A dialog box opens, as shown in Figure 7-28. Select a name for the new method and for the visibility modifier.
FIGURE 7-28 Introduce Method dialog box
After the OK button is selected, the method is created in the same source file, the selected block of code is moved into the new method, and a call to the method is created at the initial location of the block.
While the Introduction and other refactoring features have basically the same intent among varying IDEs, their implementations may vary slightly. If you have used the refactoring features on JDeveloper, Eclipse, or IntelliJ IDEA, make sure you don’t confuse the refactoring features between IDEs. Differences include command-naming differences, refactoring menu organization, feature availability, and the means of invoking the refactorings.
Encapsulate Fields
The Encapsulate Fields refactoring command hides your instance variables by allowing you to mark them private and to generate associated public accessor (getter) and mutator (setter) methods through the dialog box components. Keep in mind that there is little reason to create getter and setter methods by hand when the IDE does it for you, quickly and error free.
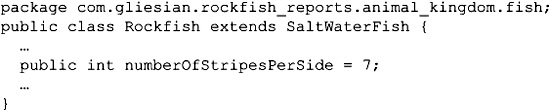
Consider the numberOfStripesPerSide instance variable in the Rockfish class. Since this instance variable is marked as public, it is not well hidden and is therefore not encapsulated. Note that rockfish typically have seven or eight stripes running down each side.
We will go through a short exercise to encapsulate the field, as shown in UML in Figure 7-29.
FIGURE 7-29 Encapsulate Fields refactoring shown with UML

To encapsulate the numberOfStripesPerSide field, we select the identifier and invoke the Encapsulate Fields refactoring command. The Encapsulate Fields dialog box for 6.1 NetBeans opens, as shown in Figure 7-30. Note that the NetBeans 6.8 Encapsulate Fields dialog box has additional fields (Insert Point, Sort By, and Javadoc) and additional buttons (Select All, Select None, Select Getters, and Select Setters).
FIGURE 7-30 Encapsulate Fields dialog box
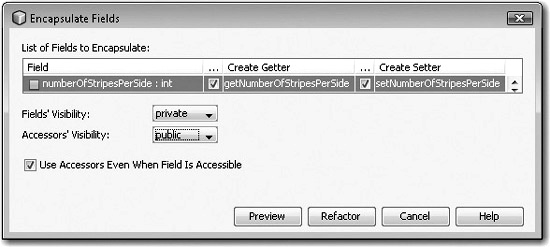
Selecting the checkboxes associated with the getter and setter methods for the numberOfStripesPerSide field, adjusting the visibility modifiers, and selecting the Refactor button modifies the code as represented in the following listing:
Refactoring Management
History and metadata surrounding each refactoring operation is recorded. Because of this, previous refactoring operations can be undone or redone, providing they are on top of the history stack, as is depicted in Figure 7-31.
FIGURE 7-31 Refactoring Management activity stack

Let’s take a closer look at the Refactor Undo and Refactor Redo commands.
Refactoring Undo and Refactoring Redo
Once you perform a refactoring command, that command and all previous refactorings that occurred can be undone in a LIFO (last in, first out) order. Once you undo a refactoring command, that command can be redone prior to any additional refactoring changes occurring.
![]()
In NetBeans 6.1, the standard Edit | Undo and Edit | Redo commands are not the same as the Refactor | Undo [refactoring] and Refactor | Redo [refactoring] commands, as the former commands do not have refactoring support. In Eclipse Galileo the standard commands are overloaded with refactoring features. Other IDEs overload the standard Edit | Undo and Edit | Redo operations as well. NetBeans is currently pursuing this overloading approach under issue ID: https://netbeans.org/bugzilla/show_bug.cgi?id=48427.
EXERCISE 7-2 Becoming Familiar with the Refactoring Catalog
Martin Fowler has written a book on refactoring and also maintains an updated catalog of common refactorings online: http://refactoring.com/catalog/. This exercise allows you to compare the refactoring features in the NetBeans IDE to those detailed in the catalog.
1. Create a list of NetBeans IDE refactoring capabilities.
2. Map NetBeans refactoring capabilities against those provided in the online catalog: http://refactoring.com/catalog/.
3. Review the remaining refactoring processes in the catalog that do not map to NetBeans implemented features. Are there any unimplemented features that NetBeans could integrate into their IDE?
4. Are there any common refactoring processes that you know of that are not in the catalog that NetBeans could integrate into their IDE?
5. If you have answers for either step 3 or 4 where you have identified a value-added refactoring that could be added to NetBeans, consider checking in the NetBeans IDE issue database to see if they are already pursuing that refactoring; if not, open up a new issue.
CERTIFICATION SUMMARY
This chapter discussed refactoring as it relates to the NetBeans IDE. We learned that refactoring is the process of changing the structure of source code, which improves our code relative to desired system qualities. We also learned that the NetBeans IDE supports several refactoring processes. These processes have a common defined flow that involves validating that the desired process is possible, checking user-defined input parameters for errors, and confirming the desired changes with the user. For concept-understanding purposes, all of the refactorings were grouped into five main categories: best practices refactorings, simplification refactorings, generalization and realization refactorings, organizational refactorings, and refactoring management. For each refactoring, we described the various configuration options and showed the details in screenshots and coding examples. To do well on the exam, you should be able to understand the purpose of each refactoring, know how to invoke it, configure it, review its intent, and how to confirm its operation.
 TWO-MINUTE DRILL
Refactoring Source Code
![]() Refactoring is the process of changing the internal structure of your code without changing its external behavior.
Refactoring is the process of changing the internal structure of your code without changing its external behavior.
![]() Fixing bugs and improving the functionality of your code is not considered refactoring.
Fixing bugs and improving the functionality of your code is not considered refactoring.
![]() Refactoring operations reside under their own top-level Refactor menu.
Refactoring operations reside under their own top-level Refactor menu.
![]() Open the refactoring menu by right-clicking a Java source file in the source editor window, followed by clicking the Refactor menu option.
Open the refactoring menu by right-clicking a Java source file in the source editor window, followed by clicking the Refactor menu option.
![]() Open the refactoring menu by right-clicking an attribute or operation in the Members View window associated with a Java source file, followed by a single click.
Open the refactoring menu by right-clicking an attribute or operation in the Members View window associated with a Java source file, followed by a single click.
![]() The Find Usages command identifies where certain elements are referenced and can help identify candidates for refactoring.
The Find Usages command identifies where certain elements are referenced and can help identify candidates for refactoring.
![]() The Rename refactoring command renames packages, classes, interfaces, methods, and fields, and all references to them from any source code files in the project.
The Rename refactoring command renames packages, classes, interfaces, methods, and fields, and all references to them from any source code files in the project.
![]() The Move refactoring command moves a class or interface to another package. All references in the project source code files are updated accordingly.
The Move refactoring command moves a class or interface to another package. All references in the project source code files are updated accordingly.
![]() The Copy refactoring command copies a class or interface within the same package, another package, or another project.
The Copy refactoring command copies a class or interface within the same package, another package, or another project.
![]() The Safely Delete refactoring command safely deletes code elements without references to them.
The Safely Delete refactoring command safely deletes code elements without references to them.
![]() The Change Method Parameters refactoring command changes the method signature including its visibility modifier.
The Change Method Parameters refactoring command changes the method signature including its visibility modifier.
![]() The Pull Up refactoring command moves methods and fields to an existing superclass.
The Pull Up refactoring command moves methods and fields to an existing superclass.
![]() The Push Down refactoring command moves inner classes, methods, and fields to all immediate subclasses.
The Push Down refactoring command moves inner classes, methods, and fields to all immediate subclasses.
![]() The Extract Interface refactoring command creates a new interface from public nonstatic methods in a class or interface, and updates the extracting class or interface to inherit from the new interface.
The Extract Interface refactoring command creates a new interface from public nonstatic methods in a class or interface, and updates the extracting class or interface to inherit from the new interface.
![]() The Extract Superclass refactoring command creates a new superclass and updates the extracting class so it is inherited.
The Extract Superclass refactoring command creates a new superclass and updates the extracting class so it is inherited.
![]() The Use Supertype Where Possible refactoring command changes the type to a supertype for code that references the selected class.
The Use Supertype Where Possible refactoring command changes the type to a supertype for code that references the selected class.
![]() The Move Inner To Outer Level refactoring command moves an inner class up one level. If the inner class is a top-level inner class, it is made into an outer class with its own source code file. If the inner class is nested within another inner class, method, or variable, it is moved up to be within the same level of that scope.
The Move Inner To Outer Level refactoring command moves an inner class up one level. If the inner class is a top-level inner class, it is made into an outer class with its own source code file. If the inner class is nested within another inner class, method, or variable, it is moved up to be within the same level of that scope.
![]() The Convert Anonymous To Inner refactoring command converts an anonymous class to an inner class.
The Convert Anonymous To Inner refactoring command converts an anonymous class to an inner class.
![]() The Introduce Variable refactoring command introduces a new statement for a variable from an existing block of code. The existing block of code is replaced with a call to the new statement.
The Introduce Variable refactoring command introduces a new statement for a variable from an existing block of code. The existing block of code is replaced with a call to the new statement.
![]() The Introduce Constant refactoring command introduces a new statement for a constant from an existing block of code. The existing block of code is replaced with a call to the new statement.
The Introduce Constant refactoring command introduces a new statement for a constant from an existing block of code. The existing block of code is replaced with a call to the new statement.
![]() The Introduce Field refactoring command introduces a new statement for a field from an existing block of code. The existing block of code is replaced with a call to the new statement.
The Introduce Field refactoring command introduces a new statement for a field from an existing block of code. The existing block of code is replaced with a call to the new statement.
![]() The Introduce Method refactoring command introduces a new method from an existing block of code. The existing block of code is replaced with a call to the method.
The Introduce Method refactoring command introduces a new method from an existing block of code. The existing block of code is replaced with a call to the method.
![]() The Encapsulate Fields refactoring command generates accessor (getters) and mutator (setters) methods with an option to allow referencing code to use the new methods.
The Encapsulate Fields refactoring command generates accessor (getters) and mutator (setters) methods with an option to allow referencing code to use the new methods.
![]() The Undo refactoring command undoes refactorings based on the order in which they were most recently performed.
The Undo refactoring command undoes refactorings based on the order in which they were most recently performed.
![]() The Redo refactoring command redoes refactoring based on the order in which they were recently undone.
The Redo refactoring command redoes refactoring based on the order in which they were recently undone.
SELF TEST
The following questions will help you measure your understanding of the material presented in this chapter. Read all the choices carefully because there might be more than one correct answer. Choose all correct answers for each question.
Refactoring Source Code
1. Which refactoring features are supported by NetBeans 6.1? Select all that apply.
A. Introduction of variables, constants, and fields
B. Generation of accessor and mutator methods
C. Application of generics
D. Extraction of methods and/or fields into superclasses
2. After selecting a refactoring command, what buttons are represented in a dialog box?
A. Preview button, Refactor button, Cancel button, Help button
B. Review button, Refactor button, Cancel button, Help button
C. Diff button, Refactor button, Cancel button, Help button
D. Diff button, Refactor button, Cancel button
3. The dialog box associated with Rename refactoring includes a checkbox with what accompanying text?
A. Force Rename Refactoring
B. Record Rename Refactoring
C. Update Javadoc Comments
D. Apply Rename On Comments
4. Which is not considered a refactoring process?
A. Changing method signatures
B. Fixing bugs
C. Moving classes
D. Extracting methods into a new superclass
5. Consider the following illustration. Again, this is from NetBeans 6.1, and NetBeans 6.8 differs slightly. Which action invokes the given refactoring menu?
A. Clicking the Refactor menu bar
B. Right-clicking a Java source file in the source editor window and selecting Refactor
C. Right-clicking a Java source file in the project window and selecting Refactor
D. Right-clicking an attribute or operation in the Members View window associated with a Java source file and selecting Refactor
E. All of the above
6. What keyboard shortcut invokes Rename refactoring? Select all that apply.
A. CTRL-R
B. SHIFT-R
C. CTRL-SHIFT-R
D. CTRL-ALT-R
E. All of the above
7. In the Change Method Parameters dialog box, which feature does not exist?
A. The ability to change the access modifier
B. The ability to rename the method
C. The ability to reorder the parameters via Move Up and Move Down buttons
D. The ability to preview the refactoring
8. Given the following tooltips, match them with the Refactoring window’s annotation glyphs:
A. Show logical view
B. Show physical view
C. Collapse all nodes in the tree
D. Expand all nodes in the tree
E. Next occurrence—Ctrl + Period
F. Previous occurrence—Ctrl + Comma
G. Refresh the refactoring data
TABLE 7-3 Refactoring Window Annotation Glyphs

9. Which statement is not true in regard to the Find Usages command?
A. The gutter icons are the same for the Usages window and the Refactoring window.
B. The Find Usages dialog box has a checkbox labeled Search In Comments.
C. The Find Usages dialog box has a Scope combo box that allows for the selection of searching across all open projects or the current project.
D. The shortcut for Find Usages is ALT-F6.
10. When you create a new class by using the Extract Superclass command, which statement is true?
A. The new superclass is placed into the top-level package without exception.
B. The new superclass is placed into the same package from which the class was extracted.
C. The Extract Superclass command provides an option via a drop-down combo box listing targeted packages to be placed in.
D. The Extract Superclass command provides an option via an edit box and Browse button in order to target packages to be placed in.
11. Which system qualities can be improved with refactoring? Select all that apply.
A. Readability
B. Maintainability
C. Validity
D. Extensibility
E. Performance
F. Security
12. Which two refactoring commands support unnesting classes?
A. Move Inner To Outer Level
B. Unnest Inner Class
C. Move Anonymous Class To Inner
D. Convert Anonymous To Inner
13. Considering the following declaration, which statements can be created when the Introduce Variable command is used on the 'A' character literal to create a new variable named newCharacter? Select all that apply.
Character c = 'A';
A. char newCharacter = 'A';
B. final char newCharacter = 'A';
C. Character newCharacter = 'A';
D. final Character newCharacter = 'A';
E. All of the above
14. Bonus: After you highlight a primitive literal in your source code, a light bulb appears in the gutter bar. What editor hints are present when clicking the light bulb? Select all that apply.
A. Surround with /* selection */
B. Introduce Variable…
C. Introduce Constant…
D. Introduce Field…
E. Introduce Method…
F. All of the above
SELF TEST ANSWERS
Refactoring Source Code
1. Which refactoring features are supported by NetBeans 6.1? Select all that apply.
A. Introduction of variables, constants, and fields
B. Generation of accessor and mutator methods
C. Application of generics
D. Extraction of methods and/or fields into superclasses
![]() A, B, and D are correct. The introduction of variables, constants, and fields is supported. The generation of accessor and mutator methods is supported. The extraction of methods and fields into superclasses is supported.
A, B, and D are correct. The introduction of variables, constants, and fields is supported. The generation of accessor and mutator methods is supported. The extraction of methods and fields into superclasses is supported.
![]() C is incorrect because generics refactoring is not supported in NetBeans 6.1.
C is incorrect because generics refactoring is not supported in NetBeans 6.1.
2. After selecting a refactoring command, what buttons are represented in a dialog box?
A. Preview button, Refactor button, Cancel button, Help button
B. Review button, Refactor button, Cancel button, Help button
C. Diff button, Refactor button, Cancel button, Help button
D. Diff button, Refactor button, Cancel button
![]() A. After selecting a refactoring command, the Preview button, Refactor button, Cancel button, and Help button are available in a dialog box.
A. After selecting a refactoring command, the Preview button, Refactor button, Cancel button, and Help button are available in a dialog box.
![]() B, C, and D are incorrect. B is incorrect because there is no Review button. C is incorrect because there is no Diff button. D is incorrect because there is no Diff button, and there is a Help button that is not listed.
B, C, and D are incorrect. B is incorrect because there is no Review button. C is incorrect because there is no Diff button. D is incorrect because there is no Diff button, and there is a Help button that is not listed.
3. The dialog box associated with Rename refactoring includes a checkbox with what accompanying text?
A. Force Rename Refactoring
B. Record Rename Refactoring
C. Update Javadoc Comments
D. Apply Rename On Comments
![]() D. Apply Rename On Comments is included next to a checkbox associated with the Rename refactoring dialog box.
D. Apply Rename On Comments is included next to a checkbox associated with the Rename refactoring dialog box.
![]() A, B, and C are incorrect. A is incorrect because Force Rename Refactoring is not an option. B is incorrect because Record Rename Refactoring is not an option. C is incorrect because Update Javadoc Comments is not an option.
A, B, and C are incorrect. A is incorrect because Force Rename Refactoring is not an option. B is incorrect because Record Rename Refactoring is not an option. C is incorrect because Update Javadoc Comments is not an option.
4. Which is not considered a refactoring process?
A. Changing method signatures
B. Fixing bugs
C. Moving classes
D. Extracting methods into a new superclass
![]() B. While correcting bugs and fine-tuning functionality is highly beneficial to your code and overall project, it is not considered a refactoring process. Refactoring has to do with improving the structure of code, not its functionality.
B. While correcting bugs and fine-tuning functionality is highly beneficial to your code and overall project, it is not considered a refactoring process. Refactoring has to do with improving the structure of code, not its functionality.
![]() A, C, and D are incorrect. A is incorrect because changing method signatures by modifying the number of parameters is considered a refactoring process. C is incorrect because moving classes to more suitable packages is considered a refactoring process. D is incorrect because extracting methods into new or existing superclasses is a common refactoring process.
A, C, and D are incorrect. A is incorrect because changing method signatures by modifying the number of parameters is considered a refactoring process. C is incorrect because moving classes to more suitable packages is considered a refactoring process. D is incorrect because extracting methods into new or existing superclasses is a common refactoring process.
5. Consider the following illustration. Again, this is from NetBeans 6.1, and NetBeans 6.8 differs slightly. Which action invokes the given refactoring menu?
A. Clicking the Refactor menu bar
B. Right-clicking a Java source file in the source editor window and selecting Refactor
C. Right-clicking a Java source file in the project window and selecting Refactor
D. Right-clicking an attribute or operation in the Members View window associated with a Java source file and selecting Refactor
E. All of the above

![]() E. All of the above, because all of the listed steps invoke the refactoring menu. In some instances when a certain refactoring is not allowed, it is shown in the menu, but is disabled as indicated by lighter-colored text.
E. All of the above, because all of the listed steps invoke the refactoring menu. In some instances when a certain refactoring is not allowed, it is shown in the menu, but is disabled as indicated by lighter-colored text.
6. What keyboard shortcut invokes Rename refactoring? Select all that apply.
A. CTRL-R
B. SHIFT-R
C. CTRL-SHIFT-R
D. CTRL-ALT-R
E. All of the above
![]() A. The keyboard shortcut CTRL-R invokes Rename refactoring. Rename refactoring can be done on packages, classes, interfaces, methods, and fields.
A. The keyboard shortcut CTRL-R invokes Rename refactoring. Rename refactoring can be done on packages, classes, interfaces, methods, and fields.
![]() B, C, and D are incorrect because they do not invoke the Rename refactoring.
B, C, and D are incorrect because they do not invoke the Rename refactoring.
7. In the Change Method Parameters dialog box, which feature does not exist?
A. The ability to change the access modifier
B. The ability to rename the method
C. The ability to reorder the parameters via Move Up and Move Down buttons
D. The ability to preview the refactoring
![]() B. The Change Method Parameters dialog box does not allow for the modification of the method’s name.
B. The Change Method Parameters dialog box does not allow for the modification of the method’s name.
![]() A, C, and D are incorrect because they are all available features within the Change Method Parameters dialog box. This refactoring allows for the changing of the method’s access modifier, the reordering of the parameters, and for previewing the refactoring. Other features are also included.
A, C, and D are incorrect because they are all available features within the Change Method Parameters dialog box. This refactoring allows for the changing of the method’s access modifier, the reordering of the parameters, and for previewing the refactoring. Other features are also included.
8. Given the following tooltips, match them with the Refactoring window’s annotation glyphs:
A. Show logical view
B. Show physical view
C. Collapse all nodes in the tree
D. Expand all nodes in the tree
E. Next occurrence—Ctrl + Period
F. Previous occurrence—Ctrl + Comma
G. Refresh the refactoring data
TABLE 7-4 Refactoring Window Annotation Glyphs
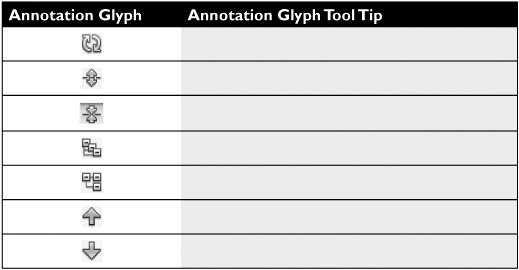
![]() Table 7-5 details the Refactoring window’s annotation glyphs and matching tooltips.
Table 7-5 details the Refactoring window’s annotation glyphs and matching tooltips.
TABLE 7-5 Refactoring Window Annotation Glyphs; Answers
9. Which statement is not true in regard to the Find Usages command?
A. The gutter icons are the same for the Usages window and the Refactoring window.
B. The Find Usages dialog box has a checkbox labeled Search In Comments.
C. The Find Usages dialog box has a Scope combo box that allows for the selection of searching across all open projects or the current project.
D. The shortcut for Find Usages is ALT-F6.
![]() D. The correct shortcut for the Find Usages command is ALT-F7. The Test Project command is ALT-F6.
D. The correct shortcut for the Find Usages command is ALT-F7. The Test Project command is ALT-F6.
![]() A, B, and C are incorrect because they all represent true statements about the Find Usages command. A is an incorrect answer because “The gutter icons are the same for the Usages window and the Refactoring window” is a true statement. B is an incorrect answer because “The Find Usages dialog box has a checkbox labeled Search In Comments is a true statement. C is an incorrect answer because “The Find Usages dialog box has a Scope combo box that allows for the selection of searching across all open projects or the current project” is a true statement.
A, B, and C are incorrect because they all represent true statements about the Find Usages command. A is an incorrect answer because “The gutter icons are the same for the Usages window and the Refactoring window” is a true statement. B is an incorrect answer because “The Find Usages dialog box has a checkbox labeled Search In Comments is a true statement. C is an incorrect answer because “The Find Usages dialog box has a Scope combo box that allows for the selection of searching across all open projects or the current project” is a true statement.
10. When you create a new class by using the Extract Superclass command, which statement is true?
A. The new superclass is placed into the top-level package without exception.
B. The new superclass is placed into the same package from which the class was extracted.
C. The Extract Superclass command provides an option via a drop-down combo box listing targeted packages to be placed in.
D. The Extract Superclass command provides an option via an edit box and Browse button in order to target packages to be placed in.
![]() B. The new superclass is placed into the same package as the class was extracted from.
B. The new superclass is placed into the same package as the class was extracted from.
![]() A, C, and D are incorrect. A is an incorrect because the superclass is not placed in the top-level package by default. C and D are incorrect answers because no visual components support the placement of the superclass into a desired package outside of the one used when it was created.
A, C, and D are incorrect. A is an incorrect because the superclass is not placed in the top-level package by default. C and D are incorrect answers because no visual components support the placement of the superclass into a desired package outside of the one used when it was created.
11. Which system qualities can be improved with refactoring? Select all that apply.
A. Readability
B. Maintainability
C. Validity
D. Extensibility
E. Performance
F. Security
![]() A, B, D, and E. Refactoring can improve the readability, maintainability, extensibility, and performance of code.
A, B, D, and E. Refactoring can improve the readability, maintainability, extensibility, and performance of code.
![]() C and F are incorrect. C is incorrect because refactoring does not improve validity, the ability to validate results of a system or user input. F is incorrect because refactoring does not improve security, the ability to ensure information assurance.
C and F are incorrect. C is incorrect because refactoring does not improve validity, the ability to validate results of a system or user input. F is incorrect because refactoring does not improve security, the ability to ensure information assurance.
12. Which two refactoring commands support unnesting classes?
A. Move Inner To Outer Level
B. Unnest Inner Class
C. Move Anonymous Class To Inner
D. Convert Anonymous To Inner
![]() A and D. Unnesting refactoring commands include Move Inner To Outer Level and Convert Anonymous To Inner.
A and D. Unnesting refactoring commands include Move Inner To Outer Level and Convert Anonymous To Inner.
![]() B and C are incorrect. B is incorrect because there is no Unnest Inner Class command. C is incorrect because there is no Move Anonymous Class To Inner command.
B and C are incorrect. B is incorrect because there is no Unnest Inner Class command. C is incorrect because there is no Move Anonymous Class To Inner command.
13. Considering the following declaration, which statements can be created when the Introduce Variable command is used on the 'A' character literal to create a new variable named newCharacter? Select all that apply.
Character c = 'A';
A. char newCharacter = 'A';
B. final char newCharacter = 'A';
C. Character newCharacter = 'A';
D. final Character newCharacter = 'A';
E. All of the above
![]() A and B. The Introduce Variable command on a primitive char literal creates primitive char declarations.
A and B. The Introduce Variable command on a primitive char literal creates primitive char declarations.
![]() C and D are incorrect. C and D are incorrect because Character wrapper classes cannot be created from using the Introduce Variable command on primitive char literals.
C and D are incorrect. C and D are incorrect because Character wrapper classes cannot be created from using the Introduce Variable command on primitive char literals.
14. Bonus: After you highlight a primitive literal in your source code, a light bulb appears in the gutter bar. What editor hints are present when clicking the light bulb? Select all that apply.
A. Surround with /* selection */
B. Introduce Variable...
C. Introduce Constant...
D. Introduce Field...
E. Introduce Method...
F. All of the above
![]() F. All of the above. All of the listed commands are available from clicking the gutter bar light bulb.
F. All of the above. All of the listed commands are available from clicking the gutter bar light bulb.
![]() A, B, C, D, and E are incorrect because the correct answer is “All of the above.” A Surround with /* selection */, B Introduce Variable…, C Introduce Constant…, D Introduce Field…, and E Introduce Method are all listed when clicking the gutter bar light bulb.
A, B, C, D, and E are incorrect because the correct answer is “All of the above.” A Surround with /* selection */, B Introduce Variable…, C Introduce Constant…, D Introduce Field…, and E Introduce Method are all listed when clicking the gutter bar light bulb.