
CHAPTER |
|
4 |
Advanced JavaScript Topics |
In this chapter, you continue your exploration of JavaScript with a few more advanced topics. While the code segments of the preceding chapter were rather generic to demonstrate basic features of the language, starting with this chapter you will see code examples specific to the Google Maps API. As with the previous chapter, the topics presented in this chapter are meant to assist you in programming the Google Maps API and not as a general introduction to JavaScript’s features.
The basic topic of this chapter is the manipulation of multiple data values in arrays and collections. Arrays and collections are convenient mechanisms for storing data items, but the most convenient mechanism for storing data is to create custom objects that reflect the structure of the entities they represent. Custom objects allow you to store not only data, but their structure as well. Instead of using individual variables to store an airport’s code, name, and location, you can use a custom object that has three properties (the
code, name, and location properties) and assign the appropriate value to each property. All the information about a specific airport is stored in a single variable that contains multiple named values such as airport.code, airport.location, and so on.Storing Data in Custom Objects
In addition to JavaScript’s built-in objects, you can create your own custom objects. The map-related objects, such as the
LatLng object or the Marker object, are implemented in the script you download from Google every time you include this script in your page. JavaScript knows nothing about LatLng objects, or the Map object for that matter, and this is why all map related objects are declared with the prefix google.maps.You can create a new object on the fly by specifying its properties and their values as pairs embedded in a pair of curly brackets. The following statement creates a new object:
and so does the following statement:
If you attempt to display the value of the
obj variable with this statement:you will see that its value is
[object Object]. This is a string that JavaScript generates to describe an object. All variables provide a method called toString(), and every time you attempt to print a variable, JavaScript calls this function internally to convert an object to a string. The generic description of the preceding example says that obj is a variable of type Object. This is all the information JavaScript has about the object. If you attempt to print a LatLng object, you will get back a string with the location’s coordinates like this:The
LatLng object is identified by its coordinates, and the toString() method returns a meaningful string that identifies the object. Most objects do not lend themselves to a simple textual description, so their toString() method returns a generic string. The Marker object, for example, can’t be uniquely identified by a simple string; this object has many properties, but not a single property, or combination of properties, that make it unique, so its toString() method returns a generic string to describe it.Creating Objects On the Fly
Let’s add some content to our custom object. Objects have properties, which are named values. The following statement creates an object that represents an airport (you’ll use this definition in later chapters to generate a list of airports and place them on a map as markers).
The quotes around the property names are not mandatory, unless the names contain spaces. It’s a very common practice, however, and it’s followed in this book. The
toString() method will return the usual [object Object] string, but your object has properties, which you can access using the dot notation:The values displayed are shown as comments next to each statement. You can also access the properties as elements of the
LAXAirport array using the property names as index values:There’s a catch here: The name of the property must be enclosed in a pair of quotes. If not, the JavaScript engine will not treat it as a literal; it will attempt to find a variable named
Code and use its value to evaluate the expression. If no such value exists, then a run-time error will occur. Things will get really bad if a Code variable exists: JavaScript will use its value to access a property of the LAXAirport object!The two notations are totally equivalent. The
LAXAirport variable is not a common array, but it can be accessed as if it were an array, only instead on an index value you use a string to identify the desired element. You can also add new properties to the LAXAirport object using the same notation. The following statement adds a property of the LatLng type, which is the location of the airport:The
Location property is itself another object. Any property of an object variable can be another object, or even an array of objects. The Location property is a nested object: It’s an object contained within another object, the LAXAirport object, and you can nest properties in any depth.If you think of an object as an array, then the property names are the keys of the values stored in the array. As a result, you can use the
for … in loop to iterate through the properties of an object:
Here’s a practical example of the
for … in loop. Enter the following statements in a script and execute the script: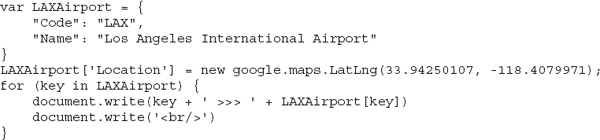
The preceding statements will generate the following output (paste the preceding statements in the JavaScript pane of a new fiddle and run it):

You may be wondering why the script declares an object with properties initially and then adds a new property (the
Location property). There’s no specific reason beyond demonstrating multiple methods of adding new properties to custom objects.Extending Existing Objects
Creating custom objects and adding properties at will is straightforward. Does it mean that you can add custom members to existing objects such as a
LatLng object? If you execute the following statements, you will see that it’s quite possible (and easy):
The last statement will display the value of the
dummy property! Note that if you attempt to read the value of the dummy property before it has been added to the location object, you will get back the value “undefined.” This undefined value means that the property dummy hasn’t been created yet. To find out whether an object supports a property before requesting its value, use the if statement to compare the property to undefined:It’s generally recommended that the strict comparison operator (
!==) be used with undefined and null comparisons, but the != operator works fine in most situations.It’s not recommended to add new properties to existing objects, especially to objects that are implemented by a third-party script, such as the Google Maps API script. People reading your code will not understand it, and you may not always recognize that a specific property is not one of the object’s built-in properties. Moreover, custom properties are added to specific variables, and not to all variables of the same type: You can’t expect that all objects of the
LatLng type have a property named dummy (only the one variable to which you added the custom property).All objects in JavaScript support the
objInfo property, which is a place to store custom information. If you want to extend the functionality of the LatLng object, create a new custom object with the additional information and assign it to the objInfo property of the original LatLng object.Variables and Objects
Variables that store objects are called object variables and they behave differently than variables that represent basic data types. Let’s create a string variable:
Then create a new variable and assign to it the value of the
str variable:So far, both variables store the same string. They actually store two copies of the same string. To verify this, modify each variable as follows:
and then display their values:
The output will be:
Even though they contain the same value initially, each variable can be manipulated individually because they each contain a separate value. Let’s do the same with two object variables. Execute the following statements:
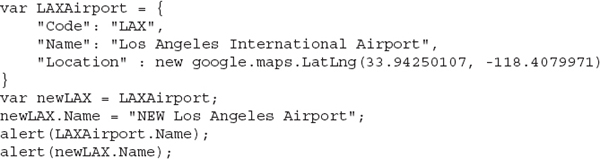
Both
alert() statements will display the string “NEW Los Angeles Airport”! Objects are structures in memory and the corresponding variables do not contain the object data. Instead, they contain a pointer to the memory, where the structure with the object’s data is stored. These variables are called reference variables because they hold a reference to their values, and not the actual values. The variables that hold simple values are called value variables. When you assign a value variable to another, the original variable’s value is copied. When you assign a reference variable to another, then the reference (memory address) to the object is copied, not the object.Objects and Methods
Typically, objects have properties, which are values, and methods, which are functions that perform specific tasks associated with the object. The
google.maps.Map object, for example, exposes the setCenter() method. When you call this method, you change the map’s center point, which is equivalent to scrolling the map from within your code. Objects in JavaScript are extremely flexible in that they can store anything, including functions. It’s possible to add a method to an object by adding a function to it, just as you would add a property. The method has a name and a code block that implements it.Let’s revise the
LAXAirport object by adding a simple function that returns the airport’s full name (that is, its IATA code followed by its name). Let’s call this method getFullName() and implement it with a single statement that returns the airport code followed by its name:
To call the
getFullName() method of the LAXAirport variable, use a statement like the following:and you will get back the string “LAX - Los Angeles International Airport.” The
getFullName() method is a good candidate for the object’s toString() method, isn’t it? You can replace the default implementation of the toString() method with a custom function by adding the toString() method to your object. Change the name of the getFullName function to toString in the definition of the LAXAirport object and you have a custom object that returns a meaningful representation of itself:This is the definition of a custom object that stores airport data, including the airport’s location, and it also provides a custom
toString() method that returns a meaningful description of the object.Adding a Custom Method
Let’s add a method to create a marker at the location of the airport on the map. The
Marker object has two basic properties as you recall from the previous chapter, the title and position properties. The marker’s title property should be set to the same string returned by the custom object’s toString() method. The position property of the same marker must be set to the custom object’s Location property. Here’s the definition of the createMarker() method: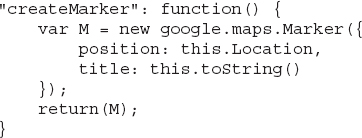
The
createMarker() method doesn’t place a marker on the map; it returns a Marker object that represents the specific airport. To place the marker returned by the createMarker() method on the map, call the Marker object’s setMap() method, passing as an argument a reference to the appropriate Map object:Assuming that the
map variable represents the map on your page, the last statement will place the marker on the map. Alternatively, you can modify the createMarker() method so that it accepts a Map object as an argument and places the marker it creates on the map:
The revised function need not return a value, as it handles the insertion of the marker on its own. The
createMarker() method, however, has a major drawback: It will place a new marker on the map, even if one exists already. You must somehow keep track of the marker that corresponds to each airport and not create a new marker, even if the application calls the createMarker() method multiple times on the same object. The createMarker() function must be modified as follows:
The
markerExists property is set to true once the marker is created, and the comparison at the beginning of the function prevents the creation of a new marker for the specific variable if one exists already. If the current object, represented by the keyword this, has a property by the name markerExists already, then the function exists. It the object doesn’t have a property by that name, the script creates it and sets it to true. When the createMarker() function is called again, it won’t place another marker on the map.Prototyping Custom Objects
So far, you have seen how to create individual objects in JavaScript. These objects are created on the fly and have no type: You can’t create a new type and declare variables of this type. When you use the Google Maps script, you can create variables of the
LatLng type, variables of the Marker type, and so on. How does one create custom types in JavaScript? Other OOP languages use classes. A class contains the definition of an object, its properties, and its methods, and you can create new variables based on this class. JavaScript doesn’t recognize classes. You can still create custom types with JavaScript using prototypes. In this book, you’re not going to build any prototypes, but a very short introduction to the topic is included for reasons of completeness.“This” Keyword
Among JavaScript’s keywords,
this is a special one. The keyword this in JavaScript refers to the owner of a function and it’s used frequently as a shorthand notation to the current object. When you create a new object with a function, this refers to the newly created object. It actually refers to the object you’re about to create. When you use the keyword this in a method, it represents the owner of the method: the object to which the function is applied as a method. Finally, when you use the same keyword in an event listener, it refers to the object that fired the event. The keyword this is used in JavaScript very much like it’s used in the English language: It denotes something that is close at hand. At various parts of the program, the same keyword refers to totally different entities, and it’s not always obvious which object it represents. You can safely use it to refer to the custom objects you’re creating in your code and the object you associate with a listener in the addListener() method. The topic of event listeners is discussed later in this chapter, and you will see shortly how the keyword this is used to identify the object that fired the event.Let’s say you want to create a new custom type to represent cities, and let’s assume that the type will be called “City.”
Start by creating a function called
City:In the body of the function, insert the new type’s properties and methods. To do so, use the keyword
this, which represents the object described by the function. Here’s the definition of the City() function with a few properties:
In the
City() function, you don’t care about the actual property values, and that’s why they’re all set to undefined. The function does not create a new object; it’s simply the definition of an object. To create a new object of the City type, use the new keyword, and then assign values to its properties as shown here: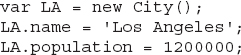
Now this object looks more like the objects of the Google Maps API you have seen so far: You can create a new object of the
City type, not a generic object. The City() function is the object’s constructor and it’s executed every time you create a new object of the City type. You could initialize the properties to specific values rather than setting them to undefined. These values, however, would be the same for all new objects of the City type. Use this technique if you want to assign default values to some properties.The constructor can also be called with arguments, which you can then assign to the object’s properties. When you create a new variable of the
City type, it’s convenient to call the constructor passing the city’s data as arguments. Developers using the City class should be able to pass the necessary parameters to the constructor of the new object, with a statement like this:To enable the use of parameterized constructors, modify the constructor as follows:

Now you can use either notation to create new instances of the
City custom type:
or
Custom Objects as Collections
It’s evident from this chapter’s examples that objects are multivalued variables. The same can be said for arrays, and there’s a close relationship between arrays and objects in JavaScript. Arrays store multiple values, which are accessed by an index value. The index of the first element in the array is 0, the index of the second element is 1, and so on. The problem with this addressing scheme is that the indices are meaningless. Consider an array for storing state capitals. To access the capital of California, you need to know the index of the appropriate element. Wouldn’t it be far more practical to access the capital of California as:
With this addressing scheme there’s no need for indexing. Indeed, many languages support data structures known as associative arrays, hashtables, or dictionaries. These collections allow you to associate meaningful keys with their elements.
JavaScript doesn’t support associative collections as a data structure. However, because an object’s properties can be accessed by name, you can create objects and use the keys as property names and objects as values. Consider the
capitals object defined with the following statement:
The
capitals variable may be an object, but it looks and feels just like an associative array: an array whose elements can be accessed by a key value. You can view objects as associative arrays, if you wish, and use them in your code. The fact that JavaScript doesn’t have a special structure for associative arrays is of no importance because objects can be used just like associative arrays.The value assigned to a property of the
capitals object (or equivalently to an element of the capitals associative array) need not be a single value. It can be another object with data about each state. Create an object with many properties, as in the following:
and then append it to the
states associative array using the state name as key:Some of the object’s properties may be objects, or arrays of objects. The
majorCities property could be an array with the state’s largest cities:If you want to store additional data about each city, use custom objects in the place of the city names:

The
majorCities property is an array of custom objects! Do you want to store the major cities in a collection so you can access them by name? Almost trivial. Start by creating a collection with the cities, using city names as the keys:
Then create the
states collection and add the state of California and the major cities as a property:
To see the advantages of using collections over regular arrays, take a look at the code for iterating through each state in the
states array and through each city in the state. There’s only one state in the collection, but the same loop will work with as many states as it will find in the states collection.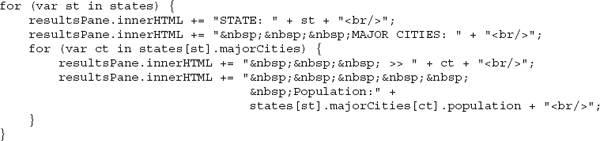
The preceding code segment, along with the declarations of the
states variable shown earlier, generates the following output: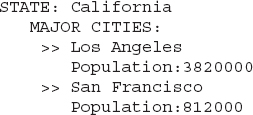
Figure 4-1 shows the code of the last example as a fiddle (it’s the
CitiesAsObjects.html sample page). Use this code as your starting point to add more properties to the individual objects and more states and cities in each state.
Figure 4-1 Using objects as collections in JavaScript
Event Listeners
JavaScript’s programming model is based on events: When the user interacts with the page by clicking an element, typing a key, making a selection from a list, and so on, the element fires an event and the script reacts to it by executing a special function known as an event listener. Most elements provide attributes that allow you to associate an event listener with a specific event on that element. The button element, for example, provides the
onclick attribute, to which you assign the name of the function that will handle the click event of the specific button; the text box element provides the textchanged attribute, to which you assign the name of the function that will handle the text as it’s being edited (by converting it to uppercase, or by rejecting non-numeric keystrokes).In the context of this book, you’re interested in the events raised by the
Map object. The Map object, which represents the map on your page, fires many of its own events as the user interacts with it, but you’ll never handle all the events. You select the ones you’re interested in and associate a listener to these events; all other events raised by the Map object will go unnoticed. Such events are the click and right-click of the mouse buttons, the dragging of the map, and more.To associate a listener to an event, you must use the
addListener() method passing as arguments the name of the object that fires the event, the name of the event, and the name of a function that will handle the event. The following statement associates the mapClicked() function with the click event of the map:This statement is said to “register” an event listener so that the JavaScript engine starts monitoring the specific events. Every time the user clicks the map, the
mapClicked() function is executed automatically.Passing Information to the Event Listener
The map’s events pass an argument to the event listener, the
event argument, which contains information about the event. For the click event, this argument carries information about the location that was clicked. The following is the implementation of the mapClicked() function that displays the coordinates of the location that was clicked in an alert box:
The
MapClickEvent.html sample page demonstrates how to register listeners with their events and is shown in Figure 4-2 as a fiddle. Figure 4-3 shows the same page when opened in Google Chrome.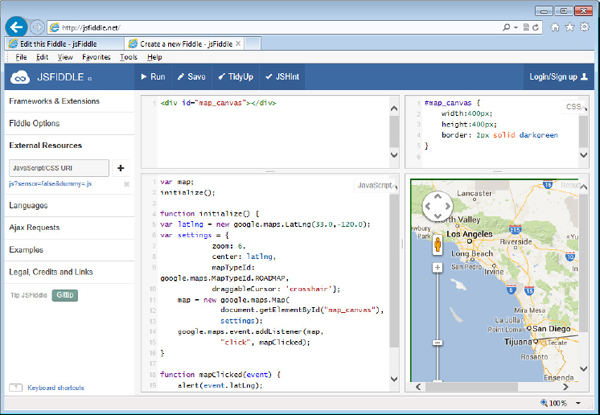
Figure 4-2 The
MapClickEvent.html sample page implemented as a fiddle
Figure 4-3 The
MapClickEvent.html sample page in ChromeThe click event may also take place on other items you place on the map, such as a
Marker object. As you will see in Chapter 7, you program this event to display a window with additional information about the feature identified by the marker. This window looks like a speech bubble and it’s called InfoWindow. In Chapter 8, you learn about shapes, such as lines, polygons, and circles, that you can place on the map. When the user clicks a shape, an event is raised and you can program this event to display additional information about the selected feature, or perform an action. A common design pattern is to add a marker when the map is clicked and to remove the marker when it’s right-clicked.All objects that fire the
click event fire the rightclick event as well. The rightclick is extremely important, because this is how you can implement context menus on your maps, a topic that is discussed in detail in Chapter 5. Placing all the commands that apply to the item being clicked on a right-click menu will help you unclutter your interface, as you would normally have to create buttons for these operations. In addition, you would have to change the visibility of these buttons, as not all actions are applicable at all times.Removing an Existing Listener
Event listeners usually remain in effect once registered, but this isn’t mandatory. You can just as easily remove a listener from your application by calling the
removeListener() method, which accepts an integer as an argument. This integer identifies the event handler and it’s returned by the addListener() method. If you plan to remove a specific listener down the road, you must store the return value of the addListener() method to a script variable, and then pass this value to the removeListener() method.Add a new event listener with a call to the
addListener() method and save its return value:and later in the code remove the listener with the following statement:
Closures
Closures are functions that are defined without a name and can be passed as parameters to other functions. You first met these back in Chapter 3 as a way of providing a means of comparison during array sorting.
Closures are the most obscure concept in JavaScript. Yet there are situations when you will have to resort to closures, if everything else fails. I will not even attempt to present a definition of this technique; a simple example will demonstrate very clearly the type of problem that calls for closures. There are three sample projects in the support material of this chapter to demonstrate closures: the
No Closures.html page, which demonstrates the problem, and Closures 1.html and Closures 2.html, with two different solutions to the problem. It’s the same solution actually, just implemented with two different methods.Here’s the problem. Let’s consider a code segment that creates markers and places them on the map. The coordinates and titles of the markers are stored in an array, the
Cities array, and the script iterates this array and creates a marker for each array element. The following is the definition of the array that holds city data:
The loop that iterates through this array and creates the
Marker objects is shown in Listing 4-1. In addition to creating the markers, it also adds a listener for the click event. When each marker is clicked, the script displays a string with the selected city’s name.Listing 4-1 Creating multiple markers from within a loop

The code is straightforward. Open the
No closures.html page in your browser and hover the pointer over the three markers, located on three cities in California. The correct title will appear for each marker. Now click a marker. While you’d expect to see an alert box with the name of the city you clicked, nothing will happen. To find out what went wrong, double-click the status bar of Internet Explorer, or open the Developer tools of Google Chrome (open the Chrome menu and select the “Developer tools” command from the Tools submenu). If you’re using Internet Explorer, you will see the error message shown in Figure 4-4.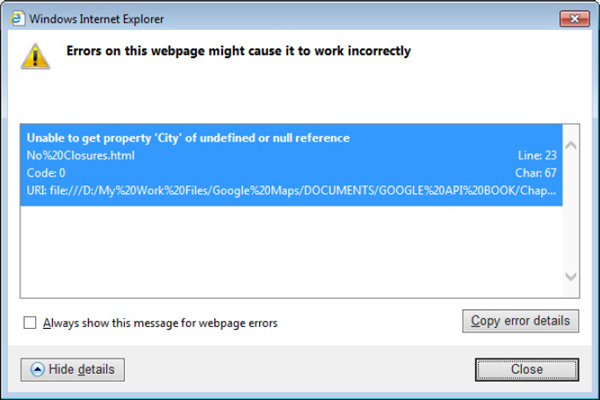
Figure 4-4 The message describing the error of the code shown in Listing 4-1
This error message is telling you that the expression
Cities[i] is undefined and, as a result, the script can’t access the City property of an undefined object. This is a hard-to-understand error message because the Cities array has been used to set up the markers, and the markers have been placed successfully on the map. The problem isn’t with the Cities array, but with the specific element you’re attempting to access. To understand what’s happening, change the listener’s code so that instead of the element Cities[i].City, it displays the value of the variable i. This time you will see an alert box showing the value 3. This value corresponds to the fourth element of the array, but there’s no such element in the array!Here’s what happens. The event listener contains a function definition, which is stored somewhere and executed when you click a marker. This is when the function reads the value of the variable
i. When the listener is executed, the script has gone through the loop and the loop’s counter variable has reached the value 3. This is how the loop ends (it keeps increasing its counter until it exceeds a maximum value). When the listener is executed, the value of i is 3 and the code fails to access the element Cities[3].You clearly need a mechanism that will execute some code in the loop, evaluate the variable
i, and store it along with the definition of the function that implements the listener. This is where the closure comes in. The most important feature of a closure is that the inner function has access to variables of the outer function, even after the outer function has returned!Write a function that accepts a
Marker object and an index value as arguments, and associates the Marker object’s click event with a listener.
Then, modify the loop in the script so that it calls the
fnc() function to add the listener:
The
fnc() function will actually be executed with different arguments each time. The arguments will be passed to the event listener, and the script will work as expected. For your convenience, Listing 4-2 shows the entire segment of the script that creates the three markers, places them on the map, and associates a listener with their click event.Listing 4-2 Creating multiple markers from within a loop with closures

If you open the
Closures 1.html page in your browser, you will see that it works as expected and each marker reacts to its own click event. Closures are defined as functions that capture the state of their environment: the values of the variables at the moment they’re declared, and not the moment they’re executed. By forcing some code to be executed while adding the markers, you effectively force the script to evaluate the values of the variables and pass to the listener the actual values, not the variable names.Things can get even nicer with an inline function. The
Closures 2.html page demonstrates a fancy technique of using closures, but this time without an external function. The fnc() function can be defined in-place, as shown in Listing 4-3:Listing 4-3 Defining and executing an anonymous function inline
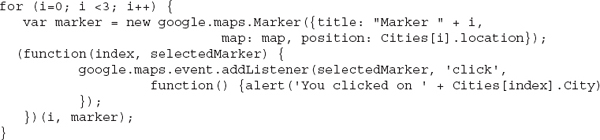
By embedding the function definition in a pair of parentheses, you’re telling the JavaScript engine to execute it immediately. It’s like calling another function, only the function being called is defined in-place. In the definition of the function, you specify the arguments, and as you can see, their names (arguments
index and selectedMarker) need not match the names of the variables with the actual values (variables i and marker). At the end of the function, you pass the values as arguments and these values are the index of the current marker and the Marker object that represents the current marker.If you’re familiar with other object-oriented languages, you may find this approach elegant. If you’re just learning JavaScript, just don’t give up! When you see that several objects on your map have the same property values (while they shouldn’t), it’s time to use closures. And the most common scenario for closures is a code segment that adds event listeners for individual objects from within a loop. Define your own custom function, insert the same code you used in the script, and use this function in the statement that creates the event listener.
Am I suggesting that you need not try to master the concept of closures? Absolutely. There are tricks to avoid closures altogether, although there are situations in which you may not be able to do so. The source of the problem is that the code creates a
marker variable and at each iteration stores a different Marker object to this variable. Once the marker has been placed on the map, the variable is no longer needed and can be reused. However, in the click event’s listener of each marker, you must invoke a different alert box. The easy way out is to create an array and store your markers there. Each marker will be assigned its own listener for the click event and you’re no longer required to handle the listeners of the markers in any special manner. The Without Closures.html page displays the same three markers without closures because it stores the individual Marker objects in an array. Here’s the loop that places the markers on the map: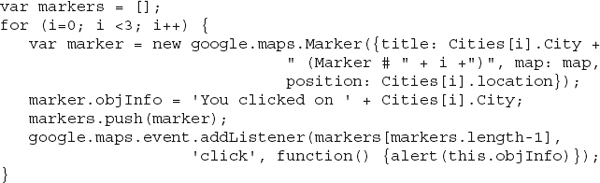
The message to be displayed when a marker is clicked is stored in the
Marker object’s objInfo property and it’s passed to the alert() function as an argument. The event listener is associated with an element of the markers array and there’s no interference between the markers because they are stored in different elements of the array.The drawback of this technique is that the array with the markers remains in memory while the page is open. If your map contains hundreds or thousands of markers, your script will take up a lot of resources. As you program more advanced applications, you will run into situations that call for closures and it won’t always be possible to come up with an alternative technique. Closures aren’t very common in programming with the Google Maps API, but remember to double-check any operations that take place in loops. All the objects you create in the loop may end up with the properties of the last object created in the loop, and this is a good indication to consider closures.
To use the sample code of this section with JSFIDDLE, do the following:
1. In the HTML pane, enter the following
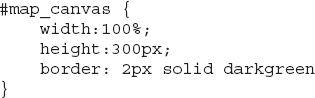
<div> element definition:2. In the CSS pane, enter the following style definition:
3. In the JavaScript pane, enter the definition of the
initialize() and addMarkers() functions, as well as the statements to call the two functions. The addMarkers() function iterates through the Cities array and adds a marker to the map for each city.
You should also add a reference to the Google Maps API, as explained in the first section of this chapter.
Summary
In Chapters 3 and 4, you have seen all the features of JavaScript you’ll be using in the sample applications of this book. You may have read about topics that you have never heard of before, or techniques that may appear unnecessarily complex. You will see many examples in the course of this book, and you will become quite familiar with JavaScript. The ability to write JavaScript code will help you design elaborate and highly interactive map-enabled applications.
You’ve learned how to create basic web pages with embedded maps and you have a basic understanding of JavaScript. Now that you’re done with the prerequisites, and it’s time to start exploring the Google Maps API in detail. In the following chapter, you learn about the basic components of the API and the objects you’ll be using from now on to build applications based on the Google Maps API.
If you’re interested in further exploring JavaScript, a good starting point is the JavaScript section of the w3schools site at http://www.w3schools.com/js/default.asp. Another excellent resource is John Pollocks’ JavaScript: A Beginner’s Guide from McGraw-Hill Education. If you need more information on building web pages with HTML and CSS, look into Powell’s HTML & CSS: The Complete Reference, also from the same publisher.
..................Content has been hidden....................
You can't read the all page of ebook, please click here login for view all page.