

CHAPTER
11
Building Mobile Applications with Oracle Mobile Application Framework
Oracle Mobile Application Framework (MAF) is a hybrid platform for building enterprise mobile applications that allows developers to build single-source applications which deploy to both Android and iOS devices. With MAF, developers use Java, HTML5, CSS, JavaScript, and Cordova plugins to declaratively construct cross-platform hybrid applications. In this chapter, you will use Oracle MAF to build yet another Personnel Directory by consuming our Chapter 8 REST services (perhaps I should have named this book 101 Ways to Build a Personnel Directory?). Although this chapter may offer a good introduction to MAF, the primary purpose is to show you how to consume PeopleSoft REST services with MAF. This chapter is not intended to be a definitive reference. While working through this chapter, I highly recommend reading Oracle Mobile Application Framework Developer Guide by Luc Bors, Oracle Press. I found it to be an invaluable resource.
Another important aspect of mobile application development is the user experience. This chapter will show you the basics of skinning MAF applications. You can learn more about Oracle mobile design guidelines at http://www.oracle.com/webfolder/ux/mobile/index.html.
Up and Running with JDeveloper 12c
Oracle maintains a great set of tutorials describing how to install Oracle JDeveloper and the MAF extension. When I wrote this book, the latest tutorial was located at http://docs.oracle.com/cd/E53569_01/tutorials/tut_jdev_maf_setup/tut_jdev_maf_setup.html. The following is a summary of the steps required to install and configure JDeveloper with the MAF extension.
The first step is to download and install JDeveloper 12c Studio Edition. When writing this book, JDeveloper was available at http://www.oracle.com/technetwork/developer-tools/jdev/downloads/index.html. Download and install JDeveloper. When downloading, be sure to choose the Studio Edition. When JDeveloper finishes installing, choose Help | Check for Updates from the JDeveloper menu bar. The Update Center dialog will appear. Select the Oracle Fusion Middleware Products and Official Oracle Extensions and Updates options, choose next, and then select Mobile Application Framework.
![]()
NOTE
JDeveloper requires JDK 7. The MAF extension, however, requires Java 8. After JDeveloper restarts, it will prompt you for the location of JDK 8. Make sure you have a copy of JDK 8 installed before continuing.
Next, we have to configure the MAF preferences. Specifically, we need to tell JDeveloper MAF where to find the Android (and iOS if running on a Mac) SDK. From the JDeveloper menu bar, choose Tools | Preferences. Select the Mobile Application Framework node. If you see the Load Extension button, then click Load Extension. Otherwise, select the Android Platform (or iOS Platform) child node and specify the location of the Android SDK. Figure 11-1 is a screenshot of the MAF preferences.

FIGURE 11-1. MAF preferences
Creating an MAF Project
Let’s create a new MAF project so we can build yet another Personnel Directory. From the Applications sidebar, choose New Application. Alternatively, choose File | New | Application from the JDeveloper menu bar. From the New Gallery dialog, select General | Applications | Mobile Application Framework Application. Figure 11-2 is a screenshot of the New Gallery dialog.

FIGURE 11-2. New Gallery dialog
The Create MAF Application dialog will appear. In step 1, enter the Application Name PersonnelDirectory. For the Application Package Prefix enter com.example.ps.hcm. Figure 11-3 is a screenshot of step 1. Click Next to move to the next step.

FIGURE 11-3. Step 1 of the Create Mobile Application Framework wizard
Continue through the wizard, accepting the defaults for steps 2 through 5, and then click the Finish button. JDeveloper will respond by creating a new Application named PersonnelDirectory that contains two projects: ApplicationController and ViewController. We will perform most of our work in the ViewController project.
The Client-Side Data Model
As we have seen in other chapters, our client-side user interface (UI) consists of four primary views:
![]() Search parameter page
Search parameter page
![]() Search results list
Search results list
![]() Detail view
Detail view
![]() Editable profile view
Editable profile view
We also know that our server-side REST handlers consist of four services:
![]() Search service
Search service
![]() Details service
Details service
![]() Photo service
Photo service
![]() Profile details service
Profile details service
The data model will contain structures that we can map to on-screen display attributes as well as methods to invoke remote services. From the PersonnelDirectory iterations and mockups we already created, we know what we expect to see on each page within the application. Just to recap…what do we expect to see on the search page? Data-entry fields requesting…what? Employee attributes. What about the search results page? We expect to see a list of employees, which is really a list of employee attributes. And then on the details page we expect to see even more employee attributes. All of the pages within our application deal with just one entity: Employee. Each view within our application will capture or display attributes about an employee or a group of employees.
You may be familiar with JDeveloper Web Service Data Control. JDeveloper 12c with MAF 2.1 has great support for XML-based web services, but not for JSON. At this time, developing for JSON services requires invoking service operations directly through Java. While it may seem a little more complicated from a developer perspective, using JSON and REST reduces network strain resulting in better performing applications.
The Employee Entity
Let’s create the entity Java class that we have determined will satisfy our requirements. Create a new Java class within the ViewController project in JDeveloper. There are several ways to create a new Java class:
![]() Right-click the ViewController project and select New | Java Class from the context menu.
Right-click the ViewController project and select New | Java Class from the context menu.
![]() Select File | New | Java Class from the JDeveloper menu bar.
Select File | New | Java Class from the JDeveloper menu bar.
![]() Click the drop-down arrow beside the New toolbar button in the JDeveloper toolbar and select Java Class.
Click the drop-down arrow beside the New toolbar button in the JDeveloper toolbar and select Java Class.
Whichever mechanism you choose, just be sure that the ViewController project is the active project. The easiest way to confirm this is to select the ViewController node in the Projects explorer sidebar. We want JDeveloper to create the new Java class in the ViewController project rather than in the ApplicationController project.
When the JDeveloper Create Java Class dialog appears, name the new class Employee and set the Package to com.example.ps.hcm.mobile.entities. Leave all other fields at their default values. Figure 11-4 is a screenshot of the Create Java Class dialog.

FIGURE 11-4. Create Employee entity class dialog
The Employee Java class will have an attribute for each field displayed on any screen, or view, within the mobile application. Here is a list of attributes:
![]() emplid
emplid
![]() name
name
![]() address1
address1
![]() city
city
![]() state
state
![]() postal
postal
![]() countryCode
countryCode
![]() phone
phone
![]() photoDataUrl
photoDataUrl
Each of these attributes contains string, or text, data. Add them as private String fields to the Employee class as follows:
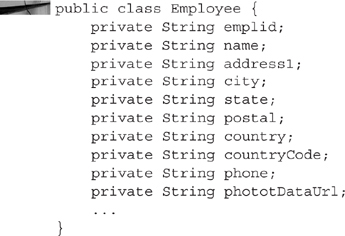
NOTE
I included the class declaration for context. Place your field definitions directly below the first line of the class declaration.
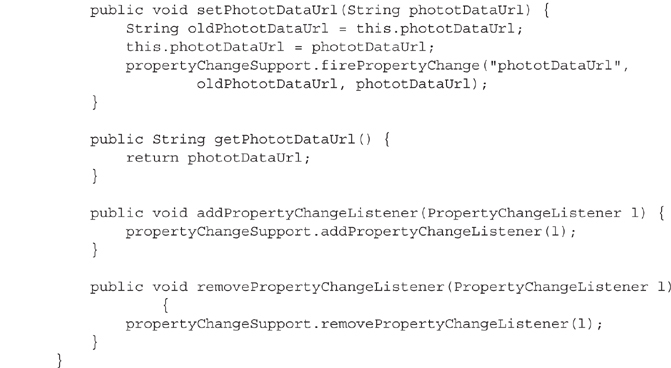
After adding these new fields, JDeveloper will provide you with feedback via markers in the right-hand gutter. These markers tell you that the class contains unused field definitions, which can be very valuable after you have written a fair amount of code. Ignore these warnings for now. They will go away as soon as we implement getter and setter methods. Right-click near the end of the Java class editor and choose Generate Accessors from the context menu. The Generate Accessors dialog will appear. Check the box next to the Employee node at the very top of the list. Checking this box will select all child nodes. We want to generate accessors for all fields within the Employee class. Ensure that the scope for these accessors is set to public and that the Notify listeners when property changes box is selected. The Notify listener when property changes functionality ensures the UI is updated when we use Java to change entity attributes. Figure 11-5 is a screenshot of the Generate Accessors dialog. When you click the OK button, JDeveloper will generate a getter and a setter method for each field selected in the Generate Accessors dialog. After creating accessors, the markers in the right-hand gutter should disappear and the overview marker at the top will turn to green, providing you with instant feedback that your Java code is in good order.

FIGURE 11-5. Generate Accessors dialog
![]()
NOTE
It is very important that you right-click at the end of the Java class file rather than somewhere in the middle. JDeveloper will use your click location as the insert location when adding accessor methods. It is not likely that you want JDeveloper to insert these anywhere except after the constructor definition.
Here is a complete listing of the Employee class:


JSON Helper Classes
Unfortunately, the JSON data structure returned by the PeopleSoft REST service doesn’t match the Employee object. A matching JSON data structure would look like this:

The PeopleSoft REST Service Operation, however, insists on including an object identifier. We named that identifier DETAILS. Here is a sample (relevant text in bold):

If our structures matched, we could let the MAF JSONBeanSerializationHelper convert the employee details JSON response directly to an Employee object. Instead, we have to write a few lines of conversion code. First, we will create a class that converts a JSON object into an Employee entity and then we will create a class that converts the search results service response into an array of Employee entities.
Converting a JSON Object into an Employee Entity The JSONBeanSerializationHelper.fromJSON(java.lang.Class type, java.lang.String jsonString) method will convert a JSON string (the second parameter) into an object where the return type matches the first parameter…or at least that is the design. Actually, if the type specified implements JSONDeserializable, it will return an object with a type that matches the return value of the JSONDeserializable.fromJSON method. It is this design feature that we will leverage to keep our converters separate from our entities.
Create a new Java class in the ViewController project named JsonObjectToEmployee with a package name of com.example.ps.hcm.mobile.json.converters. In the Implements section, add the JSONDeserializable interface. Figure 11-6 is a screenshot of the Create Java Class dialog.

FIGURE 11-6. Create Java Class dialog
Implement the fromJSON method as follows. I included the complete class definition for reference purposes even though you only need to implement the fromJSON method (in bold text). JDeveloper will write the rest of the Java code for you.

As noted in the JSON example above, the details Service Operation JSON response contains a nested object. The Java code in our fromJSON method first identifies the input parameter as a JSONObject and then extracts that inner employee details object.
![]()
NOTE
Rather than creating an Employee converter class we could have modified the Employee entity to implement the JSONDeserializable interface. How you implement JSONDeserializable is a matter of preference.
Create another Java class named JsonArrayToEmployeeArray with a package name of com.example.ps.hcm.mobile.json.converters that also implements JSONDeserializable. The following code listing contains the Java code for the JsonArrayToEmployeeArray class. As before, I included the entire class definition even though you only need to enter code into the fromJSON method.
NOTE
JDeveloper will automatically resolve missing imports. You can speed up the process by pressing the ALT-ENTER keyboard combination whenever JDeveloper identifies an unknown definition.

![]()
NOTE
The Oracle A-Team created a Mobile Persistence Accelerator that eases the consumption of REST services as well as providing SQLite offline persistence. You can learn more about the A-Team Mobile Persistence Accelerator at http://www.ateam-oracle.com/getting-started-with-the-a-team-mobile-persistence-accelerator/.
URI Utility Class
Our application will invoke four different REST URLs. Each of these URLs shares common segments. Rather than littering our Java classes with URL references, let’s create a utility class responsible for constructing REST service URLs. Create a new class named UriUtil. Set the package name to com.example.ps.hcm.mobile.uri. To this new class, add the following Java code:
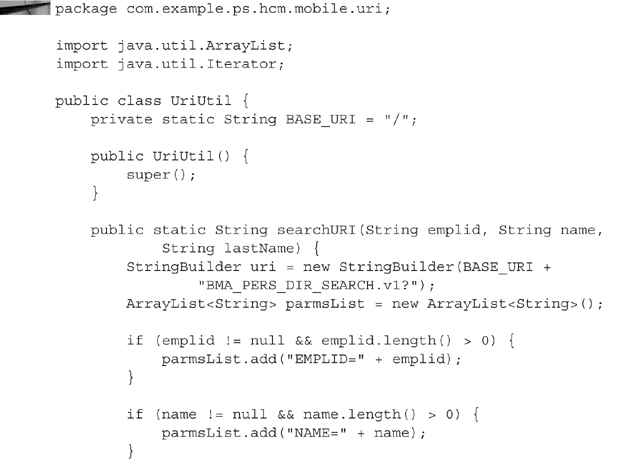

All of these methods concatenate Service Operation parameters into proper REST URLs. The only method with any substance is the searchURI method. The searchURI method takes several optional parameters and converts them into query string key/value pairs, but only for parameters with values.
If you review the methods of the UriUtil class, you will notice that they return a URL fragment; specifically, something like /BMA_PERS_DIR_DETAILS.v1/KU0001. This is the fragment of the URL that is unique to each Service Operation. Later we will create an Application Resource REST connection that identifies the primary, static portion of the URL.
Data Control JavaBean
Next, we need a Java class to invoke service operations. For example, after collecting search parameters we need to invoke the PeopleSoft search REST Service Operation. Likewise, after selecting a result we then have to invoke a Service Operation to fetch details. From the UI perspective, we want to call these Service Operations in response to clicking a button or selecting an item from a list.
With the ViewController project selected, add a new Java class named PersonnelDirectoryDC. Set the package name to com.example.ps.hcm.mobile.datacontrol. We will bind UI events to methods of this Java class through a JavaBean data control. JDeveloper will create a basic Java class with the following definition:

Data Bound Accessors Our UI will have a view that displays search results and another view that displays employee details. Let’s add member fields to hold data for these two views. Just before the Java class constructor, add the following field definitions. I included the full class definition for context. Additions are in bold text.

Now we need public methods we can bind to UI elements. As with the other Java classes, move to the end of the file, right-click, and then select Generate Accessors from the context menu. Check the very top box to generate getters and setters for all fields. Make sure the scope is set to public. Unlike the other times we used the Generate Accessors routine, this time deselect the Notify listeners when property changes option. Later we will implement ProviderChangeSupport instead. Provider Change support is the collections equivalent of Notify listeners. After JDeveloper generates accessors, change the scope of the two setXXX methods from public to private. Our use case only requires read access to these members, not write access. The reason we generate write (or set) accessors is to provide a central mechanism for updating member field values from within other methods of the class. Specifically, we will set values internally after invoking web services. The PersonnelDirectoryDC Java class should now contain the following additional four methods. Notice that I changed the scope qualifier of setSelectedEmployee and setSearchResults to private.

Data Provider Change Support The first page a user experiences within our mobile application is the search page. When viewing the search page the first time, the searchResults collection and selectedEmployee object will be empty. Later when we actually have values assigned to these member fields we want to make sure UI knows about data control changes. We notify the framework of bound variable changes through a class called ProviderChangeSupport. Let’s add ProviderChangeSupport to the PersonnelDirectoryDC. Add the following field and method declarations to the PersonnelDirectoryDC Java class:

![]()
NOTE
The providerChangeSupport member field is marked as transient even though the PersonnelDirectoryDC class is not marked as serializable. We write code for two audiences. The first audience is the computer that will interpret the code. The second is other developers that have to maintain our code. The computer doesn’t require the transient attribute, but other developers will appreciate knowing that this field should not be serialized.
Next, update the setSelectedEmployee and setSearchResults methods to fire a provider refresh when the corresponding property changes. The following is a listing of the two methods with additions in bold text:

NOTE
You can find a great YouTube video discussing MAF provider and property change support at https://www.youtube.com/watch?v=ZJePFhfVqMU.
Invoking Service Operations Our UI will invoke two primary service operations. The first operation expects search criteria and returns a list of matching search results. Converting those requirements into a data control method declaration would result in a method signature resembling the following:

The UI will invoke searchForEmployees through a search button on a search form. Wait…didn’t I say that it would return a list of search results? That method signature says the method does not return any results. Instead of returning results, the method will make the results available through the searchResults member field. Our UI will bind to the searchResults bean property exposed through the getSearchResults() method.
The other method we need to implement is the select employee method. Here is its method signature:

The user will invoke the selectEmployee method by selecting an employee from a list of search results.
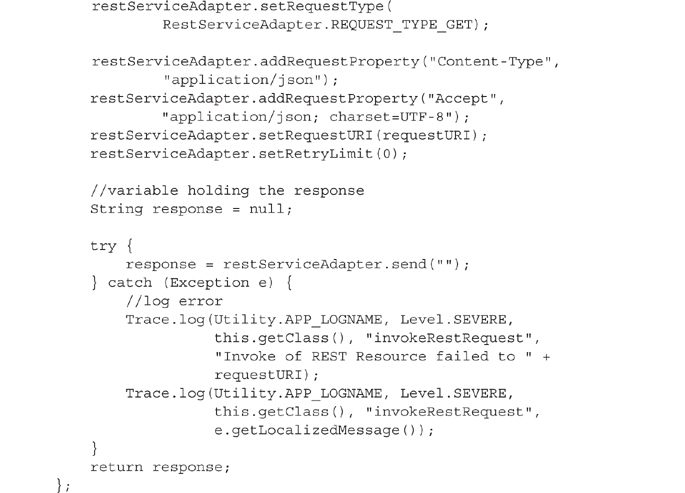
Since both methods invoke REST service operations, they share a lot of similar code. Rather than writing that code twice, let’s create a private helper method named invokeRestRequest. The following code listing provides the implementation for this new method:

![]()
NOTE
This method introduces the oracle.adfmf.util.logging.Trace class and its log method. I will write more about the Trace class later.
Inside the body of the invokeRestRequest method you will see the following line:
![]()
The connection PersonnelDirectoryRestConn does not exist yet. MAF maintains a separate connection descriptor so we don’t have to hard code the REST end point in our URI utility class. Create a new connection by invoking the New Gallery through the File | New | From Gallery menu item and then selecting Connections | REST Connection from the Gallery. Choose the Create Connection in Application Resources option. Name the connection PersonnelDirectoryRestConn and set the URL to the portion of the REST service URL that is common across all REST services used by the application. To connect to my VirtualBox PUM environment configuration, the URL is http://192.168.56.102:8000/PSIGW/RESTListeningConnector/PSFT_HR. Figure 11-7 is a screenshot of the new REST connection.

FIGURE 11-7. Create REST Connection dialog
NOTE
The Create REST Connection dialog contains a Test Connection button near the bottom. Attempting to test the connection with that button will result in an error because our REST Connection points to a URL fragment, not the entire REST URL.
With the common service operation code written, let’s implement the remainder of the searchForEmployees and selectEmployee methods. First the searchForEmployees method:
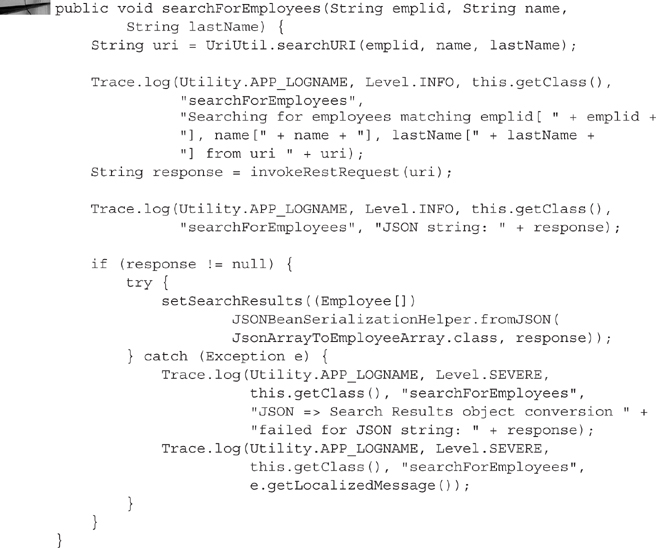
The code in the above listing performs the following tasks:
![]() Asks
Asks UriUtil to compose a URL for the search service given the input parameters.
![]() Calls our
Calls our invokeRequest method to fetch results from the REST search service.
![]() Uses the MAF
Uses the MAF JSONBeanSerializationHelper and our custom JsonArraytoEmployeeArray class to convert the service JSON response into an array of Employee objects.
The selectEmployee method is very similar:

Besides the obvious fact that this method invokes a different rest service and creates a different object, this method has one very important difference from the searchForEmployees method: selectEmployee calls two REST services. The first REST service selects an employee’s details and the second selects the employee’s photo. Considering that all of our use cases require both the image and the employee’s details, it may make sense to combine these two services into one.
The complete class listing follows:


Creating the Data Control Find the PersonnelDirectoryDC.java file in the project explorer. It is inside the folder ViewController/Application Sources/com.example.ps/hcm/mobile/datacontrol. Right-click the PersonnelDirectoryDC.java node and choose Create Data Control from the popup menu. When the Create Bean Data Control wizard appears, accept the default values assigned in each step of the wizard by clicking Next and then click Finish. After the wizard finishes, expand the Data Controls palette. If it is empty, then click the refresh button (the button beside the words “Data Control” with two arrows forming a circle). You should now see the PersonnelDirectoryDC data control as depicted in Figure 11-8.

FIGURE 11-8. PersonnelDirectoryDC data control
NOTE
When you create a Data Control, JDeveloper opens the DataControls.dcx file. This file contains metadata describing data controls. From this file, you can edit data-control UI display hints, validation rules, and so on. If you plan to use the same data control on many views, then you can set display hints, such as the display label and default control type, in the control metadata rather than on each page that uses the data control.
User Interface
MAF displays application functionality to users through artifacts called features. Features become springboard icons. Locate the maf-feature.xml file in the JDeveloper project explorer (ViewController/Application Sources/META-INF/maf-feature.xml) and open the file. Click the add feature button (green plus icon) within the feature grid to create a new feature named DirectorySearch. Figure 11-9 is a screenshot of the Create MAF Feature dialog.

FIGURE 11-9. Create MAF Feature dialog
The maf-feature.xml file contains a significant amount of metadata for configuring the appearance of each feature, including how (icons) and when (constraints) to display the feature. To keep this example as simple as possible, we will just focus on feature content. With the new DirectorySearch feature selected in the Features grid, select the Content tab. You will see that the content grid already has one item with a default type of MAF AMX Page. MAF feature content can come from the following:
![]() MAF AMX Page
MAF AMX Page
![]() MAF AMX Task Flow
MAF AMX Task Flow
![]() Local HTML
Local HTML
![]() Remote URL
Remote URL
We are going to build our solution as a single MAF AMX Task Flow. Change the Type value for the com.example.ps.hcm.DirectorySearch.1 content row to MAF AMX Task Flow. JDeveloper will immediately highlight the File field telling you that an MAF AMX Task Flow requires a file. Click the green plus sign to the left of that field to create a new AMX Task Flow. Name the new Task Flow DirectorySearch-task-flow.xml as shown in Figure 11-10.

FIGURE 11-10. New MAF AMX Task Flow
Figure 11-11 is a screenshot of the maf-feature.xml file after adding the DirectorySearch Task Flow.

FIGURE 11-11. maf-feature.xml file
JDeveloper will automatically open the DirectorySearch-task-flow.xml file.
![]()
NOTE
You can reopen a closed Task Flow by searching for it under the ViewController/Web Content node within the project explorer.
Designing a TaskFlow
The Task Flow designer looks like a flow chart designer…kind of like Microsoft Visio. We will drag Views and data control Methods onto the task flow and connect them with Control Flow arrows.
From our experience with prior chapters, we already know that our Personnel Directory will have a search page, a search results page, and a details page. We also know that these three pages are linked together by two Service Operations:
![]() A search operation
A search operation
![]() A details operation
A details operation
Let’s build a flow chart describing this use case. From the palette on the right side of JDeveloper, drag a view component into the upper left corner of the new Task Flow and name the view search. Drag another view to the right of the first but down a little ways and name it results. Drag a final view component to the right of the results view and parallel to the search view. Name this final view details. Align the three so that they make two eyes and a nose as if you were trying to create a smiley face instead of a flow chart. The search view represents the eye on the left (I believe that would be smiley’s right eye, which is your left). The details view is the other eye. Move the results view down in the middle between the two eyes. This is smiley’s nose.
The search form will gather parameters for the searchForEmployees data control method. The searchForEmployees data control method fetches data for the results page. Let’s model the invocation of this method by dragging searchForEmployees from the Data Controls palette onto the Task Flow designer. Dragging a data control operation onto a Task Flow causes JDeveloper to display the Edit Action Binding dialog. JDeveloper noticed that the searchForEmployees method requires parameters and it wants you to specify values for those parameters. The values for the searchForEmployees method will come from data entered into the search page. What we need is a container for values that we can pass between the search page and the searchForEmployees operation. MAF satisfies this requirement through a runtime variable named pageFlowScope. The pageFlowScope variable is a dynamic object to which we can add custom properties. Later when we define the search page, we will transfer values from the search page data entry fields into the pageFlowScope object. Right now, we need to tell JDeveloper the names of our custom pageFlowScope properties so we can continue defining our Task Flow diagram. Use the values from Table 11-1 to map searchForEmployees parameters to pageFlowScope custom attributes.

TABLE 11-1. searchForEmployees parameter mappings
Figure 11-12 is a screenshot of the Edit Action Binding dialog.

FIGURE 11-12. Edit Action Binding dialog
Now use the Control Flow Case component to connect the search page with the searchForEmployees method. Name the Control Flow Case search. Drag another Control Flow Case from searchForEmployees to the results page. Keep the default name. Your Task flow should resemble Figure 11-13. We will add a few more items to this Task Flow before we finish.

FIGURE 11-13. DirectorySearch-task-flow intermediate state
So…let’s say the user performing a search enters some criteria, clicks search, and then views the results. While viewing the results, the user realizes that the desired employee is not in the list. The user decides to return to the search form and enter new criteria. Let’s model this in our Task Flow. Drag a Control Flow Case between the results page and the search page and name it returnToSearch.
The Search Parameter View
We still need to connect the details view to the rest of the Task Flow components, but let’s pause here and construct enough of the view definitions to test the data model. For each view within the Task Flow, double-click the view icon to create a new AMX page. Keep the default name and directory. For the Facets, select the Header and Primary Action. Figure 11-14 is a screenshot of the Create MAF AMX Page dialog for the search.amx page.

FIGURE 11-14. Create MAF AMX Page dialog
When the new AMX page designer appears, drag the searchForEmployees operation from the Data Controls palette onto the XML page just before the closing </amx:panelPage> tag. When the popup menu appears, select MAF Parameter Form. An Edit Form Fields dialog will appear. Enter a descriptive label for each field. For example, enter Employee ID for the emplid field and so on. Figure 11-15 is a screenshot of the Edit Form Fields dialog.

FIGURE 11-15. Edit Form Fields dialog
JDeveloper will insert XML into the AMX page to define the parameter form we just added. It also added a button to invoke the searchForEmployees operation. That isn’t how we plan to execute the searchForEmployees method. Instead, we want to use a control flow case to route the request through the searchForEmployees operation and then to the results page. Delete the <amx:commandButton> XML element that should be near the end of the AMX page definition. Just to make sure you are deleting the correct button, the text for the button will be searchForEmployees. Now switch to the Bindings tab and delete the searchForEmployees binding. To delete a binding, select the binding from the Bindings list and then click the red X within the header of the list. Figure 11-16 is a screenshot of the bindings after making these changes.

FIGURE 11-16. Search AMX page bindings tab
NOTE
Adding the parameter form created an extra binding we don’t intend to use. Alternatively, we could have manually dragged a form and then input text elements to the page, one for each field. The add-and-then-delete approach presented here was just a little more efficient.
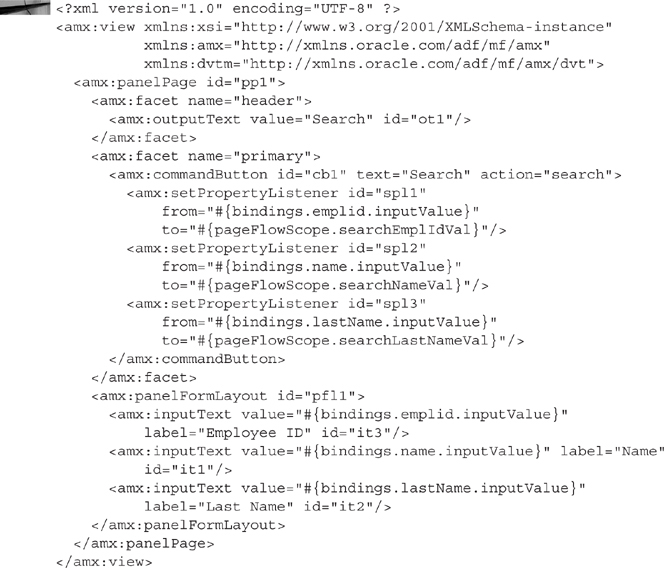
Switch back to Source view and locate the amx:outputText element within the header facet. Change the value attribute to Search. This is the text that will be displayed in the page header region. In like manner, locate the amx:commandButton within the primary facet and use the properties inspector to set its text attribute to Search. This is the text that will be displayed on the face of the button. While still editing the amx:commandButton within the properties inspector, set the action attribute to search. The action attribute identifies the Control Flow Case we configured in the Task Flow definition. From the Components palette on the right, drag three setPropertyListener components onto the amx:commandButton that resides in the header facet (it should be the only amx:commandButton). These setPropertyListeners will move values from the search parameter form into the pageFlowScope attributes that our searchForEmployees method expects. With your cursor inside one of the amx:setPropertyListener elements, you should find a Properties Inspector in the lower right corner of JDeveloper. Use the Properties Inspector to set the From and To attributes for each setPropertyListener according to values shown in Table 11-2.

TABLE 11-2. setPropertyListener attribute mapping
![]()
NOTE
When you place your cursor inside the From or To attribute of the Properties Inspector you will see an icon appear just to the right of the field. Selecting this icon gives you access to the Expression Builder. Inside the Expression Builder, you can navigate through the bindings to select the correct binding for each setPropertyListener.
Your search.amx file should now contain the following XML:
We have now written enough code, created enough definitions, and configured enough options to test this application. But, let’s make one more adjustment before testing. Our Java model classes contain Trace statements that print to the application’s log file if the log level is set to INFO or higher. Since we haven’t configured the results UI yet, we will have no visual feedback that our web services executed successfully. By setting the log level to INFO, however, we can view results in the log file before we finish configuring the UI. From the Application Resources palette, expand the node Descriptors/META-INF, and then open the file logging.properties. Replace all instances of the word SEVERE (the default log level) with INFO. Save and then close the logging.properties file.
Make sure your emulator is running and that you can connect to your PeopleSoft instance. When you are ready, select Application | Deploy | Android1 from the JDeveloper menu bar. Select Deploy application to emulator when the Deployment Action dialog appears. Click Finish to begin the deployment process. You can track the deployment status from deployment log located at the bottom of the JDeveloper application window.
![]()
NOTE
Deploying to an android emulator on my laptop takes 3–5 minutes.
After deployment, look for the PersonnelDirectory app within the emulator’s list of apps and then launch the PersonnelDirectory app. Enter some valid criteria into the search parameter form and then click the search button. Figure 11-17 is a screenshot of the search parameter form.

FIGURE 11-17. MAF search parameter form
The next page you will see should be an empty results page. The page is empty because we haven’t added any output controls to that page. Nevertheless, we can confirm the design of our data model by reviewing output in the MAF application log file. The log file for an Android device is a text file located in the root of the sdcard and shares the same name as the application. Therefore, we are looking for a file named sdcard/PersonnelDirectory.txt. The mount point for an sdcard varies by Android release, but is easily located by launching the monitor application from the sdk ools folder of the Android SDK, and then using the File Explorer. Figure 11-18 is a screenshot of the log file selected in the Android Monitor File Explorer.

FIGURE 11-18. Android Device Monitor File Explorer
You can download and view the file from the File Explorer. I prefer to note the path and then use the following command line syntax:
![]()
![]()
NOTE
About my preference for the command line…it isn’t that I really like typing commands. The command line just has this cool feature called command-line history. You can easily recall the last command by pressing the up arrow on the keyboard. What this means is that I type the command once and then recall it each time I want to view the log by just pressing the up arrow on my keyboard.
Download the log file and search for the text PersonnelDirectoryDC. These are the lines we printed from the PersonnelDirectoryDC JavaBean. You should see at least one line showing the URI that resembles:

You should see another line containing the REST JSON response. If your search criteria did not return any results, then the log file should contain the following SEVERE warning:

The Search Results View
Now that we know our data model works and our search operation executes successfully, let’s move on to defining the search results view. The search results view is just a full page list of results that serves as navigation. Touching an item in the list should navigate to the details view for the selected list item.
Open the results.amx page and drag the PersonnelDirectoryDC searchResults collection from the Data Controls palette onto the results.amx page just below the primary facet. Select the MAF List View item from the popup that will appear when you drop the data control item. When the ListView Gallery appears, select the first variation of the Simple format. Figure 11-19 is a screenshot of the ListView Gallery.
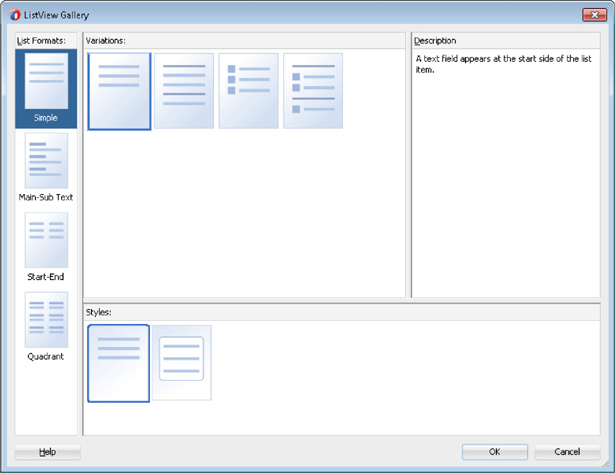
FIGURE 11-19. ListView gallery
Next, we need to tell the ListView wizard what data to display. In the Edit List View dialog, replace the emplid Value Binding with the name field. Figure 11-20 is a screenshot of the of the Edit List View dialog after updating the value binding.

FIGURE 11-20. Edit List View dialog
The List View wizard added bindings for the data control and the name attribute of the searchResults collection. Since we need to pass the employee ID onto the details view, we will also need to add a binding for the emplid attribute. While still editing results.amx, switch to the Bindings tab and locate the searchResults binding. It will be in the list on the left side. Select the searchResults item and then click the edit icon (the pencil) in the Bindings list header. Note the list of available attributes and the list of display attributes. These are located at the bottom of the Edit Tree Binding dialog that will appear when you click the edit icon to edit the searchResults binding. Use the shuttle button to move the emplid attribute to the list of Display Attributes. Figure 11-21 is a screenshot of the results.amx display attributes.

FIGURE 11-21. Display Attributes
Return to Source view and update the amx:listItem element’s child amx:outputText element. Since we now have the employee ID available, let’s add it to the list item display. Change the value attribute of the amx:outputText element to match the following:
![]()
Notice that we added the employee ID row attribute inside of parenthesis. When we run this we expect to see a list containing rows similar to the following:
![]()
Deploy the application to your emulator and verify that the results page appears as expected. Figure 11-22 is a screenshot of the emulator list view showing a list of search results.

FIGURE 11-22. Screenshot of list view in emulator
Let’s return to the Task Flow and finish assigning routes. As it stands, we don’t have a route to take us from the results page to the details page. Drag the selectEmployee method from the PersonnelDirectoryDC data control onto the DirectorySearch task flow. When the Edit Action Binding dialog appears, set the emplid parameter to #{pageFlowScope.selectedEmplId}. Figure 11-23 is a screenshot of the Edit Action Binding dialog.
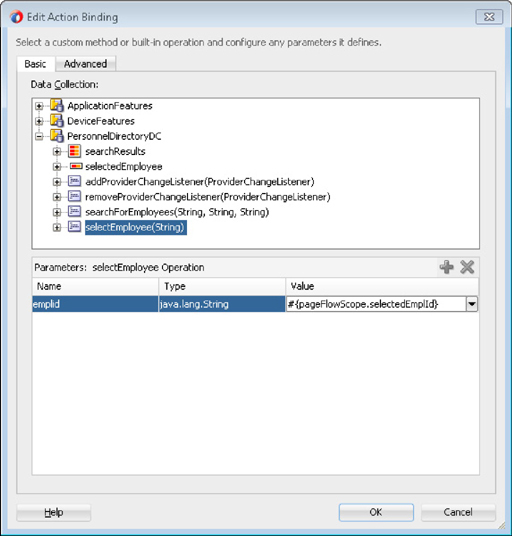
FIGURE 11-23. Edit Action Binding dialog
Drag a Control Flow case from the results view to the selectEmployee method and name it select. Drag another Control Flow case from the selectEmployee method to the details view. Accept the default name of selectEmployee. Now we need return routes for the details view. While viewing employee details, a user may decide to either return to the search results or perform a new search. Drag two Control Flow cases from the details view with one going to the results view and another returning to the search view. Name the results Control Flow case returnToList and name the search Control Flow case returnToSearch. Figure 11-24 is a screenshot of the completed Task Flow.

FIGURE 11-24. DirectorySearch completed Task Flow
Let’s return to results.amx and finish the layout. We now have targets defined so we can invoke some action when the user selects an item in the ListView. Select amx:listItem and use the Property Inspector to set the listItem action to select. This is the name of the Control Flow case that invokes the selectEmployee data control method. Add a setPropertyListener just inside the amx:listItem; we will use this to set the ID of the employee when a user taps a list item. Select the amx:setPropertyListener and set the From attribute to #{row.emplid}. Set the To attribute to the value #{pageFlowScope.selectedEmplId}.
Let’s update the header attributes of the results.amx page before moving onto the details.amx page. Locate the amx:outputText within the header facet and change the value to Search Results. Just below the header facet you should see the primary facet. Set the action of the button within the primary facet to __back. This is a special MAF Control Flow case that converts the button into an operating system-specific back button. Your results.amx page should now contain the following XML:

Deploy and test your application. The results.amx view should now invoke the selectEmployee operation and transfer to the details.amx page. If it weren’t for the application log, we would have no way of knowing this because the details.amx page is currently empty. From the log file, we can confirm that the Task Flow is working properly because the log file contains entries similar to the following:

The Details View
Creating the details page is a little trickier than the rest. The details view is a read-only page that exists for information and action. Not only should it provide relevant information but it should also facilitate actions such as placing a call or mapping an address. To match the mockups from Chapter 5 and provide actionable links we will need to
![]() Create a layout using a mixture of AMX components and CSS.
Create a layout using a mixture of AMX components and CSS.
![]() Manually specify data bindings.
Manually specify data bindings.
Open the details.amx page and update the header and primary facets just like we did for the results page. Set the header facet amx:outputText value to Details and set the action of the primary facet amx:commandButton to __back.
Details Layout Part I In this chapter so far we have used a panelFormLayout and a listView. Both of these automatically format the contents of the page according to best practices. The details page is a bit more free-formed. The layout will consist of two stacked tables. The top table will hold the photo, name, and ID. The bottom table will contain phone number and address links. Add a tableLayout just after the primary facet. Set the table width to 100% and the margin property to 12px 16px. To this tableLayout and a rowLayout and then add two cellFormat elements inside the rowLayout. Your XML should resemble the following (tableLayout in bold text):

The first cellFormat, which likely has an ID of cf1, will contain an employee photo. Drag the photoDataUrl attribute of the PersonnelDataDC.selectedEmployee data control into the first cellFormat. We don’t actually want to display the photoDataUrl because it contains quite a bit of base64 encoded binary data. The reason we added it to the page in this manner is to easily create a data binding and generate the appropriate expression language selector. Into this same cellFormat, drag an image component from the component palette. Set the image source attribute to the expression language applied to the outputText. Add an inlineStyle attribute with a value of width:100px;. We don’t want the image width to exceed 100 pixels. Delete the donor amx:outputText element. The image XML should now resemble:
![]()
Inside the second amx:cellFormat, which likely has the ID cf2, add a panelGroupLayout. The panelGroupLayout can either display its contents horizontally or vertically. We want it to display the employee name and ID in a stacked fashion so set the amx:panelGroupLayout element’s layout attribute to vertical. We also want the contents aligned to the right of the layout so set the halign attribute to end. Now drag the name and emplid attributes from the PersonnelDirectoryDC.selectedEmployee data control field into the amx:panelGroupLayout. When prompted to select the control type, choose Text | MAF Output Text.
The city, state, postal code, and country come next, but it would be nice to add a little vertical whitespace between the name and address. Drag a spacer from the component palette and place it under the emplid outputText field. Set the height of the spacer to 20. Now drag the city, state, postal, and country fields from the selectedEmployee property of the PersonnelDirectoryDC data control and place them underneath the spacer.
We will combine these outputText bindings into just two amx:outputText elements. Dragging them onto the AMX page gives us the necessary expression language and page bindings. Cut the expression language out of the state and postal code outputText elements and add them to the city outputText value attribute so that the contents is formatted the same as an envelope. Like this:

After concatenating values, delete the donor outputText elements. For each outputText within the tableLayout, set the styleClass to amx-text-sectiontitle.
Now is a good time to deploy and test the details page appearance. Your details page should resemble Figure 11-25.

FIGURE 11-25. Details page part I
Details Layout Part II Drag a new tableLayout component underneath the first tableLayout. We want this table to appear similar to the first table, so set the width to 100% and the margins to 12px 16px. Later you will learn how to style AMX page content using CSS. This tableLayout is one of the items we will style. To prepare for our future styling needs, set the tableLayout element’s styleClass to contactDetails.
This lower tableLayout will have two columns and two rows. The first row will contain the phone number and the second row will contain the employee address. The first column will be a textual representation of the information so a user can copy the text. The text will be two lines tall. The second column will contain a Go Link, which is a special name for a standard hyperlink that launches a task outside of the MAF application. The link in this column will use an icon that is as tall as two lines of text.
To the tableLayout, drag two rowLayout elements. Inside each rowLayout, drag two cellFormat elements. Set the halign of the first cellFormat in each row to start and set the halign of the second cellFormat to end. This will cause the contents of the left column to be left aligned and the right column to be right aligned. Stay with me, this will get a little confusing. Drag a panelGroupLayout inside the first cellFormat of each row. Set the layout of each panelGroupLayout to vertical. Now drag an outputText element into each panelGroupLayout. Set the value of the first outputText to Call Phone. Set the value of the second to Location. If you get lost, review the full AMX XML at the end of this section.
Drag the countryCode and phone attributes into row one column one and drag address1 inside row two column one. Place them inside the panelGroupLayout for the corresponding row and choose MAF Output Text as the control type. After JDeveloper creates the appropriate amx:outputText elements, combine expression language in the value attributes for the countryCode and phone fields. We want these to look like a normal phone number as shown in the following listing:
![]()
Delete the extra amx:outputText after combining the values into a single field. Drag a Link (Go) into the empty cell in each row. Set the URL attribute of the phone row’s amx:goLink to the same value as the phone’s outputText binding with the tel: prefix like this: tel:#{bindings.countryCode.inputValue} #{bindings.phone.inputValue}. This link will eventually contain an icon rather than text. Rather than using an image we will use FontAwesome, the same icon font we used in our AngularJS application. We will configure FontAwesome later. For now, set the style class to icon phone-icon.
The URL for the address amx:goLink is similar to the link we used in our AngularJS application: https://maps.google.com/?q=#{bindings.address1.inputValue}+#{bindings.city.inputValue}+#{bindings.state.inputValue}+#{bindings.postal.inputValue}+#{bindings.country.inputValue}. As with the phone link, set the style class for the location link to icon map-marker-icon.
Deploy the application to an emulator and test your work. The layout should be functional; perhaps not pretty, but functional. Test the links to make sure the phone link opens a dialer and the location link opens a web browser. Figure 11-26 is a screenshot of our work thus far.

FIGURE 11-26. Details page part II
The following is a complete listing of the details.amx page:


Changing the Appearance with FontAwesome
The search button on our search page should have a magnifying glass and the details page needs icons for the two amx:goLink elements. As you learned in Chapter 6, FontAwesome is a great way to add icons to HTML elements. There are two ways to add FontAwesome to an MAF project:
![]() Globally, by extending the MAF skin
Globally, by extending the MAF skin
![]() Local to a feature, by adding FontAwesome CSS to an individual feature within the maf-feature.xml file
Local to a feature, by adding FontAwesome CSS to an individual feature within the maf-feature.xml file
We will take the first approach and extend the default skin. Download a fresh copy of FontAwesome from http://fortawesome.github.io/Font-Awesome/ and expand the archive into your ApplicationController public_html directory. On my laptop, the public_html folder is in C:JDevelopermyworkPersonnelDirectoryApplicationControllerpublic_html. Expanding the archive will create css and fonts subdirectories.
Return to JDeveloper and expand the Application Resources palette. Look for the Descriptors node and then expand it and the ADF META-INF child node. This will reveal the maf-config.xml file. Double-click this file to open it and look for the default skin family and version. You will need the values from these nodes to extend the default skin. My maf-config.xml file contains these values (values in bold):
![]()
From the Projects Explorer in JDeveloper, expand the ApplicationController/Application Sources/META-INF node and open the maf-skins.xml file. Drag a skin-addition element from the components palette into the adfmf-skins element. JDeveloper will prompt for a skin-id and a style-sheet-name. The skin-id is a concatenation of the default skin-family and skin-version. My value based on my maf-config.xml file is mobileAlta-v1.3 (skin-family-skin-version). Enter the path and name of the FontAwesome CSS file into the style-sheet-name field. Since we copied the FontAwesome files to public_html, the style-sheet-name value should be css/font-awesome.min.css. MAF will now add the font-awesome.min.css file to the head element of every AMX page in our application. The following code listing contains the contents of my maf-skins.xml file:

NOTE
We won’t actually be using the fa and fa-* classes directly. In fact, the only part of the font-awesome.min.css file we will actually use is the font declarations. Rather than extend the MAF skin, we could achieve the same affect by adding the FontAwesome font declarations directly to a feature-specific CSS file.
Now we need to add some custom CSS to our feature to configure the search button and details links. Back in the ViewController project, right-click on the Web Content node and choose New | CSS File. Name the new CSS file search.css. Delete any content JDeveloper added to search.css before continuing.
Next, we need to associate the new search.css file with the AMX Task Flow. Open the maf-feature.xml file and switch to the Content tab. Locate the Includes section and click the green plus sign to add a new resource. In the Insert Includes dialog, select Stylesheet as the type and then select the resources/css/search.css file. Figure 11-27 is a screenshot of the Task Flow after adding search.css to the Includes section.

FIGURE 11-27. Task Flow after adding search.css
Styling the Search Page Let’s add some CSS that will display a magnifying glass next to the search button. Open the search.css file and insert the following:

This CSS uses FontAwesome along with a Unicode sequence to display a magnifying glass icon at the beginning of any button with the class search-icon. The only problem is that we don’t have any buttons that use the class search-icon. Let’s remedy that now. Open the search.amx file and locate the search button within the primary facet. Set the styleClass to search-icon. The amx:commandButton will now contain the following markup:
![]()
Redeploy your application and confirm that the search page search button contains a magnifying glass icon.
![]()
NOTE
If you don’t see the magnifying glass or don’t see it where you expect, use the Chrome’s remote inspector, which was described earlier, to identify the reason.
Styling the Details Page Now let’s style the lower table of the details page. This will require a little more CSS. First, let’s add a border under each of the cells as well as some extra padding. Add the following CSS to search.css:

![]()
NOTE
The CSS above uses !important. Never use !important…unless it is the only way to override someone else’s CSS.
Next, let’s style the icons within the lower table. Add the following CSS to search.css:

The first two declarations set the appearance of each icon and the second two determine the actual icon.
![]()
NOTE
Need to figure out the Unicode sequence for each FontAwesome icon? Visit the FontAwesome cheat sheet at http://fortawesome.github.io/Font-Awesome/cheatsheet/.
One last thing…we need to delete the goLink1 and goLink2 text from the details.amx page. Open the details.amx page and look for the amx:goLink elements. Delete the contents of the text attributes. Each goLink should now start with the following:
![]()
Redeploy your application. The search and details pages should now resemble Figure 11-28.

FIGURE 11-28. The search and details pages
Implementing Additional Routes
Our TaskFlow defines routes on the results and details views but we haven’t provided a way to invoke those routes. Our jQuery Mobile and AngularJS implementations from Chapters 5 and 6 used a panel drawer pattern and “hamburger” menu for navigation. This time we will use the AMX footer facet with FontAwesome icons and a little extra CSS.
Each view has a different number of routes. The search view, for example, only has one route, search, and that route is already implemented. Remember the profile route from the prior chapters? We didn’t implement it in this chapter. Let’s add a profile route placeholder button to the search view. Open search.amx, identify the amx:panelPage, and right-click on the element. When the context menu appears, choose Facets - Panel Page | Footer. This will add a footer facet to the end of the panelPage definition. Place a tableLayout inside the footer facet and set the width to 100%. While still editing the tableLayout, set the styleClass to footer-layout. Add a rowLayout and a cellFormat to the tableLayout. Set the amx:cellFormat element’s halign to center and valign to middle. Finally, add a button to the amx:cellFormat. Clear the button’s text attribute and set the styleClass to profile-icon. Here is a complete listing of the footer’s XML:

Now let’s add some CSS to search.css to style the footer. Besides adding function-specific icons to buttons, this CSS rounds the corners on the footer’s buttons as well applying a minor change to the background color.

![]()
NOTE
The CSS above contains declarations for each icon, not just the profile icon.
Redeploy the application and confirm that the profile button appears in the footer of the search page. If it doesn’t, then use Chrome’s inspector tools to figure out why the CSS isn’t working properly.
If all is well, copy the footer facet into the results.amx page. This page needs an icon that returns to the search page. Add an amx:cellFormat and amx:commandButton to the footer facet and configure them as before. Instead of using the profile-icon class, set the styleClass attribute to search-icon. Since we actually want this button to go somewhere, set the action attribute to returnToSearch.
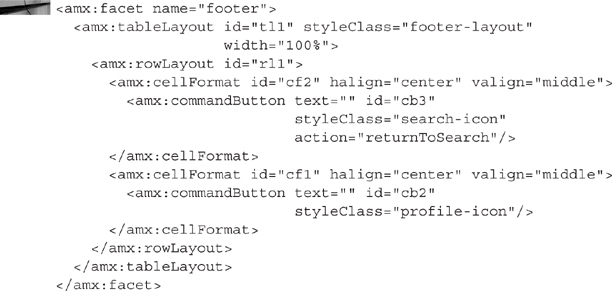
![]()
NOTE
I find it easiest to copy the prior cellFormat and then use the bubble/balloon help to create unique IDs for the cloned elements.
Copy the expanded footer from the results page into the details.amx page. When the red error balloons appear in the left-hand gutter, click them and choose Generate a unique ID from the context menu. Since the details page uses a table layout, those auto-generated IDs already exist. Once again, add another button. This final button returns to the search results list so set its action to returnToList and its styleClass to list-icon.
Redeploy the application and verify the results. Do you see that interesting icon at the bottom of every page that is labeled PersonnelDirectory? That is a navigation bar that contains a link to each feature within an application. MAF displays this by default. Since we only have one feature within this application, let’s turn it off. From the Application Resources palette, identify the Descriptors/ADF META-INF node and open the maf-application.xml file. Scroll to the Navigation section at the bottom of the file and uncheck the Show Navigation Bar on Application Launch checkbox. Figure 11-29 is a final screenshot of the details page.

FIGURE 11-29. Final screenshot of the details page
Conclusion
In this chapter, you learned how to build hybrid mobile applications using Oracle’s declarative, multidevice Mobile Application Framework. This platform is extremely powerful, flexible, and efficient. Unlike the other approaches described in Parts II and III of this book, most of our work with MAF was declarative.
For extra credit, I encourage you to continue the work started in this chapter by creating a profile Task Flow for editing personal profiles. The tutorial at http://docs.oracle.com/cd/E53569_01/tutorials/tut_jdev_maf_app/tut_jdev_maf_app_2.html contains a great example of using the device camera in MAF.
If you are new to MAF and would like more information, then I highly encourage you to visit Oracle Mobile Platform YouTube channel located at https://www.youtube.com/user/OracleMobilePlatform. MAF contains a significant amount of features including enterprise specific security features that you may find of interest.