
Protecting your reputation
Abstract
Your reputation is one of the most precious things you have, and once tarnished or destroyed, it’s difficult to get back to its previous state. In this chapter, we’ll look at some of the methods and tools available online to protect your reputation and how you can make your identity less accessible.
Keywords
Cyber safety; privacy; history; reputation; security breaches; TOR; private browsing; search engines
Finding Yourself
If you’ve been using the Internet for any length of time, you’ve probably been asked whether you’ve ever Googled yourself. What you’re really being asked is whether you’ve ever typed your name into a search engine, like Google, to see what you’ll find. Alternate names for searching yourself that aren’t company-specific are egosurfing or vanity searching.
So is egosurfing truly a sign of vanity? Not if you’re doing it for the right reasons. In a 2013 survey, Pew Internet found that 58% of men and 54% of women used search engines to search their own name, and see what’s online about them. By monitoring their digital footprints, people have a better understanding of their online reputation. It shows what information and photos of you are readily available and revealed to others if they were to search for you.
If you are going to do a search for yourself, you should go beyond just entering of your first and last name. By entering variations of your name, additional criteria, and different input you’ll be able to narrow and expand your searches to see different results. This would include:
![]() In addition to searching for your name, also put your first and last name in quotes to limit the results to pages where that exact text (i.e., your full name) is used.
In addition to searching for your name, also put your first and last name in quotes to limit the results to pages where that exact text (i.e., your full name) is used.
![]() Use variations of your name, such as any nick names, shortened versions of your name, maiden name, your middle name, and any applicable titles you may have (such as Dr. or Doctor) or aliases you use.
Use variations of your name, such as any nick names, shortened versions of your name, maiden name, your middle name, and any applicable titles you may have (such as Dr. or Doctor) or aliases you use.
![]() Do an image search for yourself, as we showed you in Chapter 9, Beyond technology—dealing with people.
Do an image search for yourself, as we showed you in Chapter 9, Beyond technology—dealing with people.
![]() Narrow your searches by adding keywords specific to what you’re looking for. If you’re concerned about leaked photos, type your name and the word “leaked,” or if you’re concerned about some other content (such as a profile, review, and complaints), add that word to your search.
Narrow your searches by adding keywords specific to what you’re looking for. If you’re concerned about leaked photos, type your name and the word “leaked,” or if you’re concerned about some other content (such as a profile, review, and complaints), add that word to your search.
![]() Similarly, if you’re concerned about your professional reputation, include the name of your business in the search. This will narrow the search to content where your name and business are mentioned.
Similarly, if you’re concerned about your professional reputation, include the name of your business in the search. This will narrow the search to content where your name and business are mentioned.
When searching for yourself, you should start by opening an InPrivate browsing window in Internet Explorer (by clicking Tools, and then clicking InPrivate Browsing) or an Incognito window in Chrome (by clicking the Settings icon, and then clicking New incognito window). As we’ll discuss later in this chapter, working in one of these windows prevents cookies, browsing history, and search history from being stored, and will also prevent your search results from being skewed by previous searches and other factors. This will give you a better understanding of what others see when they search for you.
In doing the search, you’ll find results that apply to others who share your name, so be prepared to navigate through several pages of search results before finding ones that relate to you. It may take time, but it may also be well worth the effort.
What Not to Do When Searching Yourself
When you look for yourself on a search engine, you should also be prepared to pull up information and photos that you don’t want others to see. While it may be disconcerting, it’s better to know what’s out there than not see it at all.
When searching yourself online, don’t limit yourself to one search engine. Many make the mistake of looking themselves up on Google, and forget that different search engines may yield different results. Search engines will use different algorithms to return search results, and (as we saw in chapter: Finding a job online) may not display certain content due to takedown notices, so you’ll want to get a good understanding of what’s returned on several of the more popular ones. According to Net Marketshare (www.netmarketshare.com), the most used search engines as of September 2015 are:
![]() Google (www.google.com)
Google (www.google.com)
![]() Baidu (www.baidu.com), a Chinese language search engine
Baidu (www.baidu.com), a Chinese language search engine
![]() Bing (www.bing.com)
Bing (www.bing.com)
![]() Yahoo (www.yahoo.com)
Yahoo (www.yahoo.com)
Another important aspect of searching yourself is to not limit or restrict your results in any way. As mentioned throughout this book, you can set your preferences on search engines, activate parental controls on devices, configure filtering, and install software like NetNanny (www.netnanny.com) to filter out adult content. If you’ve blocked certain content, any photos or comments that are restricted may not appear in your results, and/or you may be unable to open the site to review what’s there. Before monitoring your reputation online, ensure that you’ve removed any restrictions on what can be returned.
Google Alerts
Google Alerts (www.google.com/alerts) is a site where you can specify a search term or phrase, and be notified when it appears in search results. To use it, you would enter your name, email address, business name, or anything else you’re interested in into the Create an alert about… field. As mentioned earlier, if you want to be notified about an exact phrase, enclose the phrase in quotation marks. Once you begin typing, you’ll see a field appear that allows you to enter the email address where Google will send a notification. If you click on the Show Options link beside it, you’ll see additional options appear, similar to that shown in Fig. 8.1.
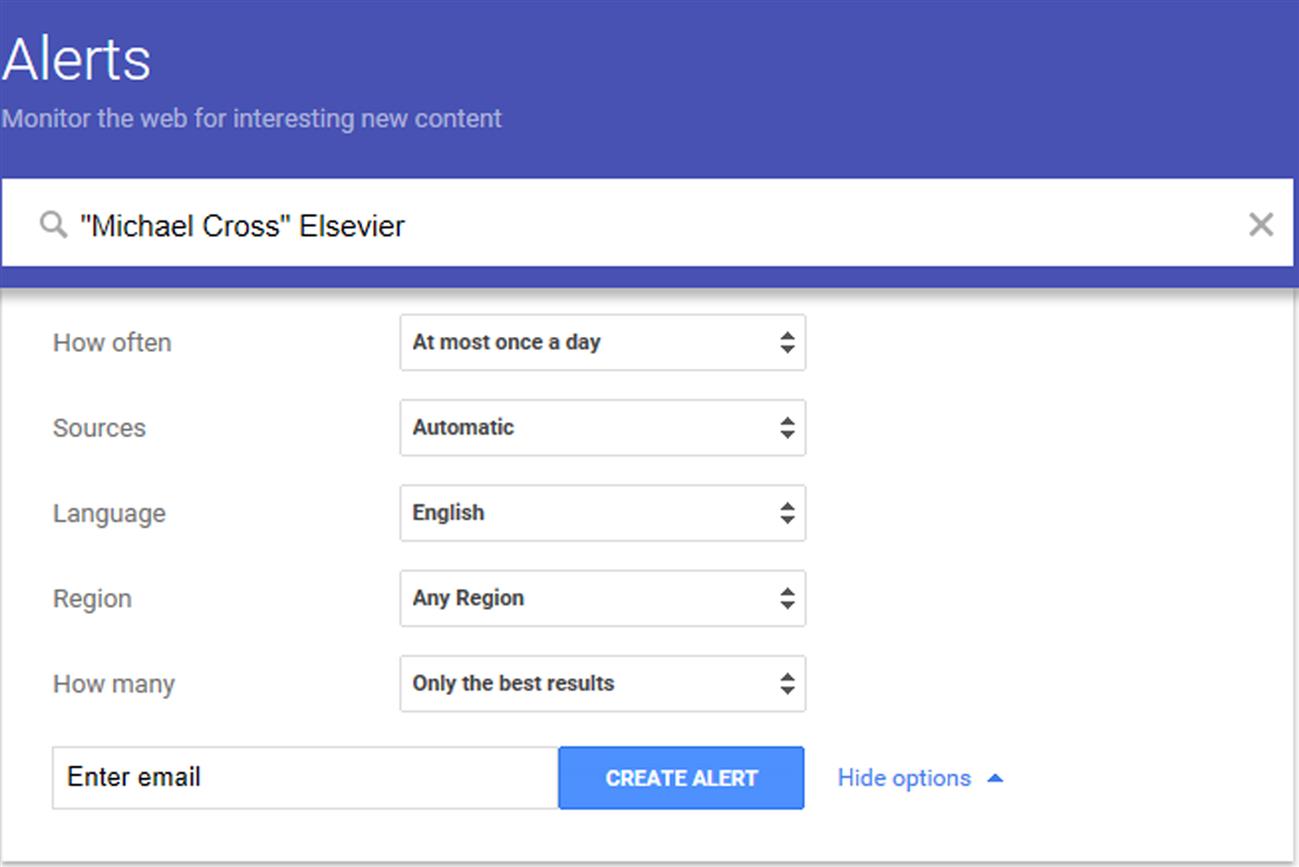
Once you’ve specified what Google is to look for, you then configure how often you’re to be notified (i.e., daily, weekly, or as it happens), the language to use, and how many results you want. You can also narrow searches to specific sources of content, such as blogs, news, and so forth. Once you enter your email into the field at the bottom and click Create Alert, you’ll be notified of when content matching your search criteria is found.
Is There a Problem?
When you’re searching yourself online, you should also look at the sites you’re using. If a site is hacked and believes your account was compromised, they will often notify you of the problem. However, you shouldn’t rely on anyone to tell you if a data breach occurs. Some won’t bother, or are unable to notify you since your contact information has changed since initially signing up for an account. Searching for media releases or news articles may tell you if a site you use has been hacked, and indicate your information is at risk. Another tool to view information on data breaches in the United States that have compromised personal information is the Privacy Rights Clearinghouse’s Chronology of Data Breaches (www.privacyrights.org/data-breach). Using this tool, you can filter the results to see incidents where data has been compromised since 2005 in various types of organizations.
Identifying if your account has been compromised is vital to dealing with the repercussions. One way of discovering this is with Have I been pwned (www.haveibeenpwned.com). As we mentioned in Chapter 5, Cybercrime, hackers may take the data acquired from a successful hack and publish it online. In doing so, anyone can now read the email address, username, and other information that was stolen. Using Have I been pwned, you can enter your email address into a search field, click the pwned? button, and see if the account was compromised in a particular attack. The results show which site was hacked, a description of the incident, and the kinds of data illegally obtained. To take a proactive approach, you should also use the feature to notify you if your account appears in future data breaches that are published online.
Other Tools
Trying to keep track of being mentioned or tagged on different sites would be an overwhelming and impossible task if you didn’t take advantage of tools that will do most of the work for you. Using them you can monitor mentions of your name, business, or other terms you’re interested in on social media. Some of the useful search tools include:
You can also do a Deep Web search to find results that aren’t indexed by mainstream search engines. Such a search will go beyond the static web pages commonly crawled by search engines and return results from online databases and other sources.
Maintaining Privacy
Depending on what you find out about yourself and your activities online, you may want to keep others from finding out what you do. There may be embarrassing photos you’re tagged in, and some search engine results about you may show up high in the list of results. Even if your activities aren’t showing online, there may be sites you visit and activities you enjoy that you simply don’t want others to find out about. Fortunately, it’s not impossible to hide what you’ve done from most people.
In Chapter 8, Protecting your reputation, we discussed ways in which you can have embarrassing photos, videos, and other content removed from sites and search engines. Unfortunately, your success rate may vary. As we discussed, search engines like Bing recommend that you contact the site owner to remove the offending content, and then it will be removed from the search engine on the next search. While true, it’s not very helpful. Even if an image or article about you is removed from a site, it doesn’t mean every site will be as accommodating.
One way to prevent these links from coming up at the top of search results for your name is to add fresh content that’s positive. You might consider starting a blog that highlights your achievements and interests, add a LinkedIn page that shows your education and experience, and possibly consider building your own website. While any party photos and snide comments may still reside in cyberspace, the new content that portrays you in a positive light will hopefully appear higher in the results, burying the old posts and pictures further back in the results.
One of the ways that search engines determine a site’s rank is by looking at the number of times other sites link to it. By creating new social media sites, and adding content and linking them together, someone searching for you will see these before the other content you’re trying to hide. For example, create a Twitter account, add a link to it on your Facebook account, and then add links to each of them on your blog. If you use them frequently, the new content will also increase your ranking.
Privacy of Search
Major search engines don’t simply process your search criteria and give you results. Your queries are stored and associated with either the IP address of your computer, or an account you’re logged into. For example, if you have logged onto Google and then used their search engine, your searches can be tied to the account. By associating your computer or account with your searches, recent searches can be offered in the search box as you type, and more relevant results may be returned. Unfortunately, by recording your search criteria, the information can also be used to target advertisements to things you’ve searched for. As we’ll see in Chapter 9, Beyond technology—dealing with people, someone with access to your Google account could view your history and see your browsing habits, which could be problematic if you’re concerned about privacy.
There are search engines that don’t track your queries, allowing you to search anonymously. Because the site doesn’t keep any information on you, it also means that they have nothing to give to third parties. Some of the anonymous search engines include:
Untag Yourself
A tag is a type of metadata, which is information about a piece of information. When a photo, bookmark, or other piece of data is tagged, it helps to describe and associate it with other content. For example, when you tag a photo or other content on Facebook, you’re associating it with a particular person, creating a link to their account, and posting it on their timeline. If you write a blog, you might add tags to index a post so it’s categorized and can be easily found later. When a search engine crawls the site, it may use these tags to associate the content with text in the tag. In other words, if you’re tagged in a photo or post, that content may show up in the results when you search for your name.
It isn’t unusual to be tagged on social media sites. According to the Pew Research Center, 12% of Facebook users have tagged a friend in a photo, and 35% were tagged themselves (Pew Research Center, 2014). On Facebook, you’re notified when someone tags you, so you’ll be able to decide whether you want to be associated with a particular picture or post. As we saw in Chapter 6, Protecting yourself on social media, you can also use the Activity Log to view posts you’re tagged in, and there are Timeline and Tagging Settings that control what happens when you are tagged by someone else.
Of course, not everything a person tags you in is flattering, and you may not want to be associated with a particular image or comment. In such cases, you can untag yourself by doing the following:
1. In Facebook, hover over the post you’re tagged in. When a downward arrow button appears in the top right of the post, click on it.
3. When prompted that the tag will be removed, but the picture will still appear in feeds and searches, click Okay.
Another way to remove tags from photos in Facebook is to navigate to the photo you’re tagged in and click on the photo so it appears larger. At the bottom of the photo, you’ll see a number of options, but to untag yourself, click Options and then Remove Tag. There will be a prompt telling you that the tag will be removed; click Okay to confirm.
Private Browsing
For a variety of reasons, you may not want your computer to record your Internet activity. By default, your browser will keep track of the sites you visit and even download website content (i.e., pictures) to your hard drive. This makes it easier to return to the places you like and perhaps make the pages load faster. While this functionality greatly improves your Web browsing experience, it also enables others to see what we’ve been doing. Private browsing features are common to all popular Web browsers and allows us to surf the Web without being concerned that others can follow our path.
When you open a private browsing session like InPrivate Browsing in Internet Explorer or Incognito in Chrome, information about your browsing will not be saved to the computer or will be only kept temporality. After you close the tab or browser, it’s gone. For example:
![]() First party cookies or session cookies kept in memory will work normally. These allow you to do things like add items to a cart on a shopping site, and remember information as you move between pages.
First party cookies or session cookies kept in memory will work normally. These allow you to do things like add items to a cart on a shopping site, and remember information as you move between pages.
![]() Third-party cookies like those used for tracking your movements between sites are blocked.
Third-party cookies like those used for tracking your movements between sites are blocked.
![]() Temporary Internet files are deleted when you close the browser.
Temporary Internet files are deleted when you close the browser.
![]() History on sites you visited and files you downloaded, form data, passwords, address bar, and search AutoComplete aren’t stored.
History on sites you visited and files you downloaded, form data, passwords, address bar, and search AutoComplete aren’t stored.
If you’re using Internet Explorer, you can open an inPrivate Browsing window by clicking Tools, and then clicking inPrivate Browsing. A new instance of the browser will open, and you’ll see you’re using private browsing by the word inPrivate beside your address bar.
To use private browsing in Chrome, you would open an incognito window by doing the following:
1. Click or tap the Chrome menu  , which is located in the upper right-hand corner of the browser.
2. Click New incognito window if you’re using a computer, or tap New incognito tab if you’re using an iPhone, iPad, or Android device.
Regardless of whether your computer is using inPrivate Browsing or Incognito, once you open a new private browsing window, any new tabs you open in the browser window will also be private. In other words, you don’t need to start a new private browsing session for each new site you want to visit.
It’s important to realize that private browsing isn’t completely private, and won’t mean you’re anonymous on the Internet. As you surf the net, your Internet Service Provider (ISP) or employer (if you’re on a network at work) may log the sites you’ve visited, files you’ve downloaded, and so on. The websites you visit may also capture your IP address, and record information about your activity, browser information, and other details of your visit. Also, if you’re opening a private browsing session in Chrome on a device running iOS, like an iPhone or iPad, you should note that these devices may still store some information. Unlike the private browsing sessions in Chrome on a computer, these devices work differently, as the tabs share HTML5 storage. When you put all of this together, you can see that private browsing is better, but it isn’t completely private.
Your Internet history can also be seen by someone looking at your browser. When you visit a site with a standard browser, a history is created. The sites you visit are logged, cookies are created showing the domain you visited, and files are downloaded and stored on your computer, so that the next time you visit a page it opens quicker. As we’ll see in Chapter 9, Beyond technology—dealing with people, all of this may be visible to anyone using your computer. A trick to ensuring it isn’t readily available to the next person using the browser is to remove traces of it. One way to do this is to use the private browsing option in your favorite Internet browser. When you use this option the information that is normally collected and stored by the places you visit on the Internet is not collected so there is no record of the sites you’ve visited left behind. That isn’t to say that there will be no record of your Internet activity on your computer at all, but it will eliminate the possibility that someone can view your Internet activity from your browser.
Delete the history, clear the cache
In Chapter 2, Before connecting to the Internet, we discussed settings in browsers to remove and manage cookies. In the same area where you set these options, there are also settings for other types of information. For example, in Internet Explorer 11, you could control such items as:
![]() Temporary Internet files, which are web pages, images, and other content that are sent from a Web server and stored on your computer so that it can then be viewed in a browser.
Temporary Internet files, which are web pages, images, and other content that are sent from a Web server and stored on your computer so that it can then be viewed in a browser.
![]() History, which is a list of sites you visited.
History, which is a list of sites you visited.
![]() Download History, which is a list of files you downloaded.
Download History, which is a list of files you downloaded.
![]() Form Data, which is saved information that was entered into Web forms.
Form Data, which is saved information that was entered into Web forms.
![]() Passwords, which are passwords that are saved by the browser, and automatically filled in when returning to a site.
Passwords, which are passwords that are saved by the browser, and automatically filled in when returning to a site.
![]() ActiveX Filtering and Tracking Protection, which are sites that are excluded from filtering.
ActiveX Filtering and Tracking Protection, which are sites that are excluded from filtering.
To remove this information from your computer using Internet Explorer 11, you would do the following:
1. After opening IE, click on the gear-shaped Tools icon  in the upper right-hand corner, select Safety, and then click Delete browsing history.
2. Ensure that the checkbox for items you want to remove (described in the bulleted items we just mentioned) are checked. If you want to keep the cookies and temporary Internet files for sites you’ve added to favorites, also click the Preserve Favorites website data checkbox.
If you are using a Chrome browser, you would remove information on your browser by doing the following:
1. Click on the Chrome menu  , which is located in the upper right-hand corner of the browser.
3. Scroll to the bottom of the page and click Show Advanced Settings.
4. Scroll to the Privacy section of the page, and click the Clear browsing data… button.
5. In the Obliterate the following items from dropdown menu, select the time limit of past data to remove. For example, to clear out everything, select the beginning of time.
6. Ensure the checkbox for each item you want to remove is checked, and then click Clear browsing data.
If you are using Firefox, you would remove information on your browser by doing the following:
1. Click on the History menu, and then click Clear Recent History.
2. In the Time range to clear dropdown, select the time limit of past data to remove. For example, to clear out everything, select Everything.
3. When the dialog box appears, click on the downward arrow button beside Details.
4. Ensure the item beside each item you want to delete is checked, and then click the Clear Now button.
Automatically clearing private data
If you never want to leave a trace of what you did online, then you probably don’t want to have to manually remove your history, temporary Internet files, and other private data. Instead, it makes more sense for the information to be removed each time you close the browser. In Internet Explorer 11 this is configured by doing the following:
1. After opening IE, click on the gear-shaped Tools icon  in the upper right-hand corner, and then click Internet Options.
2. On the General tab, in the Browsing history section, click the Delete browsing history on exit checkbox so it appears checked.
Firefox also allows you to have Internet information removed automatically. To configure this:
1. Click on the Tools menu, and then click Options.
2. When the Options dialog box appears, click on the Privacy icon.
3. In the History section, click on the dropdown menu and select Never remember history.
As we saw in Chapter 2, Before connecting to the Internet, you can set Chrome to remove cookies when you close the browser, but there aren’t settings to remove everything. If you want such information saved on the browser, then you should look into using a private browser window.
Tor
As we discussed in Chapter 7, Finding a job online, using the Tor browser (www.torproject.org), you can browse, chat, and send instant messages anonymously. Because communication between your browser and the site you’re visiting are bounced across different servers, the site can’t see where your request to view a page originated. Any chat or instant messaging application that uses Tor is likewise made anonymous.
Unfortunately, some activities with the Tor network can reveal your identity. For example, let’s say you were downloading a movie using a torrent file-sharing application. If you setup the application to use Tor, it would still send out your IP address as it makes a direct connection to get the file. If you downloaded a document and opened it, the PDF or Microsoft Word file could contain resources that are downloaded outside of Tor, which would reveal your IP address.
Another aspect of using Tor that you should be prepared for is a decrease in performance browsing the Web. Because any requests you make go through a network of servers before reaching its destination, you’ll notice that it’s slower than other browsers you may have used. Unfortunately, that’s the tradeoff for anonymity.
Virtual private networks
A Virtual Private Network or VPN is a private network within a public network like the Internet, and can be used to hide your identity. After logging onto a VPN, any requests to view a web page or other traffic from applications you use are passed through a proxy server. Any site you’re visiting will see the IP address of the proxy server, and not the one given to you by your ISP when you first connected to the Internet. Some VPN service providers include:
![]() Private Internet Access (www.privateinternetaccess.com)
Private Internet Access (www.privateinternetaccess.com)
![]() TorGuard (www.torguard.net)
TorGuard (www.torguard.net)
![]() CyberGhost (www.cyberghostvpn.com)
CyberGhost (www.cyberghostvpn.com)
Depending on your needs, in choosing a VPN, you should check whether they log activity. If they log what you do, it’s possible that a government or law enforcement agency could subpoena the logs related to your activity.
Another benefit to using a VPN is that it can make your computer appear to be located in other countries, making content that’s blocked in certain countries available to access. For example, you might live in a country that heavily censors what you can view online, or want to stream a TV show that’s only available to a specific region. By using an IP address associated with that certain region, your computer appears to be in that country and allows you to see the content.
Tools
As we’ll see in Chapter 13, one way of others seeing what someone has done is to look through their computer. By looking at a person’s history, cookies, cache, recent documents, Recycle Bin, and other data stored on the computer, you can piece together a profile of someone’s browsing patterns, interests, and behaviors. Obviously, the best way for someone to hide what they’ve done is to delete this evidence so it isn’t visible to others.
Windows provides its own tool to analyze the computer and remove unwanted files. By running Disk Cleanup, you can remove temporary files, empty the Recycle Bin, and delete other files that may be slowing down your computer and reveal information about your activities. To run Disk Cleanup, you would do the following:
1. In Windows 7, click on the start button, type Disk Cleanup, and then click Disk Cleanup in the list of results. In Windows 8.1, right-click on the Start menu, click Control Panel on the context menu that appears, click Administrative Tools, and then double-click Disk Cleanup.
2. When Disk Cleanup opens, select the drive to cleanup from the dropdown list, and click OK.
3. On the Disk Cleanup tab, in the Files to delete list, click on the checkbox beside each type of file you want to delete, so the checkbox appears checked.
5. When prompted if you want to permanently delete the files, click the Delete Files button.
Another tool that can remove unwanted files from computers running Windows XP and higher, Apple Mac, and Android devices is CCleaner (www.piriform.com/ccleaner). On a computer, it will delete such information as browsing history, cookies, and temporary Internet files from major browsers, and get rid of temporary and unwanted files left by programs like Adobe Flash Player, WinZip, Microsoft Office, and others. The version for Android will delete the app cache, clipboard content, call logs, and other unwanted data. While free, there are also versions you can purchase that have additional features, such as scheduling CCleaner to run automatically.
Even Though It’s Deleted, It May Not Be Deleted
Generally, when someone deletes something, they assume it’s gone forever. Just because you remove something, doesn’t mean it’s been erased from existence. If the data hasn’t yet been rewritten on the computer then, using the proper tools, someone might restore the data. If you’ve uploaded information to the Internet or sent to someone else (e.g., in an email), it may still be lurking out there for someone to find.
Tools
When you delete files on your computer, it isn’t actually gone. It may have been sent to the Recycle Bin, which you can then open, right-click on the file, and click Restore to return it to its previous undeleted location. Even if you delete it from there, or a program has “permanently” deleted it, it can be recovered using tools like those discussed in Chapter 9, Beyond technology—dealing with people. The reason is that when a file is deleted, the space occupied by the file is deallocated, which means the computer now sees it as a free space that can be overwritten. The files are still there, you just don’t see them. To make these files unrecoverable, you need to wipe the free disk space so your deleted file is overwritten with new data.
There are a number of tools you can use to wipe a drive, including free ones and those native to your operating system. Windows includes a tool called Cipher that is used to encrypt/decrypt data, but also has the ability to overwrite deleted data. To use the tool, you would:
1. Open a command prompt by clicking Start, typing cmd, and clicking cmd.exe in the list.
2. When the command prompt window opens, type cipher /w: followed by the drive letter and (optionally) a folder name. For example, to overwrite free space in a folder called D:Data, you would type cipher /w:D:Data. Press Enter on the keyboard.
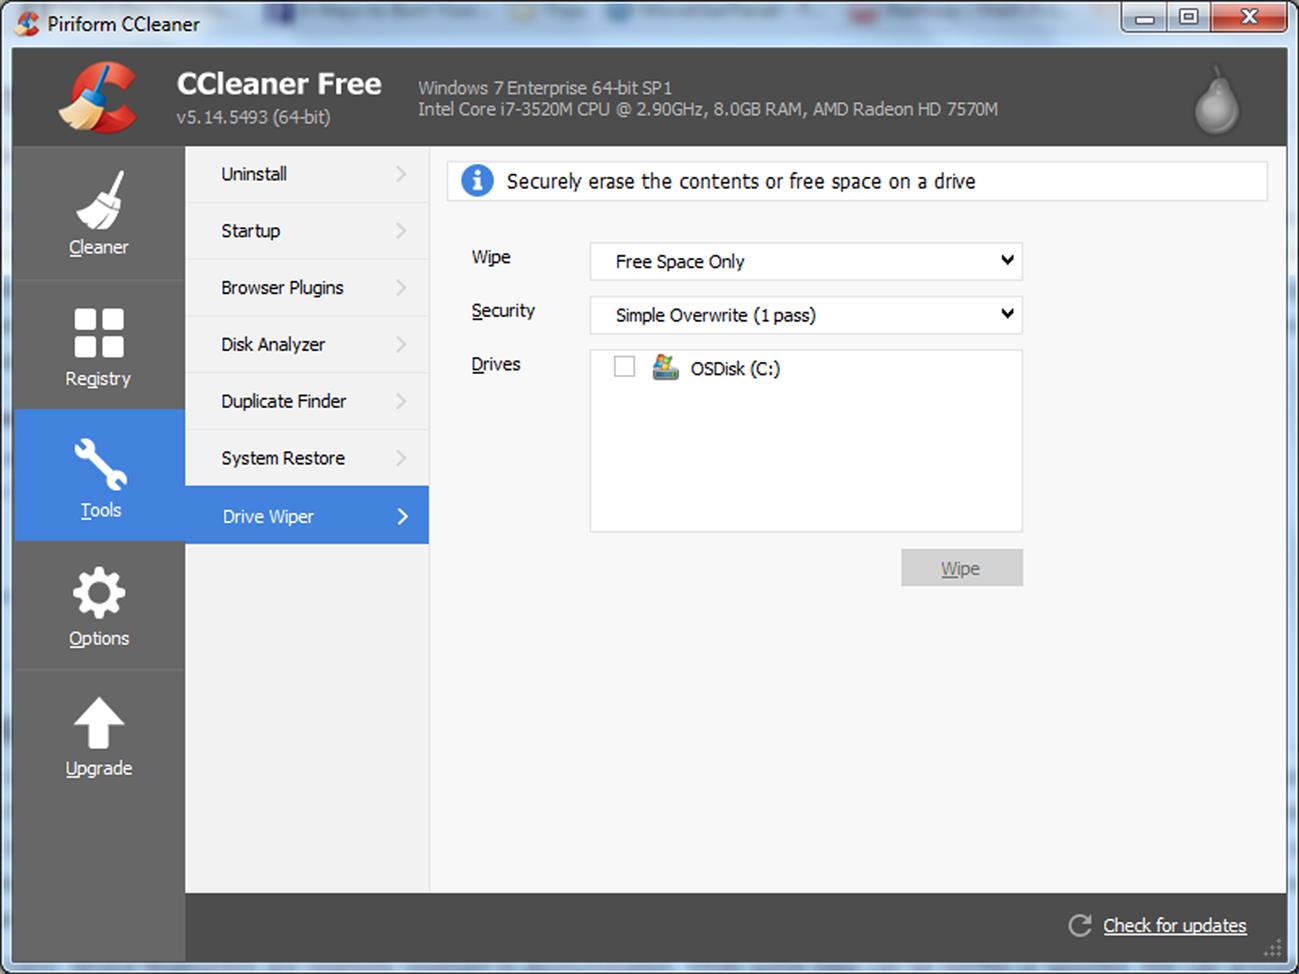
As we discussed earlier, CCleaner (www.piriform.com/ccleaner) removes unwanted files, but also has features to overwrite deleted data or completely wipe a drive. As seen in Fig. 8.2, CCleaner also allows you to specify how many times the free space should be overwritten, so that any data is completely obliterated and irrecoverable. To use this tool:
1. In CCleaner, click the Tools icon in the left navigation bar, click Drive Wiper.
2. In the Wipe dropdown list, select Free Space Only to remove deleted data. If you choose the other option Entire Drive (All data will be erased), everything on the drive (including data that hasn’t been deleted) will be wiped.
3. In the Security dropdown list, choose the number of times CCleaner will overwrite space on the hard disk. The more passes or times it overwrites the disk, the more difficult it is to ever recover data.
4. In the Drives list, click on the checkbox of the drive(s) you want to overwrite.
Copies others may have
Even if the data has been completely erased from your machine, it may still exist elsewhere. A file may have been transferred from your phone or tablet to a computer, or copied to a USB disk. To effectively delete the data from all sources, you’ll need to think about and track down where the data might be.
One source that limits your control is when data has been shared. If you emailed or texted an embarrassing image, the photo would also be on the recipient’s computer, phone, or device. Unless you had access to their devices or accounts, you’d probably have to ask them to delete it, and then trust they did so. Unfortunately, if they forwarded it to someone else, multiple copies may exist.
If the data you want removed from existence has been uploaded to social media or other websites, the likelihood of others having it increases. An embarrassing picture may have been downloaded, so even if it’s removed from the site, someone still has a copy to view offline. By viewing an image online, a copy may reside in a person’s temporary Internet files directory. By looking though these cached files, the person could retrieve a copy of the file.
Assuming you’ve been careful to keep your files offline and not share them with others, a deleted file could still exist in backups. If you regularly backup your computer and other devices (which you should), deleting a file wouldn’t affect the copy stored in backup files. If you or someone else restored these files, it could still be recovered. To erase those files from existence, you’d need to create a new backup (without the deleted data), and then delete any previous backups.
Online storage
To protect data, you need to control where it resides. If you store data in the Cloud, there’s an added measure of complexity. Cloud storage (also often referred to as online storage) is a service that allows you to store data on a server belonging to a third party and accessed over the Internet. You might use a service to back up the contents of your phone, tablet, or computer, or use it to store and share important documents, photos, music, or other files. Some Cloud services also provide syncing, so that you can offload files and settings from your computer to servers, making them accessible between other computers you log into. Some popular cloud storage solutions include:
Depending on the service and whether it supports synchronizing between devices, your data may exist in different locations. For example, a file might only be stored on an Internet server, or a copy may be on your computer and an Internet server. When using OneDrive, your files are stored online, but a copy of the file also resides on your computer. If you modify a document or file on your computer, the updated file is uploaded to the Cloud, so that the same version now resides on both file systems. If you’re not connected to the Internet, the next time you go online, OneDrive will sync the files and update the online version with an updated one on your computer.
While a Cloud storage service should encrypt data as its transmitted and stored, and have security measures in place to protect it from attack or disasters, this isn’t always the case. There are many providers, and not all of them are equal. While every provider will claim your data is secure and their business is stable, an unreliable or unstable company may lack the resources or experience to live up to their promises. If the company goes bankrupt or has a disaster, your data could be lost.
You should also be aware that as data is stored in different locations, it increases the surface area for possible attacks. Not only could data be recovered from the computers and devices used to access files in Cloud storage, a hacker or malware could potentially access the data as it moves over multiple networks, and is replicated across different servers in a data center. Even though you see your data on the Cloud, you wouldn’t know if it’s been replicated to hard disks or servers that are being disposed, at risk of unauthorized access, or viewed by people within the company who have been compromised or corrupt.
If you’re unsure of your settings or how Cloud storage works, you might even be surprised that your files are being backed up or synced to the Cloud. When Microsoft added OneDrive (then called SkyDrive) it automatically synced the PC and Internet server. Similarly, in checking the default settings on your phone, or settings for certain security apps, you may find that it’s automatically set to sync and backup files to a Cloud service. To control what’s sent to the Cloud, you should check the settings on your computer and devices, and any apps that may provide online storage. For example:
![]() On an iOS device, such as an iPhone or iPad, you would tap Settings, tap iCloud, and then tap on the iCloud features you don’t want to use so they appear disabled. These include iCloud Drive, Photos, Mail, and Contacts.
On an iOS device, such as an iPhone or iPad, you would tap Settings, tap iCloud, and then tap on the iCloud features you don’t want to use so they appear disabled. These include iCloud Drive, Photos, Mail, and Contacts.
![]() On a Mac, you would click the Apple menu, click System Preferences, click iCloud, and then deselect features you don’t want to use.
On a Mac, you would click the Apple menu, click System Preferences, click iCloud, and then deselect features you don’t want to use.
![]() If you use iCloud on a Windows machine, you would open the iCloud for Windows program, and then deselect features you don’t want.
If you use iCloud on a Windows machine, you would open the iCloud for Windows program, and then deselect features you don’t want.
You should also determine how the service provider handles deleted files. Rather than erasing a deleted file, it may be hidden or reside in a Trash or Recycle Bin. For example, in DropBox, you can click on a trash-shaped icon to view deleted files. To permanently delete them, you need to right-click on a deleted file that appears in gray, and then click Permanently delete from the menu that appears.
Just because you don’t see it, doesn’t mean it’s not there
If you’re not going to use a site or email account ever again, it’s wise to download what you want and then delete the account. However, just as a deleted file may exist on a hard disk after deletion, the data from a deactivated account may still reside on a site’s servers. It may take time for the deletion process to complete, not all data may be removed, or the account may simply be hidden or unusable with all the details you’ve provided retained in a database.
Sites commonly give you the ability to deactivate your account, but this isn’t always automatic. For example, on Twitter, once you’ve deactivated your account, it isn’t permanently deleted until 30 days after you’ve requested it. During that time, you can simply logon to reactivate it. Similarly, when you delete your account on Facebook, removal of the content isn’t immediate. Even though others won’t be able to see or search for your account, it may take up to 90 days for everything to be deleted, and even then some data may still reside in their databases. In addition, the messages others have from you won’t be removed, and continue to exist after the account is permanently deleted.
Just because you don’t see it, doesn’t mean it’s removed from a site. Ashley Madison (www.ashleymadison.com) offers a paid delete feature for $19 that removes a customer’s profile, but when they were hacked in 2015, it was found that some details were not removed from their databases, including their gender, date of birth, and GPS coordinates (BBC News, 2015). While the company maintained the hard delete worked, and a significant amount of information appearing in the hacked data appeared to be removed, they offered the feature free to users after the data breach.
In removing accounts from sites, you need to read the policies and details about what is actually removed, and when removal occurs. You also need to be aware that even if the account is removed, certain data may still exist in log files and backups of the site’s data, and other users may have downloaded or reposted photos or other content you wanted to get rid of.
Think Twice, Post Once
The easiest way to avoid having something embarrassing online is not to post it at all. Before posting a comment or photo, think of how an employer, loved one, or others of influence might view it. You should also review anything that you’ve previously posted, as anyone truly interested in you and your online identity won’t simply review the latest posts. Just imagine how an old photo of someone doing drugs or drinking in college, acting sexual, or making a controversial comment will appear to a stranger or someone who’s just getting to know the person. What seemed okay to share when you were younger, angry, or intoxicated could be incredibly embarrassing and damaging later in life, so it’s wise to go back and review what you did in the past.
A good rule of thumb is not to post or upload anything on the Internet that you wouldn’t feel comfortable putting on a billboard. By taking a few moments to review what you’ve written or the photo you’re uploading, you can avoid possible backlash and embarrassment when and if others see it.
Oversharing
A common mistake that people make online is oversharing, in which people reveal too much information or say things they probably should have kept private. You’ve probably seen people do it in real life, where they say something embarrassing, blurt out something that they later regret, or give way too many personal details about something. While you may be able to do damage control if it’s a verbal exchange, it becomes difficult if you’ve posted it for the whole world to see.
Many times, oversharing occurs when someone is anxious about something in their life, and they need someone to talk to. They’ll go online, vent about something that angers or saddens them, and then get into a back-and-forth online conversation, giving more and more details about what’s going on. They may even say something embarrassing in an attempt to impress a person, and have it backfire. Whether it’s because you want to let off steam, or you’re attempting to make a connection with another person, you should try to selfregulate what you say online. Remember that any posts, messages, or other digital exchanges create an online record of what you said and felt at the time.
Oversharing can also be dangerous. As we discussed throughout this book, the bits of information you provide can be compiled by someone interested in stealing your identity, password, or be used to cyberstalk you. In looking at the posts you’ve previously made, or looking back over a chat log with a particular person, you may have mentioned your spouse’s name, the names of your children, where you or they work and go to school, and other facts that provide a telling story about your real life. You may have even posted that you’re going away on vacation during a specific week, where you’re staying, and other details about a trip that excites you. However, this can also be read as a declaration of when your house will be empty and easily burgled.
There is no technology that can regulate the things you say online, so you need to learn how to do this yourself. Be aware of what you’re saying. If you look over the posts and comments you’ve made, what you’ve chatted with others about, and other sources of what you’ve said, you may identify mistakes you’re commonly making where too much is revealed. While you may be able to edit and remove some of these posts, the important thing is to gain awareness, so that oversharing becomes less of a habit.
The Real World and Cyberspace
When you think of cybersafety, it’s easy to forget that your activities can flow from the virtual world to the real world. You may order something online, but the shipment may come to your door, along with bills or statements that reveal personal or financial information. That person you met online may make an effort to show up at work or your home, and that job offer you saw on an employment site will probably require meeting someone for an interview. Unfortunately, things don’t always go as intended. Cybercriminals don’t always stay in cyberspace.
Not Everything Is Internet Based
Not every piece of information a criminal can get is obtained from a computer. You should also take steps to protect printouts, forms, and other physical documentation that might be used to steal your passwords or identity. Some of the steps you can take include:
![]() Keeping a minimal amount of ID and credit cards on your person.
Keeping a minimal amount of ID and credit cards on your person.
![]() Not authorizing others to use your card.
Not authorizing others to use your card.
![]() Keep national identification numbers (i.e., Social Security Number), passports, or other identification you don’t normally use in a secure location, such as a safe or locked away so it isn’t easily accessible.
Keep national identification numbers (i.e., Social Security Number), passports, or other identification you don’t normally use in a secure location, such as a safe or locked away so it isn’t easily accessible.
![]() If asked for a national identification number, try and use another piece of government ID, such as a driver’s license. Never give it to a third party you don’t trust, and unless they need it (such as when applying for a credit card or loan). Before giving it to them, ask what measures they take to protect the number so it’s not recorded, how they securely store it on servers to protect the data from being hacked, and if it will appear on any documents mailed to you.
If asked for a national identification number, try and use another piece of government ID, such as a driver’s license. Never give it to a third party you don’t trust, and unless they need it (such as when applying for a credit card or loan). Before giving it to them, ask what measures they take to protect the number so it’s not recorded, how they securely store it on servers to protect the data from being hacked, and if it will appear on any documents mailed to you.
![]() Don’t leave receipts at ATMs, bank windows, or trash cans at or near the bank. Don’t leave receipts behind at restaurants, gas stations, grocery stores, etc. Someone may take it to obtain your account number, see your balance to determine how much is in an account. Similarly, don’t leave receipts that have any credit card or account numbers printed on them in a place where others can get them.
Don’t leave receipts at ATMs, bank windows, or trash cans at or near the bank. Don’t leave receipts behind at restaurants, gas stations, grocery stores, etc. Someone may take it to obtain your account number, see your balance to determine how much is in an account. Similarly, don’t leave receipts that have any credit card or account numbers printed on them in a place where others can get them.
![]() Don’t throw out printed copies of income tax returns, or any receipts that may have been used with them.
Don’t throw out printed copies of income tax returns, or any receipts that may have been used with them.
When you no longer need documents containing personal or sensitive information, make sure you shred them. Shredders are inexpensive, and many include the ability to shred plastic cards and CDsDVDs. If you have an expired credit or bank card, make sure these are shredded, so no one can use them as ID, or attempt to get new ones. Since CDs and DVDs may have been used to save copies of important documents, backups, or other data, you should destroy these with a shredder as well.
While identity thieves will focus on using your ID and personal information to pose as you, other criminals may try to use the information you have to gain access to online accounts. As we discussed in Chapter 5, Cybercrime, dumpster diving is a simple way to get information about you that they want by going through your trash. Maybe you wrote down a username or password, had a note with a coworker’s name, a bill with account information, or a printed map of computer names. In throwing them out, someone could retrieve them and read a telling tale of your habits, interests, colleagues, and accounts. Remember that one person’s trash is another’s treasure.
Telephone and mail scams
Cybercriminals don’t just use websites and email to get you to fall for a scam. Many will try and reach a wider market of potential victims by incorporating direct mail or telephone solicitors to dupe more people. The bogus offer, opportunity, or plea in your mailbox or offered to you over the phone may seem legitimate, but it could be a variation of scams we’ve discussed in other chapters.
Regardless of whether the mail is sent electronically or as a printed letter, you should treat it with suspicion. If a letter or parcel is mailed to you, you should look over the packaging as well as the contents for signs that should make you wary. It might claim to be from a friend or relative but you don’t remember them, or come from a foreign country you have no connection with. You might also notice that there are spelling mistakes, restrictive markings (such as saying its confidential or time sensitive), or the address is to a title or just the address and doesn’t have any personal markings.
In looking at the mail, you may find that the letter or parcel doesn’t have a return address or uses a fictitious one, which you can check using a search engine by looking up the sender. Of course, even if the return address is a real one, it doesn’t mean it’s legitimate. For example, a fraudster might do a mass mailing using your address as the return address. He or she wouldn’t care about the letters that didn’t reach a recipient and was returned to you, as they would only care about people who fell for their scam. If you did get such mail returned to you, you should contact the postal service and report it.
Similarly, if you get unexpected calls over the phone, you shouldn’t automatically take them at their word. As we discussed in Chapter 5, Cybercrime, you should ask yourself and them:
![]() Who is calling and why? If they’re a legitimate solicitor, they’ll tell you.
Who is calling and why? If they’re a legitimate solicitor, they’ll tell you.
![]() Why do they need your information if you’ve done business with them? If they’re asking for any personal or financial information, it’s a sign they don’t know you. Don’t “confirm” account information, as they may not have it to begin with.
Why do they need your information if you’ve done business with them? If they’re asking for any personal or financial information, it’s a sign they don’t know you. Don’t “confirm” account information, as they may not have it to begin with.
![]() Why is there a rush? If they don’t give you time to think about, there’s usually a reason (and not one that benefits you). You want time to research a company, and think about what they’re offering.
Why is there a rush? If they don’t give you time to think about, there’s usually a reason (and not one that benefits you). You want time to research a company, and think about what they’re offering.
![]() If the offer is “free,” why do I need to provide a credit card or pay? Any expectation to give a credit card number shows they want your account. If they need an account that could be charged, it’s a purchase not a gift or prize.
If the offer is “free,” why do I need to provide a credit card or pay? Any expectation to give a credit card number shows they want your account. If they need an account that could be charged, it’s a purchase not a gift or prize.
As we saw in Chapter 10, Protecting your kids, there are ways to identify who is calling and block them. In doing so, you can prevent further calls from the same number. Unfortunately, if they’re calling from an IP phone (a phone that transmits calls over a computer network such as the Internet) or using different numbers, you may find this difficult if almost impossible. Playing it better safe than sorry by hanging up is always your best bet. Often, the scammers and solicitors are using a system that autodials numbers, so if you hang up, they won’t call back immediately.
Online “Support”
In reading your email or answering your phone, you may find yourself contacted by someone claiming to offer assistance with a computer problem. They may say they’re with Microsoft and offer to install or walk you through a free Windows upgrade, or profess they’re with McAfee or Symantec and say a virus has been discovered on your computer. The claim to be from a familiar company and mention a product you use lends some credibility, and aggressive sales tactics and lies may pressure you to do what they want. However, since Microsoft isn’t monitoring your computer and doesn’t work this way, and antivirus companies rely on their products to remove viruses, you should immediately identify it as a scam.
If you decided to follow their instructions, you’d be doing so at a great risk. The link or email attachment could install malware, or you might be given directions that would have you install a program to give the “technician” remote access to “fix” the problem. To install the software, you might need to provide personal information and make a payment (giving them your credit card number). As you’ve probably guessed, this can now be used to commit other frauds or steal your identity. Unfortunately, it may not end there. Once a scammer has access to your machine, they might delete important files, install malware, or do other actions that cause damage. To take another bite at the apple, they may install ransomware to get you to pay again.
The best way to deal with these offers of support is to ignore them. If you’re interested in a free upgrade, check the vendor’s site. If you’re concerned you have a virus, run a full scan of your system. Don’t ever think it’s rude to hang up, especially if they’re doing their best to keep you on the line and continue talking.
Do not call
Enrolling in a national Do Not Call Registry can provide some protection. Once your number is in the registry, it reduces the number of calls you’ll receive from telemarketers. In the United States, you can sign up for the National Do Not Call Registry at www.donotcall.gov, while in Canada you can register at www.lnnte-dncl.gc.ca. Once enrolled, after 31 days, anyone you don’t have an existing relationship with or falls into certain categories like the following should stop calling:
If you do receive a call, you can file a complaint on the site you registered with. This may lead to fines or other actions against the organization a caller’s representing. Also, even though there are exemptions, you should ask to be put on the telemarketer’s internal do-not-call list to prevent future calls.
Being on the Do Not Call list also provides some indicators that a caller is trying to scam you. If a caller says that they’re with a company you don’t do business with, and they continue or say they’re with another company, it may indicate that they are a scammer. A legitimate business will thank you for their time and hang up.
Preventing mail theft
Once an identity thief has sufficient information, he or she doesn’t necessarily need access to your online accounts. Having your address, they could also go to your house and take mail from your mailbox. When you think of the utility bills, monthly financial statements, preapproved credit cards, and other mail you might get in an average month, you can see how profitable stealing this information would be.
To prevent someone from stealing your mail, you should consider the placement of your mailbox, and make sure that it’s visible from the house and neighbors and in a well-lit area. If a person thinking of stealing your mail can be seen doing it, they may think twice. As we discussed earlier in this chapter, if you don’t want any mail that contains personal or financial information, shred it before you throw it out.
An identity thief doesn’t necessarily need to go to your house to get your mail. If they apply for a change of address, they can divert your mail to another address. When they first get your mail, they could use it to steal your identity, and since any additional mail is still diverted, any additional statements for your accounts would never reach your house. If you’re not receiving any mail or certain types of mail, contact the post office.
If you’re going on vacation or business trip, mail piling up in a mailbox is a sure sign you’re away. To prevent it from being stolen, contact the post office and have them put a hold on your mail. This won’t stop fliers, free newspapers, and other unwanted mail from being delivered, so have a neighbor check each day and pick up any mail and deliveries.
To avoid getting mail, have important items sent electronically or not at all. If they have a site you can log onto to check your account, all you really need is an email saying a new statement is available. In addition to electronic statements, you should see you can use direct deposit for any checks you receive on a regular basis. If an employer deposits your paycheck in a bank account, and allows you to get other important documents like proof of income and tax statements online or picked up at the office, it will prevent anyone taking it out of your mailbox.
Delivery
When you shop online or order something from a catalog, it has to reach you somehow. It may be shipped by a courier, who delivers it to your home. If you’re not there, they might leave a card saying they’ll try again later, or you might be required to pick it up from a depot. Since policies vary between delivery companies, you might find that they’ve left it at your door or shoved in a mailbox, making a tempting target for anyone to simply walk over and take it, or left it with a neighbor who you may or may not trust. Even worse, the person knocking on your door might not even be a real courier, which is why you should never let a delivery person in your house. Instead, verify who they are, and check to see if they have a delivery vehicle outside and a uniform that identifies the company they’re with.
You should also be wary of emails that inform you that a parcel you weren’t expecting is waiting, or provides a link related to a delivery. In some cases, the link may actually redirect you to a phishing site, or download malware. In other situations, the email may be a ploy to get you to pay money, saying that it’s held up at customs and a fee is required to release the package. Since customs bureaus won’t send computations or assessments of taxes, duties, or other costs in email, it’s likely to be a scam. If you’re unsure, contact the customs bureau to confirm. In doing so, ignore any contact information provided in the email, and look up the phone number in a telephone book or search engine.
Delivering an item requires the sender to know where it’s to be shipped, but you might be hesitant to give your address or credit card number to someone you’ve never met, such as on an auction site or some other seller you’re unsure about. Before ordering, it’s important to know what delivery options are available:
![]() Cash On Delivery, where you pay when the shipment arrives. When delivered, you might pay the post office or delivery company by cash, check, credit or debit cards. If unpaid, the item is returned to the seller.
Cash On Delivery, where you pay when the shipment arrives. When delivered, you might pay the post office or delivery company by cash, check, credit or debit cards. If unpaid, the item is returned to the seller.
![]() Direct to Store, where it isn’t shipped to you, but to a brick-and-mortar store owned by the merchant. Often, this can be quicker than sending it to your home, and may be as simple as the store holding a product that’s already in stock for you to pick up.
Direct to Store, where it isn’t shipped to you, but to a brick-and-mortar store owned by the merchant. Often, this can be quicker than sending it to your home, and may be as simple as the store holding a product that’s already in stock for you to pick up.
![]() Post Office (P.O.) Box, where it’s sent to the post office or a private company (like United Parcel Service) that accepts delivery, so you can pick it up later.
Post Office (P.O.) Box, where it’s sent to the post office or a private company (like United Parcel Service) that accepts delivery, so you can pick it up later.
When you use a P.O. Box, you have a unique address that you can use instead of your home address for orders and delivery of items, for companies that will deliver to a P.O. Box. In using one, anyone involved in a transaction doesn’t necessarily need to know where you live. An added benefit to using P.O. Box is that it can help prevent someone stealing your mail, as they’re secured in some way. Before renting one however, you should look how your mail is protected. Some P.O. Boxes are little more than a locked mailbox in a public lobby, while others are only accessible during normal business hours, and may be stored in an area that’s only accessible to staff.
Avoiding Online Records
Using a P.O. Box and shipping products directly to a store also have the benefit of limiting the information you provide online. The less information there is about you online, the less chance it will be accessed. Combined with reading a site’s policies and opting out of sharing information with third parties, not giving out unnecessary details, and finding alternate methods of making purchases, you can avoid giving more information than a site really needs.
If you don’t want to use a credit card or setup PayPal accounts, there are other ways to make purchases online. A retailer may have gift cards that can be used to purchase items in their store or online. Even certain online games and ecommerce sites offer gift cards that can be purchased off of a rack in your local grocery, pharmacy, or convenience store. You can pay with the card using cash, and then use a code on the card to pay for items on the online store.
You can also resort to the basics. Often, you’ll hear companies complaining about how online shopping is driving them out of business, and use it as an excuse of why their stores are closing. It’s difficult to argue that shopping over the computer isn’t popular when you consider that 63% of Americans have made an online purchase. However, in 2014, an estimated 6.5% of retail sales in the United States came from online purchases, and by 2018 it’s estimated to increase to 8.9%. Even in China, the world’s largest group of online shoppers, online transactions make up only 10% of all retail purchases (eMarketer, 2014). Looking at the figures, a majority of people enjoy shopping in brick-and-mortar stores, so don’t expect them to go away anytime soon.
What to Do After a Security Breach
When a site or system is hacked and your data is compromised, it can be a frightening experience. Depending on how you hear about it, you may not initially know if you’re even a victim, or dodged a bullet and were unaffected. You don’t know what they took, who took it, what they plan to do, and whether the data’s been shared with others. While you might be tempted to panic, it’s wise to keep a clear head and try to minimize the damage.
The first thing you need to do is figure out whether you’re affected. If you were a customer or signed up for an account, you may have done so after a breach occurred, which means your data was added after the hackers broke in. Similarly, hackers may have only accessed a subset of data, or data over a window of time. For example, if you didn’t use a credit or debit card during the time the breech occurred, you wouldn’t have been affected by that data breach. Even if you fall into a timeframe of using a company’s site or services, it’s possible that your data wasn’t in the database or table the hackers accessed. As we saw earlier in this chapter, there are ways of finding out, and agencies and businesses will often notify you if your data was accessed in a breach.
If any online account is compromised, you should stop further unauthorized access. Changing the password immediately, and setting up multistep authentication on sites that provide it, will keep the hacker from getting back into the account. If the same password is used on other accounts, you should also change them with unique, strong passwords as well. If someone has accessed the one account, it’s possible they may try and access others.
Once you discover whether it was stolen, you need to identify what was stolen. Not all information is valuable, or worth the concern. If someone stole your name, phone number, and address, you should realize it may already be publically available in the phone book. An email address might result in more SPAM, or could be used with a stolen reused password to gain entry into other sites. As we’ve discussed, some of the worst information to have stolen would include your date of birth (which can be used to verify identity), medical information, financial information, and national identification numbers.
The value of stolen data isn’t necessarily calculated in dollars and cents. In 2014, hundreds of private and nude photos of celebrities were stolen when iCloud (www.icloud.com) was hacked, while the adult dating site Ashley Madison (www.ashleymadison.com) data breach revealed customer’s sexual preferences and fantasies. The humiliation of having such data leaked, combined with any possible uses for blackmail, can be of greater concern than any other information taken.
You should contact authorities who can help, including to any relevant financial institutions, the site that was breached, and of course the police. Depending on the crime, local police may do the investigation, and/or forward it to federal authorities. Even if local police seem unable to do anything, they can provide an incident number that references the complaint. If your phone, tablet, or computer was stolen and/or you have insurance that covers data breaches, the insurance company may want proof it was reported to process the claim. The incident number will also provide useful information if you need to prove you were a victim of the breach, such as when there is a civil lawsuit against a company or dispute a fraudulent claim. If you had credit or debit card numbers, or other financial information stored on an affected site, make sure to contact your bank. Explaining that your account is at risk of fraud will enable them to cancel and reissue a new card and/or put an alert on the account to detect suspicious activity. Of course, online accounts aren’t the only way a hacker can get your data. If your computer was hacked, you should cut off access to the computer by turning off your Wi-Fi or disconnecting the cable that connects it to your network. As with online accounts, you want to prevent someone from accessing more than they already have. Once you’re sure they can’t do any more damage, contact the police. Once they’ve indicated they don’t need your computer or other device as evidence:
![]() Scan your device for malware, rootkits, and backdoors using antimalware software.
Scan your device for malware, rootkits, and backdoors using antimalware software.
![]() Check email rules and filters to make sure email isn’t getting redirected.
Check email rules and filters to make sure email isn’t getting redirected.
![]() Check all your accounts. Audit them to ensure they use strong, unique passwords, and haven’t been accessed.
Check all your accounts. Audit them to ensure they use strong, unique passwords, and haven’t been accessed.
If you know an account was compromised, deauthorize access to any apps that use it. An app may use an account to access other sites, and a hacker may have used it to authorize other devices or services. Once you’ve removed their access, you can go through the steps of reauthorizing them, so they can access your account.
Monitoring your financial information is especially important after a breach, as the data someone acquires could be used to steal your identity. If financial data was possibly taken, contact your bank, credit card companies, and any other financial institutions. Check your monthly credit card and bank statements, and make routine checks of your accounts online to determine if any fraudulent activity is occurring. You should also get a free credit report from each of the three credit bureaus each year:
If there’s an indication that you may be the victim of fraud, checking each year may not be enough. You should consider getting a credit report more frequently, such as every few months. By finding that someone’s recently posed as you, you’ll be able to deal with subsequent problems faster. In addition to manual checks of your statements and credit reports, you should also put a fraud alert on your credit report. Once this is done, if someone applies for credit, the potential creditor is informed of the alert, and can contact you to double-check that the request is legitimate. An alert can be placed on your report for 90 days, but if you’re a confirmed victim of identity theft, it will last 7 years.
A security freeze can also be placed on your credit report so that it can’t be pulled if someone applies for a new line of credit. As we discussed in Chapter 5, Cybercrime, freezing a child’s credit can be a useful deterrent to someone attempting to steal a child’s identity. For an adult, the process can present a number of difficulties, as you’re more likely to apply for loans, credit cards, jobs, apartment rentals and mortgages, or other activities where a credit check is required. If you’re a victim of identity theft, it’s free to freeze your credit report, but there is a charge for others. Also, each time you apply for credit, you’ll have to pay a service fee to lift the freeze so a potential creditor can check your report. To place a security freeze on your report, go to:
![]() Equifax (www.freeze.equifax.com)
Equifax (www.freeze.equifax.com)
![]() Experian (www.experian.com/consumer/security_freeze.html)
Experian (www.experian.com/consumer/security_freeze.html)
![]() TransUnion (www.transunion.com/credit-freeze/place-credit-freeze)
TransUnion (www.transunion.com/credit-freeze/place-credit-freeze)
While it might be embarrassing to be a victim of a data breach, depending on the site that was hit, you should consider telling others. While those with Ashley Madison accounts might not want to be forthcoming (for obvious reasons), someone whose social media or email account was involved in a data breach should let others know. Doing so lets your friends, family, and coworkers know to be wary of odd posts or suspicious emails that appear to be from you, but are actually scams or attempts to distribute malware and/or hack them.
Digital Legacies
While it may seem strange, your reputation doesn’t end after you die. People may see the photos, posts, and tweets you’ve made long after you’ve passed away. If at first you think you don’t care about this, consider that your family and friends might. If people are able to make nasty comments or post embarrassing photos that are upsetting to those mourning you, there may be no way to take them down.
In addition to your digital presence, there are also your digital assets. After you’ve passed away, the online accounts you have will still exist, as will any assets associated with them. You might have online-only bank accounts, investments, virtual currencies like Bitcoin, and other assets with monetary value. There are also items like music, movies, or books you’ve purchased that are accessible through an account like iTunes, which might be something you’d like to bequeath to an heir but overlooked.
In creating or updating a will, you should include such items in your estate, and leave clear instructions as to what should happen to them. If you want certain social media or other accounts shut down, let others know so they aren’t left guessing after you’re gone. If you want someone to manage them, give your executor a way to login. While your password should change regularly, include information on the location of a password list or services you use. For example, PasswordBox (www.passwordbox.com) is an identity manager software that also provides a legacy feature that allows you to specify who will be able to access the passwords if you die.
Facebook Memorial Page
Facebook (www.facebook.com) provides a feature to indicate whether you want your account deleted when you die, or name a Legacy Contact who will take care of your account. To name a friend or family member who will take on this responsibility, you can do the following:
1. After logging into Facebook, click on the downward arrow in the upper right-hand of the top navigation bar. Click Settings.
2. In the left navigation, click Security.
3. In the Legacy Contact section of the page, click Edit.
4. When the section expands, type the name of the person who will manage the account after you’ve died. If the account is memorialized in this way, people will be able to post on your timeline to share memories and condolences. A prompt will appear with the option to send a message letting the person know they’re a legacy contact. If you click Not Now, they won’t be notified at this time.
5. If you want your account deleted after you’ve died, click on the Account Deletion checkbox so it appears checked.
Summary
In this chapter we’ve seen how to research yourself on the Internet, and discover if there’s a problem. If your accounts have been compromised, someone tracks what you’ve done, or someone uses the details of your life to steal your identity and ruin your credit, your reputation can be ruined quickly. By keeping what you do online private, monitoring activities related to your account, and protecting your digital presence and assets, you have a better chance of preventing your reputation from being damaged.