12. Moving Out into the World
Figure 12.1. Stunt. © istockphoto.com/craftvision

Consider this graduation day. Congratulations! Before you take everything you’ve learned up to this point and head out into the world, I want to arm you with some tips on how to prepare your final copies for submission, how to ace any entry exams you may face when setting up your contributor accounts, where to find additional online resources to help you succeed, and close out with a few parting words. Let’s get to it.
Save Your Final Versions
I’ve shown you how to get your photos into Lightroom and how to use Lightroom to process them to look their best. So I wanted to close out the book with how to save the best quality copies. One of the most important things to keep in mind when working with Lightroom is that it never applies any changes to your originals; instead, it will only apply the adjustments you make to copies that are saved during some type of output. “Output,” in Lightroom terms, can mean printing, creating a slideshow, creating a Web gallery, or exporting copies. For the purpose of preparing an output for stock, there are two methods of exporting copies that you can use; one is called Export and the other is Publish Services.
Lightroom Export
Prior to Lightroom 3, the Lightroom Export process was the only way to create copies of your photos with your Lightroom adjustments, based on your chosen output settings. The basic workflow is simple: you select the photos you want to export in Grid view and choose File > Export (or click the Export button), then configure the specific file settings—such as file type, file size, color space, and destination folder—in the Export dialog box (Figure 12.2) according to the needs of your output. When the export process is complete, you have a folder of photos that match your specifications.
Figure 12.2. Lightroom Export dialog box.
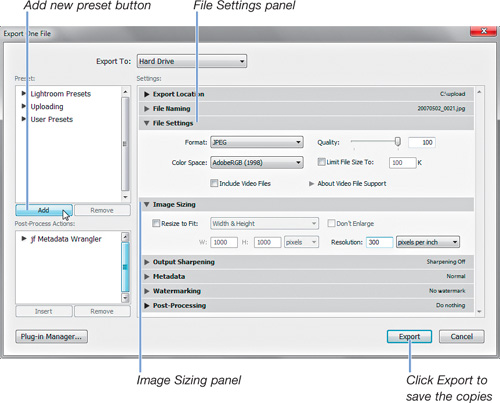
When exporting your photos for submission to microstock, there are a few settings you need to get right:
• In the File Settings panel, choose JPEG as the format, set the Quality slider to 100, and choose AdobeRGB as the color space. Honestly, choosing sRGB as the color space is not a wrong answer, but Adobe RGB is the most often recommended choice between the two.
• In the Image Sizing panel, uncheck Resize to Fit so that Lightroom does not change the pixel dimensions of your exported copies, and set the value in the Resolution field to 300 pixels per inch. The pixels per inch setting simply writes that value into the photo’s metadata, and it is solely for the benefit of customers who expect that number to be there because they were taught 300 pixels per inch equals high quality.
• In the Output Sharpening panel, uncheck the Sharpen For box so that no additional sharpening is applied to your copies. This setting is used for applying output sharpening to photos heading to an online printing service, or for photos that will only ever be displayed on screen. Since we don’t know the final output destination of our stock photos, it is best to do no further sharpening.
• In the Metadata panel, leave both boxes unchecked. If you check Minimize Embedded Metadata, your keywords, title, and description will be stripped out. There’s no reason to write keywords as Lightroom Hierarchy for this output destination.
It is entirely up to you where you save your photos on your drive prior to uploading and what you name them. When the dialog box is configured to your liking, and you’ve double-checked all the settings, do yourself a favor and click the Add button in the Preset section and save all your settings as an export preset that will recall these settings with a single click when preparing future stock submissions.
There is nothing wrong with continuing to use the Export dialog box with Lightroom 3 for saving out your final copies, but the new (with Lightroom 3) Publish Services panel in the Library module offers an interesting option to consider.
Lightroom Publish Services
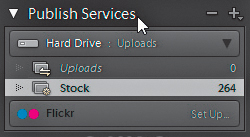
You can think of Publish Services (Figure 12.3) as a sort of managed export. Just as with a typical export, you can save copies of photos to local folders on your drive. However, the difference between a Lightroom export and the Publish Services panel is that the latter creates a connection between the originals in your catalog and the published copies (at the location of your choosing) that you can manage from within Lightroom over time. In other words, you can assemble a special Lightroom collection of your top stock picks and publish (just like export) them to a folder on your hard drive, and then if you need to make changes to any of those published copies, such as if you get a rejection, you can make the correction in Lightroom and easily republish the improved version to resubmit.
Figure 12.3. The Publish Services panel in Lightroom’s Library module.
Note
Publish Services also has the potential to directly publish photos to some photo-sharing sites, like Flickr, but as of this writing, I do not know of any such options to publish directly to a stock site.
I really like the idea of having Lightroom manage my master originals inside the catalog, and at the same time, have a permanent home on my hard drive for the actual final copies I submitted for stock. Furthermore, I feel it is vitally important to give those final copies one last quick (but thorough) inspection before uploading them, and I mean specifically the copies saved out by Lightroom in this instance. You always want to visually inspect the actual photos you are uploading because those are the copies that the inspectors will be checking. You can catch any output configuration errors you may have made (like accidentally resizing too small, or even worse, resizing larger), or any technical problems you missed earlier in the process.
Tip
To learn more about the other Publish Service possibilities, such as Flickr, Smugmug, Facebook, and so on, head over to www.publish.lightroomers.com.
Let’s go through the process of setting up a Publish Service that saves copies to a folder of your choosing on your hard drive to help clarify how this works. When you first expand the Publish Services panel (Figure 12.3), you will see two publish connections: Hard Drive and Flickr. The Hard Drive type of connection is designed for publishing copies to a local or shared drive, which is the one we want to set up:
- Click Set Up on the Hard Drive connection in the Publish Services panel to launch the Publishing Manager dialog box (Figure 12.4), which should remind you of the normal Export dialog box (Figure 12.2).
Figure 12.4. The Publishing Manager dialog box.
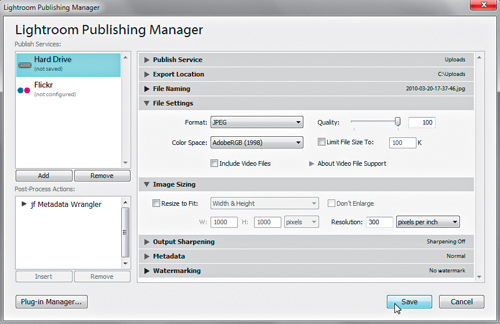
- Enter a short, yet descriptive name for this connection in the Publish Service panel, which will be displayed later in the Publish panel. I named mine Uploads.
- Choose the Export Location, which is where on your drive you want Lightroom to publish these copies. This is an important one to get right the first time because it can’t be changed without deleting the entire connection and starting over. I created a folder on my drive called Uploads and used that.
- Configure the remaining panels the same exact way as I describe for the Export dialog box in the preceding section. You will find all the same panels, named the same way, performing the same functions as the Export dialog box.
- Click the Save button to save your settings and exit the Publishing Manager.
Now you could stop there and simply drag and drop your top picks to that new Uploads connection to create a batch for publishing, but I want to give you one more tip that utilizes the power of smart collections (see Chapter 11) to automatically collect all your final stock picks for you.
- Right-click on the connection you just created and choose Create Published Smart Folder from the contextual menu.
This will launch the Create Published Smart Folder dialog box, which is 100 percent identical in looks and functionality to the Create Smart Collection dialog box in Chapter 11 (Figure 11.13).
- Customize the rules you want to use to automatically assemble your final versions into this Smart Folder.
I took the easy way out and simply added the keyword <<STOCK>> to all my final masters. The only rule I use for my Smart Folder is to find all photos in my catalog with that keyword. This is a simple way to add photos for output as well as quickly find them all through a keyword search inside of Lightroom. There’s no wrong answer here, and you might have different criteria, so experiment with what works for you.
- Click Save to create the Smart Folder, and it will immediately pull all your photos together.
Think of that connection as a bit of a cross between a Lightroom smart collection and a real folder on your drive. You see the master copies in Lightroom, but once published, new copies will exist in the designated folder on your drive. Next comes the actual “publish” part of the process:
- Click on the Smart Folder you created in the Publish Services panel to see the photos displayed under New Photos to Publish (Figure 12.5).
Figure 12.5. Lightroom manages your photos in various queues depending on what needs to happen with them next.

- Click the Publish button (below the panel). As the copies are published to the designated folder, you will see them move under the Published Photos heading (Figure 12.5).
- When the publishing is complete, right-click on the connection and choose Show in Explorer (Mac: Show in Finder) to open the folder and see the new copies.
Now you have a folder full of copies ready to upload to whichever stock sites you choose. Lightroom will track your masters, and any time you make the slightest change, from adding new keywords to making an exposure adjustment, Lightroom will put those changed folders in a Modified Photos to Re-Publish queue inside that connection (Figure 12.5). Clicking Publish will update the copies in the folder on your drive accordingly.
The same goes for any rejects that are beyond saving (hey, it happens). If you decide (or it gets decided for you) that one of your picks just doesn’t make the cut, then all you need to do is change the aspect of that photo that caused it to be included in the smart folder to begin with. In my case, I just remove the <<STOCK>> keyword from that photo, and Lightroom moves it to the Deleted Photos to Remove queue (Figure 12.5). The next time I click the Publish button, that original photo will be removed from the Smart Folder and the copy will be removed from the folder on disk (the actual master copy is not deleted or harmed in any way).
The Publish Service output option certainly requires more initial setup than a typical export, but once it is created, you’ve got a live mechanism for continuous output and management of your stock submissions. I’ve just showed you the basics. You can create multiple connections and use a wide range of criteria to meet your needs as time goes on.
Now that you know how to get your copies ready for submission, I want to give you a few final tips for getting the most out of the experience as you venture out into the world of microstock.
Establish a Name for Yourself
One of the very first things you’ll do when you create an account at any stock site is to choose a username (sometimes called a member name or nickname). A lot of people don’t give this much thought when they are first starting out and can sometimes choose a name they may later regret because it doesn’t sound professional, is hard to spell, or just easy to forget. Perhaps their nickname from their college days came to mind, or they just use their XBox gamertag for everything. There’s nothing wrong with choosing a creative or clever name, or even something odd like “suckaheadjivemamacow” (true story) if that is what you really want to do. But you may not want to go through your microstock life being known as “crawlinghomedrunk” (true story). I’ve seen many people build their careers from their start in microstock, so ask yourself:
• Do you have a blog or website that might suggest a good name?
• Do you have an existing business that you want to tie into?
• Do you want to carry the same name across all sites?
• Do you want to carry the same name across other social media outlets like Twitter or Flickr?
I’m not trying to make this more complicated than it needs to be, or even suggest that the first name you pick is carved in stone, as most sites should allow for you to change your username (though I can’t claim for certain that all will). I just want to suggest that you give it some thought now, because down the road you may find it harder to switch—and you lose any name recognition you may have built with customers—or you may find that all the really good names, like “shooterguy,” are already taken. Just keep in mind that this will be the name that people will come to know you by, and that many people may never even know your real name.
Going through the Application Process
While creating accounts at each site is free and relatively painless, some will require you to read through their contributor manual, submit sample photos, and possibly even take a short quiz before they let you begin uploading your work. Of the five sites I suggested checking out in Chapter 2, only Shutterstock and iStockphoto require submitting samples before getting approved. These are also the two most profitable sites for most people, so it is worth your time to get the green light as soon as possible.
My hope is that all the material in this book will get you through the door easily, but here are a few important tips to keep in mind:
• Submit your best work. This is your chance to show what you are capable of, so don’t mess around with snapshots on your hard drive from your last vacation. Go out and create some stock with intention.
• Keep it simple. Don’t go gear crazy. Think simple compositions that communicate a simple message.
• Keep it clean. Watch out for the easy technical problems that inspectors hone in on like bloodhounds.
• Choose a diverse range of subject matter. Ten variations of an apple on a white background will get you sent to the back of the line. Play to your strengths and interests, but show some variety.
If you encounter a quiz in the application process, you should be well prepared, so don’t sweat it. These are pretty much open book quizzes anyway, since there is no time limit and you are on the Internet. Their purpose is really just to make sure you’ve read that site’s contributor guidelines. Usually, the safest, most cautious answer is the correct one (especially in regard to model releases, property releases, and respecting copyrights of other artists). In addition, since becoming a contributor brings the potential to start generating income, some sites also require that you submit a scanned (or photographed) copy of your driver’s license or equivalent photo identification. This is just to verify you are who you say you are, you are of legal age (18), and your address matches the address in your account.

Find Your Photos in Use
One of the first things microstock contributors want to see (aside from increasing account balances) is where their downloaded photos end up being used. It is still very rewarding for me to find a new instance of one of my photo’s incorporated into someone else’s project. Since so much of microstock content ends up being used in online projects, it isn’t that difficult to discover some of them for yourself. There’s one major caveat: it can take quite a bit of time before you actually find anything. This shouldn’t be a big surprise, but I don’t want you to get the impression that this is an instantaneous process. It could easily be a year or more before you have enough work in circulation to start finding the places it has been used.
Over the years, I’ve had a few kind souls contact me to let me know they’ve used my work in their projects. I’ve even had a few folks send me samples. I’ve also had other contributors send me links to places where they happened to have spotted seeing one of my photos in action, and I’ve stumbled on a few myself (like that pet obituary ad I mentioned in Chapter 2). But such sightings are rare. To find more, you’ll need to take matters into your own hands.
Google Google Google
This undisputed king of searches is the logical starting point for finding your work. There are a number of Google tools to help you discover your images in use. One of the first and most obvious is to do a few regular Google searches using combinations of:
• Your real name in quotes. For example, “Rob Sylvan.” If you get a lot of hits on just your name, then also try adding in words like: photography, credits, copyright, and the individual names of the sites you are working with.
• Your username for each site (a good reason to have a single name across all sites). Some customers will add a credit line in their projects, and just as often they’ll use your member name since it is often more visible at the point of purchase.
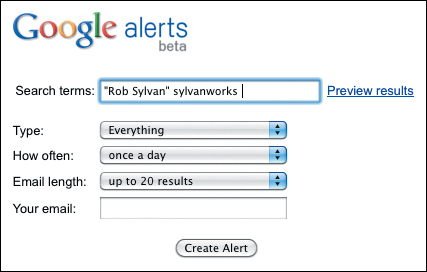
You’re certainly not going to want to keep repeating those searches on a regular basis, but you can take advantage of another free service from Google, called Google Alerts (see Figure 12.7 on the next page). Head over to www.google.com/alerts and use your most successful search configurations to create automated alerts that will be emailed to you at the frequency you choose.
Figure 12.7. Setting up a Google Alert.
After setting up a few alerts, switch over to Google’s Image Search (www.images.google.com) and again, enter the most successful search terms. I usually just start with my name, and then try other combinations. Online news agencies are some of the most likely customers to put your name as a credit with the photos they use. I’ve also had luck using the terms from the titles of my most successful photos (like the geese migration example from Chapter 11).
There’s one last Google resource worth checking out before you go, and that’s Google Books (www.books.google.com). Many book publishers and authors will include the name or username of the artist’s work that was included in their books. I’ve done that with all of the stock photos I’ve used. Try a search on your real name and your username, and you might just find you’ve been published.
Reverse Image Search
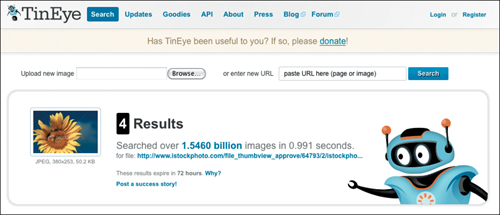
Several years ago I learned of a website called TinEye that developed an image identification technology that allows you to take a starting image (like a photo from your portfolio) and search the Web to try to find other instances of that same image in other places. You can give it a test drive yourself over at www.tineye.com. It really is amazing, and it’s free. TinEye is continually crawling the Web and indexing the images it finds, so this is not an exhaustive search of the entire Web (yet) but rather a search of all images TinEye had already found.
You can upload a photo from your desktop, or paste in a link to an image that is already online. But the easiest way is to install the browser plug-in (plug-ins exist for Firefox, Chrome, and Internet Explorer) that enables you to right-click an online photo from within your Web browser and initiate a search. If it finds any matches, it will return the matching thumbnails and links (Figure 12.8) for you to click through and investigate further. It can even find photos that have been cropped and changed pretty dramatically from the original. Remember, it takes time for your photos to be licensed, used online, and eventually indexed, so don’t despair if you come up with empty results for a while.
Figure 12.8. TinEye search results on one of my stock photos.
Move to the Next Level
The bulk of this book has been about building a solid foundation for getting started in shooting for microstock. I hope you will read the stories of my friends Nicole, who wrote the Foreword, and Rasmus, who wrote the Afterword, as well as all the tips from fellow contributors throughout the book, to get a sense of the bigger picture, and the notion that, like most things in life, the results you get out of the experience are in direct proportion to what you put in. This is not an easy and quick path to riches. It is a very accessible learning opportunity, and a way to grow and develop your craft while generating income along the way.
I’ve mentioned a few online resources in tips and notes throughout the book, but wanted to focus on a few that I really don’t want you to miss. These are all resources I use frequently, are all lovingly maintained by other microstock contributors who are willing to share their experiences and expertise to provide these services to the rest of us, and, these are all free. From these, you will discover new resources, head down new paths, find new tools, and stay connected to everything you need to know beyond what this book can offer you:
• Microstock Diaries (www.microstockdiaries.com)
This is the original blog about all the important happenings in the world of microstock. Run by a long-time contributor, Lee Torrens, it is a well-respected resource among contributors.
• Microstock Group (www.microstockgroup.com)
This is the most popular, non-stock agency-affiliated, online forum for micro-stock contributors. Started and maintained by another long-time contributor, Tyler Olsen, there’s plenty of unbiased and unvarnished commentary about what the various stock sites are up to, sales trends, rejection woes, and what new tools and resources people have discovered. Don’t take anything anyone says personally; use the forum search before asking a question, and you’ll do just fine.
• Deepmeta (www.deepmeta.com)
Although this tool is only useful for submitting photos to iStockphoto, it is such a better option than the Web interface offered by iStock itself (though that may change in the near future) so I am compelled to mention it. Deepmeta is completely free, and 100 percent developed and maintained by a fellow contributor, Franky De Meyer. He’s done a great service for us all, and you’ll be glad I told you about it.
• PicNiche (www.picniche.com)
I mentioned PicNiche in the section on keywording, but I wanted to highlight it here because I think you’ll find it incredibly useful. Developed by Rob Davies, another microstock contributor, it is a handy tool for providing some insight into subject matter supply and demand based on accumulated publicly available information from various stock sites. What I like most about what Rob has created, though, is the Contributor Toolbar for Firefox. The Toolbar puts links to various microstock forums, most popular content lists, blogs, and a really cool keywording tool all in one place.
• Myerson Photo Blog (www.myersonphoto.com/blog)
This is the blog of fellow contributor Ethan Myerson (who also happened to be the Technical Editor of this book). Ethan’s blog entries run the gamut from Photoshop tutorials to keywording tips (he is an image inspector and moderates the Keywording forum on iStockphoto, so he’s a real resource in that area).
• Nicolesy Blog (www.nicolesyblog.com)
Nicole shares a ton of information about her stock experience from photography tips, to processing advice, and a lot of really great stock photos. This is a great source of information and inspiration.
• Rasmus Rasmussen (www.rasmusrasmussen.com)
I’ve been enjoying Rasmus’ writing for many years. He’s written articles on photography for iStockphoto and has even written his own microstock photographer’s guide. He’s a very down-to-earth guy with a wealth of wisdom to share.

• Sean Locke Digital Imagery (www.seanlockedigitalimagery.wordpress.com)
Sean is a stock-producing dynamo (I profiled him in Chapter 6). He just completely understands how to create clean useful stock, and works hard at doing it right. On top of that, he’s an ubiquitous presence in a few micro-stock forums, and can be counted on for delivering no-nonsense advice. His blog is a great read and a great way to get a glimpse inside what has made him so successful.
• Yuri Arcurs (www.arcurs.com)
Widely regarded as one of the most successful microstock contributors in terms of sheer volume of licenses sold, Yuri has accumulated a number of informative blog posts and contributor resources on his website.
I know there are more resources out there (and apologies if I missed your favorite), but this list should provide you with more than enough new information to chew on for a while. That said, there is one more resource I want to remind you to check out:
• Taking Stock (www.takingstockphoto.com)
This is, of course, the website I built to support this book. Aside from giving you the opportunity to download all of the practice files for the lessons in the book, I provide additional tutorials, links to new resources, and an easy way for you to contact me if you have any questions about any of the material in this book. Don’t be a stranger.
Parting Words
I sincerely hope this book has provided you with a solid foundation for deciding if this is the right path for you to follow, and more importantly, to get you started on the right foot. I have found that the people who focus first on the quality of their submissions, and then branch into diverse subject matter, before finally shifting to building up quantity tend to find greater success and satisfaction from the process. If there were any universal recipe for success, this is as close as it gets.
Are you familiar with the 80-20 rule? It can be applied to many things in life, but when applied to a microstock portfolio, it suggests that 80 percent of your earnings will come from 20 percent of your portfolio. In other words, you are bound to discover that your portfolio consists of a few really successful images (in terms of earnings) and a lot of much less successful content. It can be incredibly helpful for you to discover and monitor those high performers over time, so that when you get to the point where you are focusing on quantity, you consider creating new content that is similar but different enough that it doesn’t directly compete with your top earners. For example, after seeing the success of my Christmas tree image I decided to create a few variations on the same snowy tree theme. My hope is that together, that offering can support a wider variety of customers without eating into the success of my top performer. So far it has turned out to be very positive, and they were all shots I enjoyed creating.
The point I am trying to make is that over time, just adding new content alone is not going to translate directly into an equal amount of income. Work smarter, not just harder, and follow your own interests and passions. Let the authenticity in your work be the engine of your success, and have fun!