5. Tools of the Trade
It’s gotta be the shoes.
—Mars Blackmon
There was a series of commercials for Nike’s Air Jordan sneakers in the late ‘80s that featured Mars Blackmon, Spike Lee’s fictional alter-ego, and legendary basketball player Michael Jordan. The gist of the commercial was that Mars Blackmon attributed Michael Jordan’s prowess on the court to his shoes, despite Michael’s repeated, patient, yet slightly exasperated, denial that no, it was not the shoes at all.
If you’ve ever shown someone a photo you are really proud of only to hear, “Wow, you must have a really great camera,” you can just politely smile and think of Mars Blackmon.
The flip side, of course, is that there is a wide (and ever-growing) range of camera equipment, in terms of quality, cost, ease of use, and functionality. The challenge we face as photographers (at all levels) is how to navigate through the dizzying array of choices and make the best investments we can on equipment that offers us the best fit, with a little room to grow (and wiggle our creative toes) without breaking the bank.
Gear Crazy
Talking about photo gear with other photographers can be fun and enlightening, but sometimes a little crazy-making, too. You may hear a lot of seemingly conflicting advice about what is the best and why. Some will swear you need this gadget or should never use that brand, and then you’ll find people who say the exact opposite. It is easy (and sometimes fun) to get caught up in these often lively gear debates or to get swept away by someone else’s glowing review of his latest acquisition. After awhile you may find yourself thinking that if you just had that camera or this lens, you’d be getting the shots you want. This is a place we all go to at some point.
Figure 5.1. Crazy Paparazzi. © Peeter Viisimaa (istockphoto.com/peeterv)

My advice is to not buy anything … yet. I don’t know you. I don’t know what experiences you’ve had, what gear you already own or have access to, or where you want to go in the future. I have to assume that you already have some equipment at your disposal or you wouldn’t be holding this book. And there is definitely new gear in your future because there is no way around that simple fact.
However, before you open your wallet I suggest you first seek mastery over what you already have. Sure, you may find out that what you have is not good enough to get you where you want to go, but discovering exactly what limitations your current gear has will be incredibly valuable for honing in on what you want to invest in next.
I can’t teach you everything you need to know about photography gear in a single chapter. What I can do is make the case for what equipment choices I think will help you improve your chances at getting your stock photos approved.
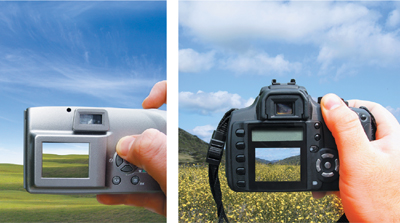
The most essential piece of gear (after your brain) is, of course, your camera. Cameras tend to be lumped into two general categories: point-and-shoot or digital single lens reflex (DSLR). Due to advances in digital camera technology, the line between these two rather broad categories has become increasingly blurred, but a DSLR is pretty much defined by the fact that it has interchangeable lenses, while a point-and-shoot does not. Some cameras are designed for the casual shooter who just wants an easy way to capture special moments in life, while other cameras offer more features for a higher price and target the prosumer, the person who wants to do more and is willing to pay more but who is not earning their living from photography. At the top is the pro gear that typically offers the largest feature set, the best quality, and the highest cost.
Figure 5.2. Taking a Photo. Both. © Lee Pettet (istockphoto.com/LPETTET)
It has been my experience that the majority of microstock contributors enter the field at the prosumer level. Over time, as their experience, knowledge, and success grows, so does their equipment budget. There are people who have started with a high-quality point-and-shoot, and have gone on to build complete photographic studios. But as the microstock industry has matured and the opportunity to earn more has increased, I see more people enter at the professional level.
At the end of the day, when people are looking at photos to download for their projects, they care more about the usefulness of the photo than about what camera it was created with. That said, your photos still need to get past the gatekeepers. The right equipment will improve your odds.
Camera Choices
A question I often hear from people who are new to microstock is, “Can I submit photos taken with my point-and-shoot camera?” This is a fair question since it is the type of camera many of us have when we first get bitten by the shutterbug. Back in 2002, I started with a 3 megapixel point-and-shoot camera, but that camera wouldn’t cut it today.
However, the technological advances in point-and-shoot cameras have come a long way since 2002. Your cell phone may have a better camera in it than my old Kodak DC4800. So, can you submit point-and-shoot photos? Yes, but the range in circumstances under which you can get images of acceptable quality for stock is going to be significantly smaller than the range of a DSLR.
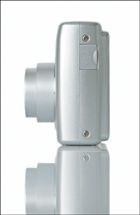
Figure 5.3. Point-and-shoot digital camera. © istockphoto.com/jsemeniuk
Every camera and lens combination has a sweet spot; a set of conditions that will produce an optimal result. Even the worst camera in the world has its sweet spot. When you make the commitment to purchase any piece of photographic equipment, you should also make the commitment to learn the optimal set of conditions required to get the best result out of that gear.
When I say optimal conditions I mean, what combinations of ISO, f-stop, and exposure produce the most noise-free and tack-sharp results? What is the closest you can stand to your subject and still be able to focus? What is the farthest away you can be and still fill the frame? What is the widest aperture you can use to get the shallowest depth of field? If you are using a zoom lens, what focal length produces the sharpest result with the least edge distortion?
I do want to warn you that some of this may involve a little-used and somewhat scary trick of the trade called “reading the manual.” You don’t have to read it cover to cover; just keep it handy for emergencies—like the moment you are ready to put all your gear on eBay and take up knitting.
Some of a photo’s problems can be fixed later in post-production, but ideally, if you get to know your camera’s sweet spots you can save yourself a lot of post-production time by avoiding problems in the first place. You’ll also know when you to have to move out of the optimal zone because there just is no other way to get a certain shot.
The most essential difference between a point-and-shoot and a DSLR is the size of the sweet spot. Because a DSLR allows you to change lenses, you have entirely new worlds of possibilities that point-and-shoots just can’t enter.
The flip side, of course, is that the compactness of a point-and-shoot camera makes it much more mobile, which means it is much more likely to be within arm’s reach. It is also much less “in your face” when you point it at someone, so other people will be more at ease around you. For these reasons, I still keep a point-and-shoot camera in my bag and am quite fond of it, but I wouldn’t dream of not having a DSLR that provided much more flexibility.
So, back to the original question: Do people submit photos from a point-and-shoot and get them accepted? Yes. Are those same people on a trajectory that will lead to their first purchase of a DSLR? If they are planning to continue shooting for stock, the answer is “yes” again.
The file format you want to shoot with—whether it’s the ubiquitous JPEG or the increasingly popular raw format—can also influence the type of camera you buy. Let’s take a look at the differences between these file formats.
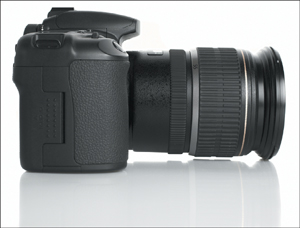
Figure 5.4. Side view of digital 35mm camera. © istockphoto.com/jsemeniuk

Raw vs. JPEG
JPEG is a very familiar file format. It is the file format of almost every photo on the Internet, as well as the file format that your phone’s camera uses and likely the default file format on whatever other digital camera you own. If you’ve ever looked at a photo on a computer, the odds are that it was a JPEG.
Tip
It is tempting to buy the largest-capacity memory card so you can fit more images on a single card. Fitting all your photos on a single card sounds great until it fails and you lose everything. Consider buying smaller cards instead so that your risk of loss is reduced.
The reason for JPEG’s popularity is that, by design, it does a great job of compressing image data to smaller file sizes with little or no visual difference from the original. A smaller file size is a great advantage for fitting more photos on a memory card or your computer’s disk drive and for sending photos over the Internet.
The main downside of the JPEG format is that it uses lossy compression: It reduces file size by removing some of the original data from the image. The more compression you apply, the smaller the file size and, consequently, the more data that is lost from the original. Too much JPEG compression (Figure 5.6) will result in visible artifacts that look like jagged or blocky areas in your photo. It goes without saying that too much JPEG compression would result in a rejection at any stock site. Luckily, it is easy to avoid: Simply apply the least amount of JPEG compression possible when creating the file.
Figure 5.6. The telltale blocky-pixel look of too much JPEG compression. For a closer look, download from www.takingstockphoto.com/downloads.
The other potential negative to shooting in JPEG mode is that it requires your camera to process the original capture data for output. To do this, the camera uses a combination of the settings you dialed in via the camera’s menu options (such as color, white balance, sharpening, and contrast adjustments), and the programming instructions written into the camera’s software. You’ll often hear this referred to as having the settings baked in. This means that by the time you first see that photo on your computer, it has lost some of the original capture data from both JPEG compression and whatever processing was done by the camera along the way.
This is not automatically a bad thing. It just means that you may have limited some of your post-processing options in the future since you can’t unbake a cake. For example, if too much sharpening was applied by the camera, there is no way to undo that and start over from scratch. The damage is done.
Because of the smaller file sizes possible with JPEG, it makes a good output format for photos that will be distributed over the Internet (not to mention the fact that all the microstock sites require you to upload your photo submissions in JPEG format). But if you would like to have the opportunity to work with more of the original data captured by the camera when you sit down for editing, there is an alternative to consider: shooting in raw.
Keeping Your Options Open
Raw is not a specific file format, but rather a shooting mode that saves out the unprocessed image data from the sensor to your memory card. There are actually a great many raw file formats that are unique to different camera makes and models. Each camera manufacturer has its own proprietary raw format, with file extensions such as .cr2, .nef, .pef, and .raf, to name a few, and new formats appear with each new camera model. The primary benefit gained by shooting in raw mode is that you now have all the original data captured by your camera to work with and to process as you see fit. No data has been lost due to compression or by in-camera processing.
The flip side is that the file size of a raw photo is as much as four times or more larger than its JPEG equivalent. There are types of lossless compression formats for raw files, which will reduce the file size of a raw file, but these files will still be significantly larger than a JPEG. That means fewer photos per memory card as well as more disk space required for storage. In addition, since by design raw photo data is unprocessed, you will need to use some type of raw processing software before your photos are ready to be shared with the world.
Here’s how I have approached this particular dilemma. When I first started shooting digital, JPEG was the only option my camera supported. As my skill improved and my interests in photography increased, I upgraded to a camera that produced a larger and better quality JPEG. When I reached the point of purchasing my first DSLR camera, which offered a raw format option, I stayed with JPEG because that was all I knew. It took me about a year to start testing the raw waters, and I did so by setting my camera to raw+JPEG mode, which meant the camera saved a raw file and a processed JPEG side by side. This seemed like the best of both worlds in terms of maximum flexibility, but of course it meant even more disk space was being used by twice as many photos. Eventually my confidence in my raw processing skills increased to the point that I abandoned shooting in JPEG (for stock purposes) completely and have never looked back.
I appreciate having as much data on hand as possible when processing my photos for output. As the software for processing raw data has improved, I have been able to go back and reprocess older raw photos with better results than were originally possible, something you cannot do with a JPEG photo. The price of hard drive storage has continued to decrease over time, so for me the trade-off in file size has been outweighed by the benefits of keeping an archive of raw image data. You’ll need to make the best decision for your current needs. If you are not shooting in raw already, I strongly encourage you to at least try shooting raw+JPEG so that if/when the day comes that you are ready to give raw a try, you’ll have an archive of raw files already on hand.
Key Camera Settings
If you’re going to shoot JPEG, that means that your camera is the first computer that is going to process your photos. This in itself is not a bad thing, since the people who make those cameras are actually pretty smart folks. However, they are designing cameras to make pretty pictures, not necessarily pictures that will pass the standards for submission for stock. In this light, it is in your best interest to configure your camera to do the least amount of processing of your JPEGs as possible.
Figure 5.7. Choosing your camera settings.

If you are shooting raw, you can skip this section because none of these settings will be baked into the raw photo’s pixels. Your camera will save these settings as instructions in each raw photo’s metadata, which is the non-image data section of a file format. If you are using the raw processing software provided by your camera’s manufacturer, then it will read those instructions, and use them as a starting point for processing your raw files. However, you retain complete control for changing settings as you see fit since the data is unprocessed. If you use a third-party vendor’s raw processing software (such as Adobe Camera Raw or Lightroom), then those applications will completely ignore in-camera processing settings, except for white balance, and have their own default settings to use as a starting point (more on this in Chapter 8).
Do Touch That Dial
Note
This may be one of those times to pull out the manual and decipher what all those symbols and labels mean.
Every camera’s feature-set and menu offerings are going to be different, but there are several types of in-camera image processing that you should be aware of so you can make conscious decisions about what you want done to your photos. I’ll assume you have already chosen to set the camera to the largest image size and least amount of JPEG compression (typically called “highest quality”), so here are the other settings to look for and configure:
• Sharpening: Turn this to the lowest setting the camera allows. Off is preferred. I’ll discuss the role of sharpening in Chapter 8.
• Contrast: Set this to the lowest setting possible. You can always add more contrast later if desired.
• Noise reduction: Turn this off completely. This is one setting you want to apply just as little as is needed, and preferably after close inspection of the image on your computer.
• Color styles: This may be called saturation on some cameras. Use the setting that applies the least amount of color adjustment so that the colors in the photo most closely resemble the actual scene.
• Digital zoom: Turn off and never use. Digital zoom means your camera uses software in the camera to enlarge the center of the image captured to make the subject appear larger. This process is called interpolation, and most microstock sites will reject photos that have been interpolated to a larger size because the process can degrade the quality of the image detail.

My reasons for suggesting those settings are simply to provide you with the least processed version of your photo possible when shooting JPEG, so that you can have a more deliberate role in making those adjustments later in postprocessing, and so that your camera won’t make adjustments to your images that decrease their chances of getting approved. I do still think shooting in raw mode is preferred, but I realize you need to start where you are comfortable and get the best results possible.
Beyond the Camera
You can do a lot with just a good camera and lens. As you discover where the sweet spots are with any given camera/lens combination, you will probably find yourself wanting to acquire more equipment to expand your repertoire of subjects, technique, and style. I’m reluctant to encourage people who are new to shooting for stock to make large investments in new equipment, but I am not immune to the siren call of new gear, or the heady aroma of freshly unboxed electronics. So, if you have a couple hundred bucks just burning a hole in your pocket and you want to know one good investment to make, I suggest looking at some tools to help add or modify light.
Tip
Head over to http://strobist.blogspot.com/ for an indispensible free resource for getting the most out of your off-camera flash.
I love sunlight for lots of reasons, and the fact that it is free doesn’t hurt. However, depending on where you live in the world, the amount and quality of useful sunlight varies with the seasons as well as by the day. An off-camera flash or speedlight is an extremely versatile piece of equipment to add to your kit as soon as you can afford to do so. You can use it with available daylight to fill in shadow areas (called fill light), or you can use it in the absence of daylight to light a scene completely.
In Figure 5.9 I used a single Nikon SB-800 speedlight to provide all the light in the shot. All I did was mount the speedlight on a spare tripod (though I could have held it in my hand, used a lighting stand, or put it on a table top) and direct the beam of light at the white paper behind the objects shown in the photo. In front of the objects and slightly to camera left, I placed a sheet of white foam core covered with aluminum foil, which reflected the light bouncing off the white paper back on to the subjects. Next to using daylight, this is a very simple yet useful way to start expanding your use of artificial light.
Figure 5.9. Inexpensive, yet essential, gear.
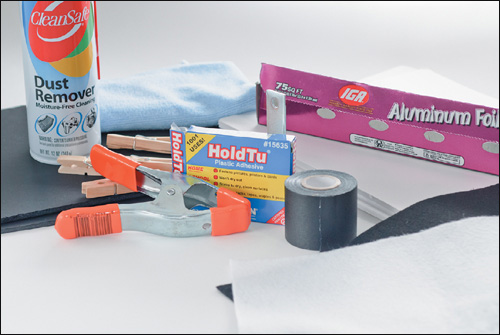
The objects in Figure 5.9 are some of the least expensive and most essential accessories I think you can add to your gear list. Here’s what I included:
• White seamless paper: You can order this by the roll from any photography supply store.
• Gaffers tape: This cloth tape is easy to tear and has a strong bond, but can be removed easily without leaving a sticky residue behind. It’s great for holding just about anything in place.
• Compressed air: A little blast of air is great for clearing dust off an object or insects off a flower. Removing distracting elements before you shoot is much easier than removing them in post-production.
• White and black foam core: Found at any craft supply store, foam core is light yet rigid, and can be used to either reflect (white) or block (black) light as needed.
• Aluminum foil: Highly reflective, easy to work with, and cheap.
• Clothespins and “A” clamps: You can never have too many hands for holding things right where you want them. Wooden clothespins are cheap and lightweight. When you need more holding power, pick up a few A Clamps (the orange-handled clamp in the photo) from your favorite photography supply store.
• HoldTu, Sticky Tack, or Blu-Tack: There are many different brand names for this reusable, putty-like adhesive. Handy for any time you need to temporarily hold something small in place.
• White and black felt squares: Pick a few of these up at the craft store for a few cents each. They make versatile light modifiers.
I directed the light coming from the speedlight in that scene by creating what is called a snoot, which is a sort of light-directing tunnel, out of a piece of black felt and a little gaffers tape. You can see what I mean in Figure 5.10, where I lit the scene using the same speedlight showing in the photo. The felt isn’t lightproof, as you can see in that shot, but for this use that wasn’t a problem.
Figure 5.10. Light from a speedlight modified by felt and gaffers tape.

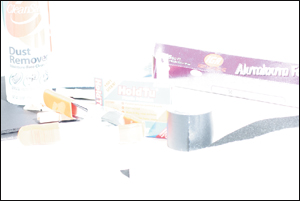
Just like in the previous figure, I bounced the light off the paper in the back and then reflected it using foam core and aluminum foil back on to the subject (Figure 5.11). In case you are wondering how much difference that little piece of felt made, I took one more photo of the same scene in Figure 5.9, with the same exposure settings but without the snoot (Figure 5.12). As you can see, the light went everywhere and completely blew out the subject.
Figure 5.11. Lighting setup showing seamless white paper, single speedlight with felt square snoot, and white foamcore covered in aluminum foil reflector.
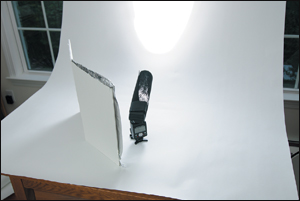
Figure 5.12. The difference a snoot makes. Same scene and camera settings as Figure 5.9, but without snoot on the speedlight.
From this point forward you will continue to be faced with new decisions involving some sort of trade-off. I can’t make those decisions for you, but I can encourage you to be thoughtful, to maximize the use from the equipment you already have, and to then discover all the little inexpensive ways you can expand your repertoire without mortgaging your future. Enjoy the process, focus on creating useful content, and know the next equipment upgrade can always wait until tomorrow.