
Although you can do a lot to improve a photo with tonal adjustments, color corrections and retouching, sometimes the best way to produce the perfect image is simply to fake it!
Photoshop Elements delivers powerful tools that will enable you to do just that by combining multiple images. Merge ordinary scenic photos into stunning panoramas that truly recapture the feel of the location or combine a series of shots to produce the perfect group photo where everybody is smiling and there are no closed eyes. Deal with difficult lighting conditions by blending differently exposed pictures.
In this lesson you’ll learn some of the tricks you’ll need for combining multiple images to create that perfect shot that you didn’t actually get:
Merging multiple photos into a panorama
Assembling the perfect group shot
Removing unwanted elements
Blending differently exposed photographs
Combining images using layers
Resizing and repositioning selections
Creating a gradient clipping mask
Defringing a selection
You’ll probably need between one and two hours to complete this lesson.
If you’re ready to go beyond fixing pictures in conventional ways, this lesson is for you. Why settle for that scenic photo that just doesn’t capture the way it really looked? Or that group portrait where Dad’s looking away and Mom’s eyes are closed? Combine images to produce the perfect shot. Merge photos to make a stunning panorama, remove obstructions from the view, and even get little Jimmy to stop making faces.
Before you start working on the exercises in this lesson, make sure that you have installed the software on your computer from the application CD (see the Photoshop Elements 9 documentation) and that you have correctly copied the Lessons folder from the CD in the back of this book onto your computer’s hard disk. (See “Copying the Classroom in a Book files” on page 2.)
This lesson assumes that you are already familiar with the main features of the Photoshop Elements workspace. Should you need to brush up on the basic concepts review “Getting Started” and “A Quick Tour of Photoshop Elements” at the start of this book, or refer to Photoshop Elements Help.
While you’re working on the projects in this lesson, you’ll use sample images from the CIB Catalog that you created in the “Getting started” section at the beginning of this book:
Start Photoshop Elements and click the Organize button in the Welcome screen. Check the name of the currently loaded catalog displayed in the lower left corner of the Organizer workspace. If your CIB Catalog is not already loaded, choose File > Catalog and select it from the list in the Catalog Manager.
Choose File > Get Photos And Video > From Files And Folders. In the Get Photos And Videos From Files And Folders dialog box, locate and open your Lessons folder.
Select the Lesson11 folder. Disable the option Get Photos From Subfolders and any automatic processing option that is currently active, and then click Get Media. In the Import Attached Keyword Tags dialog box, click Select All, and then click OK.
Click the Show All button in the Find bar. In the Keyword Tags panel, expand the Imported Keyword Tags category, and then click the find box beside the Lesson 11 tag to isolate the images for the projects in this lesson.
If you don’t see filenames below the thumbnails in the Media Browser, choose View > Show File Names.
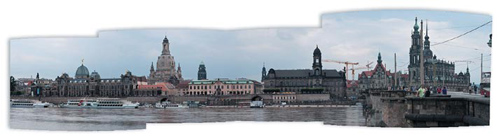
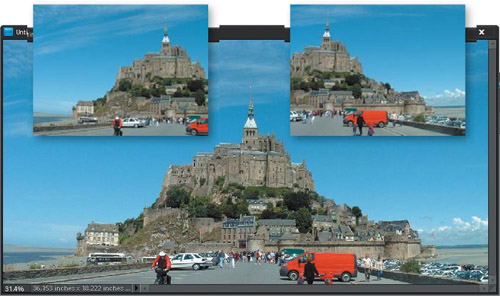
The images you’ll use for this first exercise are four slightly overlapping photos of the German city of Dresden, taken from across the river Elbe. The lens used for these shots did not have a wide enough angle to capture the entire scene—a common problem for many of us when taking photos at a scenic location. These photos provide an ideal opportunity to create a panorama; in the following exercises you’ll learn how to have Photoshop Elements do most of the work for you.
Although it is possible to start the Photomerge Panorama process from the Organizer, we’ll switch to the Editor first, to set up the workspace.
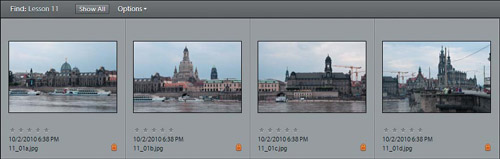
In the Organizer, Ctrl-click / Command-click to select all four pictures of the Dresden skyline (11_01a.jpg through 11_01d.jpg) in the Media Browser, and then right-click / Control-click any of the selected thumbnails and choose Edit With Photoshop Elements from the context menu.
In the Editor, either choose Window > Reset Panels or click the Reset Panels button (
 ) at the top of the workspace. Drag the Layers panel out of the Panels Bin by its header bar, and then hide the Panels Bin by un-checking its name in the Window menu. Drag the lower right corner of the Layers panel to make it large enough to show four layers; then, position the panel at the lower left corner of the workspace.
Choose Window > Images > Consolidate All To Tabs, or click the Arrange button (
 ) at the top of the workspace, and then click the Consolidate All button at the upper left of the Arrange menu.
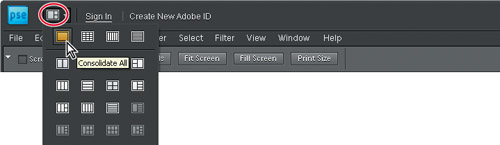
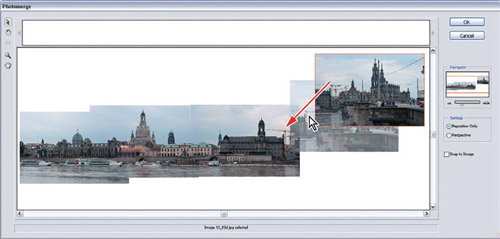
Choose File >New > Photomerge Panorama to open the Photomerge dialog box.
In the Photomerge dialog box you have the option to select individual source files or the entire contents of a specified folder, and a choice of layout methods that will affect the way the source images will be stitched together to create your panorama.???
Photomerge Panorama layout options
Auto. Analyzes the source images and applies either a Perspective or Cylindrical layout, depending on which produces a better photomerge.
Perspective. Creates a consistent composition by designating one of the source images (by default, the middle image—or images, in this case) as a reference. The other images are then repositioned, stretched, or skewed as necessary, so that overlapping content is matched.
Cylindrical. Reduces the “bow-tie” distortion that can occur with the Perspective layout by displaying individual images as on an unfolded cylinder. Overlapping content is still matched. The reference image is placed at the center. This is best suited for creating wide panoramas.
Spherical. Aligns and transforms images as if mapped to the inside of a sphere. This is particularly effective for a set of images that cover 360 degrees, but can also produce great results in other cases. For our sample images, there is noticeable distortion in the horizontal line of the river-bank.
Collage. Aligns images and matches overlapping content by rotating and scaling the source photos.
Reposition. Aligns the images and matches overlapping content without scaling, skewing, or stretching any of the source photos. In our example, there has been a problem with matching the construction crane at the junction of the two photos on the right. You can often fix this kind of problem very easily with the Clone Stamp tool or the Spot Healing Brush.

Interactive Layout. A message will appear on screen when Photoshop Elements can’t align photos automatically. This may happen when Photomerge can’t identify specific detail to match, often in photos without man-made structures. You can then choose the Interactive Layout option to open the Photomerge dialog box where you’ll find the tools you need to position the source images manually.
Under Layout, select Cylindrical.
Under Source Files in the Photomerge dialog box, select Files from the Use menu, and then click the Add Open Files button. The four images that you opened in the Editor appear in the source files list.
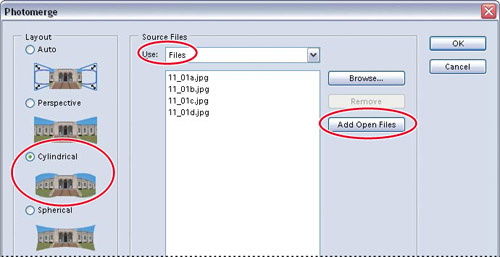
Make sure that the Blend Images Together option is activated below the source files list. This option calculates the optimal borders between overlapping photos, and also color-matches the images. Click OK.
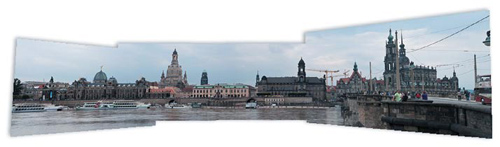
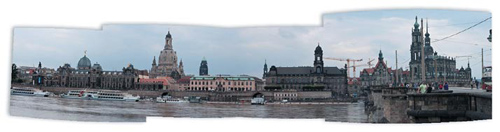
Watch the Layers panel while Photoshop Elements creates a new file for the panorama, and places each source image on its own layer. Photomerge calculates the overlapping areas, adds a blending mask to each image layer accordingly, and then color-matches adjacent images as it blends the seams. When the Clean Edges dialog box appears, drag it aside so that you can see the edges of all the source images, and the checker-board transparency around them.
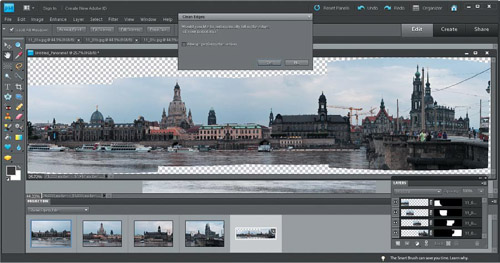
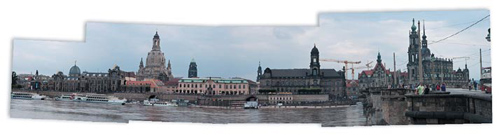
You can see that cropping away the transparency would interrupt the skyline and spoil the image. Photoshop Elements 9 can help you solve this problem, by using content-aware healing to fill the missing areas.
In the Clean Edges dialog box, click Yes. Photoshop Elements does a great job, although there are just a few areas in the image where the content-aware healing process has produced unwelcome artefacts.
Press Ctrl+Z / Command+Z. This will not undo the healing operation—only the last step in the process, the de-selection of the area that was filled. Use the Zoom and Hand tools to examine the extended image in detail; the re-instated selection will help you to look in the right places to spot the anomalies. When you’re done, press Ctrl+D / Command+D, or choose Select > Deselect.
Use a few strokes with the Spot Healing Brush or the Clone Stamp to remove the unwelcome artefacts.
Tip
If necessary, refer to “Removing unwanted objects from images” and “Using the Clone Stamp tool to fill in missing areas” in Lesson 9.
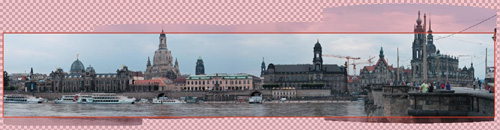
Choose File > Save. Name the file Dresden_Panorama and save it to your My CIB Work folder in Photoshop (PSD) format. Make sure that you enable layers, and include the file in the Organizer; then, click Save.
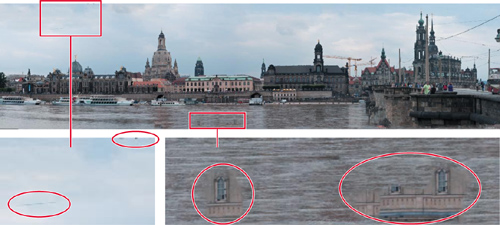
Now let’s have a closer look at how well Photoshop Elements matched the overlapping areas between the source images. Depending on your source files, you may at times notice small problem areas—edge artifacts along the line where the images are blended. In these cases you can either try a different layout option for the photomerge operation, or retouch the layer blending masks manually.
In the Layers panel, click the eye icon (
 ) beside the top layer (Layer 1, the panorama extended by the content-aware fill) to hide it. Use the Zoom tool and resize and scroll the image window, if necessary, to focus on the right half of the panorama. Hold down Alt+Shift / Option+Shift and click the layer mask thumbnail on the bottom layer.
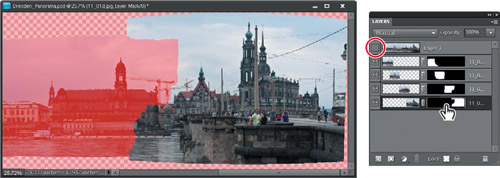
In the edit window, the mask associated with this layer appears as a semi-transparent overlay, enabling you to see which part of the image in the lower layer has contributed to the panorama. The unused portion is hidden by the layer mask.
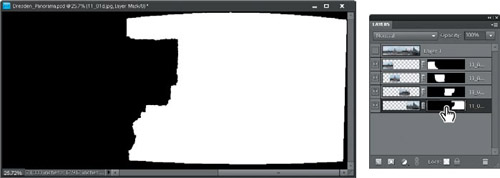
Click the image thumbnail for the bottom layer; then, Alt-click / Option-click the layer mask thumbnail.
The layer mask is displayed in opaque black and white; black represents masked portions of the layer and white represents areas that have contributed to the blend.
Tip
If you were unhappy with any portion of the seam between images, you could alternate between these two views of the layer mask to adjust the blend by painting (or erasing) directly onto the mask. If you do this with a panorama extended by content-aware fill, you’ll need to erase the corresponding area of the top layer, creating a “window” so that your changes to lower layers are visible.
Use the same technique to inspect the blended seams between the other source layers. When you’re done, make the top layer visible once more, choose File > Save, and then choose File > Close all. Stay in the Editor for the next exercise.
The automatic layout options in the Photomerge dialog box usually do a good job, but if you need manual control over the way source images are combined to create a panorama, choose the Interactive Layout option in the Photomerge dialog box.
In Full Edit mode in the Editor, choose File > New > Photomerge Panorama.
In the Photomerge dialog box, select Folder from the Use menu, and then click Browse. In the Choose (A) Folder dialog box, navigate to your Lesson11 folder. Inside the Lesson11 folder, select the folder Panorama_2 and click OK / Choose.
Choose Interactive Layout from the Layout options. Make sure the option Blend Images Together is activated, and then click OK.
Explore the tools and controls in the Photomerge dialog box:
Use the Zoom tool (
 ) or the Navigator controls to zoom in or out of the image. Drag the red rectangle in the Navigator to shift the view in the zoomed image.
Switch between the Reposition Only and Perspective settings.
With the Perspective option activated, you can click any source image in the Photomerge workspace with the Set Vanishing Point tool (
 ) to set the vanishing point in that image as the reference around which the other images will be composed.
Use the Select Image tool (
 ) to select any of the photos in the work area; then drag the selected photo or use the arrow keys on the keyboard to reposition it as desired.
To remove a photo from the composition (if you are using more than two source images), drag it from the work area into the photo bin above. To add an image to the composition, drag it from the photo bin into the work area.
Use the Rotate Image tool (
 ) to rotate a selected photo.
When you’re satisfied with the result, click OK. The Photomerge dialog box closes, and Photoshop Elements goes to work. You’ll see windows open and close as you wait for Photoshop Elements to create the panorama.
In the Clean Edges dialog box, click Yes. Photomerge Elements fills the areas outside the two source images using content-aware healing. For the sky, the result is very good, but—as might be expected—Photomerge has been unable to deal with the cyclist at the lower left. The image will need to be cropped.???
Vanishing point
The vanishing point in an image is the point at which receding parallel lines seem to meet when seen in perspective. For example, as a road stretches out ahead of you, it appears to grow narrower with distance, until it has almost no width at the horizon. This is the vanishing point.
You can change the perspective of the Photomerge Panorama composition by specifying a different image to be used as reference for the vanishing point.
Select Perspective under Settings in the Photomerge dialog box, and then click an image with the Vanishing Point tool. Photoshop Elements analyzes the image and composes the Photomerge Panorama in reference to the vanishing point in that image.
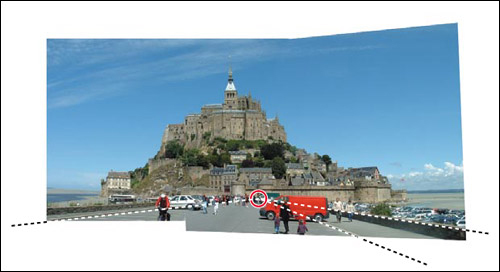
Now you’ll use the Crop tool to trim the very few unsuccessfully extended areas from the image.
Choose View > Fit On Screen, and then choose Image > Crop. Drag the handles of the cropping rectangle to make it as large as possible without including the blur below the cyclist or any dark artefact you may see at the upper left; then, click the Commit button in the lower right corner of the cropping rectangle.
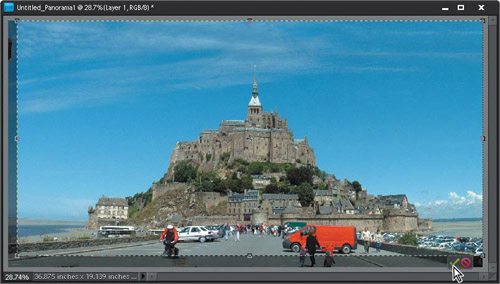
Choose File > Save. Name save the merged image Panorama_2, to be saved to your My CIB Work folder in Photoshop format with Layers activated. Make sure that the file will be included in the Organizer. Click Save, and then close the file.
Shooting the perfect group photo is a difficult task, especially if you have a large family of squirmy kids. Fortunately, Photoshop Elements offers a solution: a powerful photo blending tool called Photomerge Group Shot. The next exercise will show you how multiple photos can be blended together into one with amazing precision.
No longer do you need to put up with family photos where someone has their eyes closed, someone else has looked away at the wrong moment, and you-know-who has just made an even odder facial expression than usual. Photomerge Group Shot lets you merge the best parts of several images into the perfect group photo.
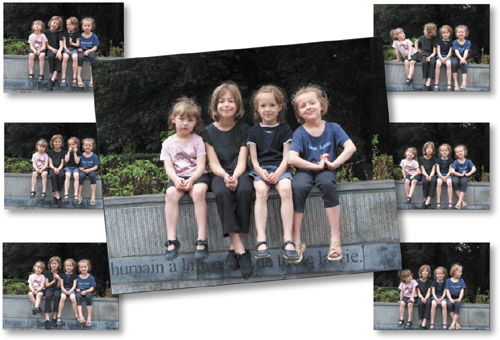
Typically, you would use the Photomerge Group Shot feature to create a merged image from a series of very similar source images such as you might capture with your camera’s burst mode, as was the case with the photos in this illustration.
For this exercise however, you’ll work with just three distinctly different images to make it easier for you to learn the technique.
If you’re still in the Editor from the last exercise, switch to the Organizer now by clicking the Organizer button (
 ) at the top right of the Editor workspace.
In the Keyword Tags panel, click the Find box beside the Lesson 11 tag to isolate the sample files for this lesson, and then Ctrl-click / Command-click to select the images 11_02a.jpg, 11_02b.jpg and 11_02c.jpg.
Choose File > New > Photomerge Group Shot.
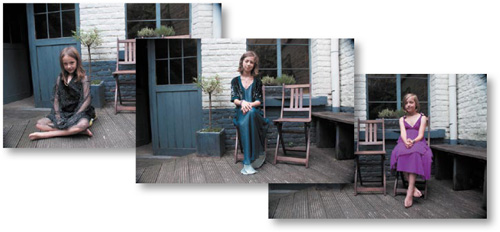
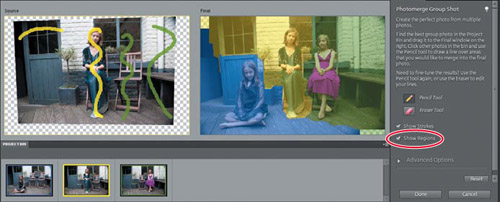
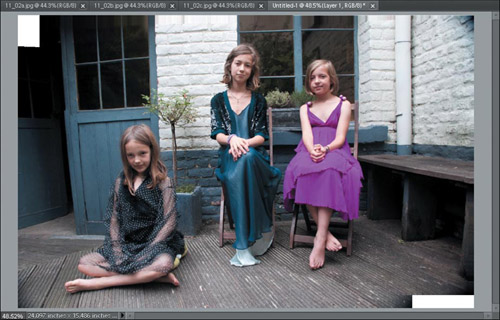
Photoshop Elements has automatically designated the first image as the source image. To replace it, click the second thumbnail in the Project Bin (11_02b.jpg). Drag the first thumbnail (11_02a.jpg) from the Project Bin and drop it into the Final image pane on the right.

If you were composing a group shot from a series of similar photos, you would make the best image in the series the Final image, and then use each of the other photos as sources for those elements you would like to replace.
We chose the image 11_02a.jpg as the Final (target) image because it includes more of the wooden decking than the other photos. As the girl in the photo is sitting further forward than the girls on the chairs, it’s preferable that we retain the decking around her rather than try to blend it to either of the other photos.
Use the Zoom and Hand tools to magnify and position the image so you can see all of the girl in the Source pane and at least part of the girl in the Final image.
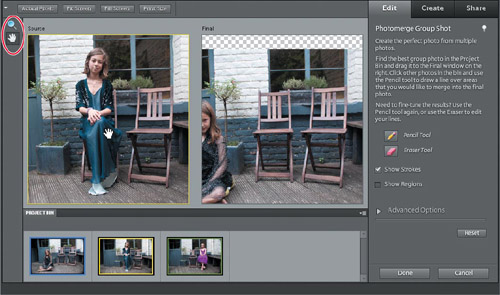
In the Photomerge Group Shot panel at the right of the workspace, select the Pencil tool (
 ). Make sure that the Show Strokes option is activated, and the Show Regions option is not.
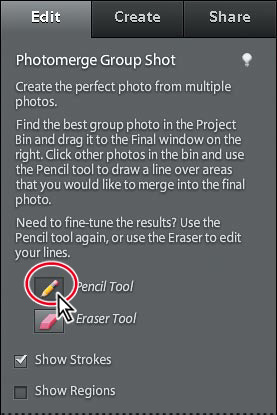
With the Pencil tool you can quickly mark any area or object in the Source image that you wish to copy to the Final image; Photoshop Elements will do all the selecting, copying, pasting, and aligning for you!
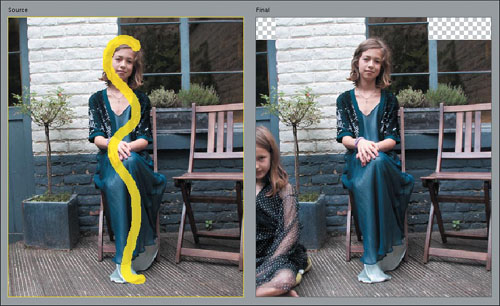
With the Pencil tool (
), draw one stroke in the Source image, from the top of the girl’s head to the hem of her dress, as shown in the illustration below. Allow the edges of your stroke to just slightly overlap the window and wall behind the girl’s head. Extend the end of the stroke just far enough onto the wooden decking to pick up the shadow of the light-colored fabric.When you release the mouse button, Photoshop Elements merges the girl from the Source image into the Final image—including the shadow below her skirts!
Seeing the magic of this tool in action will probably cause you some healthy mistrust whenever you come across an unlikely photo in the future.
Click with the Pencil tool to add any part of the subject that was not copied from the source. Use the Eraser tool (
 ) to delete part of a stroke drawn with the Pencil tool; the area copied to the Final image will be adjusted accordingly.
Sometimes it can be a little tricky to make the perfect selection—especially when you’re working with a more complex source image than our example. You may find you are copying more of the source image than you want.
If you’ve switched several times between the Pencil and Eraser tools and you still can’t get the selection right, click the Reset button below the Photomerge Group Shot controls and start again. Try modifying the shape that you’re drawing with the Pencil tool, reducing the brush size, changing the direction of the stroke, or making shorter strokes.
Double-click the green framed image (11_02c.jpg) in the Project Bin to make it the Source image. Use the Zoom and Hand tools to move the Source image in its frame so you can see all of the girl in the pink dress; then, use the Pencil tool to add her to the Final image. Be sure to include the shadow below her left foot.
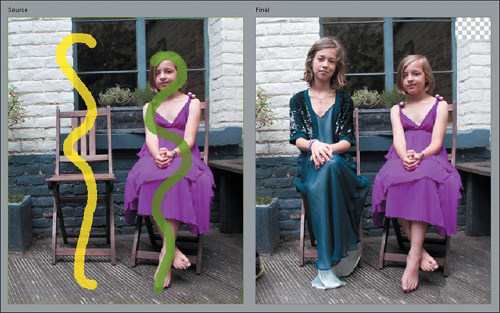
Double-click the Hand tool so that you can see the areas that are still missing from the Final image. With the Pencil tool, drag a line through the right side of the Source image as shown in the illustration below.
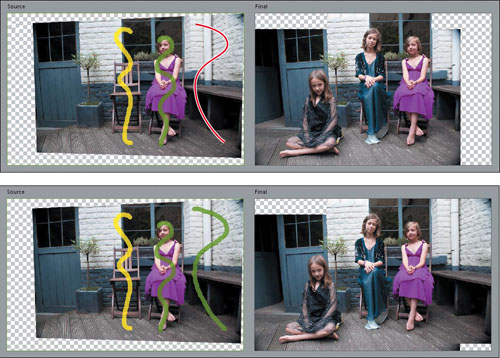
In the Project Bin, click the thumbnail with the yellow border to make it the source image once more; then, drag with the Pencil tool through the upper left corner of the image in the Source pane.
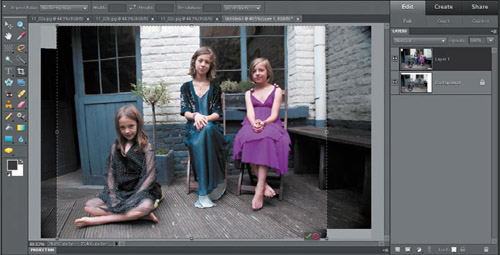
To see which part of each of the three source images was used for the merged composition, first click the Fit Screen button above the Edit pane so that you can see the entire image, and then activate the Show Regions option in the Photomerge Group Shot panel. The regions in the Final image are color coded to correspond to the borders of the thumbnails in the Project Bin.
Select the Hand tool; then click the Actual Pixels button above the edit pane, or zoom in even closer, and use the Hand tool to position the image at a boundary between colored regions in the Final image.
Toggle Show Regions off and on while you look for imperfections along the region boundaries in the merged image. If necessary, use the Pencil and Eraser tools to add to or subtract from the portions of the source images that are being merged to the Final image. When you’re satisfied with the result, click Done.
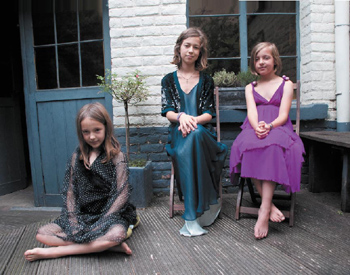
The merged image needs to be cropped slightly. Choose Image > Crop to place a cropping rectangle on the image, and then drag the handles of the cropping rectangle to trim off the empty corners of the photo.
Click the Commit button at the bottom right of the cropping rectangle; then, choose File > Save and save the merged image to your My CIB Work folder as 11_02_Composite, in Photoshop (PSD) format. Make sure that the Layers option is activated and that the new file will be included in the Organizer. Click Save, and then choose File > Close All.
Tip
The Photomerge Faces feature works similarly to the Photomerge Group Shot tool, except that it’s specialized for working with faces. You can have a lot of fun merging different faces into one. Try merging parts of a picture of your own face with one of your spouse to predict the possible appearance of future offspring. Choose File > New > Photomerge Faces, or click the Faces button in the Photomerge panel In Guided Edit mode to create your own Frankenface.
The Photomerge Scene Cleaner helps you improve a photo by removing passing cars, tourists, and other unwanted elements. The Scene Cleaner works best when you have several shots of the same scene, so that you can combine the unobstructed areas from each source picture to produce a photograph free of traffic and tourists.
When you’re sightseeing, it’s a great idea to deliberately take a few extra shots of any busy scene so that later you can use the Photomerge Scene Cleaner to put together an uncluttered image.
It’s not necessary to use a tripod; as long as your photos were shot from roughly the same viewpoint, Photoshop Elements will align the static content in the images automatically. An easy way to capture a series of images that will perform well with the Scene Cleaner is to stand in one position, frame up your shot, and then shoot several sequences using your camera’s burst mode. Once you’ve imported them into Photoshop Elements, you can review your photos and choose the least cluttered shot from each burst.
You can use up to ten images in a single Scene Cleaner operation; the more source images, the more chance that you’ll produce a perfect result. In this exercise, you’ll do the best you can with just three photos.
If you’re still in the Editor from the last exercise, switch to the Organizer now by clicking the Organizer button (
) at the top right of the Editor workspace.If necessary, isolate the sample photos for this lesson by clicking the Find box beside the Lesson 11 tag, which is listed under Imported Keyword Tags in the Keyword Tags panel.
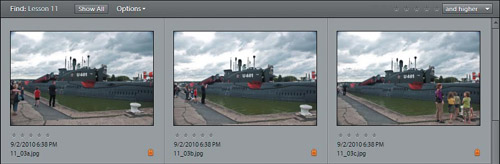
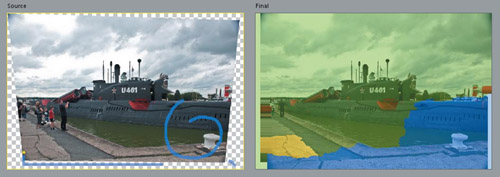
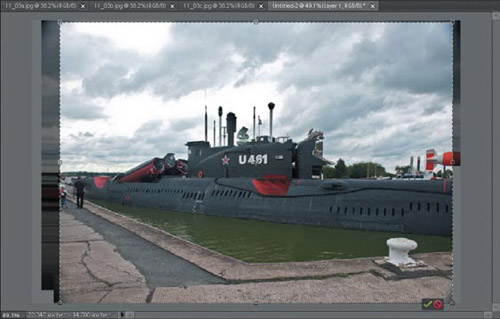
In the Media Browser, Ctrl-click / Command-click or drag a marquee to select the images 11_03a.jpg, 11_03b.jpg and 11_03c.jpg: three photos of an old Russian submarine.
Choose File > New > Photomerge Scene Cleaner.
The selected images open in Full Edit mode, where Photoshop Elements analyzes and aligns the images before opening the Scene Cleaner.
By default, the first image in the Photo Bin, 11_03a.jpg (framed in blue), has been loaded as the Source image. Drag the image framed in green, 11_03c.jpg, from the Project Bin to the Final pane. This is the image you will clean: the base image for your composite.

Zoom in and use the Hand tool to position the images so that you can see the lower right corner. If necessary, scroll down in the Photomerge Scene Cleaner panel at the right, so that you can see the tools at the bottom.
Select the Pencil tool (
) in the Photomerge Scene Cleaner panel; then, drag a line through the family in the foreground of the Final image. For the purposes of this demonstration, try to replicate the line you see in the illustration below.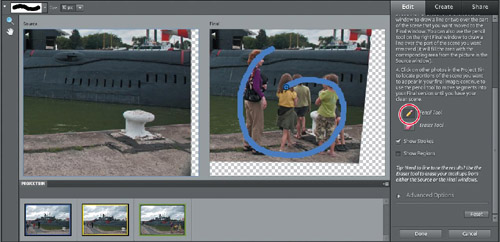
When you release the mouse button, information is copied from the Source image to replace the area that you marked in the Final pane.
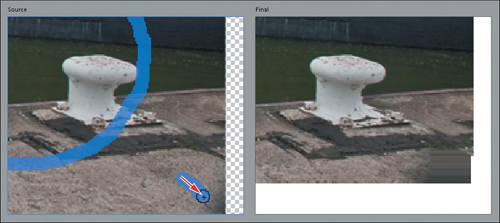
Move the pointer away from the Final image; you may see a blurry blending artefact in the lower right corner. Use the Zoom tool to focus on the problem area. This time, you’ll use the Pencil tool in the Source image, which includes more of the pavement in the foreground than does the Final image. With the Pencil tool, draw a short line into the lower right corner of the Source Image.
Double-click the Hand tool to see the all of both images. Select the Pencil tool again and drag a line along the lower edge of the Source image. Hold down the Shift key as you drag with the Pencil tool to constrain the line to the horizontal.
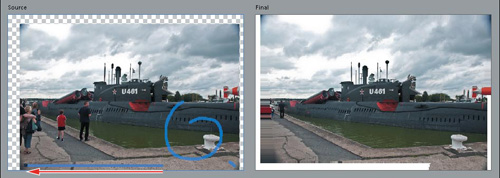
The pavement in the foreground of the Source image is copied to the Final pane. The result is good, but now we have a problem in the lower left corner of the blended image.
Still working in the Source image, extend the left-hand end of your most recent line upwards, about half-way to the woman’s feet. The corner is improved, but there’s a small area of the artefact left behind where we ended the stroke.
In the Project Bin, click the photo with the yellow border to switch it into the Source pane. Click once in the Source image with the pencil tool, at the left edge of the image, and just above the blue line. There is a tiny improvement, but this image does not extend far enough to the left to be of more use.
Working with only these three images, there’s not a lot more we can do for the photo. If you can’t see all of the Final image, double-click the Hand tool; then, activate the Show Regions option in the Photomerge Scene Cleaner panel, to see which part of each source image contributed to the blended result.
Click Done, and then choose View > Fit On Screen. Choose Image > Crop and drag the corner handles of the cropping rectangle to maximize the image while avoiding the areas that are empty or stretched. When you’re satisfied, click the Commit button in the corner of the bounding box.
Choose File > Save. Name the file 11_03_Depopulated and save it to your My CIB Work folder, in Photoshop (PSD) format. Activate Layers and make sure the file will be included in the Organizer. Click Save, and then close all four files.
There are many common situations where we (or our cameras in automatic mode) are forced to choose between properly exposing the foreground or the background.
Interior shots often feature overexposed window views where the scene outside is washed-out or lost completely. Subjects posing in front of a brightly lit scene or backlit by a window are often underexposed, and therefore appear dull and dark. A person posing in front of a city skyline at night is another classic example of this kind of exposure problem; we need to use a flash to make the most of our subject in the foreground, but the background is better exposed without it.
Photomerge Exposure provides a great new way to deal with photos captured in difficult lighting conditions, enabling you to combine the best-lit areas from two or more images to make the perfect shot.
If you’re still in the Editor from the last exercise, switch to the Organizer now by clicking the Organizer button (
) at the top right of the Editor workspace.In the Organizer, click the Find box beside the Lesson 11 tag in the Keyword Tags panel, if necessary, to isolate the images for this lesson.
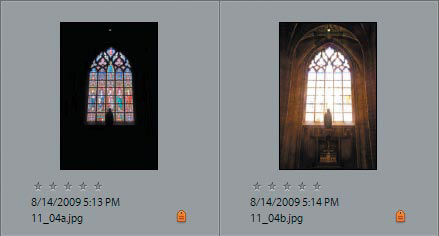
Ctrl-click / Command-click to select the images 11_04a.jpg and 11_04b.jpg, two different exposures of the same stained-glass window.
Click the arrow on the Fix tab above the Task Pane and choose Full Photo Edit.
When you’re faced with difficult lighting conditions, you can simply take two or more photos at different exposure settings and let the Photomerge Exposure tool align them and blend them together.
Photoshop Elements can detect whether the images you’ve chosen to blend with the Photomerge Exposure tool were taken with the exposure bracketing feature on your camera, or with and without flash.
The Photomerge Exposure tool has two working modes; it will default to Automatic mode for exposure-bracketed shots, or open in Manual mode for a set of photos captured with and without flash.
For this exercise you’ll work with two interior shots of a stained-glass window captured with exposure bracketing.
One shot has been correctly exposed to capture the dimly lit interior, but the window appears “burnt out” so that all color and detail have been lost. The other photo is exposed perfectly to capture the glowing colors in the stained glass, but has failed to register any detail in the church walls and vaulted ceiling.
Ctrl-click / Command-click to select both photos in the Photo Bin, and then choose File > New > Photomerge Exposure. Wait while Photoshop Elements aligns the content in the source photos and creates the composite image.
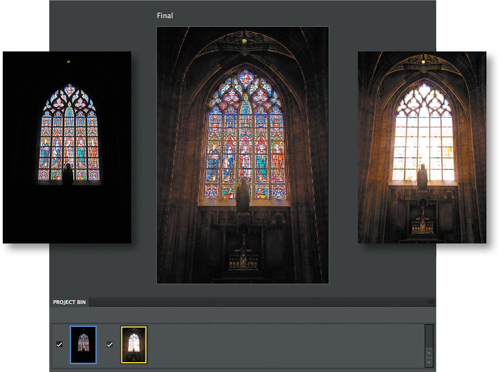
Photomerge Exposure has defaulted to Automatic mode for these exposure bracketed shots, and has successfully combined the differently exposed areas to produce an image that looks like what we actually saw but couldn’t capture in a single shot.
Use the Zoom and Hand tools to inspect the merged image.

Even in Automatic mode, Photomerge Exposure provides you with controls to fine-tune the way the source images are combined.
If necessary, click the Fit Screen button above the Edit pane or double-click the Hand tool so that you can see the entire image.
To increase the contrast in the blended image, drag the Shadows slider in the Photomerge Exposure panel to the left to set a Shadows value of −50.
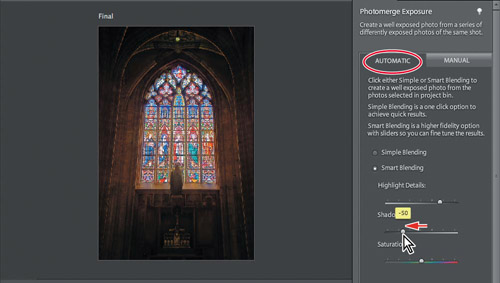
Use the Zoom tool to zoom in on the stained-glass window. Increase the Highlight Details value to 100 and the Saturation value to 10.
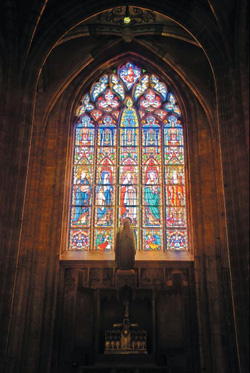
Click Done, and then wait while the merged image file is generated.
Choose File > Save. Name the file 11_04_Leadlight and save it to your My CIB Work folder, in the default Photoshop (PSD) format with the Layers option activated. You know the drill.
Choose File > Close All.???
Merging exposures manually
Photomerge Exposure does a great job of merging your exposure bracketed shots automatically, producing good results in Automatic mode for most backlit situations. When Photoshop Elements detects shots taken with Flash / No Flash, Photomerge Exposure defaults to Manual mode.
Select two or more images in the Photo Bin, and then choose File > New > Photomerge Exposure. Depending on your photos, Photomerge Exposure may open in Manual or Automatic mode.
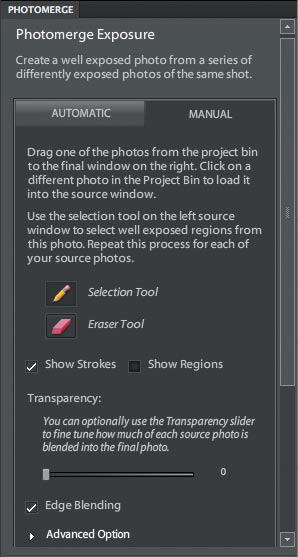
You can easily switch modes by clicking the Manual and Automatic tabs in the Photomerge Exposure panel.
On the Manual tab you’ll find basic instructions together with the Selection (Pencil) tool—for identifying the areas you wish to copy from the Foreground (source) image—and the Eraser tool for modifying your selection.
There are also controls for showing or hiding Selection tool strokes and the color-coded regions indicating the areas being contributed to the blend by each source image.
Activating the Edge Blending option will smooth the edges between merged regions and the Transparency slider lets you fine tune the way each source photo is blended into the final composite image.
For more detail on using the Photomerge Exposure feature, please refer to Photoshop Elements Help.
In this project, you’ll use layers to combine three photos into one—yet another way to use the power of Photoshop Elements to produce that great image that you never actually captured.
You’ll apply a clipping mask to one image in order to blend it smoothly into the background picture; then, you’ll add a selection from another photo and learn how to remove the colored fringe that is often visible surrounding such a selection.
Your final work file will retain the original pixel information from all three source images, so you can go back and make adjustments to any of them—or even rearrange the whole composition—at any time.
If you’re still in the Editor from the last exercise, switch to the Organizer now by clicking the Organizer button (
) at the top right of the Editor workspace.In the Organizer, click the Find box beside the Lesson 11 tag in the Keyword Tags panel, if necessary, to isolate the images for this lesson.
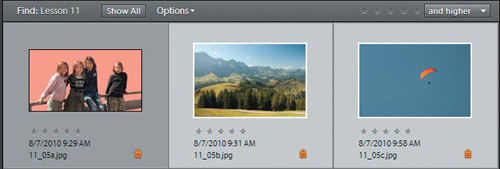
Ctrl-click / Command-click to select the images 11_05b.jpg and 11_05c.jpg, a scenic view of an alpine valley and photo of a sunlit para-glider.
Click the arrow on the Fix tab above the Task Pane and choose Full Photo Edit.
In the first exercise, you’ll place these two images on separate layers to create a composite background to which you’ll add foreground figures later.
Click the Arrange button (
) at the top of the workspace and choose the layout at the right of the top row, Tile All Horizontally.
Click the title tab of the image 11_05c.jpg (the para-glider) to make it the active window. Select the Move tool (
 ) and hold down the Shift key as you drag the para-glider onto the alpine view. Release the mouse button, and then the Shift key. Holding the Shift key as you drag a layer to another file ensures that the image appears in the same position in the target file as it occupies in the source.
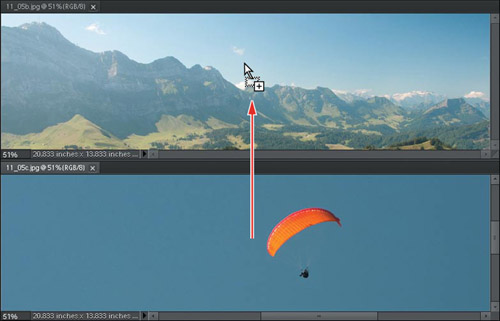
Close the image 11_05c.jpg (the one you just copied from) and double-click the Hand tool or choose View > Fit On Screen.
In the Layers panel, select Layer 1 (the para-glider) to make it the active layer. Choose Image > Resize > Scale. In the tool options bar, make sure Constrain Proportions is activated, and then type 50% in the W (width) field. Click the Commit button in the lower right corner of the bounding box.
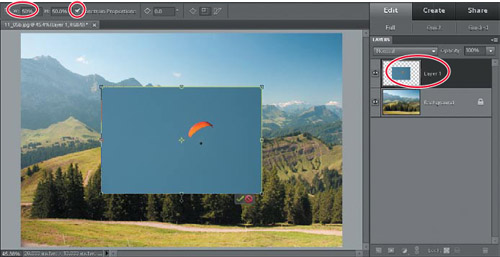
With the Move tool, drag the para-glider on Layer 1 right into the upper right corner of the image; then, drag the lower left handle of the bounding box upwards and to the right to reduce the size of the image further. As you drag in the image window, keep your eye on the width (W) and height (H) values in the tool options bar; stop when the width and height reach 80%.
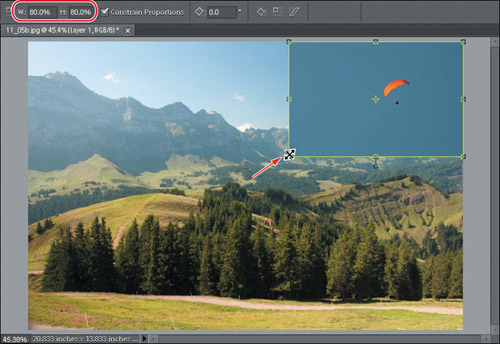
Click the Commit button on the bounding box to accept the changes.
A layer mask allows only part of the image on a layer to show and hides the rest by making it transparent. Layers lower in the stacking order will be visible through the transparent areas in the masked layer.
In the next steps you’ll create a gradient that fades from fully opaque to fully transparent, and then use this gradient to create a mask with a soft edge. This will make it easy to blend the images together without a visible edge.
With Layer 1 selected as the active layer, click the Add Layer Mask button (
 ) at the bottom of the Layers panel to add a new, blank layer mask.
In the toolbox, select the Gradient tool (
 ); then, click the Default Foreground And Background Colors button beside the foreground and background color swatches, or press the D key on your keyboard.
In the tool options bar, click the Radial Gradient (
 ) button, the second in the row of gradient type options, and then click the Edit button to the left.
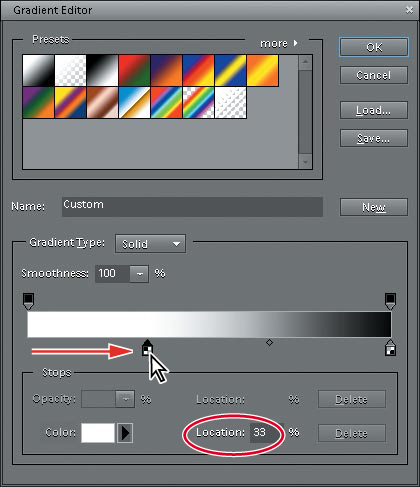
In the Gradient Editor dialog box, drag the left-hand marker below the black and white gradient strip to the right. As you drag the marker, keep an eye on the Location value below the gradient strip; stop dragging when the value reaches 33%. Click OK to close the Gradient Editor.
Make sure that Layer 1 is still selected in the Layers panel. Starting from a point between the parachute and the parachutist, drag a line upwards with the Gradient tool. Release the mouse button when you reach the top of the image.
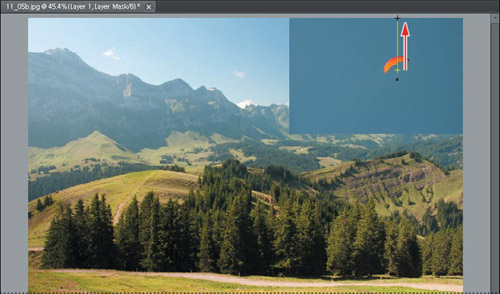
To see the layer mask displayed in the image window as a semi-transparent overlay, hold down the Shift button, and then Alt-click / Option-click the layer mask thumbnail on Layer 1.

As you can see, the central area of the mask is completely clear; the soft edge created by the gradient you painted begins well away from the para-glider. This is a result of the modification that you made in the Gradient Editor dialog box in step 4.
Review step 4 on the facing page. You moved the left color stop marker to a location 33% of the distance from the start to the end of the gradient strip. By doing this, you set the gradient so that the transition from foreground color to background color began one-third of the way along the line you dragged with the Gradient tool in step 6. Had you not made this adjustment to the gradient, the fade would have begun at the point you first clicked, and the para-glider would have been partially masked.
Hold down the Shift button, and then Alt-click / Option-click the layer mask thumbnail once more to hide the overlay.

Although your gradient mask blends the image on Layer 1 very smoothly into the layer beneath it, it’s obvious that the color in our para-glider image will need to be adjusted.
Every color-matching problem will have its own solution, but this exercise should at least give you an idea of what kinds of things you can try.
In this case you’ll use a blending mode together with several different adjustments to both color and lighting.
In the Layers panel, click the layer thumbnail on Layer 1; then, use the menu at the top of the panel to change the blending mode to Hard Light. Leave the opacity set to 100%.
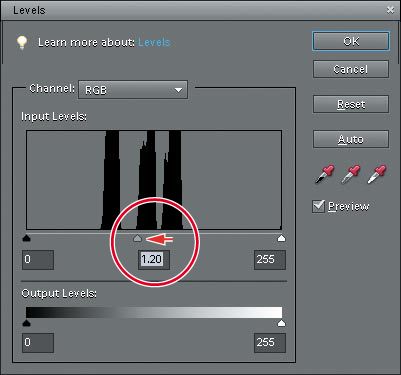
Choose Enhance > Adjust Lighting > Levels. In the Levels dialog box, drag the gray slider beneath the center of the tone graph to the left slightly, or type in the text box, to set a new midtone value of 1.2; then, click OK.
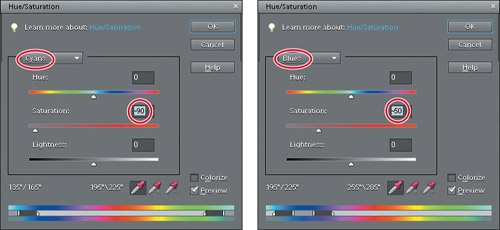
Choose Enhance > Adjust Color > Adjust Hue/Saturation. In the Hue/Saturation dialog box, use the menu above the sliders to switch from the Master channel to the Cyans channel. Set the Saturation value for the Cyans channel to −90. Switch to the Blues channel and set the Saturation to −50; then click OK.
Choose Enhance > Adjust Lighting > Brightness/Contrast. Reduce the value for Brightness to −10; then, click OK.
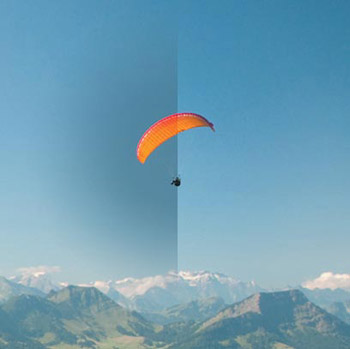
As you can see in the before and after illustration to the right, this combination of adjustments has not only matched the colors in the blended images, but has also dimmed the para-glider slightly, helping it to fit in better with the hazy aerial perspective in the background image.
Choose File > Save As. Save the file to your work folder, in Photoshop format with Layers enabled. Make sure the file will be included in the Organizer, but not in a Version Set. Name the new file 11_05_Composite, and then click Save. Keep the blended image open for the next exercise.
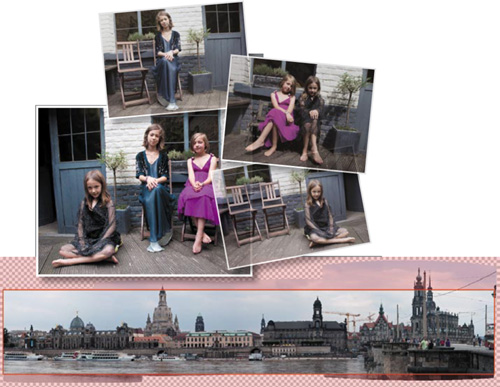
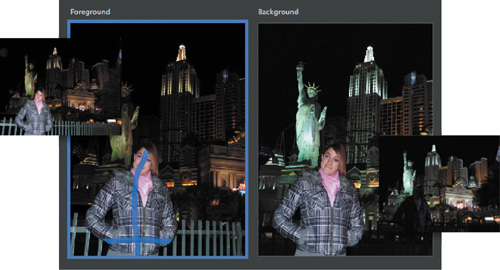
Defringing removes the annoying halo of color that often surrounds a selection copied and pasted from one image to another. In this exercise you’ll add a foreground image of four sisters, so that they appear to be overlooking our alpine valley. To do this, you’ll select and delete the background from the photo of the girls and use the Defringe feature to blend the selection halo into the background.
Choose View > Fit On Screen; then, choose File > Open. Navigate to and open your Lesson11 folder. Select the file 11_05a.jpg, and then click Open.
With the image 11_05a.jpg selected as the active window in the Edit pane, choose Select > All. Choose Edit > Copy, and then File > Close. In the Layers panel, make sure that Layer 1, the top layer of your composite image, is still selected; then, choose Edit > Paste. The image of the four sisters is placed on a new layer named Layer 2, right above the layer that was selected.
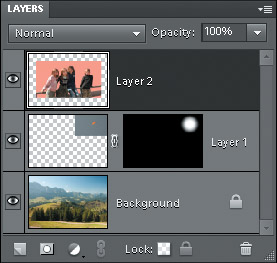
With the new selected in the Layers panel, select the Move tool (
) and drag the photo of the girls to the lower left corner of the image.Choose Image > Resize > Scale. Make sure that Constrain Proportions is activated in the tool options bar, and then drag the upper right handle of the bounding box upwards and to the right, until the wooden rail extends just a little outside the right border of the image. Click the Commit button near the lower right corner of the bounding box to accept the change. Press the left arrow key twice to nudge the content of Layer 2 just a fraction to the left.
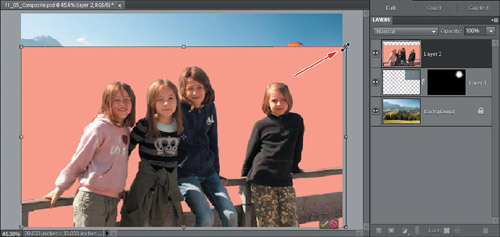
Select the Magic Wand tool (
 ). In the tool options bar, set the Tolerance to 25, activate Anti-alias, and disable Contiguous and Sample All Layers. Click on the pink-colored background of the Layer 2 image with the Magic Wand tool. If necessary, hold down the Shift key and click to select any un-selected pink areas in the background.
Zoom in on the faces of the three girls on the right. Small areas in the sun-lit skin of all three faces have become selected. Pick up the Lasso tool (
 ); then, hold down the Alt / Option key and drag around the selected areas in the faces to subtract them from the selection. Zoom in on the right hand of the girl on the left, and then both hands of the girl on the right. Use the same technique to clear the selected areas. Check the pink sweater at the girl’s right hip.
Press the Delete key to delete the pink background, and then press Ctrl+D / Command+D, or choose Select > Deselect to clear the selection.
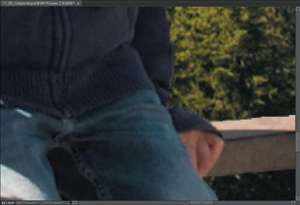
Zoom in to the edge of the left hand and lower arm of the girl in the purple sweater. A pinkish fringe or halo is clearly visible here.
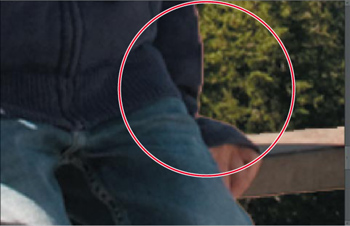
Choose Enhance > Adjust Color > Defringe Layer. In the Defringe dialog box, enter 5 pixels for the width and click OK. Most of the fringe is eliminated.
Double-click the Hand tool in the toolbox, or choose View > Fit On Screen to see the whole image in the edit window.
Select the Magic Wand tool (
). In the tool options bar once more, and click anywhere in the cleared area surrounding the girls. Choose Select > Modify > Border and set a border width of 4 pixels; then, click OK.Choose Filter > Blur > Blur More, and then repeat the command to soften the harder edges of the pasted image. Press Ctrl+D / Command+D, or choose Select > Deselect to clear the selection.
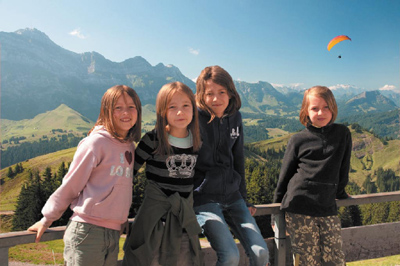
Choose File > Save, and then close the document.
Congratulations, you’ve completed the last exercise in this lesson. You’ve learned how to create a stunning composite panorama, how to merge multiple photos into the perfect group shot, how to remove obstructions from a view, and how to compose several photos into a single image by arranging layers and using a gradient to define a layer mask. You’ve also gained some experience with solving difficult lighting problems by combining shots taken at different exposures.
Take a moment to work through the lesson review on the next page before you move on to the next chapter, “Advanced Editing Techniques.”