Chapter 1. Tally

![]()
How many times have you wanted to count something and felt that your fingers and concentration alone were not enough for the task? Perhaps you’ve needed to count for a friend who is swimming laps or lifting weights. Perhaps you’ve wanted to keep track of something over a long period of time, such as how many times your spouse annoyed you with something she constantly says or does. In the past, I haven’t been able to count how many times my wife has asked me, “Do I look fat?” With the Tally app, now I can.
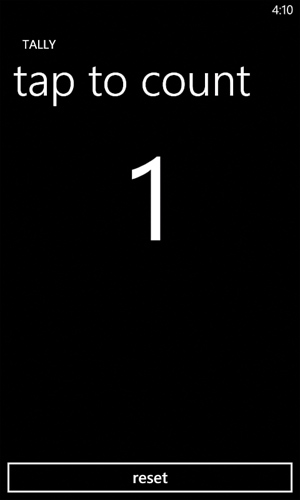
The Tally app that we’ll create in this chapter increments a counter every time you tap the screen. It has a “reset” button to clear the count. It remembers your current count indefinitely—until you either press the “reset” button or uninstall the app.
Despite my sales pitch, I must admit that Tally is not the most compelling application imaginable. However, it is simple enough to provide a good introduction to developing for Windows Phone. Compared to other chapters, this chapter is much less about the app itself and more about understanding the structure and basic features of a Windows Phone project in Visual Studio.
Why do Windows Phone apps predominantly use white text on a black background?
![]()
![]()
Deconstructing a “Windows Phone Application” Visual Studio Project
When you create a new “Windows Phone Application” project in Visual Studio, you get a complete app that you can instantly compile into a .xap file and deploy to the emulator or a physical phone. The app doesn’t actually do anything other than display some text on the screen, but it sets up a lot of infrastructure that would be difficult and tedious to create from scratch. Before creating the Tally app, let’s understand the main pieces of any new “Windows Phone Application” project:
→ Images
→ XAML code: MainPage.xaml and App.xaml
→ C# code: MainPage.xaml.cs, App.xaml.cs, and AssemblyInfo.cs
![]()
The Application Manifest
The file called WMAppManifest.xml (where WM oddly stands for the outdated “Windows Mobile” term) is an application manifest. It describes your app to the operating system—its name, what it looks like, how it starts, what it’s allowed to do, and more. Listing 1.1 shows what Visual Studio generates inside this file when you create a new project and name it “Tally.” You can find this file in your project’s “Properties” folder.
Listing 1.1 WMAppManifest.xml—The Initial Application Manifest for the Tally Project
<?xml version="1.0" encoding="utf-8"?>
<Deployment xmlns="http://schemas.microsoft.com/windowsphone/2009/deployment"
AppPlatformVersion="7.0">
<App xmlns="" ProductID="{2f711986-cfb4-40d3-9b7d-64aa37faf338}" Title="Tally"
RuntimeType="Silverlight" Version="1.0.0.0" Genre="apps.normal"
Author="Tally author" Description="Sample description" Publisher="Tally">
<IconPath IsRelative="true" IsResource="false">ApplicationIcon.png</IconPath>
<Capabilities>
<Capability Name="ID_CAP_GAMERSERVICES"/>
<Capability Name="ID_CAP_IDENTITY_DEVICE"/>
<Capability Name="ID_CAP_IDENTITY_USER"/>
<Capability Name="ID_CAP_LOCATION"/>
<Capability Name="ID_CAP_MEDIALIB"/>
<Capability Name="ID_CAP_MICROPHONE"/>
<Capability Name="ID_CAP_NETWORKING"/>
<Capability Name="ID_CAP_PHONEDIALER"/>
<Capability Name="ID_CAP_PUSH_NOTIFICATION"/>
<Capability Name="ID_CAP_SENSORS"/>
<Capability Name="ID_CAP_WEBBROWSERCOMPONENT"/>
</Capabilities>
<Tasks>
<DefaultTask Name ="_default" NavigationPage="MainPage.xaml"/>
</Tasks>
<Tokens>
<PrimaryToken TokenID="TallyToken" TaskName="_default">
<TemplateType5>
<BackgroundImageURI IsRelative="true" IsResource="false">
Background.png
</BackgroundImageURI>
<Count>0</Count>
<Title>Tally</Title>
</TemplateType5>
</PrimaryToken>
</Tokens>
</App>
</Deployment>
The application manifest is a strange file, because most of it gets overwritten by the Windows Phone Marketplace certification process. Therefore, the application manifest inside your app that can be downloaded from the marketplace will be different than the manifest inside your private copy of your app that you manually deploy.
The App element contains a ProductID Globally Unique Identifier (GUID) that uniquely identifies your app, and a RuntimeType value that indicates this is a Silverlight app rather than an XNA app. The value for Title is displayed with your installed app (either in the normal app list or the Games hub). The other four attributes are only applicable for listing your app in the marketplace, but these values (as well as Title) get overwritten by the data you enter on the marketplace website (the App Hub).
![]()
The Genre value affects where your app gets installed on the phone. If you use apps.normal, it gets placed in the normal app list. If you instead use apps.games, it gets placed inside the Games hub. (Yes, Silverlight apps can do this; the Games hub is not limited to apps created with XNA.) You must choose one of the two locations; your app cannot be installed in both. Leaving this as apps.normal is much more convenient at development-time, because the emulator does not expose the Games hub. When submitting an app to the marketplace, this value also gets overwritten by the category you choose on the website.
The IconPath element points to your icon image file, the Tasks element points to the main Silverlight page where your app begins running, and the Tokens element contains information about your tile (seen by users who pin your app to their start screen). These parts are rarely changed, but these values are preserved when your app is published in the marketplace.
Capabilities
The most interesting part of WMAppManifest.xml is the list of capabilities inside the Capabilities element. These are special permissions for actions that users might not want certain apps to perform, whether for privacy concerns or concerns about data usage charges. The Visual Studio-generated manifest requests all available capabilities. You can restrict this list to test what happens when your app tries to perform an action for which it does not have permission, but that’s a moot point. With one exception described later, the marketplace certification process automatically detects what capabilities your app needs and overwrites your list in the application manifest with the minimal set of required capabilities.
In the marketplace, users are told what capabilities your app will be granted before they decide whether to download it. Each capability has a user-friendly name, so ID_CAP_LOCATION in Listing 1.1 is called “location services” in the marketplace, and ID_CAP_NETWORKING is called “data connection.” The user approval is an implicit part of the action of downloading your app. The location services capability, however, requires explicit consent by the user. The marketplace prompts users to agree to the sending of location data before they download the app.
![]()
ID_CAP_NETWORKING is the one capability you must manually request!
![]()
The key point is that there’s no need for your app to obtain permission from the user for any capability, nor do you have to worry about whether your app has been granted certain capabilities. Just remember:
→ If your app is running, it has been granted all the capabilities listed in its manifest.
→ If your app has been downloaded from the marketplace, its manifest automatically lists all the capabilities it needs and no more (except for ID_CAP_NETWORKING, as described in the warning sidebar).
![]()
Why can I no longer debug my app on a physical phone after updating its capabilities?
![]()
How can I write a game that uses Xbox LIVE features?
![]()
Images
The project generated by Visual Studio includes three images, shown in Figure 1.1:
→ ApplicationIcon.png—The main icon, used wherever the app is installed. For normal apps (placed in the phone’s app list), the icon should be 62×62 pixels to avoid scaling. For games (placed in the Games hub), the icon should instead be 173×173 pixels.
→ Background.png—The tile icon (173×173) used when the user pins the application to the phone’s start screen, whether the app came from the app list or the Games hub. This poorly named file is named as such because it’s technically the background for the tile. The Title in the application manifest is automatically overlaid on the tile’s bottom-left corner, so care must be taken in the image to leave room for the text.
→ SplashScreenImage.jpg—The splash screen (480×800) shown while the application is loading.
Figure 1.1 The three standard images included in a Visual Studio “Windows Phone Application” project.

You can change the name and location of the first two images, and they can be either JPEG or PNG files. Just remember to update your application manifest accordingly.
→ be completely white
→ be composed of simple geometric shapes
→ reuse iconography already used by the phone if possible
→ use an understandable real-world metaphor
How can my icon get the user’s theme accent color as its background, as with the built-in apps?
![]()
![]()
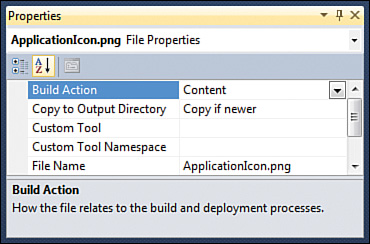
The icon and splash screen images must have a build action set to Content!
![]()
Figure 1.2 The three image files discussed in this section must be given a build action of Content in Visual Studio’s Properties window.
MainPage.xaml
Remember that MainPage.xaml is referenced in WMAppManifest.xml!
![]()
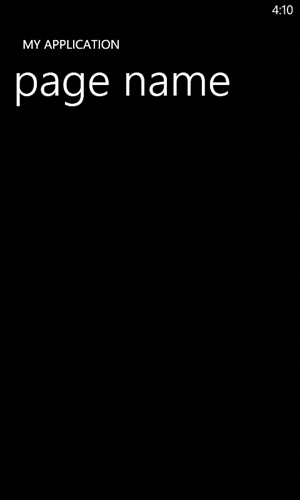
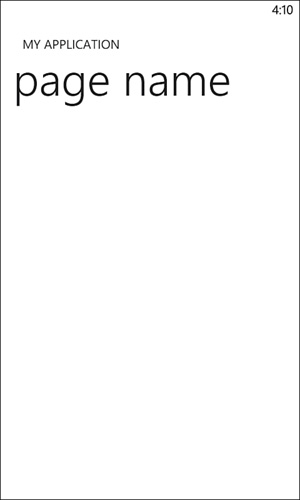
Every app consists of one or more pages. New projects are given a single page called MainPage. This page defines what the user sees once your app has loaded. It is implemented across two files: MainPage.xaml contains the user interface, and MainPage.xaml.cs contains the logic, often called the code-behind. Listing 1.2 shows the initial contents of MainPage.xaml, and Figure 1.3 shows what this XAML produces when you run the app.
Figure 1.3 The initial MainPage.xaml.
Listing 1.2 MainPage.xaml—The Initial Markup for the App’s Main Page
<phone:PhoneApplicationPage
x:Class="Tally.MainPage"
xmlns="http://schemas.microsoft.com/winfx/2006/xaml/presentation"
xmlns:x="http://schemas.microsoft.com/winfx/2006/xaml"
xmlns:phone="clr-namespace:Microsoft.Phone.Controls;assembly=Microsoft.Phone"
xmlns:shell="clr-namespace:Microsoft.Phone.Shell;assembly=Microsoft.Phone"
xmlns:d="http://schemas.microsoft.com/expression/blend/2008"
xmlns:mc="http://schemas.openxmlformats.org/markup-compatibility/2006"
FontFamily="{StaticResource PhoneFontFamilyNormal}"
FontSize="{StaticResource PhoneFontSizeNormal}"
Foreground="{StaticResource PhoneForegroundBrush}"
SupportedOrientations="Portrait" Orientation="Portrait"
mc:Ignorable="d" d:DesignWidth="480" d:DesignHeight="768"
shell:SystemTray.IsVisible="True">
<!--LayoutRoot contains the root grid where all other page content is placed-->
<Grid x:Name="LayoutRoot" Background="Transparent">
<Grid.RowDefinitions>
<RowDefinition Height="Auto"/>
<RowDefinition Height="*"/>
</Grid.RowDefinitions>
<!--TitlePanel contains the name of the application and page title-->
<StackPanel x:Name="TitlePanel" Grid.Row="0" Margin="24,24,0,12">
<TextBlock x:Name="ApplicationTitle" Text="MY APPLICATION"
Style="{StaticResource PhoneTextNormalStyle}"/>
<TextBlock x:Name="PageTitle" Text="page name" Margin="-3,-8,0,0"
Style="{StaticResource PhoneTextTitle1Style}"/>
</StackPanel>
<!--ContentPanel - place additional content here-->
<Grid x:Name="ContentGrid" Grid.Row="1">
</Grid>
</Grid>
<!-- Sample code showing usage of ApplicationBar
...
-->
</phone:PhoneApplicationPage>
At a quick glance, this file tells us:
→ This is a class called MainPage (in the Tally namespace) that derives from the PhoneApplicationPage control.
→ It is marked to only support the portrait (vertical) orientation.
→ It contains two text blocks with boilerplate text that are meant to be the application name and an appropriate page title.
→ The page leverages Grid and StackPanel controls to arrange the current text blocks, and additional content is meant to be placed in the grid named ContentGrid.
→ For such a simple page, there are a lot of things in here!
We’ll examine the following two aspects of this file more deeply:
→ The XML namespaces used at the top of the file
→ Phone theme resources, referenced as "{StaticResource XXX}"
Orientation is an interesting and important topic, but we’ll save that for Chapter 3, “In Case of Emergency.” This page also gives an example of how you might use an application bar (inside a comment at the end of the file), but this chapter’s apps is one of the few that doesn’t use an application bar. Therefore, we’ll cover this in the next chapter.
![]()
XML Namespaces
MainPage.xaml contains most of the XML namespaces you’ll see in this book. Table 1.1 explains them. Although some look like URLs that you can view in a Web browser, they are not. They all map to .NET namespaces in specific assemblies.
Table 1.1 The Common Namespaces in Windows Phone XAML Files
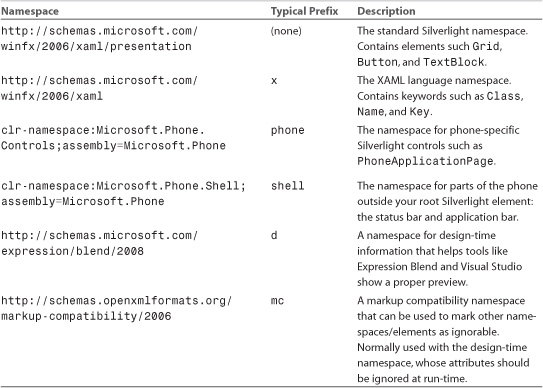
The first three namespaces are almost always used in Windows Phone apps. The shell namespace is only needed when a page uses an application bar via the ApplicationBar class, or when it enables the status bar by setting SystemTray.IsVisible to True. The status bar is the top area of the phone that displays the time and, based on various factors, signal strength, battery charge, and more. As a developer, you can’t do anything with the status bar other than show or hide it.
The last two namespaces, and the corresponding mc:Ignorable, d:DesignWidth, and d:DesignHeight attributes that are plopped in every page, add a lot of clutter, so many examples in this book remove them. This can negatively affect the design views in Visual Studio and Expression Blend, so if you find yourself in such a situation with the code in this book, you can add these namespaces and attributes back. Visual Studio even (annoyingly) adds these back when you make certain kinds of edits to your page.
![]()
Phone Theme Resources
Rather than hardcoding fonts, font sizes, and colors, MainPage.xaml makes use of several phone-specific resources using StaticResource syntax. Windows Phone defines several resources to make it easy for apps to get a look-and-feel consistent with guidelines and with the user’s chosen theme. Appendix C, “Theme Resources Reference,” lists them all and demonstrates what they look like for both user themes (light and dark). These resources not only contain individual colors, brushes, fonts, font sizes, and thicknesses (for borders and margins/padding) but also contain a bunch of styles for text blocks that package individual resources together.
When should a page show the status bar and when should it hide it?
![]()
The resources used by this initial page are
→ PhoneFontFamilyNormal—Segoe WP
→ PhoneFontSizeNormal—20 px (15 pt)
→ PhoneForegroundBrush—A solid color brush that is white in the dark theme and black in the light theme
→ PhoneTextNormalStyle—The previous three resources combined: a FontFamily of PhoneFontFamilyNormal, FontSize of PhoneFontSizeNormal, and Foreground of PhoneForegroundBrush
→ PhoneTextTitle1Style—A FontFamily of PhoneFontFamilySemiLight (Segoe WP Semilight), FontSize of PhoneFontSizeExtraExtraLarge (72 px, which is 54 pt), and Foreground of PhoneForegroundBrush.
This explains how Listing 1.2 produces the result from Figure 1.3 when the user’s theme is dark. Figure 1.4 shows the same page when the phone uses the light theme.
Figure 1.4 The initial MainPage.xaml, shown under the light theme.
Outlook always uses the light theme and Internet Explorer always uses the dark theme, regardless of user settings. Can my app also choose which theme to use?
![]()
![]()
MainPage.xaml.cs
Listing 1.3 shows the initial contents of MainPage.xaml.cs, the code-behind file for MainPage.xaml. Because this app does not yet do anything, it only contains the required call to InitializeComponent that constructs the page with all the visuals defined in the XAML file. The class is marked with the partial keyword because its definition is shared with a hidden C# file that gets generated when the XAML file is compiled.
Listing 1.3 MainPage.xaml.cs—The Initial Code-Behind for the App’s Main Page
using System;
using System.Collections.Generic;
using System.Linq;
using System.Net;
using System.Windows;
using System.Windows.Controls;
using System.Windows.Documents;
using System.Windows.Input;
using System.Windows.Media;
using System.Windows.Media.Animation;
using System.Windows.Shapes;
using Microsoft.Phone.Controls;
namespace Tally
{
public partial class MainPage : PhoneApplicationPage
{
// Constructor
public MainPage()
{
InitializeComponent();
}
}
}
Never remove the call to InitializeComponent in the constructor of your code-behind class!
![]()
App.xaml and App.xaml.cs
App.xaml is a special XAML file that doesn’t define any visuals, but rather defines an App class that can handle application-level tasks. Usually the only reason to touch this XAML file is to place new application-wide resources, such as custom styles, inside its Application.Resources collection. Many apps in this book do just that. You’ll see examples of this starting with Chapter 9, “Fake Call.”
The most notable job of App.xaml.cs, the code-behind file with a lot of plumbing, is handling the application lifetime events of Launching, Activated, Deactivated, and Closing. We’ll examine these events in Chapter 10, “Tip Calculator.”
AssemblyInfo.cs
This file is not worth showing in this book. It contains a bunch of attributes where you can put a title, description, company name, copyright, and so on, that get compiled into your assembly. But setting these is unnecessary because all of the information used by the marketplace is separately managed. Still, the AssemblyVersion and AssemblyFileVersion attributes, typically set to the same value, can be useful for you to keep track of distinct versions of your application:
[assembly: AssemblyVersion("1.0.0.0")]
[assembly: AssemblyFileVersion("1.0.0.0")]
By using *-syntax, such as "1.0.*", you can even let the version number auto-increment every time you rebuild your app.
Modifying the Project to Create “Tally”
Now that we understand what is in a newly created Visual Studio project, we can modify it to create Tally. First, we can remove all capabilities in the application manifest, but temporarily leave ID_CAP_NETWORKING so we can debug the app on a phone:
<Capabilities>
<!-- None needed -->
<!-- TODO: This is only for debugging on a device: -->
<Capability Name="ID_CAP_NETWORKING" />
</Capabilities>
Visual Studio gives a bogus warning when a project’s capabilities list is empty!
![]()
We can also change the two icon images and remove the splash screen image from the project. Now we’re ready to change MainPage.xaml and MainPage.xaml.cs.
Updating the User Interface
Listing 1.4 contains the XAML needed to create Tally, which produces the result shown at the beginning of this chapter.
Listing 1.4 MainPage.xaml—The User Interface for Tally
<phone:PhoneApplicationPage
x:Class="Tally.MainPage"
xmlns="http://schemas.microsoft.com/winfx/2006/xaml/presentation"
xmlns:x="http://schemas.microsoft.com/winfx/2006/xaml"
xmlns:phone="clr-namespace:Microsoft.Phone.Controls;assembly=Microsoft.Phone"
xmlns:shell="clr-namespace:Microsoft.Phone.Shell;assembly=Microsoft.Phone"
FontFamily="{StaticResource PhoneFontFamilyNormal}"
FontSize="{StaticResource PhoneFontSizeHuge}"
Foreground="{StaticResource PhoneForegroundBrush}"
SupportedOrientations="Portrait"
shell:SystemTray.IsVisible="True">
<Grid>
<Grid.RowDefinitions>
<RowDefinition Height="Auto"/>
<RowDefinition Height="*"/>
<RowDefinition Height="Auto"/>
</Grid.RowDefinitions>
<!-- Row 0: The Header -->
<StackPanel Grid.Row="0" Margin="24,24,0,12">
<TextBlock Text="TALLY" Style="{StaticResource PhoneTextNormalStyle}"/>
<TextBlock Text="tap to count" Margin="-3,-8,0,0"
Style="{StaticResource PhoneTextTitle1Style}"/>
</StackPanel>
<!-- Row 1: The text block containing the count -->
<TextBlock x:Name="CountTextBlock" Grid.Row="1" TextAlignment="Center"
Text="0"/>
<!-- Row 2: The reset button -->
<Button x:Name="ResetButton" Grid.Row="2" Click="ResetButton_Click"
Content="reset"/>
</Grid>
</phone:PhoneApplicationPage>
Notes:
→ Unnecessary attributes have been removed, the two text blocks in the header have been updated, and the old ContentGrid has been replaced with a text block and a button. A third row has been added to the grid to hold the button. The behavior of the Grid control is examined further in Chapter 4, “Stopwatch.”
→ The text block and reset button have been assigned names (CountTextBlock and ResetButton, respectively) so they can be referenced easily in the code-behind file.
→ The page’s font size has been changed to PhoneFontSizeHuge (186.667 px, which is 140 pt). This value is inherited by CountTextBlock only, because the other text blocks have their own styles explicitly set and the text inside ResetButton doesn’t inherit page-level text properties.
→ The reset button has a Click event, and it is assigned to a handler called ResetButton_Click that must be defined in the code-behind file.
Updating the Code-Behind
Listing 1.5 contains all the logic needed to make Tally work.
Listing 1.5 MainPage.xaml.cs—The Code-Behind for Tally
using System.Windows;
using System.Windows.Input;
using System.Windows.Navigation;
using Microsoft.Phone.Controls;
using WindowsPhoneApp; // For the Setting class
namespace Tally
{
public partial class MainPage : PhoneApplicationPage
{
int count = 0;
// Remember what the user typed, for future app activations or launches
Setting<int> savedCount = new Setting<int>("SavedCount", 0);
public MainPage()
{
InitializeComponent();
}
// Handle a tap anywhere on the page (other than the Button)
protected override void OnMouseLeftButtonDown(MouseButtonEventArgs e)
{
base.OnMouseLeftButtonDown(e);
this.count++;
this.CountTextBlock.Text = this.count.ToString("N0");
}
// Handle a tap on the button
void ResetButton_Click(object sender, RoutedEventArgs e)
{
this.count = 0;
this.CountTextBlock.Text = this.count.ToString("N0");
}
protected override void OnNavigatedFrom(NavigationEventArgs e)
{
base.OnNavigatedFrom(e);
// Persist state when leaving for any reason (Deactivated or Closing)
this.savedCount.Value = this.count;
}
protected override void OnNavigatedTo(NavigationEventArgs e)
{
base.OnNavigatedTo(e);
// Restore persisted state
this.count = this.savedCount.Value;
this.CountTextBlock.Text = this.count.ToString("N0");
}
}
}
Why do Windows Phone apps use mouse events such as MouseLeftButtonDown? You can’t use a mouse with your phone!
![]()
Notes:
→ Often, a class that exposes an event XXX also exposes an OnXXX method that subclasses can override rather than attaching a handler to the event. By overriding OnMouseLeftButtonDown, this code effectively handles the page’s MouseLeftButtonDown event, which gets raised for any tap on the page except for taps on the button—exactly the condition we want for incrementing the count and updating the TextBlock’s Text property accordingly. This method conveniently doesn’t get called on button taps because buttons internally handle this event (as well as the MouseLeftButtonUp event) in order to provide special behavior, preventing it from bubbling up to the page.
→ "N0" formatting is used whenever the count is turned into a string. This basically means “show it as a natural number (with the thousands separator).” The thousands separator is a comma for United States English but it automatically varies based on the phone’s “region & language” settings.
→ Button has its own event for a tap, called Click, which should be handled instead of its MouseLeftButtonDown event. One reason is that this event gets suppressed, as you’ll see in Chapter 10. Another reason is that a button is not supposed to invoke its action when it is tapped; it should invoke it when it is released. A button highlights itself when a finger presses it (MouseLeftButtonDown, internally) and unhighlights itself while raising the separate Click event when the finger is removed (MouseLeftButtonUp). This button’s Click event handler—ResetButton_Click—simply resets the count and updates the TextBlock accordingly.
→ The Setting member called savedCount, along with the OnNavigatedFrom/OnNavigatedTo methods, provide a simple way for the count to be remembered whenever the user leaves the app and restored whenever the user comes back to it (even if the user reboots the phone). The two methods are discussed in Chapter 6, “Baby Sign Language,” and the Setting class is implemented and explained in Chapter 20, “Alarm Clock.”
→ Remembering to update TextBlock.Text every time count changes can be error-prone, especially for larger apps. A more robust approach would be to turn count into a dependency property that can be data-bound to the text block’s Text property, enabling the display to update automatically whenever the value is changed. We’re keeping things simple for Chapter 1, however, so this approach will be used in some of the later chapters.
Why does Click correspond to lifting a finger from the screen rather than pressing a finger on it?
![]()
The Finished Product

![]()