
12. Applied JavaScript
In earlier chapters in this book, you learned how to use dozens of JavaScript techniques to accomplish many specific tasks. On many Web pages that you build, you’ll often need just one technique, and you’ll be able to use a script from this book (usually with some minor modifications) to get the job done.
But sometimes you’ll need to use more than one technique to get the job done on your pages. That’s where this chapter comes in. The tasks you’ll find here require a variety of approaches and are similar (in spirit, if not specifically) to what you’ll need to do on your own Web sites.
In this chapter, you’ll learn to improve your site’s user interface with outline-style sliding and fly-out menus; create a slideshow; process text by crunching it with JavaScript; let JavaScript do the hard work of displaying data in an easy-to-understand graphical manner; and switch between different style sheets under script control.
Using Sliding Menus
A sliding menu is a simple user interface widget that lets you put a lot of information on a page without cluttering it all up. The user can view just as much (or as little) of the extra information as they want to see at a time. Listing 12.1 contains the HTML, Listing 12.2 the CSS, and Listing 12.3 the JavaScript, which follow.
Listing 12.1. Here’s a straightforward HTML page with a lot of links.
<!DOCTYPE html>
<html>
<head>
<title>Shakespeare's Plays</title>
<link rel="stylesheet" href="script01.css">
<script src="script01.js"></script>
</head>
<body>
<h1>Shakespeare's Plays</h1>
<div>
<a href="menu1.html" class="menuLink">Comedies</a>
<ul class="menu" id="menu1">
<li><a href="pg1.html">All's Well That Ends Well</a></li>
<li><a href="pg2.html">As You Like It</a></li>
<li><a href="pg3.html">Love's Labour's Lost</a></li>
<li><a href="pg4.html">The Comedy of Errors</a></li>
</ul>
</div>
<div>
<a href="menu2.html" class="menuLink">Tragedies</a>
<ul class="menu" id="menu2">
<li><a href="pg5.html">Anthony & Cleopatra</a></li>
<li><a href="pg6.html">Hamlet</a></li>
<li><a href="pg7.html">Romeo & Juliet</a></li>
</ul>
</div>
<div>
<a href="menu3.html" class="menuLink">Histories</a>
<ul class="menu" id="menu3">
<li><a href="pg8.html">Henry IV, Part 1</a></li>
<li><a href="pg9.html">Henry IV, Part 2</a></li>
</ul>
</div>
</body>
</html>
Listing 12.2. It doesn’t take much CSS to pull off this effect.
body {
background-color: #FFF;
color: #000;
}
div {
margin-bottom: 10px;
}
ul.menu {
display: none;
list-style-type: none;
margin-top: 5px;
}
a.menuLink {
font-size: 16px;
font-weight: bold;
}
Listing 12.3. Text (and links) can appear and disappear with this script.
window.onload = initAll;
function initAll() {
var allLinks = document.getElementsByTagName("a");
for (var i=0; i<allLinks.length; i++) {
  if (allLinks[i].className.indexOf("menuLink") > -1) {
    allLinks[i].onclick = toggleMenu;
  }
}
}
function toggleMenu() {
var startMenu = this.href.lastIndexOf("/")+1;
var stopMenu = this.href.lastIndexOf(".");
var thisMenuName = this.href.substring(startMenu,stopMenu);
var thisMenu = document.getElementById(thisMenuName).style;
if (thisMenu.display == "block") {
  thisMenu.display = "none";
}
else {
  thisMenu.display = "block";
}
return false;
}
To use sliding menus
1. var allLinks = document.getElementsByTagName("a");
When the page loads, the initAll() function is called, and it begins by creating an array of all the links on the page.
2. for (var i=0; i<allLinks.length; i++) {
if (allLinks[i].className.indexOf("menuLink") > -1) {
allLinks[i].onclick = toggleMenu;
}
}
Once we have all the links, we loop through them, looking for those links with a class of menuLink and adding an onclick handler to just those links. Here, that onclick handler is set to call the toggleMenu() function when they’re clicked.
3. var startMenu = this.href.lastIndexOf("/")+1;
var stopMenu = this.href.lastIndexOf(".");
Inside toggleMenu(), JavaScript has given us this. Here, this is the link object that the user clicked, which means that this.href is the full link URL. But we only want the part between the last forward slash and the last period (that is, if the link was to http://www.javascriptworld.com/index.html, we’d only want “index”), so we create and set startMenu and stopMenu to be the locations in this.href where we want to start and stop finding the string that will end up being our menu name.
4. var thisMenuName = this.href.substring(startMenu,stopMenu);
The menu name we want begins and ends at these two positions, so here’s where we set it.
5. var thisMenu = document.getElementById(thisMenuName).style;
The variable thisMenu is set to the desired menu using the getElementById() method.
6. if (thisMenu.display == "block") {
thisMenu.display = "none";
}
else {
thisMenu.display = "block";
}
If the display property of thisMenu is block, then this code changes it to none. Alternatively, if it’s none, it’s changed to block. This is what toggles the menu display, as shown in ![]() and
and ![]() .
.
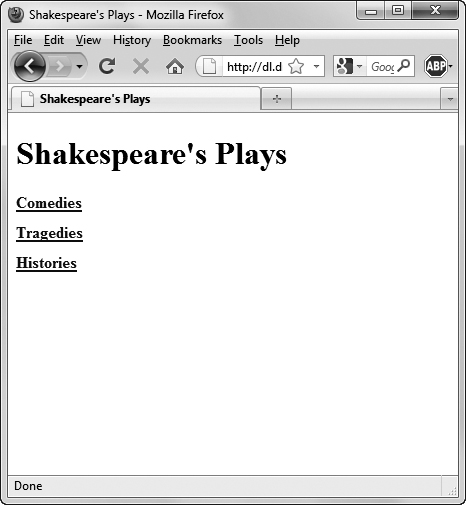
![]() The initial view of the sliding menus.
The initial view of the sliding menus.
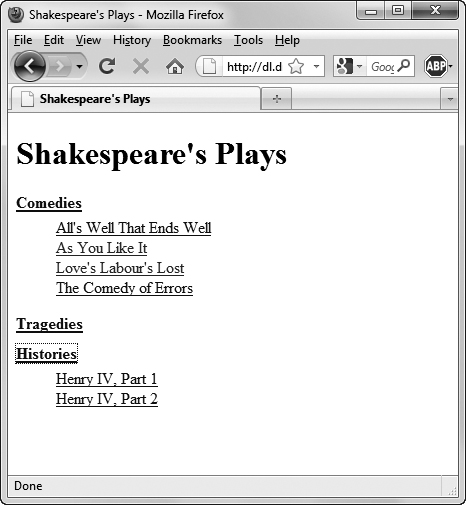
![]() After a click, the menu expands and the additional choices appear.
After a click, the menu expands and the additional choices appear.
7. return false;
And finally, we return a value of false—that’s because the toggleMenu() function was called due to an onclick event handler on a link. When we return false, the href attribute never gets loaded into the browser window, so the viewer stays on the same page.
Adding Pull-Down Menus
You may have looked at the sliding menus in the previous task and said to yourself, that’s nice, but what I really want are those pull-down menus that make Web pages look like applications. Here’s the secret: there’s not a lot of difference between the previous task and this one. In fact, the HTML is identical (just refer back to Listing 12.1); the CSS is in Listing 12.4, and the JavaScript is in Listing 12.5.
Listing 12.4. A little more CSS and a little more JavaScript give your menus a more traditional look.
body {
background-color: #FFF;
color: #000;
}
div {
margin-bottom: 10px;
width: 20em;
background-color: #9CF;
}
ul.menu {
display: none;
list-style-type: none;
margin: 0;
padding: 0;
}
ul.menu li {
font: 1em arial, helvetica, sans-serif;
padding-left: 10px;
}
a.menuLink, li a {
text-decoration: none;
color: #006;
}
a.menuLink {
font-size: 1.2em;
font-weight: bold;
}
ul.menu li a:hover {
background-color: #006;
color: #FFF;
padding-right: 10px;
}
Listing 12.5. This script turns your everyday links into pull-down menus.
window.onload = initAll;
function initAll() {
var allLinks = document.getElementsByTagName("a");
for (var i=0; i<allLinks.length; i++) {
if (allLinks[i].className.indexOf("menuLink") > -1) {
allLinks[i].onmouseover = toggleMenu;
allLinks[i].onclick = function() {
  return false;
}
}
}
}
function toggleMenu() {
var startMenu = this.href.lastIndexOf("/")+1;
var stopMenu = this.href.lastIndexOf(".");
var thisMenuName = this.href.substring(startMenu,stopMenu);
document.getElementById(thisMenuName).style.display = "block";
this.parentNode.className = thisMenuName;
this.parentNode.onmouseout = function() {
  document.getElementById(this.className).style.display = "none";
}
this.parentNode.onmouseover = function() {
  document.getElementById(this.className).style.display = "block";
}
}
To add a pull-down menu
1. allLinks[i].onmouseover = toggleMenu;
allLinks[i].onclick = function() {
return false;
}
Instead of adding an onclick handler to call toggleMenu() as we did previously, here, we set onclick to always return false—we don’t want it to do anything at all. Instead, we’ll have onmouseover call toggleMenu(), which means that the menu will open up whenever we move the mouse over it ![]() .
.
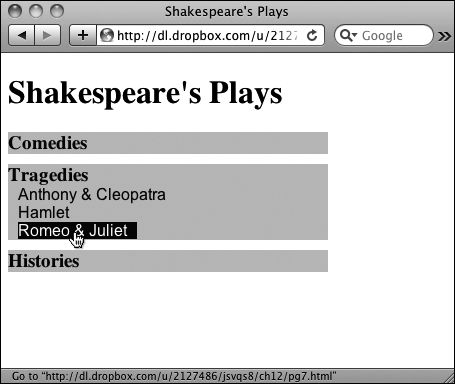
![]() The menus expand when you roll the mouse over them, highlighting the choice under the mouse pointer.
The menus expand when you roll the mouse over them, highlighting the choice under the mouse pointer.
2. document.getElementById(thisMenuName).style.display = "block";
Down in toggleMenu(), we’re not toggling quite the same way any more. Instead, we’re now just going to set this menu to always display.
3. this.parentNode.className = thisMenuName;
Once we’ve set the menu to display, we have to figure out how to hide it again. The secret to a pull-down menu is that you don’t want it to close when you move the mouse off the triggering link; you want it to close when you move the mouse off the entire div. That is, if you’re anywhere on the menu, you want it to stay open. Here, we assign a class to the parent of the current link (that’s the div around the link) so that we can keep track of what menu triggered the initial toggle.
Here’s the trick: if we got here, then by definition, the cursor is inside the div. And consequently, just setting the parent div’s onmouseover event handler causes it to immediately trigger.
4. this.parentNode.onmouseout = function() {
document.getElementById(this.className).style.display = "none";
}
We still need to tell the parent div when to open and close, and the latter is done here. Instead of setting the div to always display, we set it to hide—but only when the cursor moves off the entire div area.
5. this.parentNode.onmouseover = function() {
document.getElementById(this.className).style.display = "block";
}
Here we tell the entire div to (again) display. Yes, we did it above in step 2, but we need to do it again here; otherwise, the moment we moved off the link, the menu would snap shut again.
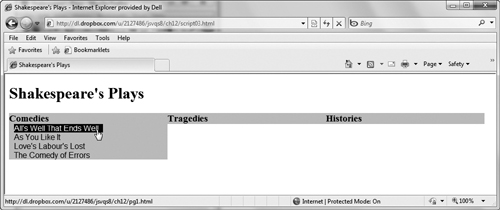
Here’s some of what’s going on inside these menus: if you take a close look at the HTML, the links are actually inside <ul> and <li> tags—that is, they’re unordered lists and list items. If a user has a browser that doesn’t support CSS, they’ll just see a list of items on the page ![]() . If the browser is capable, though, we can use CSS to style how we want those lists to look, with a result that looks nothing like a plain list.
. If the browser is capable, though, we can use CSS to style how we want those lists to look, with a result that looks nothing like a plain list.

![]() When you turn off the CSS display, as we have done here in Firefox, the menus are revealed for what they really are: just a simple unordered list.
When you turn off the CSS display, as we have done here in Firefox, the menus are revealed for what they really are: just a simple unordered list.
Enhancing Pull-Down Menus
Maybe you’ve looked at the previous example, and now you’re saying, “I don’t want a vertical menu; I want a horizontal menu!” That’s straightforward (and doesn’t even require any changes to the JavaScript!). Or maybe you want it to be a little more compatible for people who navigate using the keyboard? Here’s how to do it. Once again, there’s no change to the HTML, so you can refer back to Listing 12.1 if you need to see it.
Listing 12.6. Add one line of CSS, and you get an entirely new look to your menus.
body {
background-color: #FFF;
color: #000;
}
div {
margin-bottom: 10px;
width: 20em;
background-color: #9CF;
float: left;
}
ul.menu {
display: none;
list-style-type: none;
margin: 0;
padding: 0;
}
ul.menu li {
font: 1em arial, helvetica, sans-serif;
padding-left: 10px;
}
a.menuLink, li a {
text-decoration: none;
color: #006;
}
a.menuLink {
font-size: 1.2em;
font-weight: bold;
}
ul.menu li a:hover {
background-color: #006;
color: #FFF;
padding-right: 10px;
}
To enhance pull-down menus
1. float: left;
Here’s the sneaky trick: just add float: left; to the CSS for each menu div, as shown in Listing 12.6 and ![]() . Yes, that’s all it takes to turn a vertical menu into one that’s horizontal—no JavaScript required.
. Yes, that’s all it takes to turn a vertical menu into one that’s horizontal—no JavaScript required.
![]() A simple change to the CSS makes the menus appear across the page, rather than down the left side.
A simple change to the CSS makes the menus appear across the page, rather than down the left side.
2. allLinks[i].onclick = clickHandler;
If you want to make your menus more accessible, however, you need to add a little more JavaScript, as you see in Listing 12.7. In particular, we’ll need to add more code to the onclick event handler, so we’re giving it a function of its own, clickHandler.
3. function clickHandler(evt) {
And here’s that event handler, being passed the evt parameter. If you recall from earlier examples, some browsers pass an event object and some don’t.
4. if (evt) {
if (typeof evt.target == "string") {
toggleMenu(evt,evt.target);
}
else {
toggleMenu(evt,evt.target.toString());
}
}
else {
toggleMenu(evt,window.event.srcElement.href);
}
return false;
Here’s the code to handle those darn browsers that can pass in all kinds of different things. First off, we check to see if we have an event object—if we do, evt exists. Next, once we know we’ve got it, we check to see if its target property is a string, because we’re going to need it to be one. If it is, we pass both the event and its target to toggleMenu().
If target isn’t a string, we force it to be one, by calling the toString() method, and use that (along with evt) as our parameters to toggleMenu().
Listing 12.7. A little more JavaScript lets the menu work without a mouse.
window.onload = initAll;
function initAll() {
var allLinks = document.getElementsByTagName("a");
for (var i=0; i<allLinks.length; i++) {
if (allLinks[i].className.indexOf("menuLink") > -1) {
allLinks[i].onmouseover = toggleMenu;
allLinks[i].onclick = clickHandler;
}
}
}
function clickHandler(evt) {
if (evt) {
  if (typeof evt.target == "string") {
    toggleMenu(evt,evt.target);
  }
  else {
    toggleMenu(evt,evt.target.toString());
  }
}
else {
  toggleMenu(evt,window.event.srcElement.href);
}
return false;
}
function toggleMenu(evt,currMenu) {
  if (toggleMenu.arguments.length < 2) {
    var currMenu = this.href;
}
var startMenu = currMenu.lastIndexOf("/")+1;
var stopMenu = currMenu.lastIndexOf(".");
var thisMenuName = currMenu.substring(startMenu,stopMenu);
var thisMenu = document.getElementById(thisMenuName);
thisMenu.style.display = "block";
thisMenu.parentNode.className = thisMenuName;
thisMenu.parentNode.onmouseout = function() {
document.getElementById(this.className).style.display = "none";
}
thisMenu.parentNode.onmouseover = function() {
document.getElementById(this.className).style.display = "block";
}
}
And finally, if there wasn’t any event object, we’ll send toggleMenu() a dummy evt object and window.event.srcElement.href—which is where IE stores the value we need.
5. function toggleMenu(evt,currMenu) {
if (toggleMenu.arguments.length < 2) {
var currMenu = this.href;
}
Here’s where the menu gets toggled, and because both a click and a mouse movement can trigger the display, toggleMenu() needs to be a little more complex to handle things. We start off the function with two parameters, but here’s an important thing about JavaScript: just because a function is expecting to be passed two arguments, doesn’t mean that it always must be passed both. In fact, the way we’ve written toggleMenu(), it can get:
• zero arguments, when the browser is IE and toggleMenu() was triggered via the mouse,
• one argument (the event object), when the browser isn’t IE and toggleMenu() was triggered via the mouse, or
• two arguments (the event object and the menu name) when toggleMenu() was called by clickHandler().
If we come in here with zero or one arguments (which we can check by looking at toggleMenu.arguments.length), we know that we can find the menu name by looking at this.href—in other words, it should work just the way it used to. But because we need the value in currMenu, that’s where we’ll store it.
6. var startMenu = currMenu.lastIndexOf("/")+1;
var stopMenu = currMenu.lastIndexOf(".");
var thisMenuName = currMenu.substring(startMenu,stopMenu);
Once again, we calculate startMenu, stopMenu, and thisMenuName, but now it’s based off of currMenu.
7. var thisMenu = document.getElementById(thisMenuName);
thisMenu.style.display = "block";
Because we can’t always just refer to this (as it’s not accurate if we clicked to get here), we’ll store the current menu in thisMenu, and then as before, we set it to display.
8. thisMenu.parentNode.className = thisMenuName;
And finally, we have to change the parent class name to match the menu’s id, and that’s handled here.
It’s not just blind users that need keyboard access to menu items. Some people prefer to use the keyboard in general, and some browsers (such as the ones in mobile browsers) don’t handle mouseovers in the way that menus need. Accessibility is always a good idea, and you should never use JavaScript or fancy features as an excuse to not consider everyone’s needs.
In this example, clicking on a menu item expands the menu, but a mouse is required to close it again.
A Slideshow with Captions
While a slideshow (like the one shown in Listings 4.18 and 4.19) can be handy, it’s likely to be more useful if you can also show captions that change along with the images. Listings 12.8 (HTML), 12.9 (CSS), and 12.10 (JavaScript) show an example of such a slideshow (with pictures of our summer vacation!). In this task, we’ll show you how to blend together different techniques you’ve seen in earlier chapters into one script.
Listing 12.8. Our slideshow HTML page.
<!DOCTYPE html>
<html>
<head>
<title>Our Summer Vacation!</title>
<link rel="stylesheet" href="script04.css">
<script src="script04.js"></script>
</head>
<body>
<h1>Our Summer Vacation Slideshow</h1>
<img src="images/slideImg0.jpg" alt="Our Vacation Pix" id="slideshow">
<div id="imgText"> </div>
<div id="chgImg">
<input type="button" id="prevLink" value="« Previous">
<input type="button" id="nextLink" value="Next »">
</form>
</body>
</html>
To create a slideshow with captions
1. document.getElementById("imgText").innerHTML = captionText[0];
Our initAll() function needs to set three things: the photo caption for the first slide (in the imgText area), and the onclick handlers for the forward and back buttons (in the following step).
2. document.getElementById("prevLink").onclick = function() {
newSlide(-1);
}
document.getElementById("nextLink").onclick = function() {
newSlide(1);
}
Yes, this really is all that these two functions do—well, mostly. We could rig up some convoluted code to know whether or not we want to go forward or backward based on which button was clicked, but instead, we’ll just have two functions, both of which call newSlide(). The difference: one passes it a value of 1, and the other a value of -1, letting newSlide() know in which direction to move.
Listing 12.9. The external Cascading Style Sheet called by Listing 12.8.
body {
background-color: #FFF;
color: #000;
font: 12px verdana, arial, helvetica, geneva, sans-serif;
}
h1 {
font: 24px "trebuchet ms", verdana, arial, helvetica, geneva, sans-serif;
margin-left: 100px;
}
#chgImg {
margin-left: 100px;
clear: both;
}
#slideshow {
padding: 0 10px 10px 10px;
float: left;
height: 240px;
width: 320px;
}
#imgText {
padding: 10px 0 0 10px;
float: left;
width: 200px;
height: 150px;
border-top: 1px #000 solid;
border-left: 1px solid #000;
}
Listing 12.10. The slideshow script displays the photo and the caption.
window.onload = initAll;
var currImg = 0;
var captionText = [
"Our ship, leaving Vancouver.",
"We took a helicopter ride at our first port, Juneau.",
"The helicopter took us to Mendenhall Glacier.",
"The happy (and chilly) couple, on the glacier.",
"Here's what our second stop, Ketchikan, looked like from the ship.",
"We got to cruise through Glacier Bay. It was absolutely breathtaking!",
"In Skagway, we took a train up into the mountains, all the way to the Canadian Border.",
"Looking back down at Skagway from the train.",
"On a trip this romantic, I shouldn't have been surprised by a proposal, but I was (obviously, I said yes).",
"It's nice to go on vacation, but it's nice to be home again, too."
];
function initAll() {
document.getElementById("imgText").innerHTML = captionText[0];
document.getElementById("prevLink").onclick = function() {
  newSlide(-1);
}
document.getElementById("nextLink").onclick = function() {
  newSlide(1);
}
}
function newSlide(direction) {
var imgCt = captionText.length;
currImg = currImg + direction;
if (currImg < 0) {
currImg = imgCt-1;
}
if (currImg == imgCt) {
currImg = 0;
}
document.getElementById("slideshow").src = "images/slideImg" + currImg + ".jpg";
document.getElementById("imgText").innerHTML = captionText[currImg];
}
3. document.getElementById("slideshow").src = "images/slideImg" + currImg + ".jpg";
document.getElementById("imgText").innerHTML = captionText[currImg];
This step changes both the image and its corresponding caption at the same time ![]() .
.
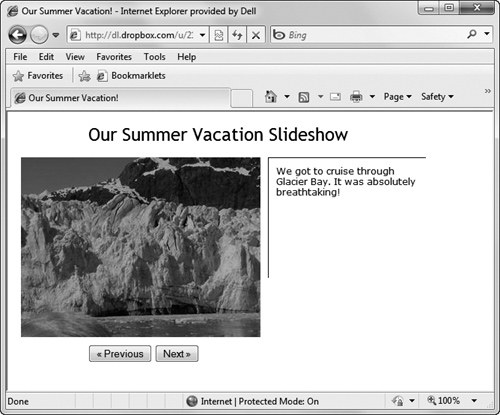
![]() The script calculates which photo and caption to display.
The script calculates which photo and caption to display.
Wondering what’s going on with captionText and its syntax? Just remember what we said early on: there’s no one right way to do things, and unsurprisingly, JavaScript has more than one way to declare a new array. There’s no difference in the result if we say
var dice=new Array(1,2,3,4,5,6);
or
var dice=[1,2,3,4,5,6];
Both methods will produce an array containing the possible values of a six-sided die.
A Silly Name Generator
You may have seen Web-based toys before that take your name and transform it into a new name, like “Your Superhero Name” or “Your Name if You Were a Character in The Sopranos.” We’ve settled for simply being ridiculous, so Listings 12.11 and 12.12 can show you how to get your own, new, silly name. In the process, you can see how to combine string handling, arrays, error checking, and form field validation into one darned silly script.
Listing 12.11. The Web page where you can enter your real name and get your silly name.
<!DOCTYPE html>
<html>
<head>
<title>Silly Name Generator</title>
<script src="script05.js"></script>
</head>
<body>
<h1>What's your silly name?</h1>
<table>
<tr>
<td class="rtAlign">First Name:</td>
<td><input type="text" id="fName" size="30"></td>
</tr>
<tr>
<td class="rtAlign">Last Name:</td>
<td><input type="text" id="lName" size="30"></td>
</tr>
<tr>
<td> </td>
<td><input type="submit" value="Submit" id="sillySubmit">
</tr>
</table>
<p id="msgField"> </p>
</body>
</html>
To combine JavaScript techniques
1. document.getElementById("msgField").innerHTML = getSillyName();
return false;
When the page first loads, the submit button’s onclick handler is set to call a function, and this is its entire content. First, we call getSillyName(). That function returns a string value (either the silly name or an error message), which we then write out to the page. Then we return false, so that the onclick doesn’t try to do anything else.
2. var firstNm = document.getElementById("fName").value.toUpperCase();
var lastNm = document.getElementById("lName").value.toUpperCase();
Anyone visiting this page will be asked to enter their first and last names into text fields. When Submit is clicked, we start off the getSillyName() function by converting both names to all uppercase and storing the result in the variables firstNm and lastNm.
Listing 12.12. This script generates a silly name from three arrays, based on characters from the first and last names entered by the user.
window.onload = initAll;
function initAll() {
document.getElementById("sillySubmit").onclick = function() {
document.getElementById("msgField").innerHTML = getSillyName();
return false;
}
}
function getSillyName() {
var firstName = ["Runny", "Buttercup", "Dinky", "Stinky", "Crusty", "Greasy", "Gidget", "Cheesypoof", "Lumpy", "Wacky", "Tiny", "Flunky", "Fluffy", "Zippy", "Doofus", "Gobsmacked", "Slimy", "Grimy", "Salamander", "Oily", "Burrito", "Bumpy", "Loopy", "Snotty", "Irving", "Egbert"];
var lastName1 = ["Snicker", "Buffalo", "Gross", "Bubble", "Sheep", "Corset", "Toilet", "Lizard", "Waffle", "Kumquat", "Burger", "Chimp", "Liver", "Gorilla", "Rhino", "Emu", "Pizza", "Toad", "Gerbil", "Pickle", "Tofu", "Chicken", "Potato", "Hamster", "Lemur", "Vermin"];
var lastName2 = ["face", "dip", "nose", "brain", "head", "breath", "pants", "shorts", "lips", "mouth", "muffin", "butt", "bottom", "elbow", "honker", "toes", "buns", "spew", "kisser", "fanny", "squirt", "chunks", "brains", "wit", "juice", "shower"];
var firstNm = document.getElementById("fName").value.toUpperCase();
var lastNm = document.getElementById("lName").value.toUpperCase();
var validName = true;
if (firstNm == "") {
  validName = false;
}
else {
var firstNum = firstNm.charCodeAt(0) - 65;
if (firstNum < 0 || firstNum > 25) {
  validName = false;
}
}
if (!validName) {
  document.getElementById("fName").focus();
  document.getElementById("fName").select();
  return "That's not a valid first name";
}
if (lastNm == "") {
  validName = false;
}
else {
var lastNum1 = lastNm.charCodeAt(0) - 65;
var lastNum2 = lastNm.charCodeAt((lastNm.length-1)) - 65;
if (lastNum1 < 0 || lastNum1 > 25 || lastNum2 < 0 || lastNum2 > 25) {
  validName = false;
}
}
if (!validName) {
  document.getElementById("lName").focus();
  document.getElementById("lName").select();
  return "That's not a valid last name";
}
return "Your silly name is " + firstName[firstNum] + " " + lastName1[lastNum1] + lastName2[lastNum2];
}
3. if (firstNm == "") {
validName = false;
}
It’s required that a visitor enter at least one character for the first name, so that check is done here. Remember, the expression is read as “if firstNm is equal to nothing, then.” If that’s the case, we set validName to false.
4. var firstNum = firstNm.charCodeAt(0) - 65;
Otherwise, the charCodeAt() method takes a single character from a string. That single character in the string is based on the number passed to the method; in this case, it is the character in the 0th place, which means the first character in the string (remember, JavaScript starts counting at 0), and returns the ASCII value for that character. The uppercase alphabet starts with “A” having an ASCII value of 65 and ends with “Z” having a value of 90. We then subtract 65 to get a result between 0 and 25, and this result is saved as firstNum.
5. if (firstNum < 0 || firstNum > 25) {
validName = false;
}
If the user enters a first name that doesn’t start with a character between “A” and “Z”, there won’t be an equivalent silly name. Here, we make sure that it’s within this range before checking the last name. If it isn’t, we set validName to false.
6. if (!validName) {
document.getElementById("fName").focus();
document.getElementById("fName").select();
return "That's not a valid first name";
}
At this point, we know that if validName is false, it means that the user didn’t enter a valid first name. When this happens, we put the cursor in the field, select anything that’s in that field, and return an error message.
7. if (lastNm == "") {
validName = false;
}
Just as with the first name, they have to enter something in the last name field.
8. var lastNum1 = lastNm.charCodeAt(0) - 65;
var lastNum2 = lastNm.charCodeAt((lastNm.length-1)) - 65;
To figure out the visitor’s new silly last name, we’ll need to calculate the ASCII values of both the first and last characters of the last name. The first is found in the same fashion as in step 4. The last character in the string is found by taking the length of lastNm, subtracting 1, and then passing that number to charCodeAt().
9. if (lastNum1 < 0 || lastNum1 > 25 || lastNum2 < 0 || lastNum2 > 25) {
validName = false;
}
As with the first name field, we have to make sure that both the first and last letter of the last name contain a character between “A” and “Z”, so once again, we set validName to false if there’s a problem.
10. if (!validName) {
document.getElementById("lName").focus();
document.getElementById("lName").select();
return "That's not a valid last name";
}
Just as we did in step 6, if the name isn’t valid, we want to let the user know.
11. return "Your silly name is " + firstName[firstNum] + " " + lastName1[lastNum1] + lastName2[lastNum2];
If we’ve passed all the tests, it’s time to calculate the new silly name. Because we turned the characters into numbers between 0 and 25, we can use the results as indices into the name arrays firstName, lastName1, and lastName2. The result of each array lookup is concatenated to the next, with a blank space between the first name and the last name. Notice that the two parts of the last name are concatenated without a space. When we’re done, that name is returned and put into the document, as shown in ![]() .
.
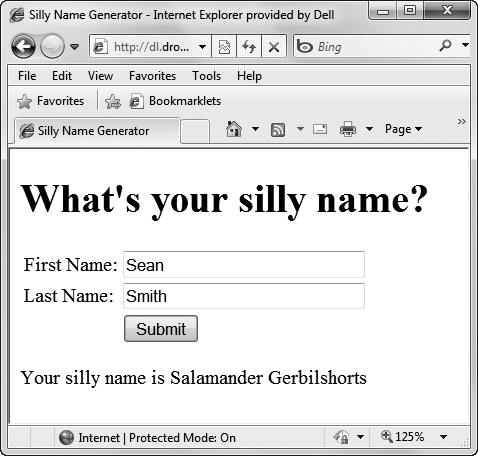
![]() The resulting silly name.
The resulting silly name.
A Bar Graph Generator
Graphs are excellent ways to display visual information. You can create bar graphs by drawing them in Adobe Photoshop or by calculating them in Microsoft Excel, but for dynamic data that might need to change on a regular basis, why not have JavaScript do it instead on the fly? While we’ve said throughout this book that JavaScript is object-oriented (and therefore buzzword-compliant), and we’ve used objects throughout the book, we’ve only briefly shown you how to create your own custom objects. Here’s a more in-depth example of how objects work, as seen in Listings 12.13 (HTML), 12.14 (CSS), and 12.15 (JavaScript).
To generate a bar graph
1. var radioButtons = document.getElementsByTagName("input");
for (var i=0; i<radioButtons.length; i++) {
if (radioButtons[i].type == "radio") {
radioButtons[i].onclick = chgChart;
}
}
chgChart();
As we’ve done so many times, the initAll() function starts the ball rolling. Here, we get all the radio buttons and loop through them, setting each to call chgChart() when they’re clicked. When that’s done, we call chgChart() manually to display the default view of the page.
Listing 12.13. The HTML page for the bar chart generator.
<!DOCTYPE html>
<html>
<head>
<title>Bar Chart Display</title>
<link rel="stylesheet" href="script06.css">
<script src="script06.js"></script>
</head>
<body>
<div id="chartType">
Choose a chart<br>
<input type="radio" name="type" value="browser" checked="checked"> Browser Usage<br>
<input type="radio" name="type" value="platform"> JavaScript Usage<br>
<p><br></p>
Choose a color<br>
<input type="radio" name="color" value="lilRed.gif" checked="checked"> Red<br>
<input type="radio" name="color" value="lilGreen.gif"> Green<br>
<input type="radio" name="color" value="lilBlue.gif"> Blue<br>
<p><br></p>
Choose a direction<br>
<input type="radio" name="direction" value="horizontal" checked="checked"> Horizontal<br>
<input type="radio" name="direction" value="vertical"> Vertical
</div>
<div id="chartArea"> </div>
</body>
</html>
2. var bChart = {
Here inside chgChart() is where we start to create our first custom object, bChart (short for “browser chart”). Yep, that’s all there is to it.
3. name: "Browser usage by year",
years: [1998,1999,2000,2001,2002,2003,2004,2005,2006,2007,2008,2009],
fieldnames: ["Netscape/Mozilla","MS IE","Other"],
fields: [
[38.9,31.9,21.2,12.4,6.6,5.1,3,1,6,11,14,17],
[60.6,67.4,78.3,85.6,92.5,94.0,92,89,90,84,79,76],
[0.5,0.5,0.5,2.1,0.9,1.0,4,9,3,5,5,6]
]
The properties for a custom object are created and initialized simply by assigning values to them. Here, we set up the name, years, fieldnames, and fields properties of bChart. Those fields are, respectively, the name of the chart, the years covered by the chart, the three labels for the chart values, and the sets of values for each year and each label (in this case, each browser).
Note that we’re not using the var keyword before each of these; that’s because they aren’t new variables. Instead, they’re new properties that we’re adding to an existing variable (albeit one we just created).
Our new fields property uses two levels of square brackets because it’s a two-dimensional array. We can then refer to the first row as bChart.fields[0][n], the second as bChart.fields[1][n], and the third as bChart.fields[2][n].
Listing 12.14. This script contains the styles for the bar chart example.
body {
background-color: #FFF;
color: #000;
font-size: 12px;
}
#chartType {
float: left;
width: 200px;
}
.vert {
text-align: center;
vertical-align: bottom;
}
th {
font-size: 16px;
padding-left: 20px;
padding-right: 15px;
}
.vert th {
border-left: 1px #000 solid;
border-bottom: 1px #000 solid;
padding-bottom: 20px;
}
.horiz th {
border-right: 1px #000 solid;
}
.horiz img {
height: 15px;
vertical-align: bottom;
}
.vert img {
width: 15px;
padding-left: 10px;
padding-right: 10px;
}
tr.vert + tr.vert {
padding-bottom: 20px;
}
The closing curly brace signifies that we’ve finished creating our new bChart object.
5. var jsChart = {
name: "JavaScript usage by year",
years: [1998,1999,2000,2001,2002,2003,2004,2005,2006,2007,2008,2009],
fieldnames: ["1.2 or later","1.0 - 1.1","No JavaScript"],
fields: [
[63.4,66.5,78.4,80.2,88.1,89.1,94,89,96,95,94,93],
[18.7,12.6,2.8,0.8,0.3,0.3,0,0,0,0,0,0],
[17.9,21.0,18.8,19.0,11.6,10.6,4,9,3,4,5,6],
]
}
In the same way that we created the bChart object, we now create the jsChart (“JavaScript chart”) object and assign its properties. For the JavaScript chart, we again have the years, but this time we’re displaying what percentage of browsers had which version of JavaScript.
Listing 12.15. And here’s the code that draws the bar chart.
window.onload = initAll;
function initAll() {
var radioButtons = document.getElementsByTagName("input");

for (var i=0; i<radioButtons.length; i++) {
  if (radioButtons[i].type == "radio") {
    radioButtons[i].onclick = chgChart;
  }
}
chgChart();
}
function chgChart() {
var bChart = {
name: "Browser usage by year",
years: [1998,1999,2000,2001,2002,2003,2004,2005,2006,2007,2008,2009],
fieldnames: ["Netscape/Mozilla","MS IE","Other"],
  fields: [
  [38.9,31.9,21.2,12.4,6.6,5.1,3,1,6,11,14,17],
  [60.6,67.4,78.3,85.6,92.5,94.0,92,89,90,84,79,76],
  [0.5,0.5,0.5,2.1,0.9,1.0,4,9,3,5,5,6]
]
}
var jsChart = {
name: "JavaScript usage by year",
years: [1998,1999,2000,2001,2002,2003,2004,2005,2006,2007,2008,2009],
fieldnames: ["1.2 or later","1.0 - 1.1","No JavaScript"],
fields: [
[63.4,66.5,78.4,80.2,88.1,89.1,94,89,96,95,94,93],
[18.7,12.6,2.8,0.8,0.3,0.3,0,0,0,0,0,0],
[17.9,21.0,18.8,19.0,11.6,10.6,4,9,3,4,5,6]
]
}
var radioButtons = document.getElementsByTagName("input");
var currDirection = getButton("direction");
var imgSrc = "images/" + getButton("color");
if (getButton("type")=="browser") {
  var thisChart = bChart;
}
else {
  var thisChart = jsChart;
}
var chartBody = "<h2>"+thisChart.name+"</h2><table>";
for (var i=0; i<thisChart.years.length; i++) {
if (currDirection == "horizontal") {
chartBody += "<tr class='horiz'><th rowspan='4'>"+thisChart.years[i];
chartBody += "</th><td colspan='2'></td></tr>";
for (var j=0; j<thisChart.fieldnames.length; j++) {
chartBody += "<tr class='horiz'><td>"+ thisChart.fieldnames[j];
chartBody += "</td><td><img alt='horiz bar' src='"+imgSrc;
chartBody += "' width='"+thisChart.fields[j][i]*3+"'> ";
chartBody += thisChart.fields[j][i]+"</td></tr>";
}
}
else {
chartBody += "<tr class='vert'><th rowspan='2'>"+ thisChart.years[i]+"</th>";
for (var j=0; j<thisChart.fieldnames.length; j++) {
chartBody += "<td><img alt='vert bar' src='"+imgSrc;
chartBody += "' height='"+thisChart.fields[j][i]*3+"'></td>";
}
chartBody += "</tr><tr class='vert'>";
for (j=0; j<thisChart.fieldnames.length; j++) {
chartBody += "<td>"+thisChart.fields[j][i]+"<br>";
chartBody += thisChart.fieldnames[j]+"<br><br></td>";
}
chartBody += "</tr>";
}
}
chartBody += "</table>";
document.getElementById("chartArea").innerHTML = chartBody;
function getButton(buttonSet) {
for (var i=0; i<radioButtons.length; i++) {
if (radioButtons[i].name == buttonSet && radioButtons[i].checked) {
return radioButtons[i].value;
}
}
return -1;
}
}
6. var radioButtons = document.getElementsByTagName("input");
var currDirection = getButton("direction");
var imgSrc = "images/" + getButton("color");
Before we draw our chart, we need to know which radio buttons have been selected. The radioButtons array contains all the input elements on the page, and once we’ve got that, we can call the getButton() function. The getButton() function is passed a string (the name of the radio set), and it returns a string (the current value of that set).
We could have written getButton() to set up radioButtons instead of doing it here, but this way means that it’s only initialized once instead of three times (once for every time getButton() is called).
7. if (getButton("type")=="browser") {
var thisChart = bChart;
}
else {
var thisChart = jsChart;
}
When the user clicks any of the radio buttons to change the chart, the chgChart() function is called. When that happens, if the browser chart is the one that’s wanted, the entire bChart object gets stored in thisChart. Otherwise, it’s the JavaScript chart for us, so thisChart is assigned the jsChart object.
8. var chartBody = "<h2>"+thisChart.name+"</h2><table>";
Here’s the start of the actual drawing code. First, we write out the name of the chart (stored in thisChart.name and displayed inside an <h2> tag), and then we open up a <table> tag. From here on out, we’re adding to the chartBody variable, and when we’re done, we’ll write it out to the page.
9. for (var i=0; i<thisChart.years.length; i++) {
Here’s the first of two loops that we’ll be going through (remember that two-dimensional array from step 3?). This external loop uses i as the index variable, and how many times it loops around is based on the number of years covered by the chart.
10. if (currDirection=="horizontal") {
If the user wants to see the horizontal version of the chart ![]() , run the following code.
, run the following code.
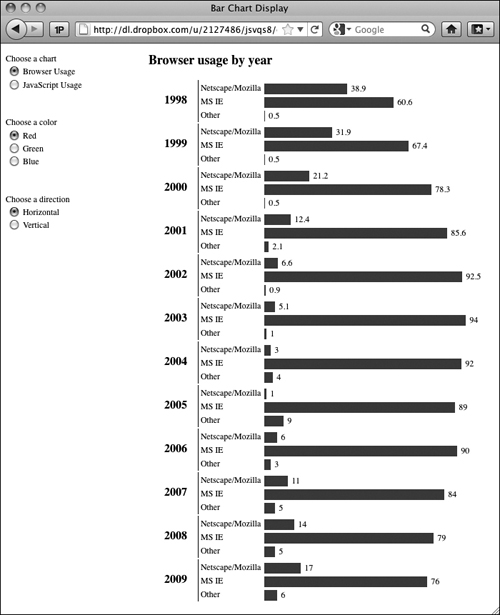
![]() The initial, horizontal version of the bar graph.
The initial, horizontal version of the bar graph.
11. chartBody += "<tr class='horiz'><th rowspan='4'>"+thisChart.years[i];
chartBody += "</th><td colspan='2'></td></tr>";
The first row of each horizontal chart contains the ith year label.
12. for (var j=0; j<thisChart.fieldnames.length; j++) {
Here’s the horizontal version of the second of the two loops. This internal loop uses j as its index, and how many times it loops around is based on the number of fieldnames that we stored.
13. chartBody += "<tr class='horiz'><td>"+thisChart.fieldnames[j];
The detail row of the table is started here, and we first write out the value label (either the browser type or the JavaScript version), which is stored in the jth element of fieldnames.
14. chartBody += "</td><td><img alt='horiz bar' src='"+imgSrc;
chartBody += "' width='"+thisChart.fields[j][i]*3+"'> ";
Next, we close the previous cell and calculate the bar image. The color of the bar is based on imgSrc, and the width is the value of the jth by ith index in the array, multiplied by 3. For example, if imgSrc is lilBlue.gif and thisChart.fields[3][4] is 30, this would write out an image tag to draw a blue rectangle 90 pixels wide.
15. chartBody += thisChart.fields[j][i]+"</td></tr>";
Now the actual data value is written out to the right of the bar to finish off this row. This is the end of the interior loop for the horizontal section of the code.
16. chartBody += "<tr class='vert'><th rowspan='2'>"+thisChart.years[i]+"</th>";
If the user wants to see the chart drawn vertically ![]() , we start by writing the initial row of the chart. The vertical version of the chart is somewhat more complex and requires two internal (but separate)
, we start by writing the initial row of the chart. The vertical version of the chart is somewhat more complex and requires two internal (but separate) j loops. Here we write out the label for the chart.
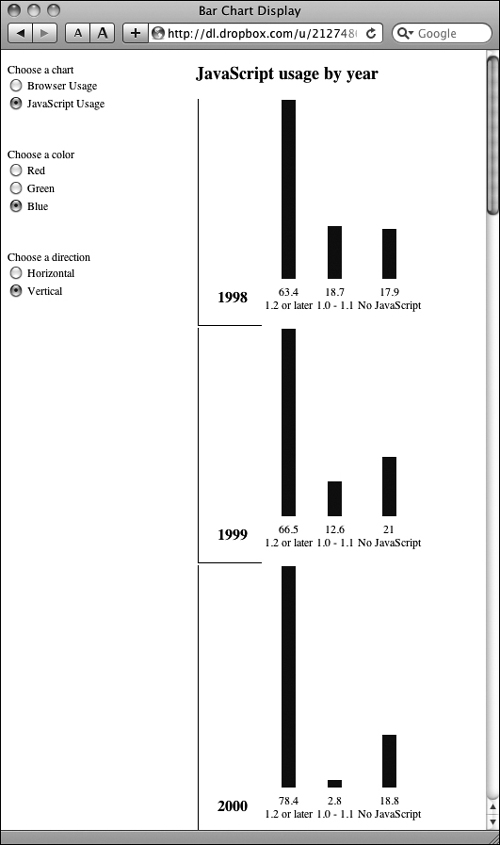
![]() The vertical version of the bar graph.
The vertical version of the bar graph.
17. for (var j=0; j<thisChart.fieldnames.length; j++) {
Here’s the first internal loop. This one writes out each vertical bar on the graph in a row.
18. chartBody += "<td><img alt='vert bar' src='"+imgSrc;
chartBody += "' height='"+thisChart.fields[j][i]*3 +"'></td>";
And here’s the image tag being written on the fly. This time, the height varies based on the value found in the two-dimensional array. For example, if imgSrc is lilGreen.gif and thisChart.fields[3][4] is 30, this would write out an image tag to draw a green rectangle 90 pixels high.
19. chartBody += "</tr><tr class='vert'>";
When all the bars on the graph have been written out, close that table row and start the next row.
20. for (j=0; j<thisChart.fieldnames.length; j++) {
Here’s the second internal loop. This one writes the value of each data point, under its corresponding bar, followed by the y-axis label.
21. chartBody += "<td>"+thisChart.fields[j][i]+"<br>";
chartBody += thisChart.fieldnames[j]+"<br><br></td>";
Here’s the information being written out for each bar. The variable thisChart.fields[j][i] is the value of that bar, and thisChart.fieldnames[j] is the data label for that bar.
22. chartBody += "</tr>";
After the last internal loop is complete, we need to write out a final end row tag.
23. chartBody += "</table>";
document.getElementById("chartArea").innerHTML = chartBody;
At this point, both the horizontal and vertical sections are done, and the external loop has completed, so we write out the final table tag to end our script and then put the entire thing into the innerHTML property of the chartArea section of the page.
This code uses three images: lilRed.gif, lilBlue.gif, and lilGreen.gif. Each of these is a single-pixel GIF in its corresponding color. HTML allows you to set the height and width regardless of the image’s actual physical dimensions, so a single pixel allows us to create bars of any size and shape.
In case you were wondering, the horizontal bar’s height and the vertical bar’s width are both set in the CSS file, Listing 12.14. Because those values are static (i.e., they don’t change), there’s no reason to use JavaScript to set them on the fly.
This chart can be changed to graph almost anything simply by changing the array values in steps 3 and 5. No matter what you set the arrays to, you shouldn’t have to change the loops that create the graphs.
The statistics on these charts are based on those found at The Counter’s Global Statistics, at www.thecounter.com/stats/. Unfortunately, they only kept track of these figures from September 1998 to December 2009, so the 1998 figures begin in September. Figures for all other years begin in January.
Style Sheet Switcher
One of the most powerful uses of JavaScript is the ability to modify, on the fly, which style sheet is being used. For example, you can offer your site’s visitors the ability to choose the style and size of the text on your site. Some people like to read tiny, sans-serif text that gets lots of words on the screen ![]() , while others prefer larger, serif text that’s a bit more readable
, while others prefer larger, serif text that’s a bit more readable ![]() . Now you can make both kinds of visitors happy. And to make it even more useful, this script also uses cookies to store the user’s choice for future visits.
. Now you can make both kinds of visitors happy. And to make it even more useful, this script also uses cookies to store the user’s choice for future visits.
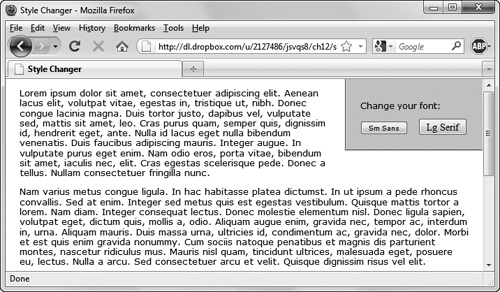
![]() Some visitors prefer to read smaller, sans-serif text that can get more text on the page.
Some visitors prefer to read smaller, sans-serif text that can get more text on the page.
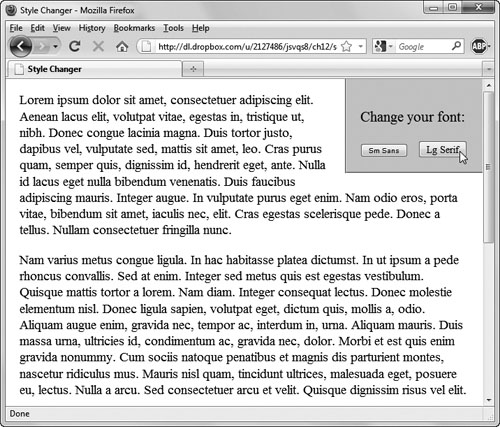
![]() Other visitors will be glad to choose larger, serif text that they find more readable.
Other visitors will be glad to choose larger, serif text that they find more readable.
To allow the user to switch between style sheets
1. <link href="sansStyle.css" rel="stylesheet" title="default">
Listing 12.16 shows a standard link to bring in an external style sheet, with one new twist: it has a title attribute with a value of “default”. That comes into play later.
Listing 12.16. This page has the content for the page and the user controls, and it calls the external style sheets that the user can choose.
<!DOCTYPE html>
<html>
<head>
<title>Style Changer</title>
<link href="script07.css" rel="stylesheet">
<link href="sansStyle.css" rel="stylesheet" title="default">
<link href="serifStyle.css" rel="alternate stylesheet" title="serif">
<script src="script07.js"></script>
</head>
<body>
<div class="navBar"><p>Change your font:</p>
<input type="button" class="typeBtn" value="Sm Sans" id="default">
<input type="button" class="typeBtn2" value="Lg Serif" id="serif">
</div>
<p>Lorem ipsum dolor sit amet, consectetuer adipiscing elit. Aenean lacus elit, volutpat vitae, egestas in, tristique ut, nibh. Donec congue lacinia magna. Duis tortor justo, dapibus vel, vulputate sed, mattis sit amet, leo. Cras purus quam, semper quis, dignissim id, hendrerit eget, ante. Nulla id lacus eget nulla bibendum venenatis. Duis faucibus adipiscing mauris. Integer augue. In vulputate purus eget enim. Nam odio eros, porta vitae, bibendum sit amet, iaculis nec, elit. Cras egestas scelerisque pede. Donec a tellus. Nullam consectetuer fringilla nunc.</p>
<p>Nam varius metus congue ligula. In hac habitasse platea dictumst. In ut ipsum a pede rhoncus convallis. Sed at enim. Integer sed metus quis est egestas vestibulum. Quisque mattis tortor a lorem. Nam diam. Integer consequat lectus. Donec molestie elementum nisl. Donec ligula sapien, volutpat eget, dictum quis, mollis a, odio. Aliquam augue enim, gravida nec, tempor ac, interdum in, urna. Aliquam mauris. Duis massa urna, ultricies id, condimentum ac, gravida nec, dolor. Morbi et est quis enim gravida nonummy. Cum sociis natoque penatibus et magnis dis parturient montes, nascetur ridiculus mus. Mauris nisl quam, tincidunt ultrices, malesuada eget, posuere eu, lectus. Nulla a arcu. Sed consectetuer arcu et velit. Quisque dignissim risus vel elit.</p>
<p>Nunc massa mauris, dictum id, suscipit non, accumsan et, lorem. Suspendisse non lorem quis dui rutrum vestibulum. Quisque mauris. Curabitur auctor nibh non enim. Praesent tempor aliquam ligula. Fusce eu purus. Vivamus ac enim eget urna pulvinar bibendum. Integer porttitor, augue et auctor volutpat, lectus dolor sagittis ipsum, sed posuere lacus pede eget wisi. Proin vel arcu ac velit porttitor pellentesque. Maecenas mattis velit scelerisque tellus. Cras eu tellus quis sapien malesuada porta. Nunc nulla. Nullam dapibus malesuada lorem. Duis eleifend rutrum tellus. In tempor tristique neque. Mauris rhoncus. Aliquam purus.</p>
<p>Morbi felis quam, placerat sed, gravida a, bibendum a, mauris. Aliquam porta diam. Nam consequat feugiat diam. Fusce luctus, felis ut gravida mattis, ante mi viverra sapien, a vestibulum tellus lectus ut massa. Duis placerat. Aliquam molestie tellus. Suspendisse potenti. Fusce aliquet tellus a lectus. Proin augue diam, sollicitudin eget, hendrerit non, semper at, arcu. Sed suscipit tincidunt nibh. Donec ullamcorper. Nullam faucibus euismod augue. Cras lacinia. Aenean scelerisque, lorem sed gravida varius, nunc tortor gravida odio, sed sollicitudin pede augue ut metus. Maecenas condimentum ipsum et enim. Sed nulla. Ut neque elit, varius a, blandit quis, facilisis sed, velit. Suspendisse aliquam odio sed nibh.</p>
</body>
</html>
Listing 12.17. This Cascading Style Sheet contains the styles that always load, no matter which font style you’ve picked.
body {
margin: 0 20px;
padding: 0;
background-color: #FFF;
color: #000;
}
div.navBar {
background-color: #CCC;
width: 175px;
position: relative;
top: -1.0em;
right: -20px;
float: right;
padding: 20px 0 20px 20px;
border-left: 2px groove #999;
border-bottom: 2px groove #999;
}
.typeBtn {
font: 9px/10px verdana, geneva, arial, helvetica, sans-serif;
}
.typeBtn2 {
font: 14px/15px "Times New Roman", Times, serif;
}
2. <link href="serifStyle.css" rel="alternate stylesheet" title="serif">
Here’s another style sheet, again using the link tag. However, the rel attribute isn’t set to the usual stylesheet; instead, it’s set to alternate stylesheet. This is because this style sheet isn’t actually in use—instead, it’ll only be used if the user chooses it.
3. <input type="button" class="typeBtn" value="Sm Sans" id="default">
<input type="button" class="typeBtn2" value="Lg Serif" id="serif">
There are two buttons: Sm Sans and Lg Serif. Clicking the former puts all the text on the page into a small sans-serif font, while clicking the latter puts all the text on the page into a larger, serif font. If supported by the browser, the styles in Listing 12.17 cause the buttons to themselves appear in the destination font, giving the user a signal as to what they will see if they choose that button.
4. body, p, td, ol, ul, select, span, div, input {
font: .9em/1.1em verdana, geneva, arial, helvetica, sans-serif;
}
Listing 12.18 (better known as sansStyle.css), just tells the browser that when it’s loaded, every tag that it covers should be displayed in .9em Verdana (or one of the other sans-serif fonts on the user’s computer).
5. body, p, td, ol, ul, select, span, div, input {
font: 1.1em/1.2em "Times New Roman", Times, serif;
}
In a complementary way, Listing 12.19 (also better known as serifStyle.css) tells the browser that every tag that it covers should be displayed in 1.1em Times New Roman (or again, any other serif font the browser can find).
Listing 12.18. This style sheet, sansStyle.css, changes all the text to a smaller, sans-serif font.
body, p, td, ol, ul, select, span, div, input {
  font: .9em/1.1em verdana, geneva, arial, helvetica, sans-serif;
}
Listing 12.19. This style sheet, serifStyle.css, changes the page text to a larger, serif font.
body, p, td, ol, ul, select, span, div, input {
  font: 1.1em/1.2em "Times New Roman", Times, serif;
}
Listing 12.20. This script handles setting the active style sheet.
window.onload = initStyle;
window.onunload = unloadStyle;
function initStyle() {
var thisCookie = cookieVal("style");
if (thisCookie) {
  var title = thisCookie;
}
else {
  var title = getPreferredStylesheet();
}
setActiveStylesheet(title);
var allButtons = document.getElementsByTagName("input");
for (var i=0; i<allButtons.length; i++) {
  if (allButtons[i].type == "button") {
    allButtons[i].onclick = setActiveStylesheet;
  }
}
}
function unloadStyle() {
var expireDate = new Date();
expireDate.setYear(expireDate.getFullYear()+1);
document.cookie = "style=" + getActiveStylesheet() + ";expires=" + expireDate.toGMTString() + ";path=/";
}
function getPreferredStylesheet() {
  var thisLink, relAttribute;
  var linksFound = document.getElementsByTagName("link");
for (var i=0; i<linksFound.length; i++) {
  thisLink = linksFound[i];
  relAttribute = thisLink.getAttribute("rel");
  if (relAttribute.indexOf("style") > -1 && relAttribute.indexOf("alt") == -1 && thisLink.getAttribute("title")) {
    return thisLink.getAttribute("title");
  }
}
return "";
}
function getActiveStylesheet() {
var thisLink;
var linksFound = document.getElementsByTagName("link");
for (var i=0; i<linksFound.length; i++) {
thisLink = linksFound[i];
if (thisLink.getAttribute("rel").indexOf("style") > -1 && thisLink.getAttribute("title") && !thisLink.disabled) {
return thisLink.getAttribute("title");
}
}
return "";
}
function setActiveStylesheet(inVal) {
var thisLink;
var linksFound = document.getElementsByTagName("link");

if (inVal) {
  if (typeof inVal == "string") {
    var title = inVal;
  }
  else {
    var title = inVal.target.id;
  }
}
else {
  var title = window.event.srcElement.id;
}
for (var i=0; i<linksFound.length; i++) {
thisLink = linksFound[i];
if (thisLink.getAttribute("rel").indexOf("style") > -1 && thisLink.getAttribute("title")) {
  thisLink.disabled = true;
  if (thisLink.getAttribute("title") == title) {
    thisLink.disabled = false;
  }
}
}
}
function cookieVal(cookieName) {
var thisCookie = document.cookie.split("; ");
for (var i=0; i<thisCookie.length; i++) {
if (cookieName == thisCookie[i].split("=")[0]) {
return thisCookie[i].split("=")[1];
}
}
return "";
}
6. var thisCookie = cookieVal("style");
if (thisCookie) {
var title = thisCookie;
}
else {
var title = getPreferredStylesheet();
}
setActiveStylesheet(title);
The initStyle() function in Listing 12.20 is loaded when the page runs, and its goal is to initialize everything that the page needs. Here, we’re checking to see if the user has a cookie already set that saved their preferred style. Our old buddy the cookieVal() function comes back from Chapter 9 to read the cookies and see if there’s one called “style”. If there is, its value is the style sheet we want; if not, getPreferredStylesheet() is called. Once the desired style sheet is known, setActiveStylesheet() is called to set the wanted appearance.
7. var allButtons = document.getElementsByTagName("input");
for (var i=0; i<allButtons.length; i++) {
if (allButtons[i].type == "button") {
allButtons[i].onclick = setActiveStylesheet;
}
}
The initStyle() function also needs to add event handlers to our buttons. Here, we tell them both to call setActiveStylesheet() when they’re clicked.
8. function unloadStyle() {
var expireDate = new Date();
expireDate.setYear(expireDate.getFullYear()+1);
document.cookie = "style=" + getActiveStylesheet() + ";expires=" + expireDate.
toGMTString() + ";path=/";
}
When the page is unloaded, we need to set the cookie for the future. The cookie’s expiration date is set to one year from today, getActiveStylesheet() is called to establish what the user currently has, and the cookie is written out for future use.
9. function getPreferredStylesheet() {
var thisLink, relAttribute;
var linksFound = document.getElementsByTagName("link");
If, when the page is loaded, there’s no cookie saying which style the user has previously chosen, our script needs to be able to figure out what the preferred style sheet is. That’s the goal of the getPreferredStylesheet() function in this step and the next.
10. for (var i=0; i<linksFound.length; i++) {
thisLink = linksFound[i];
relAttribute = thisLink.getAttribute("rel");
if (relAttribute.indexOf("style") > -1 && relAttribute.indexOf("alt") == -1 && thisLink.getAttribute("title")) {
return thisLink.getAttribute("title");
}
}
This function loops through each link tag, looking to see if each has a rel attribute, if that attribute has a value that contains “style”, if that attribute has a value that does not contain “alt”, and if the tag has a title attribute. If one is found that matches all these criteria, that’s the preferred style sheet, and its title attribute is returned.
To see which of the actual tags in our code is the preferred style sheet, look at the link tags in our HTML file. While there are three link tags, only two of them have title attributes. And of those two, one has a rel attribute of “stylesheet”, while the other is “alternate stylesheet”. Consequently, the preferred style sheet has to be default.
11. for (var i=0; i<linksFound.length; i++) {
thisLink = linksFound[i];
if (thisLink.getAttribute ("rel").indexOf("style") > -1 && thisLink.getAttribute("title") && !thisLink.disabled) {
return thisLink.getAttribute("title");
}
}
As mentioned above, we’re going to want to use a cookie to store the user’s chosen style sheet when they leave this site, so that they’ll be greeted with their favorite font when they return. While we could write out a cookie every time they click the style button, it’s a better idea to only write it out once when they leave the site. Here, the getActiveStylesheet() function (which is called when the page is unloaded, as we saw above) looks through all the link tags, chooses the one that’s currently enabled, and returns the title of that style.
12. var thisLink;
var linksFound = document.getElementsByTagName("link");
if (inVal) {
if (typeof inVal == "string") {
var title = inVal;
}
else {
var title = inVal.target.id;
}
}
else {
var title = window.event.srcElement.id;
}
As seen above, when the user loads this page, the setActiveStylesheet() function is called and passed a parameter that’s referred to inside the function as inVal. When setActiveStylesheet() is called after a button is clicked, however, there may or may not be a parameter passed, depending on which browser is being used and how it handles events. Here’s where we do a little checking to figure out how we got here and what the user wants to do. There are three possibilities:
• initStyle() called this function and passed it a string containing the preferred stylesheet. In this case, inVal exists and it’s a string, so title is set to inVal.
• A style button was clicked in a browser that supports W3C style events. In this case, inVal is automatically set to the event that triggered the function, so inVal will exist but it won’t be a string. When that happens, we know that the target of the event (what caused the event to trigger) is the button that was clicked, and the id of that button stores the style desired.
• A style button was clicked in a browser that doesn’t support W3C standards but does support the IE event model. If that’s the case, the inVal variable won’t exist, so we instead grab the style desired from window.event.srcElement.id.
13. thisLink = linksFound[i];
if (thisLink.getAttribute("rel").indexOf("style") > -1 && thisLink.getAttribute("title")) {
thisLink.disabled = true;
if (thisLink.getAttribute("title") == title) {
thisLink.disabled = false;
}
}
The setActiveStylesheet() function loops through all the link tags in the document, checking each one to make sure that it has both a rel attribute that contains “style” and an existing title attribute. If both of these are true, the link is first disabled and then (and only then) re-enabled if the title attribute is set to the title value.
So, if the current style sheet being used has the title attribute of “default”, and the user clicks the Lg Serif button, JavaScript sees that it should load the serif style sheet. There’s one link tag with a title of “serif”, so all others (i.e., the default style sheet, in this case) are disabled, and only the serif style sheet is turned on.