
Chapter 11. Set Your Images Free!: The 411 on downloading

Regardless of where your images end up down the road—in a framed wall collection, a starring role in a scrapbook layout, or perhaps as a new online profile picture—the first step of their journey begins when you free them from your memory card. (Thanks to Emir for capturing this image and indulging my obsession with all things red!)
Now that you’ve captured some great images, it’s time to liberate them from the confines of your memory card so you can start enjoying them! Generally speaking, this means moving your images to a computer.
Whether you’re a self-proclaimed computer geek or more of a technophobe, you’ll be happy to know there are several options to choose from (including one for the diehards who may prefer to leave the computer totally out of it).
The images your camera captures are stored on a memory card. Memory cards are available in several different formats, the most common of which are secure digital (SD) and compact flash (CF). Some camera models may use less common memory card formats such as Memory Sticks or xD cards.
The number on the card represents how much storage capacity it has—for example, 12 gigabytes versus 8 gigabytes. The larger the capacity, the more data the card can store, meaning the more photos you can save on them.
While it may be temping to purchase memory cards in the most ginormous capacity you can find, smaller capacity cards are helpful in that they force you to actually download the images now and then (instead of letting them pile up for six months). This reduces the number of images you would lose if your memory card becomes corrupt (or your camera is lost or stolen).

Kickin’ it old school
Although digital photography goes hand-in-hand with computers for most people, some folks out there really dig the way photo processing has been handled for years and don’t want to let computers come between them and the images they love. Back in the day, getting your photos processed meant stopping by your local shop, dropping off your film, then coming back a day or so later to pick up your prints (and corresponding negatives). There were no computers, no hard drives, and no cables.
If you prefer to keep it that way, it’s still entirely possible. Just grab your camera and head to your favorite photo processing shop. As long as they have a photo department with a kiosk, you’ll be all set. Take out your camera’s memory card, insert it into the kiosk, and follow the prompts on the screen to order the prints you want. Depending on the options you choose, your prints may be ready in under an hour!
If you want to keep the original files (the digital equivalent of your negatives), most stores will burn the files to disc for a small additional fee—no computer required.
(See Chapter 12, “Back It Up Ya’ll! Automation Is Your Friend,” for more information on the longevity of CDs and DVDs for long-term archival purposes.)
Connecting with your computer
For most people, the next step after capturing a collection of images is to get them transferred onto their hard drive. To do so, you’ll need a way to connect your memory card with your computer. As luck would have it, there’s more than one way to do so, and no matter which method you choose, the process is easy.
Tip
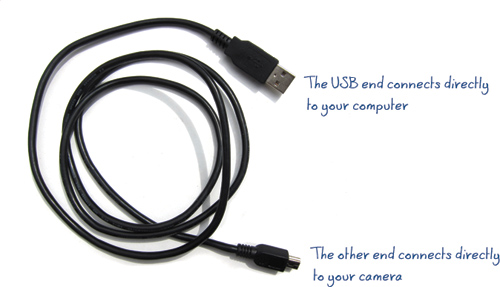
Even though the USB end of the cable is universal, the part that connects with the camera varies from model to model. If you have more than one camera (and therefore more than one cable), it is helpful to label the cables so you can easily distinguish one from another.
Direct Connection
Using the USB cable that came with your camera (Figure 11.1), you simply plug one end into the camera and the other end into your computer. Once you get everything connected, make sure your camera is powered on. With some camera models, you may actually have to switch the camera into playback mode for it to be recognized by your computer.
Figure 11.1. USB cables like this connect your camera to your computer. Although the USB side is universal, the part that connects to the camera varies from model to model.
Tip
Whenever you connect your camera directly to your computer via a USB cable, there’s a good chance you’ll forget to shut the camera off once you finish transferring the files. This means it might be left on the whole time you’re perusing your handiwork, oohing and aahing over all your great shots, and the batteries may be dead the next time you need the camera. For this reason, a card reader is highly recommended. (See the next section.)
Keep in mind that your camera will need to remain powered on during the entire image transfer process, thereby draining your batteries. (Bummer!) You can conserve power by making a conscious effort to remember to shut your camera off once the process is complete.
Card Readers
I’ve made several house calls to folks in digital photo distress who could’ve benefited from one of these little gizmos! Card readers, like the one seen in Figure 11.2, act as a go-between, helping move data from the memory card to the computer. Card readers offer two great benefits: You don’t have to keep track of which USB cable belongs to which camera, and you don’t drain your camera’s batteries while transferring the files. Pretty cool, eh?
Figure 11.2. Card readers are a convenient tool for downloading images. Some models accept a wide variety of memory card formats, whereas others take only a single type. The one pictured here reads both SD and CF cards, so I can use it whether I’m downloading from my point and shoot, or my dSLR. The small size makes it great for travel, too!
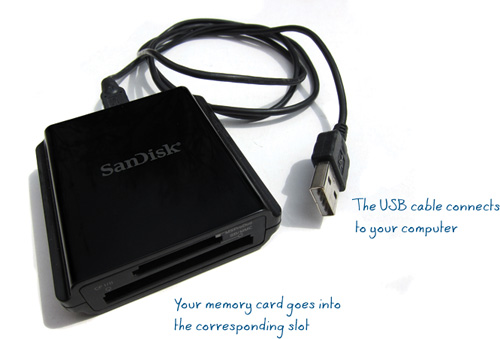
A card reader plugs directly into your computer the same way your camera’s USB cable does when downloading with a direct connection. So, instead of plugging in your camera, you put your memory card inside the corresponding slot on the card reader, then plug the card reader itself into the computer. No camera required!
Card reader models vary in terms of data transfer speeds and the types of memory cards they accept. In most cases, however, you can get your hands on one starting for around $10 from most any place that sells cameras. They’re a great buy, especially if you shoot with a camera that uses compact flash (CF) cards. (Card readers that are built into computers don’t accept CF cards.)
Built-In Card Readers
Depending on the make and model of your computer, it may come with the convenience of a built-in card reader. The reader is often located on the side of the monitor, the edge of the keyboard, or possibly next to the USB ports. Most newer laptops have them, too.
Like external card readers, built-in card readers also vary from system to system and may accept a wide variety of memory cards or only a specific format. If you’re looking to purchase a new computer, and having a built-in card reader is important to you, be sure to check the compatibility between the type of card(s) the computer will read and what your camera requires.
Eye-Fi
If you’d rather give the cat a bath (yikes!) than spend even a single moment sitting at the computer, drudgingly downloading images, an Eye-Fi card may be your most convenient (and fun) option of all!
A special kind of SD memory card, it looks and behaves just like a regular SD memory card, except for the fact that when your camera is anywhere within your established Wi-Fi network, the images will automatically download themselves.
Yep. You read that right. No hassles. No cables. Not even a card reader. Your photos will download themselves.
In fact, in addition to transferring themselves to your computer, you can set it up so that the images are automatically posted to photo sharing sites including Facebook and Flickr, as well as popular printing sites such as Shutterfly, Snapfish, and Kodak Gallery—instantly.
Check it out at www.eye.fi.
Downloading your files
Once you connect the memory card to your computer, you have multiple options for transferring your files. If you’re like many people, you’ve probably amassed quite the collection of camera software over the years—because each new camera you buy typically comes with additional software. Eventually, it can feel like a mess.
Believe it or not, you don’t actually need software of any type to download your photos. You can just use drag and drop files from your camera to your hard drive, whether you’re on Windows or a Mac. Heck, you can even copy them into whatever folder you want. But, as efficient and clean cut as dragging and dropping can be, a good image-editing or file-management program will also help you manage and organize your photos in addition to downloading them.
There are countless programs to choose from. As you already know, there’s the software that came with your camera, various free programs such as Picasa, and more robust solutions (including Photoshop Elements and the rest of the Adobe product family). Although these programs vary dramatically in some aspects, they’re each capable of helping you download images from your memory card to your hard drive.
Regardless of which software (if any) you choose to use, keep in mind that while your photos will be stored on your hard drive, they’re not stored within the software itself. Even though you may use the software to view, interact with, and possibly even edit your images, the software itself is not a storage space—just a database that references your images, wherever they happen to be stored on your hard drive. (It’s similar to how the computer system at the library keeps track of all the books on the shelves. You could remove the computer system from the library, but the books would still be on the shelves, right where you left them.)
You may be reading this and thinking, “Duh!” But the reality is, even people who understand this concept sometimes have irrational fears about removing or switching software, afraid they’re inadvertently delete or otherwise lose their photos. Just to be clear—the only thing you would lose if you uninstall any camera/photo software would be any organizational structures you created within the software (such as image tags and keywords). But your images? They stay right where they are.
Where Exactly Do the Photos Go?
The specific location on your hard drive that your images are downloaded to is really up to you! Most software programs automatically default to downloading each batch of images into a new folder created within your Pictures (or My Pictures) folder.
Unless you change the default settings and name the folder something specific like “Colorado Yurt Trip,” the new folder will most likely be automatically named with the download date. For example, if you downloaded photos on April 4, 2011, the folder might be named “2011 04 18,” or some such variation. If you prefer a different folder naming structure, you can probably specify that in preferences or customize the folder name each time you perform a download.
Every software program is different, but generally you’ll find a screen that looks something like Figure 11.3, captured from the Photoshop Elements standard download dialog box.
Figure 11.3. The standard Photoshop Elements download window makes it easy to specify where and how you want your images saved, name your own subfolders, rename your images, and more!
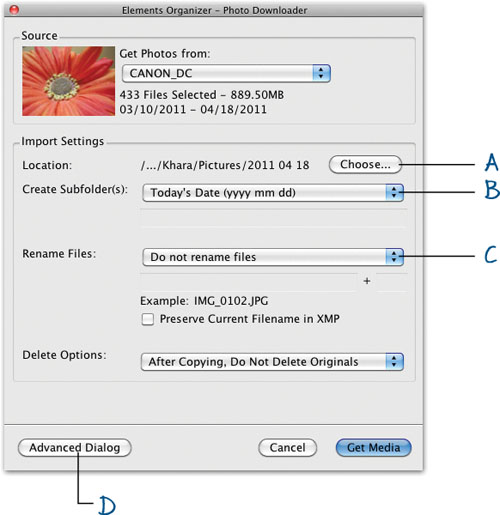
A. Location refers to where (on your hard drive) the photos will be downloaded. In this example, they will go into the Pictures folder and be put within a subfolder named: 2011 04 18 (the download date).
B. If you wanted to change the name of the subfolder to something other than the default setting (usually the current date), this is where you would do it.
C. The option to rename your images as you download them often includes the ability to add a descriptive phrase and/or numerical sequence such as Colorado_001, followed by Colorado_002, etc. (In this example, the images are not renamed.)
D. Some software programs offer additional options in an advanced dialog window.
Some software programs, like Photoshop Elements, offer additional options—as well as thumbnail previews—in an advanced dialog box, usually accessible from within the basic or standard dialog box. Look for a button or link labeled “more options” or “advanced” for helpful features like being able to preview image thumbnails, sort into groups, or add custom metadata.
Whichever software you use, make sure to pay close attention to the settings for the location and subfolder, as this is where you tell the computer which root folder to store your photos in and what you’d like the subfolder to be called.
The text that appears next to “location” is the path that leads to where your photos will be stored on your hard drive. Each forward slash (/) represents a folder. Collectively, this string of text is referred to as a “file path.” A file path such as User Name/Pictures/2011 04 18 tells you that the photos you’re about to download will be put into a folder named 2011 04 18, inside your Pictures folder, on your hard drive.
Knowing the path means you’ll know where to find your images if you later decide to uninstall the software. Instead of saying, “Help! Where the heck are my photos!?” you could be asking, “Honey, which one of these cute shots of the kids should we put on the holiday card this year?”
What to do with the Memory Card?
Some image-handling programs give you the option to automatically delete the original files from your memory card after they’re downloaded. While this may sound convenient, it’s generally not a good practice. If something goes wrong during the file transfer, and you let the software delete the original files from your card, you could have a serious problem.
Tip
Don’t be a download slacker! Sure, it’s easy to let your images pile up on your memory card for months and months at a time. But the sooner you get them downloaded, the sooner you can get them backed up, and the safer they’ll be. (See Chapter 12 for details on backing up your files.)
Therefore, once your images have been downloaded, verified, and backed up (see Chapter 12), it’s recommended that you use your camera (not the computer or any of the options in your software program) to reformat the memory card, clearing and resetting it for additional use. (This function is typically found within your camera’s menu system. Check your user guide for details.)
At this point, you might be thinking, “But memory cards are so cheap these days. Doesn’t it make sense to just buy a new one and keep the used one as an additional backup?” Perhaps—until you ask yourself where you’d store all those little memory cards (in a shoe box?) and how you’d know which one to reach for if disaster struck and you were looking for a specific image.
If it helps you sleep better at night knowing you’ve got a copy of your photos on a memory card somewhere, then more power to ’ya (the card manufacturers certainly won’t complain!). But for security and convenience, I’d still recommend a more robust backup system. The next chapter will help you with that.
Chapter snapshot
![]()
Downloading doesn’t have to be a drag! Keep these things in mind and it’ll be a breeze:
• To get the images from your camera onto your computer, you can connect the camera to the computer (with the camera’s USB cable), use a card reader (either external or built-in), or go for a special Eye-Fi memory card with a built in Wi-Fi connection to automate the entire download process.
• If you prefer to leave computers completely out of it, just bring your memory card to the kiosk at your favorite photo processor and order the prints you want. You can also order a CD or DVD of the images for safekeeping.
• Regardless of which software (if any) you use to facilitate the downloading process, remember that the images are stored on your hard drive—not within the software itself.