
4. Marking Clips
In This Chapter
One of the most fundamental aspects of the editing process is identifying the portions of your source clips you want to use in your final edit. Think of this concept as marking an area of a clip.
In addition to marking the areas you want to use in your edit, you will also frequently do the opposite: mark the sections you definitely don’t want to use.
Furthermore, there are many occasions where you’re not quite sure which parts you will want to use (or not use), so you’ll want to mark those with more descriptive information than just “yes” or “no.”
Finally, you may want to highlight a particular frame or section of a clip to alert yourself (or your fellow editors) of some bit of important information about the clip.
This chapter will cover all of these different ways of identifying, selecting, and highlighting bits of clips.
Making a Selection
The most straightforward and essential aspect of any sort of clip marking is the idea of selecting the portion of the clip you want to mark. You can use such a selection to add a clip rating or a keyword. Most importantly, you’ll used it to identify what portion of the source clip to edit into the project.
You can make selections with the mouse, which provides instant visual feedback but tends to be imprecise. You can also make them from the keyboard.
This latter method is especially useful in that it allows you to identify the desired selection while the clip is playing. Such on-the-fly clip marking allows you to simulate the experience of your viewers (who never get to step through the shots or stare at any individual frame) and make more accurate and effective decisions.
To make a selection with the mouse
1. If it’s not already enabled, press S to activate skimming, then skim the clip to find the frame where you want the selection to begin ![]() .
.
![]() Use the skimmer to find the frame where you want the selection to start.
Use the skimmer to find the frame where you want the selection to start.
2. Click that frame and drag to the right until you reach the frame where you want the selection to end ![]() .
.
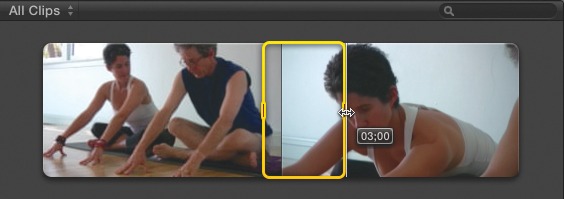
![]() Drag to the last frame you want to include in the selection.
Drag to the last frame you want to include in the selection.
A selection is made and illustrated with a thick yellow border.
If you click the clip’s filmstrip without dragging, FCP will select the entire clip. You could deselect and try again, or simply click and drag the adjustment handles (located about halfway up the clip’s yellow selection border) to fine tune your selection.
To make a selection from the keyboard
1. Press the Spacebar or L to play the clip.
2. When you reach the frame where you want the selection to begin, press I.
The beginning of the selection is marked. By default, the selection extends to the end of the clip media ![]() .
.
![]() Pressing I creates an In point and automatically adds an Out point at the end of the media.
Pressing I creates an In point and automatically adds an Out point at the end of the media.
3. When you reach the frame where you want the selection to end ![]() , press O.
, press O.
![]() Press O to indicate the frame where the selection should end.
Press O to indicate the frame where the selection should end.
You can also combine these methods, using the mouse or keyboard interchangeably during the selection process.
Rating Clips
You can rate any selection (including a whole clip) in one of two ways: You can rate it as a Favorite or you can rate it as Rejected. While this “in or out” system may seem overly simplistic, it’s a great way to quickly identify the most fundamental identity of your footage.
Footage can be rated a Favorite or Rejected. You cannot rate a portion of a clip as both. If a clip is currently rated as a Favorite, and you reject it, the Favorite rating is removed and replaced with a Rejected rating (and vice versa).
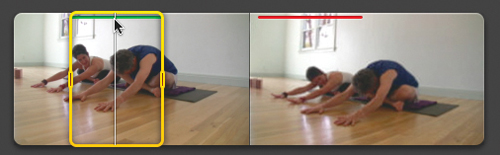
To mark a clip as a Favorite
1. Select a clip or a portion of a clip ![]() .
.
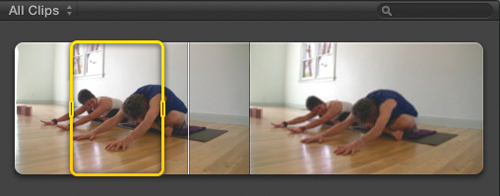
![]() Select the range you want to rate.
Select the range you want to rate.
2. Click the Mark Favorite button ![]() , or press F.
, or press F.
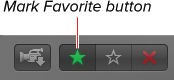
![]() Click the Mark Favorite button to rate the clip favorably.
Click the Mark Favorite button to rate the clip favorably.
The selection is marked as a Favorite, and a green bar is added to the clip’s filmstrip ![]() .
.
![]() The rated section is marked with a green bar in the filmstrip, and a Favorite item is added to the clip in list view.
The rated section is marked with a green bar in the filmstrip, and a Favorite item is added to the clip in list view.
To reject a clip
1. Select a clip or portion of a clip ![]() .
.
![]() Mark the area you want to reject.
Mark the area you want to reject.
2. Click the Reject button ![]() , or press Delete.
, or press Delete.
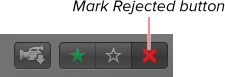
![]() Click the Reject button in the toolbar.
Click the Reject button in the toolbar.
The selection is marked as Rejected, and a red bar is added to the clip’s filmstrip ![]() .
.
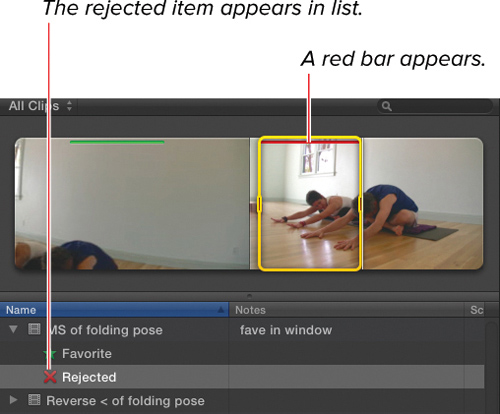
![]() The rejected section of the filmstrip is marked in red.
The rejected section of the filmstrip is marked in red.
If the Browser is set to view Favorites and Unrated clips only (as it is by default), rejecting a clip will make that clip seem to disappear. To view it again, see the “Restricting the View” section.
Rejecting a clip doesn’t delete it from the event. It merely marks it with the Rejected tag. You can, of course, also delete a clip, which will remove it from the event, and if it’s the only instance of that clip (in other words, it doesn’t appear in another folder or project), the source file is moved to the trash.
To delete a clip from an event
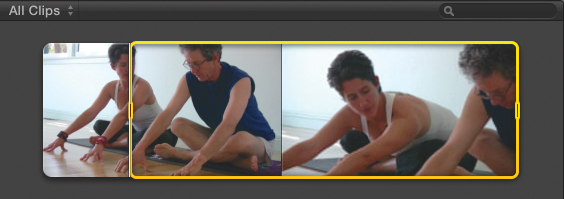
1. Select a clip or a range of a clip (or a group of clips) ![]() .
.
![]() Select the items you want to delete.
Select the items you want to delete.
2. Press Command-Delete.
The clip is removed from the event.
If the clip being deleted is the last remaining instance in that event, a warning will appear ![]() .
.
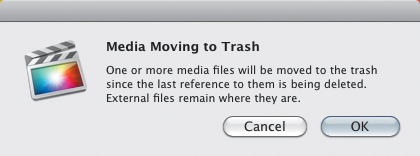
![]() A warning will appear if you’re deleting the only instance of the clip.
A warning will appear if you’re deleting the only instance of the clip.
3. Click OK.
The clip is removed from the event, and the file on disk is moved to the trash.
To select a rated area
• Click directly on the colored bar in the clip’s filmstrip ![]() .
.

![]() You can select a marked range by clicking the colored bar.
You can select a marked range by clicking the colored bar.
The marked range becomes selected ![]() .
.
![]() Click the bar to select the specific area.
Click the bar to select the specific area.
This technique works for any colored bar in the filmstrip, which could be ratings, keywords, or analysis keywords.
Unrating Clips
Sometimes you may change your mind about a clip’s rating, or you may find you’ve accidentally rated the wrong portion of a clip. Fortunately, you can unrate a clip as easily as you can rate it.
If only a portion of a clip is rated, you cannot unrate part of that range. You can unrate the entire clip, which will unrate any rated sections, or you can select a range that contains the rated section entirely and unrate that.
To unrate a clip
1. Select the rated clip, or select a range equal to or greater than the rated range ![]() .
.

![]() To unrate a clip, you must select a range equal to or longer than the range you’re unrating.
To unrate a clip, you must select a range equal to or longer than the range you’re unrating.
2. Click the Unrate button ![]() , or press U.
, or press U.
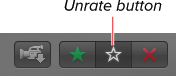
![]() Click the Unrate button in the toolbar.
Click the Unrate button in the toolbar.
Any ratings within the selection are removed ![]() .
.

![]() Any rated section within the selected area is unrated.
Any rated section within the selected area is unrated.
Restricting the View
One of the most powerful aspects of the clip rating system is that the Event Browser view can be filtered to hide clips marked Rejected, to show only those marked as Favorites, and so on.
When such a filter is applied, Clip view is updated dynamically. For example, if your view is set to Hide Rejected, rejecting a clip (or a portion of a clip) makes that rejected bit disappear from the window.
It’s not gone forever—you can get it back by changing the filter setting. But often hiding it automatically that way is a great, quick way to weed out the junk and limit your Event Browser view to show just the good stuff.
To restrict the Event Browser view by rating
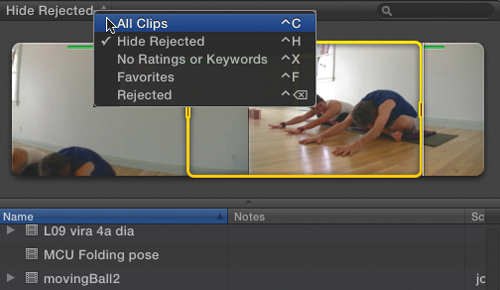
• Click the Filter pop-up menu, and choose one of the following settings:
• All Clips (Control-C) ![]()
![]() Choose a filter from the Filter pop-up menu.
Choose a filter from the Filter pop-up menu.
• Hide Rejected (Control-H)
• No Ratings or Keywords (Control-X)
• Favorites (Control-F)
• Rejected (Control-Delete)
The Event Browser is filtered to show only the clips described in the filter setting.
These filters are saved with the event, collection, or folder in the Event Library. Selecting a different item in the Library will potentially switch the filter setting.
You can also filter the view on a wide range of other criteria. For more, see “Searching for Clips” later in this chapter.
Adding Keywords
Although clip ratings are extremely helpful, they’re also quite limited. Fortunately, FCP allows you to add far more nuanced identifiers to clips or clip ranges. You can add your own custom keywords to any selection. This means you can choose your own descriptive text to identify the contents of a particular selection.
You might choose keywords that describe the content, such as the name of the person or subject, the location where the scene is shot, or the particular action that’s taking place. You could also use keywords to identify how the footage was filmed. For example, is it a moving camera? Wide shot? Handheld? Or out of focus? You could add keywords judging the quality of the shot: Is it a good take? No good? Director’s favorite?
You can combine all of these ideas and add as many keywords as you desire. Multiple keywords can overlap, and later you’ll be able to find clips based on any or all of these identifiers whenever you need them.
To add one or more keywords
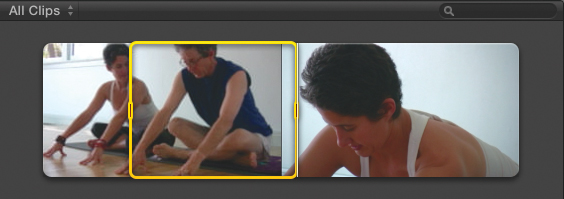
1. Select a clip or a range within a clip ![]() .
.
![]() Select the area you want to keyword.
Select the area you want to keyword.
2. Click the Show Keyword Editor button in the toolbar ![]() (or press Command-K).
(or press Command-K).
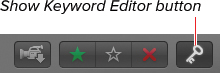
![]() Click the Show Keyword Editor button in the toolbar.
Click the Show Keyword Editor button in the toolbar.
The Keyword Editor opens ![]() .
.
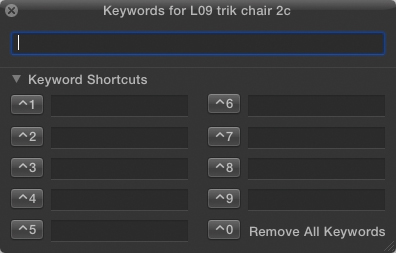
![]() The Keyword Editor
The Keyword Editor
3. Type the keyword in the Keyword Editor ![]() , and press Enter.
, and press Enter.
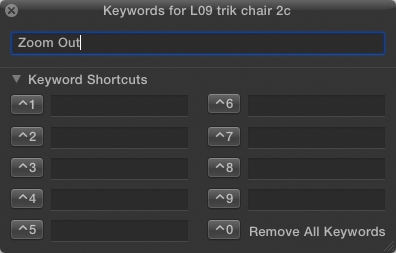
![]() Type a keyword into the textbox at the top of the Keyword Editor.
Type a keyword into the textbox at the top of the Keyword Editor.
The keyword is added to the selected range. A blue bar appears in the clip’s filmstrip ![]() .
.
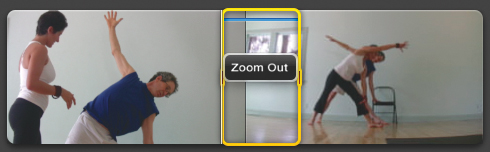
![]() When you press Enter, the keyword is added to the selected range. The range is marked with a blue bar.
When you press Enter, the keyword is added to the selected range. The range is marked with a blue bar.
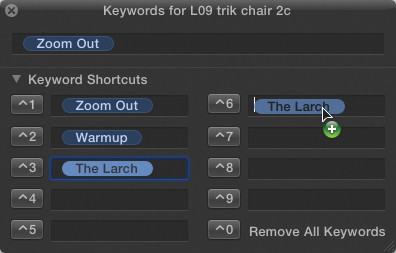
Additionally, the keyword is added to one of the Preset Keyword slots in the Keyword Editor ![]() . This makes it easy to add the same keyword to multiple clips.
. This makes it easy to add the same keyword to multiple clips.

![]() When you add a keyword, it’s also automatically added to one of the preset slots, making it easy to consistently add the same keyword to multiple clips.
When you add a keyword, it’s also automatically added to one of the preset slots, making it easy to consistently add the same keyword to multiple clips.
Once you assign keywords to the Preset Keyword slots in the Keyword Editor, you can apply those keywords to other clips by pressing the associated shortcut key without even opening the Keyword Editor.
4. To add additional keywords, type additional text in the Keyword Editor, and press Enter.
5. To add keywords that have already been saved as presets in the Keyword Editor, click the shortcut key button (or press the shortcut on the keyboard).
The keyword is added to the selected range.
When you expand a clip containing a keyword by clicking the disclosure triangle to the left of the clip icon in the Event Browser in list view, keywords appear in a list beneath the clip ![]() .
.
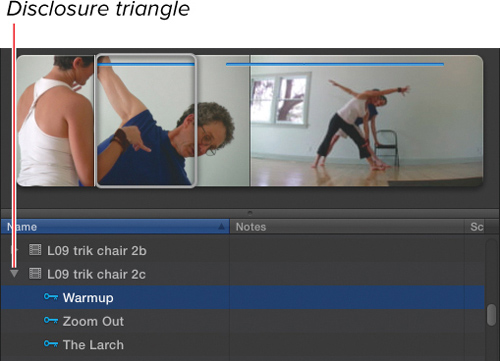
![]() To see the keywords listed in the Event Browser, expand the clip’s disclosure triangle.
To see the keywords listed in the Event Browser, expand the clip’s disclosure triangle.
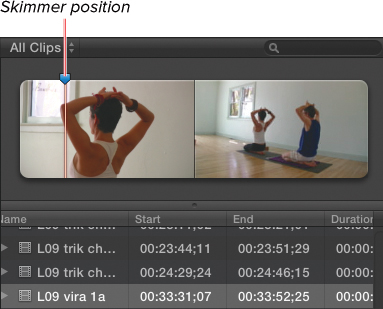
The Skimmer Info window (opened by pressing Control-Y) also identifies any markers under the current skimmer position.
Notice that Ratings, Analysis Keywords, and Markers also appear in this list. Ratings and markers are also described in this chapter. Analysis keywords are described in Chapter 6, “Importing Footage.”
If more than one keyword covers the same range in time, both keywords are listed on a single line in the list. If they cover separate ranges, they are listed separately.
Selecting any of the items in the list automatically selects the range associated with the item in the filmstrip ![]() .
.
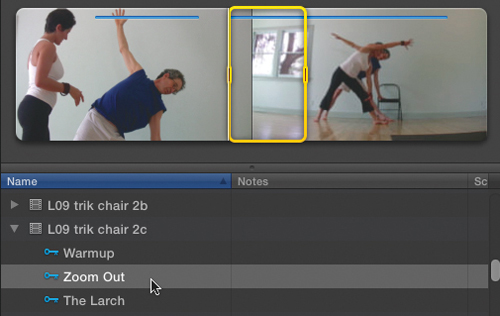
![]() Selecting a keyword in the list selects the range of the clip covered by the keyword in the filmstrip.
Selecting a keyword in the list selects the range of the clip covered by the keyword in the filmstrip.
To remove a keyword from a clip
1. Select the keyword in the Event Browser by clicking its name in the list or by clicking the colored bar associated with that keyword in Filmstrip view ![]() .
.
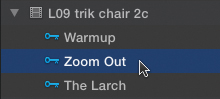
![]() Select the keyword you want to remove.
Select the keyword you want to remove.
2. Choose Mark > Remove All Keywords ![]() , or press Control-0 (zero).
, or press Control-0 (zero).
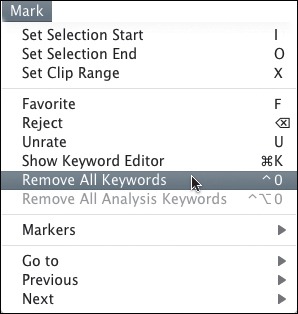
![]() From the Mark menu, choose Remove All Keywords.
From the Mark menu, choose Remove All Keywords.
The keyword is removed.
To remove all keywords from a clip
• Right-click a clip in the Event Browser, select a keyword, and then choose Mark > Remove All Keywords from the shortcut menu ![]() ; or press Control-0 (zero).
; or press Control-0 (zero).
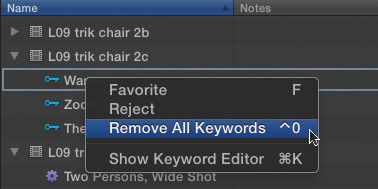
![]() Right-click a clip, and choose Remove All Keywords.
Right-click a clip, and choose Remove All Keywords.
All keywords for the selected clip are removed.
To copy a keyword to a different slot in the Keyword Editor
• Drag the text of the keyword to a new position ![]() .
.
![]() You can copy a keyword from one slot to another in the Keyword Editor.
You can copy a keyword from one slot to another in the Keyword Editor.
You can drag multiple keywords to a single preset slot ![]() . Pressing that shortcut will add all the keywords at once.
. Pressing that shortcut will add all the keywords at once.
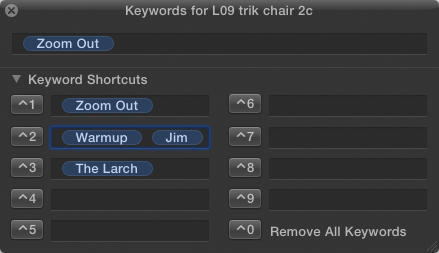
![]() You can also add multiple keywords to the same slot.
You can also add multiple keywords to the same slot.
To remove a keyword from the Keyword Editor
• Select the text of the keyword you want to remove, and press Delete.
The selected text is deleted ![]() .
.
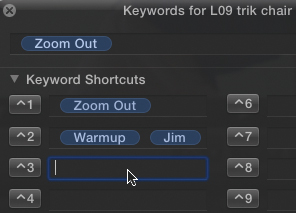
![]() To delete a keyword from the Keyword Editor, select the text and press Delete.
To delete a keyword from the Keyword Editor, select the text and press Delete.
Keyword Collections
Whenever you add a keyword to a clip in an event, a Keyword Collection is automatically created.
Clicking a Keyword Collection in the Event Library displays a list of all the clips containing that keyword in the Event Browser.
Dragging a clip onto an existing Keyword Collection automatically adds that keyword to the clip. This allows you to effectively use Keyword Collections like folders to organize your clips.
To manually create a Keyword Collection
1. Right-click an event in the Event Library, and choose New Keyword Collection ![]() ; or press Shift-Command-K.
; or press Shift-Command-K.
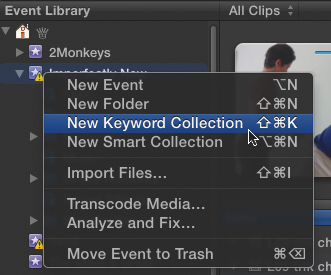
![]() Right-click an event, and choose New Keyword Collection.
Right-click an event, and choose New Keyword Collection.
An untitled Keyword Collection appears ![]() .
.
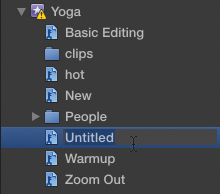
![]() A new Keyword Collection is added.
A new Keyword Collection is added.
2. Type a keyword as the name of the collection and press Enter ![]() .
.
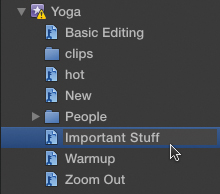
![]() Rename the Keyword Collection with the new keyword.
Rename the Keyword Collection with the new keyword.
3. Drag clips or clip ranges from the Event Browser onto the Keyword Collection to add that keyword to the selection ![]() .
.
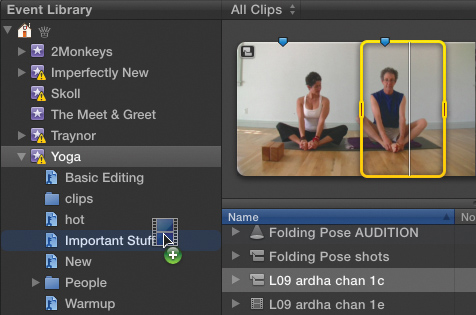
![]() Drag clips to the Keyword Collection to add the keyword to that clip.
Drag clips to the Keyword Collection to add the keyword to that clip.
To delete a Keyword Collection
• Select the Keyword Collection in the Event Library, and press Command-Delete.
The Keyword Collection is deleted, and the keyword is removed from any clips that previously contained it.
Using Markers
Markers are reference pointers you attach to a clip, and they have a variety of uses. Over the course of your work, you may find that you need to identify specific moments in your footage. You might want to mark an area of a clip that is out of focus, or you might want to mark the specific frame where a car door closes and a sound effect is required. Any time you want to add a note for yourself or your collaborators, you can simply add a marker. And markers can contain text, so you can explain why you put it there.
Markers appear both in the Event Browser and the Timeline and can be one of three colors:
![]() Blue Marker: Normal markers
Blue Marker: Normal markers
![]() Red Marker: Uncompleted To Do Item
Red Marker: Uncompleted To Do Item
![]() Green Marker: Completed To Do Item
Green Marker: Completed To Do Item
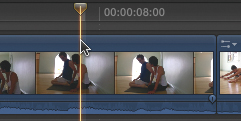
Markers act as snap points. By adding a marker on a specific frame, you make it very easy to align another clip right to that frame. For example, if you add a marker exactly where you want a title to appear, when you connect the title, you can snap it right to that marker and ensure the precise placement you desire ![]() .
.
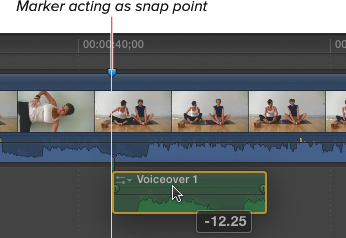
![]() Use markers and Timeline snapping to help you align your clip elements and make precision editing easy. In this example, the first frame of the audio clip is snapping to the marker in Shot_01.
Use markers and Timeline snapping to help you align your clip elements and make precision editing easy. In this example, the first frame of the audio clip is snapping to the marker in Shot_01.
Markers stay locked to the specific frame where you place them. As you insert or delete other clips in your edited project, any clip markers you’ve placed will ripple along with the clip they’re attached to—moving earlier or later in time to stay aligned with the marked frame.
If you delete a clip that contains a marker, Final Cut Pro will delete that marker as well.
Markers are just tools to aid in your editing work. They have no impact on the playback of your video. They do not appear in the Viewer or when you export or share your finished work.
You can add markers either in the Event Browser or in the Timeline. In either case, the procedure is the same.
To add a marker
1. Move the playhead to the frame you want to mark ![]() ; then press M.
; then press M.
![]() Position the playhead or skimmer on the frame where you want the marker to appear.
Position the playhead or skimmer on the frame where you want the marker to appear.
A marker appears at the specified frame. If skimming is on, the marker will be placed at the skimmer’s position, not the playhead’s.
2. To add comments to the marker, press M a second time to open the Modify Marker window ![]() .
.
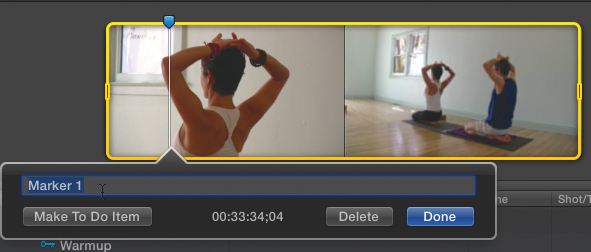
![]() Press M a second time to open the Modify Marker window and add marker text.
Press M a second time to open the Modify Marker window and add marker text.
Any markers you add to a clip in the Event Browser will be edited into the Timeline along with the clip—even if you use the clip more than once.
You can add markers on-the-fly by pressing M while the video is playing. Pressing M twice will open the Modify Marker window.
To add or modify marker text
1. Move the playhead to the marker you want to modify ![]() . Then press Shift-M.
. Then press Shift-M.
![]() Move the playhead to the marker. Markers get a little bit bigger when you position the pointer directly over them.
Move the playhead to the marker. Markers get a little bit bigger when you position the pointer directly over them.
The Modify Marker window opens.
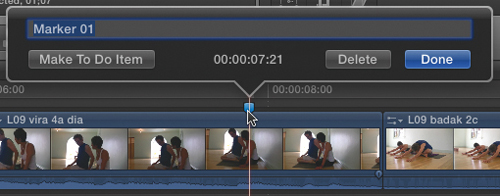
2. Type descriptive text in the Marker name field ![]() . Then click Done.
. Then click Done.
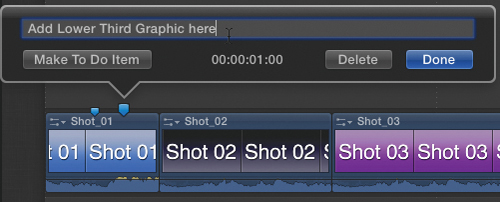
![]() The Modify Marker window points to the marker that it controls.
The Modify Marker window points to the marker that it controls.
The text is saved with the marker.
Once you’ve created a marker, it’s a good idea to add some text to clarify why you put it there. Later you can search for that text in the Event Browser or in the Timeline Index and quickly find the marker.
To delete a marker
1. Position the playhead or skimmer directly over the marker you want to delete; then press Shift-M.
The Modify Marker window opens.
2. Click Delete ![]() .
.
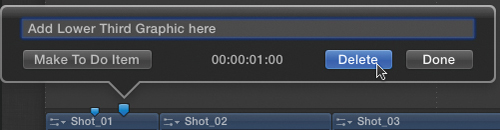
![]() To delete a marker, you can also right-click it and choose Delete Marker from the shortcut menu.
To delete a marker, you can also right-click it and choose Delete Marker from the shortcut menu.
The Modify Marker window closes, and the marker is deleted.
You can also delete a marker under the playhead without opening the Modify Marker window by pressing Control-M.
To delete all markers in a selection
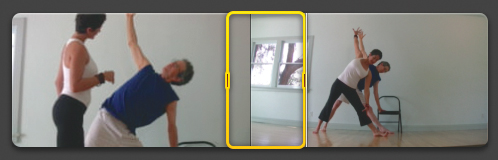
• Select a clip or range in which you want to delete all markers ![]() , and then do one of the following:
, and then do one of the following:
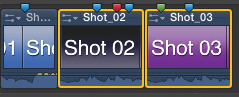
![]() Select the markers you want to delete.
Select the markers you want to delete.
• Press Control-Shift-M.
• Choose Mark > Markers > Delete Markers in Selection.
All markers within the selection are removed ![]() .
.

![]() You can select a whole clip, a portion of a clip, or multiple clips as shown here.
You can select a whole clip, a portion of a clip, or multiple clips as shown here.
To delete all markers in a project, press Command-A to select all of them, and then press Control-Shift-M to delete the markers. Wait until your client has departed before you do this.
To Do Items
One of the most common uses for markers is to identify tasks that need to be completed. Editors often go through a project and mark each location where a sound effect (or an audio fix) is needed. You can use markers to take notes during a screening, adding markers at edit points that need finessing. FCP offers a special type of marker called a To Do Item.
To Do Items act just like regular markers except they appear red. To Do Items you’ve marked as completed appear green, so you can see, at a glance, which tasks have been addressed and which are still outstanding. This can be especially helpful when collaborating with another editor.
To add a To Do Item
1. Position the playhead or skimmer over the frame where you want to mark a To Do Item ![]() .
.
![]() Identify a spot where some work still needs to be done.
Identify a spot where some work still needs to be done.
2. Press Option-M to add a marker and simultaneously open the Modify Marker window.
The Modify Marker window opens.
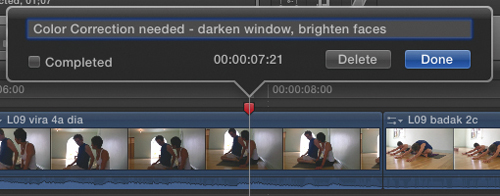
3. Add text to explain what task needs completing ![]() .
.
![]() Type your To Do Item in the text field. Any existing marker can be converted into a To Do Item in the Modify Marker window.
Type your To Do Item in the text field. Any existing marker can be converted into a To Do Item in the Modify Marker window.
4. Click the Make To Do Item button on the left side of the window; then click Done.
The button turns into a Completed checkbox and the marker turns red ![]() .
.
![]() To Do Item markers are indicated by their red color.
To Do Item markers are indicated by their red color.
5. Click Done.
The Modify Marker window closes.
To convert a regular marker to a To Do Item
• Right-click the marker, and choose To Do from the shortcut menu ![]() .
.
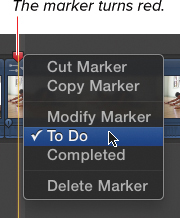
![]() To turn a To Do Item back into a regular marker, open the shortcut menu and uncheck To Do.
To turn a To Do Item back into a regular marker, open the shortcut menu and uncheck To Do.
To mark a To Do Item as completed
• Right-click the marker, and choose Completed from the shortcut menu ![]() .
.
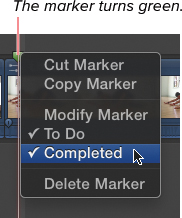
![]() Quickly mark a To Do Item as completed using the shortcut menu.
Quickly mark a To Do Item as completed using the shortcut menu.
Completed To Do Items appear as green markers.
Moving Markers
Markers can be moved frame by frame, or they can be relocated from one place to another. You can also copy a marker to create a duplicate in a new location.
If you were setting markers to indicate where footstep sounds should go, rather than having to type footstep in a dozen different markers, you could type it once, copy that marker, and just paste a new marker for each successive footfall.
To nudge a marker
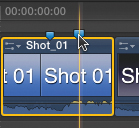
1. Position the playhead or skimmer directly over the marker you want to move.
2. Press Control-< to nudge the marker to the left or Control-> to nudge the marker to the right.
The marker is moved one frame at a time ![]() .
.
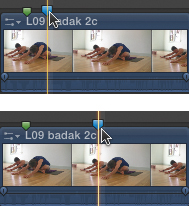
![]() This figure shows the blue marker before and after being nudged. Note that you can’t nudge a marker across clip boundaries, but you could cut and paste it in a new location.
This figure shows the blue marker before and after being nudged. Note that you can’t nudge a marker across clip boundaries, but you could cut and paste it in a new location.
To move a marker to a new location
1. Right-click the marker, and choose Cut Marker from the shortcut menu ![]() .
.
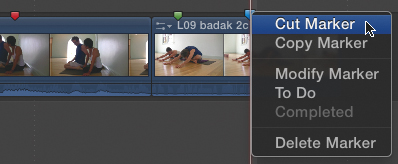
![]() Choose Cut Marker from the marker’s shortcut menu. Cutting a marker copies it to the clipboard and replaces any other data currently stored there.
Choose Cut Marker from the marker’s shortcut menu. Cutting a marker copies it to the clipboard and replaces any other data currently stored there.
2. Position the playhead or skimmer on the frame where you want the marker to be moved.
3. Press Command-V.
The marker is pasted in the new location ![]() .
.
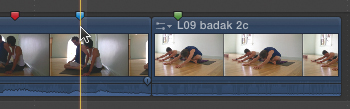
![]() The marker is pasted in the new location. Cut and paste is the only way to move a marker across a clip boundary.
The marker is pasted in the new location. Cut and paste is the only way to move a marker across a clip boundary.
To duplicate a marker
1. Right-click the marker, and choose Copy Marker from the shortcut menu ![]() .
.
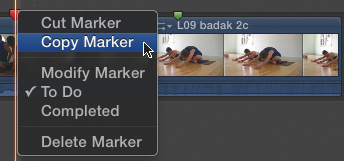
![]() Choose Copy Marker from the shortcut menu. Copy a marker when you want to duplicate it.
Choose Copy Marker from the shortcut menu. Copy a marker when you want to duplicate it.
2. Position the playhead or skimmer at the frame where you want to place your duplicate marker; then press Command-V.
The duplicate marker appears at the new location ![]() .
.
![]() Press Command-V, and the duplicate marker appears at the new location. In this example, a To Do Item marker has been copied and then pasted several times.
Press Command-V, and the duplicate marker appears at the new location. In this example, a To Do Item marker has been copied and then pasted several times.
Navigating to Markers
FCP offers a variety of ways to find and navigate to your markers both in the Event Browser and in the Timeline.
If you typically use markers to identify specific moments in the raw footage (before you’ve added clips to a project), you’ll want to be able to find those frames in the Event Browser.
To find a marker in the Event Browser
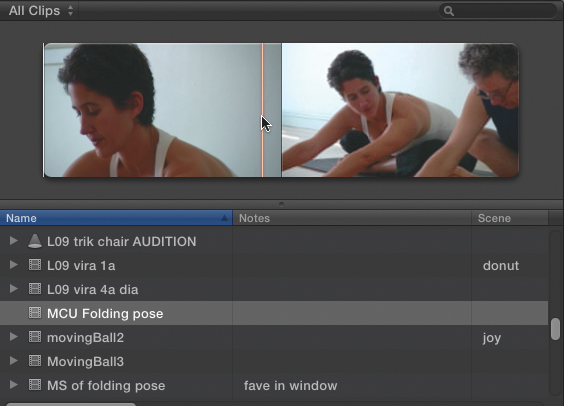
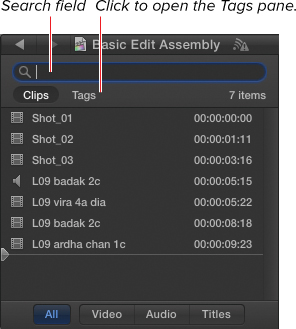
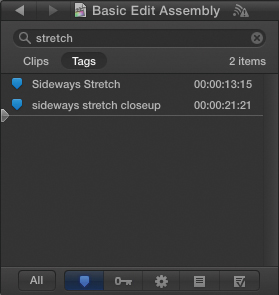
1. In the Event Browser, type a search term in the search field in the upper-right corner ![]() .
.

![]() Searching for clips, tags, or markers containing the word stretch. FCP filters the view so that only items with the search term appear in the Event Browser list. Clips that don’t match your search are hidden until you reset the search field.
Searching for clips, tags, or markers containing the word stretch. FCP filters the view so that only items with the search term appear in the Event Browser list. Clips that don’t match your search are hidden until you reset the search field.
FCP applies your search terms and filters the Event Browser display to show only clips, markers, and keywords that contain the selected text.
2. Click the marker item in the Event Browser to select it.
The clip containing the marker is selected and displayed in the Viewer ![]() .
.
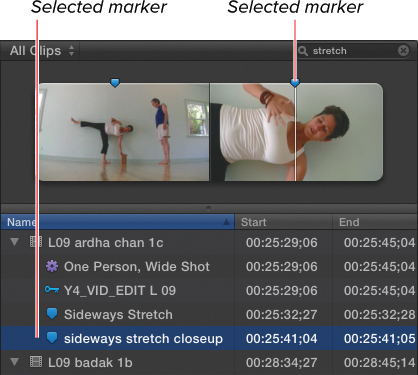
![]() When you select a marker in the list, the clip opens automatically, and the playhead jumps to the marked frame.
When you select a marker in the list, the clip opens automatically, and the playhead jumps to the marked frame.
To find a marker in the Timeline
1. Make the Timeline window active by clicking in it; then press Command-F.
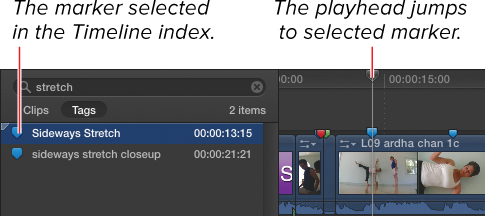
The Timeline Index opens (if it’s not already showing) with the search field automatically activated ![]() .
.
![]() You’ll find the Timeline search field at the top of the Timeline Index.
You’ll find the Timeline search field at the top of the Timeline Index.
2. In the Timeline Index search field, type any of the text that’s labeling the marker you want to find; then click the Tags button to open the Tags pane.
A list of markers and keywords that contain the search term appears in the Timeline Index ![]() .
.

![]() Just like in the Event Browser, the view is filtered to show only the items with the search text. Here there are several markers and keywords that all have the word stretch.
Just like in the Event Browser, the view is filtered to show only the items with the search text. Here there are several markers and keywords that all have the word stretch.
3. Click the marker you searched for in the Timeline Index.
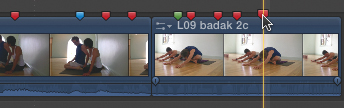
The Timeline playhead jumps to the selected marker ![]() .
.
![]() The selected object in the Timeline Index is also selected in the Timeline.
The selected object in the Timeline Index is also selected in the Timeline.
Double-click the marker in the Timeline Index to move to the marker and automatically open the Modify Marker window.
If you’d like to restrict your search results to show markers only, click the Show Only Markers button at the bottom of the Timeline Index ![]() .
.
![]() The Timeline Index filtered to show only the markers containing the word stretch.
The Timeline Index filtered to show only the markers containing the word stretch.
To jump from marker to marker
1. Make the desired window active, and then do one of the following:
• Press Control-‘ (apostrophe) to move the playhead to the next marker.
• Press Control-; (semicolon) to move the playhead to the previous marker.
The playhead moves to the next or previous marker in the selected window.
Other Clip Metadata
In addition to ratings, keywords, markers, and other information you can assign to a clip, a huge amount of additional information is associated with each clip. This information is called metadata.
Metadata can be hard-coded information such as the frame size, frame rate, audio format, and so on; it can be data supplied by the camera, such as the f-stop, shutter speed, GPS location, and other information; or it can be user-editable fields such as scene number, take number, camera reel, and so on.
You can even add your own custom metadata fields that will be available to all your clips.
All of this metadata is displayed in the Info Inspector, and the Info Inspector can be configured to display a variety of different views, each showing a different set of metadata.
To enter metadata for a clip
1. Select the clip in the Event Browser.
2. Open the Inspector and click the Info button to open the Info pane.
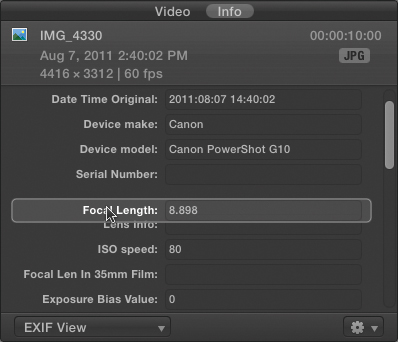
The Info pane opens showing the metadata for the clip ![]() .
.
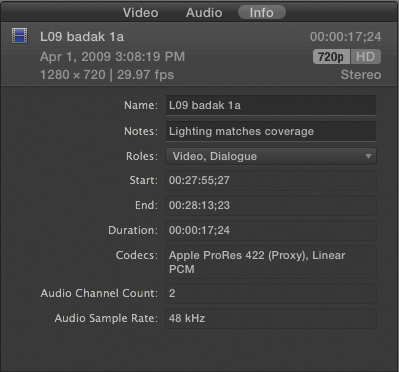
![]() Open the Info Inspector to see the clip’s metadata.
Open the Info Inspector to see the clip’s metadata.
3. If needed, choose a Metadata view from the View pop-up that contains the field you want to change ![]() .
.
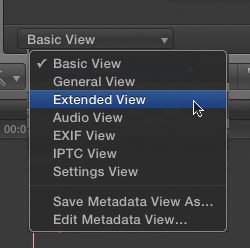
![]() Choose a view from the View pop-up.
Choose a view from the View pop-up.
4. Type text directly in the field ![]() .
.

![]() Type directly in the field to enter metadata for the clip.
Type directly in the field to enter metadata for the clip.
The metadata is added to the clip.
Many metadata fields are hard-coded, meaning you can’t manually enter data. These fields appear uneditable in the Inspector.
To create a new metadata field
1. In the Info Inspector, click the Action menu, and choose Add Custom Metadata Field ![]() .
.
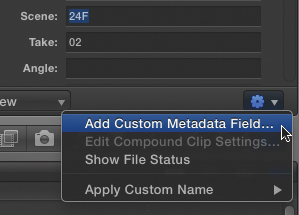
![]() Choose Add Custom Metadata Field from the Action menu.
Choose Add Custom Metadata Field from the Action menu.
The Add Metadata Field sheet appears ![]() .
.
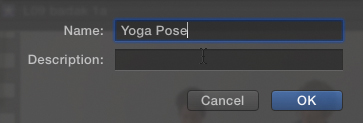
![]() Enter a name and description for your custom field.
Enter a name and description for your custom field.
2. Enter a name and optional description for the new field, and click OK.
The new field is added to the bottom of the current view ![]() .
.
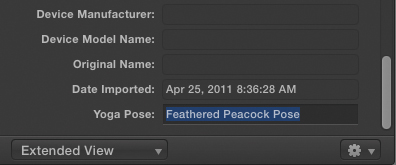
![]() Your custom field appears at the bottom of the current view.
Your custom field appears at the bottom of the current view.
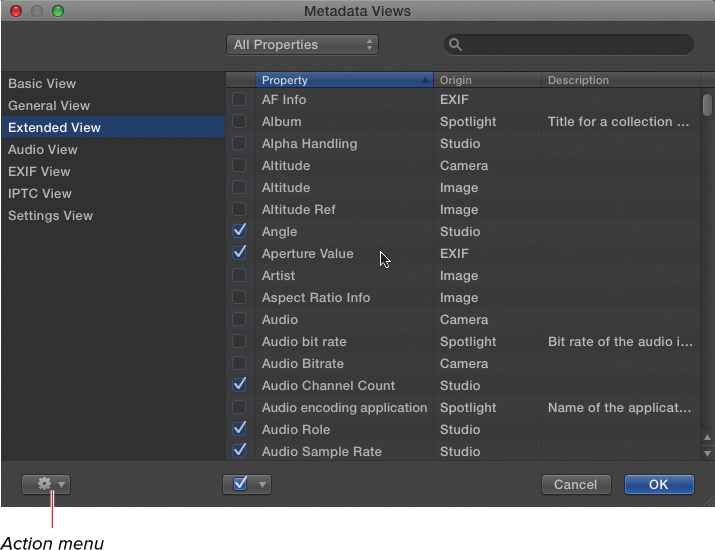
Metadata Views
There are seven different views in the Info Inspector, each showing a specific set of criteria. You can customize these views by adding or removing fields or reordering the fields in the view.
You can also create your own custom metadata views containing just the fields you want to see and in the order you want to see them.
To select a metadata view
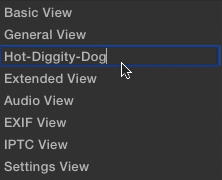
• Click the View pop-up menu, and select one of the items from the menu ![]() .
.
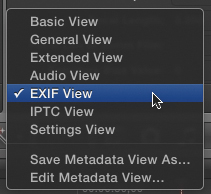
![]() Choose from one of the seven preset metadata views available in the View menu.
Choose from one of the seven preset metadata views available in the View menu.
The Info Inspector updates to show the new view ![]() .
.
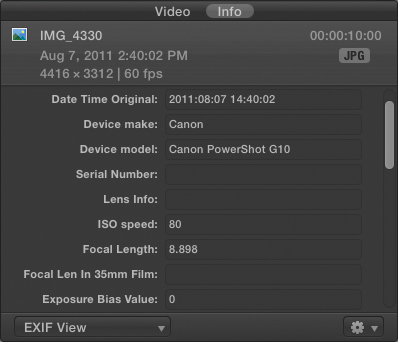
![]() The Inspector updates to show the current view.
The Inspector updates to show the current view.
To rearrange the order of fields in a metadata view
• Drag the name of the field to a new position in the view ![]() .
.
![]() Drag fields up or down to rearrange their order.
Drag fields up or down to rearrange their order.
To add or delete fields from the view
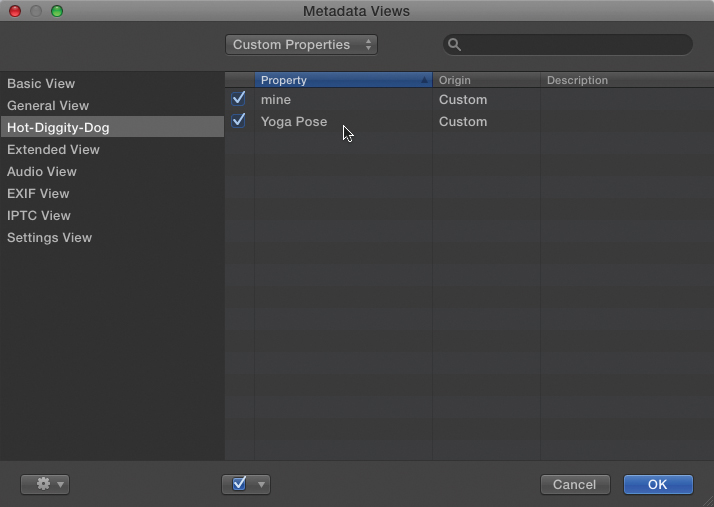
1. Click the View pop-up menu, and choose Edit Metadata View ![]() .
.
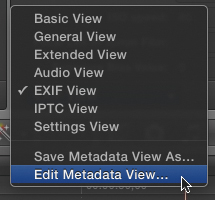
![]() Choose Edit Metadata View from the View menu.
Choose Edit Metadata View from the View menu.
The Edit Metadata View window opens ![]() .
.
![]() The Edit Metadata View window opens.
The Edit Metadata View window opens.
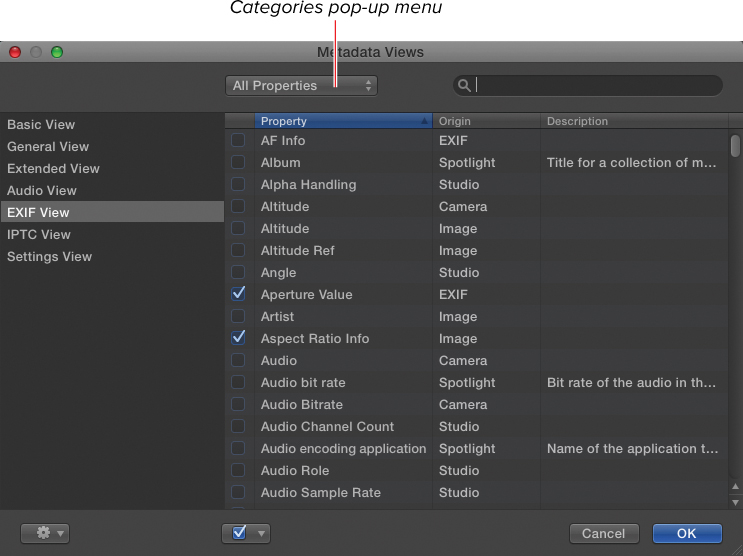
2. Choose a category of fields from the Category pop-up menu ![]() .
.

![]() Choose a category of fields.
Choose a category of fields.
3. Click the checkbox to select fields you want to add to the view or deselect fields you want to exclude ![]() .
.
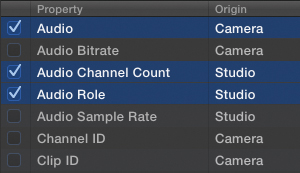
![]() Select the fields you want to include in the view, and deselect those that you don’t.
Select the fields you want to include in the view, and deselect those that you don’t.
4. Repeat steps 2 and 3 for additional categories as needed.
You can search for specific fields by typing a name (or part of a name) in the search field at the top of the window ![]() .
.
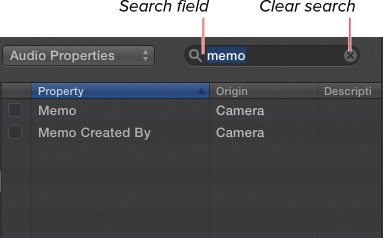
![]() Search for a specific field by typing in the search field.
Search for a specific field by typing in the search field.
5. Click OK.
The metadata view is updated to reflect the changes you made.
Optionally you can also save the changed metadata view as a new view by clicking the Action menu in the Edit Metadata Views window and choosing Save Metadata View As.
To create a new metadata view
1. Click the View pop-up menu, and choose Edit Metadata View.
The Edit Metadata View window opens ![]() .
.
![]() The Edit Metadata View window
The Edit Metadata View window
2. Click the Action menu, and choose New Metadata View ![]() .
.
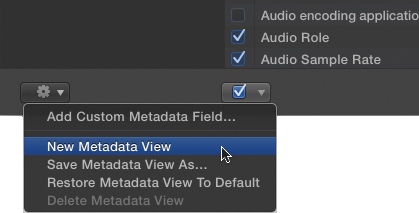
![]() Choose New Metadata View from the Action menu.
Choose New Metadata View from the Action menu.
A new view is added to the list on the left ![]() .
.
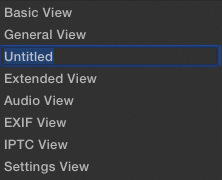
![]() The new view is added to the list on the left.
The new view is added to the list on the left.
3. Click the name of the new view, and type a custom name ![]() .
.
![]() Name the view something practical.
Name the view something practical.
4. Select the fields you want to include in the new view ![]() .
.
![]() Select the fields you want to include in your custom view.
Select the fields you want to include in your custom view.
5. When you’re finished, click OK.
Searching for Clips
The ultimate value of all the metadata you add to your clips using any of the forms described in this chapter is the ability to search your library of clips to find exactly the ones you’re looking for.
Final Cut Pro has a robust search mechanism that allows you to filter the Event Browser based on a wide variety of different criteria, filter on multiple criteria at once, and even save searches as Smart Collections that act as folders in the Event Library, updating automatically whenever a new clip fits the collection criteria.
The way filtering works in FCP X is that the results of the search replace the current view in the Event Browser. In this way, you need to clear the search or switch to a new view to see all the items in the browser again.
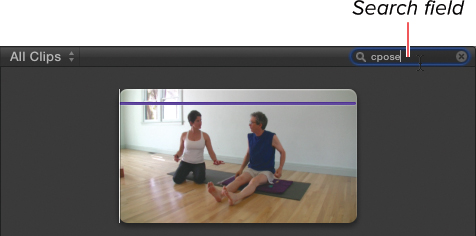
To filter the view by text only
• Type text into the search field at the top of the Event Browser ![]() .
.
![]() Type your search term in the field at the top of the Event Browser.
Type your search term in the field at the top of the Event Browser.
The view is filtered to show only clips that contain the text in the search field ![]() .
.
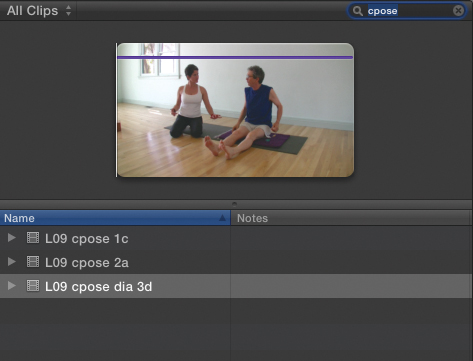
![]() The Event Browser is filtered to show only clips containing the search term.
The Event Browser is filtered to show only clips containing the search term.
The text can appear in the name of the clip, in the name of a marker, or in any of the metadata text fields in the Info Inspector (reel, scene, take, and so on).
To Filter the Event Browser
1. Choose Edit > Find, or press Command-F.
The Filter window opens ![]() .
.
![]() The Filter window
The Filter window
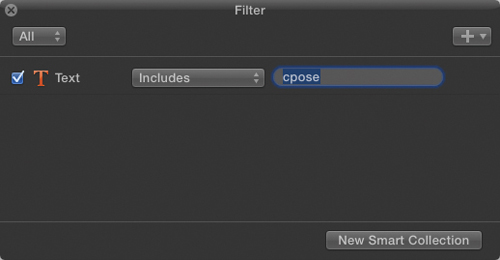
2. Optionally type text in the Text search field.
3. Click the Plus button, and select an additional type of criteria you want to search on ![]() . Choices include the following:
. Choices include the following:
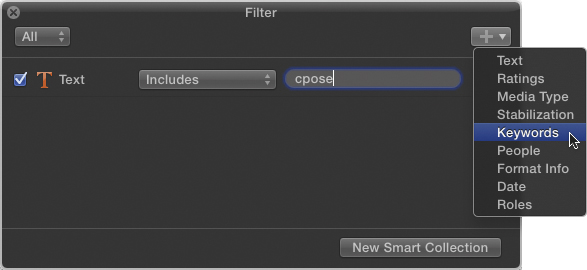
![]() Add criteria by clicking the Plus button and choosing a type.
Add criteria by clicking the Plus button and choosing a type.
• Text: Finds text in any field (name, markers, reel, scene, take, angle, and so on). You can include or exclude the entered text, and you can specify exact text or partial text.
• Ratings: Choose Favorites ![]() or Rejected.
or Rejected.
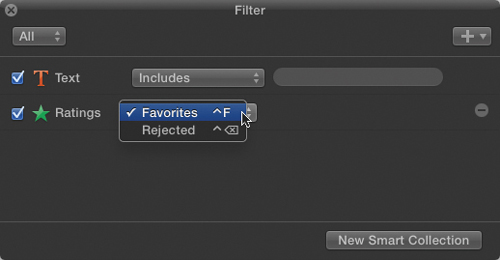
![]() The Ratings option lets you specify Favorites or Rejected.
The Ratings option lets you specify Favorites or Rejected.
• Media Type: Choose video only ![]() , audio only, video + audio, or stills. Then choose to include or exclude the selection
, audio only, video + audio, or stills. Then choose to include or exclude the selection ![]() .
.
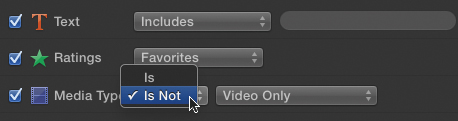
![]() The Media type lets you choose audio, video, both, or still images.
The Media type lets you choose audio, video, both, or still images.

![]() You can also choose to include or exclude the selected media type.
You can also choose to include or exclude the selected media type.
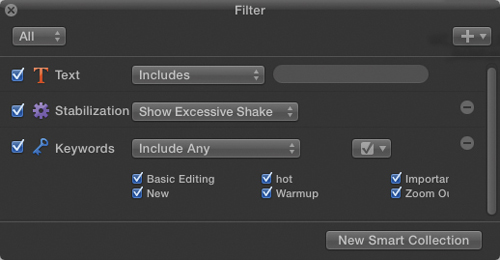
• Stabilization: Choose whether to include or exclude clips containing excessive shake. This information is gathered during clip analysis (for more, see “Video Analysis” in Chapter 6, “Importing Footage”).
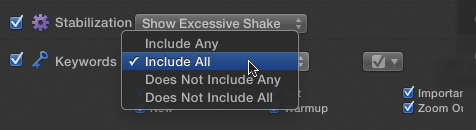
• Keywords: Each of the keywords used in the event are listed with checkboxes ![]() . Check the keywords you want to include in (or exclude from) your search. Assuming you select more than one keyword, you can choose whether the search must include all or any of the selected terms
. Check the keywords you want to include in (or exclude from) your search. Assuming you select more than one keyword, you can choose whether the search must include all or any of the selected terms ![]() .
.
![]() Any available keywords appear as checkboxes for you to select.
Any available keywords appear as checkboxes for you to select.
![]() Choose whether the results have to include all selected keywords or any.
Choose whether the results have to include all selected keywords or any.
• People: Choose to find clips containing analysis keywords identifying different types of shots as gathered during clip analysis ![]() (for more, see “Video Analysis” in Chapter 6, “Importing Footage”).
(for more, see “Video Analysis” in Chapter 6, “Importing Footage”).

![]() Choose any of the people-related analysis keywords.
Choose any of the people-related analysis keywords.
• Format Info: Enter text and choose a specific field to search on ![]() . This allows you to find only clips from a specific scene or reel (or other fields) based on the information in the Info Inspector.
. This allows you to find only clips from a specific scene or reel (or other fields) based on the information in the Info Inspector.

![]() Choose a specific metadata field, and type text into it.
Choose a specific metadata field, and type text into it.
• Date: Choose clips from a specified date ![]() or date range
or date range ![]() .
.

![]() Choose a specific date.
Choose a specific date.

![]() Or choose a relative date range.
Or choose a relative date range.
• Roles: Choose to find clips tagged with a Role designation such as Dialogue, Music, Effects, Video, or Titles.
As you add criteria, icons are added to the search field at the top of the Event Browser ![]() . Even if you close the Filter window, the filters will remain in place until you manually clear the search.
. Even if you close the Filter window, the filters will remain in place until you manually clear the search.

![]() The search field shows icons indicating what types of criteria are being used to filter the current view.
The search field shows icons indicating what types of criteria are being used to filter the current view.
To clear the search filter
• Click the Clear Search icon in the search field at the top of the Event Browser ![]() .
.

![]() Clear the search field by clicking the circled x.
Clear the search field by clicking the circled x.
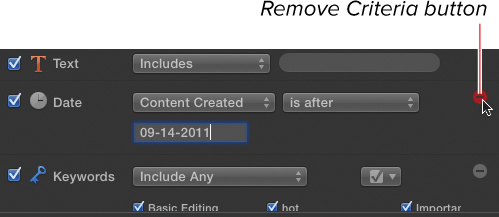
To remove an individual criterion from the search results
• Click the Remove Criteria button to the right of the criteria name in the Filter window ![]() .
.
![]() Remove any individual search criterion by clicking the red Remove Criteria button.
Remove any individual search criterion by clicking the red Remove Criteria button.
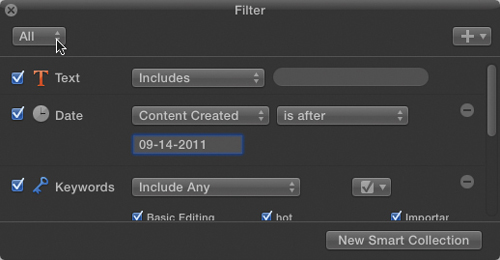
To filter based on all criteria
• Click the pop-up menu in the upper-left of the Filter window, and choose All ![]() .
.
![]() Choose whether search results must meet all criteria or any criteria.
Choose whether search results must meet all criteria or any criteria.
Only clips containing every listed criterion will appear in the Event Browser.
To filter based on any criteria
• Click the pop-up menu in the upper-left of the Filter window, and choose Any.
Any clip meeting at least one of the listed criteria will appear in the Event Browser.
To save the filter results as a Smart Collection
1. Open the Filter window, and enter any desired search criteria.
The selected event is filtered.
2. Click the New Smart Collection button ![]() .
.
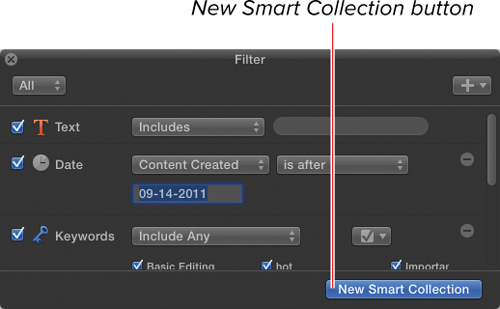
![]() Click the New Smart Collection button to save your filter settings as a collection.
Click the New Smart Collection button to save your filter settings as a collection.
A new Smart Collection appears in the Event Library ![]() .
.
![]() A new Smart Collection appears in the Event Library.
A new Smart Collection appears in the Event Library.
This collection contains clips that meet the criteria selected in the Filter window. Any clip that later meets the same criteria will automatically be added to the Smart Collection.
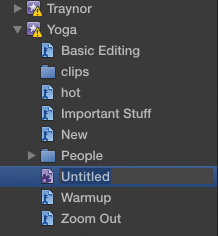
3. Click the collection’s name in the Event Library, and enter a custom name ![]() .
.
![]() Rename the Smart Collection so you’ll remember what it represents.
Rename the Smart Collection so you’ll remember what it represents.
To modify the criteria of a smart collection
1. Double-click the Smart Collection icon in the Event Library.
The Filter window opens, showing the criteria for that collection ![]() .
.
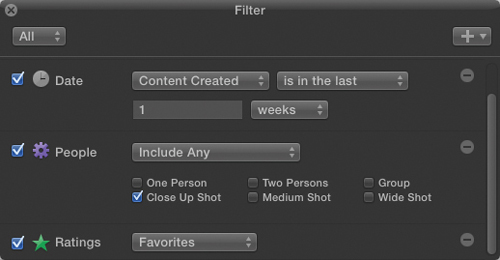
![]() The Filter window shows the settings that define the selected Smart Collection.
The Filter window shows the settings that define the selected Smart Collection.
2. Make necessary changes to the search criteria.
To delete a smart collection
• Right-click the smart collection, and choose Delete Smart Collection from the pop-up menu (or press Command-Delete).
Folders
You can also add another level of organizational structure to your Event Library: folders. Folders are simply a way to group elements in events to simplify your view.
Strangely, you cannot stick individual clips inside folders. Folders can hold only collections.
To create a folder
1. Select an event in the Event Library.
2. Right-click the event and choose New Folder ![]() , or press Shift-Command-N.
, or press Shift-Command-N.
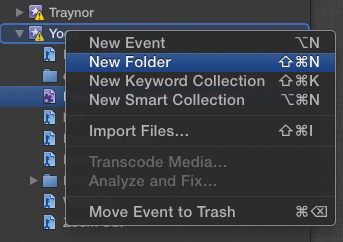
![]() Right-click the event, and choose New Folder.
Right-click the event, and choose New Folder.
A new empty folder is added to the event ![]() .
.
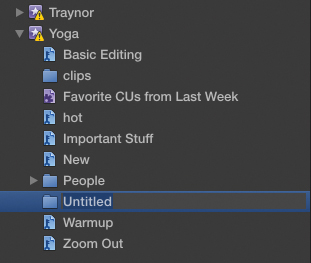
![]() A new folder is added to the event.
A new folder is added to the event.
3. Click the name of the folder, and type a name ![]() .
.
![]() Rename the folder something useful.
Rename the folder something useful.
To add items to a folder
• Drag Keyword Collections, Smart Collections, or other folders into the folder ![]() .
.

![]() Drag collections or other folders into the folder. Don’t bother trying to drag individual clips; inexplicably, folders can hold only collections of clips.
Drag collections or other folders into the folder. Don’t bother trying to drag individual clips; inexplicably, folders can hold only collections of clips.
The items are added to the folder ![]() .
.
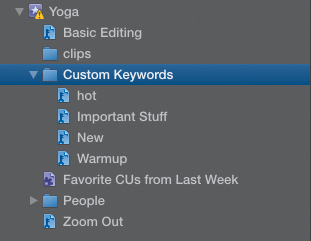
![]() The items are added to the folder.
The items are added to the folder.
To remove an item from a folder
• Drag the item from the folder onto the event name.
The item is moved from the folder back into the root of the event.
To delete a folder
• Select the folder and press Command-Delete.