18. Transition Effects
In This Chapter
Modifying Transition Effect Settings
Trimming an Edit Under a Transition Effect
In most projects, the majority of your shots will transition from one clip to the next using a cut, where one clip abruptly stops and the next abruptly starts. This common convention works great in many situations.
Sometimes, however, you want a different type of transition between shots. Often this is to create a more gradual change from one shot to the next (typically using a dissolve), and sometimes it’s to create a more dramatic shift, signaling to the viewer that the two adjacent shots should not be viewed in combination but rather that they are of two wholly different sections. This is where wipes, page-curls, zoom-blurs, and other more visually striking transition effects come into play.
Fortunately, adding and modifying such transitions in Final Cut Pro is easy and intuitive. This chapter will cover all aspects of working with such transition effects.
Adding Cross Dissolves
The most basic type of transition effect is a cross dissolve (sometimes called just dissolve) where one shot fades out at the same time another fades in.
Because cross dissolves are so common, Final Cut Pro makes it extremely easy to add them to any edit in your project, using one of two methods: Available Media or Full Overlap (see the sidebar “Two Ways to Handle Transitions” for a full explanation).
To add a dissolve to an edit
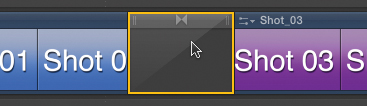
1. Click the edit to select it ![]() .
.
![]() Click either side of the edit to select it.
Click either side of the edit to select it.
The edit is highlighted in yellow.
2. Choose Edit > Add Cross Dissolve, or press Command-T.
A cross dissolve effect is added to the edit ![]() .
.

![]() The cut is converted into a dissolve.
The cut is converted into a dissolve.
To add a dissolve to the beginning and end of a clip
1. Click the clip to select it ![]() .
.
![]() Select a clip rather than an edit.
Select a clip rather than an edit.
2. Choose Edit > Add Cross Dissolve, or press Command-T.
A cross dissolve effect is added both to the edit at the beginning and to the edit at the end of the selected clip ![]() .
.
![]() And dissolves are added to both sides.
And dissolves are added to both sides.
You can also right-click any clip and choose Add Cross Dissolve from the shortcut menu. Dissolves will be added to the beginning and ending of the clip.
Two Ways to Handle Transitions
In prior versions of FCP, those extra frames were taken from the unused frames (aka handles) in your source media—frames after your chosen Out point and before your chosen In point ![]() .
.

![]() “Final Cut Pro–style” transitions do not change the clip length.
“Final Cut Pro–style” transitions do not change the clip length.
In iMovie, the two clips are each shortened by a half-second, so no extra frames are required. This ensures no unexpected frames are used, but because the frames at the very beginning and very ending of the transition effect are barely visible, those “important frames” you chose as the original edit point are now mostly hidden. Also, changing the duration of the shots can impact the “flow” of the scene ![]() .
.

![]() “iMovie-style” transitions shorten the durations of both clips.
“iMovie-style” transitions shorten the durations of both clips.
To choose how transitions are applied
1. Open the Preferences window by choosing Final Cut Pro > Preferences or pressing Command-, (comma).
2. Click the Editing icon to open the Editing pane ![]() .
.
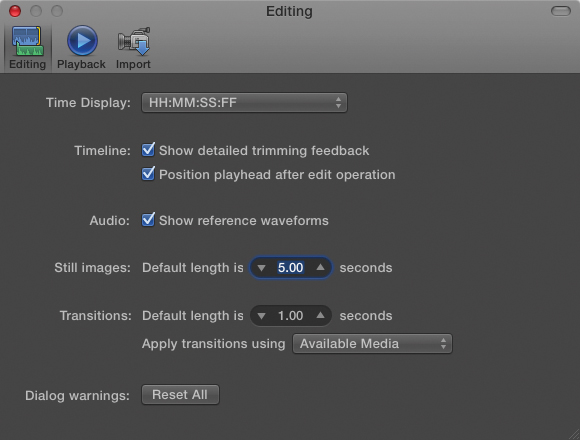
![]() Open the Editing pane of Final Cut Pro preferences.
Open the Editing pane of Final Cut Pro preferences.
3. In the Transitions category, click the “Apply transitions using” pop-up menu ![]() .
.
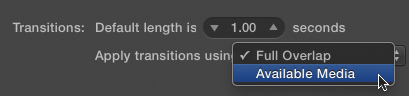
![]() Choose which style of transitions you prefer.
Choose which style of transitions you prefer.
4. Then do one of the following:
• To select the Final Cut Pro 7 way of doing things, choose Available Media.
• To choose the iMovie way of doing things, choose Full Overlap.
Using the Transitions Browser
Cross dissolves are useful for communicating time passage, location changes, or shifts in emotional state within a story, but sometimes you want to employ something a little more disruptive. Final Cut Pro comes with a collection of nearly 100 transition effects you can use to draw your audience’s attention away from the content of the footage and instead to the construction of the movie.
Sometimes such interruption is important. For example, in a safety training video, you may want to ensure that viewers disengage from a compelling dramatic reenactment before presenting them with a list of important safety tips. In such a case, a really obnoxious or goofy transition might produce just the desired effect.
Final Cut Pro’s myriad transition effects can be previewed, selected, and applied to your project from the Transitions Browser.
To view the Transitions Browser
• Click the Transitions Browser icon ![]() .
.
![]() Click the Transitions icon to open the Transitions Browser.
Click the Transitions icon to open the Transitions Browser.
The Transitions Browser opens.
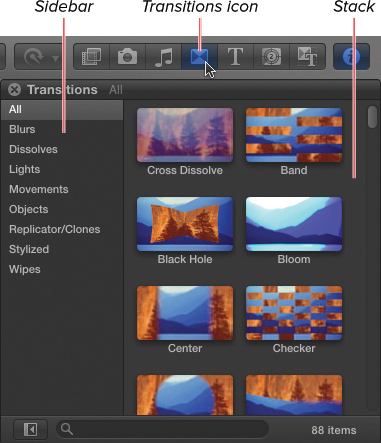
The Transitions Browser displays all the effects available to you including third-party plug-ins if you have any installed. Each effect is displayed with an illustrative thumbnail image and a descriptive name.
The Transitions Browser has two parts: the stack where the list of effects is displayed and a sidebar containing category names.
You can find specific transition effects either by searching for a particular name or by browsing through the various categories of effects.
To find specific transition effects
• Do one of the following:
• Type the name of the effect you’re looking for in the search field at the bottom of the Transitions Browser ![]() .
.
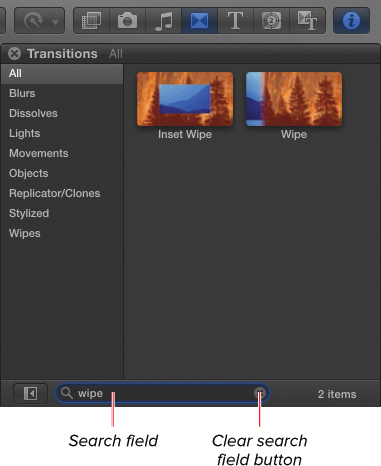
![]() Search for a specific transition effect by typing in the search field.
Search for a specific transition effect by typing in the search field.
The stack is filtered to show only transition effects containing the letters in the search field.
Clear the search field by clicking the circled X at the right edge of the field or by pressing Escape.
• Click one of the category names in the sidebar on the left side of the Transitions Browser, and scroll through the main stack area on the right ![]() .
.

![]() Click a category in the sidebar to filter the list.
Click a category in the sidebar to filter the list.
The stack is filtered by category.
Hide or show the sidebar by clicking the Show/Hide Sidebar button in the lower-left corner of the Transitions Browser.
Previewing Transition Effects
You can preview what each effect looks like prior to adding it to your project. This enables you to experiment with a variety of effects quickly.
To preview a transition effect
• Do one of the following:
• Hover your pointer over a transition icon in the Transitions Browser to skim across the effect preview ![]() .
.
![]() Skim across transition icons to see a preview or hover over the icon, and press the Spacebar to play.
Skim across transition icons to see a preview or hover over the icon, and press the Spacebar to play.
• Position your pointer over a transition icon, and press the Spacebar.
The Viewer loops a sample of the transition effect.
Click different transition icons while previewing to view different effects previews dynamically.
Adding a Transition Effect to the Primary Storyline
Once you’ve settled on which transition effect you want to use, you can add it to an edit in your primary storyline in one of two ways.
To add a transition effect
• Do one of the following:
• Select an edit in the primary storyline, and double-click a transition icon in the Transitions Browser.
The transition effect is added to the selected edit ![]() .
.
![]() If an edit is selected, double-clicking a transition icon will apply it to that edit.
If an edit is selected, double-clicking a transition icon will apply it to that edit.
• Select a clip in the primary storyline, and double-click a transition icon in the Transitions Browser.
The transition effect is added to the head and tail of the selected clip ![]() .
.
![]() If a clip is selected, double-clicking a transition icon will apply it to the head and tail of the clip.
If a clip is selected, double-clicking a transition icon will apply it to the head and tail of the clip.
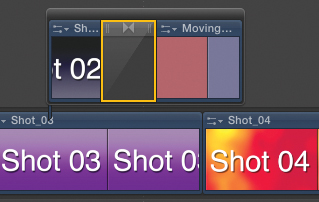
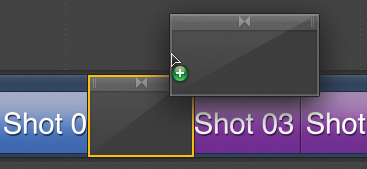
• Drag and drop the transition icon from the Transitions Browser to an edit point in the primary storyline ![]() .
.

![]() You can also drag and drop a transition effect to an edit in the primary storyline.
You can also drag and drop a transition effect to an edit in the primary storyline.
Transition Effects and Connected Clips
You cannot apply a transition effect to connected clips unless they are embedded in a secondary storyline. If you want to add such an effect to an edit that’s not in the primary storyline, you must first create a secondary storyline containing the connected clip (or clips) to which you want to add the transition effect. Fortunately, it does this automatically anytime you attempt to apply a transition effect to a connected clip.
To add a transition effect between two connected clips
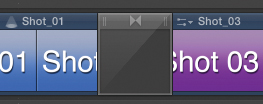
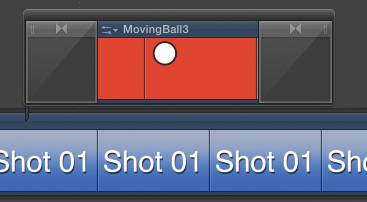
1. Select the edit between two adjacent connected clips. ![]()
![]() Select the edit between two clips.
Select the edit between two clips.
2. Press Command-T.
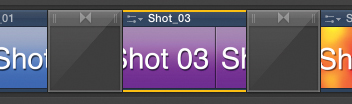
The clip or clips are converted into a secondary storyline and the transition is applied. ![]()
![]() By pressing the Command-T shortcut, a secondary storyline is automatically created and the transition is added.
By pressing the Command-T shortcut, a secondary storyline is automatically created and the transition is added.
To add a transition effect to the beginning and end of a connected clip
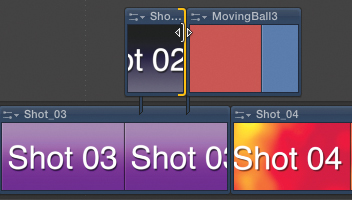
• Select the connected clip and press Command-T.
The clip is converted into a secondary storyline and the transition effect is added to the head and tail of the clip ![]() .
.
![]() Once a clip is in the secondary storyline you can apply transitions to it just like to clips in the primary storyline.
Once a clip is in the secondary storyline you can apply transitions to it just like to clips in the primary storyline.
• Drag and drop the transition icon from the Transitions Browser to the desired edit point.
Removing a Transition Effect
Transition effects are best used in moderation, so after you’ve had a good time adding different ones to every edit in your project, you’ll want to know how to remove them.
To remove a transition effect
1. Click the transition effect in the Timeline to select it ![]() .
.
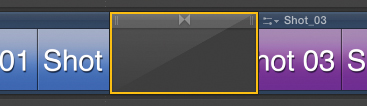
![]() To delete a transition, select it so it’s highlighted with a yellow box.
To delete a transition, select it so it’s highlighted with a yellow box.
2. Press Delete.
The transition effect is removed, and the edit is restored to a regular cut ![]() .
.
![]() Press Delete to remove the transition effect.
Press Delete to remove the transition effect.
Note that if your “Apply transitions using” setting is set to Full Overlap, deleting a transition effect will not restore the clips to their original durations.
You can also press Command-X to remove a transition and copy it to the clipboard and then select another edit point and press Command-V to paste it to that new location.
Replacing an Existing Transition Effect
Once you’ve applied a transition effect to an edit, you can swap out the specific effect for another without first removing the old effect.
To replace one transition effect with another
• Select a transition effect in the timeline, and do one of the following ![]() :
:
![]() Select a transition in the Timeline and double-click a different item in the Transitions Browser to replace one effect with another.
Select a transition in the Timeline and double-click a different item in the Transitions Browser to replace one effect with another.
• Double-click a different transition effect in the Transitions Browser.
• Drag and drop a new transition effect from the Transitions Browser onto the existing transition in the Timeline ![]() .
.
![]() Drag and drop one transition right on top of an existing one to replace the effect but maintain the existing duration.
Drag and drop one transition right on top of an existing one to replace the effect but maintain the existing duration.
The new effect replaces the old one, maintaining the duration established in the Timeline.
Modifying Transition Effect Settings
You can modify any transition’s duration, which can have a significant impact on how the transition effect is experienced by the viewer. For example, a three-frame dissolve (often called a soft cut) has a completely different meaning and effect on your audience than does a three-second lap dissolve, even though both use the same cross dissolve effect in the Timeline.
Additionally, many transitions have different settings and options you can adjust to customize an effect. This might be the number of bands in a Band Wipe, the center point of a ripple effect, or whether a Mosaic effect should employ the Classic, Wave, or Explode style.
By customizing these settings, you can make the effects in your project more distinctive and tailor them specifically to your project (by, for example, setting background colors to match colors used in your footage). This also allows you to use one general type of transition per project but with enough variation so it doesn’t feel repetitive.
Changing Duration
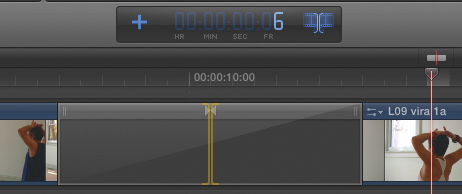
You can modify a transition effect’s duration in a variety of ways. In some cases, you may want to type in a specific duration as a number, and in other cases, you may want to drag a transition until it aligns with a particular frame in a clip.
To change a transition effect’s duration numerically
1. Select the transition in the Timeline.
2. Right-click the transition and choose Change Duration, or or select the transition and press Control-D and press Control-D ![]() .
.
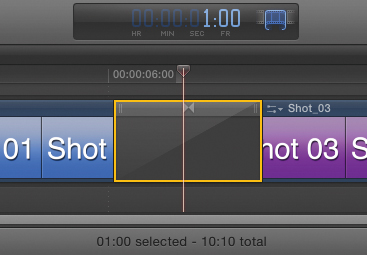
![]() Select a transition and press Control-D to modify its duration.
Select a transition and press Control-D to modify its duration.
You can see the duration of the current selection displayed at the bottom of the Timeline window.
The Current Timecode indicator changes to the Duration field.
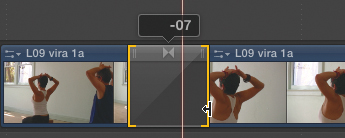
3. Type your desired transition as frames or timecode, and press Enter ![]() .
.
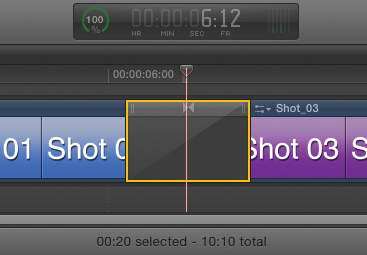
![]() In this example, I typed 20 and then pressed Enter, shortening the transition to 20 frames.
In this example, I typed 20 and then pressed Enter, shortening the transition to 20 frames.
The transition effect’s duration is updated.
When the Trim tool is selected, you can also use the trimming keys (< and >) to decrease or increase the duration of a selected transition one frame at a time.
To change a transition effect’s duration visually
1. Make sure “Show detailed trimming feedback” is enabled in the Editing preferences window ![]() .
.
![]() Enable “Show detailed trimming feedback” in the Editing preferences.
Enable “Show detailed trimming feedback” in the Editing preferences.
2. With the Select tool, drag either edge of the transition in the Timeline ![]() .
.
![]() Drag either edge of a transition effect to change its duration.
Drag either edge of a transition effect to change its duration.
The transition’s duration changes by the number of frames you drag.
An Info window appears and shows how many frames you have added or removed from the transition’s duration.
The Viewer displays the last frame of the outgoing clip before the transition starts and the first frame of the incoming clip after the transition ends ![]() .
.
![]() The Viewer shows a two-up display of the new transition’s beginning and end frames.
The Viewer shows a two-up display of the new transition’s beginning and end frames.
Note this is different from Final Cut Pro 7, which displayed the last used frame of the outgoing clip and the first used frame of the incoming shot.
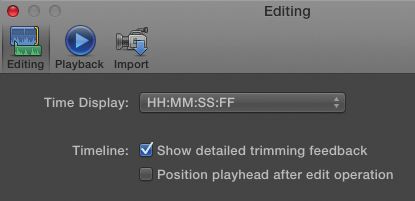
Changing the Default Duration
By default, most transitions are exactly one second long. (There are a few theme-based transitions that default to a longer duration.) You can change this default if a particular show routinely requires shorter or longer transition effects.
To change the default transition effect duration
1. Choose Final Cut Pro > Preferences.
2. Click the Editing icon to open the Editing pane ![]() .
.
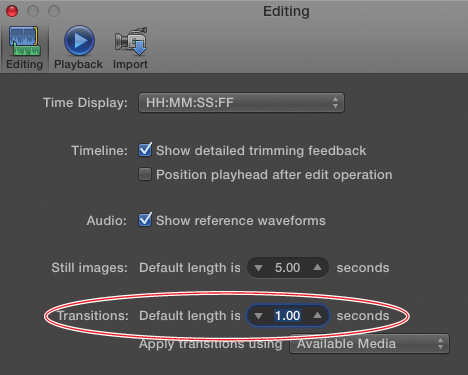
![]() The default transition length is set in the Editing preferences.
The default transition length is set in the Editing preferences.
3. In the Transitions section, set the Default Length setting to your preferred value.
4. Close the Preferences window.
From that point forward, every new transition will be applied with the chosen duration. Existing transition effects in the Timeline will not be affected.
Changing Effect Controls
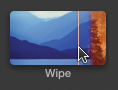
Not all transition effects have customizable settings, but many do. Examples include the width, color, and softness settings of the border on a Wipe effect; the curvature, color, and direction of a Page Curl; or the sample still images displayed in the Bulletin Board Pan transitions (described in more detail in a moment).
Transition effect controls can be displayed only after you have applied the effect to an edit in your project, so in many cases the only way to know what options may be available is to apply the transition to a sample edit before you commit to using the effect.
To modify Effect Controls
1. Apply a transition effect to an edit in your project.
2. Select the transition in the Timeline ![]() .
.

![]() Select the transition you want to modify. It’s also a good idea to make sure your playhead is parked over the transition.
Select the transition you want to modify. It’s also a good idea to make sure your playhead is parked over the transition.
3. Click the Show Inspector button, or press Command-4.
The Inspector shows any parameters you can modify for the selected transition ![]() .
.
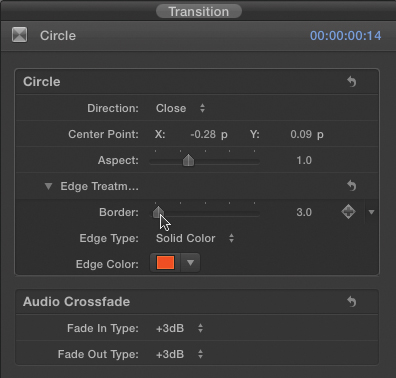
![]() The Transition Inspector contains the parameters for the selected transition.
The Transition Inspector contains the parameters for the selected transition.
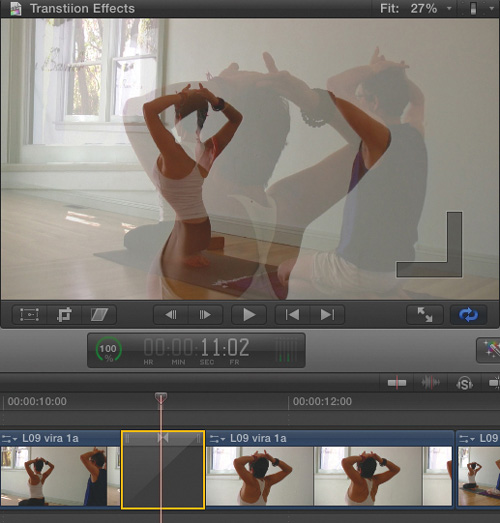
4. Adjust the settings in the Inspector to your liking ![]() .
.
![]() As you change the parameter settings, you can watch the Viewer update in real time.
As you change the parameter settings, you can watch the Viewer update in real time.
Be sure your playhead is parked over the transition effect in the Timeline to see the results of the changes you are making in the Inspector.
5. For best results, press Shift-? to play around with the edit to see how the effect looks while playing.
Note that some transitions don’t have any modifiable settings and will display only the name of the transition in the Inspector.
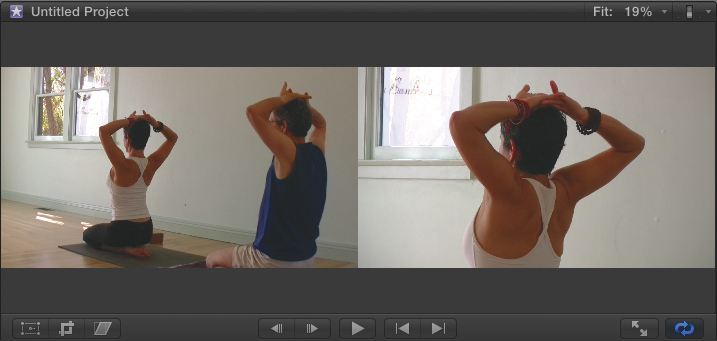
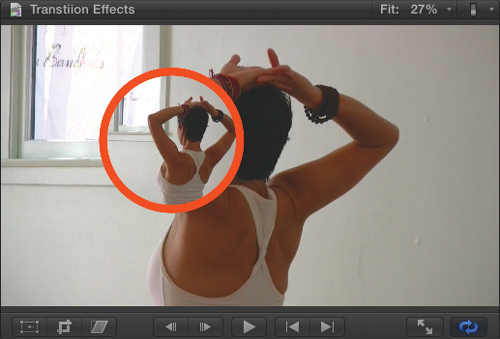
Some transitions (as well as other effects) have on-screen controls that allow you to manipulate certain parameters visually in the Viewer. The effect must be selected in the Timeline for these controls to be visible ![]() .
.
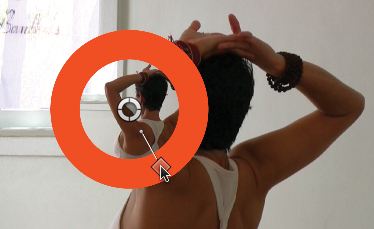
![]() Some effects have on-screen controls. This Circle Wipe, for instance, allows you to adjust the center point and the thickness of the border by dragging controls in the Viewer.
Some effects have on-screen controls. This Circle Wipe, for instance, allows you to adjust the center point and the thickness of the border by dragging controls in the Viewer.
Cross Dissolve “Looks”
One fun and powerful feature in Final Cut Pro is the cross dissolve Looks setting, which allows you to assign one of 11 different styles to any dissolve effect.
Furthermore, you can control how much or how little of the particular “look” you want to apply to the dissolve effect.
To change the cross dissolve look
1. Select a Cross Dissolve effect in the Timeline, and position your playhead over it ![]() .
.
![]() Select a dissolve and position your playhead over it in the Timeline.
Select a dissolve and position your playhead over it in the Timeline.
2. Open the Inspector, and in the Cross Dissolve section, choose a setting from the Look pop-up menu. Choices include Normal, Bright, Dark, Cold, Warm, Sharp, Dull, Additive, Subtractive, Highlights, and Shadows ![]() .
.
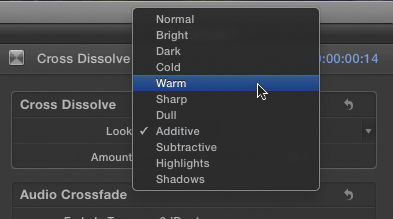
![]() In the Transition Inspector, choose one of the settings in the Look pop-up menu, and set the Amount slider to control how dramatic the effect.
In the Transition Inspector, choose one of the settings in the Look pop-up menu, and set the Amount slider to control how dramatic the effect.
3. Set the Amount slider to control how much of the “look” to apply ![]() .
.

![]() Always play around the transition to see how it looks in real time.
Always play around the transition to see how it looks in real time.
4. Play around the edit to see the results of your changes.
Choosing Sample Frames
Some theme-based transitions such as the Comic Book and Bulletin Board effects utilize frames from your project as graphic elements in the transition effect.
When such a transition is selected, new controls appear in the Timeline to allow you to choose the specific frames to be used.
To select sample frames
1. Select the transition in the Timeline.
A series of yellow flags appears in the Timeline around the transition effect.
Each of these flags represents one of the sample frames used in the effect. The Viewer shows corresponding yellow highlights to identify where the selected frames will appear ![]() .
.
![]() Some transition effects use other frames in the project as decorative elements. Yellow flags indicate which frames will be used.
Some transition effects use other frames in the project as decorative elements. Yellow flags indicate which frames will be used.
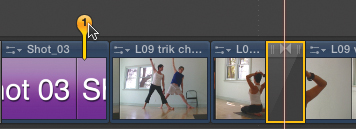
2. Be sure the playhead is over the transition effect, and drag each yellow flag to the specific frame in the Timeline you want to use ![]() .
.
![]() Drag the yellow flags to choose a new frame.
Drag the yellow flags to choose a new frame.
Some of the sample images appear only briefly during the transition. You may need to shuttle through the transition to find a frame where the sample image is visible.
The Viewer will update to show how the chosen frame will appear in the transition effect ![]() .
.

![]() Watch the Viewer to see the selected frame appear in one of the windows. Stop dragging when the desired frame is reached.
Watch the Viewer to see the selected frame appear in one of the windows. Stop dragging when the desired frame is reached.
3. Repeat step 3 for each of the remaining yellow flags.
4. Play around the edit to see the results of your changes.
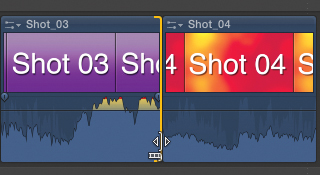
Trimming an Edit Under a Transition Effect
Just because you’ve applied a transition effect to an edit doesn’t mean you can’t ripple or roll the edit under the effect to change exactly which frames from the source clips are used.
You can ripple the outgoing clip, ripple the incoming clip, or roll the edit, and you can do all of these both in the Timeline and in the Precision Editor.
Note that trimming an edit will never affect the duration of the transition effect applied to that edit, unless your trim uses up all the available media in your source clips.
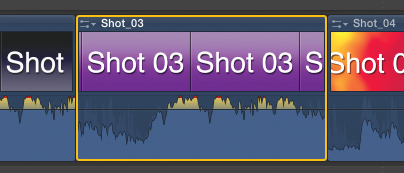
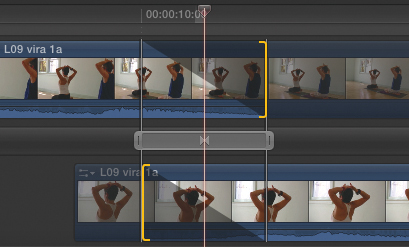
Rolling a Transition Effect
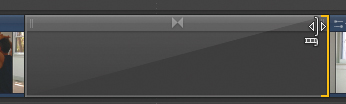
At the top of the transition effect there is a light gray bar that allows you to perform trimming effects on a transition-laden edit. You don’t even need to use the Trim tool.
Rolling a transition moves the transition earlier or later in time by trimming the frames of the underlying clips. Rolling to the left will remove frames from the outgoing clip and, simultaneously, add the same number of frames to the incoming clip, effectively moving the transition effect earlier in time.
Rolling to the right performs the opposite, moving the transition effect later in time. For more on rolling edits, see Chapter 9, “Advanced Editing.”
To roll an edit under a transition effect
• Do one of the following:
• Drag the inward-facing arrows icon ![]() at the top center of the transition effect
at the top center of the transition effect ![]() .
.
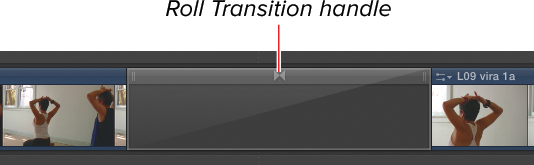
![]() The inward-facing arrows indicate the Roll Transition handle for the edit under the transition.
The inward-facing arrows indicate the Roll Transition handle for the edit under the transition.
![]() As you drag, an Info window displays the number of frames.
As you drag, an Info window displays the number of frames.
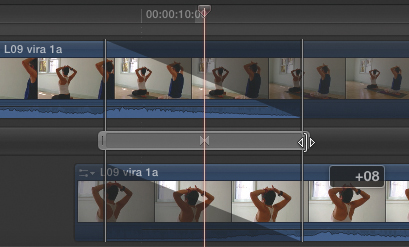
• Click the inward-facing arrows icon to select the edit, and press , (comma) to roll the edit to the left and press . (period) to roll the edit to the right.
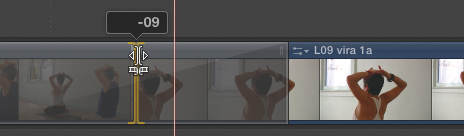
• Click the inward-facing arrows icon to select the edit, and type a timecode number (preceded by + or –) to roll the edit by a specific number of frames ![]() .
.
![]() Select the Roll Transition handle to roll the edit from the keyboard.
Select the Roll Transition handle to roll the edit from the keyboard.
The transition effect moves to a new location in the Timeline.
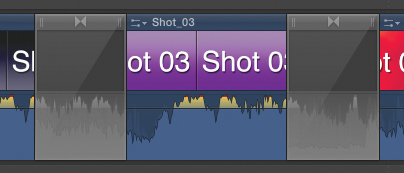
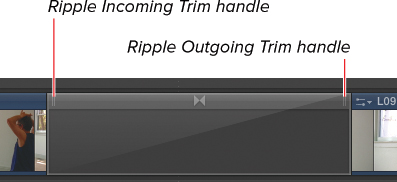
Rippling Under a Transition Effect
Similar to rolling, you can ripple the clips underlying a transition effect. You can trim either the end of the outgoing clip or the beginning of the incoming clip. For more on ripple edits, see Chapter 9, “Advanced Editing.”
To ripple the outgoing clip
• Do one of the following:
• Drag the Ripple Outgoing Trim handle at the top left of the transition effect ![]() .
.
![]() Drag the Ripple Outgoing Trim handle to trim the outgoing clip.
Drag the Ripple Outgoing Trim handle to trim the outgoing clip.
• Click to the right of the left edge of the transition effect.
Watch to make sure you see the Ripple Outgoing pointer (and not the Transition Resize pointer) before clicking. Otherwise, you’ll change the transition’s duration rather than rippling the edit.
• Click the Ripple Outgoing Trim handle to select the outgoing edit edge, and press , (comma) to shorten the outgoing clip and press . (period) to lengthen the outgoing clip ![]() .
.
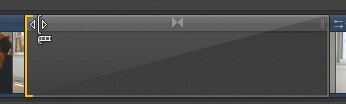
![]() Select the Outgoing Trim handle to trim the outgoing clip from the keyboard.
Select the Outgoing Trim handle to trim the outgoing clip from the keyboard.
• Click the Outgoing Trim handle to select the edit, and type a timecode number (preceded by + or –) to ripple the outgoing clip by a specific number of frames.
The outgoing clip gets longer or shorter, and the transition effect maintains its duration.
To ripple the incoming clip
• Do one of the following:
• Drag the Incoming Trim handle at the top left of the transition effect.
• Click to the left of the right edge of the transition effect.
Watch to make sure you see the Ripple Incoming pointer (and not the Transition Resize pointer) before clicking. Otherwise, you’ll change the transition’s duration rather than rippling the edit.
• Click the Incoming Trim handle to select the outgoing edit edge, and press , (comma) to lengthen the incoming clip and press . (period) to shorten the incoming clip ![]() .
.
![]() Select the Incoming Trim handle to trim the incoming clip from the keyboard.
Select the Incoming Trim handle to trim the incoming clip from the keyboard.
• Click the Incoming Trim handle to select the edit, and type a timecode number (preceded by + or –) to ripple the outgoing clip by a specific number of frames.
The incoming clip gets longer or shorter, and the transition effect maintains its duration.
Using the Precision Editor on an Edit with a Transition Effect Applied
You can also trim an edit using the Precision Editor even when a transition effect is applied to the clip. You can perform all the same trimming operations to the edit as you can when there is no transition effect, plus you can modify the transition effect’s duration in the Precision Editor. For more on using the Precision Editor, see “Using the Precision Editor” in Chapter 9.
To open the Precision Editor on a transition
• Do one of the following:
• Select the transition effect in the Timeline, and press Control-E.
• Double-click the inward-facing arrow icon or either of the Ripple handles on the top edge of the transition effect.
• Right-click the transition effect, and choose Show Precision Editor from the shortcut menu ![]() .
.
![]() Edits with transition effects applied can still be opened in the Precision Editor. The transition appears as a bar in the dividing bar.
Edits with transition effects applied can still be opened in the Precision Editor. The transition appears as a bar in the dividing bar.
The Precision Editor opens.
You can trim the edit using any of the methods described in the “Using the Precision Editor” section of Chapter 9.
To change a transition effect’s duration in the Precision Editor
• Drag either the left or right edge of the Transition icon in the center bar of the Precision Editor. Drag outward to make the transition effect longer, and drag inward to make the effect shorter ![]() .
.
![]() Drag the edge of the transition bar to change the duration of the transition effect.
Drag the edge of the transition bar to change the duration of the transition effect.
Audio Transitions
In addition to video transition effects, Final Cut Pro adds audio crossfades to create smooth transitions between adjacent audio clips. The good news is that these crossfades are high quality and very customizable. The bad news is that Final Cut Pro adds them automatically whenever you add a video transition effect—which is desirable only some of the time. What’s more, you can’t easily add just an audio transition, for which there is ample need.
Fortunately, if you just keep track of a few things, you’ll quickly learn how to make good use of audio transitions when you want them and how to avoid them when you don’t.
Audio Transitions on the Primary Storyline
Clips on the primary storyline very frequently have both audio and video components. When these clips are collapsed (as they are by default), applying any video transition effect automatically adds an audio crossfade on the corresponding audio tracks. But it’s not actually a transition effect; Final Cut Pro just overlaps the audio clips of the adjacent tracks and assigns a fade-out setting to the outgoing clip and a fade-in to the incoming clip.
You can control the fade type for both the incoming and outgoing fades in the Inspector, or you can expand the audio tracks and modify the overlapping audio with as much precision as you desire.
If you want to add a video transition effect without automatically overlapping your audio, you must expand the audio prior to applying the transition effect.
To modify the settings on an automatically applied audio crossfade
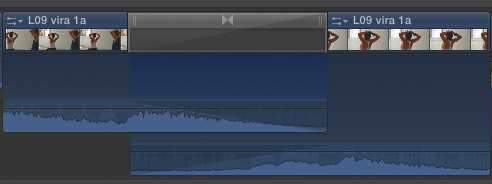
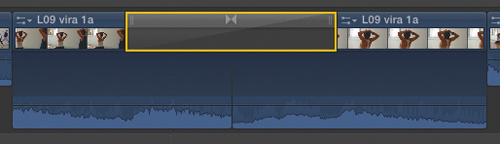
1. Add a transition effect to an edit on the primary storyline ![]() .
.
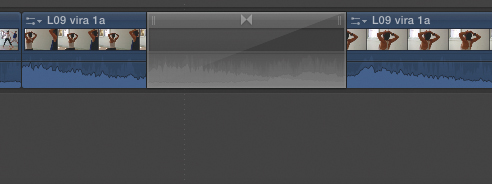
![]() When a transition is added to the primary storyline, it automatically adds a crossfade to the audio.
When a transition is added to the primary storyline, it automatically adds a crossfade to the audio.
The transition effect is added, and an automatic audio crossfade is applied.
What’s actually happened is that the corresponding audio has been overlapped and fades have been applied.
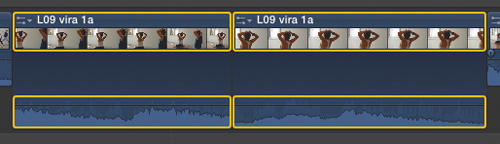
2. Double-click the audio area for each of the clips affected by the transition ![]() .
.
![]() When the audio is expanded, you can see the overlapping fades.
When the audio is expanded, you can see the overlapping fades.
3. Select the transition effect in the Timeline, and open the Inspector ![]() .
.
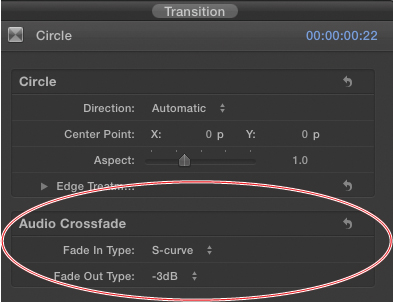
![]() The Transition Inspector contains settings to control the audio crossfade.
The Transition Inspector contains settings to control the audio crossfade.
4. In the Audio Crossfade section, set the Fade In and Fade Out settings as desired.
For more on choosing Fade In and Fade Out settings, see the “Audio Fades” section of Chapter 11, “Audio Editing.”
To add a transition effect without affecting the corresponding audio
1. Select the clips in the Timeline to which you plan to add the transition.
2. Choose Clip > Expand Audio/Video, or press Control-S.
The audio clips are expanded ![]() .
.
![]() Expand the audio tracks to separate the audio from the video.
Expand the audio tracks to separate the audio from the video.
3. Select the video edit, and add the transition effect of your choice.
The effect is added, but the audio clips remain unaffected ![]() .
.
![]() When expanded, transition effects do not affect the audio tracks.
When expanded, transition effects do not affect the audio tracks.
Audio Transitions on Connected Clips
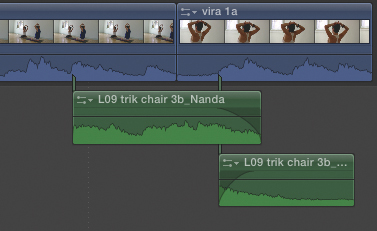
If you want to create a crossfade between two connected clips, they must abut one another in the Timeline. Otherwise, any transitions you apply will fade a single audio clip up from or down to silence.
To add a transition to connected audio clips
1. Select an edit point between the two audio clips in the Timeline ![]() .
.
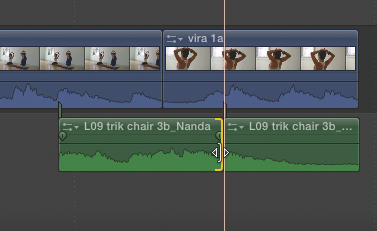
![]() Select an edit point between the two audio clips you want to transition between.
Select an edit point between the two audio clips you want to transition between.
2. Choose Edit > Add Cross Dissolve or press Command-T.
The clips are converted into a secondary storyline and a transition effect is added between the two clips ![]() .
.
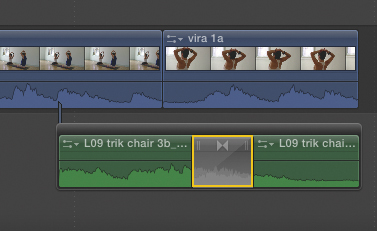
![]() Press Command-T to add an audio-only crossfade. A secondary storyline is automatically created.
Press Command-T to add an audio-only crossfade. A secondary storyline is automatically created.