
6. Importing Footage
In This Chapter
Importing from File-Based Cameras
Importing from Tape-Based Devices and Live Cameras
Importing from iPhoto, Aperture, or Photo Booth
One of the things that differentiates Final Cut Pro from most other software is that you can’t really do anything until you import some files. In most programs, you can create a document from scratch and begin working, but with a video editor, you need to start with some existing video.
This video will invariably come from one of three sources: a file-based camera, such as most modern camcorders, cell phones, DSLRs, Flips, GoPros, and so on; a tape-based camera, such as legacy DV and HDV camcorders that were popular way back in the aughts; or digital video files on your hard disk, such as a computer-generated animation, a downloaded video file, a screen-capture file, or something similar.
Regardless of your source media’s provenance, you need to import it into FCP so you can remove the bad bits, polish the rest, add some music, and call it a movie.
Importing from File-Based Cameras
The engineers who developed FCP X made the mildly controversial choice of assuming that most users will be using modern file-based cameras. While this potentially alienates the poor, the Luddite, and the professional who is deeply invested in technology they bought three years ago, the reality is that file-based cameras are the future (at least for the next decade until some even newer technology makes them obsolete). Plus, you can still import other video sources, either by using one of FCP’s other import methods (detailed in the remainder of this chapter) or by using third-party solutions.
FCP X can also optionally perform a number of useful tasks during the import process that will greatly improve your editing experience thereafter. These include organizing your files for you, transcoding your footage into editing-friendly formats, and analyzing both audio and video in search of potential problems, as well as providing details about the content such as whether there are people in the shot and how far away from the camera they are standing.
This method works for most file-based cameras, including iPhones and other Apple devices.
If your camera or memory card doesn’t appear in the Cameras list (in the Camera Import window), try following the instructions in “Importing Files” later in the chapter. That is the recommended procedure for popular DSLR cameras such as the Canon 5D and 7D.
To import files from a file-based camera
1. Connect the device to your Mac via USB (or FireWire for P2-based media), or insert the memory card containing the video clips into a connected card reader.
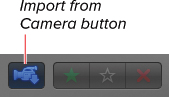
2. Choose File > Import From Camera, or click the Import from Camera button in the toolbar. ![]()
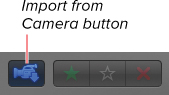
![]() Click the Import from Camera button in the toolbar to open the Camera Import window.
Click the Import from Camera button in the toolbar to open the Camera Import window.
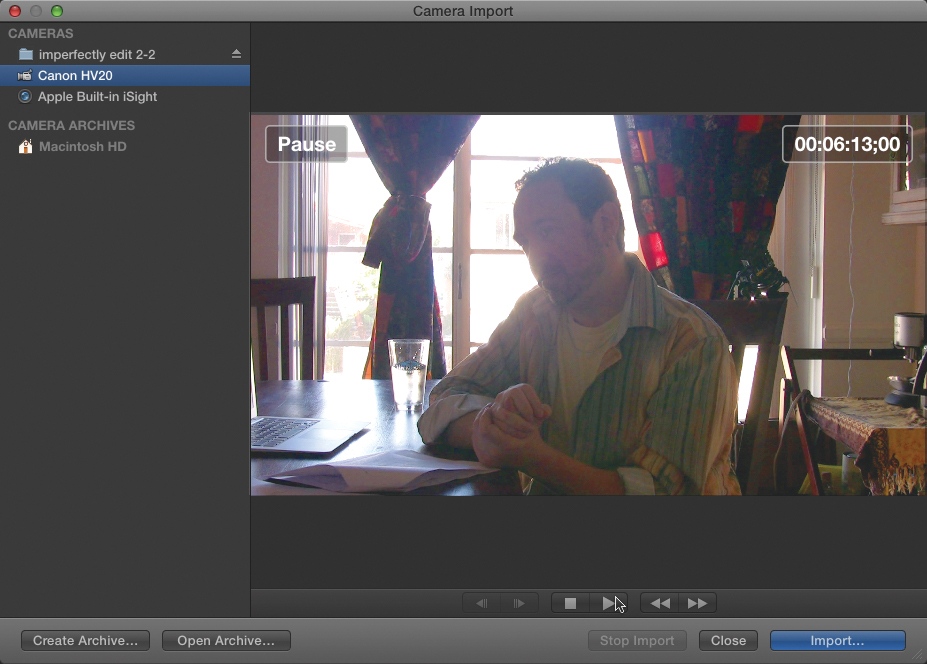
The Camera Import window opens ![]() .
.
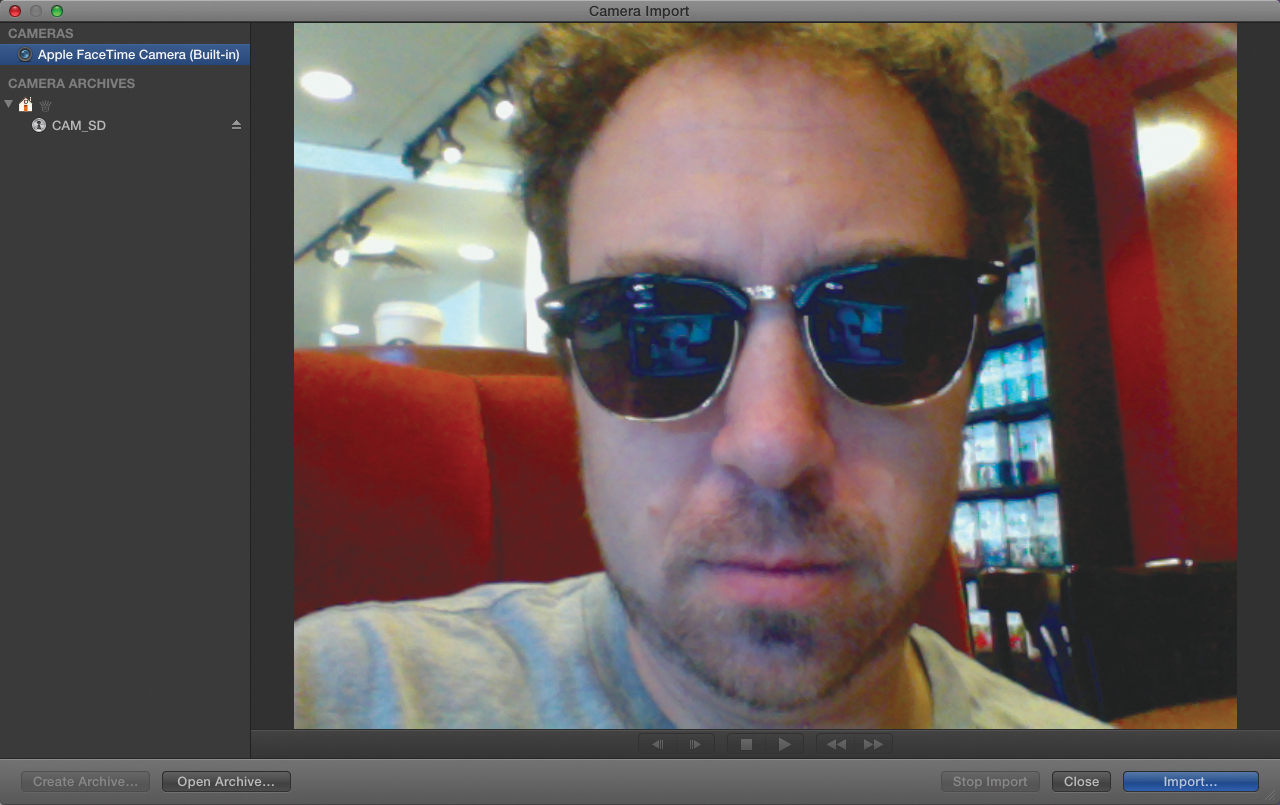
![]() On a Mac with a built-in camera, the Camera Import window defaults to showing your own face. Check your hair before proceeding.
On a Mac with a built-in camera, the Camera Import window defaults to showing your own face. Check your hair before proceeding.
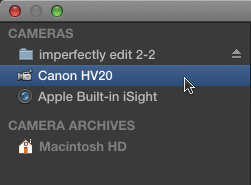
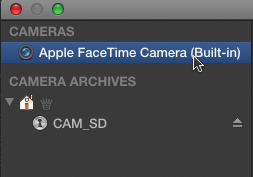
3. Select your camera or volume from the list on the left side of the window ![]() .
.

![]() Select your device from the Cameras list on the left. Its contents appear under the preview area.
Select your device from the Cameras list on the left. Its contents appear under the preview area.
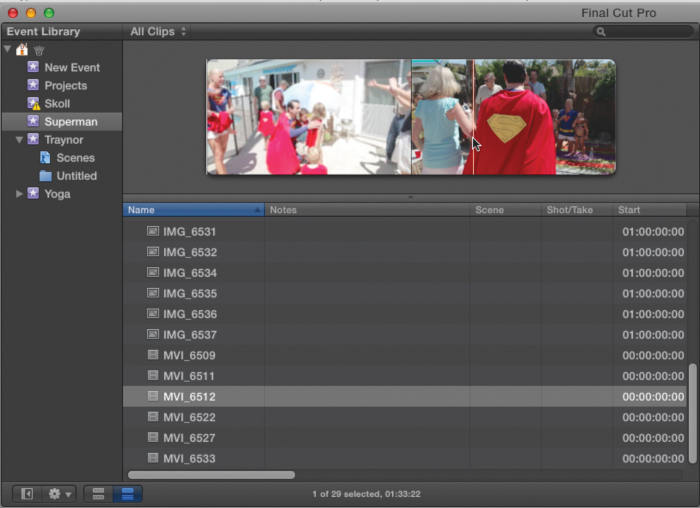
Filmstrips for each of the clips appear below the preview area. The width of the thumbnails indicates the relative duration of the clips ![]() .
.
![]() The clips on the current device are displayed as filmstrips beneath the preview area.
The clips on the current device are displayed as filmstrips beneath the preview area.
Customize the view by zooming in and out on the thumbnails, modifying the track height, and optionally displaying the audio waveforms using the controls in the lower-right corner (just like the identical controls in the Event Browser and in the Timeline) ![]() .
.

![]() Customize the filmstrip view just like you modify the view in the Event Browser. Sadly, there’s no List view.
Customize the filmstrip view just like you modify the view in the Event Browser. Sadly, there’s no List view.
4. Preview the clips by skimming the thumbnails or using the playback controls at the bottom of the preview area.
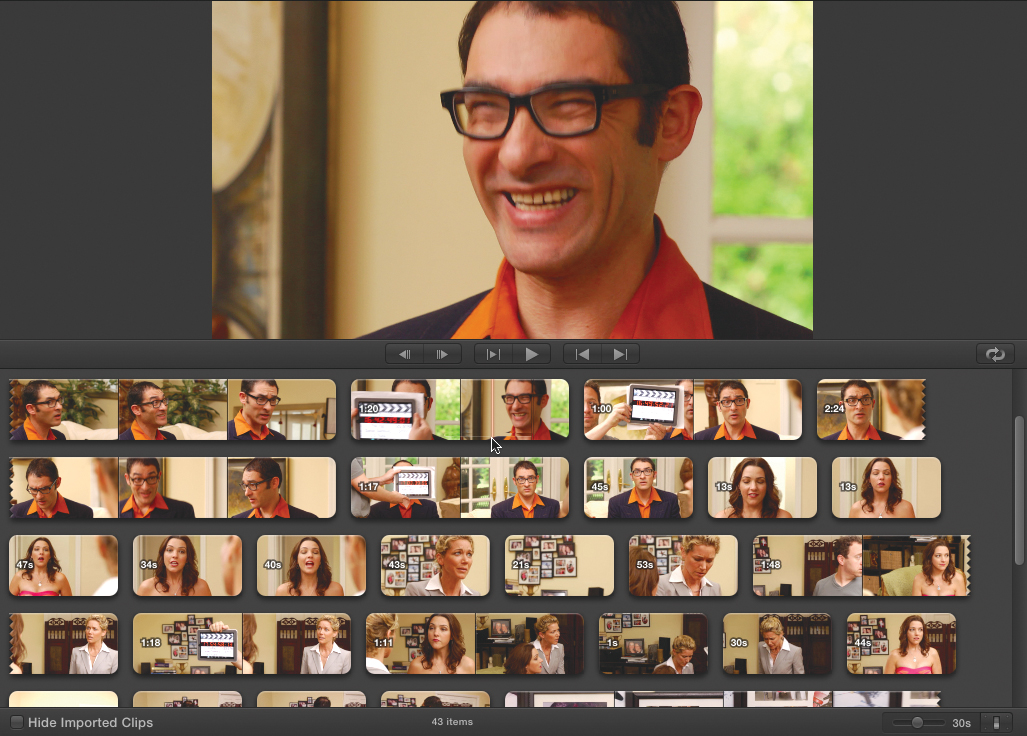
5. Press I and O to select the beginning and end of the section of a clip you want to import ![]() .
.
![]() Use the playback controls in the preview area as well as familiar keyboard shortcuts such as J-K-L, I, and O to select the range of a clip you want to import.
Use the playback controls in the preview area as well as familiar keyboard shortcuts such as J-K-L, I, and O to select the range of a clip you want to import.
6. Click Import Selection.
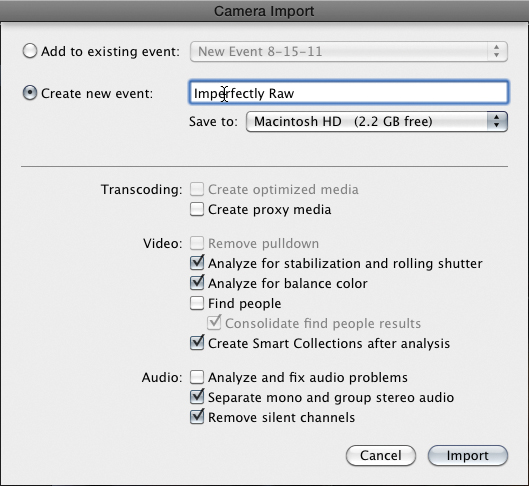
The Import Settings sheet appears ![]() .
.
![]() The Import Settings sheet allows you to choose your desired settings and analysis options prior to beginning the import.
The Import Settings sheet allows you to choose your desired settings and analysis options prior to beginning the import.
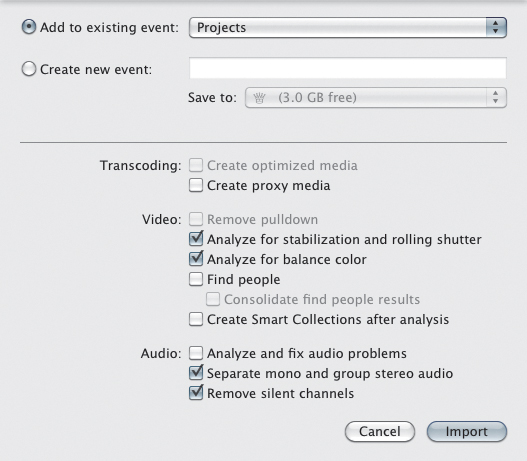
7. Select the event to which you want your imported footage stored, or create a new event and assign a hard disk on which to save it ![]() .
.
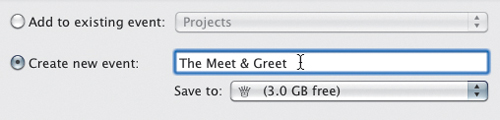
![]() Select an event or create a new one where you plan to save the imported clips.
Select an event or create a new one where you plan to save the imported clips.
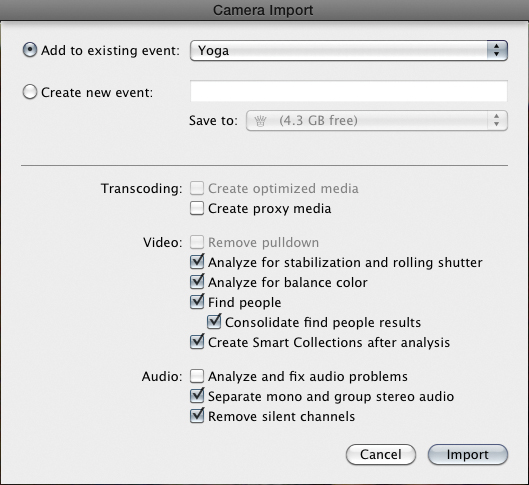
8. Enable the Transcoding, Video, and Audio analysis settings you want to apply, and click Import ![]() .
.
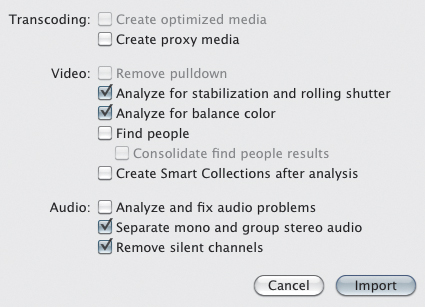
![]() Choose the import settings required for the current selection.
Choose the import settings required for the current selection.
For more on using these settings, see the “Import Settings” section.
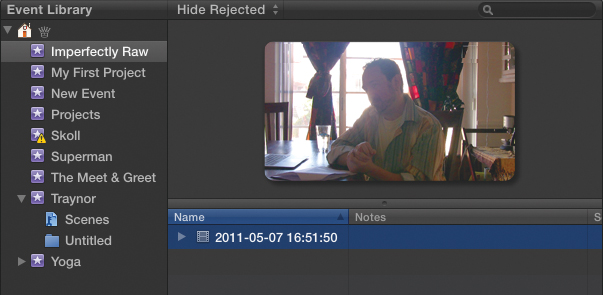
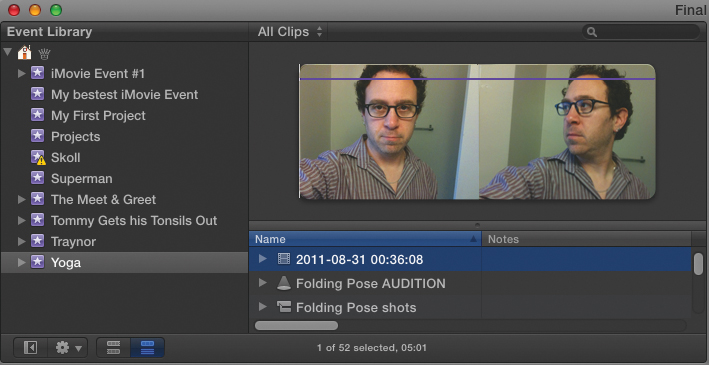
If you move the Camera Import window out of the way, you’ll see that the imported footage appears immediately in the chosen event ![]() .
.
![]() The imported video appears in the selected event (behind the Camera Import window).
The imported video appears in the selected event (behind the Camera Import window).
In the Camera Import window, the imported section is indicated with an orange bar ![]() .
.
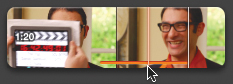
![]() As you import footage, orange marker bars indicate areas that have been imported.
As you import footage, orange marker bars indicate areas that have been imported.
As you’re working, you may want to hide the sections of your footage that have already been selected.
9. Enable the Hide Imported Clips checkbox.
Any imported footage is hidden ![]() .
.
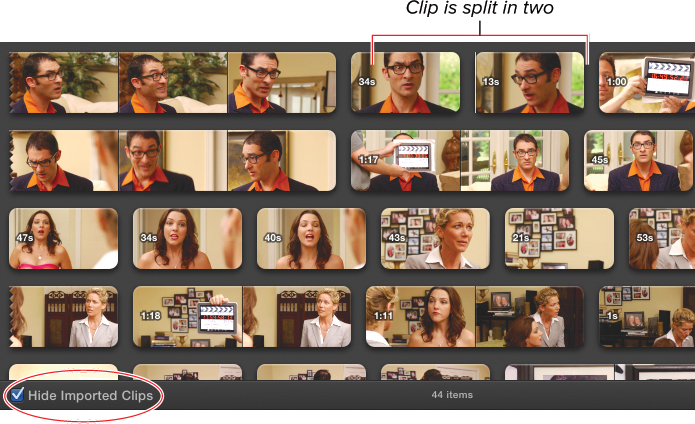
![]() If you enable the Hide Imported Clips setting, the imported areas are hidden. In this example, the remaining footage (before and after the selected area) was made into two separate clips.
If you enable the Hide Imported Clips setting, the imported areas are hidden. In this example, the remaining footage (before and after the selected area) was made into two separate clips.
10. Repeat steps 4–8 until you’ve imported all the clips you want to use.
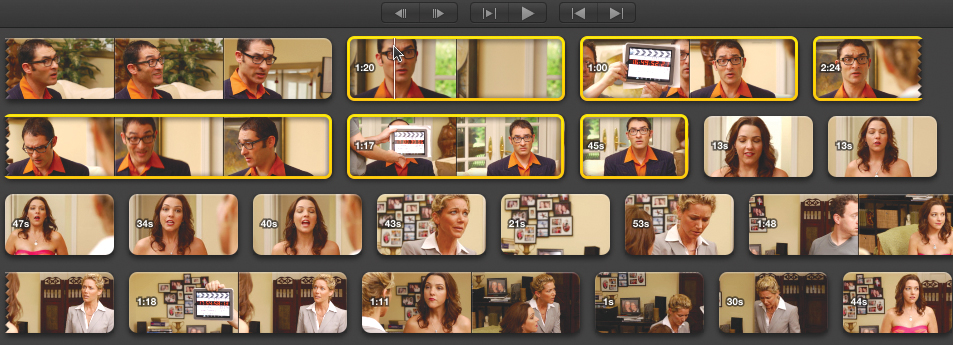
You can also select multiple clips at once by Shift-clicking or Command-clicking ![]() . Also, when no clips are selected, the Import Selected button becomes an Import All button
. Also, when no clips are selected, the Import Selected button becomes an Import All button ![]() , allowing you to quickly import all the footage from the camera in one step.
, allowing you to quickly import all the footage from the camera in one step.
![]() Shift-click or Command-click to select multiple clips at once.
Shift-click or Command-click to select multiple clips at once.
![]() If no clips are selected, the Import Selected button changes to an Import All button.
If no clips are selected, the Import Selected button changes to an Import All button.
11. To close the Camera Import window, click the Close button at the top left or the bottom right, or press Command-W or Command-I.
Note there are some devices whose media is not automatically recognized by FCP at this time. In such cases, such as when importing footage from Sony XDCAM or RED cameras, you’ll need to use a separate utility to convert the video files into a format recognizable by the software. Consult your camera’s documentation for more information.
How Files Are Imported So Fast
Little progress pie indicators ![]() appear for each clip as it being imported (both in the Camera Import window as well as in the Event Browser).
appear for each clip as it being imported (both in the Camera Import window as well as in the Event Browser).
Importing from Tape-Based Devices and Live Cameras
Of course, millions of tape-based cameras are still in use around the world, and as long as those cameras have a FireWire port, you’ll still be able to get their footage into your computer.
While FCP X does not facilitate the robust logging features found in previous versions, you can control a connected video device to rewind, cue up, and play back the video stored on the tape.
You can then choose to record the footage (in its native format—usually DV or HDV) and apply the same settings and analysis options described in the “Import Settings” section.
You can also import footage directly from the built-in camera found on all MacBooks, MacBook Pros, and iMacs, as well as any other connected webcam.
To import footage from a FireWire-enabled video device
1. Make sure the device is turned on, and connect it to your Mac using a FireWire cable.
2. Choose File > Import from Camera, press Command-I, or click the Import from Camera button in the toolbar ![]() .
.
![]() Click the Import from Camera button in the toolbar (or press Command-I).
Click the Import from Camera button in the toolbar (or press Command-I).
The Camera Import window appears ![]() .
.
![]() The Camera Import window opens.
The Camera Import window opens.
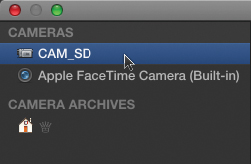
3. If it’s not already selected, choose the device from the Cameras list on the left ![]() .
.
![]() Select the device from which you want to import footage from the Cameras list on the left.
Select the device from which you want to import footage from the Cameras list on the left.
The main play-through window will display the contents of the tape-based device.
For a deck or a camcorder in playback mode, you can use the playback controls, allowing you to rewind, fast-forward, step forward or backward, play, or pause the device ![]() .
.
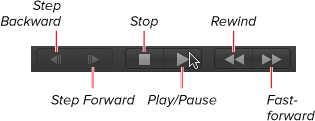
![]() Use the device control buttons to navigate the tape and cue up the section you want to record.
Use the device control buttons to navigate the tape and cue up the section you want to record.
For a camcorder in camera mode, you can still capture video, but the device control buttons will have no effect.
4. Cue up the tape, and begin playback on the device a few seconds prior to the section you want to import.
There may be a momentary lag before recording begins, so be sure to give yourself a few seconds of lead-in time.
5. Click Import.
The Import Settings sheet appears ![]() .
.
![]() The Import Settings sheet allows you to choose your desired settings and analysis options prior to beginning the import.
The Import Settings sheet allows you to choose your desired settings and analysis options prior to beginning the import.
6. Select the event to which you want your imported footage stored, or create a new event and assign a hard disk on which to save it.
7. Enable the Transcoding, Video, and Audio Analysis settings you want to apply, and click Import.
For more on using these settings, see the “Import Settings” section later in this chapter.
Recording begins automatically.
8. When you are done recording, click the Stop Import button or press Escape ![]() .
.
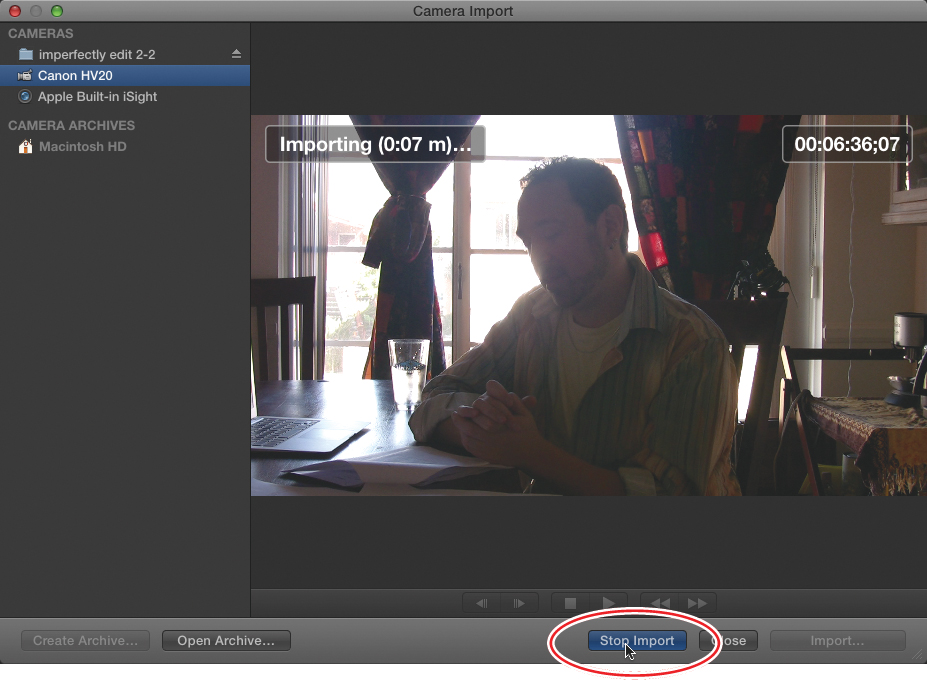
![]() To stop recording, click the Stop Import button (or press Escape).
To stop recording, click the Stop Import button (or press Escape).
The imported footage appears immediately in the chosen event ![]() .
.
![]() The imported video appears in the selected event.
The imported video appears in the selected event.
Clips imported from tape will automatically be split into multiple clips when a timecode break or scene break is encountered.
9. To close the Camera Import window, click the Close button at the top left or the bottom right, or press Command-W or Command-I.
Note that for tape-based cameras without a FireWire port, there are numerous third-party capture utilities you can utilize to import the footage and turn it into digital video files that can be edited in FCP. You can find more information on this topic online.
To import footage from an iSight/FaceTime camera
1. Choose File > Import from Camera and press Command-I, or click the Import from Camera button in the toolbar.
The Camera Import window opens ![]() .
.
![]() The Camera Import window opens.
The Camera Import window opens.
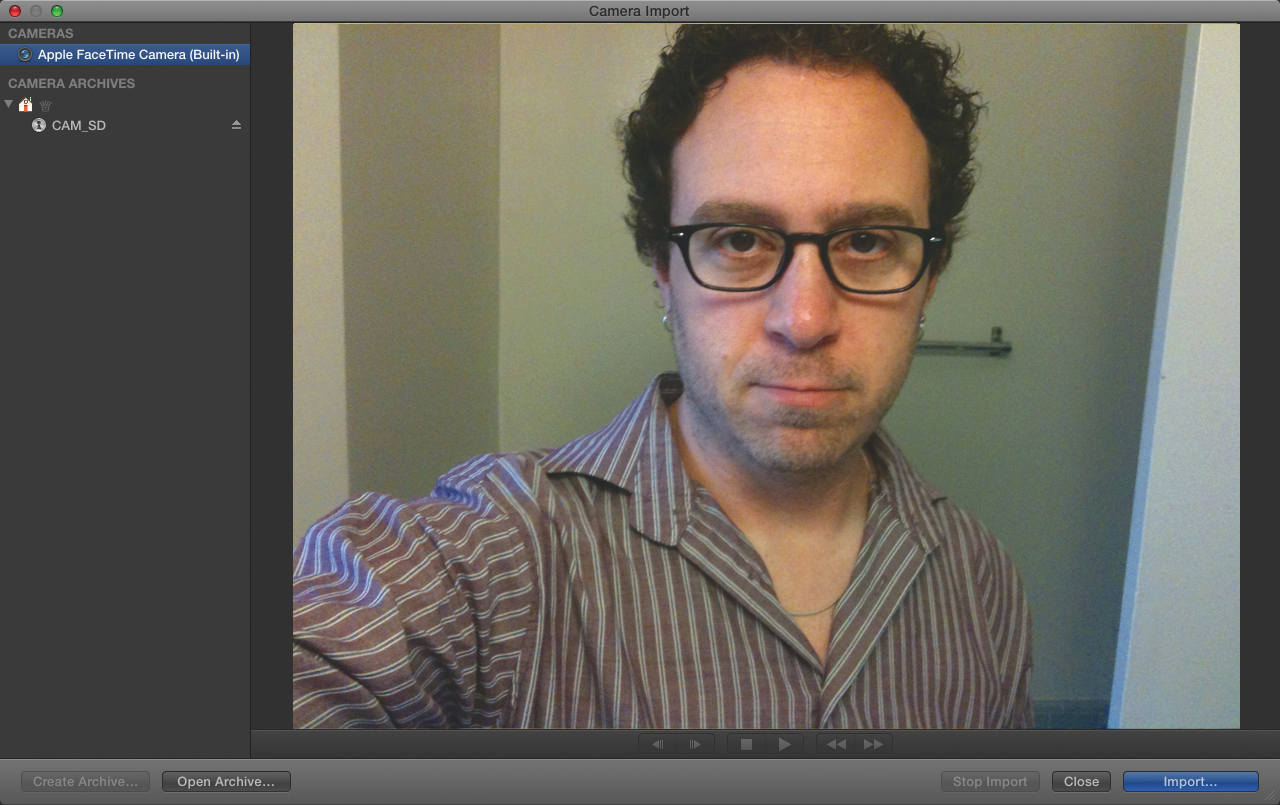
2. If it’s not already active, select the camera from the Cameras list on the left ![]() .
.
![]() Select the built-in FaceTime camera (or any attached webcam) from the Cameras list on the left.
Select the built-in FaceTime camera (or any attached webcam) from the Cameras list on the left.
The main play-through window displays the contents of the attached camera.
The Import Settings sheet appears ![]() .
.
![]() The Import Setting sheet allows you to set your choices for how the clip is handled upon import.
The Import Setting sheet allows you to set your choices for how the clip is handled upon import.
4. Select the event to which you want your imported footage stored, or create a new event and assign a hard disk on which to save it.
5. Enable the Transcoding, Video, and Audio analysis settings you want to apply, and click Import.
6. When you’re done recording, click the Stop Import button or press Escape.
The imported footage appears immediately in the chosen event ![]() .
.
![]() The imported footage appears in the selected event.
The imported footage appears in the selected event.
7. To close the Camera Import window, click the Close button at the top left or the bottom right, or press Command-W or Command-I.
Backing Up Your Footage
It’s a very wise idea to back up the footage from your camera, ideally to multiple hard drives. This is your most valuable asset, and in many cases it is irreplaceable.
FCP has a mechanism for creating a backup of your camera volume that is an identical copy of the original with all the camera metadata and file structure intact. This is called a camera archive.
Once the camera archive is created, you can access it in the Camera Import window and recover the files long after the camera memory has been erased.
To create a camera archive
1. In the Camera Import window, select the device you want to archive from the Cameras list ![]() .
.
![]() Select the device from the Cameras list, and click Create Archive.
Select the device from the Cameras list, and click Create Archive.
2. Click Create Archive.
The Create Archive sheet opens ![]() .
.

![]() Name your archive, and click OK.
Name your archive, and click OK.
The archive appears in the Camera Archives list. As it’s being saved, an indicator to the right of the name displays the progress ![]() .
.
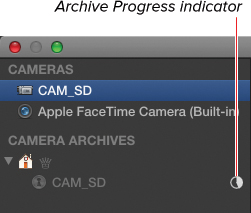
![]() The archive appears in the Camera Archives list, and as it’s being saved, an indicator shows the progress.
The archive appears in the Camera Archives list, and as it’s being saved, an indicator shows the progress.
By default, the archive is saved in a folder called Final Cut Camera Archives in your Movies folder.
For a more useful backup, you should save the archive on a different volume than where your events are stored.
To open an archive
• In the Camera Import window, select the archive from the Camera Archives list ![]() .
.
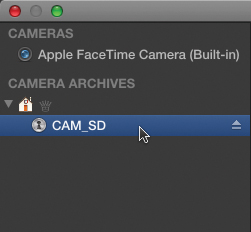
![]() Select the archive you want to restore. The volume automatically loads into the window.
Select the archive you want to restore. The volume automatically loads into the window.
The volume is loaded and works exactly the same as if you were looking at the camera original.
If the archive you want to mount does not appear in the list, click the Open Archive button at the bottom of the Camera Import window and navigate to the archive file on your hard disk.
You can also create archives from tape-based cameras. The entire tape will be stored as an archive, and later you can import sections just as you can when importing from file-based archives.
Import Settings
These Import settings (or a subset of them) appear in different windows depending on the import method you choose, but no matter where they appear, they have the same effect.
Organizing Settings
There are two checkboxes in the Organizing section of the Import Settings window ![]() .
.

![]() The Organize section controls whether files are copied to the events folder and whether folder names are imported as keywords.
The Organize section controls whether files are copied to the events folder and whether folder names are imported as keywords.
This section appears only when you’re using the Import Files command.
• Copy files to Final Cut Events folder: This option will copy all the data in your original media files into the event folder on your hard disk.
You need to enable this if you’re importing files directly from a device that is only temporarily available (such as a flash drive or a client’s hard drive, and so on).
If the files are already stored on a local hard disk, you may choose to disable this; however, in that case, it’s imperative that you do not delete the original media files.
If this setting is disabled, aliases will be added to the event folder that point to the original files.
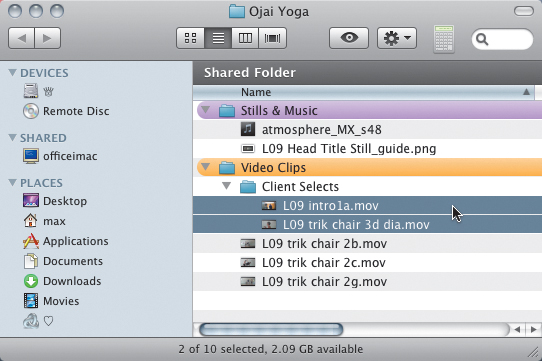
• Import folders as Keyword Collections: This setting re-creates the folder structure from the disk containing the files to be imported as sets of keyword collections in the FCP Event Browser ![]() .
.
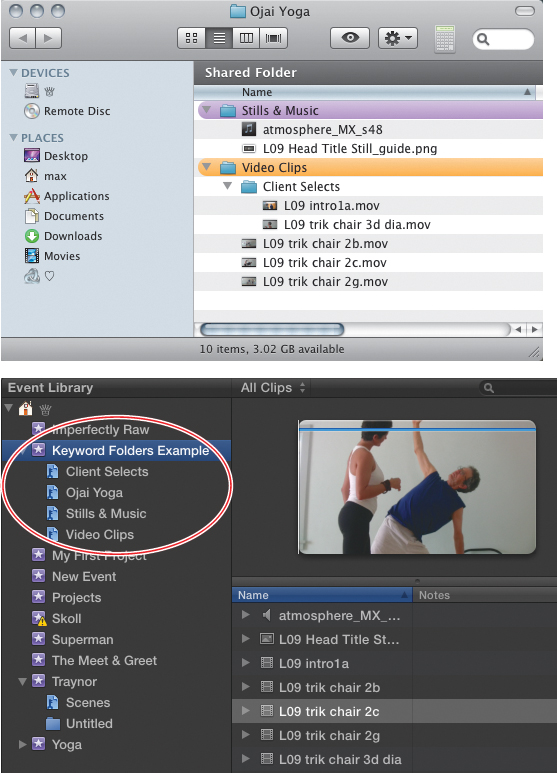
![]() When enabled, the original folder names from the disk you’re copying from are assigned as keywords to the clips within them. In this example, all of the clips were in the folder called Ojai Yoga, so all of the clips get that keyword, but only two clips were in the Client Selects folder, so only those two get that keyword, and so on.
When enabled, the original folder names from the disk you’re copying from are assigned as keywords to the clips within them. In this example, all of the clips were in the folder called Ojai Yoga, so all of the clips get that keyword, but only two clips were in the Client Selects folder, so only those two get that keyword, and so on.
Disable this checkbox if you’re importing files directly from a camera or camera memory card. Optionally, enable it if you’re importing files from another location on your hard disk.
For more on keyword collections, see Chapter 4, “Marking Clips.”
Transcoding Settings
The Transcoding section allows you to instruct FCP to create duplicate copies of all your media files in alternative file formats ![]() .
.
![]() The Transcoding settings enable you to convert your imported video into ProRes format clips that are optimized for playback in FCP.
The Transcoding settings enable you to convert your imported video into ProRes format clips that are optimized for playback in FCP.
You can transcode clips at any time (not just during Import) by right-clicking a clip, folder, collection, or whole event, and choosing Transcode Media from the shortcut menu.
• Create Optimized Media: Enabling this checkbox will create a duplicate copy of all your files in one of the ProRes formats. The specific ProRes format is determined automatically based on the quality level of the source footage being transcoded.
This can improve performance, ensure wider compatibility, and ensure consistent image quality across varied source footage types. On the other hand, it takes a long time and uses up a lot of disk space.
When optimized media exists, FCP will automatically use that version of the media instead of the original source footage. Optimized media is always stored in the event folder.
• Create Proxy Media: Enabling this checkbox will create a duplicate copy of all your files in the ProRes 422 (Proxy) format.
Once proxy media exists, you can select whether to use the proxies instead of the original source footage (or the optimized footage if it exists). Proxy media is always stored in the event folder.
To enable use of proxy media across all projects
1. Choose Final Cut Pro > Preferences.
The Preferences window opens ![]() .
.
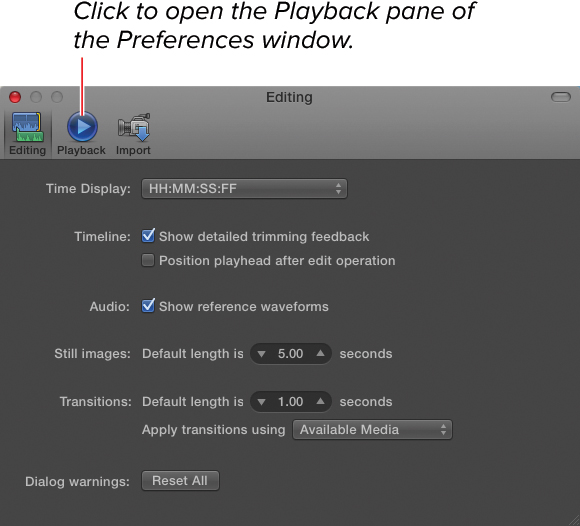
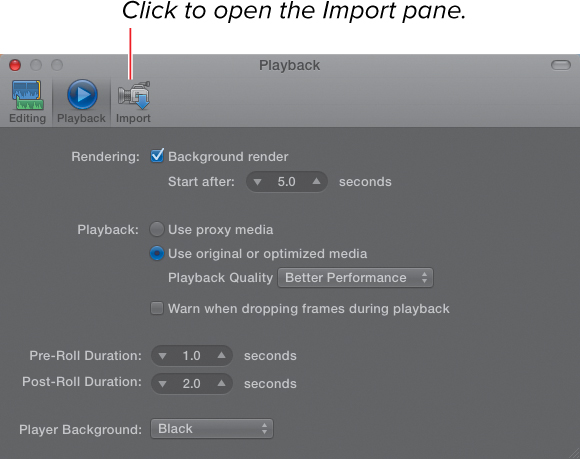
![]() Open the Preferences window, and click the Playback icon to open the Playback pane.
Open the Preferences window, and click the Playback icon to open the Playback pane.
2. Click the Playback icon to open the Playback pane.
The Playback pane opens.
3. Click the “Use proxy media” radio button, and close the Preferences window ![]() .
.
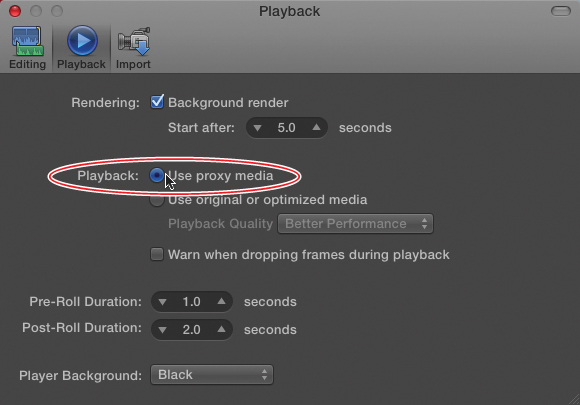
![]() In the Playback pane, select the “Use proxy media” setting.
In the Playback pane, select the “Use proxy media” setting.
FCP substitutes the proxy media (if available) for all other media.
IMPORTANT: If you enable the Use proxy media setting, it applies to all events and projects in FCP. If proxy media does not exist for a particular event or project, you will see the Offline Files warning instead of the video clips ![]() .
.
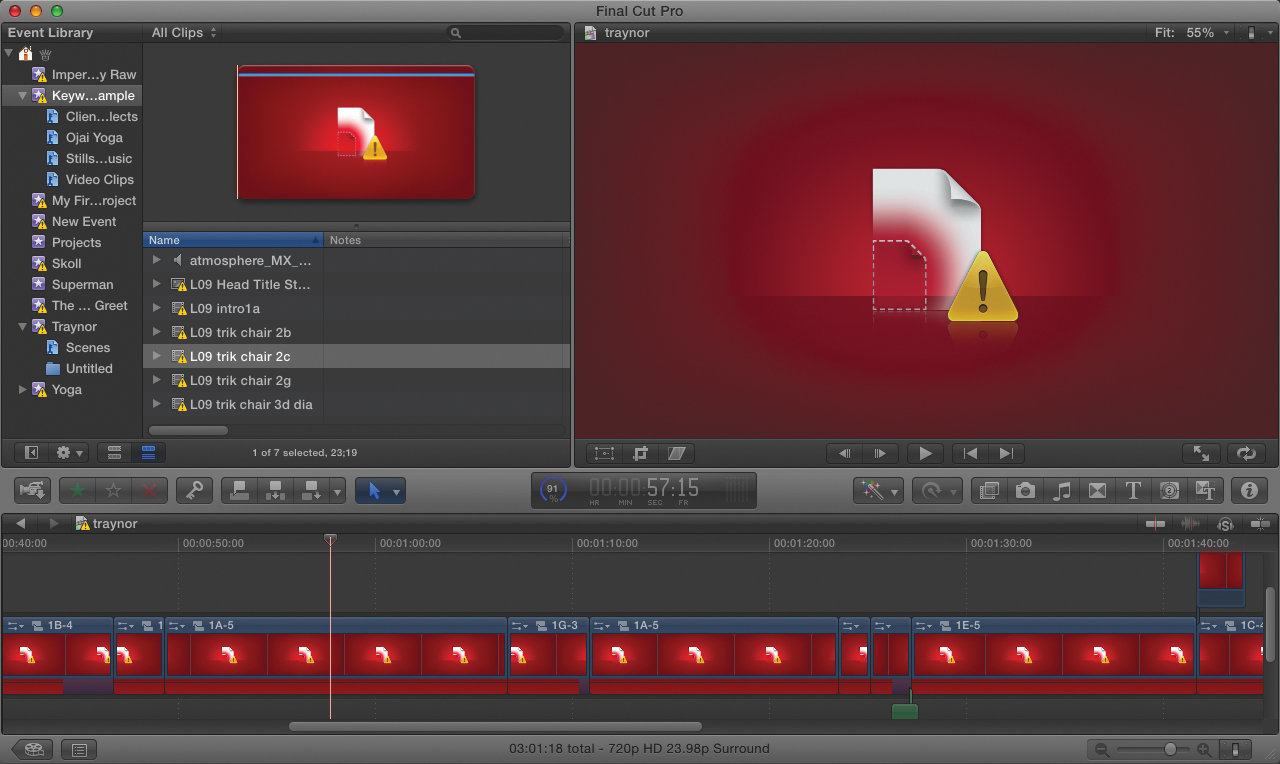
![]() If you have your preferences set to use proxies but there are no proxies in one of your events or projects, you will see the Offline Media warning in the Event Browser, the Viewer, or the Timeline.
If you have your preferences set to use proxies but there are no proxies in one of your events or projects, you will see the Offline Media warning in the Event Browser, the Viewer, or the Timeline.
To stop using proxies and use original or (if available) optimized media
• In the Playback pane of the Final Cut Pro Preferences window, choose the “Use original or optimized media” setting ![]() .
.
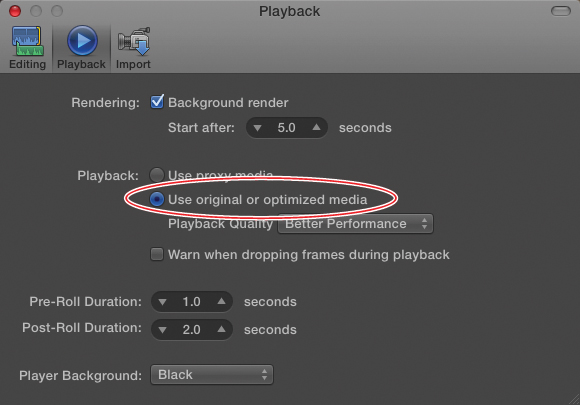
![]() Disable the “Use proxy media” setting to stop using proxies and use the original or (if available) optimized media instead.
Disable the “Use proxy media” setting to stop using proxies and use the original or (if available) optimized media instead.
Your original media or (if available) your optimized media will be used instead of the proxies.
Video Analysis
This section contains settings enabling different types of data analysis of the video image ![]() .
.
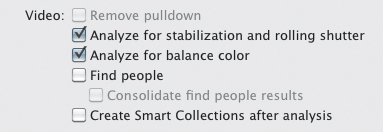
![]() Video settings provide options to analyze your clips for a variety of information that will speed up and ease your editing work.
Video settings provide options to analyze your clips for a variety of information that will speed up and ease your editing work.
• Remove pulldown: This setting is available only for footage at certain frame rates.
If prior frame-rate conversion (as occurs during telecine or when using some formats such as some frame rates in DVCPro HD or 24fps DV) has inserted duplicate frames, selecting this option will remove the extra frames and return your footage to its native frame rate (usually 24fps).
• Analyze for stabilization and rolling shutter: This option searches the footage for instances of extremely shaky camera work and instances of rolling shutter artifacts.
Once analyzed, analysis keywords are automatically added to areas in your footage where such problems might exist ![]() .
.
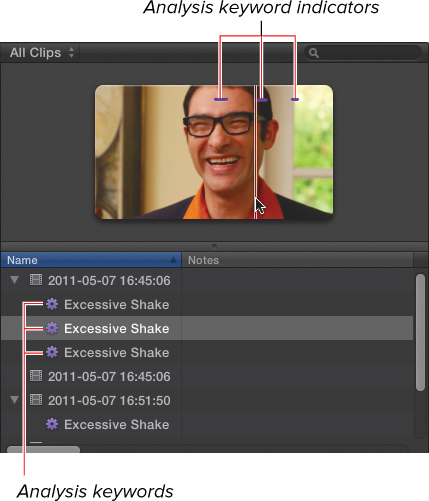
![]() Analysis keywords are added to sections of the footage where the camera was shaken excessively or had rolling shutter artifacts.
Analysis keywords are added to sections of the footage where the camera was shaken excessively or had rolling shutter artifacts.
By analyzing during import, you can correct these problems instantaneously during the editing process rather than waiting for analysis to occur after adding a clip to a project and enabling one of the correction settings in the Video Inspector ![]() .
.
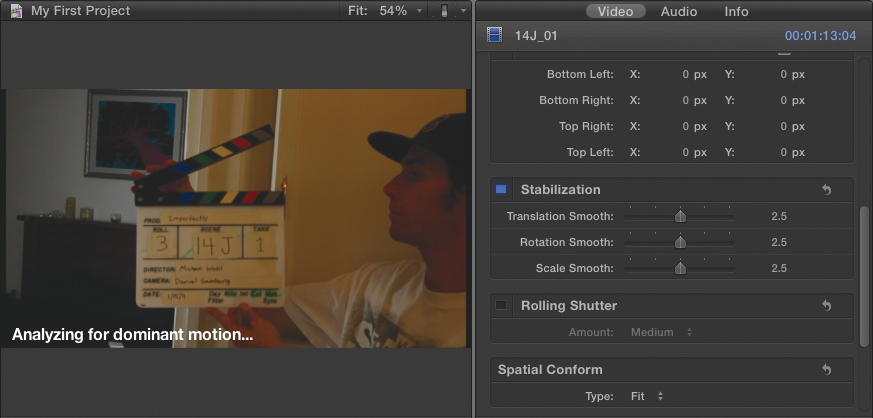
![]() If analysis hasn’t yet occurred, enabling the Image Stabilizer or Rolling Shutter controls in the Video Inspector forces analysis to begin. A warning appears in the Viewer to alert you that stabilization cannot yet be applied.
If analysis hasn’t yet occurred, enabling the Image Stabilizer or Rolling Shutter controls in the Video Inspector forces analysis to begin. A warning appears in the Viewer to alert you that stabilization cannot yet be applied.
Image Stabilization and Rolling Shutter controls are available only for clips in a project. Raw clips in the Event Browser cannot be stabilized.
On the other hand, this analysis takes a very long time, and you wind up potentially analyzing gobs of footage you never intend to use, whereas analyzing later allows you to examine only the specific footage you choose to edit into your project.
• Analyze for balance color: This setting instructs FCP to examine the color balance settings of your source footage. That way, if you later enable the Balance Color setting in the Color section of the Video Inspector, the color balance will happen instantaneously.
If you skip the analysis, you can still balance a clip’s color, but you will have to wait for the analysis to occur upon activation of the Balance Color control ![]() .
.
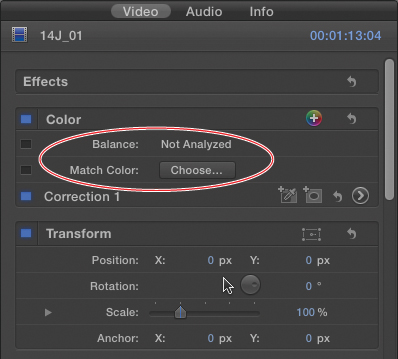
![]() If analysis hasn’t yet occurred, the Balance Color setting indicates such.
If analysis hasn’t yet occurred, the Balance Color setting indicates such.
For more on balancing color, see the “Color Balance” section of Chapter 15, “Color Correction.”
• Find People: This setting uses facial recognition technology to search your footage for clips containing human faces.
It then uses the approximate size of the faces it finds in the frame to assign a shot size (Close-up, Medium Shot, Wide Shot, and so on) and the number of faces (two-shot, group shot, and so on)
Once analyzed, analysis keywords are automatically added to your footage identifying areas spotted by the analysis ![]() .
.
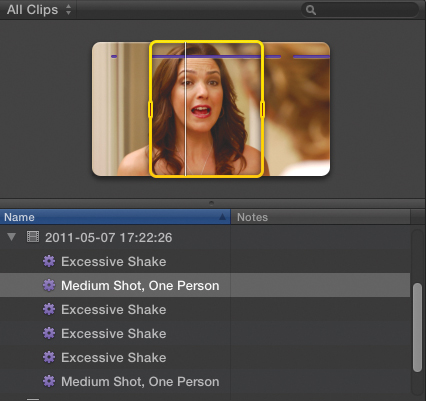
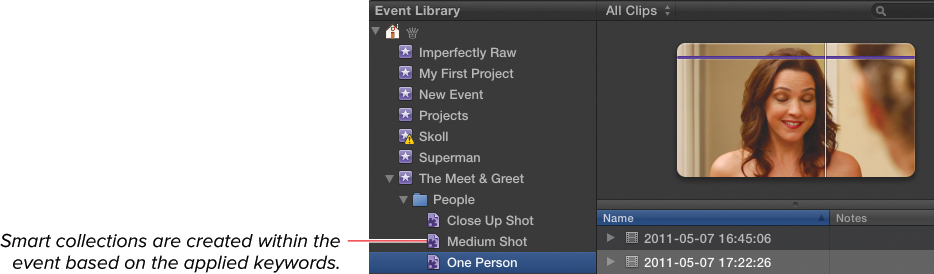
![]() Analysis keywords are added to indicate clips containing faces. In this example, the analysis thinks this is a Medium Shot of One Person. Most humans would consider this a close-up, and technically, it has two people in the frame.
Analysis keywords are added to indicate clips containing faces. In this example, the analysis thinks this is a Medium Shot of One Person. Most humans would consider this a close-up, and technically, it has two people in the frame.
While this sort of analysis is a nice idea in theory, its usefulness is limited in practice. Shots frequently change over time in ways that defeat the analysis: A person turning away from the camera is not recognized; people entering or exiting the frame change the number of faces. Occasionally inanimate objects are misread as faces, and the decision the software makes about what constitutes a close-up, medium shot, or wide shot seems fairly inconsistent or at least oversimplified.
Still, if you have a bunch of interviews peppered throughout a large pile of nonhuman subject footage, this analysis will do a great job of identifying those moments automatically.
• Consolidate find people results: If you choose to enable the Find People analysis, you can further choose whether to mark the analysis keywords for the duration of the shot versus only for the exact frames where the people are visible ![]() .
.

![]() Consolidating the results means keywords will be grouped. This figure shows the same image analyzed without consolidation (on top) and with consolidation (on bottom). The top example is more precise; when the actor moves out of frame temporarily, the keyword (indicated by the purple bar) goes away. The bottom example might be more convenient however, since overall the shot is of this subject, even if there are a few frames here and there where he isn’t visible.
Consolidating the results means keywords will be grouped. This figure shows the same image analyzed without consolidation (on top) and with consolidation (on bottom). The top example is more precise; when the actor moves out of frame temporarily, the keyword (indicated by the purple bar) goes away. The bottom example might be more convenient however, since overall the shot is of this subject, even if there are a few frames here and there where he isn’t visible.
• Create Smart Collections after analysis: Enabling this checkbox will add smart collections based on any keywords added during the analysis.
So, if there are sections of your footage with rolling shutter issues or clips containing close-ups of people, smart collections are automatically added to the event, enabling you to easily locate those keyworded sections ![]() .
.
![]() Smart collections are automatically generated based on the analysis keywords.
Smart collections are automatically generated based on the analysis keywords.
Because they are smart, any new clips with similar attributes that get added to the event will automatically be added to the existing collection.
Audio Analysis
This section contains three checkboxes to facilitate automatic correction of common audio problems:
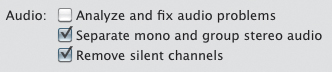
• Analyze and fix audio problems: This checkbox enables analysis of clip audio to identify areas that could benefit from audio compression (aka loudness), background noise reduction, and hum removal.
You can then use the controls in the Audio Enhancements Inspector to make these common corrections ![]() .
.
![]() The Audio Enhancements Inspector relies on this analysis, but if you haven’t already done it, the analysis can be performed manually at any time.
The Audio Enhancements Inspector relies on this analysis, but if you haven’t already done it, the analysis can be performed manually at any time.
Because audio analysis is very quick, it’s largely irrelevant whether or not you perform the analysis during import or later, when you want to adjust specific audio settings.
For more on audio enhancements, see Chapter 12, “Audio Effects.”
• Separate mono and group stereo audio: This option scans your audio files to identify tracks that were recorded in stereo (more common on consumer camcorders) or mono (more common on professional audio recording equipment). Based on the results, it assigns the relevant settings in the Audio Inspector appropriately: Mono tracks are kept discrete, and the pan settings are assigned as centered ![]() . Stereo tracks are grouped into pairs with the pan settings split to the left and right
. Stereo tracks are grouped into pairs with the pan settings split to the left and right ![]() .
.
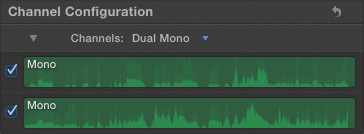
![]() Mono audio tracks displayed in the Audio Inspector
Mono audio tracks displayed in the Audio Inspector
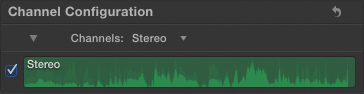
![]() Stereo audio tracks displayed in the Audio Inspector
Stereo audio tracks displayed in the Audio Inspector
• Remove silent channels: Selecting this option instructs FCP to scan your footage for audio tracks containing no data. Such tracks are hidden in the Audio Inspector and are never included when a clip is edited into a project.
Importing Files
If you have any video, audio, or still-image files on a connected hard disk and you want to use them in FCP, you can import them into an event using the Import Files window.
You can also use this method for some camera-original files when the volume doesn’t appear in the Camera Import window (such as from the Canon 5D or 7D).
You can also drag and drop files from any folder on your hard disk into a FCP event or even directly into an open Timeline.
To import files
1. Choose File > Import > Files.
The Import Files window opens ![]() .
.
![]() The Import Files window
The Import Files window
2. Navigate to the folder containing the files you want to import.
When importing files from a camera volume, select the top-level folder, and FCP will figure out where the usable video files are.
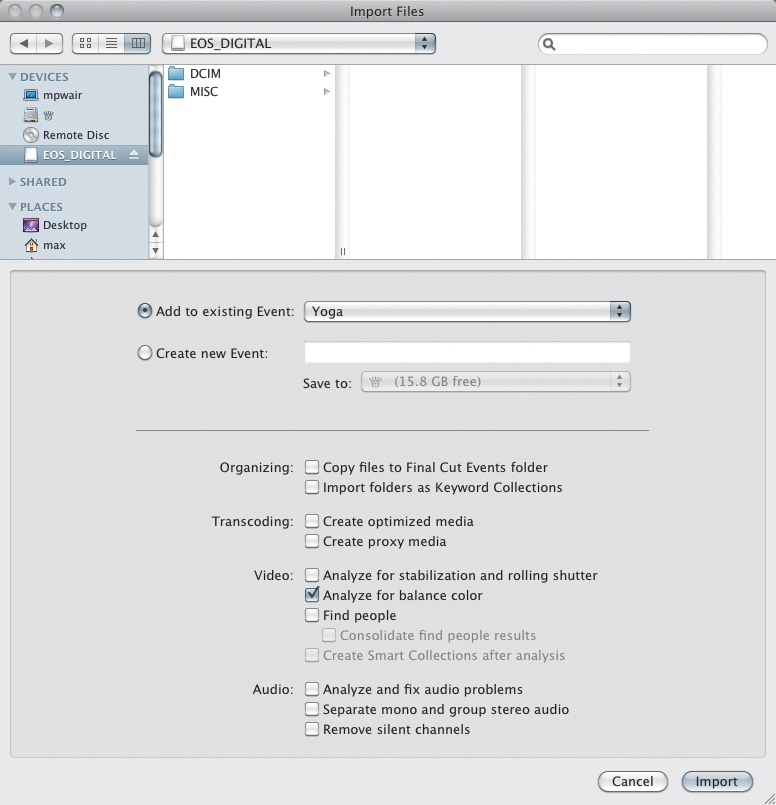
3. Select the event into which you want to import the files, or create a new event. If you create a new event, specify the disk where you want to save it ![]() .
.
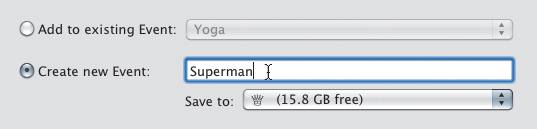
![]() Chose an event where you want to import the files, or create a new event and specify a disk on which to save it.
Chose an event where you want to import the files, or create a new event and specify a disk on which to save it.
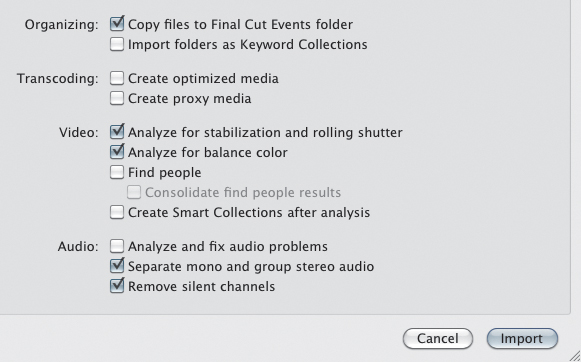
4. Specify the Import Settings you desire as described in the “Import Settings” section earlier in this chapter ![]() .
.
![]() Select the appropriate import settings, and click Import.
Select the appropriate import settings, and click Import.
If the folder you selected contains unreadable files, FCP will show a warning, identifying the files that cannot be imported ![]() .
.
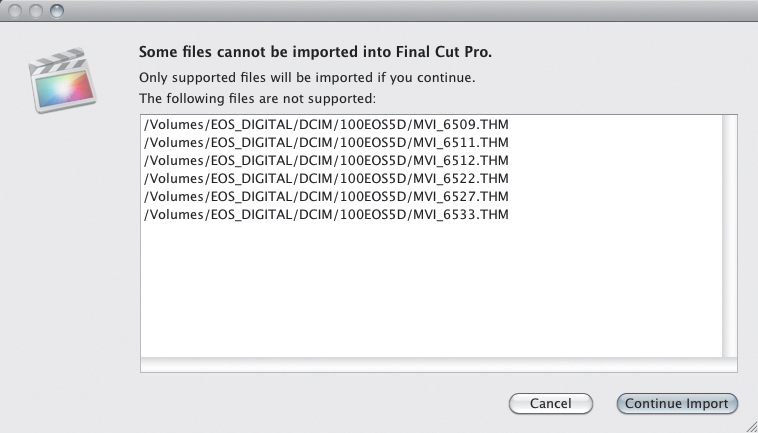
![]() You will be warned if there are files inside the selected folder that cannot be imported.
You will be warned if there are files inside the selected folder that cannot be imported.
6. Click Continue Import.
The files are imported into the selected event ![]() .
.
![]() The files are instantly added to the selected event.
The files are instantly added to the selected event.
To drag and drop files from the Finder into FCP
1. Open the Finder window containing the file(s) you want to import ![]() .
.
![]() Select the files in the Finder that you want to import.
Select the files in the Finder that you want to import.
2. Select the file(s), and do one of the following:
• Drag the files to the FCP Timeline ![]() .
.
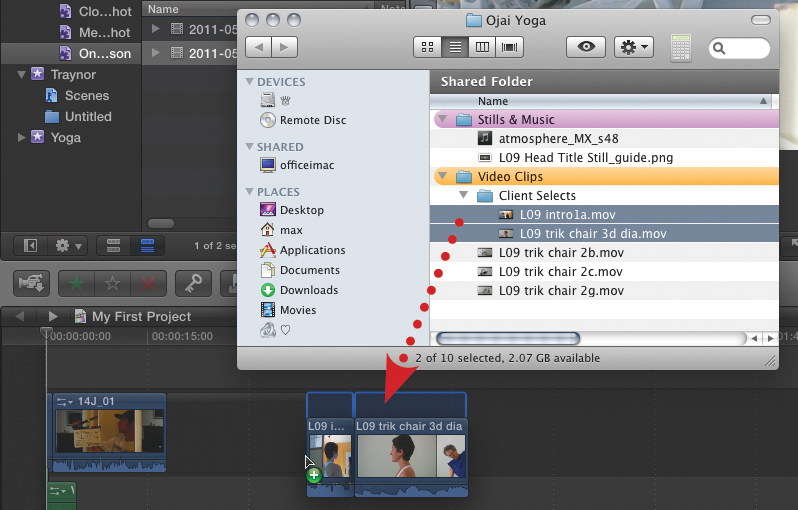
![]() You can drag directly to the Timeline.
You can drag directly to the Timeline.
• Drag the files to an event in the FCP Event Library ![]() .
.
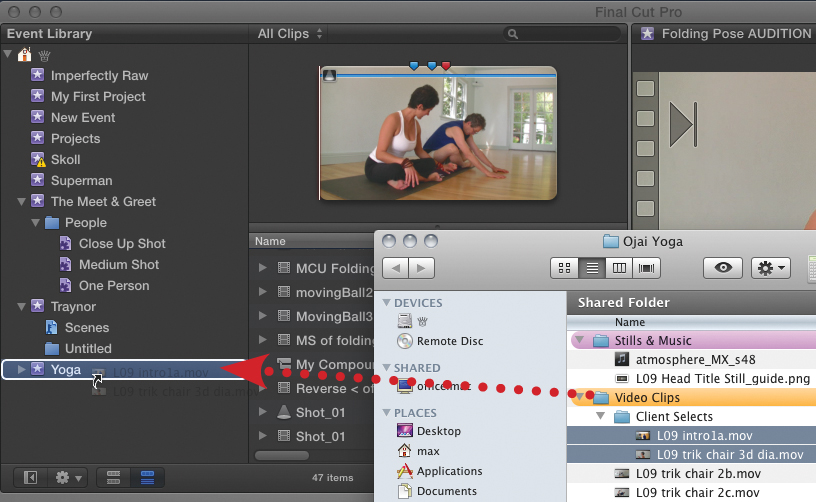
![]() You can also drag the files to an event in the Event Library.
You can also drag the files to an event in the Event Library.
Note that you cannot drag files to the Event Browser.
Import Preferences
When importing files using drag and drop, you can still determine whether to transcode the files or perform analysis on either video or audio.
These settings are determined by the controls in the Import preferences, which are identical to the settings described in the “Import Settings” section earlier in this chapter.
To choose import settings for clips dragged and dropped into FCP from the Finder
1. Choose Final Cut Pro > Preferences.
The Preferences window opens ![]() .
.
![]() Open the FCP Preferences window.
Open the FCP Preferences window.
2. Click the Import icon to open the Import pane.
The Import pane opens ![]() .
.
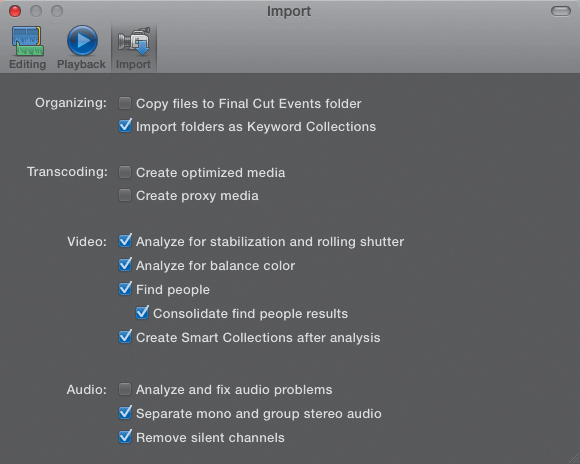
![]() The Import pane contains all the familiar import settings.
The Import pane contains all the familiar import settings.
3. Enable the checkboxes for the settings you want to apply.
4. Close the Preferences window.
For more information about the specific settings, see “Import Settings” earlier in this chapter.
Importing from iPhoto, Aperture, or Photo Booth
You can import still images from any folder on your computer using the steps described in the earlier “Importing Files” section, but if you want to import photos directly from your iPhoto, Aperture, or Photo Booth libraries, you can do that from the Photos Browser.
To import photos from other Apple applications
1. Click the Show Photos Browser button in the toolbar ![]() .
.
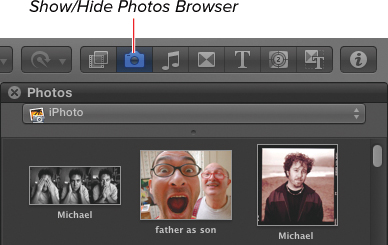
![]() Click the Show Photos Browser button.
Click the Show Photos Browser button.
The Photos Browser opens to the right of the Timeline ![]() .
.
![]() The Photos Browser opens.
The Photos Browser opens.
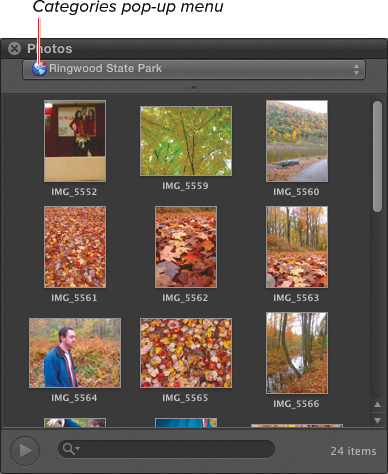
2. Click the Categories pop-up menu to choose a specific library, album, place, or other category ![]() .
.
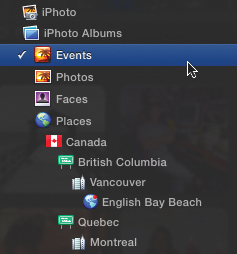
![]() Choose a category of photos from the pop-up menu.
Choose a category of photos from the pop-up menu.
The photos in that group are displayed in the stack ![]() .
.
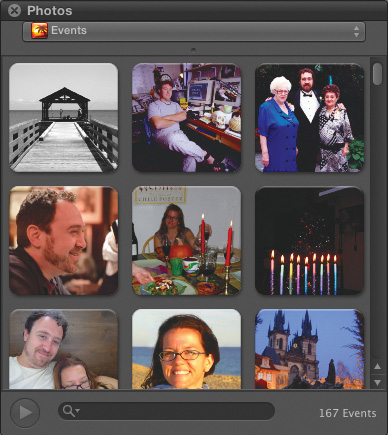
![]() The contents of the category are displayed in the stack area.
The contents of the category are displayed in the stack area.
3. Select one or more photos from the stack area ![]() .
.
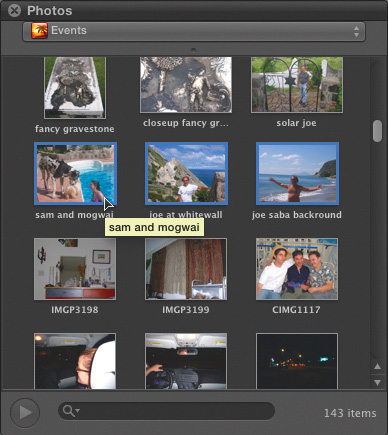
![]() Shift-click or Command-click to select more than one photo.
Shift-click or Command-click to select more than one photo.
Selected photos are highlighted in blue.
You can shift-click to select a range of photos or Command-click to select a group of individual photos.
You can double-click a photo to see a larger preview of it. Double-click again to return to the full list.
4. Drag the selected photo(s) to the Timeline or to an event in the Event Library ![]() .
.
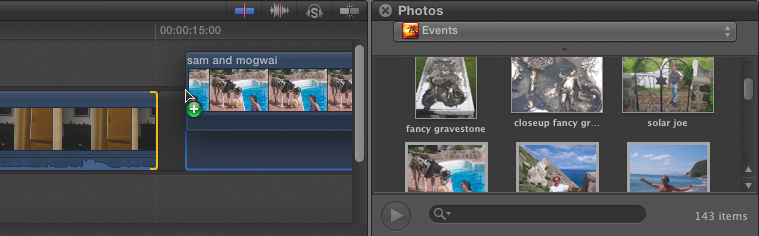
![]() Drag your selection into the Timeline or Event Library.
Drag your selection into the Timeline or Event Library.
Importing from iTunes
Similarly to working with photos, you can manually import any audio file from a folder in the Finder using the steps described in the earlier “Import Files” section, or you can directly access the library, playlists, and individual songs in your iTunes library from within FCP using the Music and Sound Browser.
The Music and Sound Browser contains all the sound effects files that come bundled with FCP, all the files bundled with iMovie, and all the files in your iTunes library.
To import sound and music files
1. Click the Show Music and Sound Browser button in the toolbar ![]() .
.
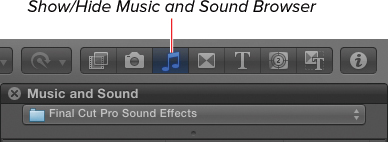
![]() Click the Show/Hide Music and Sound Browser button.
Click the Show/Hide Music and Sound Browser button.
The Sound and Music Browser opens to the right of the Timeline ![]() .
.
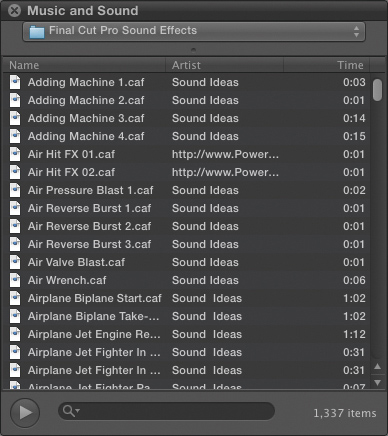
![]() The Sound and Music Browser opens.
The Sound and Music Browser opens.
2. Click the Categories pop-up menu to select a specific library, category, or iTunes playlist ![]() .
.
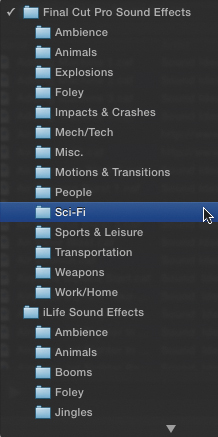
![]() Choose a category of sound effects or music from the pop-up menu.
Choose a category of sound effects or music from the pop-up menu.
The files in the selected item appear in the stack ![]() .
.
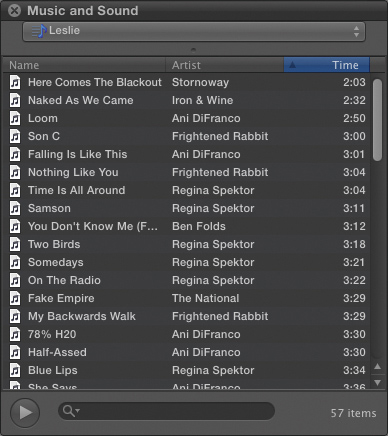
![]() The stack shows the contents of the selected category. In this example, an iTunes playlist has been selected.
The stack shows the contents of the selected category. In this example, an iTunes playlist has been selected.
3. Optionally type in the search field to refine the list of results displayed ![]() .
.
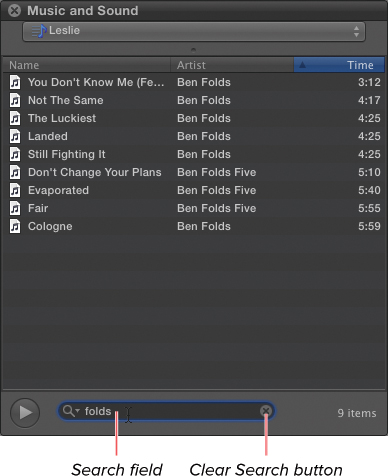
![]() Use the search field to refine your list. Clear the search field by clicking the Clear Search button.
Use the search field to refine your list. Clear the search field by clicking the Clear Search button.
4. Click any individual item in the list, and click the Preview button to hear a preview of that audio clip ![]() .
.
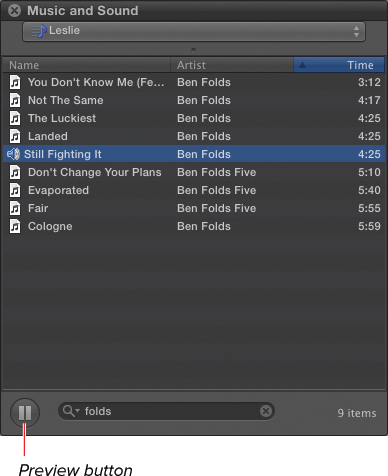
![]() Click the Preview button, or double-click any item in the list to preview it.
Click the Preview button, or double-click any item in the list to preview it.
Click the Preview button again to stop the preview.
You can also select a sound file in the stack and click the Preview button to the left of the search field to hear a preview.
5. When you find the file you’re searching for, drag it to the Timeline or to an event in the Event Library.
Importing from iMovie
Despite the complaints from previous FCP users that FCP X was nothing more than just “iMovie Pro,” for existing iMovie users, FCP X really is like the best upgrade you could ever desire!
Best of all is that you can easily import your existing iMovie events and projects directly into FCP X and pick up right where you left off working in iMovie.
To import your iMovie Events Library
1. Choose File > Import > Import iMovie Events Library ![]() .
.

![]() Choose Import iMovie Events from the File menu.
Choose Import iMovie Events from the File menu.
An alert appears, indicating that if you previously imported your Events Library, only new events will be imported ![]() .
.
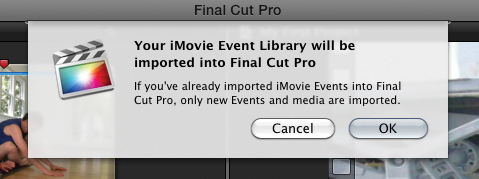
![]() Acknowledge the warning that only new events will be imported.
Acknowledge the warning that only new events will be imported.
2. Click OK.
The iMovie events are added to your FCP Event Library ![]() .
.
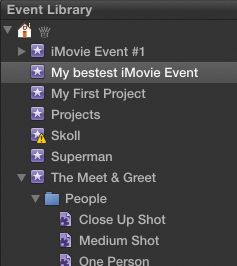
![]() Your iMovie Events are added to your FCP Event Library.
Your iMovie Events are added to your FCP Event Library.
To import an iMovie project
1. Choose File > Import > Import iMovie Project.
The Import iMovie Project window opens and displays a list of existing iMovie projects ![]() .
.

![]() The Import iMovie Project window opens, already pointing at the iMovie Projects directory in your Movies folder.
The Import iMovie Project window opens, already pointing at the iMovie Projects directory in your Movies folder.
2. Select the project you want to import, and click Import.
The project is added to your FCP Project Library ![]() .
.
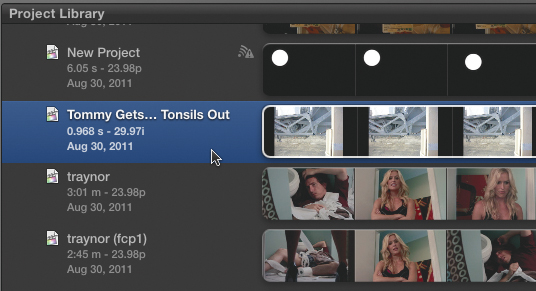
![]() The iMovie Projects are added to your FCP Project Library.
The iMovie Projects are added to your FCP Project Library.
Importing Live Audio
It’s not uncommon that you need to record some voice-over, replacement dialogue, or even foley sound effects during the editing process.
For best results, you probably want to connect a high-quality, professional microphone to your computer to do such recordings, but in a pinch you can just use the built-in mic that comes on any Mac with an iSight/FaceTime camera.
You can store the newly recorded audio in an event to later be edited into a project, or if you have a project open, you can record the audio directly into the Timeline while it plays.
This second option allows you to easily replace existing audio (also known as ADR—alternate dialogue replacement) or to record a voice-over while watching your movie play.
To record live audio to an event
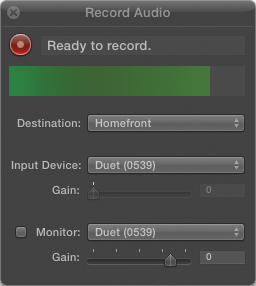
1. Choose Window > Record Audio.
The Record Audio window opens ![]() .
.
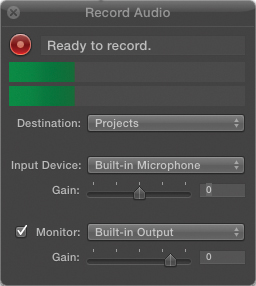
![]() Open the Record Audio window.
Open the Record Audio window.
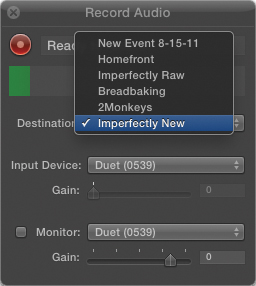
2. Click the Destination pop-up to select an event where you want the new audio file to be saved ![]() .
.
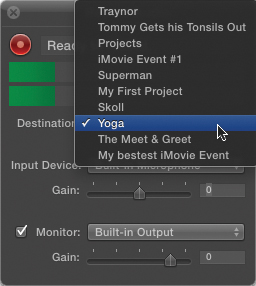
![]() Choose the event in the Destination menu where you want the audio files to be saved.
Choose the event in the Destination menu where you want the audio files to be saved.
3. Click the event in the Event Library to make sure the Timeline is not selected ![]() .
.

![]() To ensure that you’re recording only to an event (and not a project), click an event in the Event Library to make that pane active.
To ensure that you’re recording only to an event (and not a project), click an event in the Event Library to make that pane active.
You can also open the Project Library window to ensure your new audio doesn’t accidentally wind up inside some project.
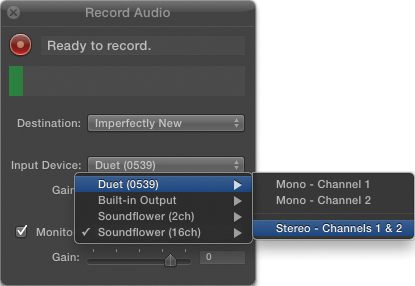
4. Select the microphone you want to use from the Input Device pop-up menu ![]() .
.
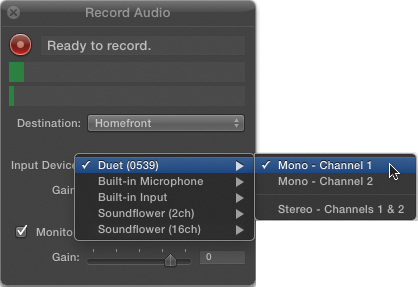
![]() Select a mic input from the Input Device pop-up menu.
Select a mic input from the Input Device pop-up menu.
5. Perform a test example of the audio, and using the audio meters at the top of the Record Audio window, adjust the Gain slider until the audio is at a nice, solid level without hitting the red at the top of the meters’ range ![]() .
.
![]() Test your audio levels, and adjust the gain slider as needed to ensure a good level (lots of green and no red in the audio meters).
Test your audio levels, and adjust the gain slider as needed to ensure a good level (lots of green and no red in the audio meters).
6. When you’re ready to record, click the red Record button ![]() .
.
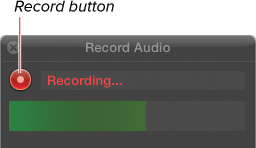
![]() Click the Record button to begin recording, and click it again to stop recording.
Click the Record button to begin recording, and click it again to stop recording.
Recording begins immediately.
7. When you’re finished recording, click the Record button again.
Recording is stopped.
To record live audio directly to the Timeline
1. In the Record Audio window, select the destination (event) where you want the new audio file to be saved ![]() .
.
![]() Set the event where you want the audio recording to be saved.
Set the event where you want the audio recording to be saved.
2. Position the playhead in the Timeline at the point where you want to begin laying down the new audio ![]() .
.
![]() Set the Timeline playhead to the position where you want recording to begin.
Set the Timeline playhead to the position where you want recording to begin.
For best results, set the starting point a few seconds before the moment where you want the audio to begin. You can always trim off that beginning edge later.
3. In the Record Audio window, select the microphone you want to use from the Input Device pop-up menu.
4. Perform a test example of the audio, and using the audio meters at the top of the Record Audio window, adjust the Gain slider until the audio is at a nice, solid level without hitting the red at the top of the meters’ range.
5. If you have headphones connected to your Mac, you can optionally enable the Monitor section and select an audio output from the pop-up menu ![]() .
.
![]() Enable the checkbox next to the Monitor setting, and use the pop-up menu to choose which sound output you want to monitor.
Enable the checkbox next to the Monitor setting, and use the pop-up menu to choose which sound output you want to monitor.
This allows you to hear the existing audio in the Timeline while you’re recording.
6. Adjust the Monitor Gain slider so it is loud enough that you can comfortably hear the audio but quiet enough that the audio doesn’t spill out of the headphones and get picked up by the microphone recording the new audio.
7. When you’re ready to record, click the red Record button.
The Timeline playhead begins moving, and recording begins immediately.
8. When you’re finished recording, click the Record button again.
Recording is stopped. The new audio clip is laid into the Timeline on a new track as an audio-only clip connected to the primary storyline ![]() .
.
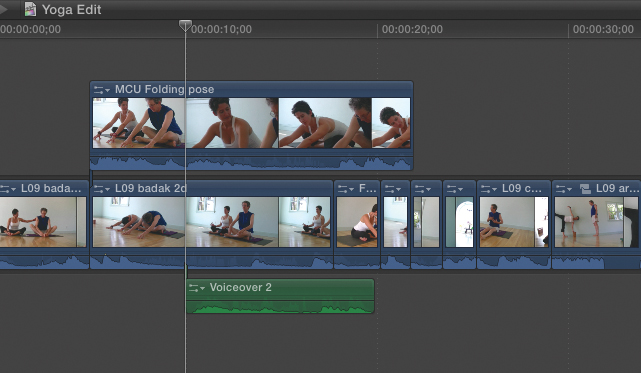
![]() When you’re done recording, the audio clip is laid into the Timeline at the selected position.
When you’re done recording, the audio clip is laid into the Timeline at the selected position.
The file is saved in the designated event.
9. If you’re not satisfied with the recording, you can repeat steps 7 and 8.
Each time you record, a new audio track is recorded and added to the Timeline ![]() .
.
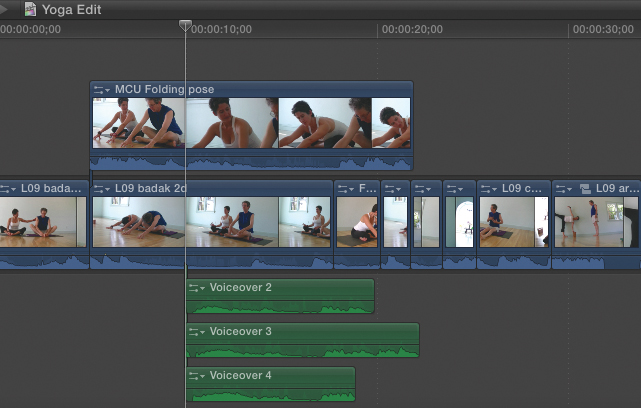
![]() Make as many passes at recording the audio as you like. When you’re done, disable or delete all the ones you didn’t use.
Make as many passes at recording the audio as you like. When you’re done, disable or delete all the ones you didn’t use.
You may want to delete or disable previous recordings prior to recording a second (or more) time. Otherwise, you’ll hear the old recording while you’re trying to re-record a new version, which can be distracting.