
11. Audio Editing
In This Chapter
Editing your picture is only half the story. Your sound is just as important. In fact, a famous movie editor once quipped that sound is two-thirds of the picture. You’ll likely spend much more time finessing and working on your audio edits than you will on your video.
While your picture carries the information about what’s happening on-screen, the sound carries the emotion. The inflection of someone’s voice often tells more than the words she is saying, and similarly, music and sound effects can often completely redefine how your viewers understand a scene. To put it simply, if seeing is believing, hearing is feeling.
Final Cut Pro contains a wide range of audio-editing tools and can facilitate myriad workflows and techniques to accommodate different types of projects.
Audio Levels
The most fundamental aspect of your audio clips is the volume, or level, of each clip. Managing audio levels can be tricky, because your computer has a volume setting, and if you’re using external speakers or headphones, those may have their own volume setting too. This can make it difficult to assess how quiet or loud your clips really are. You can turn those volume settings up or down while you’re editing, but there’s no way to know whether your viewers are going to have their volume settings the same as yours.
Because of this, we typically use audio meters to objectively measure a clip’s level. Audio is measured in decibels (dB). This is a logarithmic scale, so, for example, –6 is twice as loud as –12, and –3 is twice as loud as –6. You don’t need to worry about the specific numbers all that much as long as you can follow one simple rule: Never, ever, let the level reach 0 dB. Hitting 0 is known as peaking, and peaking is bad.
Less Than Zero
At 0 dB, sound will start to distort, and even if it may sound OK on your computer while you’re editing, that moment of distortion can be amplified and aggravated when the file is converted into a different format for playing back on the Web or on a DVD.
Keep your audio levels safely below 0 dB, and you can be sure that your program will always sound clean and clear no matter what happens to it or where it is played back.
The problem is, keeping your overall level below zero can be trickier than you think. Audio volume is additive; if you play two audio clips at the same point in time, their levels are added together, and the overall sound at that point is going to be louder than either clip would be on its own.
A typical video will have dialogue, as well as some background ambiance to set the tone and the mood of the location, plus occasional sound effects and music. All of these will get added together to make the overall output louder than any of the individual elements on their own. It’s plenty easy to accidentally hit zero, even when all of your component sounds are at perfectly reasonable levels.
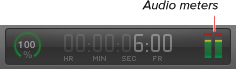
Audio Meters
To help you set your audio levels properly, FCP has audio meters in two places. There are meters at the right side of the Current Frame indicator in the center of the toolbar, and, optionally, you can display a larger set of meters to the right of the Timeline ![]() .
.
![]() Click the audio meters in the toolbar to open the full-size meters.
Click the audio meters in the toolbar to open the full-size meters.
To show the large audio meters
• Do one of the following:
• Click the audio meters in the Current Frame indicator in the toolbar.
• Choose Window > Show Audio Meters.
• Press Shift-Command-8.
The audio meters appear in the lower-right corner of the window ![]() .
.
![]() The full-size audio meters appear to the right of the Timeline.
The full-size audio meters appear to the right of the Timeline.
A stereo project will show two audio meters. A surround project will show six audio meters. For more on the difference between stereo and surround projects, see the “Stereo vs. Surround” section of this chapter.
To enlarge the audio meters
• Drag the divider bar between the Timeline (or the Media Browser if it’s showing) and the audio meters ![]() .
.
![]() Enlarge the audio meters by dragging the separator bar between the audio meters and the Timeline.
Enlarge the audio meters by dragging the separator bar between the audio meters and the Timeline.
The audio meters are expanded horizontally.
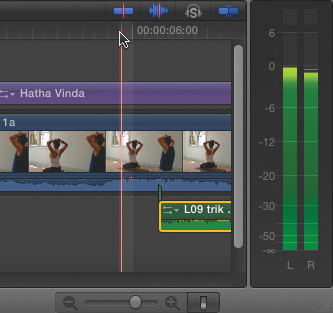
To read the audio meters
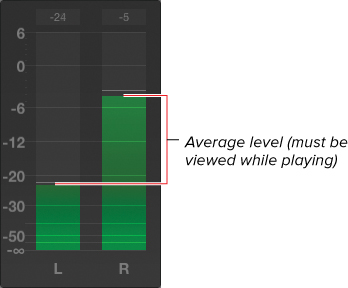
• Play the project in the Timeline, and observe the meters. The average level is the approximate position of the top of the solid bar ![]() .
.
![]() Observe the top of the solid bar over time. The average position represents the average audio level.
Observe the top of the solid bar over time. The average position represents the average audio level.
You can read the average level only while the project is playing back. The top of the bar at any one frame (as displayed when playback is stopped) is not a valid measure of average volume.
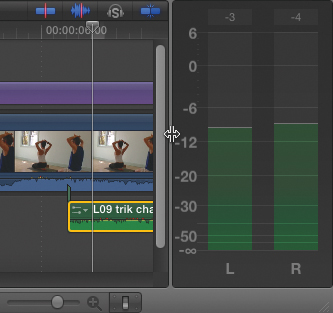
• The peak level is indicated by a flat line that sticks to the loudest level reached and then falls down after a moment ![]() .
.
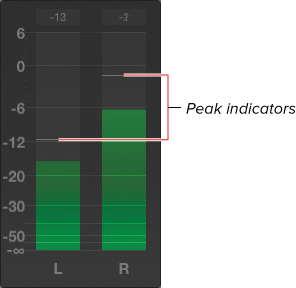
![]() The thin horizontal line represents the peak, or loudest moment in the currently playing clip.
The thin horizontal line represents the peak, or loudest moment in the currently playing clip.
If the audio reaches 0 dB, the excessive volume warning (a red box) lights up above the meter that peaked. This red light will stay on until playback is stopped and restarted. Be smart and don’t ignore this ![]()
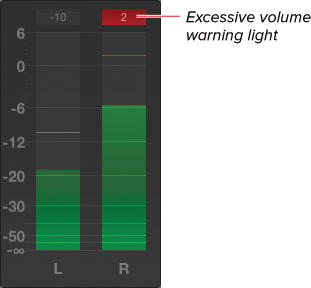
![]() At the top of the meters, the red box lights up when the audio has hit 0 dB. This warning light stays on until the next time you begin playback.
At the top of the meters, the red box lights up when the audio has hit 0 dB. This warning light stays on until the next time you begin playback.
The number in the warning light shows how many decibels over zero your level was at when it peaked. Use this to determine how much to lower your level to reach a safe volume. Make sure your meters are fully expanded or the warning light and numbers will be hidden.
Adjusting Audio Levels
Now that you know how to read your audio levels, it’s time to learn how to change them. You can change audio levels in the Timeline or in the Audio Inspector. The controls are tied together; making a change in one place automatically updates the other.
To change audio levels in the Timeline
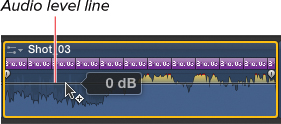
1. Position your pointer over the audio portion of an A/V clip or over any audio-only clip ![]() .
.
![]() When you position your pointer over an audio clip, the black audio level line turns white, and the pointer changes into the Adjust Levels pointer.
When you position your pointer over an audio clip, the black audio level line turns white, and the pointer changes into the Adjust Levels pointer.
The horizontal line indicating the audio level turns from black to white, and the pointer changes to the Adjust Levels pointer.
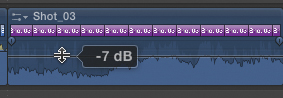
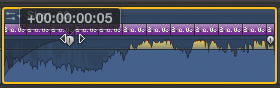
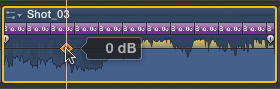
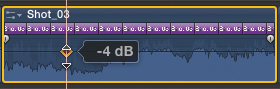
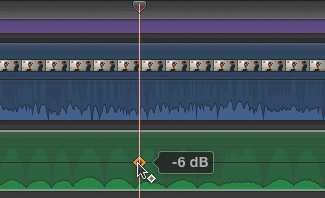
2. Drag the line up to boost (increase) the audio level, or drag it down to attenuate (decrease) the audio level ![]() .
.
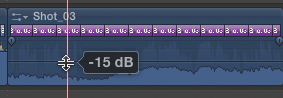
![]() Drag the line up or down to change the audio level. In this example, the audio has been attenuated to –15 dB. The little popup that appears next to the level line shows the change in decibels.
Drag the line up or down to change the audio level. In this example, the audio has been attenuated to –15 dB. The little popup that appears next to the level line shows the change in decibels.
The Info popup that appears next to the level line shows the change in decibels.
To change audio levels in the Inspector
1. Select a clip in the Timeline, and in the Inspector, click the Audio button to open the Audio pane ![]() .
.
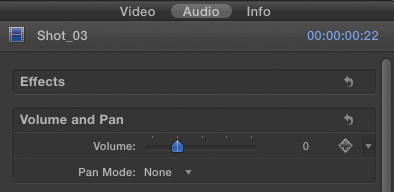
![]() In the Audio pane, the Volume and Pan section contains a Volume slider.
In the Audio pane, the Volume and Pan section contains a Volume slider.
2. In the Volume and Pan section, adjust the slider to boost or attenuate the audio level.
To change audio levels from the keyboard
1. Select a clip in the Timeline.
2. Press Control-+ (plus) to boost the audio level 1 dB, or press Control-– (minus) to attenuate the audio level by 1 dB.
Audio Fades
If audio clips start and stop abruptly, the sudden shift in background noise can create distracting interruptions in the flow of your soundtrack. At best, they create disruptive shifts that disengage the viewer from the program; at worst, these shifts may create clicks or pops that appear as audio mistakes.
Because of this, it’s common practice to make sure every single audio clip’s level fades in and fades out gradually.
Fades also allow you to create smooth transitions between adjacent audio clips (commonly called a crossfade).
Adding such fades is typically done at the end of the editing process, because you don’t want to apply a fade and then later trim the edge of the clip—which undoes the effect of the fade.
FCP makes it very easy to apply fades to your audio clips, and it provides four different fade shapes to accommodate different fade styles and requirements.
To add an audio fade-in and fade-out
1. Position your pointer over the first or last frame of the audio portion of an A/V clip or any audio-only clip ![]() .
.
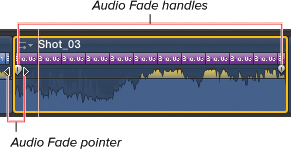
![]() When you position the pointer over an audio clip, Audio Fade handles appear, and the pointer turns into the Audio Fade pointer.
When you position the pointer over an audio clip, Audio Fade handles appear, and the pointer turns into the Audio Fade pointer.
The pointer changes to the Audio Fade pointer, and Audio Fade handles appear on the clip.
Zooming in on the Timeline and increasing the vertical height of the audio tracks will make it much easier to create fades effectively. For more about adjusting track height, see the “Timeline View Options” section of Chapter 7.
2. To create a fade-in effect, drag from the left edge of the clip toward the right ![]() .
.
![]() Drag the Audio Fade handle to add an audio fade-in or fade-out.
Drag the Audio Fade handle to add an audio fade-in or fade-out.
3. To create a fade-out effect, drag from the right edge of the clip toward the left.
A fade-in or fade-out is applied to your clip. The longer the fades, the more gradual the fade effect will appear.
To change the fade shape
1. Add an audio fade as described in the previous task.
2. Right-click the Audio Fade handle.
The Fade Shape pop-up menu appears.
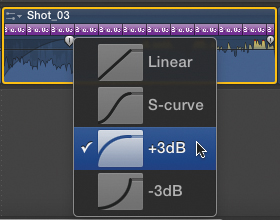
3. Choose from one of the four audio fade shapes ![]() :
:
![]() The Fade Shape pop-up menu lets you choose one of four different fade shapes.
The Fade Shape pop-up menu lets you choose one of four different fade shapes.
• Linear creates a fade where the volume changes at a uniform rate.
• S-Curve creates a fade where the volume change begins and ends gradually.
• +3 creates a fade that accelerates the change over the course of the fade. This is the default setting and generally creates an even fade.
• –3 creates a fade that decelerates the change over the course of the fade. This creates a slower fade effect.
Keyframing Audio Levels
Audio fades at the beginning and end of a clip are easily applied using the built-in fade controls, but there are plenty of occasions when you will want to make audio level changes midway through a clip.
You can easily do this using audio keyframes. Audio keyframes allow you to identify a specific audio level at a specific frame in time. By setting two or more audio keyframes, you can create dynamic audio adjustments over the course of a clip.
To add and adjust audio keyframes in the Timeline
1. Position your pointer over the audio portion of an A/V clip or over an audio-only clip.
The audio level line appears ![]() .
.
![]() The audio level line is where you add audio keyframes. Pressing the Option key turns the pointer into the Add Keyframe pointer, as shown here.
The audio level line is where you add audio keyframes. Pressing the Option key turns the pointer into the Add Keyframe pointer, as shown here.
2. Option-click the audio level line to add a keyframe ![]() .
.
![]() Option-click the white line to add a keyframe.
Option-click the white line to add a keyframe.
3. Drag the keyframe up or down to change the audio level at that point in time.
4. Drag the keyframe left or right to change the keyframe’s position in time ![]() .
.
![]() Drag the keyframe to set the audio level or to move it to a new point in time.
Drag the keyframe to set the audio level or to move it to a new point in time.
You can adjust either the level or the timing. Once you begin dragging (either left to right or up to down), you establish the type of adjustment you’re making. To switch to the other type, release the mouse and click again.
5. Repeat steps 2 through 4 to create an animated effect ![]() .
.
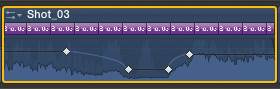
![]() Add multiple keyframes to create an animated effect.
Add multiple keyframes to create an animated effect.
To change a range of a clip audio
1. Select the Range Select tool from the toolbar, or press R ![]() .
.
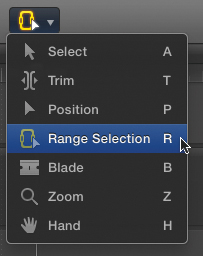
![]() Press R to select the Range Select tool.
Press R to select the Range Select tool.
2. Drag a range in the clip over the area you want to change ![]() .
.
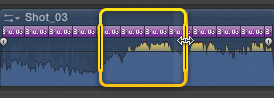
![]() With the Range Select tool, drag a range over the area you want to modify.
With the Range Select tool, drag a range over the area you want to modify.
3. Drag the Audio Level line within that range ![]() .
.
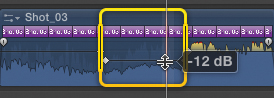
![]() Drag the white audio level line within the selected range.
Drag the white audio level line within the selected range.
Keyframes are automatically added at the beginning and end of the range to create the desired effect ![]() .
.
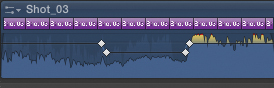
![]() Multiple keyframes are added automatically to facilitate the desired adjustment.
Multiple keyframes are added automatically to facilitate the desired adjustment.
To add audio keyframes in the Inspector
1. Select a clip in the Timeline, open the Inspector, and click Audio to open the Audio pane.
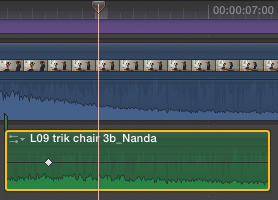
2. Position your playhead in the Timeline to the frame where you want the first keyframe added ![]() .
.

![]() First, position the playhead on the frame where you want the audio to begin changing.
First, position the playhead on the frame where you want the audio to begin changing.
3. In the Volume and Pan section of the Inspector, click the Add Keyframe button to the right of the Volume slider ![]() .
.
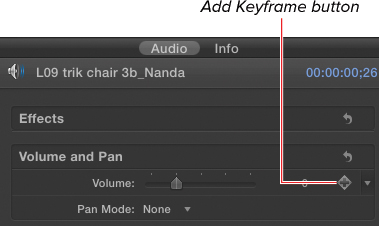
![]() When you position your pointer over the Volume slider, the Add Keyframe button appears. Click it to add a keyframe at the current frame.
When you position your pointer over the Volume slider, the Add Keyframe button appears. Click it to add a keyframe at the current frame.
4. Set the Volume slider to the desired level ![]() .
.
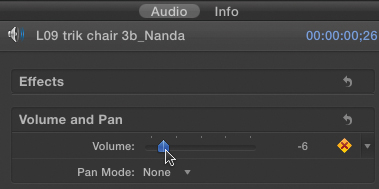
![]() Set the level for that keyframe.
Set the level for that keyframe.
5. Move the playhead in the Timeline to the position where you want the next keyframe added ![]() .
.
![]() Next, move the playhead to the next frame where you want the audio to change.
Next, move the playhead to the next frame where you want the audio to change.
6. Repeat steps 3 through 5 until all the desired keyframes have been set ![]() .
.
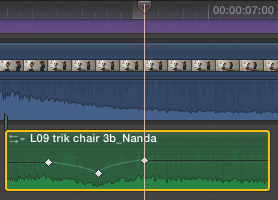
![]() The Timeline shows the keyframes as you add them in the Inspector.
The Timeline shows the keyframes as you add them in the Inspector.
You must follow the exact procedure described: 1. Move the playhead. 2. Click the Add Keyframe button. 3. Adjust the Volume slider. Otherwise, you can accidentally change the level for the wrong keyframe.
Subframe Audio Editing
FCP allows you to make audio level adjustments down to the sample level. That means you can make incredibly precise changes to your audio tracks.
You don’t need to use any special tool to make such precise edits; you simply need to zoom in on the Timeline past the normal frame or 1/100th frame boundaries.
To make audio edits at the sample level
1. Click in the Timeline to make it active, and then press Command-+ (plus) until you are zoomed in as far as possible ![]() .
.
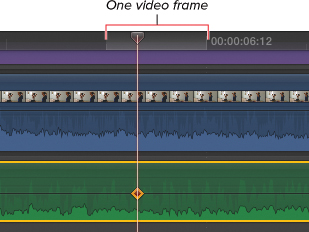
![]() Zoom in as far as you can. The light gray bar in the Timeline indicates the duration of one video frame.
Zoom in as far as you can. The light gray bar in the Timeline indicates the duration of one video frame.
The light gray bar in the Timeline ruler indicates the duration of one video frame. By moving the playhead or adding audio keyframes, you can make adjustments at 1/100th of a frame.
But you can zoom in even further.
2. Choose View > Zoom to Samples, or press Control-Z ![]() .
.
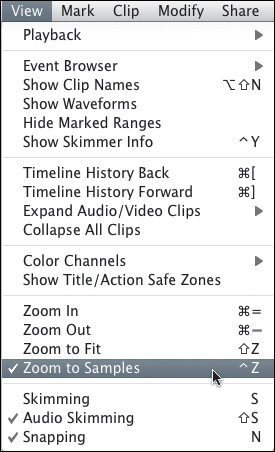
![]() Enable the Zoom to Samples setting so you can zoom in to the sample level.
Enable the Zoom to Samples setting so you can zoom in to the sample level.
Zoom to Samples becomes enabled. This state is saved on a project-by-project basis.
3. Press Command-+ (plus) repeatedly ![]()
![]() When Zoom to Samples is enabled, you can zoom further in on the Timeline.
When Zoom to Samples is enabled, you can zoom further in on the Timeline.
The Timeline will zoom in much further, until each pixel on the screen represents one sample in the audio track.
4. Add audio keyframes as desired.
5. When you’re done, press Shift-Z to zoom the window to fit the entire project.
Note that you can change your Time Display setting in the preferences to show HH:MM:SS:FF + Subframes. This lets you see the changes you are making to the audio at the subframe sample level.
Audio Pan Settings
Any time you’re playing audio through more than one speaker, you need to take into account the idea of panning—that is, how much of the sound is coming out of each speaker.
FCP allows you to control the pan settings of every clip in your project individually, and it offers some very handy preset pan settings to speed your work.
Stereo vs. Surround
With stereo output, there are two speakers, so panning is limited to left and right. You can specify whether any particular audio clip will play out of only the left speaker, only the right speaker, equally out of both speakers, or anything in between. You can even keyframe the sound so it starts in one speaker and then moves to the other.
With surround sound, there are five speakers to pan among. (Technically, there are six, but the sixth is just a subwoofer, so typically that one just plays back low-frequency sounds, regardless of which speaker the rest of the clip plays through.)
No matter how many tracks (or how few) any particular source clip might contain, you must establish the pan mode for each project. By default, all projects are set to surround mode, which can be a little confusing, since most projects are still distributed in stereo. Fortunately, it’s very easy to switch from one to the other.
To change a project from surround mode to stereo (or vice versa)
1. If the Project Library is showing, select the project you want to modify; or, if the project is already open in the Timeline, click anywhere in the Timeline to make that window active.
2. Choose File > Project Properties, or press Command-J.
The Project Library opens (if it wasn’t open already), and the Inspector opens to display the project’s properties ![]() .
.
![]() Press Command-J to open the project’s properties, which appear in the Inspector.
Press Command-J to open the project’s properties, which appear in the Inspector.
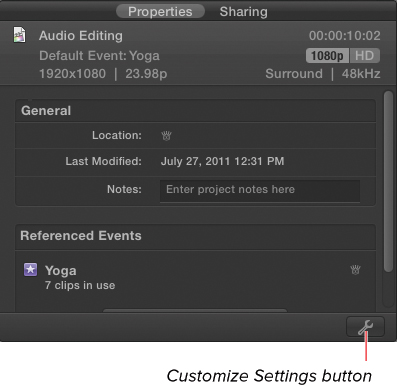
3. In the Properties Inspector, click the Customize Settings button (the wrench icon in the lower-right corner of the Inspector) ![]() .
.
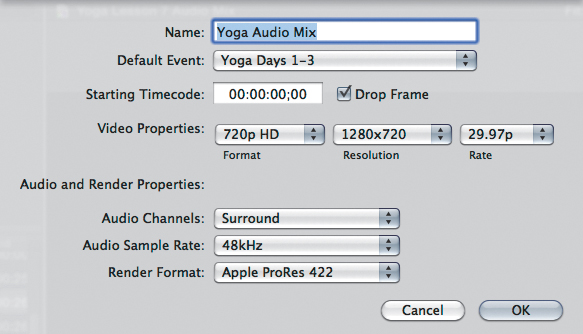
![]() Open the Project Properties dialog to access the Audio Channels setting.
Open the Project Properties dialog to access the Audio Channels setting.
The Project Properties dialog opens.
4. In the Audio and Render Properties section, click the pop-up menu for Audio Channels, select Stereo (or Surround), and then click OK ![]() .
.
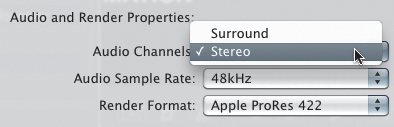
![]() Set the Audio Channels setting to Stereo.
Set the Audio Channels setting to Stereo.
You can verify the current status in the header area of the Project Properties Inspector ![]() .
.
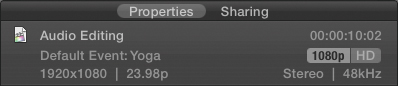
![]() You can see the current Audio Channels setting displayed at the top of the Project Properties Inspector.
You can see the current Audio Channels setting displayed at the top of the Project Properties Inspector.
The audio meters will display two meters for stereo projects and six meters for surround projects.
If you’re planning to work in surround, it’s important that you connect surround-capable speakers to your Mac. This requires using a dedicated 5.1 sound card or, alternatively, a special mini-Toslink cable that will fit in the Mac’s audio output port. There are also some USB-enabled 5.1 speaker sets. You’ll also likely need to use Apple’s MIDI setup application to configure the audio. For more information, see the documentation that came with your Mac.
Panning for Stereo
If you’re working in a stereo project, panning your audio is very straightforward: You simply need to decide how much sound should come out of the left speaker and how much out of the right speaker for each individual clip in your project.
To set the audio panning setting for a clip in a stereo project
1. Select a clip in the project, and open the Audio Inspector ![]() .
.
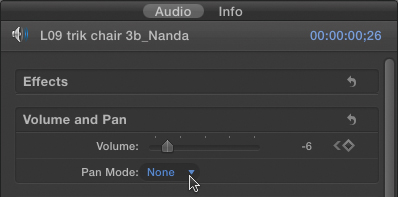
![]() In the Audio Inspector, set the Pan Mode option to Stereo Left/Right.
In the Audio Inspector, set the Pan Mode option to Stereo Left/Right.
2. In the Volume and Pan section, set the Pan Mode pop-up menu to Stereo Left/Right.
The Pan Amount slider appears ![]() .
.
![]() The Pan Amount slider is where you adjust the pan values.
The Pan Amount slider is where you adjust the pan values.
3. Adjust the Pan Amount slider to the desired pan setting.
To keyframe audio panning for a clip in a stereo project
1. Select a clip in the Timeline, open the Inspector, and click Audio to open the Audio pane.
2. Position your playhead in the Timeline to the frame where you want to add the first keyframe ![]() .
.
![]() Position the playhead on the frame where you want the pan effect to begin.
Position the playhead on the frame where you want the pan effect to begin.
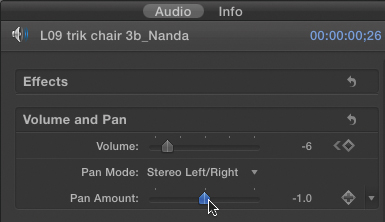
3. In the Volume and Pan section of the Inspector, set the Pan Mode pop-up menu to Stereo Left/Right.
The Pan Amount slider appears.
4. Click the Add Keyframe button to the right of the Pan Amount slider ![]() .
.
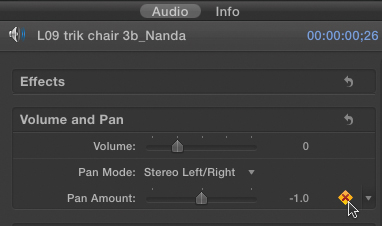
![]() Click the Add Keyframe button prior to adjusting the Pan slider.
Click the Add Keyframe button prior to adjusting the Pan slider.
5. Set the Pan slider to the desired position.
6. Move the playhead in the Timeline to the position where you want to add the next keyframe.
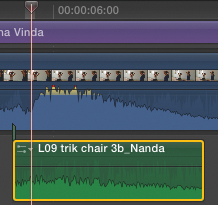
7. To see Pan keyframes in the Timeline, choose Clip > Show Audio Animation, or press Control-A ![]() .
.
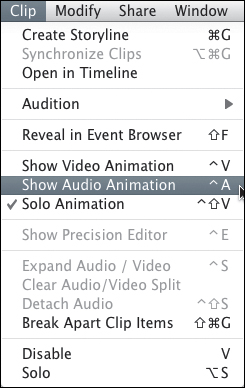
![]() Turn on audio animation to see pan keyframes in the Timeline.
Turn on audio animation to see pan keyframes in the Timeline.
The Audio Animation window appears in the Timeline, showing your pan keyframes ![]() .
.
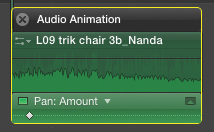
![]() Audio keyframes can be seen (and manipulated) in the Audio Animation window.
Audio keyframes can be seen (and manipulated) in the Audio Animation window.
8. Repeat steps 3–6 until all the desired keyframes have been set.
To modify pan keyframes in the Timeline
1. Select the clip in the Timeline you want to modify, and make sure the Audio Animation window is showing (as described in step 7 in the previous exercise) ![]() .
.
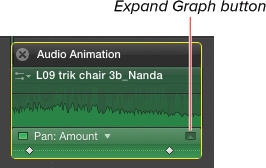
![]() Turn on audio animation for the clip you want to affect.
Turn on audio animation for the clip you want to affect.
2. In the Audio Animation window, click the Expand Graph button ![]() .
.

![]() It’s not until you add a second keyframe that you create a change over time.
It’s not until you add a second keyframe that you create a change over time.
3. Drag the keyframes horizontally to change their location in time, or drag them vertically to change the pan value ![]() .
.
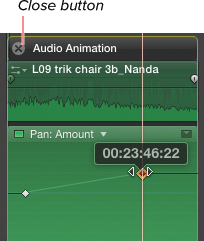
![]() Adjust the keyframes either horizontally or vertically. The Info window shows the new value or frame number (as shown here).
Adjust the keyframes either horizontally or vertically. The Info window shows the new value or frame number (as shown here).
You can adjust the keyframes location in time without expanding the graph. Just drag them horizontally.
You can also navigate to the frame where the keyframe is located and use the slider in the Audio Inspector to change the Pan setting.
4. Once you’re finished, choose Clip > Hide Audio Animation or press Control-A (or click the Close button in the Timeline) to hide the Audio Animation window.
Panning for Surround
When working in surround, things get a little bit more complicated; you need to decide which of the five different speakers you want the sound to come out of.
Fortunately, FCP has an intuitive Surround Panner that lets you visualize the speakers and pan accordingly.
To set the audio panning setting for a clip in a surround project
1. Select a clip in the project, and open the Audio Inspector.
2. In the Volume and Pan section, set the Pan Mode pop-up menu to Default ![]() .
.

![]() Set the Pan Mode pop-up menu to Default to enable the Surround slider.
Set the Pan Mode pop-up menu to Default to enable the Surround slider.
The Pan Amount slider and a disclosure triangle that reads “Surround Panner” appear.
3. Click the disclosure triangle to reveal the Surround Panner ![]() .
.
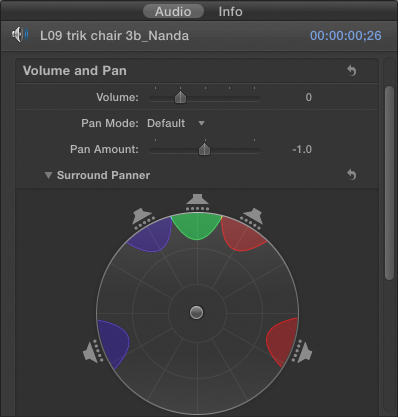
![]() Click the disclosure triangle to expose the Surround Panner.
Click the disclosure triangle to expose the Surround Panner.
4. Click or drag the center point in the Surround Panner to the location where you want the sound to come out.
• The closer you drag the center point toward a specific speaker, the more the sound will come out of that speaker ![]() .
.
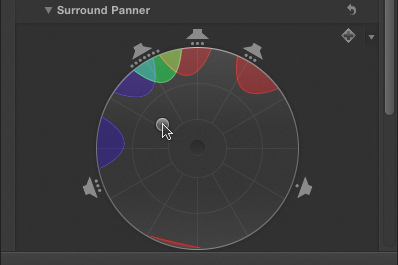
![]() Drag the center point toward one of the speaker icons to make the sound come out more from that speaker.
Drag the center point toward one of the speaker icons to make the sound come out more from that speaker.
• The closer to the center of the Surround Panner, the more the sound will come out of all speakers equally.
You can disable a speaker entirely by clicking it directly. This will make the sound ignore that channel.
To keyframe audio panning for a clip in a stereo project
1. Select a clip in the Timeline, open the Inspector, and click Audio to open the Audio pane.
2. Position your playhead in the Timeline to the frame where you want the first keyframe added.
3. In the Volume and Pan section of the Inspector, set the Pan Mode pop-up menu to Default.
The Pan Amount slider and a collapsed Surround Panner appear.
4. Click the disclosure triangle to reveal the Surround Panner ![]() .
.
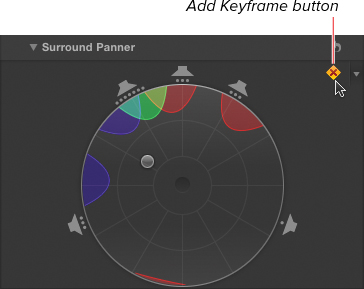
![]() When you position the pointer over the Surround Panner, an Add Keyframe button appears in the upper-right corner.
When you position the pointer over the Surround Panner, an Add Keyframe button appears in the upper-right corner.
5. In the upper-right corner of the Surround Panner, click the Add Keyframe button.
6. Click or drag in the Surround Panner to move the handle to the location where you want the sound to come out, as described in the previous task.
7. Move the playhead in the Timeline to the position where you want the next keyframe added.
8. Repeat steps 5–7 until all the desired keyframes have been set.
To view or modify panning keyframes in the Timeline, see “Panning for Stereo” earlier in the chapter.
To reset pan settings
1. In the Audio Inspector, make sure the pan parameters you want to reset are visible.
2. Click the Reset button for the slider or for the Surround Panner as needed ![]() .
.
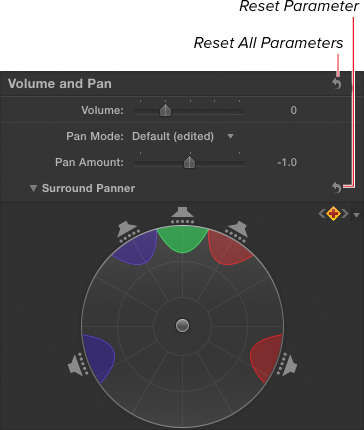
![]() Click the Reset button next to a specific parameter to remove all panning keyframes and adjustments, or click the Reset button for the entire Volume and Pan category to reset all parameters to their default settings.
Click the Reset button next to a specific parameter to remove all panning keyframes and adjustments, or click the Reset button for the entire Volume and Pan category to reset all parameters to their default settings.
Resetting removes all keyframes and resets the parameter to its default value.
Panning Presets
While dragging around in the Surround Panner is fun, it’s often not the most effective or precise way to get good panning results.
FCP includes a variety of panning presets that allow you to make common but complex surround panning effects using a simple, single slider.
For example, if you want a sound effect to move from the surround speakers to the front speakers, you can choose the Back to Front preset. With that preset selected, the Pan Amount slider will allow you to pan the sound between the rear speakers and the front speakers using a regular one-dimensional slider.
Or if you want to have a sound move from the Left Surround speaker to the Right Front speaker, you can choose the preset of that name, and the Pan Amount slider will pan the sound along that specific axis.
These presets allow you to turn potentially complex panning operations into simple, reproducible tasks.
To apply a panning preset
1. In the Volume and Pan section of the Audio Inspector, choose a selection from the Pan Mode pop-up menu ![]() .
.

![]() Choose from any of the presets in the Pan Mode pop-up menu.
Choose from any of the presets in the Pan Mode pop-up menu.
2. To see what the preset does, click the disclosure triangle to reveal the Surround Panner, and drag the Pan Amount slider from left to right, observing what happens in the Surround Panner ![]() .
.
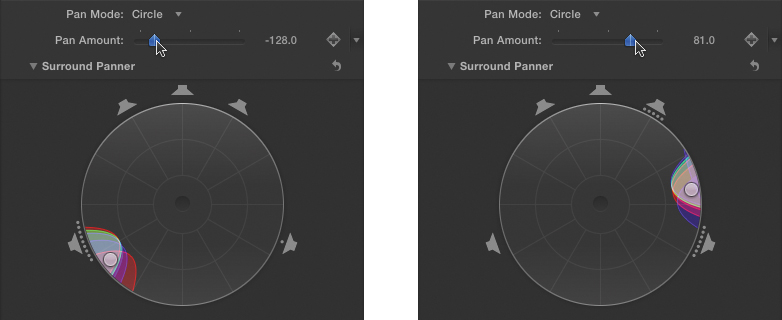
![]() Observe the movement in the Surround Panner while dragging the Pan Amount slider to see what the different pan modes do. In this example, the Circle mode rotates the sound around the room in a circular motion.
Observe the movement in the Surround Panner while dragging the Pan Amount slider to see what the different pan modes do. In this example, the Circle mode rotates the sound around the room in a circular motion.
3. Keyframe the Pan Amount slider using the technique described in the earlier “Panning for Surround” section.
Audio Channel Configuration
You can configure clips with multiple audio channels so FCP can determine which channels are included when a clip is edited into a project. Additionally, you can assign whether those channels should be considered mono, stereo, surround, and so on. This setting can be autodetected during import (for more, see Chapter 6, “Importing Footage”).
When you break apart audio clips, the way they’re broken apart is determined based on the configuration assigned in the Audio Inspector.
Changing audio configuration can be done at any point during the editing process, so you can modify which channels are included (and how they’re mixed) after a clip has been edited into a project.
To configure audio channels
1. Select a clip containing audio in the Event Browser or Timeline.
2. Open the Audio Inspector ![]() .
.
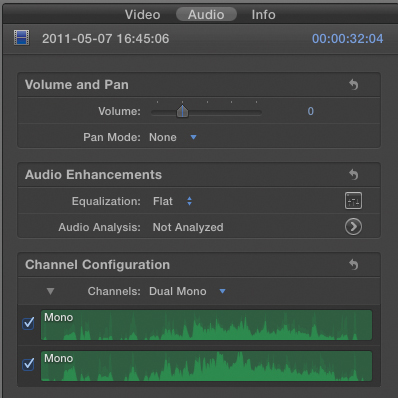
![]() Open the Audio Inspector, and scroll to the Channel Configuration section.
Open the Audio Inspector, and scroll to the Channel Configuration section.
3. In the Channel Configuration section, click the Channels pop-up, and choose from one of the options in the menu ![]() .
.
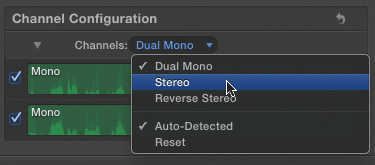
![]() The options in the Channels pop-up changes based on the number of channels and their potential configurations.
The options in the Channels pop-up changes based on the number of channels and their potential configurations.
The number of channels in the audio clip determines the options available in this menu. If you are unsure of how the channels should be configured, you can monitor the individual channels discretely.
To preview individual audio channels
1. In the Channel Configuration section of the Audio Inspector, position the pointer over an individual audio channel ![]() .
.
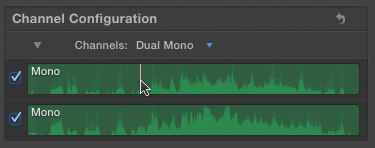
![]() You can skim individual channels, or you can position the pointer over one and press the Spacebar to hear just that channel.
You can skim individual channels, or you can position the pointer over one and press the Spacebar to hear just that channel.
A skimmer appears for the channel.
2. Skim the clip or press the Spacebar to play the individual channel.
3. Move the pointer to another channel, and repeat step 2.
To enable or disable specific audio channels
• Click the checkbox to the left of the individual channels to enable the tracks you want to include and to disable the tracks you want to exclude ![]() .
.

![]() Choose which individual channels should be included when you hear the clip play in a project. In this example, the first track is enabled, and the second track is disabled.
Choose which individual channels should be included when you hear the clip play in a project. In this example, the first track is enabled, and the second track is disabled.