
13. Basic Compositing
In This Chapter
Final Cut Pro is far more than just a video editor. It enables you to perform a wide range of special effects, including a variety of compositing techniques. Compositing simply means having more than one image on-screen at the same time. This could be a split screen, a title superimposed over video, or an animated dinosaur chasing a live-action alpaca farmer in outer space. Your only limitation is your own imagination (and your production budget).
To see two (or more) images on-screen simultaneously, you need to scale or move the objects so they don’t entirely overlap, make them partially transparent, or employ alpha channels (defined areas of transparency, such as the outline of a logo).
Final Cut Pro makes all of this extremely easy, utilizing intuitive controls in the Viewer and the Inspector and allowing connected clips in the Timeline to facilitate simultaneous playback of multiple shots.
Transformations
The most fundamental adjustments you can perform are to change the position, scale, and rotation of an object. These manipulations are commonly called transformations.
Every object in Final Cut Pro can be modified in these three basic ways, and you can perform such actions either graphically in the Viewer or numerically in the Inspector.
To change the scale of a clip in the Viewer
1. Select the clip in the Timeline.
2. In the Viewer, click the Apply Transformation button ![]() .
.
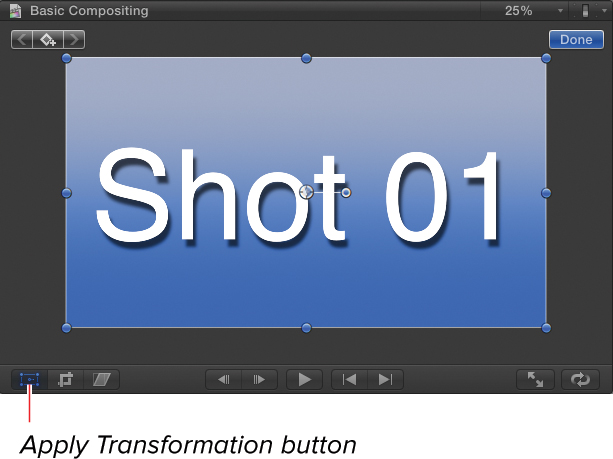
![]() Click the Apply Transformation button to enable the on-screen controls.
Click the Apply Transformation button to enable the on-screen controls.
The transformation controls appear in the Viewer.
3. Drag any of the blue handles of the clip inward to shrink the clip and drag them outward to enlarge the clip.
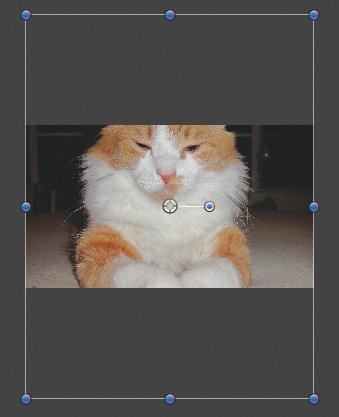
• Dragging a corner point scales the clip uniformly (maintaining its aspect ratio) ![]() .
.

![]() Drag from the corner to maintain the clip’s aspect ratio.
Drag from the corner to maintain the clip’s aspect ratio.
• Dragging one of the side handles squeezes or stretches the clip horizontally ![]() .
.
![]() Drag from one of the side handles to squeeze or stretch the image horizontally.
Drag from one of the side handles to squeeze or stretch the image horizontally.
• Dragging one of the top or bottom handles squeezes or stretches the clip vertically ![]() .
.
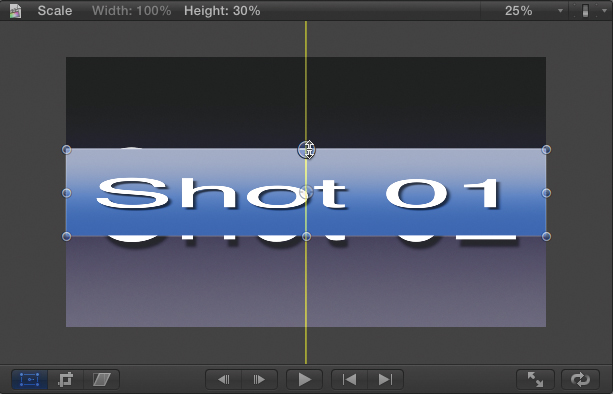
![]() Drag from the top or bottom handle to stretch the image vertically.
Drag from the top or bottom handle to stretch the image vertically.
Hold the Shift key while dragging to unconstrain corner-point adjustments or to constrain side-handle adjustments.
4. When you’re finished, click the Done button.
The adjustment is applied to the clip.
To change the position of a clip in the Viewer
1. Select the clip in the Timeline.
2. In the Viewer, right-click and choose Transform from the shortcut menu ![]() .
.
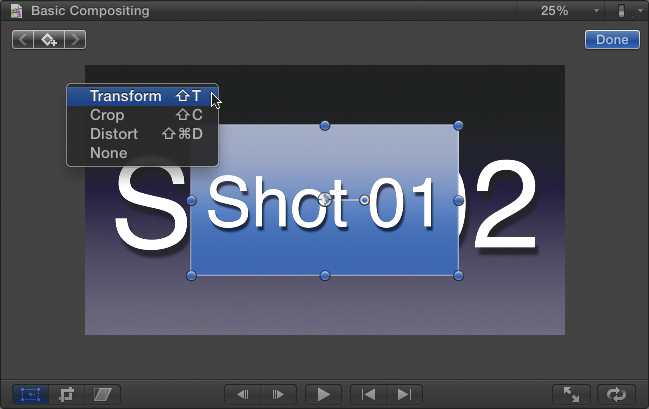
![]() Right-click anywhere in the Viewer and choose Transform to enable the on-screen controls.
Right-click anywhere in the Viewer and choose Transform to enable the on-screen controls.
The transformation controls appear in the Viewer.
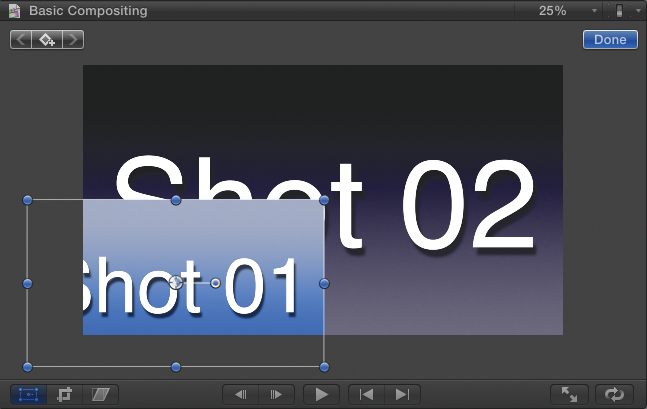
3. Drag anywhere in the body of the object to move it to a new position ![]() .
.

![]() Drag anywhere in the body of the object to reposition it.
Drag anywhere in the body of the object to reposition it.
4. When you’re finished, click Done.
The transformation is applied to the clip.
To change the rotation of a clip in the Viewer
1. Select the clip in the Timeline.
2. In the Viewer, click the Apply Transformation button, or press Shift-T ![]() .
.
![]() Press Shift-T to enable the transformation on-screen controls.
Press Shift-T to enable the transformation on-screen controls.
The transformation controls appear in the Viewer.
3. Drag the Rotate handle to rotate the clip ![]() .
.
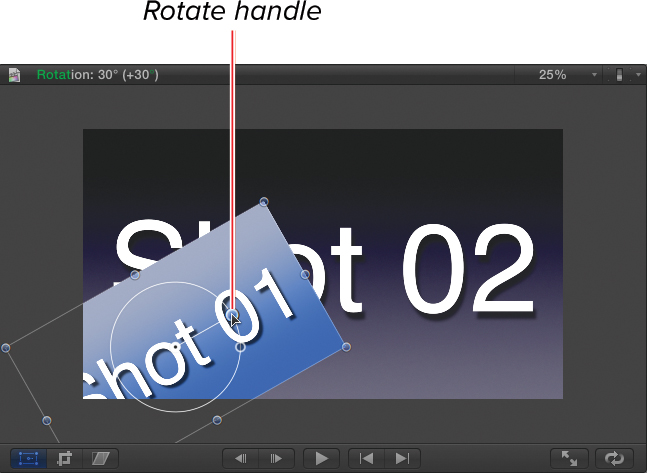
![]() Drag the Rotate handle to rotate the image.
Drag the Rotate handle to rotate the image.
The farther from the center point you move your mouse, the more precise your rotation adjustments will be.
Hold Shift to constrain rotation movements to only horizontal or only vertical (depending on the direction of mouse movement).
• Hold Shift to constrain rotation movements to 45° increments.
4. When you’re finished, click Done.
The transformation is applied to the clip.
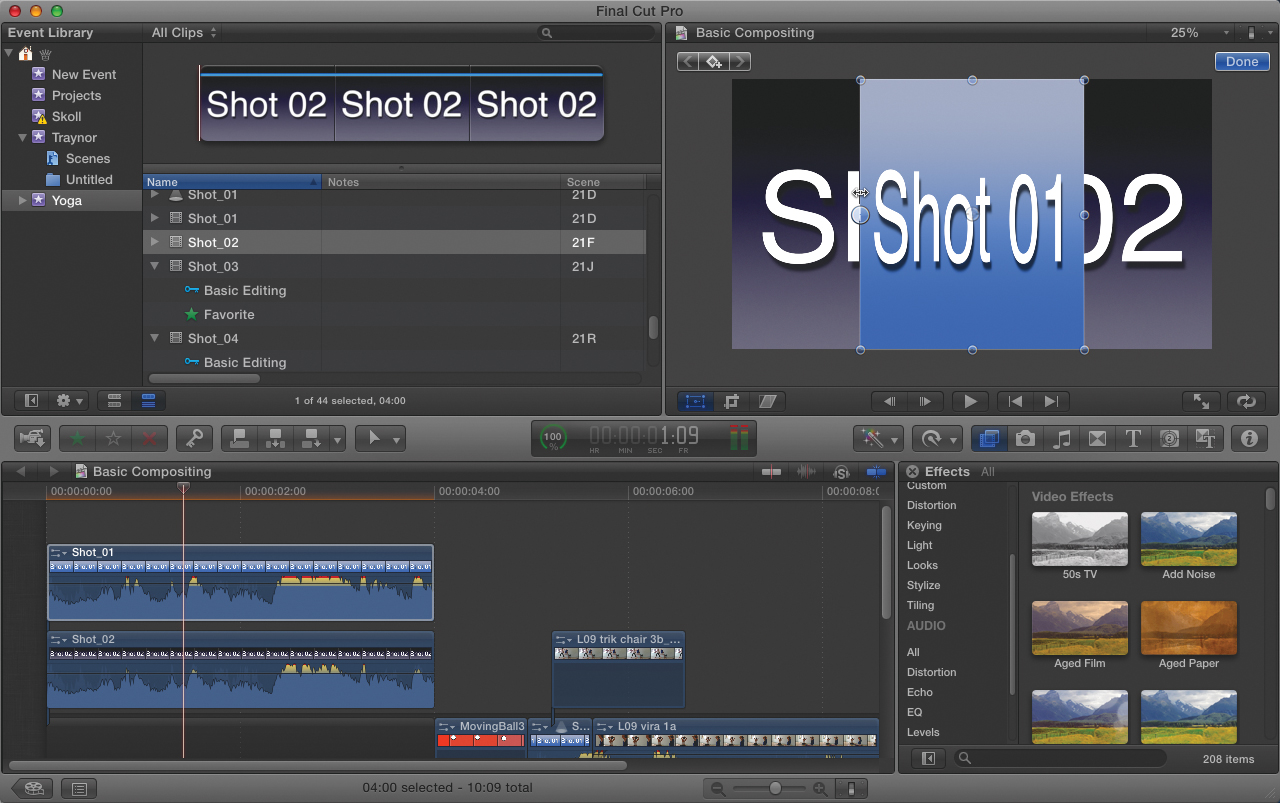
Remember that whichever clip is higher up in the Timeline will obscure the clips beneath it ![]() .
.

![]() Clips on higher tracks obscure the clips beneath them.
Clips on higher tracks obscure the clips beneath them.
You must use connected clips to perform compositing, but you don’t need to put all the clips above the primary storyline. As long as the clip in the primary storyline is not completely obscuring what’s below it, you can connect clips beneath the primary storyline too ![]() .
.
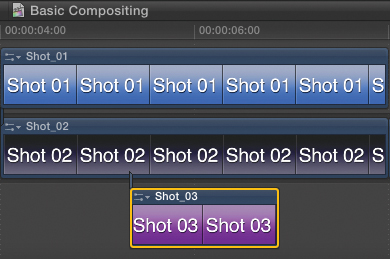
![]() You can connect clips beneath the primary storyline too!
You can connect clips beneath the primary storyline too!
To transform a clip numerically
1. Select the clip in the Timeline.
2. Open the Video Inspector ![]() .
.
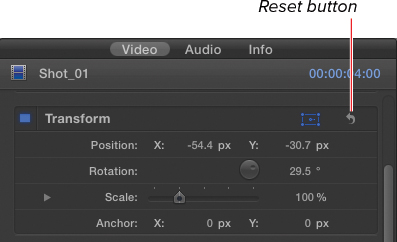
![]() The Video Inspector has numerical controls for all transformation settings.
The Video Inspector has numerical controls for all transformation settings.
3. In the Transform category, adjust the Position, Rotation, Scale, or Anchor parameters.
This allows you to maintain precision, which can be important for accurately matching the settings of two or more clips.
To reset transform settings
• In the Video Inspector, click the Reset button in the Transform section.
All transformation settings are returned to their defaults.
Controlling Zoom Level
As you do more transformations and other compositing tasks, you may find yourself wanting to zoom out on the Viewer so you can see where the edge of an object when it is offscreen.
To zoom out on the Viewer
• Do one of the following:
• Click the Zoom menu at the top of the Viewer, and choose a smaller number ![]() .
.

![]() Set the Viewer zoom level so you can see objects outside the viewable area.
Set the Viewer zoom level so you can see objects outside the viewable area.
• Click on the Viewer window to make it active, then press Command – (minus).
The minimum zoom level is 12 percent (which you can only get to using the keyboard shortcut). If you have moved an object too far offscreen and you can’t see or grab it, open the Video Inspector for that clip and reset the transformation controls to restore the clip’s Position parameter to its default value.
Animating Transformations
You can animate all of these transformations so they change over time. For more about animating transformations, see Chapter 21, “Keyframing Effects.”
Spatial Conformations
Final Cut Pro automatically scales clips that do not natively match the project frame size. You can select how the object is resized:
• The Fit option scales the clip so its larger dimension is no larger than the corresponding dimension in the project ![]() .
.

![]() Fit scales the clip, ensuring that the entire image fits within the project dimensions.
Fit scales the clip, ensuring that the entire image fits within the project dimensions.
• The Fill option scales the clip so its smaller dimension matches the corresponding dimension in the project ![]() .
.
![]() Fit scales the clip so it fills the frame, even if some of the object exceeds the visible area in the Viewer.
Fit scales the clip so it fills the frame, even if some of the object exceeds the visible area in the Viewer.
• None leaves the clip at its native size, regardless of how much it exceeds the visible area in the Viewer ![]() .
.
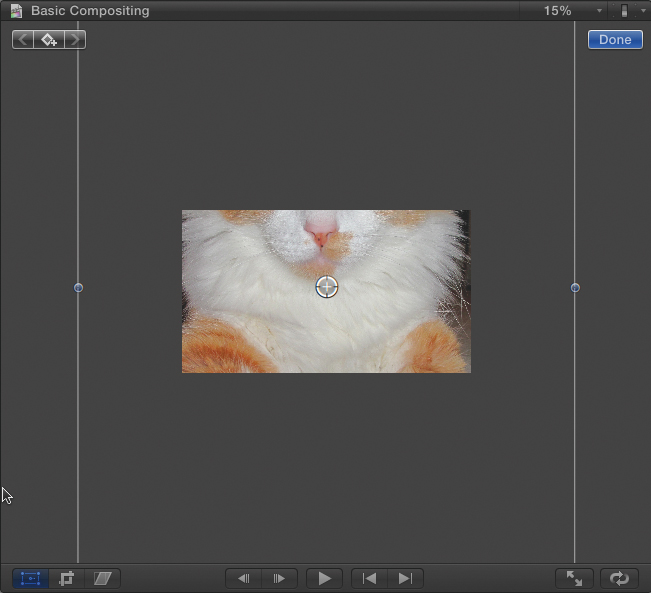
![]() None sets the clip to 100 percent scale. In this example, the image size is much larger than the project size, so the bounding box greatly exceeds the visible area.
None sets the clip to 100 percent scale. In this example, the image size is much larger than the project size, so the bounding box greatly exceeds the visible area.
To change the spatial conform settings
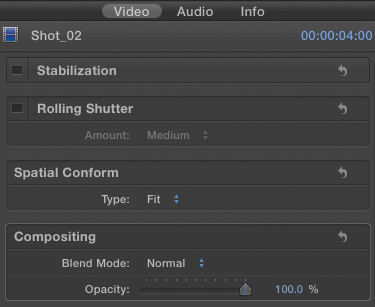
1. Select the clip in the Timeline, and open the Video Inspector ![]() .
.

![]() The Spatial Conform section allows you to choose Fit, Fill, or None.
The Spatial Conform section allows you to choose Fit, Fill, or None.
2. In the Spatial Conform section, choose a setting from the pop-up menu.
The Spatial Conform settings are updated.
Spatial conforming does not change the Scale slider in the Transform section, so you can continue to scale the “conformed” object.
Crop Effects
While transformations allow you to scale, move, and rotate a clip, you need to switch to a different mode to reframe, or crop, the image. In fact, the cropping mode has three different submodes: Trim, Crop-Fit, and Ken Burns.
Trim Mode
Trim mode works the same way the Crop tool worked in previous versions of Final Cut Pro.
In Trim mode, you drag the edges of the clip, dynamically hiding part of the image from view as you drag. The clip gets smaller because you’ve cropped off one or more of the edges. If no clip is behind the cropped clip, that area will show black.
The advantage to using the Trim mode is that it’s WYSIWYG; the Viewer shows you exactly what your finished output will look like as you crop the image.
The disadvantage is that the word Trim already has two completely different meanings related to video editing. Did we really need a third?
To crop a clip using Trim mode
1. Select a clip in the Timeline.
2. In the Viewer, click the Apply Crop button ![]() .
.
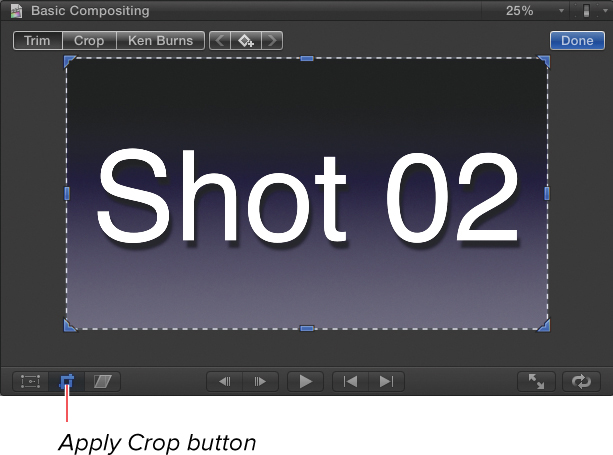
![]() Click the Apply Crop button to enable the on-screen controls.
Click the Apply Crop button to enable the on-screen controls.
The crop controls appear on the clip.
3. Click the Trim button at the top of the Viewer to make sure you’re in Trim mode ![]() .
.

![]() Choose Trim mode from the choices in the upper left.
Choose Trim mode from the choices in the upper left.
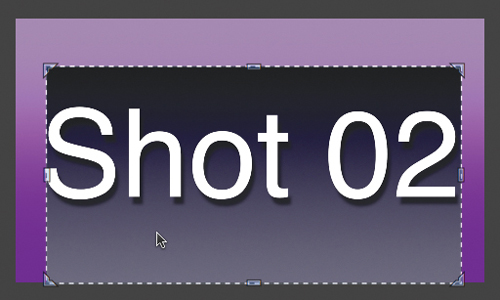
4. Drag the handles on the edge of the clip to limit the visible area of the clip ![]() .
.
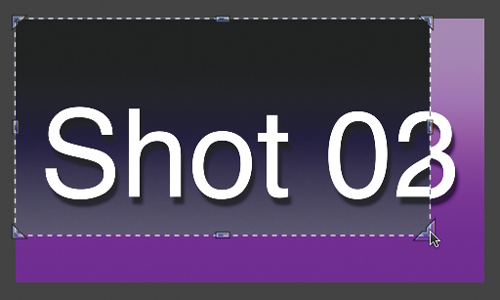
![]() Cropping in Trim mode shows exactly what you will get. Empty space is left in the areas you crop out.
Cropping in Trim mode shows exactly what you will get. Empty space is left in the areas you crop out.
Once you begin cropping, you can click in the middle of the cropped area and drag it to reframe the selection ![]() .
.
![]() While cropping, you can click the crop selection and drag it to a new position.
While cropping, you can click the crop selection and drag it to a new position.
5. When you’re done cropping, click the Done button in the upper-right corner of the Viewer.
Crop-Fit Mode
Crop-Fit mode is less WYSIWYG than Trim mode, but some users might find it more intuitive. In Crop-Fit mode, you can always see the whole image you’re cropping, and you just draw a little box around the part of the image you want to keep.
When you click the Done button, the selected part of the image is automatically scaled up to fill the screen. Unless you’re working with very high-resolution footage, this scaling can reveal artifacts or make your video look out of focus, so beware of how much you crop the image. The smaller the box you draw, the more scaling that will be required.
To crop a clip using Crop-Fit mode
1. Select a clip in the Timeline.
2. Right-click anywhere in the Viewer, and choose Crop from the shortcut menu ![]() .
.

![]() Right-click the Viewer and choose Crop to enable the crop on-screen controls.
Right-click the Viewer and choose Crop to enable the crop on-screen controls.
The crop controls appear on the clip.
3. Click the Crop button at the top of the Viewer to make sure you’re in Crop-Fit mode ![]() .
.

![]() Click the Crop button to switch to Crop-Fit mode.
Click the Crop button to switch to Crop-Fit mode.
A frame appears on top of the image. The area inside the frame is your cropped selection.
4. Drag the frame and adjust its boundaries to identify the specific area you want to select ![]() .
.
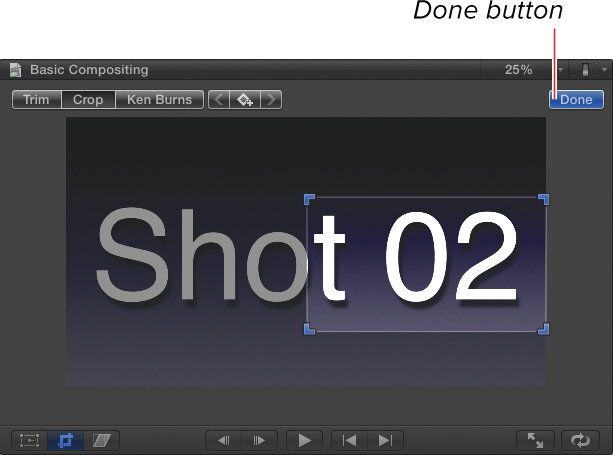
![]() The outline of the frame indicates the area that will be visible when you click Done.
The outline of the frame indicates the area that will be visible when you click Done.
5. When you’re done cropping, click the Done button in the upper-right corner of the Viewer ![]() .
.
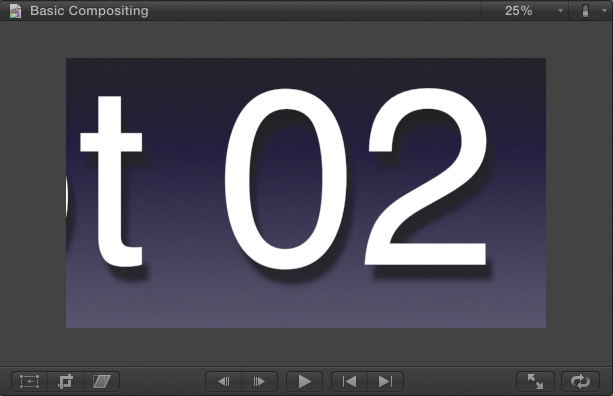
![]() When you confirm the edit by clicking Done, the selected area is scaled up to fill the Viewer.
When you confirm the edit by clicking Done, the selected area is scaled up to fill the Viewer.
The cropped area is scaled up to fill the screen.
Ken Burns Mode
This mode is just like Crop-Fit mode, except there are two boxes. You select a starting frame and an ending frame, and Ken Burns automatically animates your video between the two frames over the duration of the clip—instantly elevating your production to an Emmy Award-type documentary from the 1990s.
To crop a clip using Ken Burns mode
1. Select a clip in the Timeline.
2. In the Viewer, press Shift-C.
The crop controls appear on the clip ![]() .
.
![]() Press Shift-C to show the on-screen controls.
Press Shift-C to show the on-screen controls.
3. Click the Ken Burns button at the top of the Viewer to make sure you’re in Ken Burns mode.
A red box and a green box appear on the image. The green box indicates your starting frame, and the red box indicates your ending frame.
4. Drag the green frame and adjust its boundaries to identify the specific area you want to select for the starting frame ![]() .
.

![]() Position the green box to identify the desired starting frame.
Position the green box to identify the desired starting frame.
5. Drag the red frame and adjust its boundaries to identify the specific area you want to select for the ending frame ![]() .
.
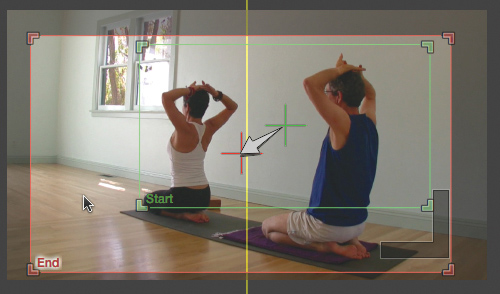
![]() Position the red box to identify the desired ending frame.
Position the red box to identify the desired ending frame.
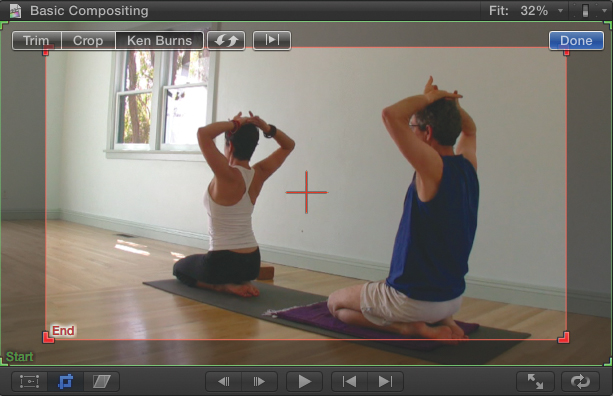
6. When you’re done cropping, click the Preview button to see the animation play ![]() .
.

![]() In Ken Burns mode, there are two frames: a green “starting” frame and a red “ending” frame. When you’re done cropping, click the Preview button to see the animation play.
In Ken Burns mode, there are two frames: a green “starting” frame and a red “ending” frame. When you’re done cropping, click the Preview button to see the animation play.
7. Click the Done button in the upper-right corner of the Viewer to confirm your work.
The animation is automatically applied to the clip.
If you later change the duration of a clip with a Ken Burns effect applied, the animation will be updated so it always begins on the first frame and ends on the last frame of the clip.
Cropping from the Inspector
You can also perform Trim and Crop-Fit cropping effects from the Inspector. This allows you to crop your clip using specific numeric values.
To crop numerically
1. Select a clip in the Timeline, and open the Video Inspector ![]() .
.
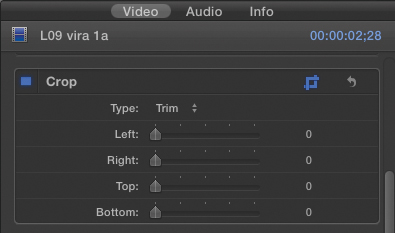
![]() The Video Inspector contains numerical controls for the Crop settings.
The Video Inspector contains numerical controls for the Crop settings.
2. In the Crop section, choose the type of cropping you want to apply from the Type pop-up menu ![]() .
.
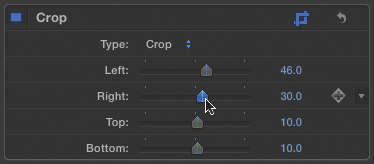
![]() Choose a crop type from the pop-up menu, and adjust the sliders to crop the image.
Choose a crop type from the pop-up menu, and adjust the sliders to crop the image.
Although you can select Ken Burns from the Type pop-up, there are no numeric controls for that type.
3. Adjust the Left, Right, Top, and Bottom sliders to create the cropping effect you desire.
If you plan to crop in the Inspector using Crop-Fit mode, click the Crop icon in the Crop header area to enable the on-screen controls ![]() . Otherwise, the on-screen feedback may be very confusing.
. Otherwise, the on-screen feedback may be very confusing.
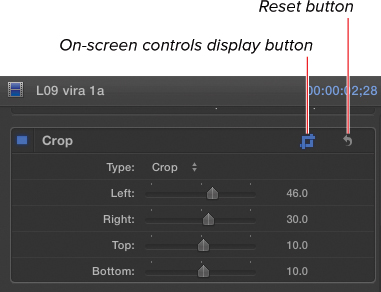
![]() Turn on and off the on-screen controls by clicking the blue Crop icon. This is the same as clicking the Apply Crop button in the Viewer.
Turn on and off the on-screen controls by clicking the blue Crop icon. This is the same as clicking the Apply Crop button in the Viewer.
To reset crop settings
• In the Crop section of the Video Inspector, click the Reset button.
All crop settings (Trim, Crop, and Ken Burns) are all reset to their defaults.
Animating Crop Effects
Although the Ken Burns effect is a built-in type of animation, the other two types of crop effects can be animated as well. For more about animating crop effects, see “Keyframing in the Viewer” in Chapter 21.
Distortion
If you want to modify the shape of your clip so the four corners are independently moved from their original positions, you can use Distort mode.
Distorting can create simulated 3D effects, or you can use it to create unusual shapes and unnatural-looking images. Try it! It’s fun.
To distort a clip in the Viewer
1. Select the clip in the Timeline.
2. In the Viewer, click the Apply Distortion button, or press Shift-Command-D ![]() .
.
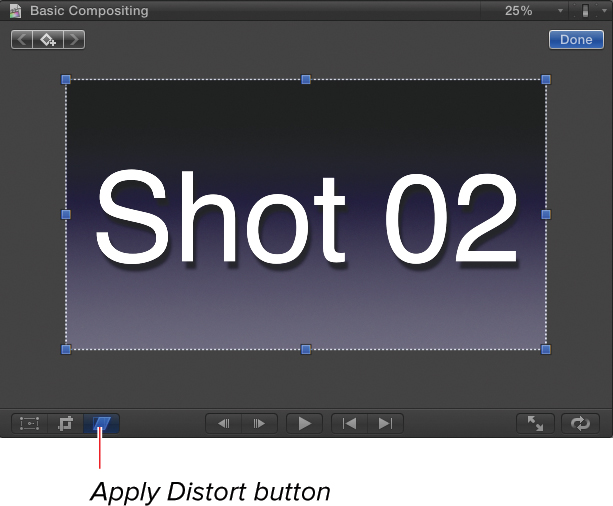
![]() Click the Apply Distortion button to enable the Distort on-screen controls.
Click the Apply Distortion button to enable the Distort on-screen controls.
The Distort controls appear in the Viewer.
3. Click any of the corner points, and drag them to a new location ![]() .
.
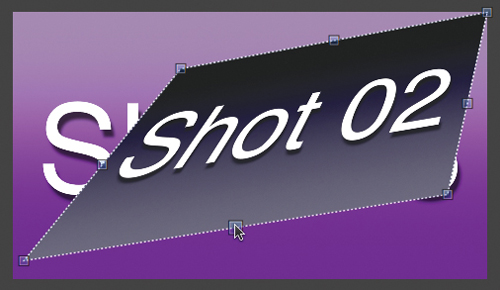
![]() Distort the image by dragging the corner points to new locations.
Distort the image by dragging the corner points to new locations.
4. When you’re finished, click Done.
To distort a clip numerically
1. Select the clip in the Timeline, and open the Video Inspector ![]() .
.

![]() The Video Inspector has a Distort category that is collapsed by default. Move your mouse over the header, and click Show.
The Video Inspector has a Distort category that is collapsed by default. Move your mouse over the header, and click Show.
2. Click the Show button that appears when you move your mouse over the Distort header.
The Distort parameters appear ![]() .
.
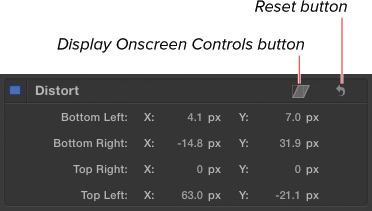
![]() The Inspector has settings to specify the coordinates of the four corner points numerically.
The Inspector has settings to specify the coordinates of the four corner points numerically.
You can turn on the on-screen controls in the Viewer by clicking the Display Onscreen Controls button in the Inspector.
3. Enter precise coordinate values for the four corner points of the selected clip.
To reset the Distort settings
• In the Distort section of the Video Inspector, click the Reset button.
All Distort settings are reset to their defaults.
Animating Distortions
You can animate distortions so they change over time. For more about animating distortions, see “Keyframing in the Viewer” in Chapter 21.
Compositing Effects
Although virtually all the techniques described in this chapter fall under the category of compositing, Final Cut Pro has a section of controls in the Video Inspector called Compositing. This section deals with the transparency and blend mode of the selected object.
Opacity
Any clip can be made partially or completely transparent. Transparency (called opacity in Final Cut Pro) can be controlled either in the Video Inspector or in the Timeline, if you turn on display of the Video Animation Editor.
Because it’s a common effect to fade clips in and out, there is a special control in the Video Animation Editor specifically designed to perform such fades.
To adjust clip opacity in the Video Inspector
1. Select a clip in the Timeline, and open the Video Inspector ![]() .
.
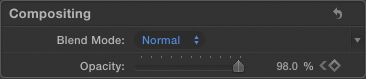
![]() The Inspector has a Compositing section where you can set a clip’s opacity.
The Inspector has a Compositing section where you can set a clip’s opacity.
2. Scroll to the Compositing section, and expand it if necessary.
3. Adjust the Opacity slider.
The lower the opacity, the more transparent the clip will become ![]() . If nothing is beneath the clip in the Timeline, lowering the opacity makes the clip appear to fade out.
. If nothing is beneath the clip in the Timeline, lowering the opacity makes the clip appear to fade out.
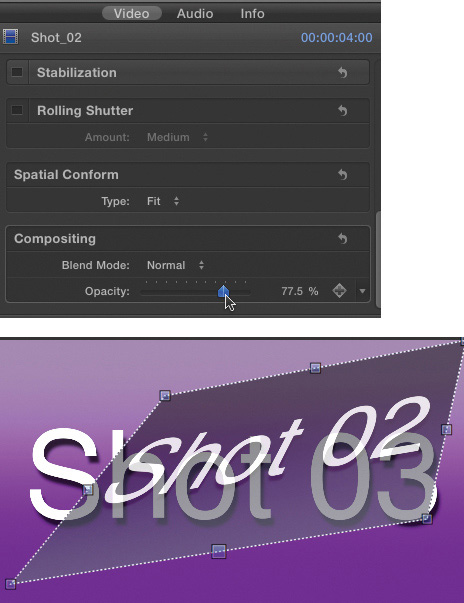
![]() The lower the Opacity slider is positioned, the more transparent the image.
The lower the Opacity slider is positioned, the more transparent the image.
To adjust clip opacity in the Timeline
1. Select the clip in the Timeline.
2. To open the Video Animation Editor, do one of the following:
• Choose Clip > Show Video Animation ![]() .
.
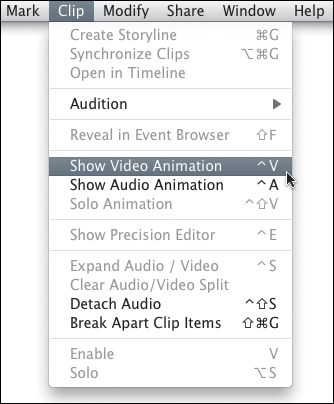
![]() Enable the Video Animation Editor in the Clip menu.
Enable the Video Animation Editor in the Clip menu.
• Click the clip’s Action menu, and choose Show Video Animation ![]() .
.

![]() Open it from the clip Action menu (or press Control-V).
Open it from the clip Action menu (or press Control-V).
• Press Control-V.
The Video Animation Editor appears above the clip ![]() .
.
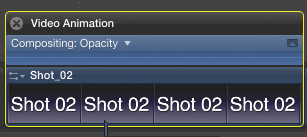
![]() The Video Animation Editor opens above the clip.
The Video Animation Editor opens above the clip.
3. Double-click the Opacity bar in the Video Animation Editor ![]() .
.

![]() Double-click the Opacity bar to expand it so you can make changes to it.
Double-click the Opacity bar to expand it so you can make changes to it.
The Opacity graph expands.
4. Drag the Opacity line down to the desired level ![]() .
.

![]() Drag the Opacity line down to make the clip more transparent.
Drag the Opacity line down to make the clip more transparent.
5. Optionally, Option-click the Opacity line to add keyframes to the line ![]() .
.

![]() Option-click the Opacity line to add keyframes.
Option-click the Opacity line to add keyframes.
You must add at least two keyframes to create a change over time.
Double-click the Opacity graph to collapse it again. You will still be able to see the keyframes and move them in time ![]() .
.
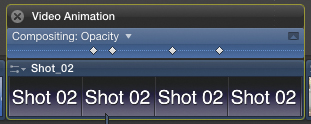
![]() When the graph is collapsed, you can still see Opacity keyframes and move them in time.
When the graph is collapsed, you can still see Opacity keyframes and move them in time.
To fade in and fade out a clip
1. Perform steps 1 through 3 of the previous task ![]() .
.
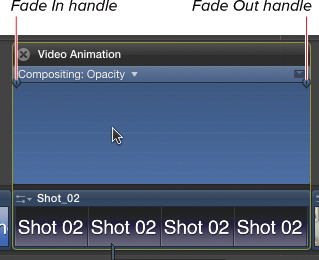
![]() Opacity graphs in the Video Animation Editor have a built-in Fade In handle and Fade Out handle.
Opacity graphs in the Video Animation Editor have a built-in Fade In handle and Fade Out handle.
2. Drag the Fade In or Fade Out handle from the left or right edge of the Opacity bar in the Video Animation Editor ![]() .
.
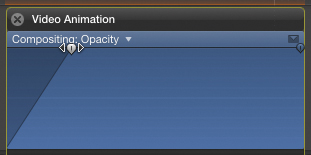
![]() Drag the Fade In and Fade Out handles to add a fade-in or fade-out to the clip. Here a fade-in is applied.
Drag the Fade In and Fade Out handles to add a fade-in or fade-out to the clip. Here a fade-in is applied.
A fade effect is added to the beginning or end of the clip.
3. Click the Close box to hide the Video Animation Editor, or press Control-V.
You can also use Cross Dissolve transition effects to perform a fade-in or fade-out effect. For more on using transition effects, see Chapter 18, “Transition Effects.”
For more on using the Video Animation Editor, see “Keyframing in the Timeline” in Chapter 21.
Blend Modes
In addition to opacity, every clip can have a blend mode assigned that will control the way it interacts with any clips beneath it in the Timeline.
Blend modes offer a wide range of creative looks and unusual interactions between clips. Often, combining a blend mode with a reduced Opacity setting can create especially interesting results.
In most cases, you may find it useful to experiment with different blend modes before settling on one. In some cases, you will get different results depending on which clip is on top.
To assign a blend mode to a clip
1. Select a clip in the Timeline that is above another clip, and open the Video Inspector.
2. Scroll down to the Compositing section of the Video Inspector, and expand it if necessary ![]() .
.
![]() Blend modes are found in the Compositing section of the Video Inspector.
Blend modes are found in the Compositing section of the Video Inspector.
3. Click the Blend Mode pop-up menu, and select from one of the choices ![]() .
.

![]() Select a blend mode from the pop-up menu.
Select a blend mode from the pop-up menu.
The Blend Mode pop-up menu is arranged in groups to help you predict the results: The first group tends to make the resulting image darker, the modes in the second group make the image lighter, and so on ![]() .
.
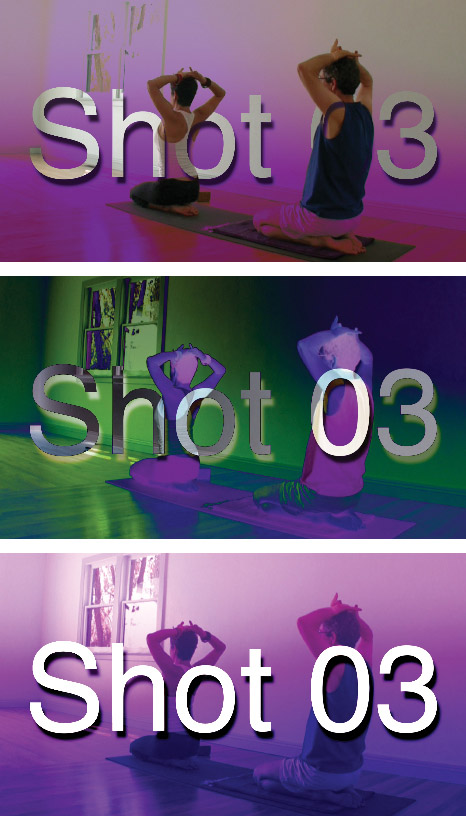
![]() Some sample blend modes: Darken, Difference, and Linear Light.
Some sample blend modes: Darken, Difference, and Linear Light.
4. Repeat step 3 until you find a look you are satisfied with.