
1. Welcome to Final Cut Pro X
In This Chapter
Your First Final Cut Pro Project: Start to Finish
Touring Your Desktop Postproduction Facility
Installing and Setting Up FCP X
Stay Out of Trouble, Get Out of Trouble
Welcome to Apple’s Final Cut Pro—a combination digital video editing, compositing, and special effects program.
Final Cut Pro is tightly integrated with Apple’s Intel processors, high-speed data transfer technology, and QuickTime multimedia format. It supports a wide variety of digital video formats, including AVCHD, DV, HDV, and DVCPRO HD, along with the latest high-definition (HD) digital formats. Final Cut Pro also supports nonbroadcast formats, streaming formats such as H.264, and all QuickTime formats.
Final Cut Pro provides professional editing functionality in a variety of styles, from strictly drag-and-drop edits to entirely keyboard-based editing.
Soon you’ll be spending plenty of time working with clips, audio levels, and other editing minutiae, so let’s start with the big picture. In this chapter, you’ll find a brief overview of Final Cut Pro workflow and features. You’ll be introduced to the main interface windows used for editing and for creating effects. You’ll also learn about Final Cut Pro’s import and export options and its functions for undoing changes.
Your First Final Cut Pro Project: Start to Finish
Here’s a road map you can use to chart a course through your first FCP project. This flowchart describes the production pathway of a typical project from media import through output of the finished program. At each step, you’ll find pointers to sections in this book that describe that part of the process in more detail.
• Import media: Use the controls in the Import window to transfer video and audio from tape or file-based camcorders—or from another hard drive—and save them to a folder in FCP’s Event Library. For more information, see Chapter 6, “Importing Footage.”
• Import other media elements: Add music or sound effects or graphics elements such as digital stills or graphics. See the “Importing Files” section of Chapter 6, “Importing Footage.”
• Rough assembly: Review your raw video in the Viewer, and select the portions you want to use by marking In and Out points. Assemble the selected portions into a “rough cut” in an empty project in the Timeline. If your project includes narration, be sure to edit a “draft” narration into your rough cut. If you plan to base the rhythm of your cut on a piece of music, you should edit the music into the rough cut as well. See Chapter 7, “Basic Editing.”
• Fine cut: Revisit your rough cut, and make fine adjustments to edit points directly by using the Precision Editor in the Timeline or by opening sequence clips and making adjustments in the Viewer. See Chapter 9, “Fine-Tuning.”
• Finishing: When your fine cut is complete, use FCP’s text generators (or the Motion application) to add titles, use the color correction tools to tweak the video’s color balance, and fill out the audio tracks with effects and music. See Chapters 11 through 21.
• Output: Select an output option from FCP’s Share window to export your finished project. FCP’s Share feature can produce finished Blu-ray Discs, upload your day’s work to YouTube, and do much more. If you need batch export options or more control over format settings, use Apple’s companion video-encoding utility, Compressor (sold separately). See Chapter 22, “Creating Output: Sharing and Exporting.”
Touring Your Desktop Postproduction Facility
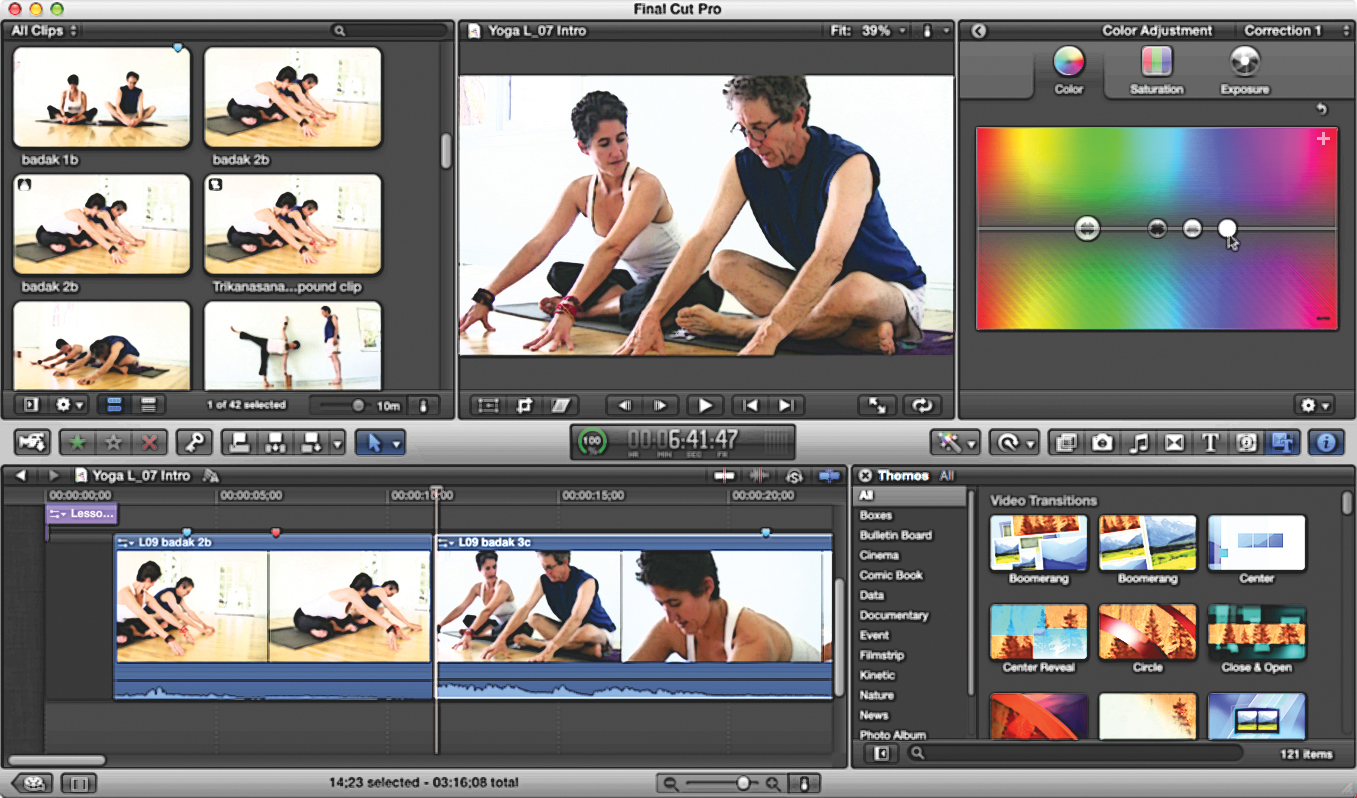
Three program windows in a single streamlined interface form the heart of the Final Cut Pro interface: the Event Browser, the Viewer, and the Timeline ![]() .
.
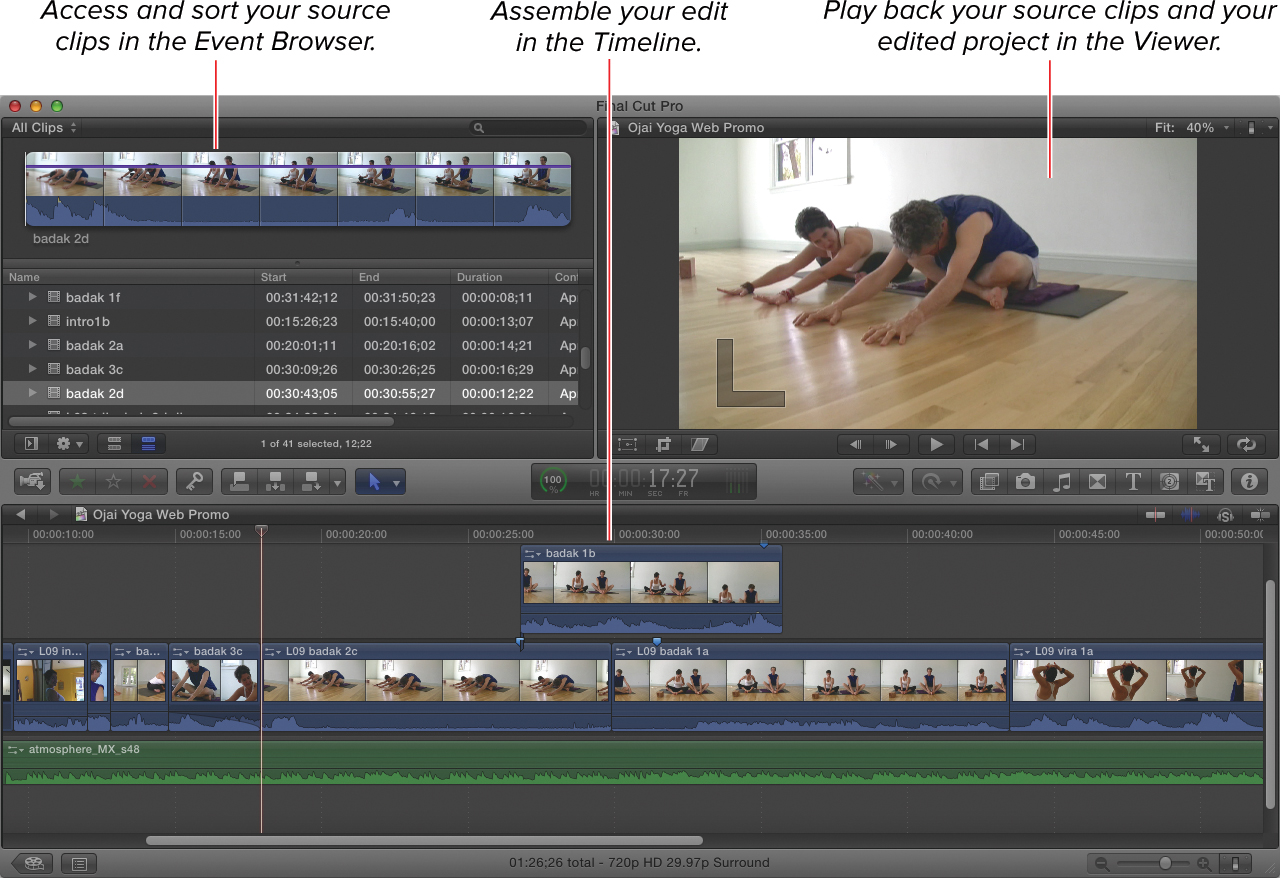
![]() The three main program windows in Final Cut Pro X
The three main program windows in Final Cut Pro X
Because the program combines so many editing and effects creation capabilities in a single application, each of these windows performs multiple functions; additional program windows are hidden from view until you reveal them—making maximum use of your screen real estate.
The tools arrayed on the interface’s center strip can be used to make selections, navigate your footage, and perform edits in the Timeline.
Useful Features
The following are a few useful features that apply throughout the program:
• Hidden program windows: Final Cut Pro makes maximum use of interface space by hiding the program windows you don’t need to access continuously ![]() . When you need access to the Event Library, the Project Library, the Inspector, or one of FCP’s stack of media and effects libraries, a single mouse click calls up the window you need.
. When you need access to the Event Library, the Project Library, the Inspector, or one of FCP’s stack of media and effects libraries, a single mouse click calls up the window you need.
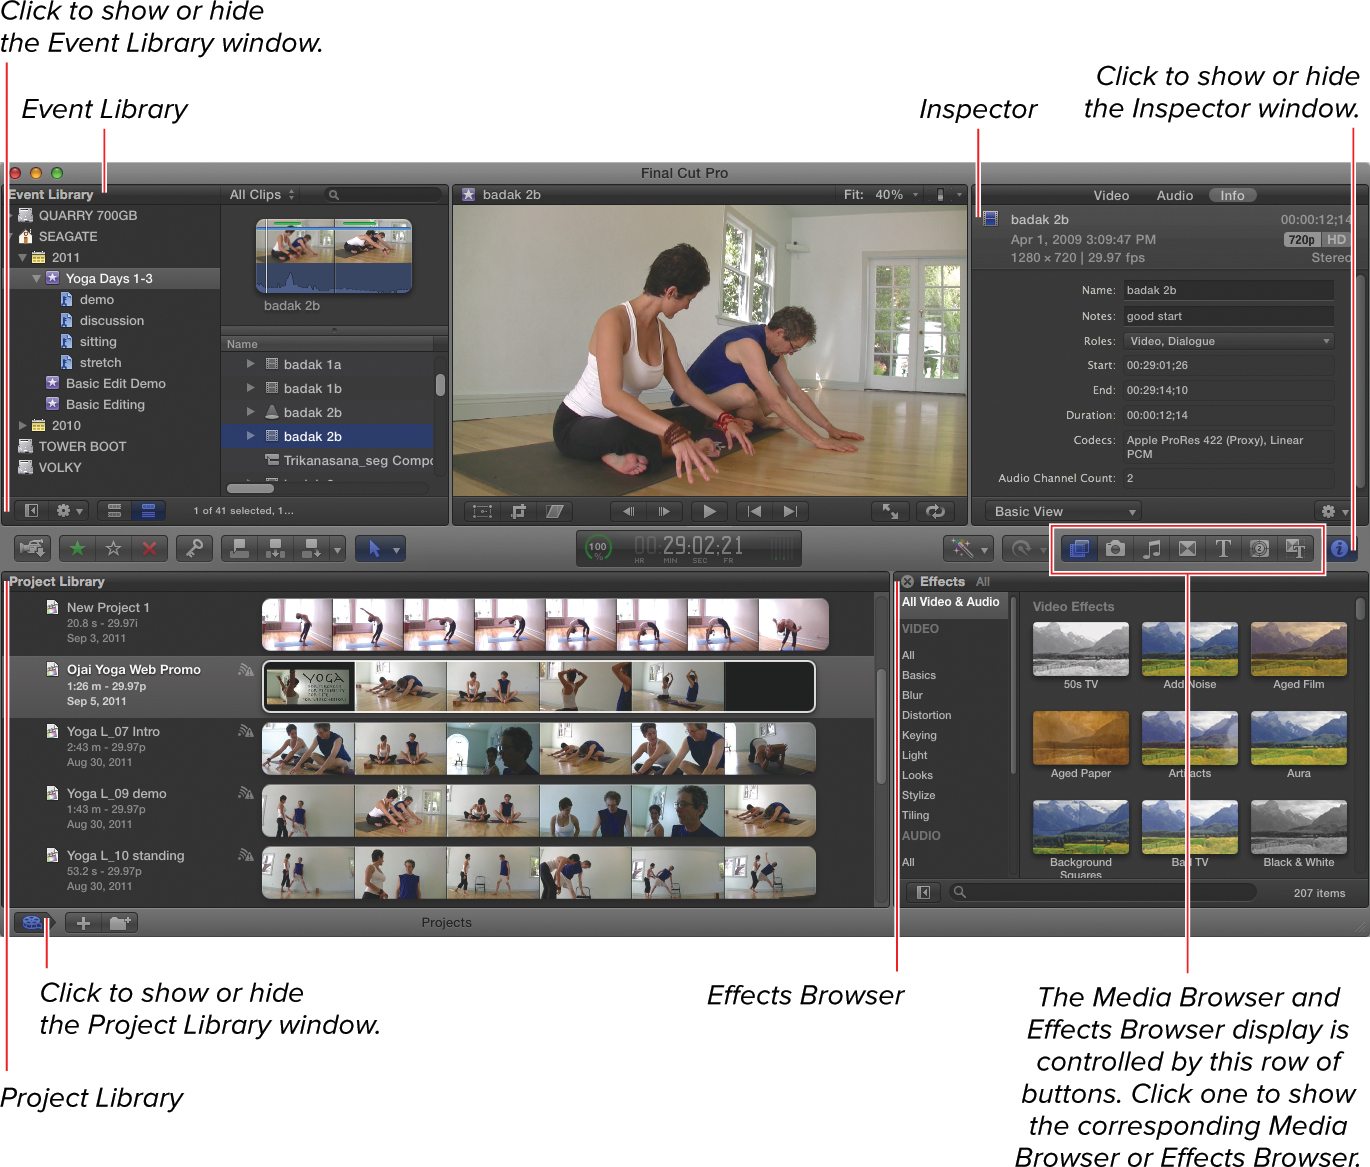
![]() This is the FCP interface with its hidden windows displayed.
This is the FCP interface with its hidden windows displayed.
When a hidden window is displayed, its control button turns blue to indicate that the window is displayed. The Event Library button’s blue status light surely will be fixed in the next version....
• Tooltips: You can use tooltips to identify most of the controls in the Viewer window and on the Tool palette ![]() . Tooltips also display the keyboard shortcut for a tool or button. Rest the pointer over the button and wait a moment, and a label will appear.
. Tooltips also display the keyboard shortcut for a tool or button. Rest the pointer over the button and wait a moment, and a label will appear.

![]() Rest the pointer over a button, and a tooltip—a label with the tool’s name—will appear. Tooltips also display keyboard shortcuts for tools and buttons.
Rest the pointer over a button, and a tooltip—a label with the tool’s name—will appear. Tooltips also display keyboard shortcuts for tools and buttons.
Menus, Shortcuts, and Controls
Final Cut Pro offers several methods for performing video-editing tasks. Some people work fastest using keyboard shortcuts; others prefer to use the menu bar or shortcut menus as much as possible. Apart from the menu bar and window buttons, you can use several other means to access Final Cut Pro’s functions; experiment to find out which control methods work best for you:
• Shortcut menus: Shortcut menus can speed your work and help you learn Final Cut Pro. Right-click an item in one of the main interface windows, and select from a list of common functions specific to that item ![]() . Right-click often as you learn your way around the program just to see your options in a particular area of the FCP interface.
. Right-click often as you learn your way around the program just to see your options in a particular area of the FCP interface.

![]() Right-clicking a project clip in the Timeline calls up a shortcut menu with a list of functions related to that clip.
Right-clicking a project clip in the Timeline calls up a shortcut menu with a list of functions related to that clip.
• Keyboard shortcuts: You may find that these shortcut keys help you work more efficiently. See “Customizing Your Workspace” later in this chapter to learn how to reassign FCP’s default keyboard shortcuts to keys that please you.
• Timecode entry shortcuts: Final Cut Pro provides a number of time-saving shortcuts for timecode entry. See “Navigating with Timecode in the Timeline” in Chapter 8, “Editing Tools.”
Customizable Interface
FCP’s flexible interface can be custom-tailored to suit your needs. Within the integrated interface, you can adjust the overall size of the main program window and the proportions between program windows.
You can also elect to display the Viewer window or the Event Browser on a second computer display and build custom keyboard configurations. See “Customizing Your Workspace” later in this chapter.
On-screen Help
The on-screen help for FCP is also the official Final Cut Pro User Manual. The Help Viewer version has certain disadvantages over the PDF manual offered with previous versions: there’s no index, no chapter or page numbers, no Boolean word search, and limited printing access. An online version of the same manual is available on Apple’s website: http://help.apple.com/finalcutpro/mac/10.0.1.
The online manual has a couple of advantages: You can bookmark manual pages for later reference, and you can use the Left and Right Arrow keys to page through the online text.
To access on-screen help
• Choose Help > Final Cut Pro X Help.
The FCP X manual you find on Apple’s website features a Print button ![]() . You can use that Print command to save a fully text-searchable PDF version of the Apple manual.
. You can use that Print command to save a fully text-searchable PDF version of the Apple manual.
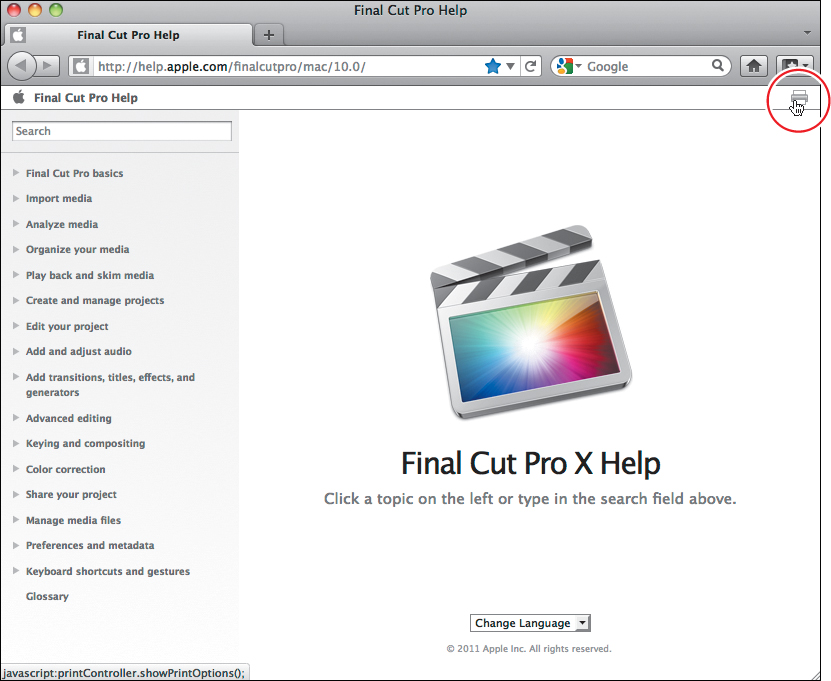
![]() Apple offers Final Cut Pro X’s manual on its website. To make a PDF version of the official manual, click the Print button, and then choose Save As PDF in the Print dialog window.
Apple offers Final Cut Pro X’s manual on its website. To make a PDF version of the official manual, click the Print button, and then choose Save As PDF in the Print dialog window.
Editing and Effects Windows
The following brief descriptions of the features and functions of the main program windows are simplified summaries of the full list of features. Final Cut Pro’s designers went all out to support a wide variety of editing styles, and they have produced a very flexible editing system.
The Event Library and Event Browser
The Event Library displays all the clips, audio, and graphics you’ve imported into FCP organized into events—FCP’s name for a folder containing clips.
Clicking an event’s icon in the Event Library displays its contents—the clips contained in that event—in the Event Browser.
The Event Browser is the window you use to organize and access individual clips, audio files, graphics, and offline clips—all the media elements you use in your project ![]() .
.
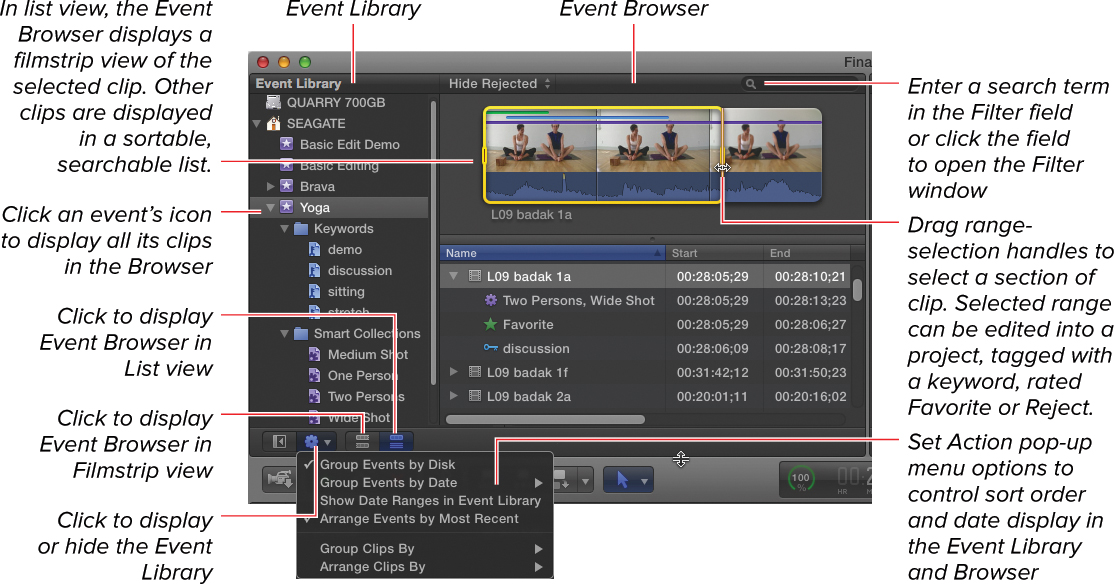
![]() Use the Event Library and Event Browser windows to organize the media elements in your projects.
Use the Event Library and Event Browser windows to organize the media elements in your projects.
The Viewer
The Viewer is bursting with functions. When you’re editing, the Viewer acts as your source monitor; you can review individual video and audio clips and mark edit points ![]() . You also use the Viewer to play back your project as you edit it in the Timeline. Load clips from the current project into the Viewer to refine your edits, apply effects, create titles—and, as they say, much, much more.
. You also use the Viewer to play back your project as you edit it in the Timeline. Load clips from the current project into the Viewer to refine your edits, apply effects, create titles—and, as they say, much, much more.
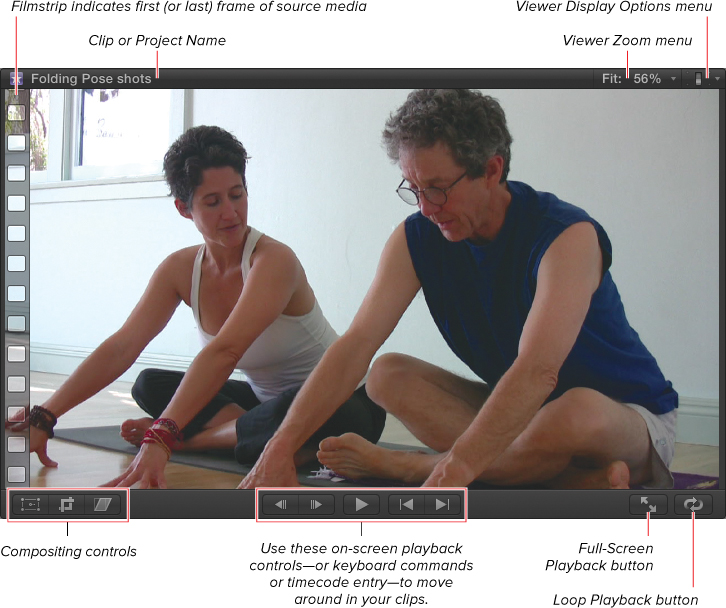
![]() Use the Viewer window to play back your source clips and your edited project.
Use the Viewer window to play back your source clips and your edited project.
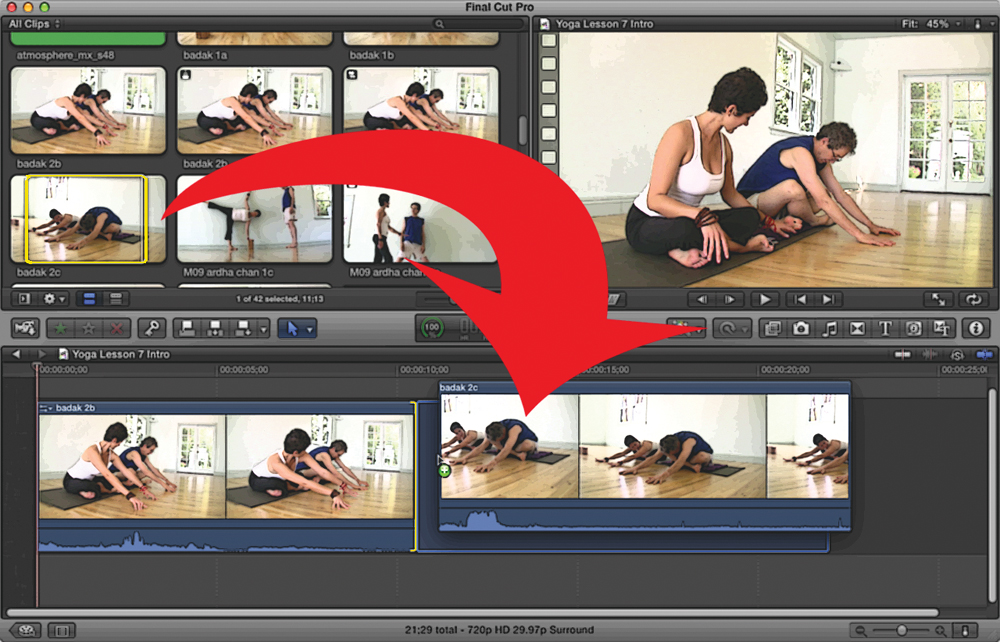
The Timeline
The Timeline displays your edited project as clips arrayed on multiple video and audio tracks along a time axis ![]() . You view Timeline playback in the Viewer. You can edit by using keyboard commands, by using the editing buttons on the Tool Strip just above the Timeline, or by dragging clips directly from the Event Browser and dropping them in the Timeline; see Chapter 7, “Basic Editing.”
. You view Timeline playback in the Viewer. You can edit by using keyboard commands, by using the editing buttons on the Tool Strip just above the Timeline, or by dragging clips directly from the Event Browser and dropping them in the Timeline; see Chapter 7, “Basic Editing.”
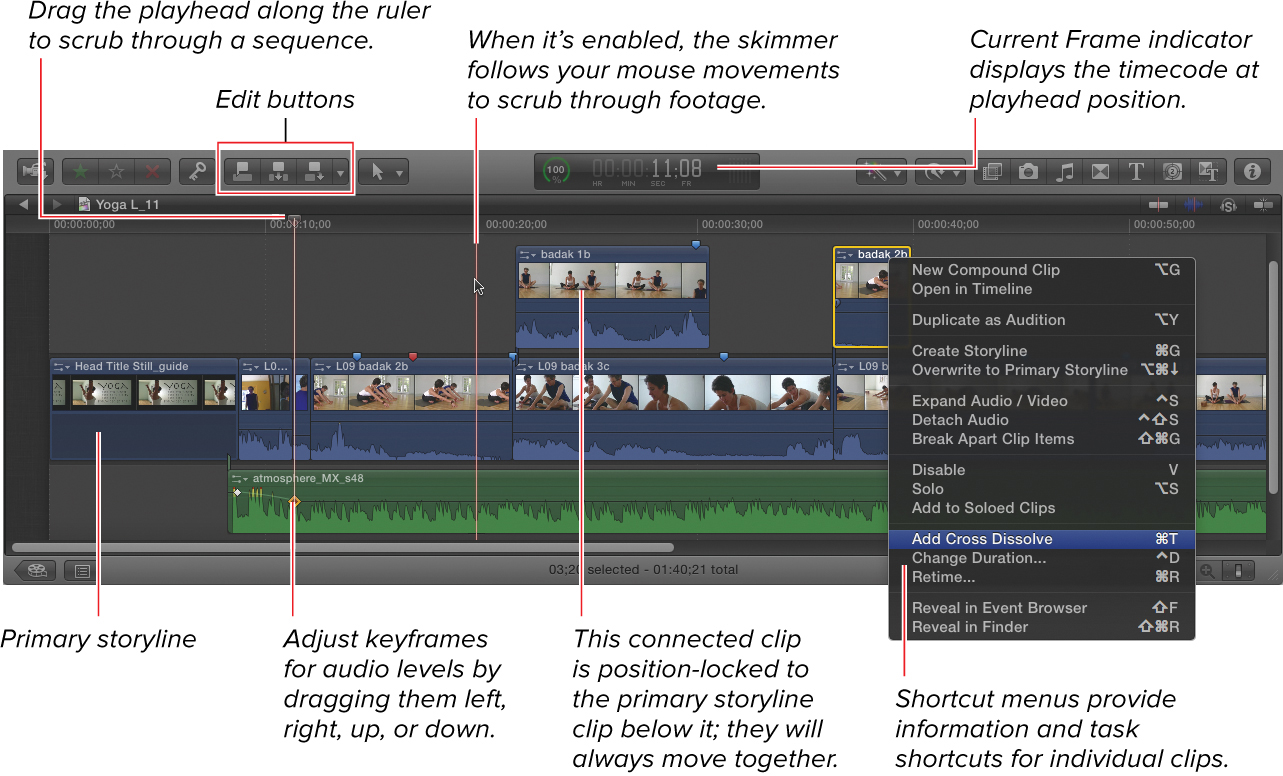
![]() The Timeline displays a chronological view of your edited project.
The Timeline displays a chronological view of your edited project.
The middle row (or track) contains your primary storyline, where you place most of the clips that make up your movie. These clips can contain both audio and video. You can connect additional clips above or below the primary storyline to synchronize them with a particular frame in one of the primary clips.
In the Timeline, a connected clip is indicated by a connection line that extends from the first frame of the connected clip to the sync point in the primary storyline.
Media and Effects Browsers
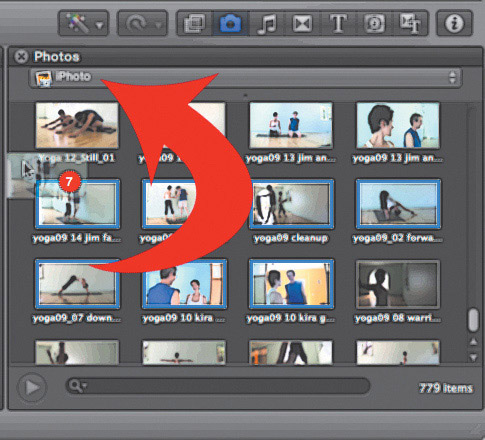
A strip of buttons above the Timeline on the right side of the FCP interface controls access to FCP’s various Effects Browsers—video and audio effects, generators, titles, and transitions. Media Browsers—which display the contents of your iTunes and iPhoto libraries—are accessed from the same button strip ![]() . You use the Effects Browsers to apply effects to your clips and the Media Browsers to import audio and stills into your FCP project from your other Apple apps.
. You use the Effects Browsers to apply effects to your clips and the Media Browsers to import audio and stills into your FCP project from your other Apple apps.
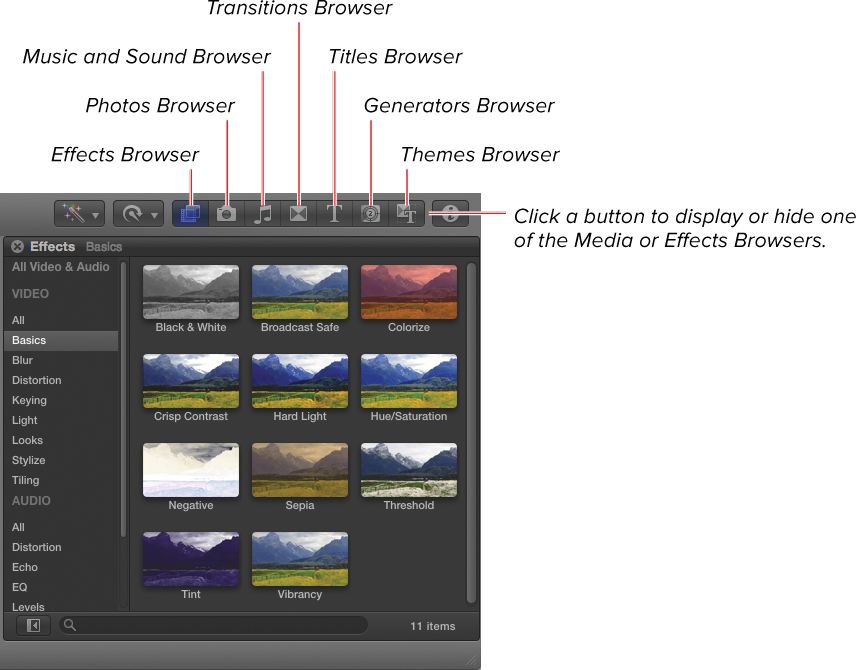
![]() The Effects Browser displays video effect options. When a Browser is displayed, its control button turns blue.
The Effects Browser displays video effect options. When a Browser is displayed, its control button turns blue.
The Inspector
You can select a clip in the Event Library or Timeline and click the Inspector button to open the Inspector window ![]() . A wealth of clip information is displayed in the Inspector window’s Video, Audio, and Info panes. You can review and modify a clip’s settings or effects, and much more. For more information, see Chapter 4, “Marking Clips.”
. A wealth of clip information is displayed in the Inspector window’s Video, Audio, and Info panes. You can review and modify a clip’s settings or effects, and much more. For more information, see Chapter 4, “Marking Clips.”
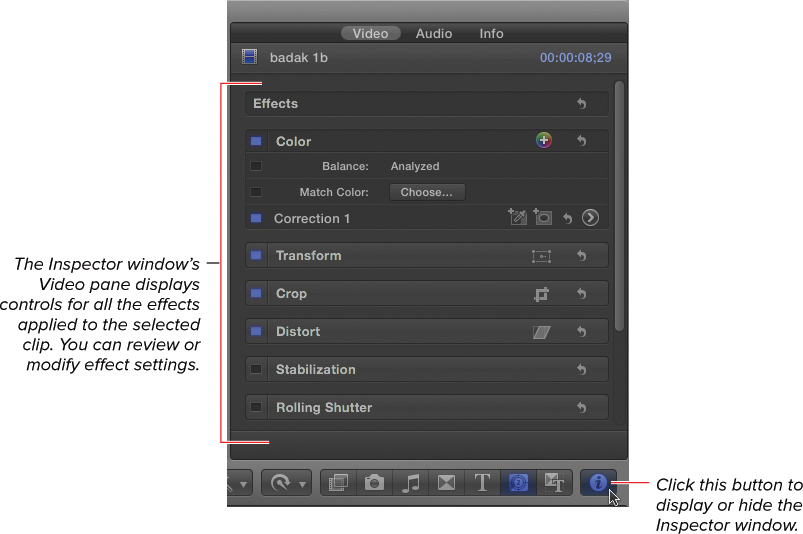
![]() Select a clip, and then click the control button to display the Inspector window.
Select a clip, and then click the control button to display the Inspector window.
Input and Output Windows
Although you perform most editing tasks in Final Cut Pro’s main editing and effects windows, you’ll need to use a couple of other windows to shape your program’s input and output.
Import Window
FCP supports a range of capturing options, from live video capture on-the-fly to automated transfer from a hard drive archive.
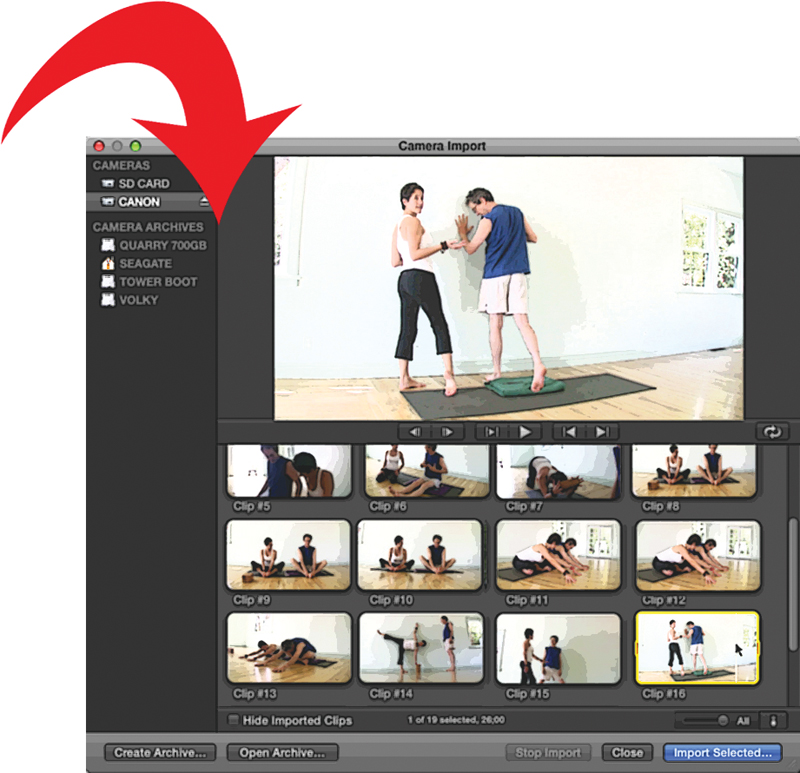
Use the Import window to import video and audio media from your file-based camera or from a hard drive ![]() . FCP is compatible with a wide variety of file-based formats, including files recorded with Advanced Video Codec High Definition (AVCHD), a highly compressed non-tape-based video format.
. FCP is compatible with a wide variety of file-based formats, including files recorded with Advanced Video Codec High Definition (AVCHD), a highly compressed non-tape-based video format.
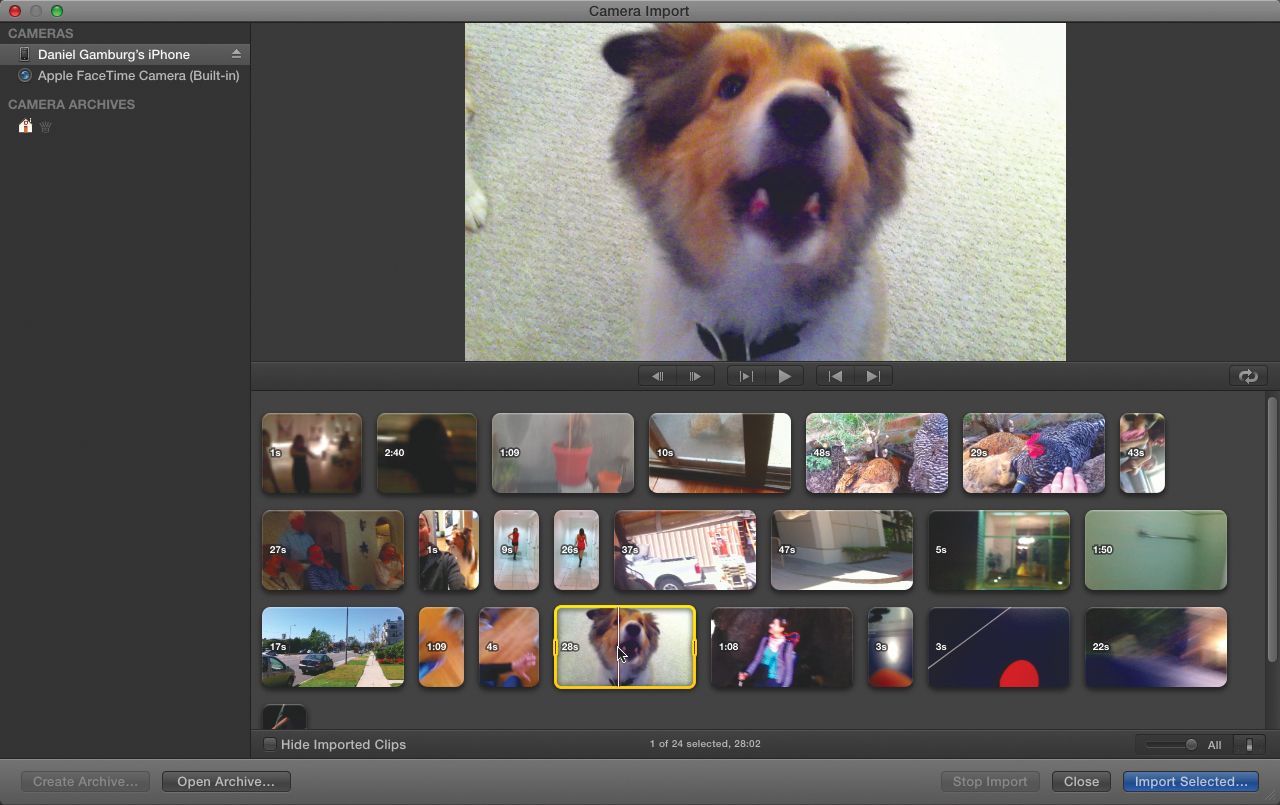
![]() The Import window supports a wide variety of file-based formats. In this example, the Import window is transferring video footage from an iPhone.
The Import window supports a wide variety of file-based formats. In this example, the Import window is transferring video footage from an iPhone.
Import functions are explained in detail in Chapter 6, “Importing Footage.”
Import and Export Options
Final Cut Pro’s media handling is based on Apple’s QuickTime, and that means you have a lot of import and export format options. If QuickTime can handle it, so can Final Cut Pro.
• You can import QuickTime-compatible media files into a Final Cut Pro project.
• You can import audio directly from your iTunes library.
• You can import still images in a full range of formats.
• You can import an Adobe Photoshop file, although Final Cut Pro will flatten Photoshop layers on import.
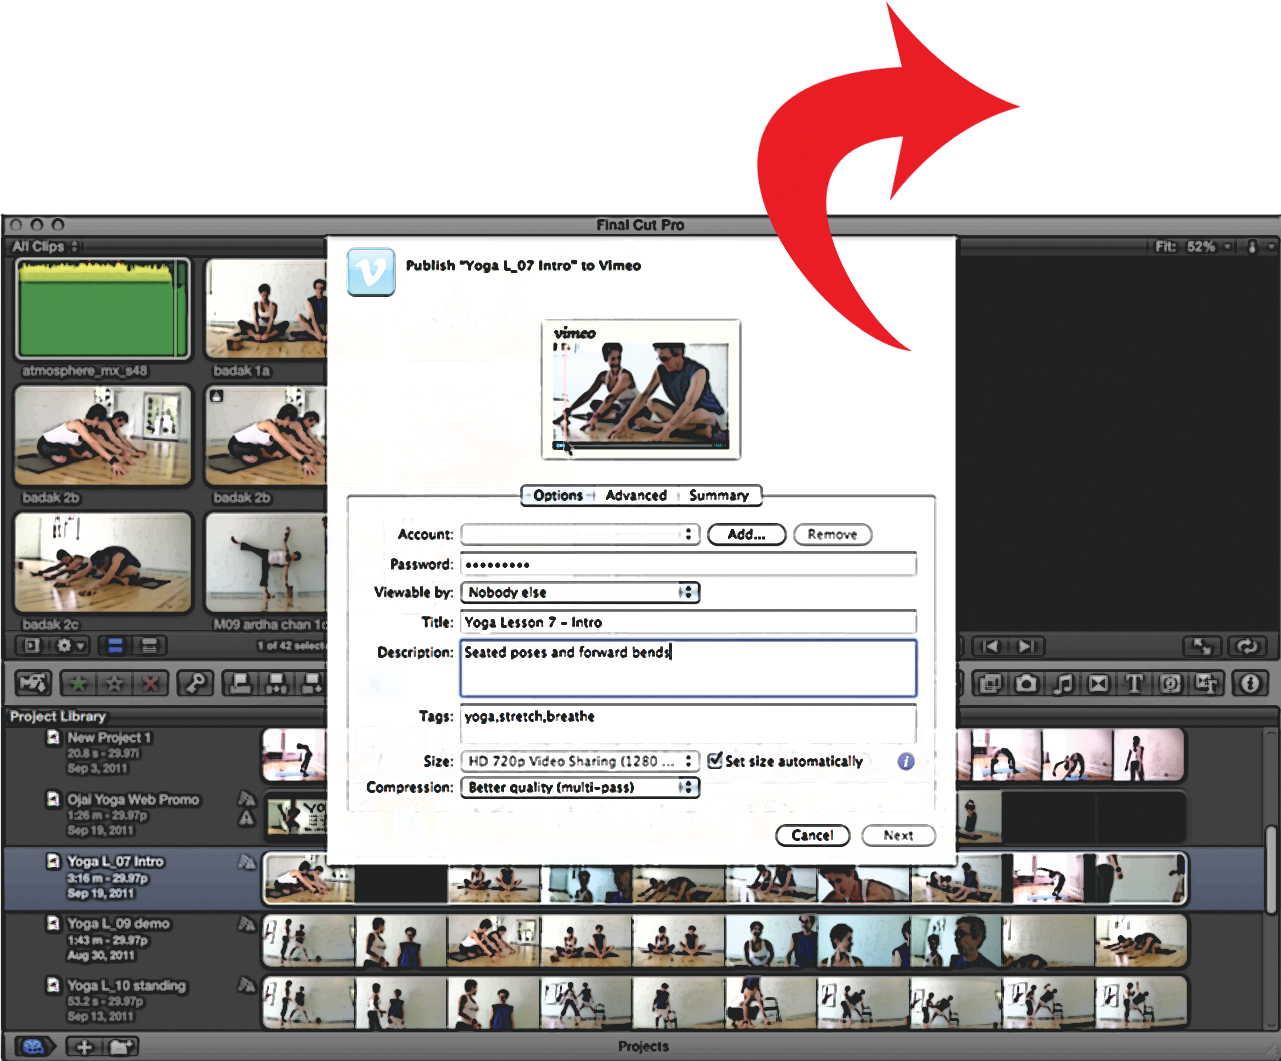
• You can use the Share feature to create and deliver output media files for a wide variety of uses ![]() . Share menu options include file export to many QuickTime formats. You can also use Share to burn DVDs and Blu-ray Discs, or process and upload files to online sites like YouTube in a single automated operation.
. Share menu options include file export to many QuickTime formats. You can also use Share to burn DVDs and Blu-ray Discs, or process and upload files to online sites like YouTube in a single automated operation.
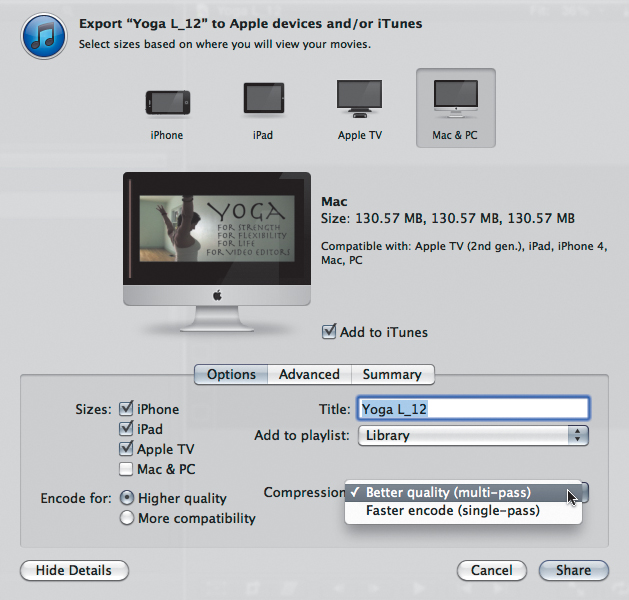
![]() The Share window offers a streamlined automated way to output and deliver your media. This example shows the options available in the Share > Apple Devices window.
The Share window offers a streamlined automated way to output and deliver your media. This example shows the options available in the Share > Apple Devices window.
• You can use the Export Media option to export clips or projects either as QuickTime movies or in a variety of image and sound formats.
• You can organize your production audio using FCP’s Roles tagging feature and then export audio stems—dialogue, effects, or music-only tracks for postproduction sound work.
• You can use Compressor, FCP’s affiliate compression application, to perform high-quality batch transcoding and export operations.
Installing and Setting Up FCP X
This section summarizes the process of assembling the necessary hardware, hooking everything up, and installing Final Cut Pro. Topics include Final Cut Pro system requirements as well as hardware selection and configuration for both a basic setup and a more full-featured system.
The perfect time to get the latest news on Final Cut Pro and your hardware options is before you commit to a particular system. There’s a bustling community of resources for Final Cut Pro. The FCP website, FCP user group meetings, and reputable vendors are our favorite sources.
It’s possible to do great work on a simple, low-cost Final Cut Pro system, but if that money is just burning a hole in your pocket, there are a number of ways to spend your dough and upgrade your FCP system.
System Requirements
Final Cut Pro 1.0 was conceived as a DV postproduction system that would run on a Macintosh G3 computer. Each new version of Final Cut Pro stiffens the minimum system requirements a bit more (FCP X requires a minimum Intel Core Duo, plus an OpenCL-capable graphics card), but because fast CPUs, graphics cards, and high-speed data transfer ports have spread throughout the Mac product line, FCP wanna-bes can keep pace on just about any recent Intel Mac. If you’re unsure whether your machine makes the grade, go to the Specifications page on Apple’s website, and look up its complete specifications at www.apple.com/finalcutpro/specs/.
Apple is continuously testing and qualifying third-party software and third-party external devices for compatibility with Final Cut Pro. To review the latest list of Apple-approved video hardware and software, go to Apple’s Final Cut Pro Technical Specification page at the URL listed above.
FCP X’s official minimum RAM requirement is 2GB, but you would be strongly advised to go with Apple’s “recommended” 4GB RAM requirement if you want the program to work properly.
Hardware Selection and Connection
You’ll need a few additional items to transform your Mac into a video production studio. This section describes two possible setups. The basic system is the bare minimum required; the recommended setup is, well, highly recommended for anyone with more than a passing interest in making movies.
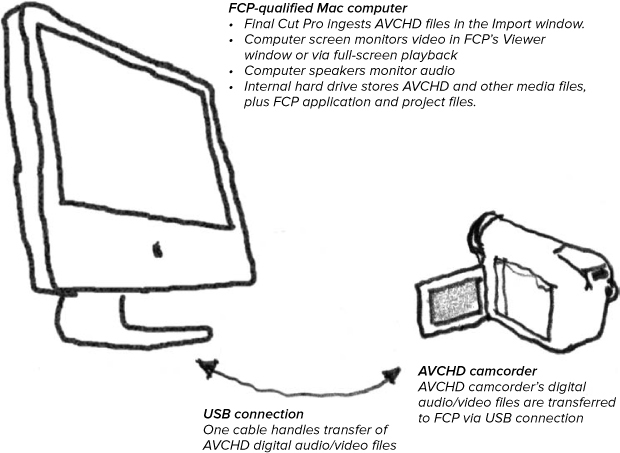
A basic hardware configuration includes an AVCHD camcorder and a FCP-qualified Mac equipped with a high-resolution computer monitor ![]() . The beauty of the basic system is its simplicity—an AVCHD camcorder connected to your Mac with a USB cable. That’s all there is to it. Here’s a rundown of the function of each piece of the system.
. The beauty of the basic system is its simplicity—an AVCHD camcorder connected to your Mac with a USB cable. That’s all there is to it. Here’s a rundown of the function of each piece of the system.
![]() A basic FCP hardware setup
A basic FCP hardware setup
• AVCHD camcorder: The AVCHD camera transfers your digital video and audio files into the computer via USB. During footage import, you must monitor audio through your camera’s or deck’s audio outputs; computer speakers are muted.
• Computer: Final Cut Pro, installed on the Mac, imports and then stores digital video files from the AVCHD camera in your Event Library on its internal hard drive; no additional video-digitizing card is needed. You view the results of your work on the computer’s monitor, and you use your computer’s speakers to monitor your audio. You edit your footage with Final Cut Pro and then export it to a format of your choice using the Share feature.
A recommended AVCHD setup adds a dedicated hard drive to store your media and enhances your monitoring capabilities with the addition of a second computer display and external speakers ![]() .
.

![]() Recommended FCP hardware configuration
Recommended FCP hardware configuration
• Dedicated hard drive: Adding a dedicated drive for your media improves the performance as well as the storage capacity of your system.
• Second computer display: If you’re producing video to be projected or viewed on television, you should preview your video output on a full-screen monitor as you edit. A real studio monitor would be best, but until FCP X supports output to a true broadcast monitor, even a midrange second display will give a more accurate idea of how your program looks and sounds. See “Customizing Your Workspace” later in this chapter for more information on connecting a second display.
• External speakers: Monitoring audio output from your computer with external speakers provides higher-quality audio output. External speakers are not expensive, and you’ll be surprised how much better you can hear your production audio—I hope it’s a pleasant surprise.
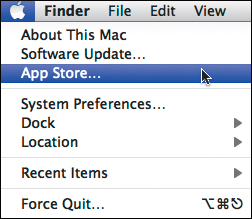
Installing Final Cut Pro from the App Store
Final Cut Pro X is available only as a $299 download from Apple’s App Store, which is accessible from your Mac’s Apple menu ![]() .
.
![]() Choose App Store from your Mac’s Apple menu to launch the App Store.
Choose App Store from your Mac’s Apple menu to launch the App Store.
Apple’s App Store controls the installation process, so just follow the on-screen prompts and then plan enough time for a 1GB-plus application download ![]() .
.
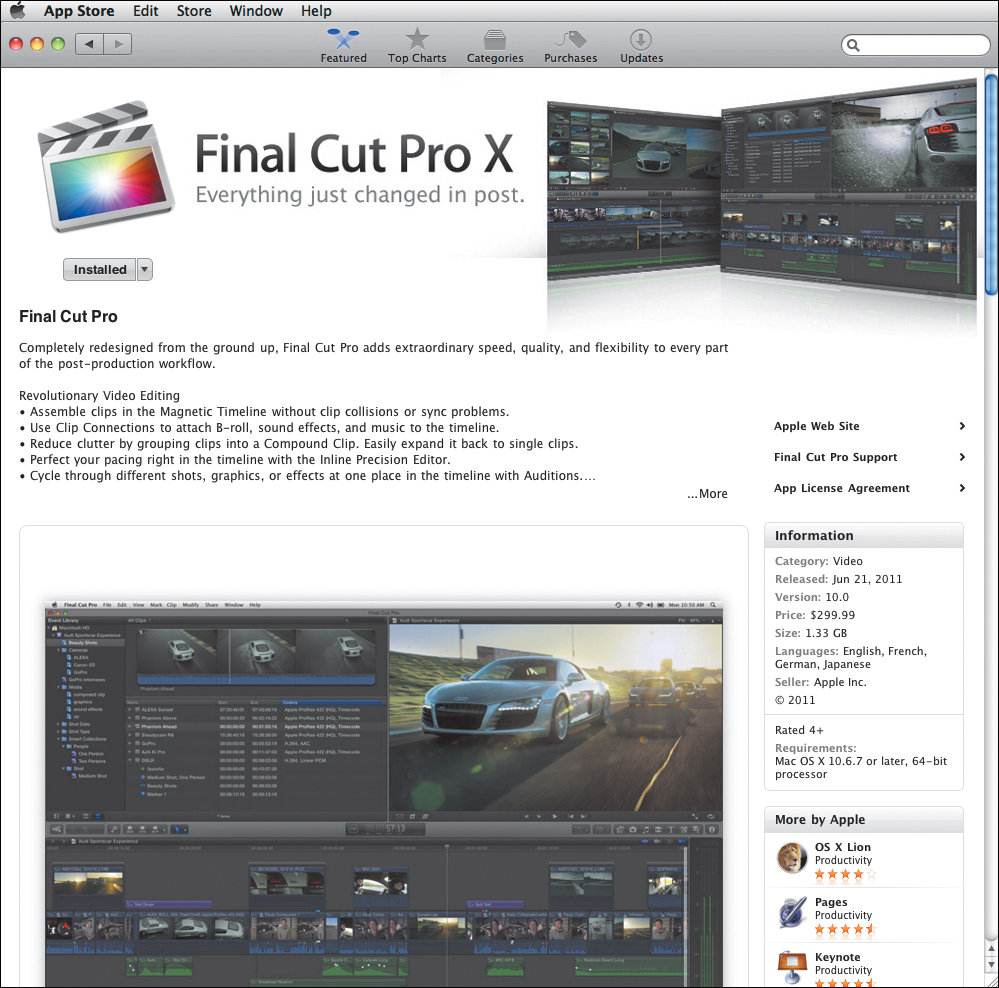
![]() The Final Cut Pro X page in Apple’s App Store
The Final Cut Pro X page in Apple’s App Store
Purchasing FCP X from the App Store entitles you to two installations. If you have a workstation and a laptop, you can install FCP X on both machines. Once your first installation is complete, return to the App Store on your second machine and navigate the Apple authorization process to obtain your second download. If things don’t go perfectly for you, know you are not alone. Courage.
Customizing Your Workspace
This latest version of Final Cut Pro has traded in its fabled array of customization options for a simplified, streamlined operation. Custom column layouts, custom screen layouts, and custom shortcut buttons are gone, but there are still a couple of useful customizing features worth mentioning:
• You can connect a second display to your Mac and use it as a dedicated full-screen playback monitor for the Viewer or to display your Event Browser’s clips and data on a big screen.
• You can create and save custom keyboard command setups.
Viewing Full-Screen Playback on a Second Display
FCP’s full-screen playback option is a terrifically useful option for enhanced video playback, especially for FCP users working on a laptop. Attach a second computer display to your Mac, and it gets even better:
• You can use the second display as a dedicated video monitor for the Viewer window. If you plan to project your movie or show it on a large TV, you’re strongly advised to get a bigger, better look at the quality of your footage as you edit it.
• You can expand your FCP workspace by using the second display to display your Event Browser’s clips and data on a big screen.
If your second display is lower quality than your Mac’s screen, shifting the Event Browser to that second display will recapture video playback space for the Viewer on your higher-quality main screen.
To switch video playback to full-screen view
1. Do one of the following:
• Choose View > Playback > Play Full Screen, or press Command-Shift-F.
• Click the Play Full Screen button to the right of the Viewer playback controls.
Your selected video plays in full-screen view starting at the playhead position.
2. To exit full-screen view, press Escape.
To show the Viewer on a second display
1. Choose Window > Show Viewer on Second Display ![]() .
.
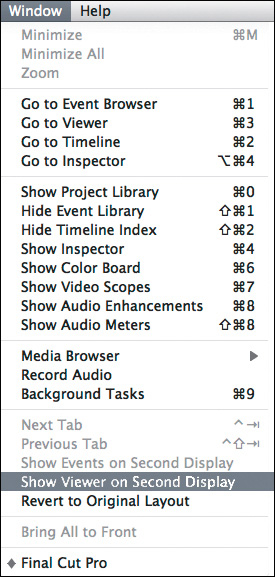
![]() Choose Window > Show Viewer on Second Display to move the Viewer window display to a second monitor.
Choose Window > Show Viewer on Second Display to move the Viewer window display to a second monitor.
The Viewer window appears on your second display. Viewer on-screen controls will still be operational on the second display.
2. Choose Window > Show Viewer in the main window to return the Viewer to the main FCP interface.
To show the Event Library and the Event Browser on a second display
1. Choose Window > Show Events on Second Display.
The Event Library and Event Browser appear on your second display. Event window on-screen controls will be operational on the second display.
2. Choose Window > Show Events in the main window to return events to the main FCP interface.
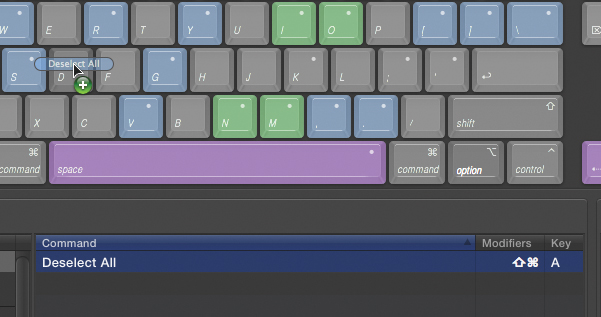
Creating Custom Keyboard Layouts
Editors with experience on other professional nonlinear editing systems rely on custom keyboard layouts; customizing keyboard shortcuts to match the editing system you know best is a lot faster and easier than rewiring your nervous system to tap unfamiliar keys.
You can do the following:
• Completely reconfigure your keyboard layout.
• Reassign an existing shortcut to a different key.
• Create an entirely new keyboard shortcut.
• Save multiple keyboard layouts, and import and export layouts from other sources.
The Command Editor window makes it dangerously easy to completely rewire your keyboard shortcuts ![]() . For a complete rundown on custom keyboard layouts, see Apple’s Final Cut Pro Help.
. For a complete rundown on custom keyboard layouts, see Apple’s Final Cut Pro Help.
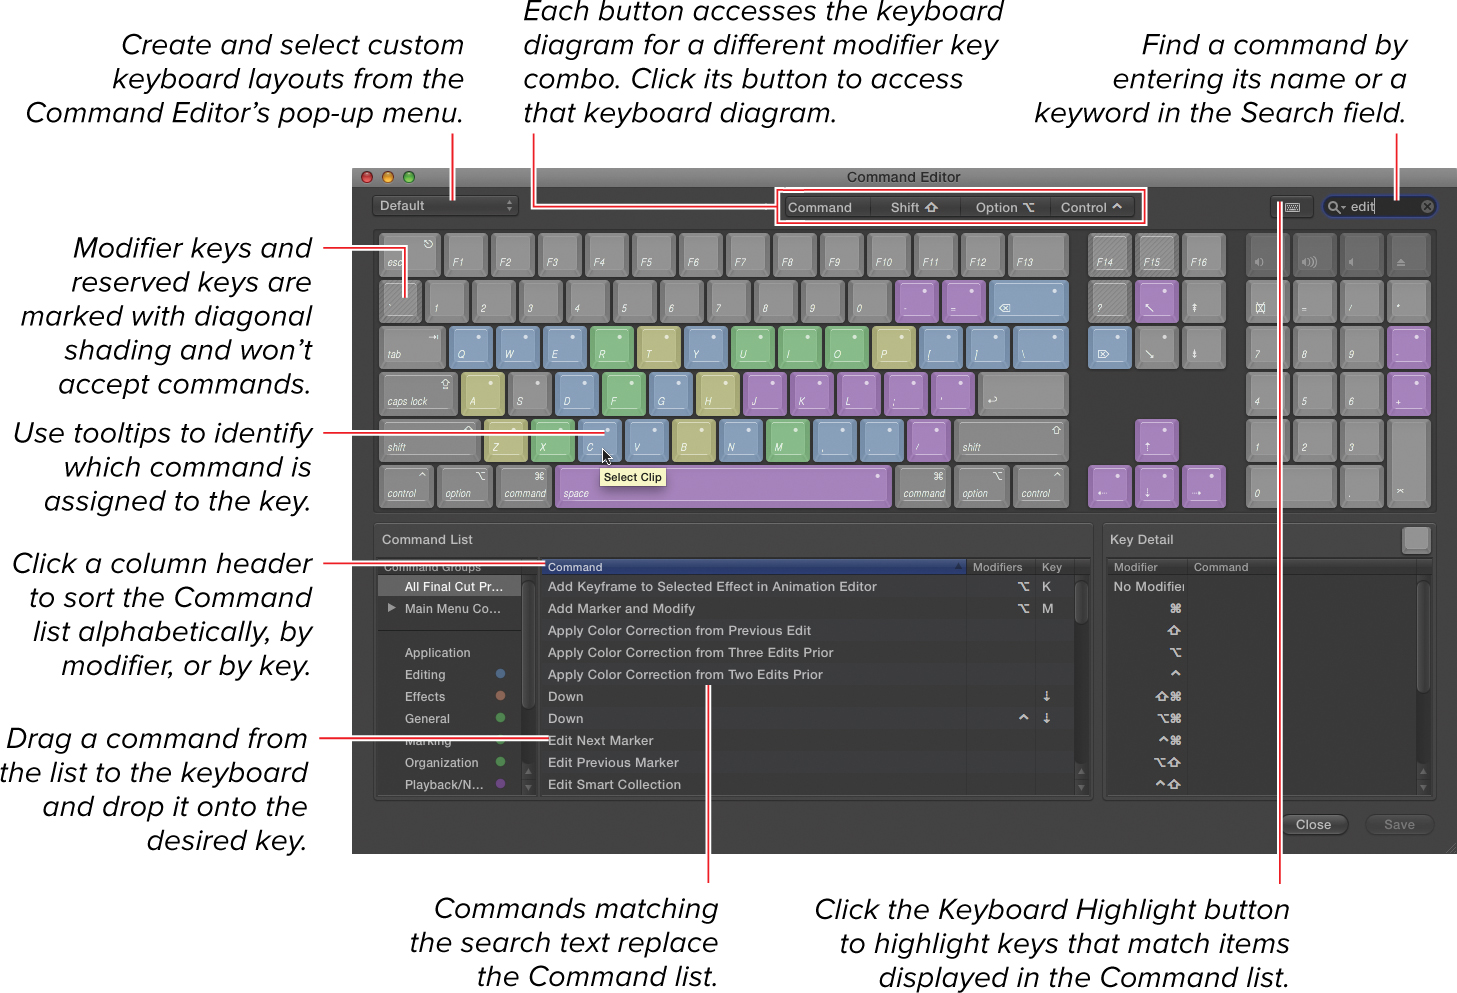
![]() The Command Editor window
The Command Editor window
This may be the hottest tip in the book: The Command Editor contains a complete list of FCP’s commands—including hidden commands you won’t find in anywhere else in the interface. When you’re wondering whether it’s possible to do something in FCP, browsing the Command Editor’s Command list should be your first move.
To create a custom keyboard shortcut
1. Choose Final Cut Pro > Commands > Customize, or press Command-Option-K ![]() .
.
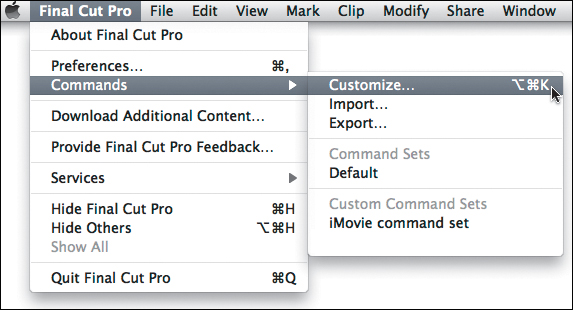
![]() Choose Final Cut Pro > Commands > Customize to open the Command Editor. Note that a list of previously created custom command sets (keyboard layouts) is available for direct selection in the lower-right corner of this submenu.
Choose Final Cut Pro > Commands > Customize to open the Command Editor. Note that a list of previously created custom command sets (keyboard layouts) is available for direct selection in the lower-right corner of this submenu.
The Command Editor appears. Keyboard layout diagrams are arranged by shortcut modifier key and appear on multiple panes. A complete list of commands, sorted by command group, appears at the bottom of the window.
2. To find the command you want to assign to the keyboard, do one of the following:
• Select the command’s menu group from the Command Groups list to filter the Command list display to show only commands from that menu group.
• Enter the command’s name or a keyword in the search field, and the Command list will automatically display only commands matching the search term ![]() .
.
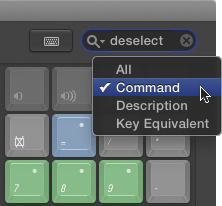
![]() Enter the command’s name or a keyword in the search field. The Command list will automatically display only commands matching the search term. The search field’s submenu options let you refine your search further.
Enter the command’s name or a keyword in the search field. The Command list will automatically display only commands matching the search term. The search field’s submenu options let you refine your search further.
• Click the Command List’s Command column header to view the command list alphabetically.
3. FCP’s default keyboard layout is locked by default. To customize the keyboard layout, you must first create a copy of the default layout by choosing Duplicate from the pop-up menu in the topleft corner of the Command Editor ![]() .
.
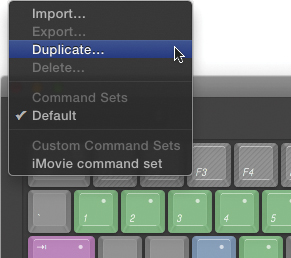
![]() Before customizing the keyboard layout, you must first create a copy of the default layout by choosing Duplicate from the pop-up menu in the topleft corner of the Command Editor. The default command set is locked by default.
Before customizing the keyboard layout, you must first create a copy of the default layout by choosing Duplicate from the pop-up menu in the topleft corner of the Command Editor. The default command set is locked by default.
4. In the dialog, type a name for your custom command set, and click OK.
Your custom keyboard layout becomes the active layout and is added to the Command Editor’s pop-up menu.
5. To assign the command to a key, select the command in the list, and do one of the following:
• Press the key or key combo you want to assign as the new shortcut for that command. If the shortcut is already in use, a dialog appears asking you to confirm your choice. If you want your new command choice to replace the key’s current assignment, click Reassign.
• If your new keyboard shortcut uses no modifier key, drag the command from the list and drop it on the appropriate key in the keyboard diagram.
• If your new keyboard shortcut is a key combined with a modifier key, select the keyboard diagram for that modifier key by clicking its tab, and then drag the command from the list and drop it on the appropriate key ![]() .
.
![]() Drag a command from the list to the keyboard and drop it onto the desired key.
Drag a command from the list to the keyboard and drop it onto the desired key.
6. To save your changes, click the Save button in the lower-right corner of the Command Editor, and then click Close ![]() .
.

![]() Click the Save button in the lowerright corner of the Command Editor to save your changes, and then click Close.
Click the Save button in the lowerright corner of the Command Editor to save your changes, and then click Close.
You can reassign a keyboard shortcut by dragging it from one key to another in the keyboard layout diagram.
Heads up: When you reassign a keyboard shortcut by dragging it to a key on the keyboard layout diagram, the change takes effect without any confirming dialog.
Undoing Changes
You can undo almost every type of action you perform in your projects, sequences, and clips, as well as redo actions that you have undone. Starting in FCP X, you can undo every action you’ve taken up to the last time you quit and reopened Final Cut Pro. That’s because Final Cut Pro’s default behavior is now to save your project automatically every time you make a change.
You never have to remember to save your project manually, but the only way to revert your project to an earlier state is by using the Undo feature to step back through your actions.
Another way to restore a heavily manipulated clip to its original state and get a fresh start is by adding a new copy of the clip to your project directly from its Event Library folder.
There are a few actions that you can’t undo in FCP X. You can’t undo an import; you can’t undo certain Media Management operations. FCP will warn you if you’re about to commit an action that cannot be undone.
To undo your last action
• Choose Edit > Undo (the name of your last action) ![]() . Or press Command-Z.
. Or press Command-Z.
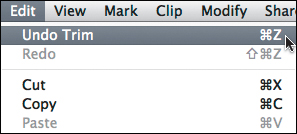
![]() Choose Edit > Undo to undo your last action. FCP specifies the name of your last action in the menu.
Choose Edit > Undo to undo your last action. FCP specifies the name of your last action in the menu.
To redo the last undone action
• Choose Edit > Redo (the name of your last action) ![]() . Or press Command-Shift-Z.
. Or press Command-Shift-Z.
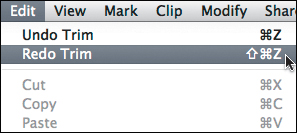
![]() Choose Edit > Redo to redo your last undo. FCP specifies the name of your last action in the menu. (Surely an FCP Project History feature must be just around the corner....)
Choose Edit > Redo to redo your last undo. FCP specifies the name of your last action in the menu. (Surely an FCP Project History feature must be just around the corner....)
Stay Out of Trouble, Get Out of Trouble
The best way to stay out of trouble using FCP is to read and heed these performance tips. If you do run into snags when using Final Cut Pro, read the sidebar “How to ‘Trash Your Prefs’”—it may help.
• Latest version of FCP: Make sure you’re running the latest version of Final Cut Pro by checking in Apple’s website.
• Settings: Avoid running processor-intensive operations in other open applications while you’re working in Final Cut Pro (especially when transcoding video for input or output).
• Clean out your old projects and events: Move your unused events and projects out of the Final Cut directories in the Finder so they are not “seen.” This will free up memory and improve performance.
• Disk space: Maintain 10 percent free space on each disk drive. If you fill your disk to the last gigabyte, your performance will take a dive—and that’s the best-case scenario.
• Work locally: Final Cut Pro performs poorly if you try to work with remote media files over a network connection. Copy files from the network to a local disk before importing them.
• Display: Make sure the entire image area is visible in windows playing video. If you see scroll bars on the edge of the Viewer, you’re zoomed in too far for optimal performance ![]() .
.
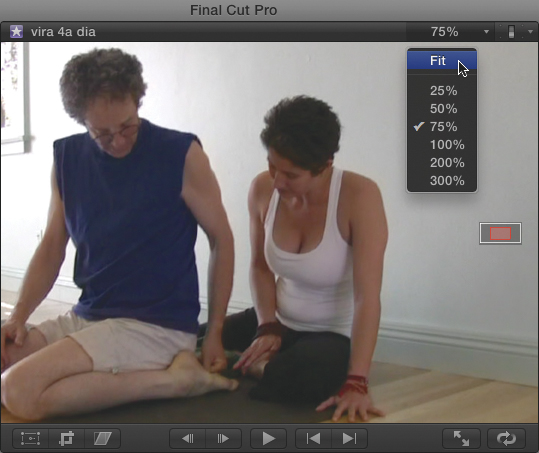
![]() If you see this red icon on the right edge of the Viewer’s image area, you’re zoomed in too far for optimal playback performance. Choose Fit from the Viewer’s pop-up menu to bring the entire frame back into view.
If you see this red icon on the right edge of the Viewer’s image area, you’re zoomed in too far for optimal playback performance. Choose Fit from the Viewer’s pop-up menu to bring the entire frame back into view.