
8. Editing Tools
In This Chapter
Chapter 7, “Basic Editing,” got you started cutting in earnest. Final Cut Pro offers a wide array of additional tools and techniques that can take you beyond the basics and greatly improve your editing efficiency.
In this chapter, you’ll explore secondary storylines and the Timeline Index, two tools that help you view and organize your projects.
You’ll also find tips on how to navigate and work with multiple projects simultaneously and many other tools and tasks that will improve your skill level dramatically.
Splitting Clips
In some cases, you may want to deliberately break one clip into multiple pieces. This can happen automatically if you insert a new clip in the middle of an existing one, but you can also manually split a clip using the Blade command or the Blade tool.
Blading a clip does not, by itself, change what the movie looks like when you play it back. It simply divides the bar in the Timeline into two pieces. This allows you to perform other tasks, such as moving or deleting a portion of a clip, applying an effect to part of a clip, and so on.
To split a clip into two pieces
• Identify where you want to split the clip, and then do one of the following ![]() :
:
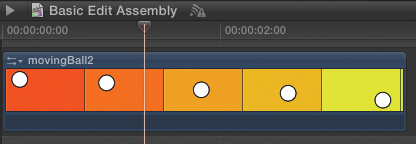
![]() Find the precise frame where you want the clip to be split.
Find the precise frame where you want the clip to be split.
• Position the playhead at the desired split location, and choose Edit > Blade or press Command-B ![]() .
.
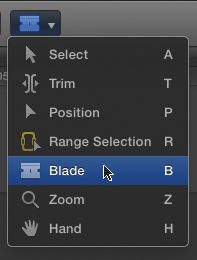
![]() Select the Blade tool from the Tools pop-up menu located above the Timeline on the main toolbar, or press B.
Select the Blade tool from the Tools pop-up menu located above the Timeline on the main toolbar, or press B.
• From the Tools pop-up menu, choose the Blade tool (or press B), and then click the clip in the Timeline at the frame where you want to divide the clip ![]() .
.
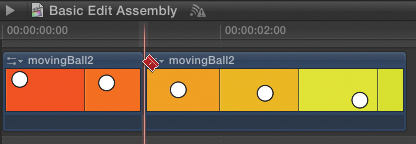
![]() Add an edit point to your clip by using the Blade tool or command.
Add an edit point to your clip by using the Blade tool or command.
The clip is split into two pieces.
Copying and Pasting Clips
The Cut, Copy, and Paste commands are frequently used to move clips from one part of a project to another or from one project to another. You can also use the copy commands to duplicate a selection and make multiple copies.
You can opt to either cut or copy the selection you want to move.
• Choosing Cut removes the initial instance of the selection (automatically closing any created gaps) and saves it in the clipboard until you are ready to paste it in a new location.
• Choosing Copy stores the selection on the clipboard but leaves the original in place.
Once you’ve stored the selection on the clipboard, you can paste it to a new location. When you paste, cut, or copy clips into a project, the clips will be pasted into the same tracks you cut them from. So, copying a clip from the primary storyline will paste to the primary storyline. Copying a connected clip will paste the copy as a connected clip.
Nonadjacent (or noncontiguous) selections will remember the relative positions of the clips. When you paste a noncontiguous selection of clips, FCP will add gaps as necessary to maintain the clips’ relative positions ![]() .
.
![]() You can cut or copy anything you can select: a portion of a clip, a whole clip, a group of clips, or even noncontiguous selections like this one.
You can cut or copy anything you can select: a portion of a clip, a whole clip, a group of clips, or even noncontiguous selections like this one.
To select a portion of a clip or a range across multiple clips
1. From the Tools pop-up menu, choose the Range Selection tool; or press R ![]() .
.
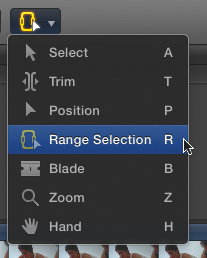
![]() The Range Select tool can select a portion of a clip or a range across multiple clips in a single storyline.
The Range Select tool can select a portion of a clip or a range across multiple clips in a single storyline.
2. In the Timeline, click at the point in the clip where you want your selection to start, and then drag the Range Selection tool to mark your selection ![]() .
.
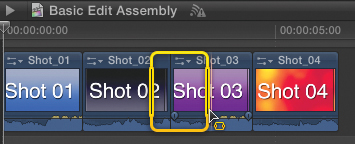
![]() Drag in the Timeline with the Range Select tool to define your selection. You can select right across edit points, selecting portions of two or more adjacent clips.
Drag in the Timeline with the Range Select tool to define your selection. You can select right across edit points, selecting portions of two or more adjacent clips.
The range is selected and ready to be cut or copied.
Pasting Clipboard Contents
Clips are pasted at the position of the playhead—or the skimmer if skimming is enabled. Pasted clips will be either inserted or connected to the primary storyline.
To paste as an insert
1. Make a selection in the Timeline using any selection method ![]() .
.
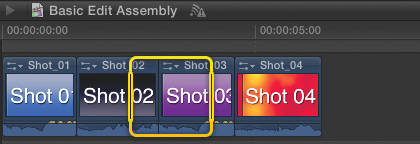
![]() Select the clip or range of clips that you want to copy to the clipboard.
Select the clip or range of clips that you want to copy to the clipboard.
2. To copy the selection to the clipboard, do one of the following:
• To copy the selection to the clipboard and delete the original, choose Edit > Cut or press Command-X.
• To copy the selection the clipboard and leave the original intact, Choose Edit > Copy or press Command-C.
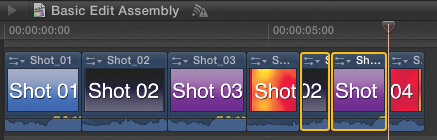
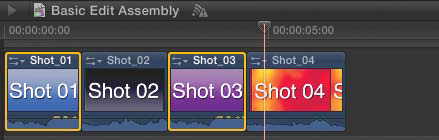
3. Place the Timeline playhead (or skimmer) at the frame where you want to paste the selection ![]() .
.

![]() Because the playhead position is midway through Shot_04, that clip will be split when the paste is performed.
Because the playhead position is midway through Shot_04, that clip will be split when the paste is performed.
4. Choose Edit > Paste, or press Command-V.
The selection is pasted as an insert into the Timeline ![]() .
.
![]() The clips are inserted, pushing the last part of Shot_04 downstream. In this example, the original clips were copied, not cut, so now there are two instances (copies) of the selected range.
The clips are inserted, pushing the last part of Shot_04 downstream. In this example, the original clips were copied, not cut, so now there are two instances (copies) of the selected range.
To paste as a connected clip
1. Make a selection in the Timeline using any selection method ![]() .
.
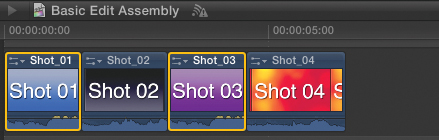
![]() In this example two nonadjacent clips are selected.
In this example two nonadjacent clips are selected.
2. To copy the selection to the clipboard, do one of the following:
• To copy the selection to the clipboard and delete the original choose Edit > Cut or press Command-X.
• To copy the selection the clipboard and leave the original intact, Choose Edit > Copy or press Command-C.
3. Place the Timeline playhead (or skimmer) at the frame where you want to paste the selection ![]() .
.
![]() The playhead position will determine where the first frame of the first selected clip will be pasted.
The playhead position will determine where the first frame of the first selected clip will be pasted.
4. Choose Edit > Paste as Connected Clip, or press Option-V.
A copy of your selection is pasted as clips connected to the primary storyline ![]() .
.
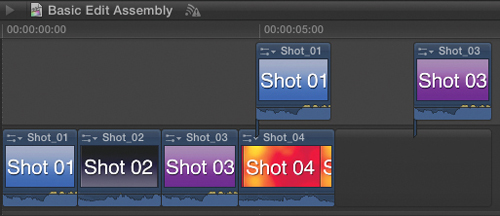
![]() FCP pastes the selection as connected clips, adding a gap to the primary storyline in order to reproduce the original spacing of your nonadjacent clip selection in the pasted copies.
FCP pastes the selection as connected clips, adding a gap to the primary storyline in order to reproduce the original spacing of your nonadjacent clip selection in the pasted copies.
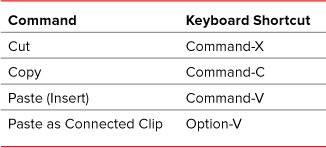
Table 8.1 shows all Cut, Copy, and Paste keyboard shortcuts.
Table 8.1. Copy and Paste Shortcuts
Navigating in the Timeline
The more time you spend editing, the more you’ll appreciate how important it is to be able to quickly and easily move around the Timeline, zoom in and out, jump right to specific edits, and so on.
Many of the tasks described here can be accomplished with the help of keyboard shortcuts. FCP has an army of key commands; many professional editors prefer a keyboard-intensive working style. This section demonstrates some other ways to approach the Timeline interface because, frankly, keystrokes don’t make good illustrations. Check out the keyboard shortcuts in Table 8.2.
Before you skip past this section, though, consider the alternatives described here. FCP has a variety of tools, commands, and controls to help you get around.
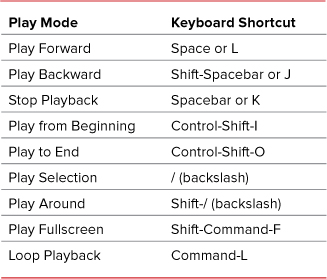
You can play your project back in a wide variety of ways. You can play forward and backward, and you can play in slow motion and in fast motion; in addition, you can play from start, play to end, play just the selection, play around the current playhead position, and so on.
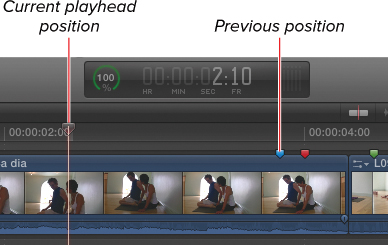
You can use the playhead’s locator line to help identify the exact timecode location of an item way down at the bottom of the Timeline window. Set the playhead’s locator line on the point you want to identify, and the Current Timecode indicator will give you its exact timecode location.
To jump the playhead to a new location
• Click the location on the Timeline ruler to move the playhead to that location.
To scrub through a project in the Timeline
• Drag the playhead along the Timeline ruler.
Click directly on a Timeline clip to move the playhead to that position and select the clip in a single operation.
To jump the playhead from edit to edit
• Do one of the following:
• Press the Up Arrow key (for the previous edit) or the Down Arrow key (for the next edit).
• Press ; (semicolon) for the previous edit, or press ’ (apostrophe) for the next edit. (These are the most convenient alternatives if you use the J, K, and L keys for navigation.)
• In the Viewer, click the Previous Edit button or the Next Edit button.
• Choose Mark > Previous (or Next) > Edit.
• Press Home to jump to the beginning of the sequence, and the playhead jumps to the first frame of the clip. If you’ve enabled Show Overlays on the View menu, an L-shaped icon appears in the lower left or right of the Canvas, indicating that you are on the first or last frame of the project clip.
• Press End to jump to the end of the project.
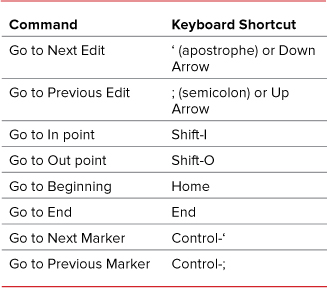
Table 8.3 lists the Timeline navigation shortcuts.
Table 8.3. Timeline Navigation Shortcuts
Navigating with Timecode in the Timeline
Just as in the Event Browser, using timecode values to position the playhead in the Timeline results in frame-accurate positioning. The timecode input function in FCP is very flexible.
There are a couple of ways to use timecode to navigate the Timeline:
• You can type a specific number of frames (preceded by a plus or minus sign) to move the playhead by the number of frames you specify.
• You can type a specific timecode number into the Current Timecode indicator to jump the playhead to the frame you specify.
To jump the playhead a specified number of frames using timecode values
1. Start in the Timeline. Make sure all clips are deselected, or you’ll move the selected clip and not the playhead.
2. Type a specific number of frames, preceded by a plus (+) or minus (–) sign. You don’t need to click in the Current Timecode indicator; just type the numbers.
3. Press Enter.
The playhead moves to the new timecode value, and the new timecode position displays in the Current Timecode indicator.
Deselecting everything in the Timeline is easy—especially if you know the keyboard shortcut. Press Shift-Command-A, and you’re completely deselected. You can also just click on an empty space in the Timeline.
To move the playhead to a precise frame
1. Click the Current Frame indicator (be sure not to double-click), or press Control-P.
The Current Frame indicator display lights up blue, the numbers turn to all zeros, and a playhead icon appears to the right of the numbers ![]() .
.
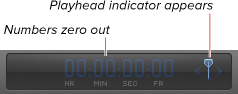
![]() When you click the Current Frame indicator, FCP indicates that it’s waiting for you to enter new timecode information.
When you click the Current Frame indicator, FCP indicates that it’s waiting for you to enter new timecode information.
2. Type a timecode number, following the rules laid out in the “Timecode Entry Rules” sidebar ![]() .
.
![]() Type the exact timecode number of the frame to which you want to navigate.
Type the exact timecode number of the frame to which you want to navigate.
3. Press Enter (or Return).
The playhead moves directly to the frame you selected ![]() .
.
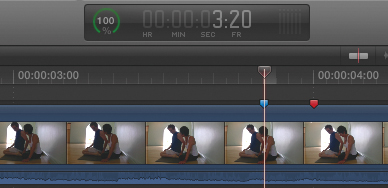
![]() In this example, the playhead moves to three seconds and twenty frames.
In this example, the playhead moves to three seconds and twenty frames.
Alternatively, you can enter a specific number of frames preceded by a plus (+) or a minus (–) to move the playhead forward or backward by that amount.
To move the playhead by a specific number of frames
1. Click the Current Frame indicator (be sure not to double-click), or press Control-P ![]() .
.
![]() Be sure the Timeline is active (press Command-2) before you click the Current Frame indicator.
Be sure the Timeline is active (press Command-2) before you click the Current Frame indicator.
The Current Frame indicator display lights up blue, the numbers zero out, and a playhead icon appears to the right of the numbers.
2. Type plus (+) or minus (–) and a number of frames following the rules laid out in the “Timecode Entry Rules” sidebar ![]()
![]() .
.
![]() When you type a plus (+) sign, a plus (+) icon appears to the left of the numbers, and a right-facing arrow lights up to the right of the playhead icon.
When you type a plus (+) sign, a plus (+) icon appears to the left of the numbers, and a right-facing arrow lights up to the right of the playhead icon.
![]() When you type a minus (–) sign, a minus (–) icon appears to the left of the numbers, and a left-facing arrow lights up to the left of the playhead icon.
When you type a minus (–) sign, a minus (–) icon appears to the left of the numbers, and a left-facing arrow lights up to the left of the playhead icon.
The playhead moves forward or backward by the number of frames you selected ![]() .
.
![]() In this example, the playhead moved 34 frames (1 second, 10 frames) to the left.
In this example, the playhead moved 34 frames (1 second, 10 frames) to the left.
Note you can also use the Current Frame indicator to move or trim specific clips. For more information on trimming numerically, see “Numerical Trimming” in Chapter 9.
Changing Time Display
You can also make the Current Frame indicator display in frames or in seconds. For very short projects, such as animations, this may be more useful than traditional timecode. For longer projects, traditional timecode is generally easier to comprehend.
FCP displays the frames in your movie in four two-digit sections: Hours, Minutes, Seconds, and Frames, abbreviated as HH:MM:SS:FF ![]() .
.
![]() The Current Frame indicator shows abbreviations under the numbers to help you remember what the numbers mean.
The Current Frame indicator shows abbreviations under the numbers to help you remember what the numbers mean.
• You don’t actually need to type the colons to separate the frames, seconds, and so on. Instead of typing 12:34:56:12, just type 12345612. FCP will know what you mean.
• Don’t bother entering leading zeros. Any zeros to the left can be ignored. Rather than typing 00:00:01:14, just type 1:14 (or 114).
• If there’s a pair of zeros to the right, you can substitute those with a period. So, rather than typing 12:00, just type 12. (12 and a period). Rather than typing 05:00:00:10, just type 5..10 (5, two periods, 10).
To change the display of the Current Frame indicator
1. Choose Final Cut Pro > Preferences.
The Final Cut Pro Preferences window opens ![]() .
.
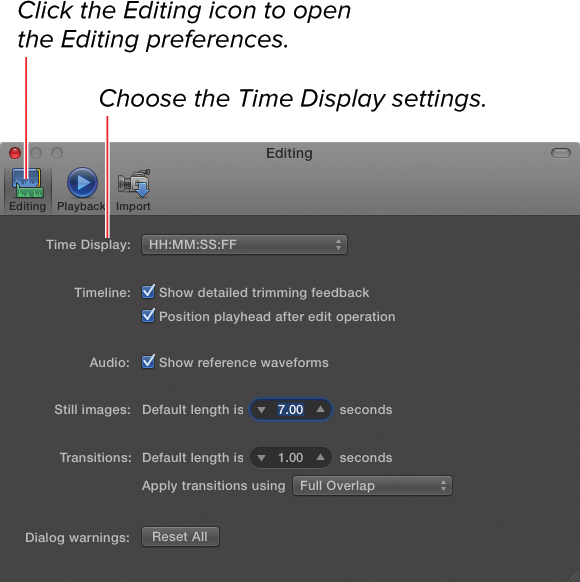
![]() The Editing pane of the Final Cut Pro Preferences window is where you’ll find the Time Display pop-up menu.
The Editing pane of the Final Cut Pro Preferences window is where you’ll find the Time Display pop-up menu.
2. If it’s not already showing, click the Editing button to open the Editing preferences.
3. Set the Time Display pop-up menu to the frame-counting method of your choice ![]() .
.
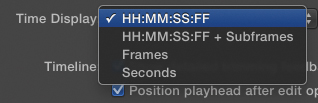
![]() Choose from standard timecode, timecode plus subframes, frames, and seconds.
Choose from standard timecode, timecode plus subframes, frames, and seconds.
Changing the Time Display preference affects all instances of time display throughout the program, so the Event Browser, Timeline Index, Timeline ruler, and so on, will all switch to the different frame-counting method when you change that preference.
Zooming In and Out
Although there aren’t quite as many ways to zoom in and out in FCP X as there were in FCP 7, there are still quite a few to choose from.
As you edit, you’ll frequently want to zoom way in to manipulate a specific edit and then quickly jump back out to see the big picture of the whole project.
There are three ways to zoom the Timeline view: the Zoom tool, the zoom commands, and the Zoom slider.
To zoom using the Zoom tool
1. Choose the Zoom tool from the Tools pop-up menu in the toolbar, or press Z ![]() .
.
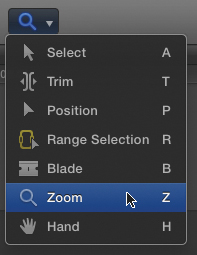
![]() Press Z to select the Zoom tool.
Press Z to select the Zoom tool.
2. Click anywhere in the Timeline to zoom in.
3. Option-click to zoom out.
You can also drag a box in the Timeline with the Zoom tool to zoom into a specific range ![]() .
.
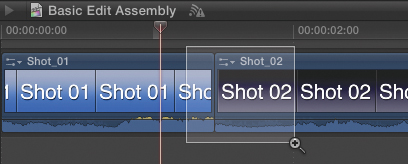
![]() Drag with the Zoom tool to zoom in on a specific selection.
Drag with the Zoom tool to zoom in on a specific selection.
Once you’re zoomed in, you can use the Hand tool to move earlier or later in time.
To navigate using the Hand tool
1. Choose the Hand tool from the Tools popup menu in the toolbar, or press H ![]() .
.
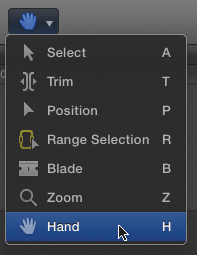
![]() Press H to select the Hand tool.
Press H to select the Hand tool.
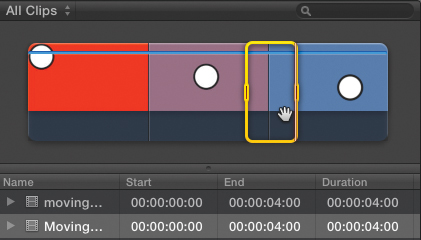
2. In the Timeline, drag right to view a later portion of the project, and drag left to view an earlier portion of the project ![]() .
.
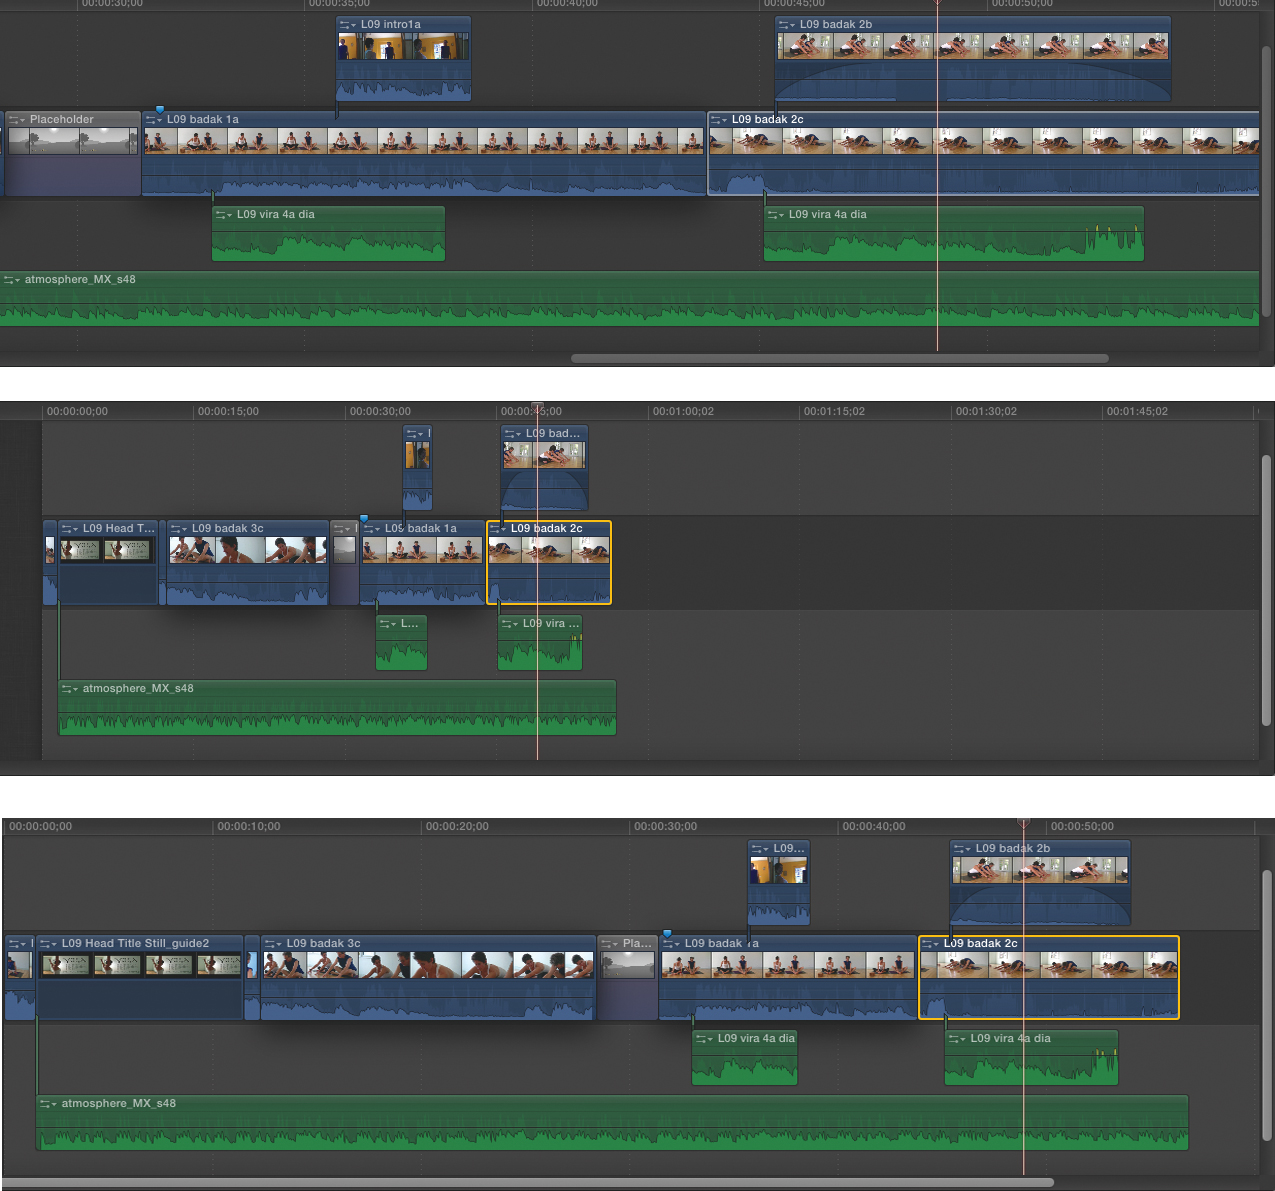
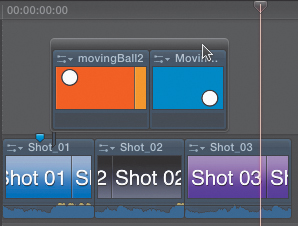
![]() Whether you’re zoomed in as pictured in the top image or zoomed out as in the middle image, the Zoom To Fit command automatically fills the Timeline window with all the clips in your project (as shown in the bottom image).
Whether you’re zoomed in as pictured in the top image or zoomed out as in the middle image, the Zoom To Fit command automatically fills the Timeline window with all the clips in your project (as shown in the bottom image).
If you’re using a multi-touch device such as a trackpad or a Magic Mouse, you can use a two-finger swipe to move earlier or later in time.
To zoom using the Zoom commands
• Choose View > Zoom In or press Command-+ to zoom in.
• Choose View > Zoom Out or press Command-– (minus) to zoom out.
• Choose View > Zoom to Fit or press Shift-Z to activate the Zoom to Fit command.
• Choose View > Zoom to Samples or press Control-Z to zoom all the way in to the audio samples level.
To zoom using the Zoom slider
• Drag left to zoom out, and drag right to zoom in ![]() .
.
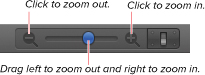
![]() The zoom slider zooms in and out centered around the playhead—even if a clip is selected.
The zoom slider zooms in and out centered around the playhead—even if a clip is selected.
• Click the Zoom In button to zoom in.
• Click the Zoom Out button to zoom out.
The Timeline Index
The Timeline’s primary linear view is extremely helpful in terms of visualizing your project over time; it allows you to quickly see how long relative clips are, where they overlap, and where in time each item begins and ends. However, it’s also a fairly inefficient way to view the contents of your project, requiring you to scroll along or zoom way out to see a large number of items at once.
Fortunately, Final Cut Pro X also provides the Timeline Index—a list of all the items in your project, arranged in chronological order. This view allows you to see a large number of items at once, but it also offers some very powerful tools that would be nearly impossible to display in the primary Timeline view ![]() .
.
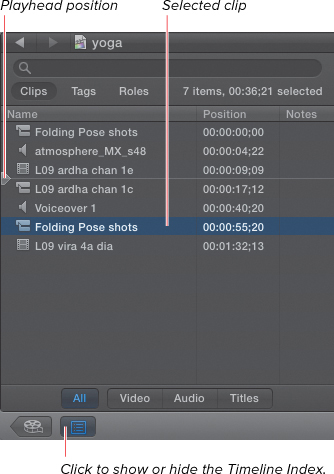
![]() The Timeline Index can show a list of clips, a list of tags such as markers and keywords, and the controls for clip roles.
The Timeline Index can show a list of clips, a list of tags such as markers and keywords, and the controls for clip roles.
To show the Timeline Index
• Do one of the following:
• Click the Show/Hide Timeline Index button.
• Press Shift-Command-2.
• Choose Window > Show Timeline Index.
The Timeline Index appears at the left side of the Timeline.
• Press Command-F.
This opens the Timeline Index and also highlights the search field.
Controlling the Timeline Index View
The Timeline Index can display clips, tags, or roles. For either clips or tags, you can filter the list with great precision to quickly find exactly the elements you may be looking for ![]() . The Roles view is covered in “Controlling Clips with Roles” later in this chapter.
. The Roles view is covered in “Controlling Clips with Roles” later in this chapter.
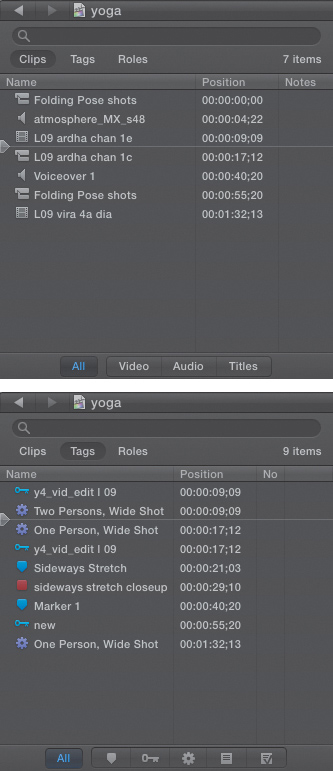
![]() Both the Clips (top) and Tags (bottom) views contain control tools to filter the view.
Both the Clips (top) and Tags (bottom) views contain control tools to filter the view.
To choose the Timeline Index view
• Click the Clips button to display the Clips pane.
• Click the Tags button to display the Tags pane.
• Click the Roles button to display the Roles pane.
Filtering the Timeline Index
In Clips view, you can filter the list to see just video, audio, or titles. In Tags view, you can filter based on markers, keywords, analysis keywords, incomplete To Do Items, and completed To Do Items ![]() . Roles can’t be filtered.
. Roles can’t be filtered.
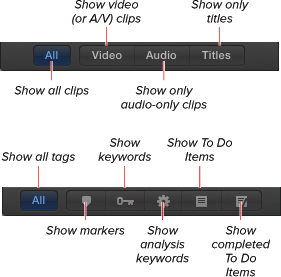
![]() Click one of the filtering buttons to limit the types of objects displayed. The top image shows the filtering options for clips, and the bottom shows the filtering options for tags.
Click one of the filtering buttons to limit the types of objects displayed. The top image shows the filtering options for clips, and the bottom shows the filtering options for tags.
To filter the Timeline Index
• Click one of the buttons at the bottom of the Timeline Index in either the Clips or Tags pane.
The Timeline Index is filtered to show only objects of the selected object type.
In either filterable view, you can further refine your search by typing specific text in the search field. The view will dynamically update to show only objects that contain the selected text.
To filter the Timeline Index with specific text
• Enter text in the search field ![]() .
.
The Timeline Index is filtered to show only objects containing the search terms and of the selected object type.
To clear the search field
• Click the gray X button at the right of the search field ![]() .
.
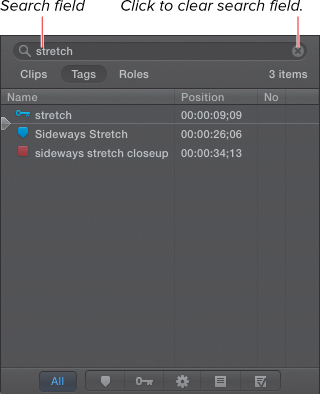
![]() Only items containing the search terms are displayed.
Only items containing the search terms are displayed.
The Timeline Index will display all objects of the selected type.
Navigating Within the Timeline Index
The more comfortable you are using the Timeline Index, the more you’ll start to appreciate all the other things you can do in that view. You can move the Timeline playhead to specific objects and select objects based on keywords, markers, or clip names. You can even copy and paste objects to control the order of clips and arrangement of your project.
To jump to a specific object
• Click any object in the Clips or Tags pane of the Timeline Index ![]() .
.
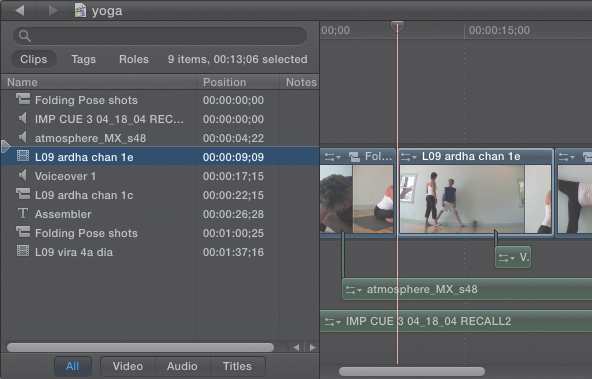
![]() Click any object to jump to the frame where that object begins in time
Click any object to jump to the frame where that object begins in time
The object becomes highlighted in the Timeline Index, and the Timeline playhead moves to the first frame of the selected object.
Selecting a keyword moves the playhead to the first frame of the keyworded range.
Selecting a marker moves the playhead directly to the marker location.
Double-click a marker in the Timeline Index to move the playhead to the marker position and open the Modify Marker window.
To copy and paste clips in the Timeline Index
1. In the Timeline Index, click the Clips button to open the Clips pane.
2. Select the items you want to cut or copy ![]() .
.
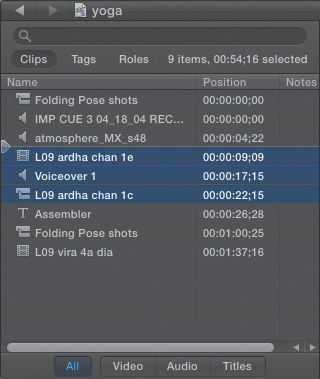
![]() You can copy and paste clips in the Timeline Index.
You can copy and paste clips in the Timeline Index.
3. Press Command-X to cut or Command-C to copy the selected clips.
The clips are copied to the clipboard.
4. Position the playhead at the location where you want to paste the copied objects.
5. Press Command-V to paste as an insert edit or Option-V to paste as a connected clip ![]() .
.
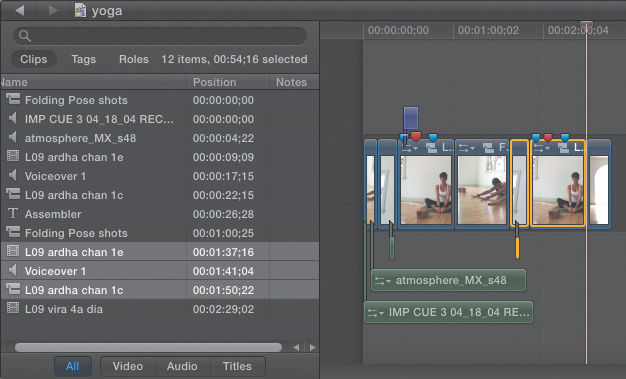
![]() In this example, the clips have been pasted as an insert before the last clip.
In this example, the clips have been pasted as an insert before the last clip.
The selection is added to the Timeline at the chosen location. For more about Copy and Paste options, see “Copying and Pasting Clips” later in the chapter.
To Do Items and the Timeline Index
One of the great benefits of the Timeline Index is being able to see all of your To Do Items in a clean list. You can jump from item to item just by clicking them, and once the task is complete, you can mark that in the Index too.
To view a To Do Item list
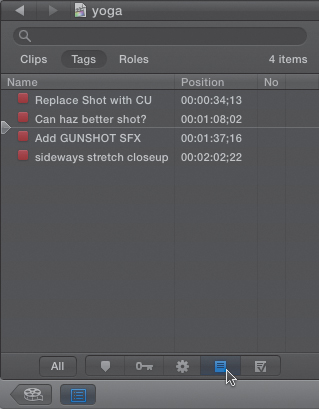
1. In the Timeline Index, click the Tags button to display the Tags pane ![]() .
.
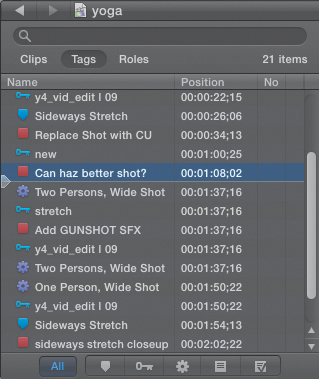
![]() To Do Items can be shown as red checkboxes in the Tags pane of the Timeline Index.
To Do Items can be shown as red checkboxes in the Tags pane of the Timeline Index.
The Timeline tags are displayed in the Timeline Index.
2. Click the To Do Items filter button at the bottom of the Timeline Index ![]() .
.
![]() By filtering the view to show only To Do Items, you get a clean list of everything you need to do.
By filtering the view to show only To Do Items, you get a clean list of everything you need to do.
The list is filtered to show just To Do Items. Each To Do item has a red checkbox to the left of the name.
To check off a To Do Item list
1. Click one of the To Do Items in the list ![]() .
.
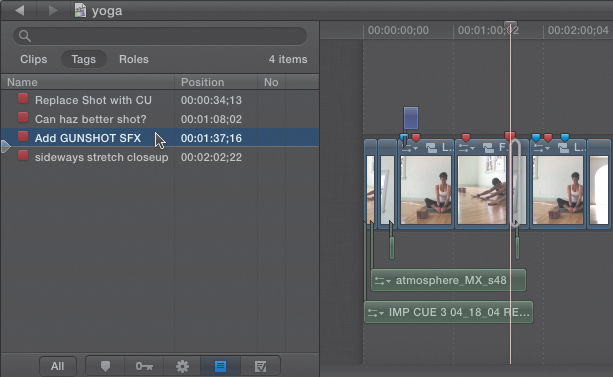
![]() Selecting an item in the To Do list jumps your playhead directly to the relevant frame in the project.
Selecting an item in the To Do list jumps your playhead directly to the relevant frame in the project.
The Timeline playhead jumps to the frame where the To Do Item has been attached.
2. Perform the task assigned in the To Do Item.
There is no reason you have to go in order. It’s just as easy to navigate to the last item as it is to get to the first!
3. Once the task is complete, click the red checkbox ![]() .
.
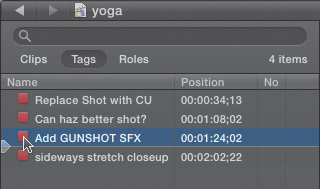
![]() Once the task is done, click the red checkbox.
Once the task is done, click the red checkbox.
The To Do Item disappears from the list.
4. Repeat steps 1–3 until your list is empty.
5. To view the completed To Do Items, click the Completed To Do Items filter button at the bottom of the Timeline Index ![]() .
.
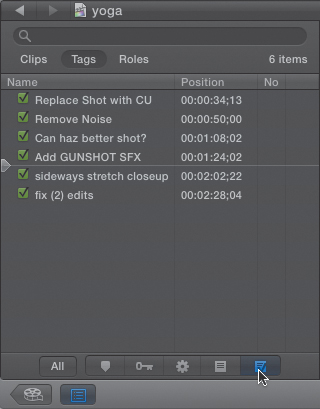
![]() You can view a list of completed To Do Items.
You can view a list of completed To Do Items.
All the completed items appear in the list. The checkboxes now appear checked and in green.
6. Click any item to jump to the corresponding frame in the project in order to check your work.
Audio Roles
You can assign every clip an identity, or role, such as video, dialogue, music, titles, and so on. This identity can be used to collectively hide and show, enable or disable, and otherwise group collections of otherwise disparate clips.
In fact, every clip must have some role assigned to it at all times, but you can ignore the roles if you like. Roles are primarily used for outputting different versions of your project or for outputting selected sections of your project based on user-assignable categories.
For example, you might have a set of subtitles in Spanish and a set of subtitles in Amharic. Using roles, you can turn on only the Spanish subtitles, output a version of your movie for Spanish speakers, and then turn on only the Amharic subtitles and output a second version for Ethiopians.
Similarly, you can assign specific audio to be dialogue, music, or effects, and then when outputting your audio for use in a traditional track-based audio editor like Pro Tools or Soundtrack Pro, your audio will automatically be grouped according to its role. This is how you can overcome any potential confusion that might come from exporting FCP X’s trackless timeline to a track-based system.
Assigning Roles
There are two types of roles: audio roles and video roles. Audio roles can be assigned only to audio clips, and video roles can be assigned only to video clips. You cannot assign more than one role to a single clip; however, clips containing both audio and video will have one of each.
If you assign an audio role to a clip in the Event Browser, every time you edit a piece of that clip into a project, the role will be maintained. If you don’t assign a role until after a clip is in the project, you will need to manually assign the desired role to each individual instance of the clip.
By default all video clips have the Video role assigned, and all audio clips have the Dialogue role assigned.
To change a clip’s assigned role
• Select a clip in the Event Browser or Timeline, and do one of the following:
• Choose Modify > Assign Role, and select one of the roles from the submenu ![]() .
.
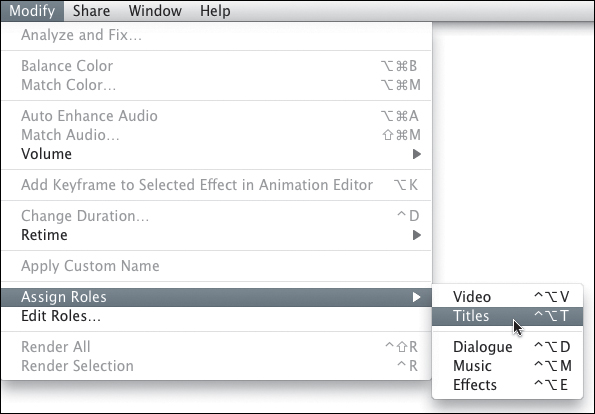
![]() Assign roles to the current selection in the Modify menu.
Assign roles to the current selection in the Modify menu.
The submenu displays a check mark next to the currently assigned role or uses dashes for multiple selections with different roles assigned.
• Click the Roles pop-up menu in the Info pane of the Inspector, and select the role of your choice ![]() .
.
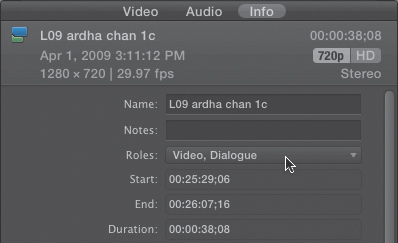
![]() You can assign the role for any individual clip in the Info pane of the Inspector.
You can assign the role for any individual clip in the Info pane of the Inspector.
Audio-only clips will allow only audio roles, video clips will allow only video roles and clips with both audio and video can have one role of each type.
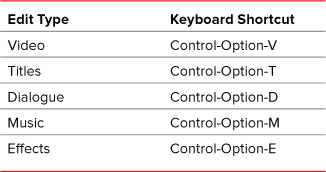
• Press one of the keyboard shortcuts listed in Table 8.4.
Table 8.4. Common Role Keyboard Shortcuts
Managing Roles
You can create custom roles to further customize the organization of your media. This is how you could create the multiple subtitle roles described in the previous example. You can assign as many video or audio roles as you like.
Roles can also have subroles. So, for example, rather than assigning all shots of people talking to the Dialogue role, you could create individual roles for each character’s clips. That way, when you import your audio into Pro Tools or another audio editor, you can easily keep all the clips containing each character’s voice on their own discrete tracks, making it easier to filter and modify them uniformly.
To create a new role
1. Choose Modify > Edit Roles.
The Role Editor window opens and displays all the existing roles available ![]() .
.
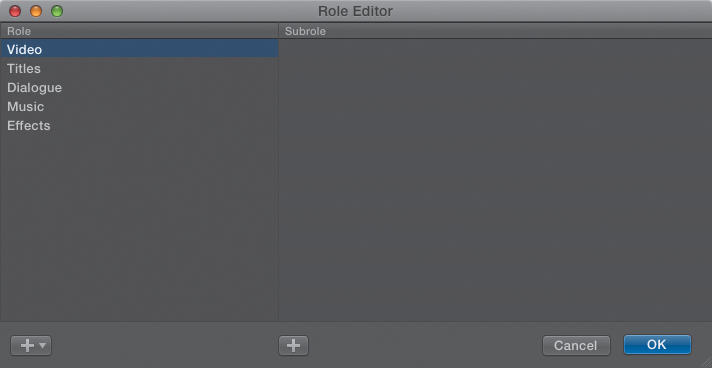
![]() The Role Editor window allows you to create, name, and delete roles.
The Role Editor window allows you to create, name, and delete roles.
You can also open the Role Editor window from the menu in the role parameter in the Info Inspector.
2. In the bottom-left corner of the Role Editor window, click the Plus button, and choose New Audio Role or New Video Role ![]() .
.
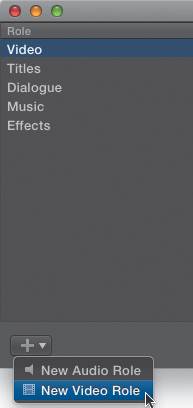
![]() Choose either a new audio role or a new video role.
Choose either a new audio role or a new video role.
The new role is added to the list ![]() .
.
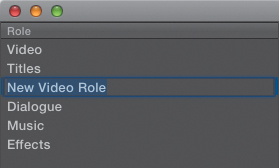
![]() The role is added to the list, identified as either a video role or an audio role.
The role is added to the list, identified as either a video role or an audio role.
3. Enter a name for the newly created role ![]() .
.
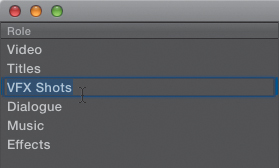
![]() Enter a name for the role.
Enter a name for the role.
4. Click OK.
The Role Editor window closes, and the new role is now available for use.
To create a new subrole
1. In the Role Editor window, select the role you want to make subroles for.
2. Click the Add Subrole button in the center of the bottom of the window ![]() .
.
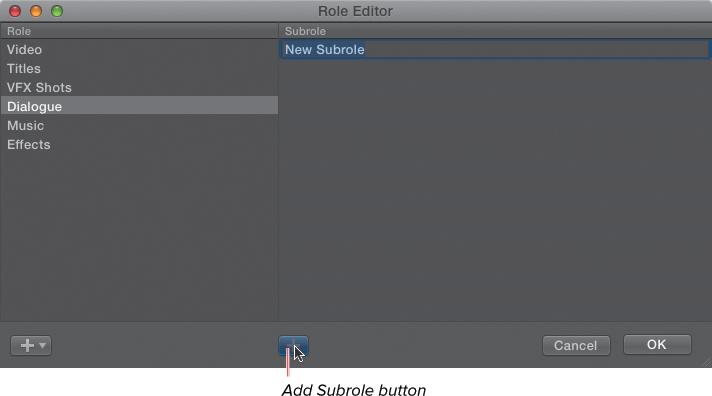
![]() Select a role, and click the Add Subrole button.
Select a role, and click the Add Subrole button.
A new subrole is added for the currently selected role.
3. Type a new name to customize the subrole ![]() .
.
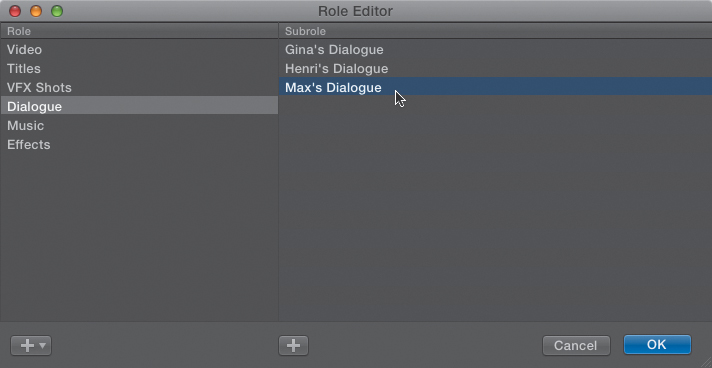
![]() Customize the subrole names to make them useful for your project.
Customize the subrole names to make them useful for your project.
4. Click OK.
Once subroles have been created, they appear indented in the Roles pop-up menu in the Inspector ![]() or in the Assign Role submenu of the Modify menu.
or in the Assign Role submenu of the Modify menu.
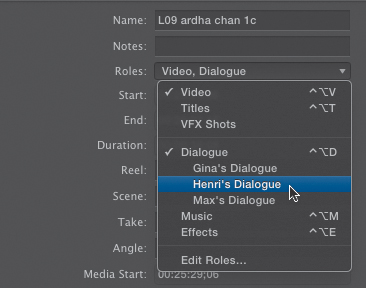
![]() Subroles are assigned exactly like ordinary roles; simply select them from the Roles pop-up in the Inspector, or choose them from the Modify menu.
Subroles are assigned exactly like ordinary roles; simply select them from the Roles pop-up in the Inspector, or choose them from the Modify menu.
Roles and subroles are not project specific. They stick around until you delete them manually, no matter what project or event is active. This can result in a large number of custom roles you may have to wade through, after working on many projects.
To delete a role or subrole
• Select the role or subrole in the Role Editor window, and press Delete.
Controlling Clips with Roles
Once you have your clips all organized with specific roles assigned to each clip’s audio and video components, you can use the controls in the Roles pane of the Timeline Index to highlight, enable or disable, and expand or collapse all the clips of a particular role.
• Highlighting clips allows you to quickly see which clips in the sequence have a particular role applied, but playback is not affected.
• Disabling a clip prevents that clip from playing back.
• Collapsing a clip simply shrinks its display in the Timeline. Playback is not affected.
To highlight all clips of a certain role
1. Click the Show Timeline Index window to display the Timeline Index if it’s not already showing.
2. Click the Roles button ![]() to open the Roles pane.
to open the Roles pane.
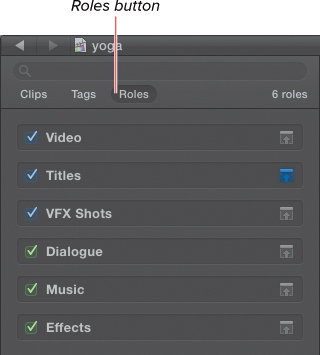
![]() You can manage roles in the Roles pane of the Timeline Index.
You can manage roles in the Roles pane of the Timeline Index.
Any roles currently used by one of the clips in the Timeline are displayed in the Roles pane of the Timeline Index. If you delete the last clip containing a particular role, the role disappears from the Timeline Index.
3. Click the name of the role you want to highlight.
The role name turns blue, and any clips in the Timeline with that role assigned light up a brighter color ![]() .
.
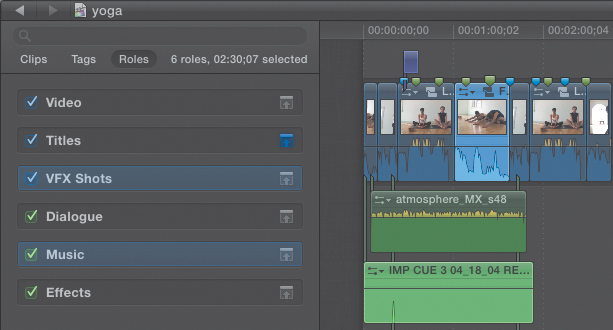
![]() Selecting the role name highlights the clips in the Timeline. In this example, the middle video clip and the bottom audio clip (IMP CUE 3 04) are highlighted.
Selecting the role name highlights the clips in the Timeline. In this example, the middle video clip and the bottom audio clip (IMP CUE 3 04) are highlighted.
4. To deselect the role, just click its name again.
To disable all clips of a certain role
• In the Roles pane of the Timeline Index, click the check mark to the left of the role name ![]() .
.
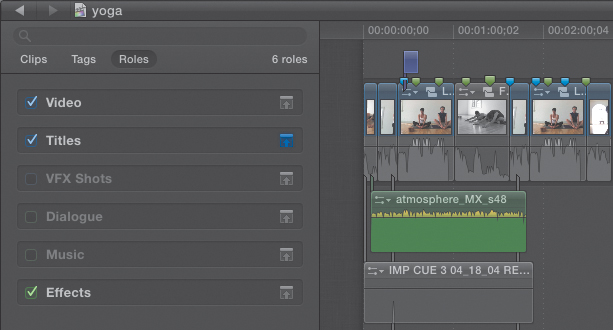
![]() The checkbox to the left of the role name controls which roles are active. Disabled clips appear in black-and-white in the Timeline. Notice that some of the A/V clips have active video and disabled audio.
The checkbox to the left of the role name controls which roles are active. Disabled clips appear in black-and-white in the Timeline. Notice that some of the A/V clips have active video and disabled audio.
The role name becomes dimmed, and any clips in the Timeline with that role assigned become desaturated.
Disabled clips will not play back when the sequence is played.
To see the effect of this setting, it helps to set the Timeline Track view to display both audio waveforms and video filmstrips at a moderate size.
• To reenable the clips, just click the role checkbox again.
To minimize all clips of a certain role
• In the Roles pane of the Timeline Index, click the Minimize icon to the right of the role name ![]() .
.
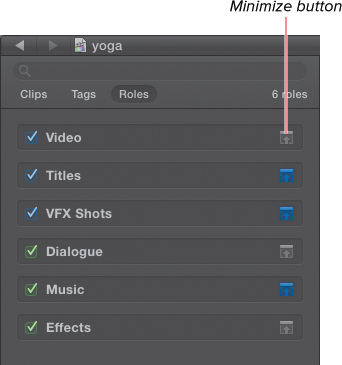
![]() The Minimize button to the right of the role name collapses the clips associated with that role. In this example, the middle video clip (but not its audio) and the bottom audio clip are minimized.
The Minimize button to the right of the role name collapses the clips associated with that role. In this example, the middle video clip (but not its audio) and the bottom audio clip are minimized.
The Minimize icon turns blue and affected clips in the Timeline shrink vertically to a minimum size.
• To expand minimized clips back to their normal height, just click the Minimize button again.
Secondary Storylines
In Chapter 7, “Basic Editing,” you learned how to create and work with connected clips. As you get more used to working with such clips and the benefits they provide (such as always moving in tandem with the primary clip they’re connected to), you may come to a point where you want to group multiple connected clips into their own storyline.
This allows you to move multiple connected clips as a single unit and apply transitions between connected clips. One common example of when you would employ this would be if you were editing a group of B-roll shots in a documentary film. Such shots might illustrate what an interview subject is describing.
Creating Secondary Storylines
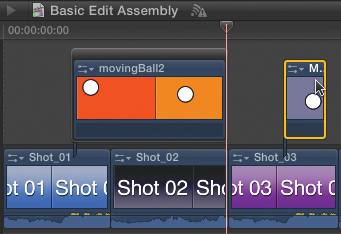
By converting the clips into a secondary storyline, you could treat the group as a single connected clip and move it around to find the best place in the interview where it could be attached ![]() .
.
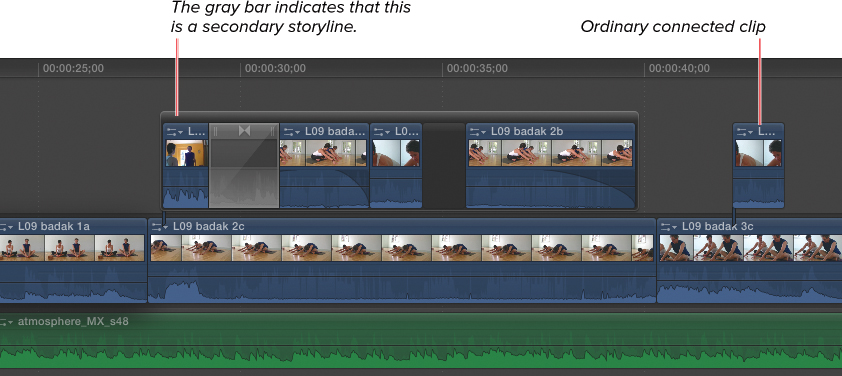
![]() Secondary storylines are like mini-movies floating above your main movie. They can contain transition effects, gaps, and more.
Secondary storylines are like mini-movies floating above your main movie. They can contain transition effects, gaps, and more.
To create a secondary storyline
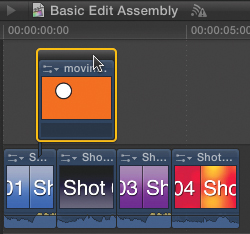
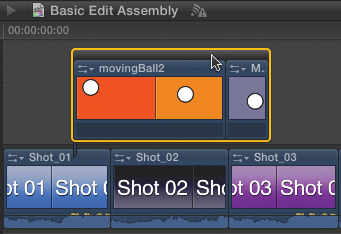
1. Select one or more connected clips ![]() .
.

![]() Select one or more connected clips. Secondary storylines can be created based only on connected clips.
Select one or more connected clips. Secondary storylines can be created based only on connected clips.
2. Choose Clip > Create Storyline, or press Command-G.
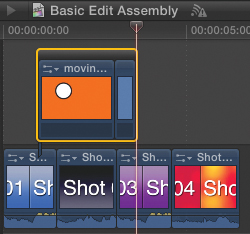
The connected clips are converted into a storyline ![]() .
.
![]() The gray bar above the clips indicates that the connected clips are now part of a secondary storyline.
The gray bar above the clips indicates that the connected clips are now part of a secondary storyline.
Editing in Secondary Storylines
Once you create a secondary storyline, you can work with it just like you do with your primary storyline: insert, append, replace, move, trim, apply transitions, and so forth. The only thing you can’t do is connect clips to it. Connected clips always connect to the primary storyline.
To edit clips into a secondary storyline
1. In the Event Browser, mark the range of the clip you want to add to the secondary storyline using In and Out points ![]() .
.
![]() Select the clip you want to edit into the secondary storyline.
Select the clip you want to edit into the secondary storyline.
2. In the Timeline, select the gray bar above the secondary storyline clips.
The entire storyline is highlighted in yellow ![]() .
.
![]() Select the storyline by clicking the gray bar. When selected, it turns yellow.
Select the storyline by clicking the gray bar. When selected, it turns yellow.
3. Depending on the type of edit you want to perform, do one of the following:
• Choose Edit > Insert, or press W.
• Choose Edit > Append, or press E.
• Choose Edit > Overwrite, or press D.
• Drag the selection directly onto a clip in the secondary storyline, and choose one of the Replace edit types from the drop menu.
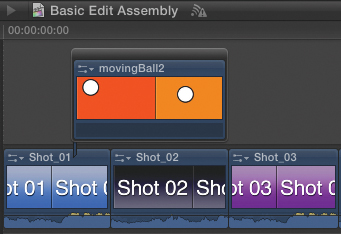
The clip is edited into the secondary storyline ![]() .
.
![]() In this example, the clip was appended to the end of the secondary storyline.
In this example, the clip was appended to the end of the secondary storyline.
You can also drag clips already in the Timeline directly into a secondary storyline. Such clips will be inserted or replaced depending on where you drop them. Your added clips will overwrite if you’re using the Position tool.
Deconstructing Secondary Storylines
Like most parts of editing, getting stuff out is just as important as getting stuff in. With secondary storylines, you can take them apart in a variety of ways. You can remove individual items from the storyline, break apart the entire storyline, or delete the storyline.
To remove a clip from a secondary storyline
1. Select the clip (or clips) you want to remove ![]() .
.

![]() Select a whole clip or a range.
Select a whole clip or a range.
2. Do one of the following:
• To delete the clips entirely, press Delete (or Shift-Delete to replace the clip with a gap) ![]() .
.
![]() Deleting a clip from a secondary storyline does not affect the overall duration of the project.
Deleting a clip from a secondary storyline does not affect the overall duration of the project.
• To convert a clip back into a freestanding connected clip, drag the clip out of the storyline and into the adjacent area of the Timeline above the primary storyline ![]() .
.
![]() Connected clips can be added or removed from a secondary storyline by just dragging them into or out of the secondary storyline.
Connected clips can be added or removed from a secondary storyline by just dragging them into or out of the secondary storyline.
If there is only one clip remaining in the secondary storyline, select the clip inside the storyline (not on the the bar) and drag it out of the storyline boundary either up, down, left, or right.
To break apart a secondary storyline
1. Click the gray bar above the secondary storyline clips to select the whole storyline ![]() .
.
![]() Select the gray bar to select the storyline rather than the clips within it.
Select the gray bar to select the storyline rather than the clips within it.
2. Choose Clip > Break Apart Clip Items, or press Shift-Command-G ![]() .
.
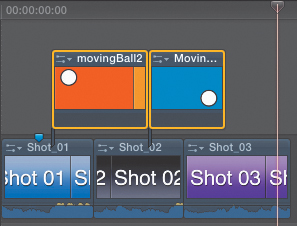
![]() When you break apart a storyline, the clips retain their position, but they are no longer part of a storyline.
When you break apart a storyline, the clips retain their position, but they are no longer part of a storyline.
The storyline is converted into freestanding clips.
Note that if the secondary storyline contains transitions, FCP warns you that the transitions will be deleted if you proceed with the Break Apart command ![]() .
.
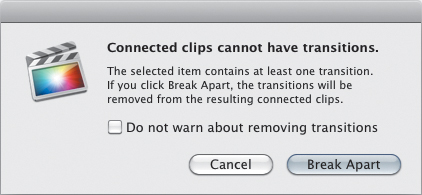
![]() Transitions cannot exist on connected clips if they are not part of a secondary storyline.
Transitions cannot exist on connected clips if they are not part of a secondary storyline.
To delete a secondary storyline
1. Click the gray bar above the secondary storyline clips to select the whole storyline ![]() .
.
![]() Select the gray bar to select the storyline rather than the clips within it.
Select the gray bar to select the storyline rather than the clips within it.
2. Press Delete.
The storyline and its contents are removed from the project ![]() .
.
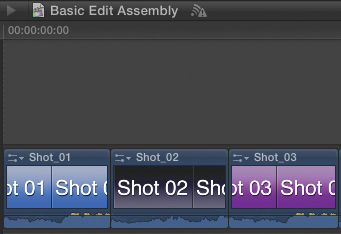
![]() The storyline and its contents are removed from the project. You can also cut a secondary storyline to remove it and store it temporarily on the clipboard. Later, you can paste it to a new location.
The storyline and its contents are removed from the project. You can also cut a secondary storyline to remove it and store it temporarily on the clipboard. Later, you can paste it to a new location.
Timeline History
As you work in FCP, you’ll find many occasions where you will want to move between multiple projects. You may be working on more than one movie at the same time, viewing multiple versions of a single show (for example, you may want to see the same edit with two different music tracks or with a different theme applied), or viewing individual clips in their own Timeline as described in the previous section.
In any of these cases, you can quickly navigate between those projects using the Timeline history commands.
Each time you open a project, the project gets added to the history much like visited web pages get added to your web browser’s history. Although you can’t access a list of those previously viewed projects, the upper-left corner of the Timeline contains a left arrow and a right arrow to navigate among the projects in your history.
To go back one level in the Timeline history
• Click the Timeline history Back button, or press Command-[ ![]() .
.
![]() When you click and hold the Timeline history Back button, a window appears to show you the name of the project that will open. Click the button to open the previously open project.
When you click and hold the Timeline history Back button, a window appears to show you the name of the project that will open. Click the button to open the previously open project.
You can keep clicking the history Back button until you’re looking at the first project you opened.
When there are no more projects to see, the Timeline history Back button is dimmed ![]() .
.
![]() The back button dims if there are no further projects to view.
The back button dims if there are no further projects to view.
To go forward one level in the Timeline History
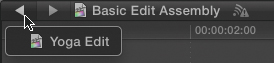
• Click the Timeline history Forward button, or press Command-] ![]() .
.

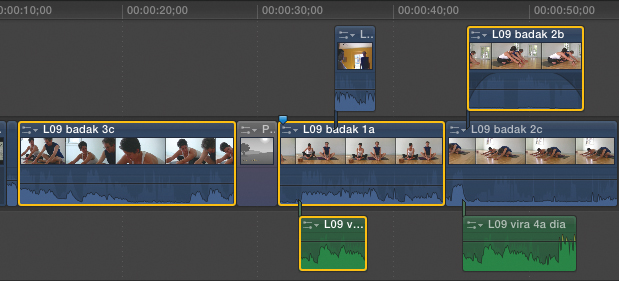
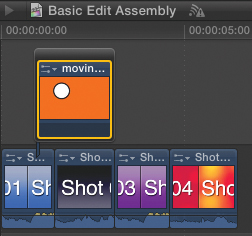
![]() When you click and hold the Timeline History Forward button, a drop-down menu appears displaying a list of all projects opened in your history after your current open project. In this case, it is the Timeline for a clip within the Basic Edit Assembly project. Notice that its icon is different from a regular project icon.
When you click and hold the Timeline History Forward button, a drop-down menu appears displaying a list of all projects opened in your history after your current open project. In this case, it is the Timeline for a clip within the Basic Edit Assembly project. Notice that its icon is different from a regular project icon.
The Timeline history Forward button is available only after you’ve clicked the Timeline history Back button to open a different project.
If there are no projects left to view, the Timeline history Forward button will be dimmed ![]() .
.
![]() If there are no further projects to view, the Forward button dims.
If there are no further projects to view, the Forward button dims.