
2. Dynamically Adding Objects to the Stage
Now that you know how to access and manipulate objects that are already on the Stage, you’ll learn how to add objects dynamically from the Library using ActionScript.
The difference with this method is that the objects you are going to manipulate are not placed on the Stage in the Flash application, also called at authortime. Instead, you’ll use objects that are in the Library, and after the application is compiled into a SWF, you’ll dynamically update the Stage using ActionScript with objects in the Library.
Creating Named Library Assets
If you remember, in order to access the properties or attributes of items on the Stage, you needed to have an instance name that ActionScript could reference. When you place objects on the Stage from the Library, you need unique instance names as well. You need to give a name to the “stack of sticky notes” in the Library to let ActionScript take an instance of the stack and place it on the Stage.
1. Create a new ActionScript 3.0 project in Flash Professional CS5.5.
2. On the Stage, create a simple circle and convert it to a symbol.
3. Name the symbol Blue Circle and make sure MovieClip is selected as the symbol type.
Generally in Flash, objects that you dynamically place on the Stage need to be MovieClips. Before you click OK though, you need to give ActionScript a name it can use to place an instance of the circle on the Stage.
4. Access the Advanced portion of the window.
With this view open, you’ll see an ActionScript Linkage section in the middle. This section is used to give the object a name that you can use to place it on the Stage.
5. Select the Export for ActionScript check box.
The Class and Base Class fields will auto fill with BlueCircle and flash.display.MovieClip.
When you’re finished, your Convert to Symbol dialog box should look like the one in Figure 2.1.
Figure 2.1. Convert to Symbol dialog box, Advanced mode section
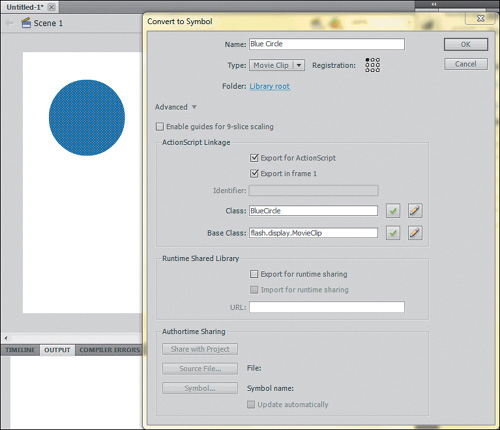
Unlike names given to objects in the Library, names used for ActionScript cannot contain spaces. That is why the Class field doesn’t have a space. A Class is the way that ActionScript represents the “stack.” The “stack” of blue circles is called the BlueCircle class. You can see this analogy if you look again at the diagram from Chapter 1 (Figure 2.2).
Figure 2.2. Another look at the stack and instances with ActionScript names

In order for Flash to know what type of object it is, it needs to have a base class defined; in this case it’s flash.display.MovieClip. You can ignore the items before “MovieClip” for now; you’ll learn about those in future chapters. Just know that the stack of blue circles is now referred to as the BlueCircle class.
6. Click OK. You’ll get an error message (Figure 2.3).
Figure 2.3. Error message that can be ignored, for now
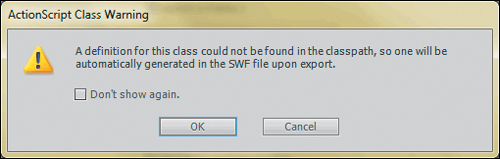
You can ignore this error message for now. In the future, you’ll be creating a special ActionScript file that will define how the BlueCircle class works and behaves.
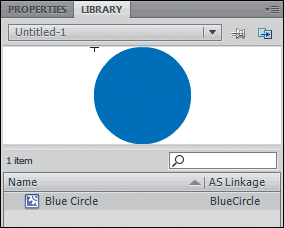
In the Linkage column of the Library, you’ll see that the Blue Circle item is linked to BlueCircle, the class name you’ll be using in ActionScript to create instances of the Blue Circle (Figure 2.4).
Figure 2.4. Library panel displaying the Blue Circle object, linked to the BlueCircle class
The error message that displays is notifying you that a special ActionScript file called a Class hasn’t been defined for this object. Later in the book, you’ll learn how to create these files.
Introducing the Display Stack
In Flash, there are some rules that define how items are displayed in the window. All displayed items are part of a special group called the display stack. The display stack is a list from which you can remove or add objects. As you create instances of objects using ActionScript, they won’t be displayed until you add them to this special group.
So why have the display stack? At times, you may want to create an object and be able to modify it, but not actually display it for the user. It could be an item that isn’t ready for use quite yet, or something that needs to be hidden from time to time. The object is still there, but just can’t be seen.
In the past, Flash users would set the .visible property to false to hide an item, or they would set the .alpha value to zero. Either property setting has the same effect, but if you have a significant number of items, it can slow down playback.
Creating New Objects on the Stage
So now that you know about the display stack, it’s time to write some code. Creating objects in ActionScript from the Library is pretty straightforward now that you know about classes and the display stack.
Since you are going to place the circle using just code, you need to remove any objects you have on the Stage.
1. Select the circle on the Stage in Flash and delete it.
2. Create a new timeline for your ActionScript code in your now-empty ActionScript 3.0 project.
3. Name the timeline scripts.
4. Select the empty frame in the new scripts timeline.
5. Open the Actions panel.
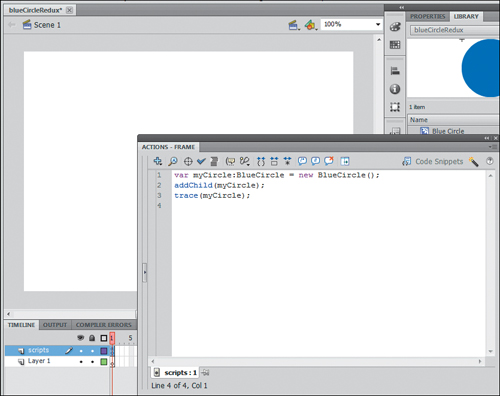
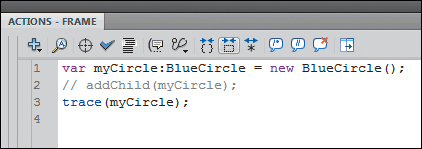
6. In the Actions panel, type in the following code:
var myCircle:BlueCircle = new BlueCircle();
addChild(myCircle);
trace(myCircle);
When you’re finished, your project should look like the one shown in Figure 2.5:
Figure 2.5. Actions and Timeline panels with new code added
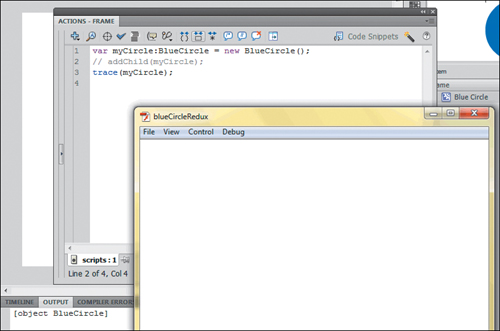
7. Run the code.
You’ll see that part of your blue circle is in the upper-left corner of the display (Figure 2.6). This is because the registration point for the circle is in the upper-right corner, and the Flash runtime positions the circle based on the coordinate 0,0, which is the default location for objects when you create them.
Figure 2.6. Dynamically placed BlueCircle object

So let’s step through the code to see how it all works. The first line
var myCircle:BlueCircle = new BlueCircle();
can be read like this: A new object named myCircle has been created, which is an instance of the BlueCircle class. That object is assigned a new instance of the BlueCircle class. The process is shown in Figure 2.7.
Figure 2.7. Creating a new object instance using ActionScript
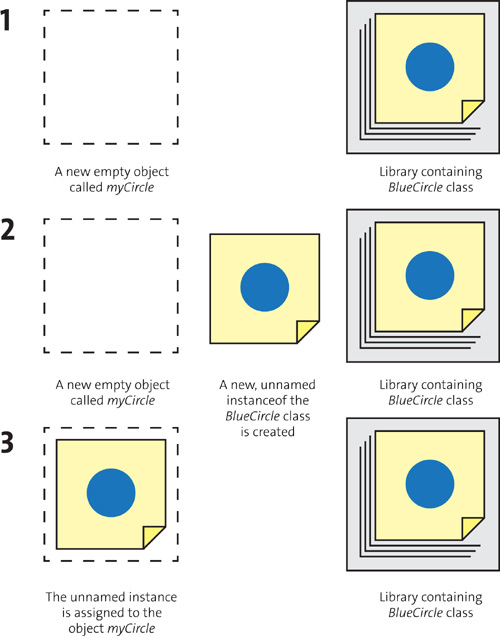
In this illustration, the first row shows that you are creating a new named object called myCircle. You’ll learn more about the var statement in an upcoming chapter, but just remember that the name of the new instance you created is called myCircle. You also have the BlueCircle “stack of sticky notes,” or class, available in the Library to use.
The second step says that you are “tearing off a sticky note” from the stack using the new statement, creating a new instance of the BlueCircle class. At this point, the instance doesn’t have a name, but it exists in your program.
The third step takes that unnamed instance of the BlueCircle class and assigns it to the named object myCircle. You need to do this in order to send any actions or make property changes on the object since it requires an instance name before you can work with it.
This process is the same as dragging an object from the Library, placing it on the Stage, and giving it an instance name of myCircle.
Take a look at the second line of code:
addChild(myCircle);
This line of code adds the shiny new blue circle to the display stack so it can be visible to the user. The addChild statement takes the item referenced in the parentheses, and adds it to the list of items that are displayed.
When the Flash runtime plays, it continually checks the contents of the display stack and renders the objects within it on the screen. Now that the blue circle is in the display stack, you can see it on the screen.
Take a look at the last line and the unusual text that appears in the Output panel:
trace(myCircle);
The last line traces the entire object to the Output panel. Notice that the panel displays the following:
[object BlueCircle]
Since the object itself doesn’t have any meaningful textual or numerical value, this line of code is sending a statement that the object being referenced is an object of the BlueCircle class. The trace statement then sends that to the Output panel.
Messing with the Display Stack
Now, you’ll update the code to show what the display stack does.
1. Change the code to read like this:
var myCircle:BlueCircle = new BlueCircle();
// addChild(myCircle);
trace(myCircle);
When you add the two slashes before the second line, you are doing what programmers call “commenting out.” You’ll learn more about using comments in the next section, but for now just know that the two forward slashes hide the code from Flash, so it skips it, ignoring any commands or actions on that line. Notice that the code in Flash turns grey. That is the default color for showing comments (Figure 2.8).
Figure 2.8. Showing comment coloring in the Actions panel
Without the addChild statement, the myCircle object is not added to the display stack.
2. Run this code. You’ll see an empty page.
Check the Output panel. You’ll see that the trace statement still works as expected because the object is still there; it just isn’t part of the display stack (Figure 2.9).
Figure 2.9. Result when removing addChild from the code
This is a common mistake that a lot of new coders make: creating an instance of an object and forgetting to add it to the display stack. You’ll see that you get no errors when you run the project, because the object is there, but you haven’t specifically told Flash to render it on the screen.
3. Add the addChild statement back in by removing the leading double slashes.
4. Run the program again. You’ll see that you restored the object.
Assigning Properties to Dynamically Created Instances
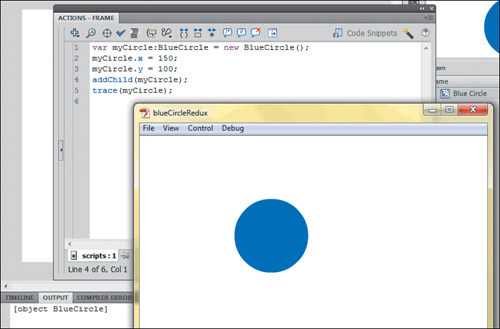
If you want to position the object at a certain location when you place it, you can assign values to the instance properties x and y after the object is created.
1. Update the code to assign values to these properties after the line that creates the initial instance with the new statement:
var myCircle:BlueCircle = new BlueCircle();
myCircle.x = 150;
myCircle.y = 100;
addChild(myCircle);
trace(myCircle);
2. Display the object. Its location will be at the coordinate 150,100 (Figure 2.10).
Figure 2.10. Change of location after modifying the x and y properties
Working with Comments
Comments are a huge part of your programming, and are critical for you and your team members to understand the code that you are writing. Comments allow programmers to add notes, hints, and explanations within their code, so they or others can understand it.
Even if you are working alone, comments are extremely important to help you understand your code after you stop working on a project for a while and need to get back to it. Many developers wrestle with confusing code that made perfect sense when they originally wrote it, but can’t remember how it worked when they went back to it months later.
Creating Comments
You have two basic ways to comment in Flash. The first is a single-line comment. To create one, start the line of code with a double forward slash, //. Any contents after these, on that line only, are hidden by Flash and aren’t executed. For example:
// This code creates a blue circle on the screen
var myCircle:BlueCircle = new BlueCircle();
addChild(myCircle);
trace(myCircle);
In this example, the first line is a comment, and is ignored by Flash when it runs the code.
The second type of comment is a multi-line comment. To create this type, you need to mark the beginning and ending of the comment using two special two-character sequences: /* and */. You’ll wrap the text you want to hide from Flash using these two sequences. Here is an example:
/* This code creates a blue circle
on the screen at 150,100 */
var myCircle:BlueCircle = new BlueCircle();
myCircle.x = 150;
myCircle.y = 100
addChild(myCircle);
trace(myCircle);
The contents inside the opening /* and the closing */ are hidden from Flash, and the contents between them can be as long as you want. You might see some code use these opening and closing symbols in various ways, but they always do the same thing: start and end a multi-line comment.
Working with Spaces
Generally, you can add whitespace characters (spaces, tabs, and carriage returns) in your code. Sometimes these are helpful to segment related pieces of code together, usually with a comment above the segment to identify what the code does. There are some best practice rules for using tabs in your ActionScript, which you’ll learn later in the book.
The blue circle example could be expanded to make the code’s function very clear and explicit:
/* This code creates a blue circle
on the screen at 150,100 */
// Create a new instance of the BlueCircle class
var myCircle:BlueCircle = new BlueCircle();
// Position the myCircle on the screen
myCircle.x = 150;
myCircle.y = 100
// Add myCircle to the display stack
addChild(myCircle);
// Send myCircle to the Output panel to confirm it is there
trace(myCircle);
Wrapping Up
Using a few new ActionScript commands, you are able to dynamically add objects to the Stage. When working with object instances using ActionScript, make sure you do the following:
• Make sure that the object in your Library is named and has been configured for “Export to ActionScript” using the Advanced mode section of the Convert to Symbol dialog box.
• Create a named object to hold your new instance using the var statement.
• Generate a new instance of the object from the Library using the new statement, assigning the object to the named object using the = assignment operator.
• Add the object to the Flash display stack using addChild to render the object on the screen.
• Remember to add comments using single-line or multi-line comments to document what your code does for others to understand, or for you to understand when you return to your project later.