
19. Desktop Applications with Adobe AIR
Projects you create in Flash Professional CS5.5 and ActionScript 3.0 aren’t limited to the browser. With the Adobe AIR runtime that users can install on their computers, you can make projects that users can run on Windows and Mac OS X as desktop applications.
This chapter will introduce you to some of the basics of Adobe AIR so you can explore this platform. In the next chapter, you’ll go even further with AIR and learn how to make mobile applications for the iOS and Andorid mobile platforms.
Getting Started
Adobe AIR is a runtime that you can install on Windows and Mac OS X operating systems. To get the Adobe AIR runtime, download it at http://get.adobe.com/air/. When installed, applications that are based on the runtime can be in installed easily from the web. Using AIR, you can also create native installers that don’t require that the users install the runtime first. You can build native installers for Windows and Mac OS X. Native installers also allow AIR applications to access deeper levels within the operating system, but these capabilities are beyond the scope of this book.
Adobe updates AIR on a regular basis, adding new capabilities and deeper integration into the desktop operating system to give you more performance, power, and control over your applications.
Desktop applications have a number of different interactive controls compared with browser-based projects. The next section will introduce you to some of these controls and how to use them to build desktop applications using AIR.
Creating an AIR project is similar to creating a browser-based project. Follow these steps to create the project in Flash Professional CS5.5:
1. Select New form the File menu.
2. Select AIR as the type of project.
3. Click OK.
4. Save your project as MyFirstAIRApp.
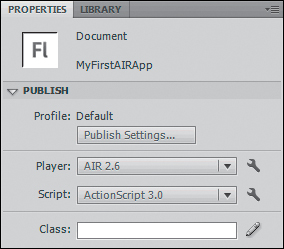
In Figure 19.1, you’ll see that the project properties show that AIR 2.6 is the player that will run the project. If you already started a project as a regular ActionScript 3.0 browser-based project, you can switch to AIR by selecting it in the Player drop-down list as shown in Figure 19.1.
Figure 19.1. Publish properties for an AIR 2.6 application
You have more options available that you can set by accessing the AIR settings.
5. Click the wrench icon next to AIR 2.6 in the Properties panel.
You’ll see the AIR Settings window as shown in Figure 19.2.
Figure 19.2. AIR Settings Window
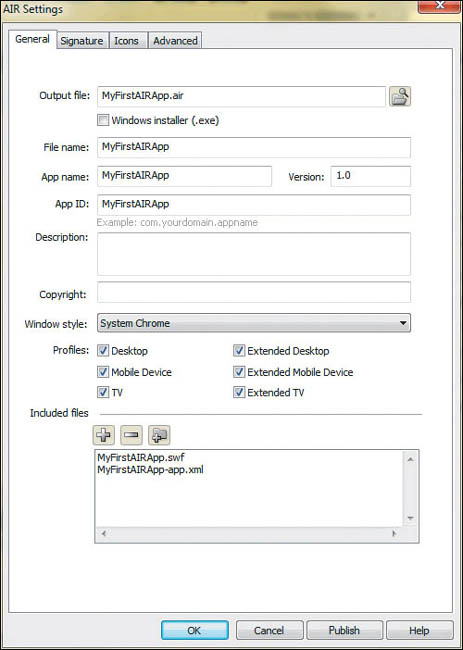
In this window, you can define a number of parameters. For this project, you will make some configuration updates here.
6. In the Description field, enter This is my first Adobe AIR desktop application!
When the application is installed, users will see the message listed as the Description.
7. For the Window style, click the drop-down list and choose System Chrome.
AIR lets you select if you want to use the native window controls, called chrome, for your application, or if you want to create your own custom chrome using Flash and ActionScript. When making your own chrome you have the option of creating an opaque application that will show the background of the project, or a transparent application that will remove that background. If you make a project where you create your own chrome, you will create it in Flash Professional and add controls for common window controls like resize, minimize, close, and so on.
8. Click OK.
9. Create a new ActionScript 3.0 class named MyButton.
10. Add the following code to your new class and save it with your FLA file:
package {
import flash.display.MovieClip;
public class MyButton extends MovieClip {
public function MyButton(buttonColor:Number=0x000000, buttonW:Number=50,buttonH:Number=50) {
graphics.beginFill(buttonColor);
graphics.drawRect(0,0,buttonW,buttonH);
}
}
}
This is a (very) simple button created entirely with ActionScript. In the constructor, a color, width, and height are optionally accepted, and are then used to create a rectangle using the drawing API that “designs” the button.
Not amazing looking—but it will work for now. Off to the Document class.
11. Create a Document class for your project, and enter the following code:
package {
import flash.display.MovieClip;
public class MyFirstAIRApp extends MovieClip {
public function MyFirstAIRApp() {
_init()
}
private function _init():void
{
//
}
}
}
Again, nothing new here—but now your project is all set and ready to go.
Working with Desktop Events
The most obvious difference between browser and desktop projects are the window controls that are part of the application’s chrome. When you are working with the native chrome, you don’t need to worry about these controls as much. But if you want to design your own, then working with the window controls becomes pretty important.
Minimize
Let’s start with the minimize control. When you do a lot of work with AIR window controls or events, you’ll be working with the nativeWindow property of the Stage. This special property is part of any AIR application, contains valuable information about the configuration of the window, and gives you the ability to control window behavior.
1. Modify the Document class with the following highlighted code to add a minimize action to the button:
package {
import flash.display.MovieClip;
import flash.events.MouseEvent;
public class MyFirstAIRApp extends MovieClip {
public var myMinButton:MyButton;
public function MyFirstAIRApp() {
_init()
}
private function _init():void
{
myMinButton = new MyButton();
addChild(myMinButton);
myMinButton.addEventListener(MouseEvent.CLICK, minWindow);
}
public function minWindow(e:MouseEvent):void
{
stage.nativeWindow.minimize();
}
}
}
2. Run the project, and click on the black square. You will see the window minimize to the task bar or dock. Clicking the minimized icon will restore the window.
You needed very little new ActionScript to use the minimize control. You created the button based on the MyButton class. You added an event listener that executed a callback function. The event callback was triggered when the MouseEvent.CLICK event was fired.
Inside the callback function, you accessed the nativeWindow property of the Stage object and executed the minimize method. That’s really all it takes.
Pretty simple, don’tcha think?
Maximize
Maximize is similar to minimize, but it offers an interesting twist.
1. Modify the code with the following highlighted code:
package {
import flash.display.MovieClip;
import flash.events.MouseEvent;
public class MyFirstAIRApp extends MovieClip {
public var myMinButton:MyButton;
public var myMaxButton:MyButton;
public function MyFirstAIRApp() {
_init();
}
private function _init():void
{
myMinButton = new MyButton();
addChild(myMinButton);
myMaxButton = new MyButton(0xFF0000);
myMaxButton.x = 75;
addChild(myMaxButton);
myMinButton.addEventListener(MouseEvent.CLICK, minWindow);
myMaxButton.addEventListener(MouseEvent.CLICK, maxWindow);
}
public function minWindow(e:MouseEvent):void
{
stage.nativeWindow.minimize();
}
public function maxWindow(e:MouseEvent):void
{
stage.nativeWindow.maximize();
}
}
}
2. Run the project. You’ll see a clickable red button.
3. Click the button. The window maximizes.
The issue that exists now is that the maximize and restore from maximize button is usually the same button. How do we know when the window is already maximized to switch the behavior?
Luckily for you, Adobe already thought of that.
They’re so smart.
4. Update the code as shown to add restore behavior to the button:
package {
import flash.display.MovieClip;
import flash.events.MouseEvent;
import flash.display.NativeWindowDisplayState;
public class MyFirstAIRApp extends MovieClip {
public var myMinButton:MyButton;
public var myMaxButton:MyButton;
public function MyFirstAIRApp() {
_init();
}
private function _init():void
{
myMinButton = new MyButton();
addChild(myMinButton);
myMaxButton = new MyButton(0xFF0000);
myMaxButton.x = 75;
addChild(myMaxButton);
myMinButton.addEventListener(MouseEvent.CLICK, minWindow);
myMaxButton.addEventListener(MouseEvent.CLICK, maxWindow);
}
public function minWindow(e:MouseEvent):void
{
stage.nativeWindow.minimize();
}
public function maxWindow(e:MouseEvent):void
{
if (stage.nativeWindow.displayState == NativeWindowDisplayState.MAXIMIZED)
{
stage.nativeWindow.restore();
} else {
stage.nativeWindow.maximize();
}
}
}
}
Using the displayState property, you can use a conditional to test the current state. The NativeWindowDisplayState (very succinct name, don’t you think?) is a class that contains three properties: MAXIMIZED, MINIMIZED, or NORMAL. If the displayState is MAXIMIZED, then the window should be restored using the restore method. If it isn’t, it needs to use the maximize method.
OK, that was too easy—time to do something a bit more challenging.
Drag
When you use native system chrome, dragging the window around is easy. Users just click and drag the title bar around the screen. Without the chrome, users will need a way to move the window around the screen.
Using AIR, there is an API to do exactly that.
1. Update the project with the following highlighted code to add this new behavior—and heads up, it won’t work the way you expect (I’ll explain in a bit):
package {
import flash.display.MovieClip;
import flash.events.MouseEvent;
import flash.display.NativeWindowDisplayState;
public class MyFirstAIRApp extends MovieClip {
public var myMinButton:MyButton;
public var myMaxButton:MyButton;
public var myDragButton:MyButton;
public function MyFirstAIRApp() {
_init();
}
private function _init():void
{
myMinButton = new MyButton();
addChild(myMinButton);
myMaxButton = new MyButton(0xFF0000);
myMaxButton.x = 75;
addChild(myMaxButton);
myDragButton = new MyButton(0x00FF00);
myDragButton.x = 150;
addChild(myDragButton);
myMinButton.addEventListener(MouseEvent.CLICK, minWindow);
myMaxButton.addEventListener(MouseEvent.CLICK, maxWindow);
myDragButton.addEventListener(MouseEvent.CLICK, dragWindow);
}
public function minWindow(e:MouseEvent):void
{
stage.nativeWindow.minimize();
}
public function maxWindow(e:MouseEvent):void
{
if (stage.nativeWindow.displayState == NativeWindowDisplayState.MAXIMIZED)
{
stage.nativeWindow.restore();
} else {
stage.nativeWindow.maximize();
}
}
public function dragWindow(e:MouseEvent):void
{
stage.nativeWindow.startMove();
}
}
}
In this new code, you added a new button, and then created a basic MouseEvent listener for the CLICK event. The handler for that listener activates the startMove method of the nativeWindow object, which should move the window.
2. Run the project.
It isn’t working as you expected. Time for your troubleshooting hat. Think about what you are doing with the mouse when you are dragging the window.
That’s right, you aren’t clicking the mouse, you are pushing the mouse button down—which is the MOUSE_DOWN event type, not CLICK.
3. Update the event listener with the right event type:
myDragButton.addEventListener(MouseEvent.MOUSE_DOWN, dragWindow);
4. Run the project again; you’ll be able to drag the window around.
Close
The last basic window control is close. This exits out of the running application using the close method.
1. Update the project with the following highlighted code:
package {
import flash.display.MovieClip;
import flash.events.MouseEvent;
import flash.display.NativeWindowDisplayState;
public class MyFirstAIRApp extends MovieClip {
public var myMinButton:MyButton;
public var myMaxButton:MyButton;
public var myDragButton:MyButton;
public var myCloseButton:MyButton;
public function MyFirstAIRApp() {
_init();
}
private function _init():void
{
myMinButton = new MyButton();
addChild(myMinButton);
myMaxButton = new MyButton(0xFF0000);
myMaxButton.x = 75;
addChild(myMaxButton);
myDragButton = new MyButton(0x00FF00);
myDragButton.x = 150;
addChild(myDragButton);
myCloseButton = new MyButton(0x0000FF);
myCloseButton.x = 225;
addChild(myCloseButton);
myMinButton.addEventListener(MouseEvent.CLICK, minWindow);
myMaxButton.addEventListener(MouseEvent.CLICK, maxWindow);
myDragButton.addEventListener(MouseEvent.MOUSE_DOWN, dragWindow);
myCloseButton.addEventListener(MouseEvent.CLICK, closeWindow);
}
public function minWindow(e:MouseEvent):void
{
stage.nativeWindow.minimize();
}
public function maxWindow(e:MouseEvent):void
{
if (stage.nativeWindow.displayState == NativeWindowDisplayState.MAXIMIZED)
{
stage.nativeWindow.restore();
} else {
stage.nativeWindow.maximize();
}
}
public function dragWindow(e:MouseEvent):void
{
stage.nativeWindow.startMove();
}
public function closeWindow(e:MouseEvent):void
{
stage.nativeWindow.close();
}
}
}
2. Run the project.
3. Click the blue close button that you just created. You will see your AIR application quit.
Pretty easy stuff—the next section gets a little more crazy.
Resize
If you have played with the window you have created, you’ll notice that the window can resize, and the contents of the window scale and get larger with it. Sometimes this is a desirable behavior, but often you don’t want the control to work that way.
Window resizing is very application specific, and you’ll need to decide which type of resizing is appropriate for your application. For this example, you’ll update the application to allow the user to resize the window, but constrain the buttons to different sides of the window, which will change their location as you resize the window.
Using ActionScript, you can define the mode of scaling you want the application to use. You control this using the scaleMode property of the Stage. By default, the scaleMode property is set to StageScaleMode.EXACT_FIT. If you want the Stage to get bigger with the window, you’ll need to change the scaleMode property setting. You also need to tell the Stage where to scale from. By default, it scales somewhat from the center of the window. To get the right effect, the Stage needs to align to the upper-left corner of the window, which is done setting the align property of the stage object to TOP_LEFT.
The other piece to this puzzle is to listen to when the window resizes and reposition the objects on the screen as needed. Let’s not tackle that quite yet—but let’s get the rest of the items mentioned in place.
To help manage the code a little better, you are going to refactor some portions of it as well.
1. Update the project with the following highlighted code:
package {
import flash.display.MovieClip;
import flash.events.MouseEvent;
import flash.display.NativeWindowDisplayState;
import flash.display.StageScaleMode;
import flash.display.StageAlign;
import flash.events.Event;
public class MyFirstAIRApp extends MovieClip {
public var myMinButton:MyButton;
public var myMaxButton:MyButton;
public var myDragButton:MyButton;
public var myCloseButton:MyButton;
public function MyFirstAIRApp() {
_init();
}
private function _init():void
{
_configureWindow();
_setupObjects();
}
private function _configureWindow():void
{
stage.scaleMode = StageScaleMode.NO_SCALE;
stage.align = StageAlign.TOP_LEFT;
}
private function _setupObjects():void
{
myMinButton = new MyButton();
myMaxButton = new MyButton(0xFF0000);
myDragButton = new MyButton(0x00FF00);
myCloseButton = new MyButton(0x0000FF);
_positionControls();
addChild(myMinButton);
addChild(myMaxButton);
addChild(myDragButton);
addChild(myCloseButton);
myMinButton.addEventListener(MouseEvent.CLICK, minWindow);
myMaxButton.addEventListener(MouseEvent.CLICK, maxWindow);
myDragButton.addEventListener(MouseEvent.MOUSE_DOWN, dragWindow);
myCloseButton.addEventListener(MouseEvent.CLICK, closeWindow);
stage.addEventListener(Event.RESIZE, handleResize);
}
private function _positionControls():void
{
}
public function minWindow(e:MouseEvent):void
{
stage.nativeWindow.minimize();
}
public function maxWindow(e:MouseEvent):void
{
if (stage.nativeWindow.displayState == NativeWindowDisplayState.MAXIMIZED)
{
stage.nativeWindow.restore();
} else {
stage.nativeWindow.maximize();
}
}
public function dragWindow(e:MouseEvent):void
{
stage.nativeWindow.startMove();
}
public function closeWindow(e:MouseEvent):void
{
stage.nativeWindow.close();
}
public function handleResize(e:Event):void
{
_positionControls();
}
}
}
The new _configureWindow method defines the scale mode of the window and specifies where the Stage will align with the outer container, in this case, the native window.
2. Run the project. You’ll see that the window, when resized, doesn’t scale up the contents within it, and the position of the items stay in the same place.
OK, back in the code, in addition to creating the new _configureWindow method, you refactored the _init method and broke that out into separate private methods. The first change was to move the button creation to _setupObjects. Within this method, you removed the positioning of the objects, but created a reference to a new, but empty, _positionControls method.
After the event handlers for the buttons, you also created a new event listener for the Stage. This event is listening for the generic Event.RESIZE event, which is broadcast anytime the Stage is resized. The callback method for this executes the empty _positionControls method.
Whew! Quite a few changes, but with the help of your friend arithmetic, you can create a layout for your buttons that will update as the window resizes.
Creating a Resizable Layout
Let’s start with a diagram of the button layout to discover how this will work (Figure 19.3).
Figure 19.3. Diagram of button layout
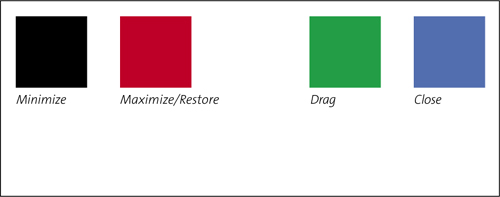
The four buttons are divided into two groups. The left group will have the black and red buttons appear “stuck” to the left edge of the window. The right two buttons will be “stuck” to the right edge of the window. Between the two buttons in each group is a 25-pixel gap. There is a 5-pixel gap from the top of the window, and 5 pixels between the left and right edges to the left-most and right-most buttons.
Now, you need to define the locations of each button. When you do this with ActionScript, you’ll use a combination of the location and widths of the buttons to calculate the location of the buttons. Before you create the code, it is always a good idea to sketch on paper exactly how this will work. So, let’s do that now.
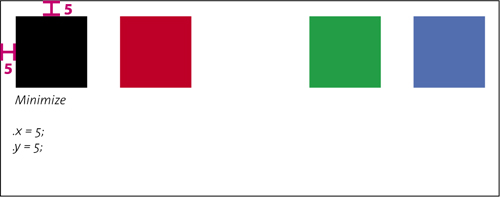
The first button is easy, the location of the minimize button (Figure 19.4) can be determined through simple x and y property values because it needs to be positioned 5 pixels from the top and 5 pixels from the left. Since the StageAlign property was set to TOP_LEFT, you can do this with no problems.
Figure 19.4. Position of minimize button
Let’s look at the maximize button next. Although you could specifically define the location of the button using the x and y properties, you can also position it relative to the location of the minimize button, which is what is shown in Figure 19.5.
Figure 19.5. Position of maximize button
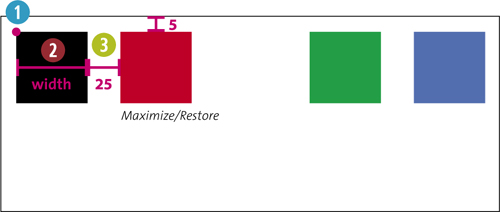
You can calculate the maximize button’s location using a few factors. You can calculate the location of the x property by taking the location of the first button ![]() , adding the width of the button using its
, adding the width of the button using its width property ![]() , and then adding 25
, and then adding 25 ![]() , which is the fixed button spacing distance. By adding these together, you can determine the location of the button on the x coordinate. The y coordinate is the same as before, 5, another fixed distance.
, which is the fixed button spacing distance. By adding these together, you can determine the location of the button on the x coordinate. The y coordinate is the same as before, 5, another fixed distance.
With the right side finished, it is time to move to the other group of buttons. Starting from the outside and moving inward, defining the close button is next (Figure 19.6).
Figure 19.6. Position of the close button
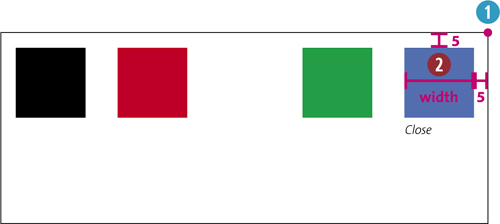
You want to position this group of buttons relative to the right side of the Stage. When the user resizes the window, it will adjust the width of the Stage, and you can use the Stage width to determine the various objects that will be positioned along its edge.
You can position the close button in this way. First, you calculate the width of the entire Stage using the width property of the stage object ![]() , then subtract the width of the button, which gives you the correct point. Again, the
, then subtract the width of the button, which gives you the correct point. Again, the y property is the same as the other buttons, 5.
Finally, you must position the drag button, which is the most complex of all (Figure 19.7).
Figure 19.7. Layout of the drag button
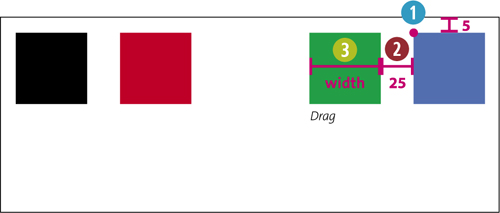
Like the maximize button, you want to position the drag button relative to the button that is outside of it. You need to take the x coordinate of the close button, and subtract the 25-pixel space that is used for spacing of the buttons, and then subtract the width of the drag button itself. Again, the y property is the same as the others, 5 pixels.
Great! With this layout sketched out, you can start creating the ActionScript to make the layout rules work. Before you do that though, there are a couple of things to point out.
In this exercise, you established two constant values. The first is the padding around the group of buttons on the top, left, and right edge of the buttons. This is 5 pixels. The second constant value is the space between the buttons. In ActionScript, there is a special variable type called a constant that you can use to store values that don’t change. To create these, you’ll use the const statement in place of var to establish these values. To differentiate constant value names from variables, the best practice is to name them in all caps.
1. Update the project with the following highlighted code:
package {
import flash.display.MovieClip;
import flash.events.MouseEvent;
import flash.display.NativeWindowDisplayState;
import flash.display.StageScaleMode;
import flash.display.StageAlign;
import flash.events.Event;
public class MyFirstAIRApp extends MovieClip {
public var myMinButton:MyButton;
public var myMaxButton:MyButton;
public var myDragButton:MyButton;
public var myCloseButton:MyButton;
public const BUTTONPADDING:uint = 5;
public const BUTTONSPACING:uint = 25;
public function MyFirstAIRApp() {
_init();
}
private function _init():void
{
_configureWindow();
_setupObjects();
}
private function _configureWindow():void
{
stage.scaleMode = StageScaleMode.NO_SCALE;
stage.align = StageAlign.TOP_LEFT;
}
private function _setupObjects():void
{
myMinButton = new MyButton();
myMaxButton = new MyButton(0xFF0000);
myDragButton = new MyButton(0x00FF00);
myCloseButton = new MyButton(0x0000FF);
_positionControls();
addChild(myMinButton);
addChild(myMaxButton);
addChild(myDragButton);
addChild(myCloseButton);
myMinButton.addEventListener(MouseEvent.CLICK, minWindow);
myMaxButton.addEventListener(MouseEvent.CLICK, maxWindow);
myDragButton.addEventListener(MouseEvent.MOUSE_DOWN, dragWindow);
myCloseButton.addEventListener(MouseEvent.CLICK, closeWindow);
stage.addEventListener(Event.RESIZE, handleResize);
}
private function _positionControls():void
{
myMinButton.x = BUTTONPADDING;
myMaxButton.x = myMinButton.x + myMinButton.width + BUTTONSPACING;
myCloseButton.x = stage.stageWidth - myCloseButton.width - BUTTONPADDING;
myDragButton.x = myCloseButton.x - myDragButton.width - BUTTONSPACING;
myMinButton.y = myMaxButton.y = myCloseButton.y = myDragButton.y = BUTTONPADDING;
}
public function minWindow(e:MouseEvent):void
{
stage.nativeWindow.minimize();
}
public function maxWindow(e:MouseEvent):void
{
if (stage.nativeWindow.displayState == NativeWindowDisplayState.MAXIMIZED)
{
stage.nativeWindow.restore();
} else {
stage.nativeWindow.maximize();
}
}
public function dragWindow(e:MouseEvent):void
{
stage.nativeWindow.startMove();
}
public function closeWindow(e:MouseEvent):void
{
stage.nativeWindow.close();
}
public function handleResize(e:Event):void
{
_positionControls();
}
}
}
The constants are defined in the top of the class definition and are immediately assigned values. If you attempt to change the values of these constants later in the project, you’ll get an error in Flash Professional:
1049: Illegal assignment to a variable specified as constant.
In the _positionControls method, you created the rules for the layout of the buttons, defining the location of the x and y properties based on the objects or properties of other objects and the Stage. Spacing values were then defined using the constants at the top of the class.
2. Run the project.
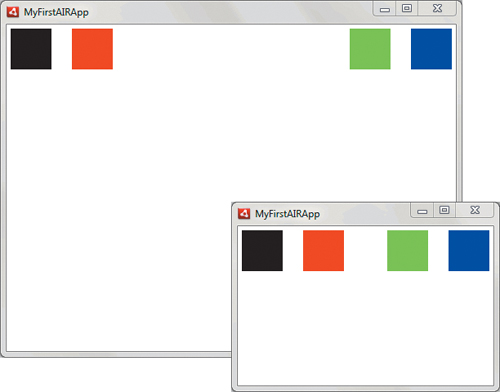
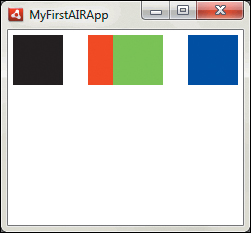
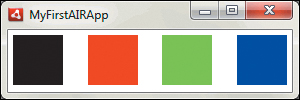
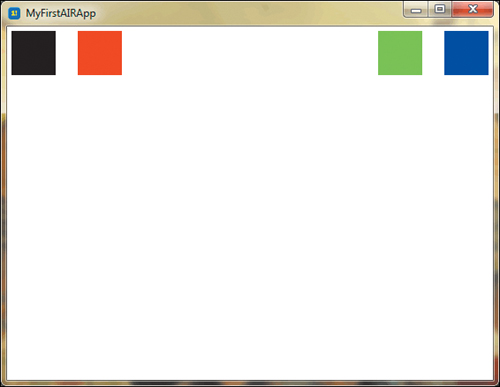
You can resize the window and see the buttons on the right stay “stuck” to the edge. The event listener that listens for when the Stage resizes executes the _positionControls method and repositions the buttons based on the new Stage size (Figure 19.8).
Figure 19.8. Normal and resized windows with dynamically positioned objects
There is one final thing you need to learn about resizing, and that is to establish the minimum size of the window. If you resize the window too small, the buttons will start to overlap (Figure 19.9).
Figure 19.9. Resizing the window too small
You need to define the minimum window size of the project. You can define this in the AIR Settings dialog box.
3. Open or select the tab for the project FLA.
4. Select AIR 2.6 Settings from the File menu.
5. Open the Advanced tab.
In this panel, you can define the minimum and maximum window size of the project.
6. Set the Minimum width to 300.
7. Set the Minimum height to 100.
8. Save and run the project again.
Now when you attempt to resize the window, the window will prevent resizing below the defined minimum width and height (Figure 19.10).
Figure 19.10. Resizing the window to the minimum size
With a little planning, creating a resizable layout is not extremely complicated—just remember to sketch your layout and resizing rules ahead of time. It will save you a lot of time and aggravation.
Configuring Your AIR Project
When you have finished your Adobe AIR project, you need to configure and build it for testing and eventually to release to your users. The AIR Settings window handles most of the configuration options for you.
Icons
When you build your project, you can give your application a custom icon that displays in the task bar or dock of the operating system and other areas where the icon is displayed.
For desktop AIR applications, there are four icon sizes that you need to create. Using a product like Adobe Fireworks, you can create an icon design (Figure 19.11).
Figure 19.11. Creating an icon in Adobe Fireworks
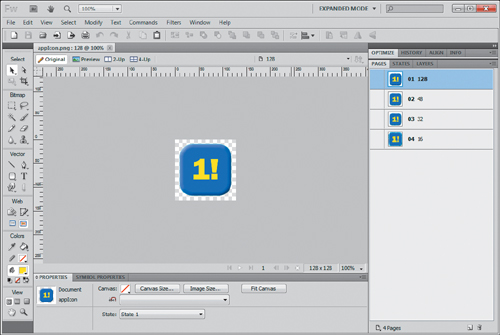
In Fireworks, you can create multiple pages that represent the icon at various sizes. Adobe AIR requires that you provide graphic files for the following icon sizes:
• 128x128
• 48x48
• 32x32
• 16x16
Using Fireworks, you can create unique document sizes for individual pages in the design, and then export these as unique graphics for use in your AIR project. For more information on Fireworks, visit the Adobe Fireworks web page at www.adobe.com/go/fireworks.
To associate these graphics with the application icons, use the AIR Settings window. In the Icons tab, you can select the files you want to have for each of the sizes (Figure 19.12).
Figure 19.12. Setting icons in the AIR Settings window
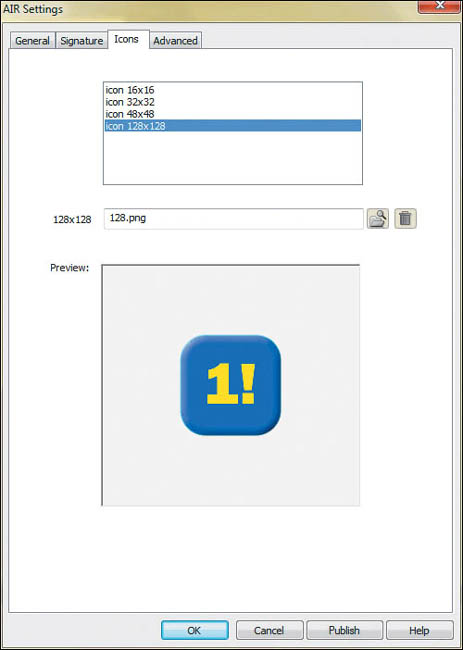
With these icons created and associated with the project, when it is published, it will display these icons when you see the application in the Applications folder in Mac OS X, or the Start Menu in Windows.
Certificate
To ensure your application is being installed from a trusted source, AIR applications require a signature to protect the security of the application user. While creating an app, you can create what is known as a self-signed certificate that you can use to test and install the application on your own machine.
To create the self-signed certificate, you can use the AIR Settings window (helpful little window, isn’t it?).
1. Open the AIR Settings window for the FLA project (Figure 19.13).
Figure 19.13. Certificate Signature Settings window

2. Click Create, the Create Self-Signed Digital Certificate window will appear (Figure 19.14).
Figure 19.14. Self-Signed Certificate window
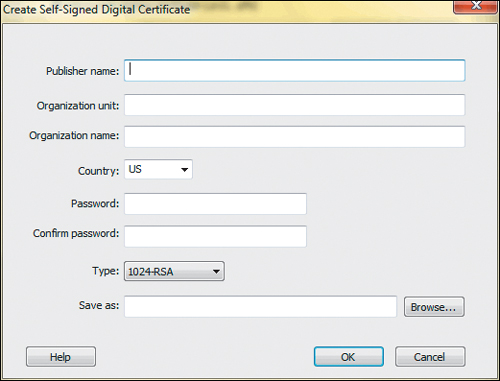
3. Enter your name as the Publisher name.
4. Enter your name (or your company name if you wish) as Organization unit.
5. Enter your name (or your company name if you wish) as Organization name.
6. Enter a password.
7. Reenter the password in Confirm password.
8. Enter MyFirstAIRApp in the Save as field, and click Browse to save it to the same directory as your FLA project.
9. Click OK.
The certificate file will be populated in the Certificate field.
10. Enter the password for the certificate you just created in the Password field.
11. Select the Remember password for this session [check box?]. This will alleviate you from entering the password each time you try to publish the project during your session in Flash Professional.
12. Click OK.
The project is now configured with a self-signed certificate that you can use to publish and test the application.
When you need to create a public version of your application that you distribute to others, you can purchase a commercial code-signing certificate from a vendor, such as VeriSign from Symantec. For more information, see www.verisign.com/code-signing/adobe-air/index.html.
If you are releasing the application internally, you can use the self-signed certificate. When the user attempts to install it, AIR will notify them that it may not be secure since it doesn’t have a commercial certificate—(this can be acceptable in some situations, but all applications that are released publicly should have a commercial certificate).
Publish and Install
With the certificate signed, it is time to publish the project.
1. Select Publish from the File menu, you will see the confirmation message display Figure 19.15.
Figure 19.15. Publishing the project as an Adobe AIR application
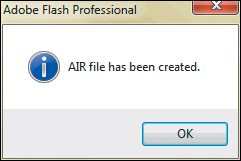
If you look at the location of your FLA, you’ll see a couple new files. The first is MyFirstAIRApp.air. This is the file that will install your AIR application. The second is MyFirstAIRApp-app.xml, this is a configuration file containing setup and configuration information. The XML file contents are beyond the scope of this book.
2. To install the application, double click the MyFirstAIRApp.air file.
You’ll see an installer display and prompt you to begin the installation of the application on your computer (Figure 19.16).
Figure 19.16. The AIR application installer

As you can see, since you are using a self-signed certificate, the installer warns the user that they are installing an application from an unknown publisher, with unrestricted access to the system, potentially putting their system at risk. When you use a commercial certificate, the icons will appear as green and will give the user more confidence about the security level of the application.
For you as an app creator though, the self-signed certificate is an easy way to test your application as an installed application on your computer.
3. Click the Install button.
The installer displays the install options for the application (Figure 19.17).
Figure 19.17. AIR application installer options
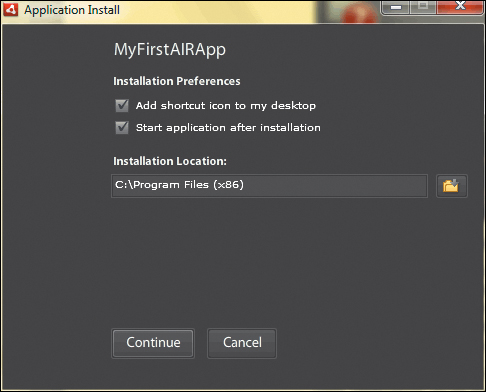
You can opt to change the installation preferences here or change the installation location if you wish. If your system doesn’t have the AIR runtime installed, it will be downloaded from Adobe before it installs the application.
You’ll see some progress indicators showing the installation process. When the install finishes, the application will launch, and you’ll now see it in the Start Menu or Applications folder in your operating system (Figure 19.18 and Figure 19.19).
Figure 19.18. Your application in the Start Menu in Windows 7
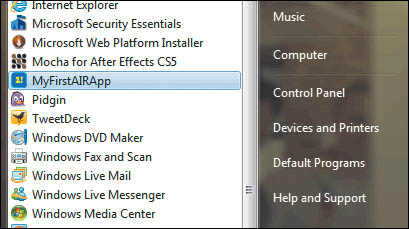
Figure 19.19. The installed application running, with custom icon in Windows 7
Congratulations! You have created your first AIR application using Flash Professional CS5.5 and are on your way to creating desktop applications for Windows and Mac OS X operating systems, all with the skills you have learned in ActionScript. Great job!
Wrapping Up
In this chapter, you learned the basics of creating desktop applications using Flash Professional CS5.5 and the Adobe AIR runtime. Creating cross-platform applications using tools and languages you already know is one of the biggest advantages to working with Flash. This chapter only scratched the surface of the power of AIR. You can find additional information on Adobe’s website at www.adobe.com/go/air.
Here are some tips to help you work with Flash Professional, ActionScript, and the AIR runtime:
• To create an AIR project, remember to define the publishing options correctly and either select AIR as your project type when you start the project, or switch the Player type in the project Properties panel to AIR 2.6.
• AIR applications can use the native operating system chrome, or you can create your own custom chrome by modifying the AIR Settings for the project.
• When creating desktop applications, consider the different types of interactions that come along with desktop apps. The AIR API gives you control over some of these interactions to work with the window controls and to manage resizing.
• When resizing your application, remember to configure your application window properly to get the right effect when the user resizes the app.
• To create a resizable layout that will adapt to various window sizes, draft on paper or sketch the layout rules you want to add to your application before you jump into creating code.
• Create event listeners for the resize event to capture when the window size changes, and then reposition the objects in your project based on your layout rules.
• Configure your project with icons and a certificate before publishing your project.
• When publishing your project for general use, acquire a commercial certificate to reassure your users that your application is secure and their systems are protected.