
20. Mobile Applications with Adobe AIR
In this final chapter, you’ll learn one of the biggest advantages of the Adobe Flash Platform—the ability to take all of your skills in Flash and ActionScript and create cross-platform mobile applications for a growing set of mobile handsets, tablets, and other screens. Using the Adobe AIR runtime, you can create applications for the popular iOS and Android operating systems, targeting the iPhone and iPad from Apple, or the dozens of Android 2.2 (Froyo) and later handsets, and Android 3.x (Honeycomb) and later tablets.
This chapter will cover some of the more common user interactions for mobile applications, and give an overview on how to provision and test an application on a device tethered to your computer.
Getting Started
As of the writing of this book, there are two mobile app platforms that are supported out-of-the-box. The first is the iOS platform that is used by the iPhone, iPod touch, and iPad devices from Apple. Using Flash Professional CS5.5, you can create applications for these devices, which convert your project into an Apple Device Application file (.IPA) that can be uploaded to the iTunes app store to sell and distribute to users.
The second platform is the Google Android platform, which is used by a number of handset and tablet manufacturers including HTC, Dell, Samsung, Motorola, and many others. For this platform, Flash Professional CS5.5 projects are converted into Android Package file (.APK) applications that run on devices with version 2.2 or later of the Android operating system.
The main difference between the two platforms is the way that the AIR runtime works. For iOS, the AIR runtime is part of the IPA or application file, resulting in a larger download footprint for the application. For Android, the AIR runtime is installed alongside the application, reducing the file size of the application.
Adobe is working to bring Flash Professional CS5.5 projects to other platforms, including RIM for their new line of handhelds and tablets. As of this writing, the RIM platform is not part of Flash Professional CS5.5; however, check Adobe’s website for more information on availability.
The gestures and other app-creation techniques in this chapter will work for both platforms; however, configuring your testing devices is unique for iOS and Android. The next section will cover how to get your devices set up for you to use with this chapter.
Setting Up Your Testing Devices
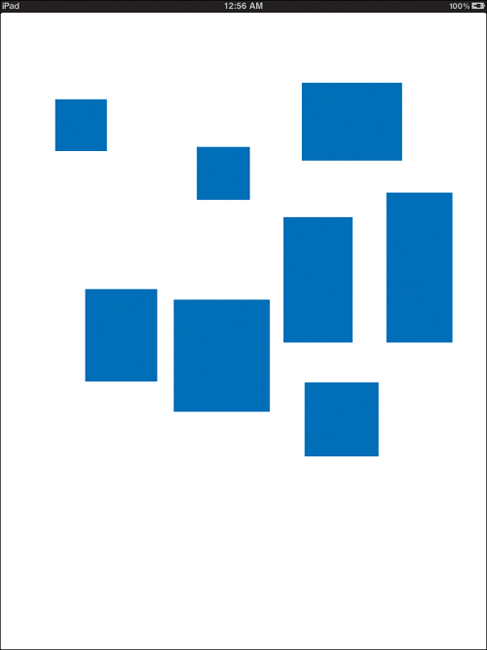
To get the best testing experience for your projects, it is best to invest in actual hardware for your own personal “testing lab.” In my environment (Figure 20.1), I have the following devices:
• Samsung Captivate, Android 2.2 (Phone)
• Dell Streak 7, Android 2.2 (Tablet)
• Motorola Droid X, Android 2.2 (Phone)
• Nexus One, Android 2.3 (Phone)
• iPod touch, iOS (Phone)
• iPad, iOS (Tablet)
Figure 20.1. A mini lab of devices, Apple iPad, Apple iPod touch, Dell Streak 7, Google Nexus One, Samsung Captivate, and Motorola Droid X
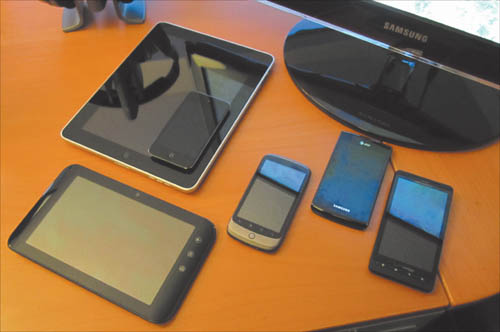
It is important to have a cross section of devices on which to test your content, including devices that might be a little slower than the current new available models. If you want to test the performance of your application, you need to consider the newer phones that are available today, as well as the phones that are already in customers’ hands. Remember, most cell or data contracts are for two years, meaning that customers cannot upgrade to newer models without incurring additional fees or early upgrade charges.
You can use emulators for some testing; however, they can be misleading since you are not using the genuine gestures with the physical hardware, and the emulators cannot accommodate for performance limitations that come with some older hardware models. In this chapter, you’ll learn how to test on tethered physical devices. For more information on how to work with emulators, refer to the mobile operating system software development kit.
Configuring your devices for first-time use requires a number of steps for both Android and iOS-based devices. For help on how to configure these devices, the appendix for this book contains information available at the time of the publication of this book. For the latest information, please visit these links:
• Publishing AIR for Android applications: http://help.adobe.com/en_US/flash/cs/using/WSb03e830bd6f770ee317e94381294c702634-8000.html
• Packaging applications for AIR for iOS: http://help.adobe.com/en_US/flash/cs/using/WSb03e830bd6f770ee-29e1e072124c0d552aa-8000.html
When you have your devices configured, it is a good idea to build a test application to make sure that everything is up and running correctly. You’ll do that in the next section.
Creating a Mobile Project
Just as with AIR desktop applications, there is a unique project type when working with iOS and Android devices. To verify that everything is up and running correctly on your system, it is best to create a simple project when you first test your devices to verify that everything works.
Your First Android Application
All Android targeted AIR applications are created the same way, so let’s create one now.
1. Open Flash Professional CS5.5.
2. Select New from the File menu.
3. Select AIR for Android from the Type column.
The default size for an Android project is the same resolution as a Nexus One and other similar devices. You can create specific layouts for various screen sizes, scale a project across screens, or create an adaptive layout based on layout and positioning rules, similarly to what you did in the previous chapter.
4. Click OK.
5. Save your project as testAndroid.fla.
6. Draw some shapes on the Stage with the drawing tool.
7. Save and run (not publish) the project. You should see the project run.
When you run a project, Flash Professional uses AIR to preview the application on your computer. You can use this for quick verification of the application before you test it on an actual device.
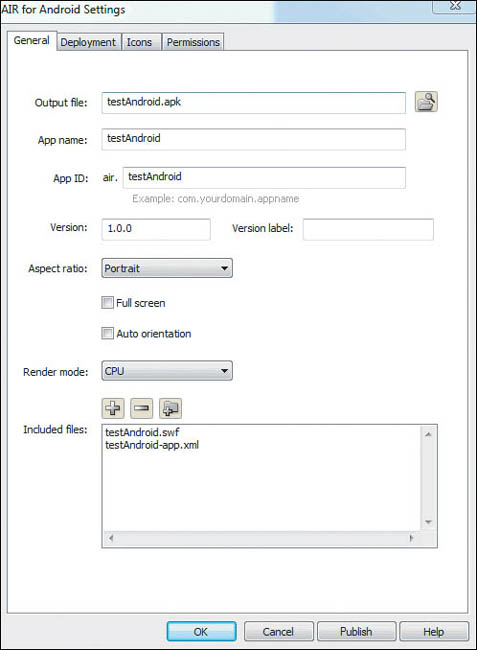
8. From the File menu, select AIR for Android Settings.
This panel (Figure 20.2) allows you to configure your application for deployment onto an Android device.
Figure 20.2. AIR for Android Settings window
9. Select the Deployment tab.
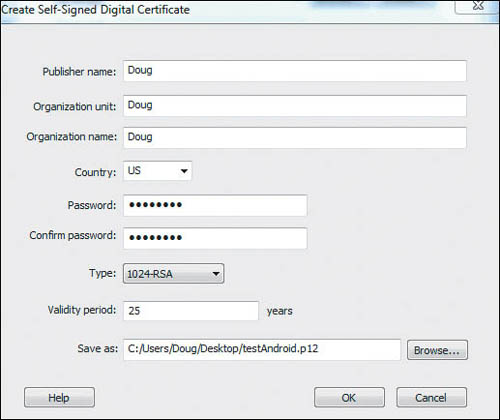
10. In the Certificate row in the dialog box, click Create.
This will be identical to what you did in the previous chapter to create a self-signed certificate that you can use with your application.
11. Enter your name (or company name) for Publisher name, Organization unit, and Organization name.
12. Enter a password and re-enter it in the Confirm password field in the dialog box.
13. Select a location to save the certificate by clicking Browse.
You should have a form that looks similar to Figure 20.3.
Figure 20.3. A completed self-signed certificate form
14. Click OK.
15. Enter the password for the certificate if it is empty.
16. Select the Remember password for this session check box. This will alleviate you from having to enter the password for your certificate each time you publish your application during a session.
17. Make sure that “Install application on the connected Android device” and “Launch application on the connected Android device” check boxes are selected.
18. Click OK.
19. From the File menu, select Publish.
If you don’t have AIR already installed on your device, the phone will prompt you to install (Figure 20.4). If you need to download and install AIR, you can find the application in the Applications drawer on your device (Figure 20.5).
Figure 20.4. A notification to install AIR
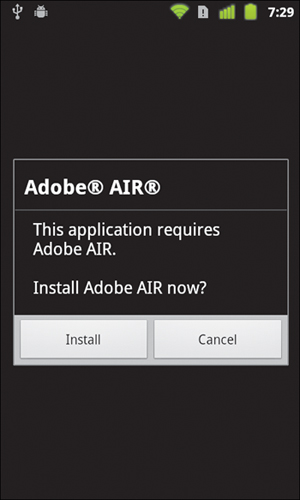
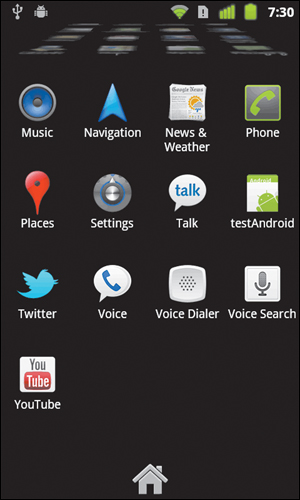
Figure 20.5. The installed application ready to launch
20. Click Install.
If AIR is already installed, your application will launch automatically.
21. If the application didn’t start automatically, locate it in the list of applications and run it.
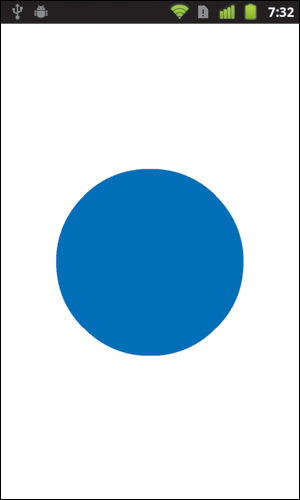
You’ll see that the application runs and displays your lovely artwork on your device (Figure 20.6).
Figure 20.6. Your app, in all of its glory
There you go. You have created your first Android application using Flash Professional CS5.5 and Adobe AIR.
Your First iOS Application
Now that your provisioning is all finished, creating and building an iOS app is much easier from this point on.
1. Open Flash Professional CS5.5.
2. Select New from the File menu.
3. Select AIR for iOS from the Type column.
You have three main resolutions available for iOS as of the writing of this book:
• iPhone 3GS: 320x480
• iPhone 4 and current model iPod touch: 640x960
• iPad and iPad 2: 768x1024 (Portrait Mode)
4. Pick a resolution that is right for your target device.
5. Click OK.
6. Save your project as myTestApp.fla.
Remember that app ID you worked with before? It is best practice to replicate that as your project filename as well.
7. Draw some shapes on the Stage with the drawing tool.
8. Save and run (not publish) the project. You should see the project run.
Just as with Android, you can preview your apps before going to the physical hardware using AIR.
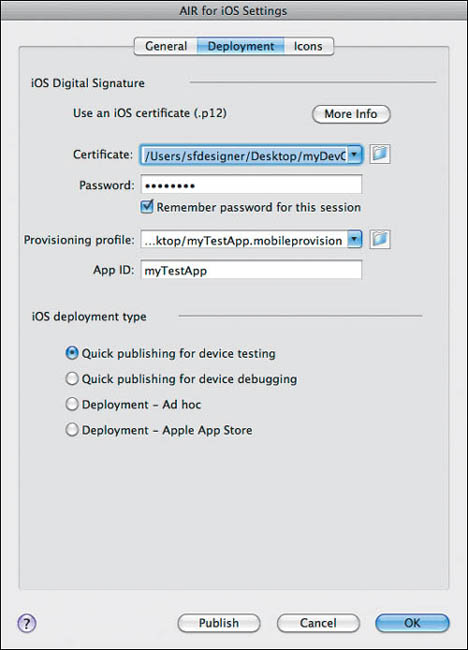
9. From the File menu, choose AIR for iOS settings.
10. Select the Deployment tab.
Unlike Android, you don’t create a self-signed certificate. Instead, you’ll use the .p12 file you exported from Keychain Access to populate the Certificate field.
11. Click the folder icon beside the Certificate field and navigate to and select your .p12 certificate file.
12. Enter the password for the certificate.
13. Select the “Remember password for this session” check box.
Remember that provisioning profile you downloaded earlier? Here is where you’ll need that.
14. Click the folder icon beside the Provisioning profile field and navigate to and select your provisioning profile for this application.
15. Select Quick publishing for device testing in the iOS deployment type section.
Your window should look something similar to Figure 20.7.
Figure 20.7. iOS Deployment Settings
16. Click OK.
17. From the File menu, select Publish.
The publish process will create an IPA file for you to use to install on the physical device. The process for publishing on iOS takes a bit longer than Android, but should be finished within 15 seconds or so.
18. Locate the IPA file on your computer.
19. Double-click the IPA file to launch iTunes.
20. Select the Apps tab of your device; you should see the application listed (Figure 20.8).
Figure 20.8. iTunes listing the new application for the target device
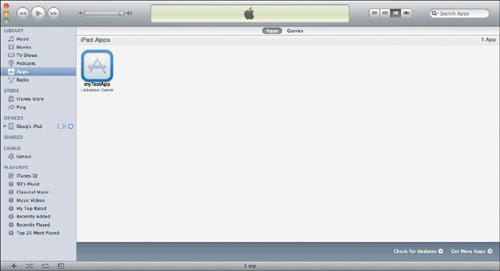
21. Sync your device with iTunes.
22. Find the application on your device and run it.
Just like with Android, you’ll see the application launch and display your awesome design handiwork (Figure 20.9).
Figure 20.9. Your first app using Flash Professional CS5.5 and iOS.
Creating Interactions for Devices
Users work with applications on handheld devices very differently than they work with applications on workstations. There is no mouse—the user’s finger, through touch gestures, is what drives most interaction with mobile applications. Because of this, the AIR mobile API includes standardized behaviors for common multi-touch gestures that you’ll use in your application.
For simplicity, the rest of this chapter will focus on Android applications. The same methods used in Android applications will work equally as well in iOS apps. Screenshots of the same applications will be shown, but the instructions will focus on Android applications.
Tip, Tap—Basic Touch Interactions
The most basic interaction for touch gestures is the tap. Tap is similar to a mouse click, but devices broadcast a unique event type for a tap as opposed to a mouse click.
To get started, you need to create a new application to experiment with:
1. Create a new AIR for Andorid (or iOS) application in Flash Professional CS5.5.
2. Save the project as TouchGestures.fla.
3. Open the AIR for Andorid settings, and open the Permissions tab.
4. Select the INTERNET option.
You don’t need to enable this for all projects; however, you’ll get a warning when you try to publish without this selected. Selecting the INTERNET option will avoid the warning.
5. Create a new ActionScript 3.0 class named TouchButton.
6. Enter the following code for the TouchButton class:
package {
import flash.display.Sprite;
public class TouchButton extends Sprite {
public function TouchButton() {
drawNewShape();
}
public function drawNewShape():void
{
graphics.beginFill(Math.random()*0xFFFFFF);
graphics.drawRect(0,0,250,250);
graphics.endFill();
}
}
}
This code creates a public method that you can use to change the color of the button when you detect a tap interaction. You now need to create an instance of the button and then add the event listener to listen for the user’s tap.
7. Create a matching Document class for the project and enter the following code:
package {
import flash.display.MovieClip;
import flash.events.TouchEvent;
import flash.ui.Multitouch;
import flash.ui.MultitouchInputMode;
public class TouchGestures extends MovieClip {
public var myTouchButton:TouchButton;
public function TouchGestures() {
myTouchButton = new TouchButton();
myTouchButton.x = myTouchButton.y = 25;
addChild(myTouchButton);
Multitouch.inputMode = MultitouchInputMode.TOUCH_POINT;
myTouchButton.addEventListener (TouchEvent.TOUCH_TAP, changeButton);
}
public function changeButton(e:TouchEvent):void
{
myTouchButton.drawNewShape();
}
}
}
8. Make sure your phone is attached and publish your application (or if using iOS, publish and then use iTunes to sync the application to your device).
9. Run the application on your phone.
You’ll find that when you touch the square that appears it will change color. The device is detecting the tap event and the project is broadcasting that tap event, executing the event handler that then draws a new rectangle on the screen.
Returning to the Document class, there are a few things to point out. First, you added a line that altered the Multitouch.inputMode property. When working with touch events, there are two modes that you can work with. The first is the TOUCH_POINT mode, which is used for basic touch events, like taps. The second is the GESTURE mode. When using this mode, you can create more advanced gesture-based interactions, and simple taps are mapped to the common mouse events.
Let’s refactor this project using GESTURE mode.
10. Update the Document class with the following highlighted code:
package {
import flash.display.MovieClip;
import flash.events.MouseEvent;
import flash.ui.Multitouch;
import flash.ui.MultitouchInputMode;
public class TouchGestures extends MovieClip {
public var myTouchButton:TouchButton;
public function TouchGestures() {
myTouchButton = new TouchButton();
myTouchButton.x = myTouchButton.y = 25;
addChild(myTouchButton);
Multitouch.inputMode = MultitouchInputMode.GESTURE;
myTouchButton.addEventListener(MouseEvent.CLICK, changeButton);
}
public function changeButton(e:MouseEvent):void
{
myTouchButton.drawNewShape();
}
}
}
When you publish the project again, the same effect will work, but this time your project is working with basic mouse events instead of tap events. Depending on your project, if you need more advanced gestures, you’ll need to register tap events using this method.
Before moving to the gesture-based events, there is more that you can accomplish with the TOUCH_INPUT type—specifically, touch and drag.
Simple Dragging with Touch
Using the TOUCH_INPUT interaction type, you can create basic drag and drop functionality in your application. You first need to define the event for starting the touch-based drag and another for the drop.
1. Update the Document class code as highlighted below, note that the Multitouch input mode has been returned to the TOUCH_INPUT type:
package {
import flash.display.MovieClip;
import flash.events.TouchEvent;
import flash.ui.Multitouch;
import flash.ui.MultitouchInputMode;
public class TouchGestures extends MovieClip {
public var myTouchButton:TouchButton;
public function TouchGestures() {
myTouchButton = new TouchButton();
myTouchButton.x = myTouchButton.y = 25;
addChild(myTouchButton);
Multitouch.inputMode = MultitouchInputMode.TOUCH_POINT;
myTouchButton.addEventListener (TouchEvent.TOUCH_TAP, changeButton);
myTouchButton.addEventListener (TouchEvent.TOUCH_BEGIN, touchDrag)
myTouchButton.addEventListener (TouchEvent.TOUCH_END, touchDrop)
}
public function changeButton(e:TouchEvent):void
{
myTouchButton.drawNewShape();
}
public function touchDrag(e:TouchEvent):void
{
e.target.startTouchDrag(e.touchPointID);
}
public function touchDrop(e:TouchEvent):void
{
e.target.stopTouchDrag(e.touchPointID);
}
}
}
In this example, you’re working with the event object that is sent to the callback methods to identify which object is currently being interacted with. The event starts by listening for the TouchEvent.TOUCH_BEGIN event type. This is broadcasted when you press your finger down on the object. When this event is “heard,” the callback function receives the TouchEvent event object, which contains information you can use in the callback.
In the callback, the target of the event starts the startTouchDrag method, which is similar to the mouse-based startDrag method. Here, you need to define which touchpoint you want to work with. Remember, these are multi-touch devices, so there are multiple fingers that can be used to point and interact with objects on the device. In a single finger interaction, the touchPointID is 0.
2. Run the project.
3. Press your finger on the shape and move it around the screen.
4. Release your finger off the shape.
When you release your finger, the TouchEvent.TOUCH_END event is broadcasted. The event callback method for that event stops the drag using the stopTouchDrag method on the object (Figure 20.10).
Figure 20.10. Dragging using the TouchEvent.TOUCH_BEGIN and TouchEvent.TOUCH_END events
Taking Your Time with Long Touches
The final TOUCH_POINT event you’ll cover is the long press event. This is a combination of the TOUCH_BEGIN and TOUCH_END along with a Timer that you create to define how long of a delay you want to use to trigger the action.
The basis is this: First create the timer that you want to use for the event, then create the event listeners for the TOUCH_BEGIN and TOUCH_END events. Within TOUCH_BEGIN, start the timer. When the timer fires the TimerEvent.TIMER event type, make the change you want to make to the selected object. When TOUCH_END is broadcasted, you want to stop the timer, so the TimerEvent.TIMER event type isn’t broadcasted anymore.
1. Update the Document class with following highlighted code to modify the drag motion to start after the user holds the object down for one second:
package {
import flash.display.MovieClip;
import flash.events.TouchEvent;
import flash.ui.Multitouch;
import flash.ui.MultitouchInputMode;
import flash.utils.Timer;
import flash.events.TimerEvent;
public class TouchGestures extends MovieClip {
public var myTouchButton:TouchButton;
public var myTimer:Timer;
public function TouchGestures() {
myTouchButton = new TouchButton();
myTouchButton.x = myTouchButton.y = 25;
addChild(myTouchButton);
myTimer = new Timer(1000);
myTimer.addEventListener (TimerEvent.TIMER, touchDrag);
Multitouch.inputMode = MultitouchInputMode.TOUCH_POINT;
myTouchButton.addEventListener (TouchEvent.TOUCH_TAP, changeButton);
myTouchButton.addEventListener (TouchEvent.TOUCH_BEGIN, startTouch)
myTouchButton.addEventListener (TouchEvent.TOUCH_END, endTouch)
}
public function changeButton(e:TouchEvent):void
{
myTouchButton.drawNewShape();
}
public function startTouch(e:TouchEvent):void
{
myTimer.start();
}
public function endTouch(e:TouchEvent):void
{
myTimer.stop();
myTouchButton.stopTouchDrag(0);
myTouchButton.scaleX = 1;
myTouchButton.scaleY = 1;
}
public function touchDrag(e:TimerEvent):void
{
myTouchButton.startTouchDrag(0);
myTouchButton.scaleX = 1.5;
myTouchButton.scaleY = 1.5;
}
}
}
Let’s walk through this to see what is happening. First, you added a new timer to the project with an interval of 1000 milliseconds. The timer is started based on the TOUCH_BEGIN event type, and is stopped with TOUCH_END. With the timer running, when it reaches a timer interval, the TIMER event is broadcasted, activating the startTouchDrag method. To make this explicit to the myTouchButton, the event callback objects have been removed, and the touch point ID is set explicitly with the ID of 0.
To add an indication as to when you can drag and drop the object, the scaleX and scaleY properties were modified to grow the object when the drag event starts, and shrink it back to normal when it ends.
2. Publish and run the project. You’ll see that when you press and hold the square for one second, it grows and you can start dragging it. When you release your finger, the object returns to the normal size.
There is one issue with this. Try this with the project and see what happens.
3. Press and hold the shape, but before the second expires, move your finger off the square.
You’ll find that the square still grows and is draggable, even though your finger is not on it. This is because you aren’t listening for a specific event called the TOUCH_ROLL_OUT event, which in this example should cancel the drag request. This event is broadcasted when you touch an object and then move your finger off it.
This can be easily addressed by adding a new event listener.
4. Update the code as follows:
package {
import flash.display.MovieClip;
import flash.events.TouchEvent;
import flash.ui.Multitouch;
import flash.ui.MultitouchInputMode;
import flash.utils.Timer;
import flash.events.TimerEvent;
public class TouchGestures extends MovieClip {
public var myTouchButton:TouchButton;
public var myTimer:Timer;
public function TouchGestures() {
myTouchButton = new TouchButton();
myTouchButton.x = myTouchButton.y = 25;
addChild(myTouchButton);
myTimer = new Timer(1000);
myTimer.addEventListener (TimerEvent.TIMER, touchDrag);
Multitouch.inputMode = MultitouchInputMode.TOUCH_POINT;
myTouchButton.addEventListener (TouchEvent.TOUCH_TAP, changeButton);
myTouchButton.addEventListener (TouchEvent.TOUCH_BEGIN, startTouch)
myTouchButton.addEventListener (TouchEvent.TOUCH_END, endTouch)
myTouchButton.addEventListener (TouchEvent.TOUCH_ROLL_OUT, endTouch);
}
public function changeButton(e:TouchEvent):void
{
myTouchButton.drawNewShape();
}
public function startTouch(e:TouchEvent):void
{
myTimer.start();
}
public function endTouch(e:TouchEvent):void
{
myTimer.stop();
myTouchButton.stopTouchDrag(0);
myTouchButton.scaleX = 1;
myTouchButton.scaleY = 1;
}
public function touchDrag(e:TimerEvent):void
{
myTouchButton.startTouchDrag(0);
myTouchButton.scaleX = 1.5;
myTouchButton.scaleY = 1.5;
}
}
}
With the new event in place, if you touch and move your finger off the object, the drag action will no longer take place. Since the endTouch callback function ends the interaction, that method can be shared with the TOUCH_ROLL_OUT and TOUCH_END event listeners.
Working with Gesture Events
When working with multiple touch points or fingers, you need to switch your Multitouch.inputMode property to GESTURE. In this mode, common actions that involve multiple touch points can be used to create interactions in your application like zooming and rotating of objects.
Pinch to Zoom
One of the most common multi-touch gestures is the pinch gesture. This is when a user presses on an object with two fingers and moves their fingers farther apart or closer together.
To use this event type, you’ll work with a new touch event, the TransformGestureEvent, which contains information about the gesture that you can apply to objects quite easily.
For this, you are going to rewrite the TouchGestures Document class.
1. Replace the code in the Document class:
package {
import flash.display.MovieClip;
public class TouchGestures extends MovieClip {
public var myTouchButton:TouchButton;
public function TouchGestures() {
myTouchButton = new TouchButton();
myTouchButton.x = stage.stageWidth / 2;
myTouchButton.y = stage.stageHeight / 2;
addChild(myTouchButton);
}
}
}
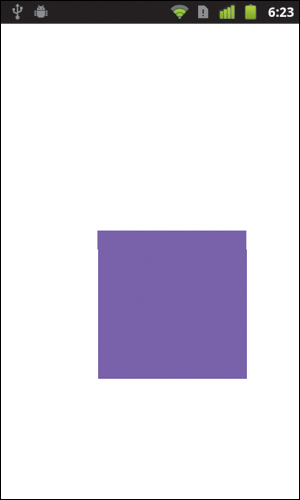
2. Run the project before you start adding any interactions. There is an important point here.
You might get something unexpected (or expected, if you remember how the drawing API works) (Figure 20.11).
Figure 20.11. A little off-center

When you draw using the API, remember that the default drawing point for a rectangle is from the top-left corner. For the next section, you’ll be creating transitions that will rotate and scale an object based on pinch and rotate gestures on the device. For these to look correct, the center point of the object needs to be in the center.
3. Modify the TouchButton class as follows:
package {
import flash.display.Sprite;
public class TouchButton extends Sprite {
public function TouchButton() {
drawNewShape();
}
public function drawNewShape():void
{
graphics.beginFill(Math.random()*0xFFFFFF);
graphics.drawRect(-125,-125,250,250);
graphics.endFill();
}
}
}
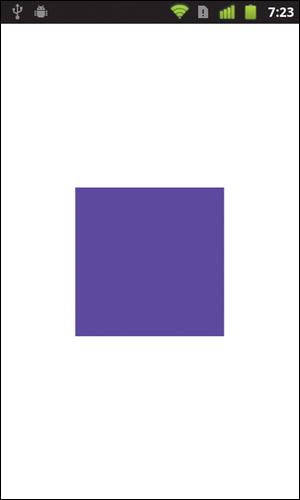
4. Run the project again. You’ll see that the square is now properly in the center of the screen (Figure 20.12).
Figure 20.12. The object correctly positioned in the center of the screen
With the object centered correctly, you can start adding the pinch to zoom interaction to your project.
5. Modify the Document class with the following highlighted code:
package {
import flash.display.MovieClip;
import flash.ui.Multitouch;
import flash.ui.MultitouchInputMode;
import flash.events.TransformGestureEvent;
public class TouchGestures extends MovieClip {
public var myTouchButton:TouchButton;
public function TouchGestures() {
myTouchButton = new TouchButton();
myTouchButton.x = stage.stageWidth / 2;
myTouchButton.y = stage.stageHeight / 2;
addChild(myTouchButton);
Multitouch.inputMode = MultitouchInputMode.GESTURE;
myTouchButton.addEventListener (TransformGestureEvent.GESTURE_ZOOM, changeScale);
}
public function changeScale(e:TransformGestureEvent): void
{
myTouchButton.scaleX *= e.scaleX;
myTouchButton.scaleY *= e.scaleY;
}
}
}
The code starts by defining the input mode as GESTURE for the interaction. You added an event listener for the TransformGestureEvent.GESTURE_ZOOM event type (getting a little lengthy, I know). This event, when broadcasted, sends a scale parameter into the event object that you then use by proportionally modifying the object on the Stage.
6. Run the project. You’ll find that you can change the object’s size by pinching out or in.
However, there is an issue. You may find that when you make the object smaller, you cannot access the interaction anymore. This is because the size of the event is too small. Since the input device is a finger, you need to consider the size of a finger to complete the interaction. By making the object too small, the area in which to create the interaction can’t accommodate two fingers. To adjust this, you can add a conditional that will force a minimum size.
7. Update the code as highlighted:
package {
import flash.display.MovieClip;
import flash.ui.Multitouch;
import flash.ui.MultitouchInputMode;
import flash.events.TransformGestureEvent;
public class TouchGestures extends MovieClip {
public var myTouchButton:TouchButton;
public function TouchGestures() {
myTouchButton = new TouchButton();
myTouchButton.x = stage.stageWidth / 2;
myTouchButton.y = stage.stageHeight / 2;
addChild(myTouchButton);
Multitouch.inputMode = MultitouchInputMode.GESTURE;
myTouchButton.addEventListener (TransformGestureEvent.GESTURE_ZOOM, changeScale);
}
public function changeScale(e:TransformGestureEvent): void
{
myTouchButton.scaleX *= e.scaleX;
myTouchButton.scaleY *= e.scaleY;
if (myTouchButton.scaleX < 1) {
myTouchButton.scaleX = myTouchButton.scaleY = 1;
}
}
}
}
With the conditional in place, the object will now never be smaller than its original shape, allowing the user to always have enough room to interact with it using the pinch gesture.
Rotate
Along with pinch zoom, you can also rotate an object using two fingers. You’ll use a similar event called the GESTURE_ROTATION event type.
1. Update the code as highlighted to add this new interaction:
package {
import flash.display.MovieClip;
import flash.ui.Multitouch;
import flash.ui.MultitouchInputMode;
import flash.events.TransformGestureEvent;
public class TouchGestures extends MovieClip {
public var myTouchButton:TouchButton;
public function TouchGestures() {
myTouchButton = new TouchButton();
myTouchButton.x = stage.stageWidth / 2;
myTouchButton.y = stage.stageHeight / 2;
addChild(myTouchButton);
Multitouch.inputMode = MultitouchInputMode.GESTURE;
myTouchButton.addEventListener (TransformGestureEvent.GESTURE_ZOOM, changeScale);
myTouchButton.addEventListener (TransformGestureEvent.GESTURE_ROTATE, changeRotation);
}
public function changeScale(e:TransformGestureEvent): void
{
myTouchButton.scaleX *= e.scaleX;
myTouchButton.scaleY *= e.scaleY;
if (myTouchButton.scaleX < 1) {
myTouchButton.scaleX = myTouchButton.scaleY = 1;
}
}
public function changeRotation (e:TransformGestureEvent):void
{
myTouchButton.rotation += e.rotation;
}
}
}
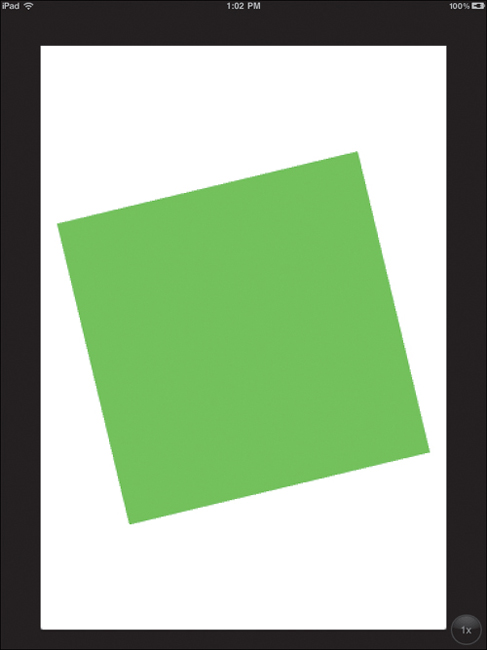
2. Publish the project. You can now zoom and rotate the object with your fingers. By pressing two fingers down on the shape and pivoting around the center of the square, you can rotate the square (Figure 20.13 and Figure 20.14).
Figure 20.13. Zooming and rotating using gesture events
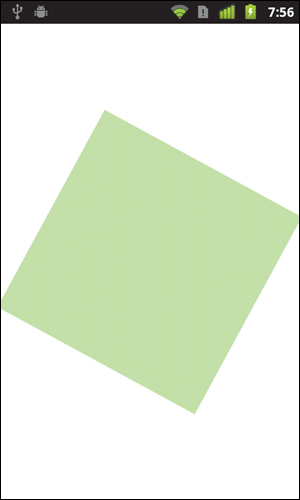
Figure 20.14. Zooming and rotating in iOS, supporting scaling of iPhone applications on the iPad
As you can see, the basic mobile interactions for touch and gestures are not that difficult to add to your project. With these interactions, plus your creativity, you can create some amazing mobile applications for the Android and iOS platforms.
Debugging over USB
In the examples in this chapter, you didn’t use the trace statement to send messages to the Output console. As with all projects, there will eventually (or immediately if you prefer) be a need to enable debugging with tethered devices over USB.
Luckily, using Flash Professional, you can debug your application using remote debugging. The process is a little different for Android and iOS, so they will be covered separately.
Debugging on Android
To debug on Android, you need to configure the debugger to work over USB. You need to create a new project to see how this works:
1. Create a new AIR for Android application in Flash Professional CS5.5.
2. Name and save your application as AndroidDebugger.fla.
3. Update the matching Document class with the following code:
package {
import flash.display.MovieClip;
public class AndroidDebugger extends MovieClip {
public function AndroidDebugger() {
trace("This message is brought to you by the letters U S and B.");
}
}
}
This is a pretty simple example, but it will demonstrate how you can send messages to the Output panel. If there are any errors in your project, they will also be sent to the Output panel.
4. Select or open the AndroidDebugger.fla tab.
5. From the Debug menu, select Debug Move > On Device via USB.
This shouldn’t be confused with the Test Movie > On Device menu command, which doesn’t activate the debugger. You’ll see an error that says that Internet permissions need to be enabled to perform device debugging. That is an easy adjustment to make.
6. Select AIR for Android Settings in the File menu.
7. Open the Permissions tab.
8. Make sure that INTERNET is selected.
9. Click OK.
10. Again, from the Debug menu, select Debug Move > On Device via USB.
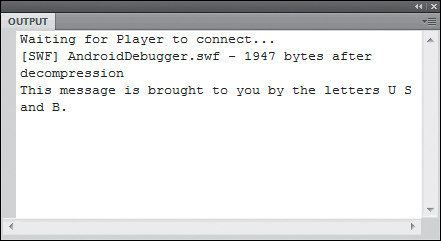
You’ll see the publishing progress indicator appear, and the application will run on the device. The Output panel will open and display the message sent to it from the trace statement (Figure 20.15).
Figure 20.15. Debugging on a tethered Android device over USB
That’s it! Pretty easy, huh?
When debugging over USB, you need to specifically end the Debug session.
11. Select End Debug Session from the Debug menu.
Debugging on iOS
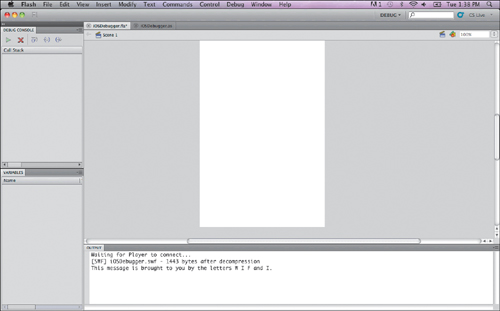
To test on iOS, you need to perform the debugging over a WiFi network. When working in this way, your iOS device will send debugging messages over the network to your computer and the messages will appear in Flash Professional.
In the following example, you’ll create a new project in Flash Professional and connect the remote application to your debugger using WiFi.
1. Create a new AIR for iOS project in Flash Professional CS5.5.
2. Name and save the project as iOSDebugger.fla.
3. Update the matching Document class as follows:
package {
import flash.display.MovieClip;
public class AndroidDebugger extends MovieClip {
public function AndroidDebugger() {
trace("This message is brought to you by the letters W I F and I.");
}
}
}
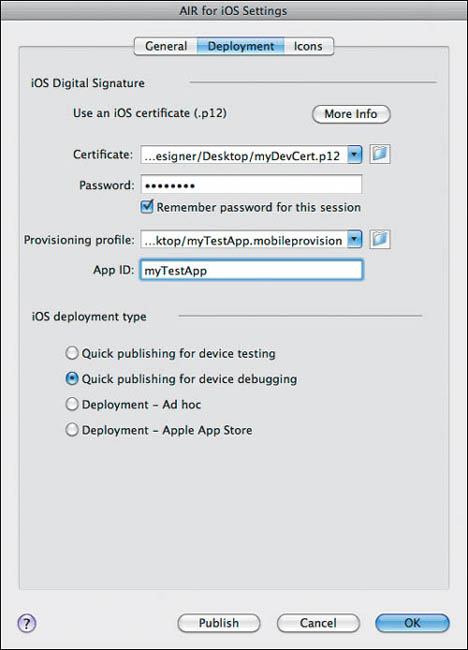
4. Save your FLA and Document class and open the AIR for iOS Settings from the File menu.
5. Provision your project as you normally would and open the Deployment tab.
6. Select Quick publishing for device debugging in the iOS deployment type section of the panel (Figure 20.16).
Figure 20.16. Configuring debugging in the AIR for iOS Settings window
7. Open the OS X System Preferences from the Apple menu or the Applications folder.
9. Record the IP of your computer; you’ll need this to connect the debugger.
10. Deploy the application to your iOS device.
11. In Flash Professional, from the Debug menu, select Begin Remote Debug Session > ActionScript 3.0.
12. Run the application on your iOS device.
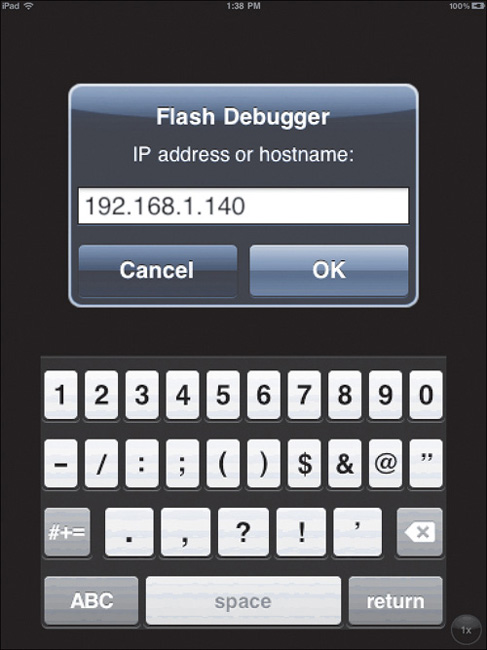
13. Enter the IP address for your computer (Figure 20.17).
Figure 20.17. Entering your computer’s IP address to begin remote debugging
You’ll see the application start, and in Flash Professional the Debugger will display the trace statement contents in the Output panel (Figure 20.18).
Figure 20.18. Displaying the trace statement contents in the Flash Professional debugger over a WiFi connection
15. Select End Debug Session from the Debug menu.
Just like with Android, you need to specifically end the debugging session in Flash Professional.
Debugging with an iOS device required few more steps than working with Android, but as you can see, you can perform debugging using your iOS device.
The WiFi debugging method also works with Android devices, but USB debugging is much easier to implement, and the workflow to publish and debug is much more seamless when you use USB debugging.
Optimizing Content
You have some methods available to optimize your content for mobile devices. One of these methods is to use bitmaps or bitmap caching to improve device performance. Flash is traditionally a vector graphics product, so when you work with vectors, especially complex vectors, there can be a performance impact when working with smaller devices. To help you optimize your imported vector artwork, Flash Professional CS5.5 allows you to convert your artwork to bitmaps on export or cache the object as a bitmap during runtime.
To use this optimization feature, place object instances on the Stage, select them, and open the Properties panel. From here, you can access their bitmap options in the Display section of the panel (Figure 20.19).
Figure 20.19. Setting the display properties for an object on the Stage

Alternatively, you can set this property with ActionScript using the cacheAsBitmap property. Setting this to true will use the bitmap optimization engine to treat the object as if it were a bitmap to give you performance gains.
There is an extensive amount of information on optimizing your content to run on mobile devices. If you are going to do more work as a mobile application creator, mastering the techniques for performance is a required skill. For more information on project optimization, there is a good overview on Ben Stucki’s blog at http://blog.benstucki.net/?p=65.
Wrapping Up
In this chapter, you learned the basics to start creating mobile applications using Flash Professional CS5.5 and Adobe AIR. While this chapter only scratched the surface, the ability to take your projects to mobile devices on multiple platforms is one of the biggest advantages of working with Flash. With one set of tools and one set of skills, you can create applications and content for the browser, desktop, and mobile devices. Pretty cool!
Here are some tips to help you work with the AIR runtime and Flash Professional as you embark on your new career as a mobile application creator:
• Test your projects on a variety of devices with different variations on operating systems, screen sizes, and hardware. Doing so will uncover potential issues with your project.
• Take the time to fully set up all your devices before embarking on your project, and create a simple test application to ensure that everything is working.
• When working with various touch events, determine if you need to work with TOUCH_POINT or GESTURE event types early in the process.
• Make sure your interactions can fit the fingers used to manipulate them.
• Remember to enable debugging through either USB or over WiFi to send messages and errors to your Output panel to make it easier to find issues with your project.
• Become an expert on mobile optimization. It will make your projects better and definitely more successful.