7. Creating Timer and Frame Events
In addition to mouse events, there are two types of events that will be helpful for you in your applications. The first is the timer event, which is an internal stopwatch in ActionScript that you can use to trigger events after a specific amount of time. The second is the frame event, which is triggered every time a new frame in the Flash runtime is displayed.
This chapter will introduce both types of events and will show you when to use them appropriately.
Using the Timer Event
When you need to create events based on time, you need to use a timer, known in ActionScript as Timer. A timer and its related event type, TimerEvent, is like a countdown clock. You define how long you want a timer to run, and it will broadcast a special event when the allotted time expires. You can customize the timer to repeat indefinitely or for a set number of times.
Some of the attributes that define a time are shown in Figure 7.1. You will work with these attributes to learn how to create a timer event.
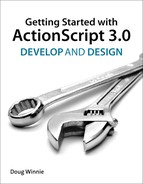
Figure 7.1. Anatomy of a TimerEvent
A timer has a few properties that define how it works, the events it broadcasts, and how it completes. A timer is first created and defined with two parameters. The first, the interval, is the amount of time that passes each time before the timer sends an event, similar to when you hear a tick on a stopwatch. The second defines the number of intervals that the timer will have, or if it will run forever, or infinitely. When the last interval “ticks,” the timer indicates that it is finished and stops running.
Figure 7.1 shows a timer that has been configured with a 1-second interval, meaning that each “tick” of the timer will last 1 second. It has also been configured to have a total number of ten intervals, so after the tenth interval the timer will be complete.
Each of these two parameters define the events that are fired by the timer. When the timer is started, and the first “tick” takes place after a second, the TimerEvent.TIMER event is broadcasted from the timer. When the last interval “ticks,” the timer then broadcasts a TimerEvent.TIMER_COMPLETE event, signifying that the timer has completed its operation.
Let’s start with a basic example.
1. Create a new ActionScript 3.0 file and enter the following code as a frame script:
var timer:Timer = new Timer(1000,10);
timer.start();
timer.addEventListener(TimerEvent.TIMER, tickTock);
timer.addEventListener(TimerEvent.TIMER_COMPLETE,
timerComplete);
function tickTock(e:TimerEvent):void
{
trace("Tick!");
}
function timerComplete(e:TimerEvent):void
{
trace("Finished!");
}
2. Run the project.
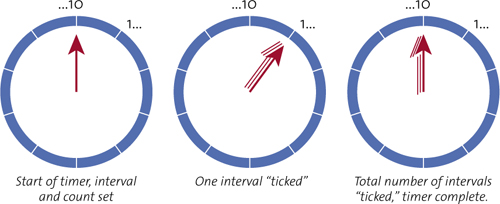
The Output panel (Figure 7.2) adds a “Tick!” to the display at regular intervals. After ten “Tick!” displays, the Output panel displays “Finished!” What you are doing is creating a timer that will broadcast an event every second after it is started and when the final interval runs. Then when each event is broadcasted, you are adding a line to the Output console.
Figure 7.2. An example timer in ActionScript
Let’s step through the code to see how it works. The first line creates the timer itself and then customizes its parameters. In this case, you are creating a timer that will last for 1 second. The values for these parameters are defined in milliseconds, and since there are 1000 milliseconds in a second, you set this as 1000. You want the timer to have ten intervals, which is defined by the second parameter. If you wanted the timer to run infinitely, you would omit this parameter.
A timer doesn’t start running until you tell it to start. You do that on the second line using the start() function that is part of the timer instance.
You then create the event listeners. In this case, you are listening for a timer event instead of a mouse event, so you use the TimerEvent type inside the listener parameters. The TimerEvent event type has an event called TIMER that is what is broadcasted with each interval of time—in this case, after the timer has run for 1000 milliseconds, or a single second. Just like with the previous examples, you also provide a callback function, which in this example is called tickTock().
You then create the second listener for when all the timer intervals end, using the TIMER_COMPLETE event type of the TimerEvent event. This triggers a different callback function called timerComplete().
The callback function accepts an event object parameter, in this case a TimerEvent object instead of a MouseEvent, which then sends “Tick!” to the Output panel using the trace statement in the first callback function, or “Finished!” in the second.
Stopping the Timer
If for some reason you need to stop the timer, you can add the stop() function, which will end the timer. The following is an example:
var timer:Timer = new Timer(1000,10);
timer.start();
timer.addEventListener(TimerEvent.TIMER, tickTock);
timer.addEventListener(TimerEvent.TIMER_COMPLETE, timerComplete);
function tickTock(e:TimerEvent):void
{
trace("Tick!");
timer.stop();
}
function timerComplete(e:TimerEvent):void
{
trace("Finished!");
}
In this example, the code contains a stop() function that targets the timer object. When this code runs, it produces only one “Tick!” in the Output panel. Notice also that the timerComplete() callback function isn’t executed. Although the timer stopped, the code doesn’t broadcast the TIMER_COMPLETE event, because this event broadcasts only when the timer completes naturally—without interruption using stop().
Using the Enter Frame Event
Another type of event that you will use in your project is the ENTER_FRAME event. This event takes place each time your project plays another frame in the Flash runtime.
One precaution about this event is to not overload or over use it. Putting too much processing power into the ENTER_FRAME event can affect performance in your project. For basic activities, this event will work fine, but this is good to know as you get to more advanced projects.
The implementation of the ENTER_FRAME event is pretty basic. Let’s look at this example.
1. Create a new ActionScript 3.0 project in Flash Professional CS5.5.
2. Create a new MovieClip named Ball and add it to the Library, removing it from the Stage.
3. Enter the following into the main timeline as a frame script:
// Create a new ball and add to the display stack
var myBall:Ball = new Ball();
myBall.x = 50;
myBall.y = 50;
addChild(myBall);
// Add ENTER_FRAME event
myBall.addEventListener(Event.ENTER_FRAME, moveBall);
// Callback function for ENTER_FRAME event
function moveBall(e:Event):void
{
myBall.x++;
}
4. Run the project. You’ll see the ball slowly inch across the screen.
Congratulations! You have created your first ActionScript-only animation! As you become more proficient in ActionScript, you’ll find that creating animations in ActionScript will give you extensive control and capabilities that the timeline alone can’t offer. But enough congratulations for now—take a look at the code and walk through how it works.
In the opening section, you are creating an instance of the Ball class called myBall, positioning it on the Stage, and adding to the display stack.
The event listener in this case is listening for the ENTER_FRAME event type that is part of the generic Event object. You then indicate that you want to run the moveBall() callback function when the listener hears the event.
The moveBall() callback function then increases the x property by 1, changing the location on the Stage. You’ll find that the object will move off the Stage but continue to run. This is because the location is now beyond the width of the project.
Removing Event Listeners
Now that you can add event listeners, you should also remove them when you no longer need them. In fact, removing unwanted listeners is a best practice for enhancing performance, especially when you start working with larger applications and projects.
Removing event listeners uses the exact same format as adding them, except you use the removeEventListener() function to disable and remove the listener, stating the specific event and callback function that you no longer want to listen for and trigger.
Let’s take the previous example, where you were animating a simple ball across the stage using the ENTER_FRAME event, and add a mouse event to remove the listener to stop the animation.
1. Modify the existing code as follows:
// Create a new ball and add to the display stack
var myBall:Ball = new Ball();
myBall.x = 50;
myBall.y = 50;
addChild(myBall);
// Add ENTER_FRAME event
myBall.addEventListener(Event.ENTER_FRAME, moveBall);
// Add CLICK event
myBall.addEventListener(MouseEvent.CLICK, stopEvents);
// Callback function for ENTER_FRAME event
function moveBall(e:Event):void
{
myBall.x++;
trace("Ball is at " + myBall.x);
}
// Callback function for CLICK event
function stopEvents(e:MouseEvent):void
{
myBall.removeEventListener(Event.ENTER_FRAME, moveBall);
myBall.removeEventListener(MouseEvent.CLICK, stopEvents);
}
2. Run the project.
The first section of new code adds a new event handler for the mouse click on the ball. Next, the original callback function for the ENTER_FRAME event is now displaying the current x property location in the Output panel.
The next section of code is the new callback function for the CLICK event. By using removeEventListener(), you are indicating what event type and what callback you are removing as a listener. In this case, you are no longer listening for the ENTER_FRAME event from myBall, and will then remove the reference to the callback function, moveBall(). You know this is working because when you run the project and click on the ball, the ball no longer moves, and the trace statement doesn’t execute anymore, meaning that the moveBall() callback function is not running any longer.
Since this action would happen only once in the project, you are also being diligent and removing the CLICK event as well, since there is now no reason to keep listening for that event.
When to Use Frame vs. Timer Events
A common question for people new to ActionScript is when to use timers or enter frame events. The answer isn’t a clear-cut one, but here is an example to help you understand the differences.
Let’s modify the example used earlier.
1. Replace the code in the project with the following to help illustrate the point:
// Create a new ball and add to the display stack
var myBall:Ball = new Ball();
myBall.x = 50;
myBall.y = 50;
addChild(myBall);
// Add ENTER_FRAME event listener
myBall.addEventListener(Event.ENTER_FRAME, moveBall);
// Callback function for ENTER_FRAME
function moveBall(e:Event):void
{
myBall.x++;
}
2. Run the project. The project runs exactly as before, with the ball slowly creeping across the screen.
Flash Professional projects have something called a frame rate. This value defines the number of frames that pass in a second. By default, the frame rate is 24 frames per second. Based on this, you can say with reasonable accuracy that using the code moves the ball 24 pixels to the right in a second.
What happens if you change the frame rate?
In Flash Professional CS5.5, your project properties allow you to change your frame rate, or FPS. Let’s modify that now.
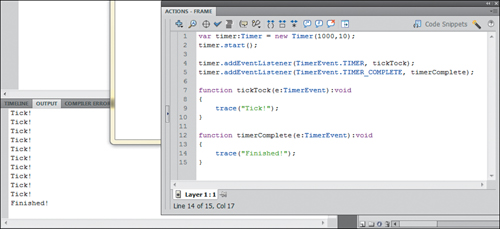
3. Deselect any objects and open the Properties panel (Figure 7.3).
Figure 7.3. Frame rate property (FPS) in the Properties panel
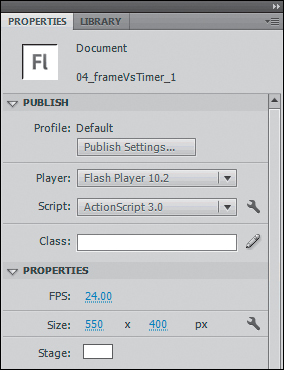
4. Set the frame rate (FPS) to 5.
5. Run the project again. You’ll notice that the animation runs much slower. This is because it is now firing the ENTER_FRAME only 5 times per second instead of the 24 that it was doing earlier.
ENTER_FRAME is directly connected to your frame rate. If you modify your frame rate, any animation you create using ENTER_FRAME will be affected.
Let’s change the code to use a timer and see what the difference is.
6. Change the ActionScript code to match the following, but keep the frame rate at 5:
// Create a new ball and add to the display stack
var myBall:Ball = new Ball();
myBall.x = 50;
myBall.y = 50;
addChild(myBall);
// Create a animation timer
var myTimer:Timer = new Timer(100);
// Add TIMER event listener
myTimer.addEventListener(TimerEvent.TIMER, moveBall);
// Start timer
myTimer.start();
// Callback function for ENTER_FRAME
function moveBall(e:TimerEvent):void
{
myBall.x++;
}
7. Run the project. You’ll see that the ball continues to creep across the stage. In fact, you are setting the timer to broadcast the TIMER event every tenth of a second (100 milliseconds).
Now, let’s mess with the frame rate a bit more.
8. Access the FPS property again and change it to 100.
Setting the frame rate to 100 is really high, but it will illustrate a point.
9. Run the project and you’ll see what I mean.
Notice that the rate of motion of the ball doesn’t change. The only thing you may notice is that the animation is a little smoother than it was before. Here’s why: The FPS is indicating how many frames per second are being rendered, which directly affects the ENTER_FRAME event. The timer is based on time, and is independent of the FPS value, so you can set the value high, low, or whatever—the animation will always run at the same rate. The difference is that the fluidity of the movement may be better using high FPS since there are more frames being rendered each second to show your timer animation. If you want this timer-based animation to run faster, you would need to modify the interval of the timer, perhaps lowering it to 50 milliseconds to make it run twice as fast, or increasing it to 200 milliseconds to make it run twice as slow.
Wrapping Up
In this chapter, you learned how to use timers and frames to control actions using the TIMER, TIMER_COMPLETE, and ENTER_FRAME events. You also covered the differences in how they work and how they relate to your project’s frame rate, or FPS. Here are some tips to help you work with these new capabilities in ActionScript:
• To use a timer, create a new timer using the new statement and define the timer properties: interval duration in milliseconds and, optionally, the number of intervals in the timer.
• To create an infinitely running timer, omit the number of intervals in the timer.
• When using a timer, remember to use the start() function to start it “ticking.”
• Listen for the TimerEvent.TIMER for each “tick” of the timer, and TimerEvent.TIMER_COMPLETE for when the last interval runs.
• Use the stop() function to interrupt the timer.
• When working with frame events, listen for the Event.ENTER_FRAME event.
• Remember that frame rate (FPS) directly affects the rate of an ENTER_FRAME-based animation.
• FPS doesn’t affect the speed of a timer-based animation, but can affect its fluidity.
• Increase or decrease the interval of a timer-based animation to change the rate of the animation.
• Remember to remove unwanted listeners using the removeEventListeners() function.