
17. Animation Using ActionScript
Animation on the timeline is very powerful, and it has been the cornerstone of Flash Professional since it was first created. As scripting and coding have become more advanced, the need for dynamically created animations that are driven by data or random events has also evolved.
This chapter will introduce you to creating animations using ActionScript. As the saying goes, this is just the tip of the iceberg. There are countless implementations, evolutions, and mind-blowing examples of how you can extend the basics of code-based animation, including new 3D capabilities in the Flash runtimes. When you finish this chapter, you’ll have a pretty cool ActionScript animation example—an animated starfield that looks like you are traveling at warp speed!
ActionScript Animation = Location + Time
Animation is a basic concept, and there are a number of various forms. Cell-based animation is like a cartoon or film; you draw an object as if you took photos of its movements in rapid succession. Tween-based animation uses the computer to calculate the changes from a start point to an end point over a set amount of time and automatically fill in the gaps between. Time-based animation is what you’ll cover in this chapter. It is the concept of taking an object and determining its location and other properties on the Stage at a given period of time.
Let’s create a starting point for a warp speed starfield.
1. Create a new Flash Professional project called Starfield, give it a black background, and set the frame rate, or FPS, to 60.
2. Create a Document class for the project.
3. Create a new custom class named Star that extends the Sprite class.
4. Enter the following as the code for the new Star class:
package {
import flash.display.Sprite;
public class Star extends Sprite {
public function Star() {
// Create a basic star with (graphics)
{
lineStyle(0);
beginFill(0xFFFFFF);
drawCircle(0,0,3);
}
}
}
}
This class will draw a three-pixel-wide white circle centered at the registration point of the sprite.
5. Enter the following code for the Starfield Document class:
package {
import flash.display.MovieClip;
public class Starfield extends MovieClip {
private var _starCollection:Array;
public function Starfield() {
var newStar:Star = new Star();
newStar.x = stage.stageWidth / 2;
newStar.y = stage.stageHeight / 2;
addChild(newStar);
_starCollection = new Array();
_starCollection.push(newStar);
}
}
}
This class will create an array to hold all the instances of the Star class (you will create more later in the project). It then creates a new instance of the Star class, centers it based on the Stage width and height, adds it to the display stack, and then pushes it to a newly created array.
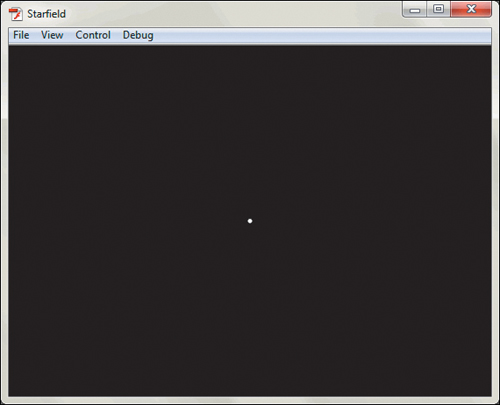
6. Run the project. The results are shown in Figure 17.1.
Figure 17.1. A single lonely star
Moving an Object Using a Timer
The basis of working with time-based animation is, you guessed it, time. In this project, you’ll use ActionScript to move an object (star) around the screen, changing its location over time. You can use the Timer class and the TimerEvent.TIMER to create a callback function that will move the object slightly with each interval of the timer.
Since you are going to create more complex functionality, you should follow best practice and move some code outside of the constructor.
1. Update the code from the previous section with the following code:
package {
import flash.display.MovieClip;
import flash.utils.Timer;
import flash.events.TimerEvent;
public class Starfield extends MovieClip {
private var _starCollection:Array;
private var _animateTimer:Timer;
public function Starfield() {
_createCollection();
_configureTimer();
_createStars();
_startTimer();
}
private function _createCollection():void
{
_starCollection = new Array();
}
private function _configureTimer():void
{
_animateTimer = new Timer(100);
_animateTimer.addEventListener (TimerEvent.TIMER, _animateStars);
}
private function _createStars():void
{
var newStar:Star = new Star();
newStar.x = stage.stageWidth / 2;
newStar.y = stage.stageHeight / 2;
addChild(newStar);
_starCollection.push(newStar);
}
private function _startTimer():void
{
_animateTimer.start();
}
//// Event Callbacks
private function _animateStars(e:TimerEvent):void
{
_starCollection[0].x += 1;
}
}
}
Let’s walk through this and discover exactly what is going on.
If you follow the flow of the constructor, you’ll see that you first create the array collection object by assigning an empty array to it. Next, you configure the timer to an interval of 100 milliseconds. The timer will continue infinitely so an interval count is not required. The event listener is then created, accessing a callback function when the TimerEvent.TIMER event is broadcasted. The next section is the same as you had before, creating the star instance in a temporary variable and pushing it to the array as a new element. The timer is then started.
The callback event for the timer is where the animation happens. Every 100 milliseconds, this function will execute. Its function is to move the location of the stars in the array (for now there is only one) to give the appearance that they are moving. The equation that is used increases the x property of the selected array element by one.
2. Run the project. You’ll find that the star slowly moves across the screen to the left.
The callback function is determining the direction of the animation. You can modify that by changing the location properties.
3. Alter the _animateStars method as shown here:
private function _animateStars(e:TimerEvent):void
{
_starCollection[0].x += 2;
_starCollection[0].y += 1;
}
This now affects both the x and y coordinates of the star.
4. Run the project again. You’ll see the star slowly move down and to the right.
Creating Random Animations
The animation so far is less than interesting, mostly because the star is moving in a constant direction at a constant speed. You can adjust and provide some interest by changing the slope of the animation.
The slope is a measurement of a line that determines changes along the x axis and y axis. You might remember it from geometry class as “rise over run.” When creating time-based animation, the slope determines the direction and the speed of the animation.
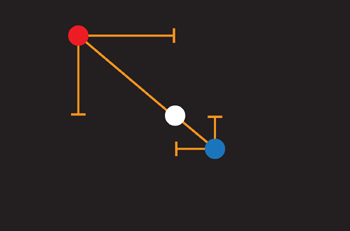
Take a look at Figure 17.2.
Figure 17.2. Various slope examples
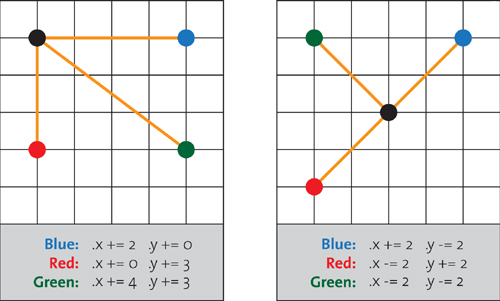
Let’s start with the graph on the left. In this example, the black dot represents the current location of the star on the screen. There are various changes you can make to the star that will move it on the screen. You can move it directly to the right by increasing x as shown with the blue dot. The dot can move directly down by increasing y as shown using the red dot. You could also move both x and y at the same time, causing a diagonal movement, as shown with the green dot.
The amount you change it will determine the speed at which the animation will take place. If you create a smaller number of x or y changes, the animation will run slower. The more you increase the amount of change to x and y, the faster the animation will run. Think about it: If you change the increase of x from 1 to 2, the speed at which the animation moves will double.
These examples are all using positive changes, and as a result, you can see that the movement is either to the right, down, or a combination of both. If you want to move the object in any direction, you will need to use a combination of positive and negative changes to x and y.
The graph on the right of Figure 17.2 shows how these other changes will work. If you want to move an object up and to the right, you increase x, but decrease y, as shown with the blue dot. The red dot is moving down and to the left, which is an increase in y, but a decrease in x. Finally, to move up and to the left, as shown with the green dot, you need to decrease x and y.
Whew! Enough of the geometry lesson for now. What you want to do is create an animation that will go in all directions, but what would make it better would be to make it random at the same time.
To introduce some randomness, you need to generate two random numbers for the star. The rate you want x to change, and the rate you want y to change. These will then be used to calculate the change you want for the star. Now the trick is to pick a range that is positive and negative, otherwise you’ll only have animations that move right and down.
Figure 17.3 shows how you can take a starting random number range and get what you want.
Figure 17.3. Modifying a random number generator
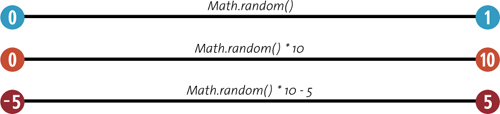
First, you start with the base random number generator, which gives you a range of decimals from 0 to 1. You then scale that range to go up to 10 by multiplying it. You then shift the range so that the midpoint of the range is 5 by reducing it by half of the scale you expanded it by.
Now, you can get a random number in the range of -5 to 5. Since you need to store both numbers, you can use a nested array to hold the numbers. Why an array, you ask? It might seem like overkill, but it will make perfect sense later in the chapter.
1. Update the code from the previous example, as shown below:
package {
import flash.display.MovieClip;
import flash.utils.Timer;
import flash.events.TimerEvent;
public class Starfield extends MovieClip {
private var _starCollection:Array;
private var _rateCollection:Array;
private var _animateTimer:Timer;
public function Starfield() {
_createCollection();
_configureTimer();
_createStars();
_startTimer();
}
private function _createCollection():void
{
_starCollection = new Array();
_rateCollection = new Array();
}
private function _configureTimer():void
{
_animateTimer = new Timer(100);
_animateTimer.addEventListener (TimerEvent.TIMER, _animateStars);
}
private function _createStars():void
{
var newStar:Star = new Star();
newStar.x = stage.stageWidth / 2;
newStar.y = stage.stageHeight / 2;
addChild(newStar);
_starCollection.push(newStar);
var newXRate:Number = Math.random()*10-5;
var newYRate:Number = Math.random()*10-5;
var newRate:Array = [newXRate,newYRate];
_rateCollection.push(newRate);
}
private function _startTimer():void
{
_animateTimer.start();
}
//// Event Callbacks
private function _animateStars(e:TimerEvent):void
{
_starCollection[0].x += _rateCollection[0][0];
_starCollection[0].y += _rateCollection[0][1];
}
}
}
Let’s walk through this to better understand. First, you are creating a new array to hold the rate changes (even though you have only one for now). When you create the star in the _createStars method, you also create a new rate for both x and y coordinates using the equation you created earlier. You then create a new temporary array to hold these and push that array inside as a new array element. As a result, you’ll have an array, _rateCollection, whose first element contains an array of two elements, the first is the rate of change for x, the second is the change of y.
In the callback function, you apply these rate changes to the x and y location of the star. You access the nested arrays by stacking the element brackets against each other. In this case, accessing the first element’s first element as the rate of change for x, and then the first element’s second element as the rate of change for y.
Whew!
2. Run the project and see what happens.
3. Run the project again. You’ll see that each time you run the project, the star will move in a random direction.
Now wouldn’t it be cool if there were more stars? Why yes, I think it would.
Animating Multiple Objects with Loops
Now you’ll discover why the star and rates of change are stored in arrays. It is to allow you to easily add multiple instances of stars to the example without needing to refactor extensive amounts of code.
You already have the arrays to store the stars and the rates of change. All you need to do is add the loops, and it should all work. Let’s find out.
1. Update the code, as highlighted, to add the loops you need—let’s start with 10 stars:
package {
import flash.display.MovieClip;
import flash.utils.Timer;
import flash.events.TimerEvent;
public class Starfield extends MovieClip {
private var _starCollection:Array;
private var _rateCollection:Array;
private var _animateTimer:Timer;
public function Starfield() {
_createCollection();
_configureTimer();
_createStars();
_startTimer();
}
private function _createCollection():void
{
_starCollection = new Array();
_rateCollection = new Array();
}
private function _configureTimer():void
{
_animateTimer = new Timer(100);
_animateTimer.addEventListener (TimerEvent.TIMER, _animateStars);
}
private function _createStars():void
{
for (var i:uint = 0; i < 10; i++)
{
var newStar:Star = new Star();
newStar.x = stage.stageWidth / 2;
newStar.y = stage.stageHeight / 2;
addChild(newStar);
_starCollection.push(newStar);
var newXRate:Number = Math.random()*10-5;
var newYRate:Number = Math.random()*10-5;
var newRate:Array = [newXRate,newYRate];
_rateCollection.push(newRate);
}
}
private function _startTimer():void
{
_animateTimer.start();
}
//// Event Callbacks
private function _animateStars(e:TimerEvent):void
{
for (var i:uint = 0; i < 10; i++)
{
_starCollection[i].x += _rateCollection[i][0];
_starCollection[i].y += _rateCollection[i][1];
}
}
}
}
As you can see, you didn’t need to change much.
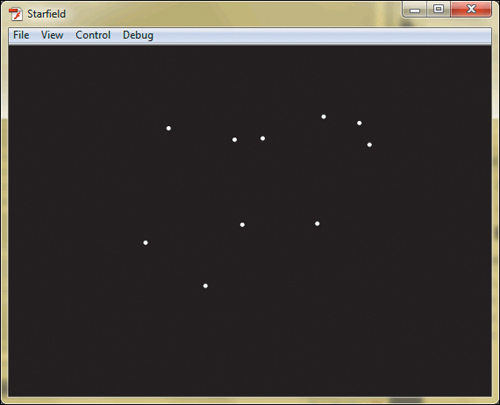
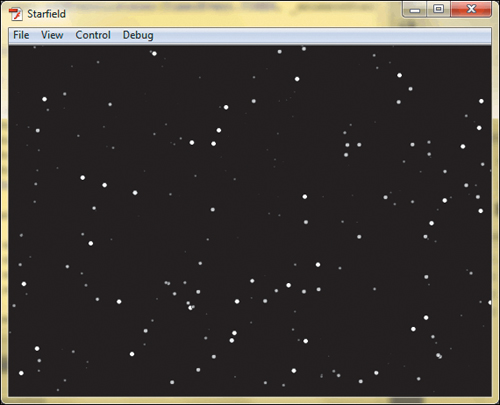
2. Run the project. You’ll see a bunch of stars start to animate (Figure 17.4).
Figure 17.4. Warp speed captain!
Congrats! But you aren’t finished—as you may have found out, when the stars move off the screen they disappear forever. So sad! How do you detect when the stars move off the Stage, place them back in the center, and create a new random rate of movement so you can keep moving forward at Warp 10?
The answer: Use a conditional to determine the location and see if it is within the range of the Stage. If it is, animate it as usual, if not, adjust it.
3. Update your code, as highlighted below:
package {
import flash.display.MovieClip;
import flash.utils.Timer;
import flash.events.TimerEvent;
public class Starfield extends MovieClip {
private var _starCollection:Array;
private var _rateCollection:Array;
private var _animateTimer:Timer;
public function Starfield() {
_createCollection();
_configureTimer();
_createStars();
_startTimer();
}
private function _createCollection():void
{
_starCollection = new Array();
_rateCollection = new Array();
}
private function _configureTimer():void
{
_animateTimer = new Timer(100);
_animateTimer.addEventListener (TimerEvent.TIMER, _animateStars);
}
private function _createStars():void
{
for (var i:uint = 0; i < 10; i++)
{
var newStar:Star = new Star();
newStar.x = stage.stageWidth / 2;
newStar.y = stage.stageHeight / 2;
addChild(newStar);
_starCollection.push(newStar);
var newXRate:Number = Math.random()*10-5;
var newYRate:Number = Math.random()*10-5;
var newRate:Array = [newXRate,newYRate];
_rateCollection.push(newRate);
}
}
private function _startTimer():void
{
_animateTimer.start();
}
//// Event Callbacks
private function _animateStars(e:TimerEvent):void
{
for (var i:uint = 0; i < 10; i++)
{
with (_starCollection[i]) {
if (x < 0 || x > stage.stageWidth || y < 0 || y > stage.stageHeight)
{
x = stage.stageWidth / 2;
y = stage.stageHeight / 2;
_rateCollection[i][0] = Math.random()*10-5;
_rateCollection[i][1] = Math.random()*10-5;
} else {
_starCollection[i].x += _rateCollection[i][0];
_starCollection[i].y += _rateCollection[i][1];
}
}
}
}
}
}
Well look at that, all that stuff you learned before is starting to come in handy, isn’t it? With the use of an if statement, you are able to detect if the x coordinate is less than 0, greater than the Stage width, or if the y coordinate is less than 0, or greater than the Stage height. If it is, plop it back in the center and create a new rate of change for the star.
4. Run the project. You’ll find that as soon as a star disappears from the window, it is back in the center and keeps moving.
Fine-Tuning Animations
You have done a lot so far, and the fundamentals are all in place, but there are some adjustments you can make to really polish this example. The first thing you can do is adjust the starting location of the stars. They all appear in the center—the exact center of the screen. This isn’t very realistic; in fact, it is downright odd. To fix this, you can create a random location on the screen and use this to evaluate the rate of change you want to use to move the star. Take a look at Figure 17.5.
Figure 17.5. Calculating random position and rate of location change
In this illustration, the white dot represents the center of the Stage, otherwise known as the coordinate stage.stageWidth/2,stage.stageHeight/2. You can position an object anywhere in the Stage using the stageWidth and stageHeight methods with the random number generator. You now need to calculate the slope, or the difference of x and y from the center of the Stage to the random location. You can do that by taking the random x and y coordinate and subtracting the location of the center of the Stage. This is the slope of the position of the star relative to the center of the Stage. You can scale down this slope to calculate the rate of change for x and y.
1. Update the project with the code highlighted below:
package {
import flash.display.MovieClip;
import flash.utils.Timer;
import flash.events.TimerEvent;
public class Starfield extends MovieClip {
private var _starCollection:Array;
private var _rateCollection:Array;
private var _animateTimer:Timer;
public function Starfield() {
_createCollection();
_configureTimer();
_createStars();
_startTimer();
}
private function _createCollection():void
{
_starCollection = new Array();
_rateCollection = new Array();
}
private function _configureTimer():void
{
_animateTimer = new Timer(100);
_animateTimer.addEventListener (TimerEvent.TIMER, _animateStars);
}
private function _createStars():void
{
for (var i:uint = 0; i < 10; i++)
{
var newStar:Star = new Star();
newStar.x = Math.random()*stage.stageWidth;
newStar.y = Math.random()*stage.stageHeight;
addChild(newStar);
_starCollection.push(newStar);
var newXRate:Number = (newStar.x - stage.stageWidth/2) * .1;
var newYRate:Number = (newStar.y - stage.stageHeight/2) * .1;
var newRate:Array = [newXRate,newYRate];
_rateCollection.push(newRate);
}
}
private function _startTimer():void
{
_animateTimer.start();
}
//// Event Callbacks
private function _animateStars(e:TimerEvent):void
{
for (var i:uint = 0; i < 10; i++)
{
with (_starCollection[i]) {
if (x < 0 || x > stage.stageWidth || y < 0 || y > stage.stageHeight)
{
x = Math.random()*stage.stageWidth;
y = Math.random()*stage.stageHeight;
_rateCollection[i][0] = (x - stage.stageWidth/2) * .1;
_rateCollection[i][1] = (y - stage.stageHeight/2) * .1;
} else {
_starCollection[i].x += _rateCollection[i][0];
_starCollection[i].y += _rateCollection[i][1];
}
}
}
}
}
}
As you can see, there were only a couple modifications required.
2. Run the project. You’ll see that the stars don’t always fly out from the direct center of the stage, and the direction of movement follows the slope they were already on based on their random location.
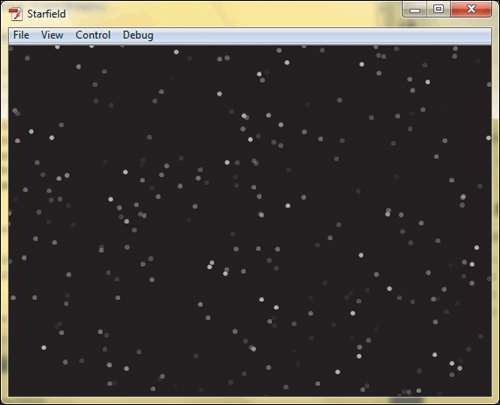
But you aren’t finished yet. There are a few more tweaks you can do. The next adjustment is to change the brightness, or alpha property, of the stars as they animate. Remember, you are flying through space, so they stars shouldn’t be as bright when they first display, but get brighter as the viewer “moves” towards them.
You can create this effect by defining the initial alpha property at a low value, and adding another rate of change to the array. This time it will be a rate of change of alpha.
3. Update the project as highlighted below to add this new animation effect:
package {
import flash.display.MovieClip;
import flash.utils.Timer;
import flash.events.TimerEvent;
public class Starfield extends MovieClip {
private var _starCollection:Array;
private var _rateCollection:Array;
private var _animateTimer:Timer;
public function Starfield() {
_createCollection();
_configureTimer();
_createStars();
_startTimer();
}
private function _createCollection():void
{
_starCollection = new Array();
_rateCollection = new Array();
}
private function _configureTimer():void
{
_animateTimer = new Timer(100);
_animateTimer.addEventListener (TimerEvent.TIMER, _animateStars);
}
private function _createStars():void
{
for (var i:uint = 0; i < 10; i++)
{
var newStar:Star = new Star();
newStar.x = Math.random()*stage.stageWidth;
newStar.y = Math.random()*stage.stageHeight;
newStar.alpha = 0;
addChild(newStar);
_starCollection.push(newStar);
var newXRate:Number = (newStar.x - stage.stageWidth/2) * .1;
var newYRate:Number = (newStar.y - stage.stageHeight/2) * .1;
var newARate:Number = Math.random() * .1;
var newRate:Array = [newXRate,newYRate, newARate];
_rateCollection.push(newRate);
}
}
private function _startTimer():void
{
_animateTimer.start();
}
//// Event Callbacks
private function _animateStars(e:TimerEvent):void
{
for (var i:uint = 0; i < 10; i++)
{
with (_starCollection[i]) {
if (x < 0 || x > stage.stageWidth || y < 0 || y > stage.stageHeight)
{
x = Math.random()*stage.stageWidth;
y = Math.random()*stage.stageHeight;
alpha = 0;
_rateCollection[i][0] = (x - stage.stageWidth/2) * .1;
_rateCollection[i][1] = (y - stage.stageHeight/2) * .1;
_rateCollection[i][2] = Math.random() * .1;
} else {
_starCollection[i].x += _rateCollection[i][0];
_starCollection[i].y += _rateCollection[i][1];
_starCollection[i].alpha += _rateCollection[i][2]
}
}
}
}
}
}
4. Run the project again. Now the stars will fade in as they get “closer” to you.
You can probably guess what I’m going to say next, and your right—“But wait! There’s more!” As you play the animation, you’ll notice it needs to be a little less choppy. If you remember, the interval that the objects move at is determined by the timer interval. You can adjust this to make a more fluid animation.
5. Adjust the timer interval in the following line of code:
_animateTimer = new Timer(10);
6. Run the project again.
Woah! What is this? Warp 20?! It is clear that the animation is running too quickly—but it is flowing much better that it was before. You can adjust the speed by adjusting the rate of the movement of the stars with each interval. This was calculated as a proportion of the slope based on the original random location of the star against the center of the Stage. Since the interval is now a tenth of what it used to be (10 milliseconds instead of 100), to achieve the same effect you had before you need to reduce the rate of change by a tenth as well.
7. Adjust the code, as shown below, to apply the fix:
package {
import flash.display.MovieClip;
import flash.utils.Timer;
import flash.events.TimerEvent;
public class Starfield extends MovieClip {
private var _starCollection:Array;
private var _rateCollection:Array;
private var _animateTimer:Timer;
public function Starfield() {
_createCollection();
_configureTimer();
_createStars();
_startTimer();
}
private function _createCollection():void
{
_starCollection = new Array();
_rateCollection = new Array();
}
private function _configureTimer():void
{
_animateTimer = new Timer(10);
_animateTimer.addEventListener (TimerEvent.TIMER, _animateStars);
}
private function _createStars():void
{
for (var i:uint = 0; i < 10; i++)
{
var newStar:Star = new Star();
newStar.x = Math.random()*stage.stageWidth;
newStar.y = Math.random()*stage.stageHeight;
newStar.alpha = 0;
addChild(newStar);
_starCollection.push(newStar);
var newXRate:Number = (newStar.x - stage.stageWidth/2) * .01;
var newYRate:Number = (newStar.y - stage.stageHeight/2) * .01;
var newARate:Number = Math.random() * .01;
var newRate:Array = [newXRate,newYRate, newARate];
_rateCollection.push(newRate);
}
}
private function _startTimer():void
{
_animateTimer.start();
}
//// Event Callbacks
private function _animateStars(e:TimerEvent):void
{
for (var i:uint = 0; i < 10; i++)
{
with (_starCollection[i]) {
if (x < 0 || x > stage.stageWidth || y < 0 || y > stage.stageHeight)
{
x = Math.random()*stage.stageWidth;
y = Math.random()*stage.stageHeight;
alpha = 0;
_rateCollection[i][0] = (x - stage.stageWidth/2) * .01;
_rateCollection[i][1] = (y - stage.stageHeight/2) * .01;
_rateCollection[i][2] = Math.random() * .01;
} else {
_starCollection[i].x += rateCollection[i][0];
_starCollection[i].y += rateCollection[i][1];
_starCollection[i].alpha += rateCollection[i][2]
}
}
}
}
}
}
8. Run the project again. You’ll see that the rate of the animation is back to what it was before, but now it is much smoother than it originally was.
Ok, one more change—this one is simple. You need more stars. Update the following line so you can have a (partial) universe of stars:
package {
import flash.display.MovieClip;
import flash.utils.Timer;
import flash.events.TimerEvent;
public class Starfield extends MovieClip {
private var _starCollection:Array;
private var _rateCollection:Array;
private var _animateTimer:Timer;
public function Starfield() {
_createCollection();
_configureTimer();
_createStars();
_startTimer();
}
private function _createCollection():void
{
_starCollection = new Array();
_rateCollection = new Array();
}
private function _configureTimer():void
{
_animateTimer = new Timer(10);
_animateTimer.addEventListener (TimerEvent.TIMER, _animateStars);
}
private function _createStars():void
{
for (var i:uint = 0; i < 500; i++)
{
var newStar:Star = new Star();
newStar.x = Math.random()*stage.stageWidth;
newStar.y = Math.random()*stage.stageHeight;
newStar.alpha = 0;
addChild(newStar);
_starCollection.push(newStar);
var newXRate:Number = (newStar.x - stage.stageWidth/2) * .01;
var newYRate:Number = (newStar.y - stage.stageHeight/2) * .01;
var newARate:Number = Math.random() * .01;
var newRate:Array = [newXRate,newYRate, newARate];
_rateCollection.push(newRate);
}
}
private function _startTimer():void
{
_animateTimer.start();
}
//// Event Callbacks
private function _animateStars(e:TimerEvent):void
{
for (var i:uint = 0; i < 500; i++)
{
with (_starCollection[i]) {
if (x < 0 || x > stage.stageWidth || y < 0 || y > stage.stageHeight)
{
x = Math.random()*stage.stageWidth;
y = Math.random()*stage.stageHeight;
alpha = 0;
_rateCollection[i][0] = (x - stage.stageWidth/2) * .01;
_rateCollection[i][1] = (y - stage.stageHeight/2) * .01;
_rateCollection[i][2] = Math.random() * .01;
} else {
_starCollection[i].x += _rateCollection[i][0];
_starCollection[i].y +=
_rateCollection[i][1];
_starCollection[i].alpha += _rateCollection[i][2]
}
}
}
}
}
}
Figure 17.6. Traveling the galaxy, courtesy of ActionScript
9. Run the project again, and sit back, you are well on your way to Alpha Centauri.
Oh, OK, one more change—you are such a good student, you can do one more little tweak. Remember when I said that you would want to adjust the alpha because the star was farther away? Well, that would adjust the size too, wouldn’t it? You can adjust that with an easy tweak.
10. Update the code as follows:
package {
import flash.display.MovieClip;
import flash.utils.Timer;
import flash.events.TimerEvent;
public class Starfield extends MovieClip {
private var _starCollection:Array;
private var _rateCollection:Array;
private var _animateTimer:Timer;
public function Starfield() {
_createCollection();
_configureTimer();
_createStars();
_startTimer();
}
private function _createCollection():void
{
_starCollection = new Array();
_rateCollection = new Array();
}
private function _configureTimer():void
{
_animateTimer = new Timer(10);
_animateTimer.addEventListener (TimerEvent.TIMER, _animateStars);
}
private function _createStars():void
{
for (var i:uint = 0; i < 500; i++)
{
var newStar:Star = new Star();
newStar.x = Math.random()*stage.stageWidth;
newStar.y = Math.random()*stage.stageHeight;
newStar.alpha = 0;
newStar.scaleX = newStar.scaleY = 0;
addChild(newStar);
_starCollection.push(newStar);
var newXRate:Number = (newStar.x - stage.stageWidth/2) * .01;
var newYRate:Number = (newStar.y - stage.stageHeight/2) * .01;
var newARate:Number = Math.random() * .01;
var newRate:Array = [newXRate,newYRate, newARate];
_rateCollection.push(newRate);
}
}
private function _startTimer():void
{
_animateTimer.start();
}
//// Event Callbacks
private function _animateStars(e:TimerEvent):void
{
for (var i:uint = 0; i < 500; i++)
{
with (_starCollection[i]) {
if (x < 0 || x > stage.stageWidth || y < 0 || y > stage.stageHeight)
{
x = Math.random()*stage.stageWidth;
y = Math.random()*stage.stageHeight;
alpha = 0;
scaleX = scaleY = 0;
_rateCollection[i][0] = (x - stage.stageWidth/2) * .01;
_rateCollection[i][1] = (y - stage.stageHeight/2) * .01;
_rateCollection[i][2] = Math.random() * .01;
} else {
_starCollection[i].x += _rateCollection[i][0];
_starCollection[i].y += _rateCollection[i][1];
_starCollection[i].alpha += _rateCollection[i][2];
if (_starCollection[i].alpha > 1) _starCollection[i].alpha = 1;
_starCollection[i].scaleX = _starCollection[i].alpha;
_starCollection[i].scaleY = _starCollection[i].alpha;
}
}
}
}
}
}
Now the star’s size is determined using scaleX and scaleY, which will adjust the size relative to its natural dimensions. Notice that you added an if statement near the end. This is because the alpha property is constantly going up, in fact, it is going above 1. While the alpha property can deal with this since it treats any value over 1 as 1, scaleX and scaleY are a different story. They will accept values over 1 and scale them above their natural dimensions.
Another trick that is used is assigning a value to multiple values in a single line:
scaleX = scaleY = 0;
This is the same as writing it out on two lines:
scaleX = 0;
scaleY = 0;
Another quick shortcut that you can use—free of charge!
Ok—enough—I hear you loud and clear.
11. Run the Project.
The result of all your hard work is a cool animated warp speed starfield effect (Figure 17.7). Congratulations.
Wrapping Up
In this chapter, you learned some of the basics of creating time-based animation using ActionScript. Using a few simple concepts, you can create some interesting animated effects.
Here are some helpful tips to help you work with time-based animation using ActionScript:
• Time-based animation has a basic principle: Change the location of an object based on a rate of location change over a series of timer intervals.
• To define the speed of the animation requires two factors. The first is the rate of movement change (sometimes called slope) and the second is the frequency of intervals that apply that rate of change.
• The slope of an object is based on the change in x and the change in y.
• The rate of change when moving in all directions away from a center point will require positive or negative changes to x and y.
• When animating a series of objects, use arrays and loops to repeat animations actions and keep your code easier to scale and change.
• Experiment! Animation is about creativity—play with different effects, properties, timings, and objects. Happy mistakes are fun to discover!