
18. Working with External Media
Flash is one of the most expressive ways to create interactive content and media across multiple devices. ActionScript is a core part of connecting with media, and gives designers and developers the ability to work with images, audio, and video to make any experience more immersive and compelling.
In this chapter, you’ll learn how to load images, audio, and video and control their display and playback in your applications.
Using Images
When working with images, you have two options: You can import them into your Library and place instances of them on the Stage, or you can load them dynamically using ActionScript. Both options have advantages and disadvantages.
When importing images into the Library, you make the process of visually laying out your project much easier; but keeping your project small for fast loading on a web browser can be complex. For mobile or desktop applications images are typically embedded into the application, so this isn’t as much of a concern, but it can affect startup time of a project published on the web. Another limitation is that the images are static, and you still need to work with ActionScript to change them.
Loading images with ActionScript keeps your images separate from the rest of the project, making it easier to change images outside of Flash if you need to make updates or other changes. It also ensures that your published project is smaller since the images aren’t embedded with the SWF. The disadvantage of using ActionScript is that layout needs to be handled with code. It varies between people, but there is often a personal preference to have graphics visually laid out in Flash Professional, or have it handed through ActionScript. There is no right or wrong way, just find the balance that is right for you and your project.
In the next few sections, you’ll learn how to load images and media assets into a project using ActionScript. You’ll learn to work with images and other SWF files.
You can load images from an external location. The most common are graphics files, including JPEG, GIF, and PNG files. You can load PNGs with transparency without any problems. You can also load another SWF file and it will be treated like any other graphic file.
A special class called the ProLoader class manages the loading and unloading of images and SWFs. You’ll use the ProLoader class in the following example.
1. Create a new Flash Professional project named FirstProLoader and a matching Document class.
2. Add the following code to your Document class:
package {
import flash.display.MovieClip;
import fl.display.ProLoader;
import flash.net.URLRequest;
public class FirstProLoader extends MovieClip {
private var _imageLoader:ProLoader;
public function FirstProLoader() {
_loadImage();
}
private function _loadImage():void
{
// Create a variable to store the URL of the file to load
var imageURL:URLRequest = new URLRequest("http://www.helpexamples.com/flash/images/image1.jpg");
// Create the ProLoader
_imageLoader = new ProLoader();
// Position the ProLoader on the stage
_imageLoader.x = 10;
_imageLoader.y = 10;
// Load the file at the URL stored
_imageLoader.load(imageURL);
// Add the loader to the display stack
addChild(_imageLoader);
}
}
}
Let’s step through this code and look at what is going on. The _loadImage method is where all the action happens, so you’ll focus there.
First, you need a variable that will store the URL of the file that you’ll load. In this case, it is a JPEG file that is being loaded. ActionScript has a specific class that is used to hold URLs, called the URLRequest class.
The ProLoader is constructed and then positioned on the Stage. The ProLoader is like any other display object so you can manipulate its appearance on the Stage (Figure 18.1) like any other image, Sprite, or MovieClip.
Figure 18.1. Loading an image using the ProLoader class
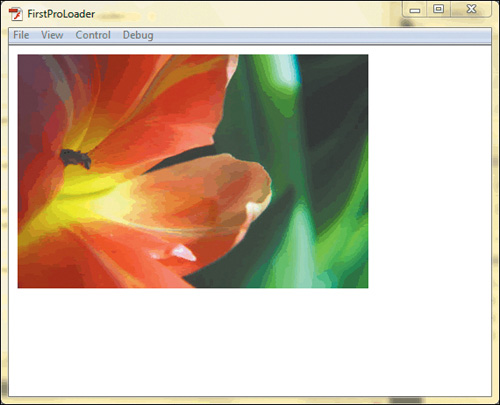
The load method loads the file at the URL location. Finally the ProLoader is added to the display stack.
3. Run the project. You’ll see an image of a flower appear in the project, this is the image at the location of the URL that is part of the URLRequest.
See? Not that hard when you understand all the parts. The ProLoader class is new to Flash Professional CS5.5, and is pretty easy and flexible to use.
Playing Audio from the Web
You’ll undoubtedly want to include audio with your projects at some time. ActionScript offers an easy way to play sound files including MP3 files as a response to user events in your projects.
In this section, you are going to start a new project and create a simple play button that will start the playback of the audio file.
1. Create a new Flash Professional project called PlayAudio and create a matching Document class.
2. Add the following code to your Document class:
package {
import flash.display.MovieClip;
import flash.display.Sprite;
import flash.events.MouseEvent;
public class PlayAudio extends MovieClip {
var playAudioButton:Sprite;
public function PlayAudio() {
playAudioButton = new Sprite();
playAudioButton.graphics.beginFill(0xFF0000);
playAudioButton.graphics.drawRect(0,0,50,50);
playAudioButton.graphics.endFill();
addChild(playAudioButton);
playAudioButton.x = playAudioButton.y = 20;
playAudioButton.addEventListener(MouseEvent.CLICK, controlSound);
}
public function controlSound(e:MouseEvent):void
{
}
}
}
You created a sprite called playAudioButton, drew the button using the drawing API, and then added an event listener for the MouseEvent.CLICK event type.
The process of working with audio is very similar to working with images, with two exceptions. First, you will be working with the Sound class, not the ProLoader class. Like the ProLoader, you need to define the URL of where the audio file is located with an instance of the URLRequest class. Also, you have to explicitly tell the sound to play; it won’t start automatically when you load it.
3. Update the Document class, as highlighted below:
package {
import flash.display.MovieClip;
import flash.display.Sprite;
import flash.events.MouseEvent;
import flash.media.Sound;
import flash.net.URLRequest;
public class PlayAudio extends MovieClip {
var playAudioButton:Sprite;
var soundURL:URLRequest;
var mySound:Sound;
public function PlayAudio() {
playAudioButton = new Sprite();
playAudioButton.graphics.beginFill(0xFF0000);
playAudioButton.graphics.drawRect(0,0,50,50);
playAudioButton.graphics.endFill();
addChild(playAudioButton);
playAudioButton.x = playAudioButton.y = 20;
soundURL = new URLRequest("http://www.helpexamples.com/flash/sound/song3.mp3");
mySound = new Sound(soundURL);
playAudioButton.addEventListener(MouseEvent.CLICK, controlSound);
}
public function controlSound(e:MouseEvent):void
{
mySound.play();
}
}
}
4. Run the project. When you click the button, you’ll hear a groovy little tune play on your speakers.
Playing Video from the Web
There are a few ways you can work with video on the web including progressive, streaming, or embedded. In addition there are a number of controllers you can use to play back video. The flexibility for what and how to play video is one reason why Flash is such a successful way to deliver video on the web.
This section will cover how to work with the FLVPlayback component that is part of Flash Professional CS5.5. The FLVPlayback component is an object that you can include on the Stage or in the Library, populate with a video source, and use the built-in player controls to control the video experience in your project. In addition, you can create your own playback controls using some easy-to-use methods that are part of the FLVPlayback component
You need to add the FLVPlayback component to your project:
1. Create a new Flash Professional CS5.5 project.
2. Open the Components panel from the Window menu (Figure 18.2).
Figure 18.2. The Flash Professional Components panel
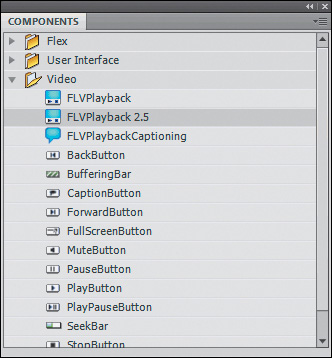
3. Drag the FLVPlayback 2.5 component to the Library.
With the component added to your project, you can configure it to play back video using ActionScript.
The FLVPlayback component has an extensive API to allow you to control how you want to play and display video. Let’s start with pointing the component to a video file on the web.
4. Create a Document class for your project.
5. Update the Document class with the following highlighted code:
package {
import flash.display.MovieClip;
import fl.video.FLVPlayback;
public class PlayFLV extends MovieClip {
var myVideo:FLVPlayback;
public function PlayFLV() {
_setupVideo();
}
private function _setupVideo():void
{
myVideo = new FLVPlayback();
myVideo.x = myVideo.y = 10;
addChild(myVideo);
myVideo.source = "http://www.helpexamples.com/flash/video/water.flv";
}
}
}
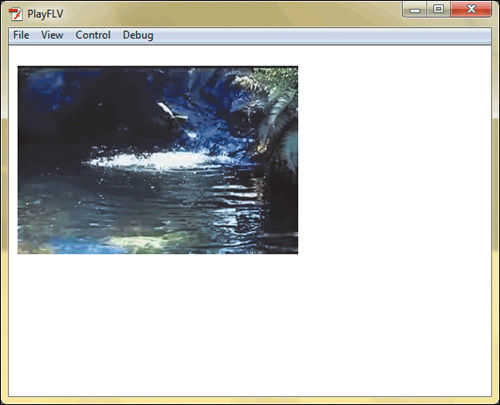
6. Run the project. You’ll see a serene video play in the corner of your project (Figure 18.3).
Figure 18.3. Video playing in the project using the FLVPlayback component
Let’s step through the code to discover how it works.
First, you need to create an instance of the FLVPlayback component that is in the Library. It is linked to the FLVPlayback class that is located in the fl.video class package, imported at the top of the class definition.
Next, you need to position and add the component to the display stack like any other visual object.
At that point, you provide the URL for the video file that will play. The file in this example is an FLV video that is on a web server. You can work with any of the files that are supported by the FLVPlayback component including FLV, F4V, or H.264 encoded video files. You set this location using the source property.
Altering the Playback of Video
When using the FLVPlayback component, you have an API available to control the video. To get started, we need to create a button you can use for the project.
1. Create a new custom class called VideoButton and save it at the same location as your FLA.
2. Update the code in VideoButton as follows:
package {
import flash.display.Sprite;
import flash.text.TextField;
import flash.text.TextFormat;
public class VideoButton extends Sprite {
var buttonLabel:TextField;
var buttonFormat:TextFormat;
public function VideoButton(newLabel:String) {
graphics.beginFill(0xCCCCCC);
graphics.drawRect(0,0,100,20);
graphics.endFill();
buttonLabel = new TextField();
buttonLabel.width = 100;
buttonLabel.height = 20;
buttonLabel.selectable = false;
addChild(buttonLabel);
buttonFormat = new TextFormat();
buttonFormat.font = "Verdana";
buttonLabel.defaultTextFormat = buttonFormat;
setLabel(newLabel);
}
public function setLabel(newLabel:String)
{
buttonLabel.text = newLabel;
}
}
}
You are drawing a background of the button using the drawing API. Then, you are creating a text field, formatting it, populating it from a string passed into the class constructor and assigned using the helper function setLabel.
You now need to update the Document class to use this new shiny button, and then control the playback of the video. Since the video immediately plays when you load it, you need to stop it immediately after you load it.
3. Alter the Document class as follows:
package {
import flash.display.MovieClip;
import fl.video.FLVPlayback;
import flash.events.MouseEvent;
public class PlayFLV extends MovieClip {
var myVideo:FLVPlayback;
var playButton:VideoButton;
public function PlayFLV() {
_setupVideo();
}
private function _setupVideo():void
{
myVideo = new FLVPlayback();
myVideo.autoPlay = false;
myVideo.x = myVideo.y = 10;
addChild(myVideo);
myVideo.source = "http://www.helpexamples.com/flash/video/water.flv";
playButton = new VideoButton("Play");
playButton.x = 400;
playButton.y = 50;
addChild(playButton);
playButton.addEventListener(MouseEvent.CLICK, playVideo);
}
public function playVideo(e:MouseEvent):void
{
myVideo.play();
}
}
}
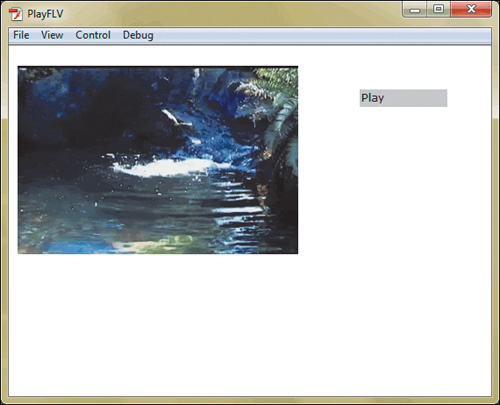
Here, you created a new instance of the VideoButton that you created in step 2, and positioned it on the screen, providing it with the label “Play.” After defining the video source, you immediately stopped the playback with the stop method of the FLVPlayback class.
To play the video when the button is clicked, you added an event listener listening for the MouseEvent.CLICK event type. The callback method for the event, playVideo, then executes the play method of the FLVPlayback class.
4. Run the project. You’ll be able to play the video using the new play button you created (Figure 18.4).
Figure 18.4. Starting a video using the FLVPlayback API
Pausing Video
To add pause functionality to the video, you need to consider if you want the pause to be a toggle button. Typically, while a video is playing, if the user clicks pause, the video stops; if the user clicks pause again, the video continues.
You can do this by creating a conditional that will test if the movie is paused or not using the paused property. In addition, it is helpful to give the user feedback on what the button will do, so using the VideoButton class, you can use the setLabel method to change the button label accordingly.
1. Update the Document class with the following highlighted code:
package {
import flash.display.MovieClip;
import fl.video.FLVPlayback;
import flash.events.MouseEvent;
public class PlayFLV extends MovieClip {
var myVideo:FLVPlayback;
var playButton:VideoButton;
var pauseButton:VideoButton;
public function PlayFLV() {
_setupVideo();
}
private function _setupVideo():void
{
myVideo = new FLVPlayback();
myVideo.autoPlay = false;
myVideo.x = myVideo.y = 10;
addChild(myVideo);
myVideo.source = "http://www.helpexamples.com/flash/video/water.flv";
playButton = new VideoButton("Play");
playButton.x = 400;
playButton.y = 50;
addChild(playButton);
pauseButton = new VideoButton("Pause");
pauseButton.x = 400;
pauseButton.y = 100;
addChild(pauseButton);
playButton.addEventListener(MouseEvent.CLICK, playVideo);
pauseButton.addEventListener(MouseEvent.CLICK, pauseVideo);
}
public function playVideo(e:MouseEvent):void
{
myVideo.play();
}
public function pauseVideo(e:MouseEvent):void
{
if (!myVideo.paused)
{
myVideo.pause();
pauseButton.setLabel("Resume");
} else {
myVideo.play();
pauseButton.setLabel("Pause");
}
}
}
}
2. Run the project.
After creating the pause button, you attached an event listener to the button to listen for the MouseEvent.CLICK event type. The event callback function then asks if the video is paused or not. If it is not paused, the video pauses, and the button updates to say “Resume,” indicating that the user can click it again to resume playback. Alternatively, if the video is paused, the video will then start playing from where it was stopped, and the button label is updated again.
Rewind and Seek
To change the location of the play head of the video, you need to perform what is called seeking. Whether you are rewinding to the beginning, or wish to seek to a specific point, you need to tell the FLVPlayback class where you need to go.
There are two methods that are helpful for seeking video. The first is the seek method, which accepts a parameter asking for the time index of the video you want in seconds. As an example, for rewind, you want to seek to 0 seconds. In some cases, you want to seek to a proportional point in the video, say the middle. For those cases there is the seekPercent method, which accepts a percentage amount from 0 to 100.
1. Update the Document class with the following highlighted code to create two buttons: the first to rewind to the beginning and the second to seek to the middle of the video.
package {
import flash.display.MovieClip;
import fl.video.FLVPlayback;
import flash.events.MouseEvent;
public class PlayFLV extends MovieClip {
var myVideo:FLVPlayback;
var playButton:VideoButton;
var pauseButton:VideoButton;
var rewindButton:VideoButton;
var seekToMiddle:VideoButton;
public function PlayFLV() {
_setupVideo();
}
private function _setupVideo():void
{
myVideo = new FLVPlayback();
myVideo.autoPlay = false;
myVideo.x = myVideo.y = 10;
addChild(myVideo);
myVideo.source = "http://www.helpexamples.com/flash/video/water.flv";
playButton = new VideoButton("Play");
playButton.x = 400;
playButton.y = 50;
addChild(playButton);
pauseButton = new VideoButton("Pause");
pauseButton.x = 400;
pauseButton.y = 100;
addChild(pauseButton);
rewindButton = new VideoButton("Rewind");
rewindButton.x = 400;
rewindButton.y = 150;
addChild(rewindButton);
seekToMiddle = new VideoButton("50%");
seekToMiddle.x = 400;
seekToMiddle.y = 200;
addChild(seekToMiddle);
playButton.addEventListener(MouseEvent.CLICK, playVideo);
pauseButton.addEventListener(MouseEvent.CLICK, pauseVideo);
rewindButton.addEventListener(MouseEvent.CLICK, rewindVideo);
seekToMiddle.addEventListener(MouseEvent.CLICK, seekVideo);
}
public function playVideo(e:MouseEvent):void
{
myVideo.play();
}
public function pauseVideo(e:MouseEvent):void
{
if (!myVideo.paused)
{
myVideo.pause();
pauseButton.setLabel("Resume");
} else {
myVideo.play();
pauseButton.setLabel("Pause");
}
}
public function rewindVideo(e:MouseEvent):void
{
myVideo.seek(0);
}
public function seekVideo(e:MouseEvent):void
{
myVideo.seekPercent(50);
}
}
}
These two new buttons and the event callback functions they trigger use the seek and seekPercent methods to control the location of the play head.
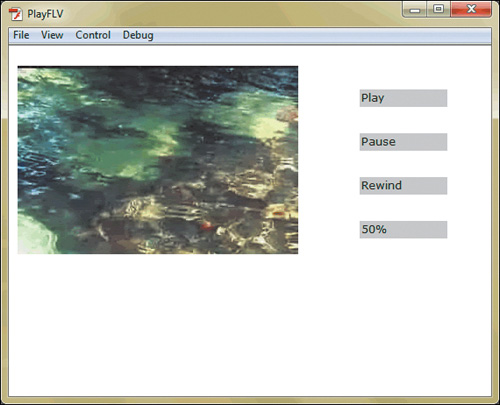
2. Run the project. Notice that seek will continue playback if the video was already playing (Figure 18.5).
Figure 18.5. Rewind and seek buttons added to the project
Good job! As you can see, the FLVPlayback component offers a lot of capabilities for you to play back and control video. The example here is using a simple FLV file that is stored on a server. Flash video has the ability to stream from a server to optimize the playback experience if you have heavy video requirements in your project. For more information on streaming video vendors, Adobe provides a list of partners: www.adobe.com/products/flashmediaserver/fvss/.
Wrapping Up
In this chapter, you learned how to work with external web media in your projects with ActionScript. Through the use of a few new methods and classes, you can add references to external assets that are downloaded from the web in your project.
Here are some helpful tips for working with external media using ActionScript:
• When working with external images or SWFs, use the ProLoader class to access them and display them in your project.
• Audio loaded from an external location uses the Sound class, and requires your project to explicitly play the content using the play method.
• The FLVPlayback component is the easiest way to work with external video in your project.
• To use the FLVPlayback component, remember to add it to your Library before attempting to work with it.
• When working with functions that toggle, like pausing a video, it is recommended to provide your user with indications about what the user controls will do.