
14. Working with Text and the Keyboard
Working with text and working with the keyboard are skills that all Flash programmers need in their virtual tool belts. In this chapter, you’ll learn how to use ActionScript to work with text fields, format them, and then respond to events from the keyboard. Working with text and the keyboard requires a high level of precision and accuracy. To help decipher all of this, you will use an interactive quiz to display ActionScript-based text and control the selection of answers through the keyboard.
Working with Text Fields
Before you learn how to work with keyboard events, let’s cover the basics of working with text fields with ActionScript. The example for using the keyboard will be with a simple quiz where you’ll ask a question and the user must press the button on the keyboard that corresponds to the answer. The text that displays in the quiz will be created entirely with ActionScript, without placing any text fields visually on the Stage in Flash Professional CS5.5.
You could create dynamic text fields in the FLA file, but let’s cover how to create these in ActionScript. Text fields are just like other objects in Flash—you create them using the var and new statements. In this example, there is an FLA file that uses a Document class called TextFields.
1. Create a Flash Professional project and a matching Document class named TextFields. Update the code in the class using the following code:
package {
import flash.display.MovieClip;
public class TextFields extends MovieClip {
public function TextFields():void {
}
}
}
Now you want to create a text field that will contain the question you are going to ask the user in the quiz. You need to define the variable at the top that will contain the text field, and then add in the code to create the text field and update the text attribute.
2. Add the following highlighted code:
package {
import flash.display.MovieClip;
import flash.text.TextField;
public class TextFields extends MovieClip {
public var question:TextField;
public function TextFields():void {
_init();
}
private function _init():void {
question = new TextField();
question.x = 50;
question.y = 50;
question.width = 450;
question.height = 100;
question.text = "Which of these is the equality statement?";
addChild(question);
}
}
}
Let’s review the code to see how it works.
First, you include the TextField class that is part of the flash.text package by inserting the import statement at the top of the class definition.
Next, you create an instance of the TextField class called question using the var statement. Notice that you are not creating an instance of it here, you do that later on in the init method.
In the _init method, a new TextField class instance is created, and some of the TextField instance properties are then modified. You set its location, its width and height, and then set the text contents with the text attribute.
Finally, you add the question TextField instance to the display stack.
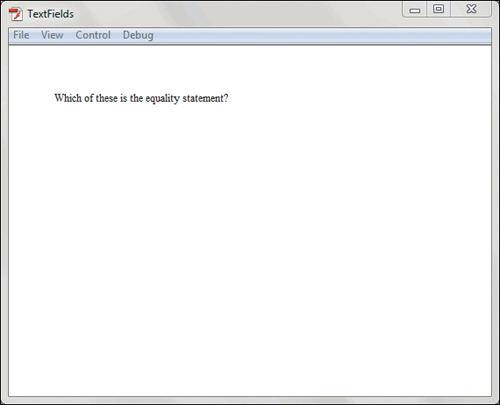
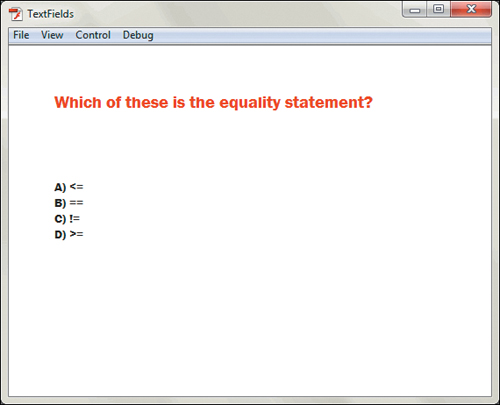
3. Run the project. You’ll get a line of text that contains the quiz question (Figure 14.1).
Figure 14.1. Creating your first text field using ActionScript
Unfortunately, the default text style isn’t very interesting. In the next section, you’ll learn how to create a text style and apply it to the text field.
Customizing the Text Style
The Flash Player built-in default font is similar to the Times New Roman. Unfortunately, it isn’t very appealing. To make this project more interesting, you should give the quiz question a unique font, color, and size. You can do that using the TextFormat class.
The TextFormat class contains several properties that allow you to define the format of text. You can then apply that formatting to a text field, and all the text that appears from that point will use the format.
1. Update the package code with the following highlighted code:
package {
import flash.display.MovieClip;
import flash.text.TextField;
import flash.text.TextFormat;
public class TextFields extends MovieClip {
public var question:TextField;
public var format:TextFormat;
public function TextFields():void {
_init();
}
private function _init():void {
question = new TextField();
question.x = 50;
question.y = 50;
question.width = 450;
question.height = 100;
format = new TextFormat();
format.font = "Verdana";
format.color = 0xFF0000;
format.size = 14;
question.defaultTextFormat = format;
question.text = "Which of these is the equality statement?";
addChild(question);
}
}
}
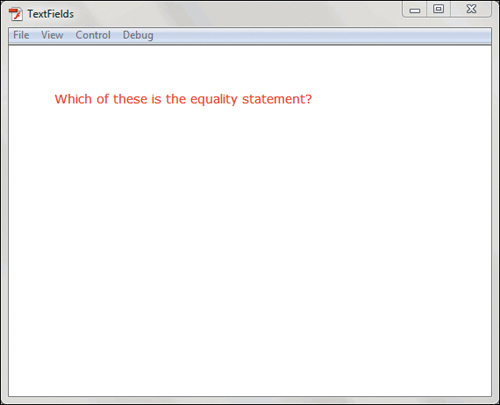
2. Run the project. You’ll have the new font style applied (Figure 14.2).
Figure 14.2. Displaying the new font style
The TextFormat class needs to be included in the opening import statements in the class definition and the variable needs to be defined as well.
When you create the instance of the TextFormat class, you can access the properties. In this example, you are accessing the font, color, and size properties of the format instance of the TextFormat class.
Then you add the format to the defaultTextFormat property of the question instance of the TextField class. When you add the text to it and then add the text field to the display stack, you see that the text is now using the Verdana font, that it is red, and that it is larger than before.
Notice that colors are defined using hexadecimal numbers. In ActionScript, you begin a hexadecimal number with the characters 0x, followed by the six-character value of the color. These are the same hexadecimal values used in HTML and CSS. So for a CSS formatted color of #00FF00, you would use 0x00FF00.
If you applied the text format after you added the text, the format won’t look different. That is because you need to apply the format before you add the text to the field, otherwise you’ll use the original format.
Making Changes to Style Later on
In the last example, you set the default text format with the defaultTextFormat property and then added the string to the text property. Often there are situations when you need to adjust the style of the text field after it has been created.
You can’t just change the text format property settings; you need to create a new text format, or update the old one, and reapply it to the text field. To reapply the format, use the setTextFormat method that is part of the TextField class. The setTextFormat method applies the format to the entire field, or you can add two optional parameters that define the start and end character that should have the format. So if you want to apply the text to only the second word of your string, you can count the number of characters and set the first and last character as the range that will accept the text format. Remember that the first character is 0, not 1, just like the elements of an array.
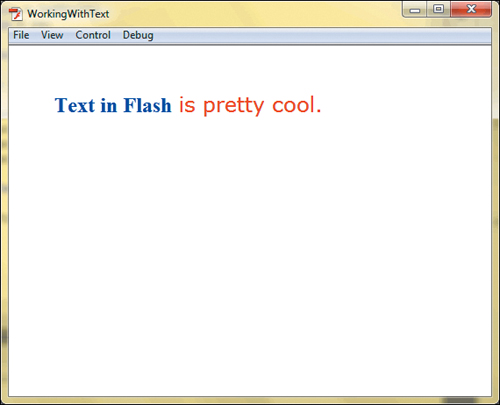
The following code is a example snippet that uses the setTextFormat method to update an existing text field with an alternative text format. Note the highlighted lines of code that changes the text using the different format:
myTextField = new TextField();
...
myTextFormat = new TextFormat();
myTextFormat.font = "Verdana";
myTextFormat.color = 0xFF0000;
myTextFormat.size = 24;
myTextField.defaultTextFormat = myTextFormat;
myTextField.text = "Text in Flash is pretty cool.";
myAlternateFormat = new TextFormat();
myAlternateFormat.font = "Times New Roman";
myAlternateFormat.color = 0x0000FF;
myAlternateFormat.bold = true;
myTextField.setTextFormat(myAlternateFormat,-1,13);
This code produces the output shown in Figure 14.3.
Figure 14.3. Using the setTextFormat method to update text format on an existing text field
Creating Your Own ActionScript Fonts
You’ll find that if you attempt to run the previous examples on a computer that doesn’t have the Verdana font, the program won’t work correctly. This is because the font is not embedded in the application. To remedy this situation, you need to embed the font in the SWF so it is available to use on any system that renders it, regardless of whether it has the font.
There are a few extra steps required to embed a font, and they start with going back to the FLA file. Back in the FLA file, you need to create a new Font object in the Library, using a dialog box like the one shown in Figure 14.4.
Figure 14.4. The Font Embedding dialog box in Flash Professional CS5.5
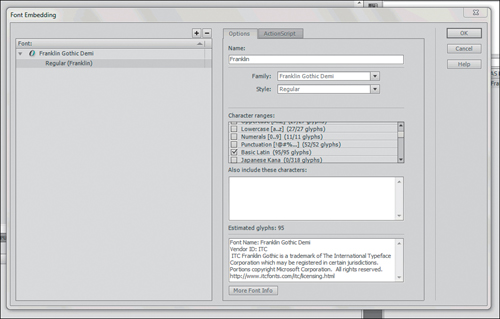
Here is the step by step on how to embed a single font:
1. Right-click in the Library panel and select New Font.
2. Give your font a name in the Name field.
3. Select a font family.
4. Select a font style (each embedded font can be of a specific family and style).
5. Select the character range you want to embed.
The character range is a good place to provide some more explanation. When you embed the font, you are taking the characters, or glyphs, of the font and embedding them in the SWF for use later on. Fonts can contain hundreds or even thousands of glyphs, so if you know that you won’t need some, it is best to limit the range of glyphs you are embedding to keep your file size small. Typically, for English or Roman-based language projects, selecting the Basic Latin character range is sufficient. If you are working in other languages (for instance, Russian) you may need to embed additional characters.
6. Open the ActionScript tab (Figure 14.5).
Figure 14.5. The ActionScript tab in the Font Embedding dialog box
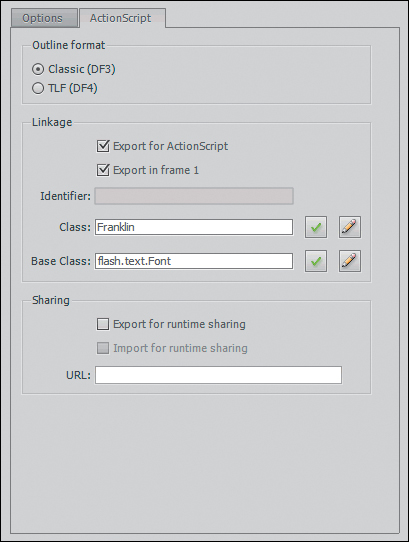
7. Select Classic as the outline format.
8. Select the Export for ActionScript check box (the Class field should fill automatically).
9. Click OK.
If you look at the Library panel, you’ll now see a new item for the embedded font (Figure 14.6).
Figure 14.6. An embedded font displayed in the Library panel
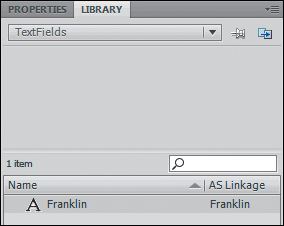
With the font embedded in the project, you can use it in ActionScript. You first need to import the flash.text.Font class to use this new Library object. For good measure, you should import the Franklin class you created in the font embedding process shown in Figure 14.5 and 14.6. Next, you need to create an instance of the embedded font in your ActionScript. Finally, you replace the fontName property with the new custom Franklin font that was created earlier.
10. Update the project with the following highlighted code. Here is what the project should look like when you use the embedded font:
package {
import flash.display.MovieClip;
import flash.text.TextField;
import flash.text.TextFormat;
import Franklin;
import flash.text.Font;
public class TextFields extends MovieClip {
public var question:TextField;
public var format:TextFormat;
public var questionFont:Font;
public function TextFields():void {
_init();
}
private function _init():void {
question = new TextField();
question.x = 50;
question.y = 50;
question.width = 450;
question.height = 100;
questionFont = new Franklin();
format = new TextFormat();
format.font = questionFont.fontName;
format.color = 0xFF0000;
format.size = 20;
question.defaultTextFormat = format;
question.text = "Which of these is the equality statement?";
addChild(question);
}
}
}
11. Run the project. You’ll see that the font changed to reflect the new embedded Franklin font (Figure 14.7).
Figure 14.7. Displaying the embedded font

Creating the Quiz Layout
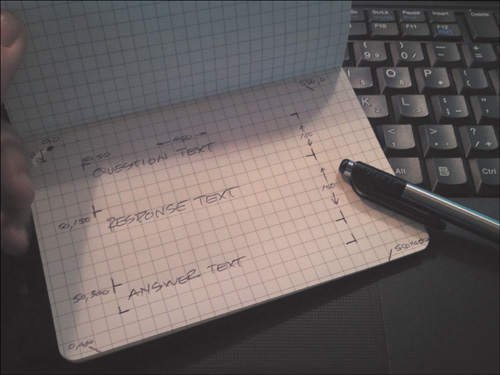
Now that you know the basics of creating text fields, you can start creating the layout of the quiz example. The quiz is going to have three major text areas: the question, the responses, and the response that will display information to prompt the user to answer the question and report back whether the answer was correct.
Let’s do this one stage at a time. You already created the question part as you were learning about text fields. You’ll add the responses next. For simplicity, you’ll use the same font as the question field, but adjust the color. You’ll also clean up some variable names to avoid confusion.
1. Update the package code with the following highlighted text:
package {
import flash.display.MovieClip;
import flash.text.TextField;
import flash.text.TextFormat;
import Franklin;
import flash.text.Font;
public class TextFields extends MovieClip {
public var question:TextField;
public var responses:TextField;
public var questionFormat:TextFormat;
public var responsesFormat:TextFormat;
public var quizFont:Font;
public function TextFields():void {
_init();
}
private function _init():void {
// Format and display the quiz question
question = new TextField();
question.x = 50;
question.y = 50;
question.width = 450;
question.height = 100;
quizFont = new Franklin();
questionFormat = new TextFormat();
questionFormat.font = quizFont.fontName;
questionFormat.color = 0xFF0000;
questionFormat.size = 20;
question.defaultTextFormat = questionFormat;
question.text = "Which of these is the equality statement?";
// Format and display the responses to the question
responses = new TextField();
responses.x = 50;
responses.y = 150;
responses.width = 450;
responses.height = 150;
responsesFormat = new TextFormat();
responsesFormat.font = quizFont.fontName;
responsesFormat.color = 0x000000;
responsesFormat.size = 14;
responses.defaultTextFormat = responsesFormat;
responses.text = "Question responses go here";
// Add text fields to the display stack
addChild(question);
addChild(responses);
}
}
}
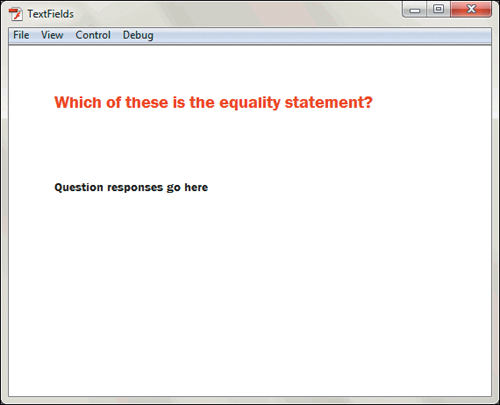
2. Run the project. You’ll see the response text field displayed below the question text and in a different size and color (Figure 14.8).
Figure 14.8. Updated quiz output with the responses added
Working with Escape Sequences
Right now, the quiz example has only one line of text for responses. You are going to want four lines, each showing a possible answer to the multiple choice question. The problem is, how do you show multiple lines of text in a string sequence?
The answer is with escape sequences. Escape sequences are special two to four character combinations that are interpreted by ActionScript as directives on how to render the entire string. The most common is the new line character, or
.
Here are the responses for the question and how you want to show them:
A) <=
B) ==
C) !=
D) >=
The new line character is placed where you want to show a line return. It is placed inside your string, and ActionScript will use it to show the line return, but not display the sequence as characters in your string.
Here are the responses with the new line escape sequence:
A) <=
B) ==
C) !=
D) >=
Now that the escape codes in the right places the line returns are not necessary. Here is what the string should look like:
A) <= B) == C) != D) >=
Looks like gibberish, doesn’t it? That is why it is best to lay it out the way you want it first and then make the adjustments you need. Let’s return to the project and make some adjustments.
1. Update the response placeholder with the following highlighted code:
responses.text = "A) <= B) == C) != D) >=";
2. Run the project. You’ll see that the escape sequences are replaced with new line returns (Figure 14.10).
Figure 14.10. Displaying text using escape sequences
There is one final step: Create the text field for the answer. This text field will give the user instructions on what to do when the question first displays, then indicate if the user was right or wrong.
You need to create a new text field and display the text, all things you have done before.
3. Update the package with the following highlighted code:
package {
import flash.display.MovieClip;
import flash.text.TextField;
import flash.text.TextFormat;
import Franklin;
import flash.text.Font;
public class TextFields extends MovieClip {
public var question:TextField;
public var responses:TextField;
public var answer:TextField;
public var questionFormat:TextFormat;
public var responsesFormat:TextFormat;
public var answerFormat:TextFormat;
public var quizFont:Font;
public function TextFields():void {
_init();
}
private function _init():void {
// Format and display the quiz question
question = new TextField();
question.x = 50;
question.y = 50;
question.width = 450;
question.height = 100;
quizFont = new Franklin();
questionFormat = new TextFormat();
questionFormat.font = quizFont.fontName;
questionFormat.color = 0xFF0000;
questionFormat.size = 20;
question.defaultTextFormat = questionFormat;
question.text = "Which of these is the equality statement?";
// Format and display the responses to the question
responses = new TextField();
responses.x = 50;
responses.y = 150;
responses.width = 450;
responses.height = 150;
responsesFormat = new TextFormat();
responsesFormat.font = quizFont.fontName;
responsesFormat.color = 0x000000;
responsesFormat.size = 14;
responses.defaultTextFormat = responsesFormat;
responses.text = "A) <=
B) ==
C) !=
D) >=";
// Format and display the instructions/answer response
answer = new TextField();
answer.x = 50;
answer.y = 300;
answer.width = 450;
answer.height = 150;
answerFormat = new TextFormat();
answerFormat.font = quizFont.fontName;
answerFormat.color = 0x0000FF;
answerFormat.size = 14;
answer.defaultTextFormat = answerFormat;
answer.text = "Press the letter next to the correct answer.";
// Add text fields to the display stack
addChild(question);
addChild(responses);
addChild(answer);
}
}
}
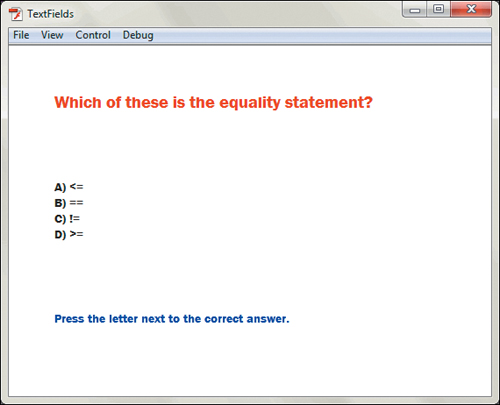
4. Run the project. You’ll see the final layout (Figure 14.11).
Figure 14.11. The final quiz layout
You are all finished with the layout! In the next section you’ll learn how to connect this to the keyboard so the user can answer the question and receive a response.
Creating the KeyboardEvent Handler
The KeyboardEvent handler is like any other event—you need to create a listener and then a callback function that is triggered when the listener hears a specific type of event. To allow the user to use the keyboard to answer the quiz question, you need to use the KeyboardEvent to capture when the user presses a key on the keyboard.
To work with the keyboard event, you need to import the KeyboardEvent class, which is part of the flash.events package. Next, you need to add an event listener for the event. Since you don’t have any objects that are necessarily linked to the event, you can attach the event listener to the Stage itself using the keyword stage. In the event listener, you want to listen for the event type. The KeyboardEvent class has a number of events. The two that are most common are KEY_DOWN and KEY_UP. The first, KEY_DOWN, is fired when the key is pressed down. The second, KEY_UP, is fired with the key is pressed and released. This example will use the KEY_DOWN event, since it is typically the behavior that you find in most programs. Finally, as with all other events, you need a callback function to run when the event occurs.
Update the code, as highlighted below, adding the KeyboardEvent event listener:
package {
import flash.display.MovieClip;
import flash.text.TextField;
import flash.text.TextFormat;
import Franklin;
import flash.text.Font;
import flash.events.KeyboardEvent;
public class TextFields extends MovieClip {
public var question:TextField;
public var responses:TextField;
public var answer:TextField;
public var questionFormat:TextFormat;
public var responsesFormat:TextFormat;
public var answerFormat:TextFormat;
public var quizFont:Font;
public function TextFields():void {
_init();
}
private function _init():void {
// Format and display the quiz question
question = new TextField();
question.x = 50;
question.y = 50;
question.width = 450;
question.height = 100;
quizFont = new Franklin();
questionFormat = new TextFormat();
questionFormat.font = quizFont.fontName;
questionFormat.color = 0xFF0000;
questionFormat.size = 20;
question.defaultTextFormat = questionFormat;
question.text = "Which of these is the equality statement?";
// Format and display the responses to the question
responses = new TextField();
responses.x = 50;
responses.y = 150;
responses.width = 450;
responses.height = 150;
responsesFormat = new TextFormat();
responsesFormat.font = quizFont.fontName;
responsesFormat.color = 0x000000;
responsesFormat.size = 14;
responses.defaultTextFormat = responsesFormat;
responses.text = "A) <=
B) ==
C) !=
D) >=";
// Format and display the instructions/answer response
answer = new TextField();
answer.x = 50;
answer.y = 300;
answer.width = 450;
answer.height = 150;
answerFormat = new TextFormat();
answerFormat.font = quizFont.fontName;
answerFormat.color = 0x0000FF;
answerFormat.size = 14;
answer.defaultTextFormat = answerFormat;
answer.text = "Press the letter next to the correct answer.";
// Add text fields to the display stack
addChild(question);
addChild(responses);
addChild(answer);
// Add keyboard event listener
stage.addEventListener (KeyboardEvent.KEY_DOWN,_checkAnswer);
}
private function _checkAnswer(e:KeyboardEvent):void {
if (e.keyCode == 65) {
answer.text = "You're wrong! Try again...";
} else if (e.keyCode == 66) {
answer.text = "You're right! Congratulations";
} else if (e.keyCode == 67) {
answer.text = "You're wrong! Try again...";
} else if (e.keyCode == 68) {
answer.text = "You're wrong! Try again...";
}
}
}
}
As mentioned earlier, you are attaching the listener to the Stage object. You need to attach to the Stage to give focus to the event listener from the beginning. If you don’t, the listener won’t work until you click once within the movie.
In the event listener, you are listening for the KEY_DOWN event. You want to trigger the callback function when the key has been pressed down. Again, when you typically use a keyboard, the key press is recognized when you press it down, not when you release it.
In the callback function, you have a series of if and else if statements that are testing a KeyboardEvent property that is passed into the function from the event listener.
In this example, you are using the event object, e, and you’ll need to access it to determine which key was pressed as part of the event. In a simple keyboard event, only one key is pressed, so the event object has a property called keyCode that is a series of numbers that map to the keys on the keyboard.
For the quiz, you are concerned about the A, B, C, and D keys, since they are matching the responses for the quiz. These are mapped to the key codes 65, 66, 67, and 68 respectively.
Every key on a keyboard has a special number associated with it in ActionScript. These are called key codes. You can find the numeric code for each key in the ActionScript 3.0 reference guide on Adobe’s website:
http://help.adobe.com/en_US/AS3LCR/Flash_10.0/?flash/ui/Keyboard.html
When you have a key that matches, you send a congratulations response. If it doesn’t match, you tell the user to try again.
Differences between Code Types: Key Codes versus Character Codes
There are two types of codes that are part of the KeyboardEvent object. The first is called the key code, which represents the specific key pressed by the user. The other is the character code, which is linked to the character created by the user with the keyboard.
You might wonder what the difference is. Let’s look at an example to demonstrate this. This is the Document class for a new FLA file:
package {
import flash.display.MovieClip;
import flash.events.KeyboardEvent;
public class KeyAndCharCodes extends MovieClip {
public function KeyAndCharCodes():void {
_init();
}
private function _init():void {
stage.addEventListener (KeyboardEvent.KEY_DOWN,_getCodes);
}
private function _getCodes(e:KeyboardEvent):void {
trace ("The key code is " + e.keyCode + " and the character code is " + e.charCode + " for the character " + String.fromCharCode(e.charCode));
}
}
}
The _getCodes method displays a line to the Output panel with the KeyboardEvent key code and character code, and shows how you can convert a character code to the actual letter it represents using the fromCharCode method of the String class.
When you run this, you can get something similar to the following:
The key code is 65 and the character code is 97 for the character a
The key code is 16 and the character code is 0 for the character
The key code is 65 and the character code is 65 for the character A
When the A button is pressed, it is represented by the key code 65 as the physical button. The character code, however, is linked to the generated character. In this case it is the lowercase a, which has a character code of 97.
The second line is when the Shift key is pressed, which has a key code of 16 but a character code of 0, because it doesn’t create a character. When the A button is pressed with the Shift key, you get another key code of 65, but now, you are creating a capital A, which has a character code of 65.
When you build keyboard interfaces, you need to map to the key code since the character code can vary. If you build the quiz using the character code it wouldn’t work if the user had caps lock on. Unless you specifically need to capture unique characters (like punctuation, for example) stick with key codes in your keyboard events.
Recognizing Special Keys
There are some special keys that you can access through shortcuts with the KeyboardEvent and Keyboard classes for buttons. The most common examples are the keyboard arrow keys. Using the Keyboard class, you can access these shortcuts using the keywords RIGHT, LEFT, UP, or DOWN as properties of the Keyboard class.
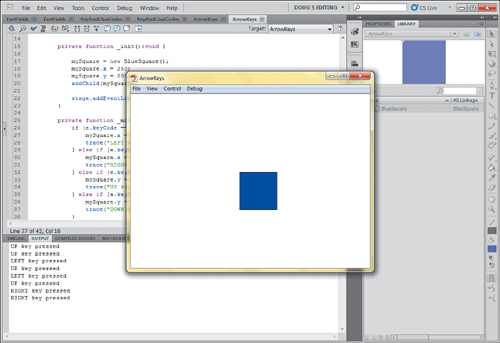
The following example is a project that contains a library object exported as a class called BlueSquare. The following defines the Document class for the project:
package {
import flash.display.MovieClip;
import flash.events.KeyboardEvent;
import flash.ui.Keyboard;
public class ArrowKeys extends MovieClip {
var mySquare:BlueSquare;
public function ArrowKeys():void {
_init();
}
private function _init():void {
mySquare = new BlueSquare();
mySquare.x = 250;
mySquare.y = 200;
addChild(mySquare);
stage.addEventListener (KeyboardEvent.KEY_DOWN, _moveCircle);
}
private function _moveCircle(e:KeyboardEvent):void {
if (e.keyCode == Keyboard.LEFT) {
mySquare.x = mySquare.x - 5;
trace("LEFT key pressed");
} else if (e.keyCode == Keyboard.RIGHT) {
mySquare.x = mySquare.x + 5;
trace("RIGHT key pressed");
} else if (e.keyCode == Keyboard.UP) {
mySquare.y = mySquare.y - 5;
trace("UP key pressed");
} else if (e.keyCode == Keyboard.DOWN) {
mySquare.y = mySquare.y + 5;
trace("DOWN key pressed");
}
}
}
}
When this project runs, you’ll get something similar to Figure 14.12.
Figure 14.12. Using keyboard arrow keys in your project
Using the Keyboard class, you can access the keys for the arrow keys with the phrases LEFT, RIGHT, UP, and DOWN without needing to remember the key codes. These phrases are called constants and in fact contain the key code values, so when you test conditions, it is testing the KeyboardEvent key code against the stored key code in the constant.
Wrapping Up
In this chapter, you learned a lot about working with text, text formatting, and embedded fonts, and then learned how to work with the keyboard to create interactivity using keyboard keys.
Working with text in ActionScript gives you a lot of control over exactly how you want text to look and appear, but it can add complexity to working with the layout. It is important to consider your layout ahead of time, and sketching out a wireframe is a great way to plan ahead before you code.
Keyboard controls create an additional layer of interactive capabilities to your application, including controls for keyboard arrow keys.
Here are some tips to help you work with text and the keyboard in your project:
• Include the flash.text.TextField and flash.text.TextFormat classes using the import statement when working with text.
• Text fields have two parts: the text field itself and the text format. Define both and set the defaultTextFormat property before adding text to the text field.
• To make changes to text format and style after the text field is created, use the setTextFormat method of the TextField class.
• To embed fonts, add fonts to the Library and export for ActionScript. Create a new instance of the font in your ActionScript and use the fontName property to use the embedded font in your text format.
• Remember to include only the glyphs or characters you need when embedding fonts to keep your file size low.
• Sketch your layout on paper before creating code to save time refactoring later on.
• Use escape sequences like
to create new line returns in text strings.
• When listening for keyboard events, determine if you want to use KEY_DOWN or KEY_UP as the event type.
• Remember the difference between key codes and character codes. Key codes are for the physical key, character codes are for the glyphs that are shown on the screen as the result of pressing a key (or combination of keys).
• Use shortcuts with the Keyboard class for special keys like the keyboard arrow keys.