
8. What is a Class?
As your projects become more complex, having all your code in a frame script will become cumbersome and difficult to maintain. You need a way to structure your code and link code to the objects themselves. You need classes. The term for using classes to structure your code is object-oriented programming.
ActionScript allows you to define the classes, or building blocks, of applications, and give them specific actions and functionality. Let’s start by exploring how classes work and dive deeper into the topic of variables. From there we’ll discuss how classes are created and how to add functionality to them using methods. Finally, you’ll learn how to formalize your class structures, making them easier to use and debug.
Overview of a Class
Earlier, you saw objects that are in the Library as “stacks of sticky notes.” For objects that you place into the Library, you can create multiple instances on the Stage either in the Flash application, or as you have learned, through ActionScript by giving them a name that the object links to.
These objects in the Library are MovieClips, graphics, or buttons; but they contain no functionality themselves. They are simply graphics. All the functionality and behaviors you apply to an object are coded outside of it in a frame script. Imagine if you could keep all that functional code linked directly with the object itself. That is what a class is.
If you remember, when you created objects and placed them in the Library, you needed to open the Advanced mode of the panel to define a class name to give ActionScript the ability to place the item on the Stage at runtime. Behind the scenes, Flash created an empty ActionScript class file for the object in the Library. What you are going to do is create that file yourself, and add interactivity and behaviors to the object, so all instances of the object will behave in the same way.
Over the course of this review of classes, you’ll incrementally learn more things that you can do to classes and add more sophisticated ActionScript over time.
Variables Revealed
One item that you learned about briefly was the var statement. The var statement allows you to create a named object that can contain various values like numbers or strings. It is also how you create instances of classes; in fact, when you create numbers and strings with the var statement, you are creating instances of the Number and String classes.
Let’s look at this example:
var myNumber:Number = 5;
In this example, you are creating a named object called myNumber that will contain the numeric value of 5. This line is a bit of a shortcut; if you rewrote this using the full code, it would look like this:
var myNumber:Number = new Number(5);
This format is a little more verbose, and shows more of what is actually happening. The var statement is creating a named object called myNumber, and this object will be an instance of a certain type, or class. In this case, the Number class. You then use the assignment operator to set the value of this named object to a new instance of the Number class, which you define with the value of 5.
This may be a bit confusing because you may be thinking, why would a number be a class? Well, everything in Flash is a class of some kind, even the simplest of objects, like a number or a string.
Let’s review another example you used previously:
var circle_1:BlueCircle = new BlueCircle();
In this example, you use the var statement to create a new named object called circle_1. You state that this object will be an instance of the BlueCircle class. Then, using the assignment operator, you create a new instance of the BlueCircle class and assign it to the named object circle_1.
If you return to the “stack of sticky notes” example, the BlueCircle class is a stack of these notes, each one looking exactly the same. The new statement is the act of peeling a note off of the stack, and the assignment is linking this new class instance to a name you can refer to later on.
The previous example with the Number class is the same; it is just that the sticky notes aren’t graphics, but rather containers that can accept numbers.
So whenever you use the var statement, you aren’t creating just a variable, but also a named container that can contain instances of various classes.
Creating a Class
OK, enough talk, let’s get down to some code and demonstrate how this works. First, start with a basic button graphic and Library item definition before you move forward (Figure 8.1).
Figure 8.1. Contents of the Red Button MovieClip
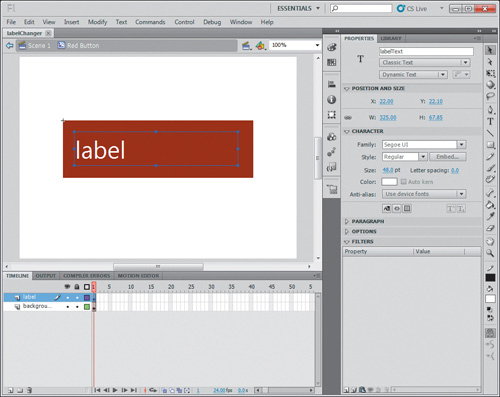
In a new Flash ActionScript 3.0 project, I have created a MovieClip symbol that contains two layers. The bottom layer, named “background,” contains a red rectangle. The top layer, named “label,” contains a dynamic text field with the instance name labelText. Make sure it is Dynamic Text. Static text fields cannot be changed with ActionScript, which you’ll want to do later to give the button a custom label name. As a placeholder, the text field contains the word “label.”
You haven’t worked with text much in Flash Professional, so here are a few hints to get you initially through this. When working with text and dynamic content using ActionScript, you’ll need to create ActionScript fonts that are linked to embedded fonts from your system. This process will be covered in detail in a future chapter. However, for now, the best way to ensure that you are working with fonts correctly when interacting with ActionScript is to set the anti-alias setting to “Use device fonts” as shown in Figure 8.1.
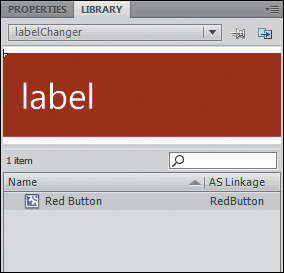
In the Library panel the symbol is named Red Button, and in the Symbol Properties window the object has been exported for ActionScript with the class name RedButton filled in (Figure 8.2).
Figure 8.2. Symbol Properties window for Red Button
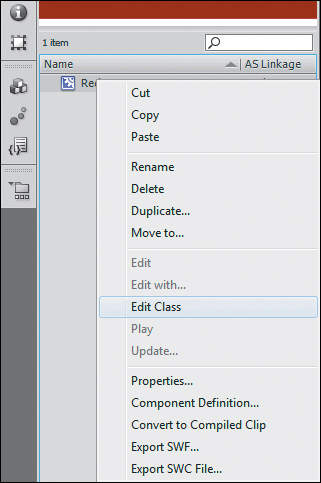
In the previous examples, you would end here, but in this case you want to customize the class. In Flash, classes are created by creating a separate file called an ActionScript file. To create this file, right-click the Red Button object in the Library and select Edit Class (Figure 8.3).
Figure 8.3. Editing a new class for a Library object
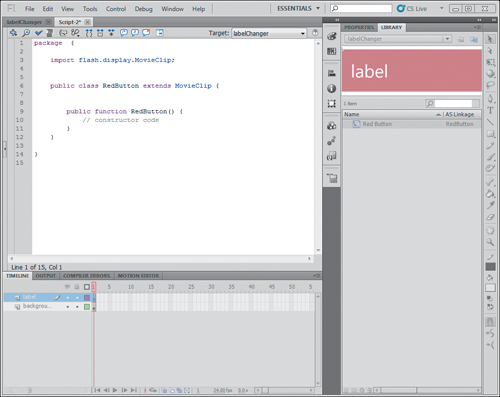
When you work with an ActionScript file, you are working exclusively in code, so panels such as the Library, Timeline, and Properties aren’t needed. You’ll also notice that the Actions panel is disabled, and instead the code takes the place that the Stage usually occupies (Figure 8.4).
Figure 8.4. Creating your first ActionScript class
Because of the different setup, you can create a workspace that is designed for ActionScript development when working with an ActionScript file (Figure 8.5).
Figure 8.5. Custom coding workspace
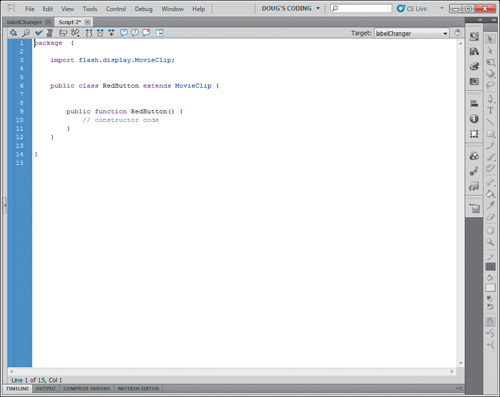
You’ll see the following has been created in this new, untitled ActionScript file:
package {
import flash.display.MovieClip;
public class RedButton extends MovieClip {
public function RedButton() {
// constructor code
}
}
}
You’ll learn what this code means in the next section, but for now, you want to make sure that you can link this custom ActionScript class to the object in the Library.
In order to save this and have it link with the Red Button object in the Library, you need to save this as a class. To do that, save the file in the same place as the Flash FLA file created earlier and name it exactly as it is listed in the Class field in the Linkage section of the Symbol Properties window. As a reminder, it is listed as RedButton, so save this as RedButton.as.
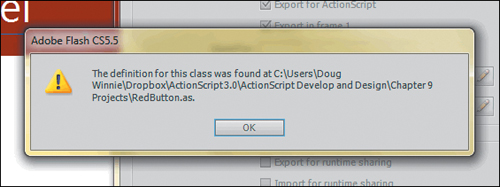
With the file saved, go back to the Flash FLA file and open the symbol properties for the Red Button object in the Library. When you click the check mark next to the class name in the window, you’ll see that it is able to find the file (Figure 8.6). If you click the edit button next to it, Flash will open the class file.
Figure 8.6. Finding the class definition
The class file has been created and linked successfully to the object in the Library. In the next chapter, you’ll dive into the ActionScript and make sense of the code that you put in the ActionScript file.
Wrapping Up
In this chapter, you took the first steps to learning how to create ActionScript classes to give each of the Library objects unique behaviors that are attached to each instance. Here are some tips to remember as you continue learning about classes in ActionScript:
• Each time you use the new statement, you are creating a named container that will contain data that maps to a class. This can be a number, a string, or a new instance of an object in your project’s Library.
• You can start to define behaviors that are associated with the class, and therefore all instances of the class, by right-clicking the object in the Library and selecting Edit Class.
• When creating a new ActionScript class using Edit Class, Flash Professional CS5.5 will create some ActionScript to get you started.
• When you save your class, remember to name it exactly as the Linkage class name reads in the Library panel. Flash Professional will name your class automatically for you when you attempt to save it.
• Although you’ll learn more about where to organize and save classes in the future, for now, remember to save your ActionScript class .as file in the same location as your project’s FLA file.
• To check if Flash Professional can find your class, open the symbol properties and click the check mark button next to the class name. Flash Professional will say if it can find the file.