
2. Documents and Data Sharing
Under iOS, applications can share information and data as well as move control from one application to another using a variety of system features. Each application has access to a common system pasteboard that enables copying and pasting across apps. Users can transfer documents from one app to another app that supports that format. They can request a number of system-supplied “actions” to apply to a document, such as printing, tweeting, or posting to a Facebook wall. Apps can declare custom URL schemes that can be embedded in text and web pages. This chapter introduces the ways you can integrate documents and data sharing between applications. You see how to add these features into your applications and use them smartly to make your app a cooperative citizen of the iOS ecosystem.
Recipe: Working with Uniform Type Identifiers
Uniform Type Identifiers (UTIs) represent a central component of iOS information sharing. You can think of them as the next generation of MIME types. UTIs are strings that identify resource types such as images and text. UTIs specify what kind of information is being used for common data objects. They do this without relying on older indicators, such as file extensions, MIME types, or file-type metadata such as OSTypes. UTIs replace these items with a newer and more flexible technology.
UTIs use a reverse-domain-style naming convention. Common Apple-derived identifiers look like this: public.html and public.jpeg. These refer, respectively, to HTML source text and JPEG images, which are both specialized types of file information.
Inheritance plays an important role with UTIs. UTIs use an OO-like system of inheritance, where child UTIs have an “is-a” relationship to parents. Children inherit all attributes of their parents but add further specificity of the kind of data they represent. That’s because each UTI can assume a more general or more specific role, as needed. Take the JPEG UTI, for example. A JPEG image (public.jpeg) is an image (public.image), which is in turn a kind of data (public.data), which is a kind of user-viewable (or listenable) content (public.content), which is a kind of item (public.item), the generic base type for UTIs. This hierarchy is called conformance, where child UTIs conform to parent UTIs. For example, the more specific jpeg UTI conforms to the more general image or data UTI.
Figure 2-1 shows part of Apple’s basic conformance tree. Any item lower down on the tree must conform to all of its parent data attributes. Declaring a parent UTI implies that you support all of its children. So, an application that can open public.data must service text, movies, image files, and more.
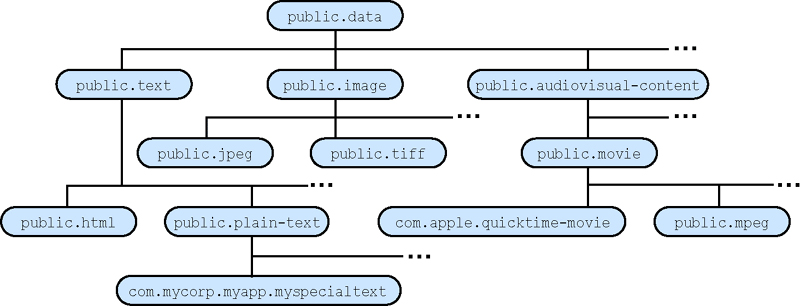
Figure 2-1. Apple’s public UTI conformance tree.
UTIs enable multiple inheritance. An item can conform to more than one UTI parent. So, you might imagine a data type that offers both text and image containers, which declares conformance to both.
There is no central registry for UTI items, although each UTI should adhere to conventions. The public domain is reserved for iOS-specific types, common to most applications. Apple has generated a complete family hierarchy of public items. Add any third-party company-specific names by using standard reverse domain naming (for example, com.sadun.myCustomType and com.apple.quicktime-movie).
Determining UTIs from File Extensions
The Mobile Core Services framework offers utilities that enable you to retrieve UTI information based on file extensions. Be sure to include the header files and link your apps to the framework when using these C-based functions. The following function returns a preferred UTI when passed a path extension string. The preferred identifier is a single UTI string:
#import <MobileCoreServices/MobileCoreServices.h>
NSString *preferredUTIForExtension(NSString *ext)
{
// Request the UTI via the file extension
NSString *theUTI = (__bridge_transfer NSString *)
UTTypeCreatePreferredIdentifierForTag(
kUTTagClassFilenameExtension,
(__bridge CFStringRef) ext, NULL);
return theUTI;
}
You can pass a MIME type instead of a file extension to UTTypeCreatePreferredIdentifierForTag() by using kUTTagClassMIMEType as the first argument. This function returns a preferred UTI for a given MIME type:
NSString *preferredUTIForMIMEType(NSString *mime)
{
// Request the UTI via the file extension
NSString *theUTI = (__bridge_transfer NSString *)
UTTypeCreatePreferredIdentifierForTag(
kUTTagClassMIMEType,
(__bridge CFStringRef) mime, NULL);
return theUTI;
}
Together these functions enable you to move from file extensions and MIME types to the UTI types used for modern file access.
Moving from UTI to Extension or MIME Type
To go the other way, producing a preferred extension or MIME types from a UTI, use UTTypeCopyPreferredTagWithClass(). The following functions return jpeg and image/jpeg, respectively, when passed public.jpeg:
NSString *extensionForUTI(NSString *aUTI)
{
CFStringRef theUTI = (__bridge CFStringRef) aUTI;
CFStringRef results =
UTTypeCopyPreferredTagWithClass(
theUTI, kUTTagClassFilenameExtension);
return (__bridge_transfer NSString *)results;
}
NSString *mimeTypeForUTI(NSString *aUTI)
{
CFStringRef theUTI = (__bridge CFStringRef) aUTI;
CFStringRef results =
UTTypeCopyPreferredTagWithClass(
theUTI, kUTTagClassMIMEType);
return (__bridge_transfer NSString *)results;
}
You must work at the leaf level with these functions, meaning at the level that declares the type extensions directly. Extensions are declared in property lists, where features like file extensions and default icons are described. So, for example, passing public.text or public.movie to the extension function returns nil, whereas public.plain-text and public.mpeg return extensions of txt and mpg, respectively.
The former items live too high up the conformance tree, providing an abstract type rather than a specific implementation. There’s no current API function to look down to find items that descend from a given class that are currently defined for the application. You may want to file an enhancement request at bugreport.apple.com. Surely, all the extensions and MIME types are registered somewhere (otherwise, how would the UTTypeCopyPreferredTagWithClass() look up work in the first place?), so the ability to map extensions to more general UTIs should be possible.
MIME Helper
Although the extension-to-UTI service is exhaustive, returning UTIs for nearly any extension you throw at it, the UTI-to-MIME results are scattershot. You can usually generate a proper MIME representation for any common item; less common ones are rare.
The following lines show an assortment of extensions, their UTIs (retrieved via preferredUTIForExtension()), and the MIME types generated from each UTI (via mimeTypeForUTI()). As you can see, there are quite a number of blanks. These functions return nil when they cannot find a match:
xlv: dyn.age81u5d0 / (null)
xlw: com.microsoft.excel.xlw / application/vnd.ms-excel
xm: dyn.age81u5k / (null)
xml: public.xml / application/xml
z: public.z-archive / application/x-compress
zip: public.zip-archive / application/zip
zoo: dyn.age81y55t / (null)
zsh: public.zsh-script / (null)
To address this problem, the sample code for this recipe includes an extra MIMEHelper class. It defines one function, which returns a MIME type for a supplied extension:
NSString *mimeForExtension(NSString *extension);
Its extensions and MIME types are sourced from the Apache Software Foundation, which has placed its list into the public domain. Out of the 450 extensions in the sample code for this recipe, iOS returned all 450 UTIs but only 88 MIME types. The Apache list ups this number to 230 recognizable MIME types.
Testing Conformance
You test conformance using the UTTypeConformsTo() function. This function takes two arguments: a source UTI and a UTI to compare to, returning true if the first UTI conforms to the second. Use this to test whether a more specific item conforms to a more general one. Test equality using UTTypeEqual(). Here’s an example of how you might use conformance testing, determining if a file path likely points to an image resource:
BOOL pathPointsToLikelyUTIMatch(NSString *path, CFStringRef theUTI)
{
NSString *extension = path.pathExtension;
NSString *preferredUTI = preferredUTIForExtension(extension);
return (UTTypeConformsTo(
(__bridge CFStringRef) preferredUTI, theUTI));
}
BOOL pathPointsToLikelyImage(NSString *path)
{
return pathPointsToLikelyUTIMatch(path, CFSTR("public.image"));
}
BOOL pathPointsToLikelyAudio(NSString *path)
{
return pathPointsToLikelyUTIMatch(path, CFSTR("public.audio"));
}
Retrieving Conformance Lists
UTTypeCopyDeclaration() offers the most general (and most useful) of all UTI functions in the iOS API. It returns a dictionary that includes the following keys:
• kUTTypeIdentifierKey—The UTI name, which you passed to the function (for example, public.mpeg).
• kUTTypeConformsToKey—Any parents that the type conforms to (for example, public.mpeg conforms to public.movie).
• kUTTypeDescriptionKey—A real-world description of the type in question if one exists (for example, “MPEG movie”).
• kUTTypeTagSpecificationKey—A dictionary of equivalent OSTypes (for example, MPG and MPEG), file extensions (mpg, mpeg, mpe, m75, and m15), and MIME types (video/mpeg, video/mpg, video/x-mpeg, and video/x-mpg) for the given UTI.
In addition to these common items, you encounter more keys that specify imported and exported UTI declarations (kUTImportedTypeDeclarationsKey and kUTExportedTypeDeclarationsKey), icon resources to associate with the UTI (kUTTypeIconFileKey), a URL that points to a page describing the type (kUTTypeReferenceURLKey), and a version key that offers a version string for the UTI (kUTTypeVersionKey).
Use the returned dictionary to ascend through the conformance tree to build an array that represents all the items that a given UTI conforms to. For example, the public.mpeg type conforms to public.movie, public.audiovisual-content, public.data, public.item, and public.content. These items are returned as an array from the conformanceArray function that follows in Recipe 2-1.
Recipe 2-1. Testing Conformance
// Build a declaration dictionary for the given type
NSDictionary *utiDictionary(NSString *aUTI)
{
NSDictionary *dictionary =
(__bridge_transfer NSDictionary *)
UTTypeCopyDeclaration((__bridge CFStringRef) aUTI);
return dictionary;
}
// Return an array where each member is guaranteed unique
// but that preserves the original ordering wherever possible
NSArray *uniqueArray(NSArray *anArray)
{
NSMutableArray *copiedArray =
[NSMutableArray arrayWithArray:anArray];
for (id object in anArray)
{
[copiedArray removeObjectIdenticalTo:object];
[copiedArray addObject:object];
}
return copiedArray;
}
// Return an array representing all UTIs that a given UTI conforms to
NSArray *conformanceArray(NSString *aUTI)
{
NSMutableArray *results =
[NSMutableArray arrayWithObject:aUTI];
NSDictionary *dictionary = utiDictionary(aUTI);
id conforms = [dictionary objectForKey:
(__bridge NSString *)kUTTypeConformsToKey];
// No conformance
if (!conforms) return results;
// Single conformance
if ([conforms isKindOfClass:[NSString class]])
{
[results addObjectsFromArray:conformanceArray(conforms)];
return uniqueArray(results);
}
// Iterate through multiple conformance
if ([conforms isKindOfClass:[NSArray class]])
{
for (NSString *eachUTI in (NSArray *) conforms)
[results addObjectsFromArray:conformanceArray(eachUTI)];
return uniqueArray(results);
}
// Just return the one-item array
return results;
}
Get This Recipe’s Code
To find this recipe’s full sample project, point your browser to https://github.com/erica/iOS-6-Advanced-Cookbook and go to the folder for Chapter 2.
Recipe: Accessing the System Pasteboard
Pasteboards, also known as clipboards on some systems, provide a central OS feature for sharing data across applications. Users can copy data to the pasteboard in one application, switch tasks, and then paste that data into another application. Cut/copy/paste features are similar to those found in most operating systems. Users can also copy and paste within a single application, when switching between text fields or views, and developers can establish private pasteboards for app-specific data that would not be understood by other apps.
The UIPasteboard class offers access to a shared device pasteboard and its contents. This snippet returns the general system pasteboard, which is appropriate for most general copy/paste use:
UIPasteboard *pb = [UIPasteboard generalPasteboard];
In addition to the general shared system pasteboard, iOS offers both application-specific pasteboards to better ensure data privacy, which do not extend beyond the application, and custom-named pasteboards that can be used across applications, but only with applications that know and use the pasteboard name key. Create app-specific pasteboards using pasteboardWithUniqueName, which returns an application pasteboard object that persists until the application quits.
Create custom pasteboards using pasteboardWithName:create:, which returns a pasteboard with the specified name. Use reverse-DNS naming for the pasteboard (for example, com.sadun.shared-application-pasteboard). The create parameter specifies whether the system should create the pasteboard if it does not yet exist. This kind of pasteboard can persist beyond a single application run; set the persistent property to YES after creation. Use removePasteboardWithName: to destroy a pasteboard and free up the resources used by it.
Storing Data
Pasteboards can store one or more entries at a time. Each has an associated type, using the UTI to specify what kind of data is stored. For example, you might find public.text (and more specifically public.utf8-plain-text) to store text data, public.url for URL address, and public.jpeg for image data. These are among many other common data types used on iOS. The dictionary that stores the type and the data is called an item, and you can retrieve an array of all available items via the pasteboard’s items property.
You can determine the kinds of items currently stored with a simple message. Query a pasteboard for its available types by sending it the pasteboardTypes message. This returns an array of types currently stored on the pasteboard:
NSArray *types = [pb pasteboardTypes];
You can set data on the pasteboard and associate a type by passing an NSData object and a UTI that describes a type the data conforms to. Alternatively, for property list objects (that is, string, date, array, dictionary, number, or URL), set an NSValue via setValue:forPasteboardType:. These property list objects are stored internally somewhat differently than their raw-data cousins, giving rise to the method differentiation:
[[UIPasteboard generalPasteboard]
setData:theData forPasteboardType:theUTI];
Storing Common Types
Pasteboards are further specialized for several data types, which represent the most commonly used pasteboard items. These are colors (not a property list “value” object), images (also not a property list “value” object), strings, and URLs. The UIPasteboard class provides specialized getters and setters to make it easier to handle these items. You can treat each of these as properties of the pasteboard, so you can set and retrieve them using dot notation. What’s more, each property has a plural form, allowing you to access those items as arrays of objects.
Pasteboard properties greatly simplify using the system pasteboard for the most common use cases. The property accessors include the following:
• string—Sets or retrieves the first string on the pasteboard.
• strings—Sets or retrieves an array of all strings on the pasteboard.
• image—Sets or retrieves the first image on the pasteboard.
• images—Sets or retrieves an array of all images on the pasteboard.
• URL—Sets or retrieves the first URL on the pasteboard.
• URLs—Sets or retrieves an array of all URLs on the pasteboard.
• color—Sets or retrieves the first color on the pasteboard.
• colors—Sets or retrieves an array of all colors on the pasteboard.
Retrieving Data
When using one of the four special classes, simply use the associated property to retrieve data from the pasteboard. Otherwise, you can fetch data using the dataForPasteboardType: method. This method returns the data from the first item whose type matches the UTI sent as a parameter. Any other matching items in the pasteboard are ignored.
Should you need to retrieve all matching data, recover an itemSetWithPasteboardTypes: and then iterate through the set to retrieve each dictionary. Recover the data type for each item from the single dictionary key and the data from its value.
As mentioned, UIPasteboard offers two approaches for pasting to the pasteboard depending on whether the information being pasted is a property list object or raw data. Use setValueForPasteboardType: for property list objects, which include strings, dates, numbers, dictionaries, arrays, and URLs. For general data, use setData:forPasteboardType:.
When pasteboards are changed, they issue a UIPasteboardChangedNotification, which you can listen to via a default NSNotificationCenter observer. You can also watch custom pasteboards and listen for their removal via UIPasteboardRemovedNotification.
Note
If you want to successfully paste text data to Notes or Mail, use public.utf8-plain-text as your UTI of choice when storing information to the pasteboard. Using the string or strings properties automatically enforces this UTI.
Passively Updating the Pasteboard
iOS’s selection and copy interface are not, frankly, the most streamlined elements of the operating system. There are times when you want to simplify matters for your user while preparing content that’s meant to be shared with other applications.
Consider Recipe 2-2. It enables the user to use a text view to enter and edit text, while automating the process of updating the pasteboard. When the watcher is active (toggled by a simple button tap), the text updates the pasteboard on each edit. This is accomplished by implementing a text view delegate method (textViewDidChange:) that responds to edits by automatically assigning changes to the pasteboard (updatePasteboard).
This recipe demonstrates the relative simplicity involved in accessing and updating the pasteboard.
Recipe 2-2. Creating an Automatic Text-Entry to Pasteboard Solution
- (void) updatePasteboard
{
// Copy the text to the pasteboard when the watcher is enabled
if (enableWatcher)
[UIPasteboard generalPasteboard].string = textView.text;
}
- (void) textViewDidChange: (UITextView *) textView
{
// Delegate method calls for an update
[self updatePasteboard];
}
- (void) toggle: (UIBarButtonItem *) bbi
{
// switch between standard and auto-copy modes
enableWatcher = !enableWatcher;
bbi.title = enableWatcher ? @"Stop Watching" : @"Watch";
}
Get This Recipe’s Code
To find this recipe’s full sample project, point your browser to https://github.com/erica/iOS-6-Advanced-Cookbook and go to the folder for Chapter 2.
Recipe: Monitoring the Documents Folder
iOS documents aren’t trapped in their sandboxes. You can and should share them with your users. Offer users direct control over their documents and access to any material they may have created on-device. A simple Info.plist setting enables iTunes to display the contents of a user’s Documents folder and enables those users add and remove material on demand.
At some point in the future, you may use a simple NSMetadataQuery monitor to watch your Documents folder and report updates. At the time this book was written, that metadata surveillance was not yet extended beyond iCloud for use with other folders. Code ported from OS X fails to work as expected on iOS. Currently, there are precisely two available search domains for iOS: the ubiquitous data scope and the ubiquitous documents scope (that is, iCloud and iCloud).
Until general functionality arrives in iOS, use kqueue. This older technology provides scalable event notification. With kqueue, you can monitor add and clear events. This roughly equates to looking for files being added and deleted, which are the primary kinds of updates you want to react to. Recipe 2-3 presents a kqueue implementation for watching the Documents folder.
Enabling Document File Sharing
To enable file sharing, add a UIFileSharingEnabled key to the application’s Info.plist and set its value to YES, as shown in Figure 2-2. When working with nonraw keys and values, this item is called Application supports iTunes file sharing. iTunes lists all applications that declare file-sharing support in each device’s Apps tab, as shown in Figure 2-3.

Figure 2-2. Enable UIFileSharingEnabled to allow user access to the Documents folder via iTunes.
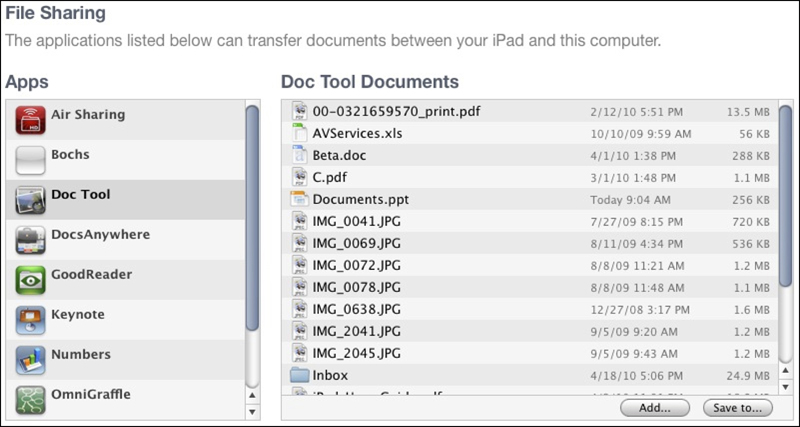
Figure 2-3. Each installed application that declares UIFileSharingEnabled is listed in iTunes in the device’s Apps tab.
User Control
You cannot specify which kinds of items are allowed to be in the Documents folder. Users can add any materials they like, and remove any items they want to. What they cannot do, however, is navigate through subfolders using the iTunes interface. Notice the Inbox folder in Figure 2-3. This is an artifact left over from application-to-application document sharing, and it should not be there. Users cannot manage that data directly, and you should not leave the subfolder there to confuse them.
Users cannot delete the Inbox in iTunes the way they can delete other files and folders. Nor should your application write files directly to the Inbox. Respect the Inbox’s role, which is to capture any incoming data from other applications. When you implement file-sharing support, always check for an Inbox on resuming active status and process that data to clear out the Inbox and remove it whenever your app launches and resumes. Best practices for handling incoming documents are discussed later in this chapter.
Xcode Access
As a developer, you have access not only to the Documents folder, but also to the entire application sandbox. Use the Xcode Organizer (Command-2) > Devices tab > Device> Applications >Application Name to browse, upload, and download files to and from the sandbox.
Test basic file sharing by enabling the UIFileSharingEnabled property to an application and loading data to your Documents folder. After those files are created, use Xcode and iTunes to inspect, download, and delete them.
Scanning for New Documents
Recipe 2-3 works by requesting kqueue notifications in its beginGeneratingDocumentNotificationsInPath: method. Here, it retrieves a file descriptor for the path you supply (in this case, the Documents folder) and requests notifications for add and clear events. It adds this functionality to the current runloop, enabling notifications whenever the monitored folder updates.
Upon receiving that callback, it posts a notification (my custom kDocumentChanged, in the kqueueFired method) and continues watching for new events. This all runs in the primary run loop on the main thread, so the GUI can respond and update itself upon receiving the notification.
The following snippet demonstrates how you might use Recipe 2-3’s watcher to update a file list in your GUI. Whenever the contents change, an update notification allows the app to refresh those directory contents listings:
- (void) scanDocuments
{
NSString *path = [NSHomeDirectory()
stringByAppendingPathComponent:@"Documents"];
items = [[NSFileManager defaultManager]
contentsOfDirectoryAtPath:path error:nil];
[self.tableView reloadData];
}
- (void) loadView
{
[self.tableView registerClass:[UITableViewCell class]
forCellReuseIdentifier:@"cell"];
[self scanDocuments];
// React to content changes
[[NSNotificationCenter defaultCenter]
addObserverForName:kDocumentChanged
object:nil queue:[NSOperationQueue mainQueue]
usingBlock:^(NSNotification *notification){
[self scanDocuments];
}];
// Start the watcher
NSString *path = [NSHomeDirectory()
stringByAppendingPathComponent:@"Documents"];
helper = [DocWatchHelper watcherForPath:path];
}
Test this recipe by connecting a device to iTunes. Add and remove items using the iTunes App tab interface. The device’s onboard file list updates to reflect those changes in real time.
There are some cautions to be aware of when using this recipe. First, for larger documents, you shouldn’t be reading immediately after you’re notified of their creation. You may want to poll file sizes to determine when data has stopped being written. Second, iTunes File Sharing transfer can, upon occasion, stall. Code accordingly.
Recipe 2-3. Using a kqueue File Monitor
#import <fcntl.h>
#import <sys/event.h>
#define kDocumentChanged
@"DocumentsFolderContentsDidChangeNotification"
@interface DocWatchHelper : NSObject
{
CFFileDescriptorRef kqref;
CFRunLoopSourceRef rls;
}
@property (strong) NSString *path;
+ (id) watcherForPath: (NSString *) aPath;
@end
@implementation DocWatchHelper
@synthesize path;
- (void)kqueueFired
{
int kq;
struct kevent event;
struct timespec timeout = { 0, 0 };
int eventCount;
kq = CFFileDescriptorGetNativeDescriptor(self->kqref);
assert(kq >= 0);
eventCount = kevent(kq, NULL, 0, &event, 1, &timeout);
assert( (eventCount >= 0) && (eventCount < 2) );
if (eventCount == 1)
[[NSNotificationCenter defaultCenter]
postNotificationName:kDocumentChanged
object:self];
CFFileDescriptorEnableCallBacks(self->kqref,
kCFFileDescriptorReadCallBack);
}
static void KQCallback(CFFileDescriptorRef kqRef,
CFOptionFlags callBackTypes, void *info)
{
DocWatchHelper *helper =
(DocWatchHelper *)(__bridge id)(CFTypeRef) info;
[helper kqueueFired];
}
- (void) beginGeneratingDocumentNotificationsInPath:
(NSString *) docPath
{
int dirFD;
int kq;
int retVal;
struct kevent eventToAdd;
CFFileDescriptorContext context =
{ 0, (void *)(__bridge CFTypeRef) self,
NULL, NULL, NULL };
dirFD = open([docPath fileSystemRepresentation], O_EVTONLY);
assert(dirFD >= 0);
kq = kqueue();
assert(kq >= 0);
eventToAdd.ident = dirFD;
eventToAdd.filter = EVFILT_VNODE;
eventToAdd.flags = EV_ADD | EV_CLEAR;
eventToAdd.fflags = NOTE_WRITE;
eventToAdd.data = 0;
eventToAdd.udata = NULL;
retVal = kevent(kq, &eventToAdd, 1, NULL, 0, NULL);
assert(retVal == 0);
self->kqref = CFFileDescriptorCreate(NULL, kq,
true, KQCallback, &context);
rls = CFFileDescriptorCreateRunLoopSource(
NULL, self->kqref, 0);
assert(rls != NULL);
CFRunLoopAddSource(CFRunLoopGetCurrent(), rls,
kCFRunLoopDefaultMode);
CFRelease(rls);
CFFileDescriptorEnableCallBacks(self->kqref,
kCFFileDescriptorReadCallBack);
}
- (void) dealloc
{
self.path = nil;
CFRunLoopRemoveSource(CFRunLoopGetCurrent(), rls,
kCFRunLoopDefaultMode);
CFFileDescriptorDisableCallBacks(self->kqref,
kCFFileDescriptorReadCallBack);
}
+ (id) watcherForPath: (NSString *) aPath
{
DocWatchHelper *watcher = [[self alloc] init];
watcher.path = aPath;
[watcher beginGeneratingDocumentNotificationsInPath:aPath];
return watcher;
}
@end
Get This Recipe’s Code
To find this recipe’s full sample project, point your browser to https://github.com/erica/iOS-6-Advanced-Cookbook and go to the folder for Chapter 2.
Recipe: Presenting the Activity View Controller
Newly introduced, iOS 6’s activity view controller integrates data activities into the interface shown in Figure 2-4. With minimal development cost on your part, this new controller enables your users to copy items to the pasteboard, post to social media, share via e-mail and texting, and more. Built-in activities include Facebook, Twitter, Weibo, SMS, mail, printing, copying to pasteboard, and assigning data to a contact. Apps can define their own custom services as well, which you can read about later in this section:
• UIActivityTypePostToFacebook
• UIActivityTypePostToTwitter
• UIActivityTypePostToWeibo
• UIActivityTypeMessage
• UIActivityTypeMail
• UIActivityTypePrint
• UIActivityTypeCopyToPasteboard
• UIActivityTypeAssignToContact
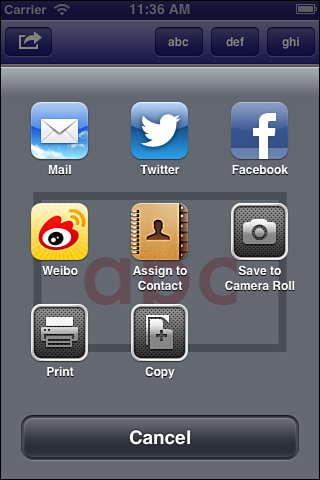
Figure 2-4. The UIActivityViewController class offers system and custom services.
Significantly missing from this list are two important activities, namely Open in... for sharing documents between applications and QuickLook for previewing files. This functionality is discussed later in this chapter, with recipes that show you how to support these features independently and, in the case of QuickLook, how to integrate into the Activity View Controller.
Note
You do not need to own an AirPrint printer to test print activities. Ecamm’s Printopia (http://www.ecamm.com/mac/printopia/, $19.95) creates a virtual printer on your local network, which you can use from both devices and the Simulator. Choose to print to any local printers, to a file on your Mac or a file on Dropbox. It’s a terrific investment for any developer working with the new Activity View Controller. Netputing makes a similar product called handyPrint (http://www.netputing.com/handyprint). handyPrint accepts PayPal donations.
Presenting the Activity View Controller
How you present the controller varies by device. Show it modally on members of the iPhone-family and in a popover on tablets. The UIBarButtonSystemItemAction icon provides the perfect way to populate bar buttons linking to this controller.
Best of all, there’s almost no work required on your end. After users select an activity, the controller handles all further interaction such as presenting a mail or Twitter compose sheet, adding a picture to the onboard library, or assigning it to a contact.
Activity Item Sources
Recipe 2-4 creates and presents the view controller from code. This implementation has its main class adopt the UIActivityItemSource protocol and adds self to the items array passed to the controller. Adopting the source protocol helps the controller understand how to use callbacks when retrieving data items. This represents the first of two ways to create and present the controller.
The protocol’s two mandatory methods supply the item to process (the data that will be used for the activity) and a placeholder for that item. The item corresponds to an object that’s appropriate for a given activity type. You can vary which item you return based on the kind of activity that’s passed to the callback. For example, you might tweet “I created a great song in App Name” but you might send the actual sound file through e-mail.
The placeholder for an item is typically the same data returned as the item unless you have objects that you must process or create. In that case, you can create a placeholder object without real data.
Both callbacks (item and placeholder) run on the main thread, so keep your data small. If you need to process your data extensively, consider using a provider instead.
Item Providers
The UIActivityItemProvider class enables you to delay passing data. It’s a type of operation (NSOperation) that offers you the flexibility to manipulate data before sharing. For example, you might need to process a large video file before it can be uploaded to a social sharing site or subsample some audio from a larger sequence.
Subclass the provider class and implement the item method. This takes the place of the main method you normally use with operations. Generate the processed data, safe in the knowledge that it will run asynchronously without blocking your user’s interactive experience.
Item Source Callbacks
The callbacks methods enable you to vary your data based on each one’s intended use. Use the activity types (such as Facebook, or Add to Contacts; they’re listed earlier in this section) to choose the exact data you want to provide. This is especially important when selecting from resolutions for various uses. When printing, keep your data quality high. When tweeting, a low-res image may do the job instead.
If your data is invariant, that is, you’ll be passing the same data to e-mail as you would to Facebook, you can directly supply an array of data items (typically strings, images, and URLs). For example, you could create the controller like this. This uses a single image:
UIActivityViewController *activity = [[UIActivityViewController alloc]
initWithActivityItems:@[imageView.image]
applicationActivities:nil];
This direct approach is far simpler. Your primary class doesn’t need to declare the item source protocol; you do not need to implement the extra methods. It’s a quick-and-easy way to manage activities for simple items.
You’re not limited to passing single items, either. Include additional elements in the activity items array as needed. The following controller might add its two images to an e-mail or save both to the system camera roll, depending on the user’s selection. Broadening activities to use multiple items enables users to be more efficient while using your app:
UIImage *secondImage = [UIImage imageNamed:@"Default.png"];
UIActivityViewController *activity = [[UIActivityViewController alloc]
initWithActivityItems:@[imageView.image, secondImage]
applicationActivities:nil];
Recipe 2-4. The Activity View Controller
- (void) presentViewController:
(UIViewController *)viewControllerToPresent
{
if (IS_IPHONE)
{
[self presentViewController:viewControllerToPresent
animated:YES completion:nil];
}
else
{
popover = [[UIPopoverController alloc]
initWithContentViewController:viewControllerToPresent];
popover.delegate = self;
[popover presentPopoverFromBarButtonItem:
self.navigationItem.leftBarButtonItem
permittedArrowDirections:UIPopoverArrowDirectionAny
animated:YES];
}
}
// Return the item to process
- (id)activityViewController:
(UIActivityViewController *)activityViewController
itemForActivityType:(NSString *)activityType
{
return imageView.image;
}
// Return a thumbnail version of that item
- (id)activityViewControllerPlaceholderItem:
(UIActivityViewController *)activityViewController
{
return imageView.image;
}
// Create and present the view controller
- (void) action
{
UIActivityViewController *activity =
[[UIActivityViewController alloc]
initWithActivityItems:@[self] applicationActivities:nil];
[self presentViewController:activity];
}
Get This Recipe’s Code
To find this recipe’s full sample project, point your browser to https://github.com/erica/iOS-6-Advanced-Cookbook and go to the folder for Chapter 2.
Adding Services
Each app can provide application-specific services by subclassing the UIActivity class and presenting a custom view controller. The view controller enables the user to process the passed data in some way. Listing 2-1 introduces a skeletal activity that presents a simple text view. This view lists the items passed to it by the activity controller. It displays each item’s class and description.
This listing includes details for two distinct classes. The first class implements a simple text controller and is intended for use within a navigation hierarchy. It includes a view for presenting text and a handler that updates the calling UIActivity instance by sending activityDidFinish: when the user taps Done.
Adding a way for your activity to complete is important, especially when your controller doesn’t have a natural endpoint. When your action uploads data to an FTP server, you know when it completes. If it Tweets, you know when the status posts. In this example, it’s up to the user to determine when this activity finishes. Make sure your view controller contains a weak property pointing back to the activity, so you can send the did-finish method after your work concludes.
The activity class contains a number of mandatory and optional items. You should implement all the methods shown in this listing. The methods to support a custom activity include the following:
• activityType—Returns a unique string describing the type of activity. One of this string’s counterparts in the system-supplied activities is UIActivityTypePostToFacebook. Use a similar naming scheme. This string identifies a particular activity type and what it does. In this listing, I return @"CustomActivityTypeListItemsAndTypes", which describes the activity.
• activityTitle—Supply the text you want to show in the activity controller. The custom text in Figure 2-5 was returned by this method. Use active descriptions when describing your custom action. Follow Apple’s lead, for example, “Save to Camera Roll”, “Print”, “Copy”. Your title should finish the phrase, “I want to...” For example, “I want to print,” “I want to copy,” or, in this example, “I want to list items.” Use header case and capitalize each word except for minor ones like “to” or “and.”
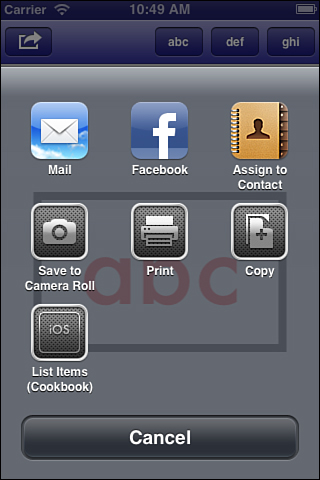
Figure 2-5. Add your own custom application activities.
• activityImage—Returns an image for the controller to use. The controller adds a backsplash and converts your image to a one-value bitmap, layering it on top. Use simple art on a transparent background (57x57 iPhone, 72x72 iPad, double for Retina screen scale) to build the contents of your icon image. You’ll want to inset your art at least 15% from the sides to allow space to inset from the controller-supplied rounded rectangle that frames it.
• canPerformWithActivityItems:—Scan the passed items and decide if your controller can process them. If so, return YES.
• prepareWithActivityItems:—Store the passed items for later use (here, they’re assigned to a local instance variable) and perform any necessary pre-processing.
• activityViewController—Return a fully initialized presentable view controller using the activity items passed to you earlier. This controller is automatically presented to the user, where she can customize options before performing the promised action.
Adding custom activities allows your app to expand its data handling possibilities while integrating features into a consistent system-supplied interface. It’s a powerful iOS feature. The strongest activity choices will integrate with system services (such as copying to the pasteboard, or saving to the photo album) or provide a connection to off-device APIs, such as Facebook, Twitter, Dropbox, and FTP.
This example, which simply lists items, represents a weak use case. There’s no reason the same feature couldn’t be provided as a normal in-app screen. When you think “actions,” try to project outside the app. Connect your user’s data with sharing and processing features that expand beyond the normal GUI.
Listing 2-1. Application Activities
// All activities present a view controller. This custom controller
// provides a full-sized text view.
@interface TextViewController : UIViewController
@property (nonatomic, readonly) UITextView *textView;
@property (nonatomic, weak) UIActivity *activity;
@end
@implementation TextViewController
// Make sure you provide a done handler of some kind, such as this
// or an integrated button that finishes and wraps up
- (void) done
{
[_activity activityDidFinish:YES];
}
// Just a super-basic text view controller
- (id) init
{
if (!(self = [super init])) return nil;
_textView = [[UITextView alloc] init];
_textView.font = [UIFont fontWithName:@"Futura" size:16.0f];
_textView.editable = NO;
[self.view addSubview:_textView];
PREPCONSTRAINTS(_textView);
STRETCH_VIEW(self.view, _textView);
// Prepare a Done button
self.navigationItem.rightBarButtonItem =
BARBUTTON(@"Done", @selector(done));
return self;
}
@end
@interface MyActivity : UIActivity
@end
@implementation MyActivity
{
NSArray *items;
}
// A unique type name
- (NSString *)activityType
{
return @"CustomActivityTypeListItemsAndTypes";
}
// The title listed on the controller
- (NSString *) activityTitle
{
return @"Cookbook";
}
// A custom image, displayed as a bitmap over a textured background
// This one says "iOS" in a rounded rect edge
- (UIImage *) activityImage
{
CGRect rect = CGRectMake(0.0f, 0.0f, 75.0f, 75.0f);
UIGraphicsBeginImageContext(rect.size);
rect = CGRectInset(rect, 15.0f, 15.0f);
UIBezierPath *path = [UIBezierPath
bezierPathWithRoundedRect:rect cornerRadius:4.0f];
[path stroke];
rect = CGRectInset(rect, 0.0f, 10.0f);
[@"iOS" drawInRect:rect
withFont:[UIFont fontWithName:@"Futura" size:18.0f]
lineBreakMode:NSLineBreakByWordWrapping
alignment:NSTextAlignmentCenter];
UIImage *image = UIGraphicsGetImageFromCurrentImageContext();
UIGraphicsEndImageContext();
return image;
}
// Specify if you can respond to these items
- (BOOL)canPerformWithActivityItems:(NSArray *)activityItems
{
return YES;
}
// Store the items locally for later use
- (void)prepareWithActivityItems:(NSArray *)activityItems
{
items = activityItems;
}
// Return a view controller, in this case one that lists
// its items and their classes
- (UIViewController *) activityViewController
{
TextViewController *tvc = [[TextViewController alloc] init];
tvc.activity = self;
UITextView *textView = tvc.textView;
NSMutableString *string = [NSMutableString string];
for (id item in items)
[string appendFormat:
@"%@: %@
", [item class], [item description]];
textView.text = string;
// Make sure to provide some kind of done: handler in
// your main controller.
UINavigationController *nav = [[UINavigationController alloc]
initWithRootViewController:tvc];
return nav;
}
@end
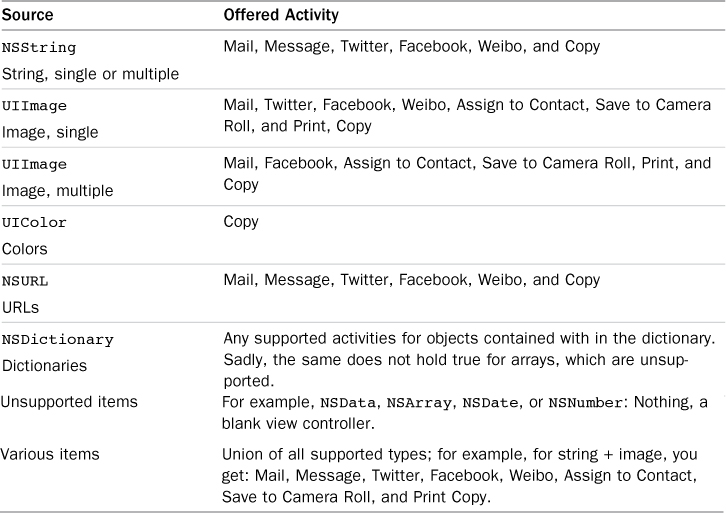
Items and Services
The services presented for each item vary by the kind of data you pass. Table 2-1 lists offered activities by source data type. As you see in this chapter, preview controller support expands beyond these foundation types:
• iOS’s Quick Look framework integrates activity controllers into its file previews. The Quick Look-provided activity controller can print and e-mail many kinds of documents. Some document types support other activities as well.
• Document Interaction Controllers offer “open in” features that enable you to share files between application. It adds activities into its “options” style presentation, combining activities with “open in” choices.
Table 2-1. Activity Types for Data Types
Supporting HTML E-mail
If you want to send HTML using an E-mail activity, make sure your item’s text string starts with @"<html>". Differentiate your HTML-based e-mail text from your plain Twitter contents by implementing the item source protocol and returning appropriate items according to the activity selected by the user.
Excluding Activities
You can specifically exclude activities by supplying a list of activity types to the excludedActivityTypes property:
UIActivityViewController *activity = [[UIActivityViewController alloc]
initWithActivityItems:items applicationActivities:@[appActivity]];
activity.excludedActivityTypes = @[UIActivityTypeMail];
Recipe: The Quick Look Preview Controller
The Quick Look preview controller class enables users to preview many document types. This controller supports text, images, PDF, RTF, iWork file, Microsoft Office documents (Office 97 and newer, including doc, ppt, xls, and so on), and comma-separated value (csv) files. You supply a supported file type and the Quick Look controller displays it for the user. An integrated system-supplied activity view controller helps share the previewed document, as shown in Figure 2-6.
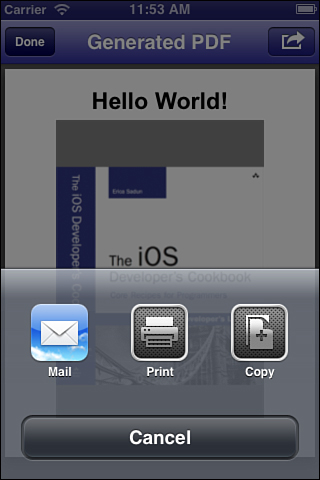
Figure 2-6. This Quick Look controller was presented modally and shows the screen after the user has tapped the action button. Quick Look handles a wide range of document types, enabling users to see the file contents before deciding on an action to apply to them. Most Quick Look types support Mail and Print. Many support Copy, and image files offer even more options.
Either push or present your preview controllers. The controller adapts to both situations, working with navigation stacks and with modal presentation. Recipe 2-5 demonstrates both approaches.
Implementing QuickLook
Quick Look support requires a few simple steps:
1. Declare the QLPreviewControllerDataSource protocol in your primary controller class.
2. Implement the numberOfPreviewItemsInPreviewController: and previewController:previewItemAtIndex: data source methods. The first of these methods returns a count of items to preview. The second returns the preview item referred to by the index.
3. Preview items must conform to the QLPreviewItem protocol. This protocol consists of two required properties: a preview title and an item URL. Recipe 2-5 creates a conforming QuickItem class. This class implements an absolutely minimal approach to support the data source.
After these requirements are met, your code is ready to create a new preview controller, sets its data source, and present or push it.
@interface QuickItem : NSObject <QLPreviewItem>
@property (nonatomic, strong) NSString *path;
@property (readonly) NSString *previewItemTitle;
@property (readonly) NSURL *previewItemURL;
@end
@implementation QuickItem
// Title for preview item
- (NSString *) previewItemTitle
{
return [_path lastPathComponent];
}
// URL for preview item
- (NSURL *) previewItemURL
{
return [NSURL fileURLWithPath:_path];
}
@end
#define FILE_PATH [NSHomeDirectory()
stringByAppendingPathComponent:@"Documents/PDFSample.pdf"]
@interface TestBedViewController : UIViewController
<QLPreviewControllerDataSource>
@end
@implementation TestBedViewController
- (NSInteger) numberOfPreviewItemsInPreviewController:
(QLPreviewController *) controller
{
return 1;
}
- (id <QLPreviewItem>) previewController:
(QLPreviewController *) controller
previewItemAtIndex: (NSInteger) index;
{
QuickItem *item = [[QuickItem alloc] init];
item.path = FILE_PATH;
return item;
}
// Push onto navigation stack
- (void) push
{
QLPreviewController *controller =
[[QLPreviewController alloc] init];
controller.dataSource = self;
[self.navigationController
pushViewController:controller animated:YES];
}
// Use modal presentation
- (void) present
{
QLPreviewController *controller =
[[QLPreviewController alloc] init];
controller.dataSource = self;
[self presentViewController:controller
animated:YES completion:nil];
}
- (void) loadView
{
self.view.backgroundColor = [UIColor whiteColor];
self.navigationItem.rightBarButtonItem =
BARBUTTON(@"Push", @selector(push));
self.navigationItem.leftBarButtonItem =
BARBUTTON(@"Present", @selector(present));
}
@end
Get This Recipe’s Code
To find this recipe’s full sample project, point your browser to https://github.com/erica/iOS-6-Advanced-Cookbook and go to the folder for Chapter 2.
Recipe: Adding a QuickLook Action
QuickLook is significant in its absence from the standard set of actions presented by the system-supplied activity view controller. You can easily add a custom action that provides this feature, offering the same preview created by Recipe 2-5. That’s what Recipe 2-6 does, wrapping Recipe 2-5’s functionality into a custom QLActivity class.
Recipe 2-6 performs a more thorough search for compliant items than you’ve seen yet in this chapter. It scans the item array passed to it until it finds a local file URL, which it can use for a document preview. If it does not find one, it returns NO from the canPerformWithActivityItems: method and will not be listed on the activity controller.
@implementation QLActivity
{
NSArray *items;
NSArray *qlitems;
QLPreviewController *controller;
}
// Activity Customization
- (NSString *)activityType
{
return @"CustomQuickLookActivity";
}
- (NSString *) activityTitle
{
return @"QuickLook";
}
- (UIImage *) activityImage
{
return [UIImage imageNamed:@"QL.png"];
}
// Items must include at least one file URL
- (BOOL)canPerformWithActivityItems:(NSArray *)activityItems
{
for (NSObject *item in activityItems)
if ([item isKindOfClass:[NSURL class]])
{
NSURL *url = (NSURL *)item;
if (url.isFileURL) return YES;
}
return NO;
}
// QuickLook callbacks
- (NSInteger) numberOfPreviewItemsInPreviewController:
(QLPreviewController *) controller
{
return qlitems.count;
}
- (id <QLPreviewItem>) previewController: (QLPreviewController *)
controller previewItemAtIndex: (NSInteger) index;
{
return qlitems[index];
}
// Item preparation
- (void)prepareWithActivityItems:(NSArray *)activityItems
{
items = activityItems;
controller = [[QLPreviewController alloc] init];
controller.dataSource = self;
controller.delegate = self;
NSMutableArray *finalArray = [NSMutableArray array];
for (NSObject *item in items)
{
if ([item isKindOfClass:[NSURL class]])
{
NSURL *url = (NSURL *)item;
if (url.isFileURL)
{
QuickItem *item = [[QuickItem alloc] init];
item.path = url.path;
[finalArray addObject:item];
}
}
}
qlitems = finalArray;
}
- (void) previewControllerDidDismiss:
(QLPreviewController *)controller
{
[self activityDidFinish:YES];
}
- (UIViewController *) activityViewController
{
return controller;
}
@end
To find this recipe’s full sample project, point your browser to https://github.com/erica/iOS-6-Advanced-Cookbook and go to the folder for Chapter 2.
Recipe: Using The Document Interaction Controller
The UIDocumentInteractionController class enables applications to present a menu of options to users, enabling them to use document files in a variety of ways. With this class, users can take advantage of the following:
• iOS application-to-application document sharing (that is, “open this document in...some app”)
• Document preview using QuickLook
• Activity controller options such as printing, sharing, and social networking
You’ve already seen the latter two features in action earlier in this chapter. The document interaction class adds app-to-app sharing on top of these, as shown in Figure 2-7. The controller is presented as a menu, which enables users to specify how they want to interact with the given document.
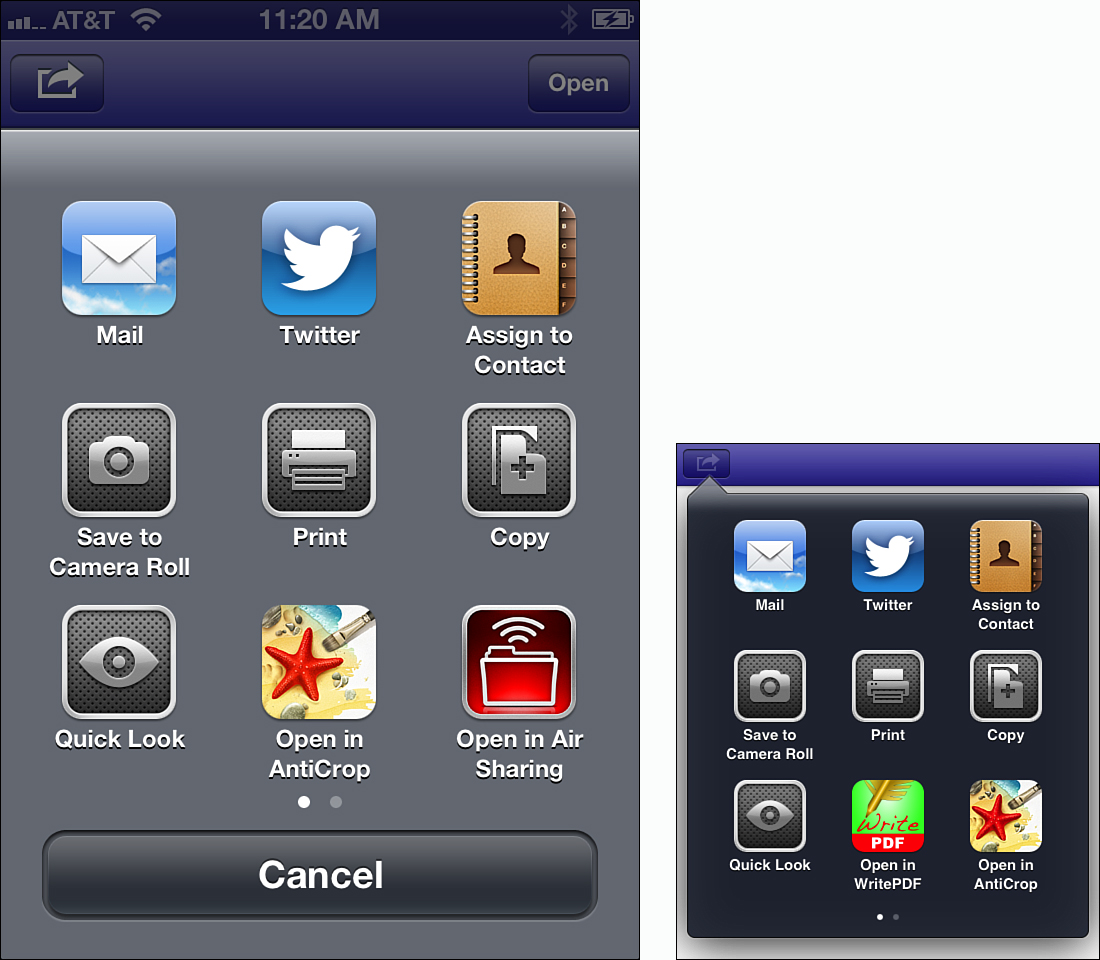
Figure 2-7. The UIDocumentInteractionController shown in its options style for iPhone (left) and iPad (right). Both presentations include two pages of icons, as indicated by the page controller near the bottom of the display.
In iOS 6, the number of “open in” options is no longer limited the way it was in earlier OS releases. That’s why you see the page indicator at the bottom of the menu. Users can swipe between screens to see a full complement of “open in” options.
The controller offers two basic menu styles. The “open” style offers only “open in” choices, using the menu space to provide as many destination choices as possible. The “options” style (refer to Figure 2-7) provides a list of all interaction options, including “open in,” quick-look, and any supported actions. It’s essentially all the good stuff you get from a standard Actions menu, along with “open in” extras. You do have to explicitly add quick-look callbacks, but it takes a little work to do so.
Creating Document Interaction Controller Instances
Each document interaction controller is specific to a single document file. This file is typically stored in the user’s Documents folder:
dic = [UIDocumentInteractionController
interactionControllerWithURL:fileURL];
You supply a local file URL and present the controller using either the options variation (basically the Action menu) or the open one (just the “open in” items). The two presentation styles are from a bar button or an onscreen rectangle:
• presentOptionsMenuFromRect:inView:animated:
• presentOptionsMenuFromBarButtonItem:animated:
• presentOpenInMenuFromRect:inView:animated:
• presentOpenInMenuFromBarButtonItem:animated:
The iPad uses the bar button or rect you pass to present a popover. On the iPhone, the implementation presents a modal controller view. As you would expect, more bookkeeping takes place on the iPad, where users may tap on other bar buttons, may dismiss the popover, and so forth.
You’ll want to disable each iPad bar button item after presenting its associated controller, and re-enable it after dismissal. That’s important because you don’t want your user to re-tap an in-use bar button, and need to handle situations where a different popover needs to take over. Basically, there are a variety of unpleasant scenarios that can happen if you don’t carefully monitor which buttons are active and what popover is in play. Recipe 2-7 guards against these scenarios.
Document Interaction Controller Properties
Each document interaction controller offers a number of properties, which can be used in your delegate callbacks:
• The URL property enables you to query the controller for the file it is servicing. This is the same URL you pass when creating the controller.
• The UTI property is used to determine which apps can open the document. It uses the system-supplied functions discussed earlier in the chapter to find the most preferred UTI match based on the filename and metadata. You can override this in code to set the property manually.
• The name property provides the last path component of the URL, offering a quick way to provide a user-interpretable name without having to manually strip the URL yourself.
• Use the icons property to retrieve an icon for the file type that’s in play. Applications that declare support for certain file types provide image links in their declaration (as you’ll see shortly, in the discussion about declaring file support). These images correspond to the values stored for the kUTTypeIconFileKey key, as discussed earlier in this chapter.
• The annotation property provides a way to pass custom data along with a file to any application that will open the file. There are no standards for using this property; although, the item must be set to some top-level property list object, namely dictionaries, arrays, data, strings, numbers, and dates. Because there are no community standards, use of this property tends to be minimal except where developers share the information across their own suite of published apps.
Providing Document Quick Look Support
Add Quick Look support to the controller by implementing a trio of delegate callbacks. These methods declare which view controller will be used to present the preview, which view will host it, and the frame for the preview size. You may have occasional compelling reasons to use a child view controller with limited screen presence on tablets (such as in a split view, with the preview in just one portion), but for the iPhone family, there’s almost never any reason not to allow the preview to take over the entire screen:
#pragma mark QuickLook
- (UIViewController *)
documentInteractionControllerViewControllerForPreview:
(UIDocumentInteractionController *)controller
{
return self;
}
- (UIView *) documentInteractionControllerViewForPreview:
(UIDocumentInteractionController *)controller
{
return self.view;
}
- (CGRect) documentInteractionControllerRectForPreview:
(UIDocumentInteractionController *)controller
{
return self.view.frame;
}
Checking for the Open Menu
When using a document interaction controller, the Options menu will almost always provide valid menu choices, especially if you implement the Quick Look callbacks. You may or may not, however, have any open-in options to work with. Those options depend on the file data you provide to the controller and the applications users install on their device.
A no-open-options scenario happens when there are no applications installed on a device that support the file type you are working with. This may be caused by an obscure file type, but more often it occurs because the user has not yet purchased and installed a relevant application.
Always check whether to offer an “Open” menu option. Recipe 2-7 performs a rather ugly test to see if external apps will offer themselves as presenters and editors for a given URL. This is what it does: It creates a new, temporary controller and attempts to present it. If it succeeds, conforming file destinations exist and are installed on the device. If not, there are no such apps, and any “Open In” buttons should be disabled.
On the iPad, you must run this check in viewDidAppear: or later—that is, after a window has been established. The method immediately dismisses the controller after presentation. It should not be noticeable by your end user, and none of the calls use animation.
This is obviously a rather dreadful implementation, but it has the advantage of testing as you lay out your interface or when you start working with a new file. I encourage you to file an enhancement request at bugreporter.apple.com.
One further caution: Although this test works on primary views (as in this recipe), it can cause headaches in nonstandard presentations in popovers on the iPad.
Note
You rarely offer users both “option” and “open” items in the same application. Recipe 2-7 uses the system-supplied Action item for the Options menu. You may want to use this in place of “Open in...” text for apps that exclusively use the open style.
Recipe 2-7. Document Interaction Controllers
@implementation TestBedViewController
{
NSURL *fileURL;
UIDocumentInteractionController *dic;
BOOL canOpen;
}
#pragma mark QuickLook
- (UIViewController *)
documentInteractionControllerViewControllerForPreview:
(UIDocumentInteractionController *)controller
{
return self;
}
- (UIView *) documentInteractionControllerViewForPreview:
(UIDocumentInteractionController *)controller
{
return self.view;
}
- (CGRect) documentInteractionControllerRectForPreview:
(UIDocumentInteractionController *)controller
{
return self.view.frame;
}
#pragma mark Options / Open in Menu
// Clean up after dismissing options menu
- (void) documentInteractionControllerDidDismissOptionsMenu:
(UIDocumentInteractionController *) controller
{
self.navigationItem.leftBarButtonItem.enabled = YES;
dic = nil;
}
// Clean up after dismissing open menu
- (void) documentInteractionControllerDidDismissOpenInMenu:
(UIDocumentInteractionController *) controller
{
self.navigationItem.rightBarButtonItem.enabled = canOpen;
dic = nil;
}
// Before presenting a controller, check to see if there's an
// existing one that needs dismissing
- (void) dismissIfNeeded
{
if (dic)
{
[dic dismissMenuAnimated:YES];
self.navigationItem.rightBarButtonItem.enabled = canOpen;
self.navigationItem.leftBarButtonItem.enabled = YES;
}
}
// Present the options menu
- (void) action: (UIBarButtonItem *) bbi
{
[self dismissIfNeeded];
dic = [UIDocumentInteractionController interactionControllerWithURL:fileURL];
dic.delegate = self;
self.navigationItem.leftBarButtonItem.enabled = NO;
[dic presentOptionsMenuFromBarButtonItem:bbi animated:YES];
}
// Present the open-in menu
- (void) open: (UIBarButtonItem *) bbi
{
[self dismissIfNeeded];
dic = [UIDocumentInteractionController interactionControllerWithURL:fileURL];
dic.delegate = self;
self.navigationItem.rightBarButtonItem.enabled = NO;
[dic presentOpenInMenuFromBarButtonItem:bbi animated:YES];
}
#pragma mark Test for Open-ability
-(BOOL)canOpen: (NSURL *) aFileURL
{
UIDocumentInteractionController *tmp =
[UIDocumentInteractionController
interactionControllerWithURL:aFileURL];
BOOL success = [tmp presentOpenInMenuFromRect:CGRectMake(0,0,1,1)
inView:self.view animated:NO];
[tmp dismissMenuAnimated:NO];
return success;
}
- (void) viewDidAppear:(BOOL)animated
{
// Only enable right button if the file can be opened
canOpen = [self canOpen:fileURL];
self.navigationItem.rightBarButtonItem.enabled = canOpen;
}
#pragma mark View management
- (void) loadView
{
self.view.backgroundColor = [UIColor whiteColor];
self.navigationItem.rightBarButtonItem =
BARBUTTON(@"Open in...", @selector(open:));
self.navigationItem.leftBarButtonItem =
SYSBARBUTTON(UIBarButtonSystemItemAction,
@selector(action:));
NSString *filePath = [NSHomeDirectory()
stringByAppendingPathComponent:@"Documents/DICImage.jpg"];
fileURL = [NSURL fileURLWithPath:filePath];
}
@end
Get This Recipe’s Code
To find this recipe’s full sample project, point your browser to https://github.com/erica/iOS-6-Advanced-Cookbook and go to the folder for Chapter 2.
Recipe: Declaring Document Support
Application documents are not limited to files they create or download from the Internet. As you discovered in the previous recipe, applications may handle certain file types. They may open items passed from other apps. You’ve already seen document sharing from the sending point of view, using the “open in” controller to export files to other applications. Now it’s time to look at it from the receiver’s end.
Applications declare their support for certain file types in their Info.plist property list. The Launch Services system reads this data and creates the file-to-app associations used by the document interaction controller.
Although you can edit the property list directly, Xcode 4 offers a simple form as part of the Project > Target > Info screen. Locate the Document Types section. You’ll find it below the Custom iOS Target Properties. Open the section and click + to add a new supported document type. Figure 2-8 shows what this looks like for an app that accepts JPEG image documents.
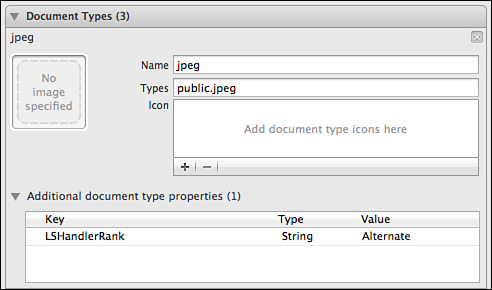
Figure 2-8. Declare supported document types in Xcode’s Target > Info pane.
This declaration contains three minimal details: a name, one or more UTIs, and a handler rank, in this case alternate.
• The name is both required and arbitrary. It should be descriptive of the kind of document in play, but it’s also somewhat of an afterthought on iOS. This field makes more sense when used on a Macintosh (it’s the “kind” string used by Finder), but it is not optional.
• Specify one or more UTIs as your types. This example specifies only public.jpeg. Add commas between items when listing several items. For example, you might have an “image” document type that opened public.jpeg, public.tiff, and public.png. Enumerate specific types when you need to limit file support. Although declaring public.image would cover all three types, it might allow unsupported image styles to be opened as well.
• The launch services handler rank describes how the app views itself among the competition for handling this file type. An “owner” says that this is a native app that creates files of this type. An “alternate,” as in Figure 2-8, offers a secondary viewer. You add the LSHandlerRank key manually in the additional document type properties.
You may optionally specify icon files. These are used in OS X as document icons and have minimal overlap with the iOS world. In the only case I can think of, you might see these icons in iTunes’ Apps tab, when using the File Sharing section to add and remove items. Icons are typically 320x320 (UTTypeSize320IconFile) and 64x64 (UTTypeSize64IconFile) and are normally limited to files that your app creates and defines a custom type for.
Under the hood, Xcode uses this interactive form to build a CFBundleDocumentTypes array in your application’s Info.plist. The following snippet shows the information from Figure 2-8 in its Info.plist form:
<key>CFBundleDocumentTypes</key>
<array>
<dict>
<key>CFBundleTypeIconFiles</key>
<array/>
<key>CFBundleTypeName</key>
<string>jpg</string>
<key>LSHandlerRank</key>
<string>Alternate</string>
<key>LSItemContentTypes</key>
<array>
<string>public.jpeg</string>
</array>
</dict>
</array>
Creating Custom Document Types
When your application builds new kinds of documents, you should declare them in the Exported UTI section of the Target > Info editor, which you see in Figure 2-9. This registers support for this file type with the system and identifies you as the owner of that type.
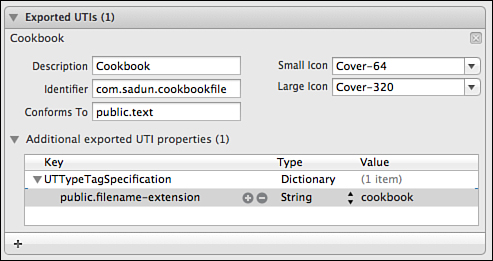
Figure 2-9. Declare custom file types in the Exported UTIs section of the Target > Info editor.
To define the new type, you supply a custom UTI (here, com.sadun.cookbookfile), document art (at 64 and 320 sizes), and specify a filename extension that identifies your file type. As with declaring document support, Xcode builds an exported declaration array into your project’s Info.plist file. Here is what that material might look like for the declaration shown in Figure 2-9:
<key>UTExportedTypeDeclarations</key>
<array>
<dict>
<key>UTTypeConformsTo</key>
<array>
<string>public.text</string>
</array>
<key>UTTypeDescription</key>
<string>Cookbook</string>
<key>UTTypeIdentifier</key>
<string>com.sadun.cookbookfile</string>
<key>UTTypeSize320IconFile</key>
<string>Cover-320</string>
<key>UTTypeSize64IconFile</key>
<string>Cover-64</string>
<key>UTTypeTagSpecification</key>
<dict>
<key>public.filename-extension</key>
<string>cookbook</string>
</dict>
</dict>
</array>
If added to your project in this way, your app should open any files with the cookbook extension, using the com.sadun.cookbookfile UTI.
Implementing Document Support
When your application provides document support, you should check for an “inbox” folder each time it becomes active. Specifically, see if an Inbox folder has appeared in the Documents folder. If so, you should move elements out of that inbox and to where they belong, typically in the main Documents directory. After the inbox has been cleared, delete it. This provides the best user experience, especially in terms of any file sharing through iTunes where the Inbox and its role may confuse users:
- (void)applicationDidBecomeActive:(UIApplication *)application
{
// perform inbox test here
}
When moving items to Documents, check for name conflicts, and use an alternative path name (typically by appending a hyphen followed by a number) to avoid overwriting any existing file. The following method helps find an alternative name for a destination path. It gives up after a thousand attempts, but seriously, none of your users should be hosting that many duplicate document names. If they do, there’s something deeply wrong with your overall application design.
Recipe 2-8 walks through the ugly details of scanning for the Inbox and moving files into place. It removes the Inbox after it is emptied. As you can see, any method like this is file manager-intensive. It primarily involves handling all the error combination possibilities that might pop up throughout the task. This should run quickly for small file support. If you must handle large files, such as video or audio, make sure to perform this processing on its own operation queue.
If you plan to support public.data files (that is, will open anything), you may want to display those files using UIWebView instances. Refer to Technical Q&A QA1630 (http://developer.apple.com/library/ios/#qa/qa1630) for details about which document types iOS can and cannot display in those views. Web views can present most audio and video assets, as well as Excel, Keynote, Numbers, Pages, PDF, PowerPoint, and Word resources in addition to simple HTML.
Recipe 2-8. Handling Incoming Documents
#define DOCUMENTS_PATH [NSHomeDirectory()
stringByAppendingPathComponent:@"Documents"]
#define INBOX_PATH [DOCUMENTS_PATH
stringByAppendingPathComponent:@"Inbox"]
@implementation InboxHelper
+ (NSString *) findAlternativeNameForPath: (NSString *) path
{
NSString *ext = path.pathExtension;
NSString *base = [path stringByDeletingPathExtension];
for (int i = 1; i < 999; i++)
{
NSString *dest =
[NSString stringWithFormat:@"%@-%d.%@", base, i, ext];
// if the file does not yet exist, use this destination path
if (![[NSFileManager defaultManager]
fileExistsAtPath:dest])
return dest;
}
NSLog(@"Exhausted possible names for file %@. Bailing.",
path.lastPathComponent);
return nil;
}
- (void) checkAndProcessInbox
{
// Does the Inbox exist? If not, we're done
BOOL isDir;
if (![[NSFileManager defaultManager]
fileExistsAtPath:INBOX_PATH isDirectory:&isDir])
return;
NSError *error;
BOOL success;
// If the Inbox is not a folder, remove it.
if (!isDir)
{
success = [[NSFileManager defaultManager]
removeItemAtPath:INBOX_PATH error:&error];
if (!success)
{
NSLog(@"Error deleting Inbox file (not directory): %@",
error.localizedFailureReason);
return;
}
}
// Retrieve a list of files in the Inbox
NSArray *fileArray = [[NSFileManager defaultManager]
contentsOfDirectoryAtPath:INBOX_PATH error:&error];
if (!fileArray)
{
NSLog(@"Error reading contents of Inbox: %@",
error.localizedFailureReason);
return;
}
// Remember the number of items
NSUInteger initialCount = fileArray.count;
// Iterate through each file, moving it to Documents
for (NSString *filename in fileArray)
{
NSString *source =
[INBOX_PATH stringByAppendingPathComponent:filename];
NSString *dest = [DOCUMENTS_PATH
stringByAppendingPathComponent:filename];
// Is the file already there?
BOOL exists =
[[NSFileManager defaultManager] fileExistsAtPath:dest];
if (exists) dest = [self findAlternativeNameForPath:dest];
if (!dest)
{
NSLog(@"Error. File name conflict not resolved");
continue;
}
// Move file into place
success = [[NSFileManager defaultManager]
moveItemAtPath:source toPath:dest error:&error];
if (!success)
{
NSLog(@"Error moving file from Inbox: %@",
error.localizedFailureReason);
continue;
}
}
// Inbox should now be empty
fileArray = [[NSFileManager defaultManager]
contentsOfDirectoryAtPath:INBOX_PATH error:&error];
if (!fileArray)
{
NSLog(@"Error reading contents of Inbox: %@",
error.localizedFailureReason);
return;
}
if (fileArray.count)
{
NSLog(@"Error clearing Inbox. %d items remain",
fileArray.count);
return;
}
// Remove the inbox
success = [[NSFileManager defaultManager]
removeItemAtPath:INBOX_PATH error:&error];
if (!success)
{
NSLog(@"Error removing inbox: %@",
error.localizedFailureReason);
return;
}
NSLog(@"Moved %d items from the Inbox", initialCount);
}
@end
To find this recipe’s full sample project, point your browser to https://github.com/erica/iOS-6-Advanced-Cookbook and go to the folder for Chapter 2.
Recipe: Creating URL-Based Services
Apple’s built-in applications offer a variety of services that can be accessed via URL calls. You can ask Safari to open web pages, Maps to show a map, or use the mailto: style URL to start composing a letter in Mail. A URL scheme refers to the first part of the URL that appears before the colon, such as http or ftp.
These services work because iOS knows how to match URL schemes to applications. A URL that starts with http: opens in Mobile Safari. The mailto: URL always links to Mail. What you may not know is that you can define your own URL schemes and implement them in your applications. Not all standard schemes are supported on iOS. The FTP scheme is not available for use.
Custom schemes enable applications to launch whenever Mobile Safari or another application opens a URL of that type. For example, should your application register xyz, any xyz: links go directly to your application for handling, where they’re passed to the application delegate’s URL opening method. You do not have to add any special coding there. If all you want to do is run an application, adding the scheme and opening the URL enables cross-application launching.
Handlers extend launching to allow applications to do something with the URL that’s been passed to it. They might open a specific data file, retrieve a particular name, display a certain image, or otherwise process information included in the call.
Declaring the Scheme
To declare your URL scheme, edit the URL Types section of the Target > Info editor (see Figure 2-10) and list the URL schemes you will use. The Info.plist section created by this declaration will look like this:
<key>CFBundleURLTypes</key>
<array>
<dict>
<key>CFBundleURLName</key>
<string>com.sadun.urlSchemeDemonstration</string>
<key>CFBundleURLSchemes</key>
<array>
<string>xyz</string>
</array>
</dict>
</array>
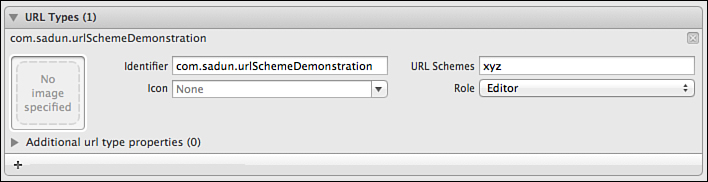
Figure 2-10. Add custom URL schemes in the URL Types section of the Target > Info editor.
The CFBundleURLTypes entry consists of an array of dictionaries that describe the URL types the application can open and handle. Each dictionary is quite simple. They contain two keys: a CFBundleURLName (defining an arbitrary identifier) and an array of CFBundleURLSchemes.
The Schemes array provides a list of prefixes that belong to the abstract name. You can add one scheme or many. This following example declares just one. You may want to prefix your name with an x (for example, x-sadun-services). Although the iOS family is not part of any standards organization, the x prefix indicates that this is an unregistered name. A draft specification for x-callback-url is under development at http://x-callback-url.com.
Former iOS developer (and current Apple employee) Emanuele Vulcano has started an informal registry at the CocoaDev Web site (http://cocoadev.com/index.pl?ChooseYourOwniPhoneURLScheme). iOS developers can share their schemes in a central listing, so you can discover services you want to use and promote services that you offer. The registry lists services and their URL schemes, and describes how these services can be used by other developers. Other registries include http://handleopenurl.com, http://wiki.akosma.com/IPhone_URL_Schemes, and http://applookup.com/Home.
Testing URLs
You can test whether a URL service is available. If the UIApplication’s canOpenURL: method returns YES, you are guaranteed that openURL: can launch another application to open that URL. You are not guaranteed that the URL is valid, only that its scheme is registered properly to an existing application:
if ([[UIApplication sharedApplication] canOpenURL:aURL])
[[UIApplication sharedApplication] openURL:aURL];
Adding the Handler Method
To handle URL requests, you implement the URL-specific application delegate method shown in Recipe 2-9. Unfortunately, this method is guaranteed only to trigger when the application is already running. If it is not, and the app were launched by the URL request, control first goes to the launching methods (will- and did-finish).
You want to ensure that your normal application:didFinishLaunchingWithOptions: method returns YES. This allows control to pass to application:openURL:sourceApplication:annotation:, so the incoming URL can be processed and handled.
Recipe 2-9. Providing URL Scheme Support
// Called if the app is open or if the launch returns YES
- (BOOL)application:(UIApplication *)application
openURL:(NSURL *)url
sourceApplication:(NSString *)sourceApplication
annotation:(id)annotation
{
NSString *logString = [NSString stringWithFormat:
@"DID OPEN: URL[%@] App[%@] Annotation[%@]
",
url, sourceApplication, annotation];
tbvc.textView.text =
[logString stringByAppendingString:tbvc.textView.text];
return YES;
}
// Make sure to return YES
- (BOOL)application:(UIApplication *)application
didFinishLaunchingWithOptions:(NSDictionary *)launchOptions
{
window = [[UIWindow alloc]
initWithFrame:[[UIScreen mainScreen] bounds]];
tbvc = [[TestBedViewController alloc] init];
UINavigationController *nav = [[UINavigationController alloc]
initWithRootViewController:tbvc];
window.rootViewController = nav;
[window makeKeyAndVisible];
return YES;
}
Get This Recipe’s Code
To find this recipe’s full sample project, point your browser to https://github.com/erica/iOS-6-Advanced-Cookbook and go to the folder for Chapter 2.
Summary
Want to share data across applications and leverage system-supplied actions? This chapter showed you how. You read about UTIs and how they are used to specify data roles across applications. You saw how the pasteboard worked, and how you could share files with iTunes. You read about monitoring folders and discovered how to implement custom URLs. You dived deep into the document interaction controller and saw how to add support for everything from printing to copying to previews. Here are a few thoughts to take with you before leaving this chapter:
• You are never limited to the built-in UTIs that Apple provides, but you should follow its lead when you decide to add your own. Be sure to use custom reverse domain naming and add as many details as possible (public URL definition pages, typical icons, and file extensions) in your exported definitions. Precision matters.
• Conformance arrays help you determine what kind of thing you’re working with. Knowing that it’s an image and not, say, a text file or movie, can help you better process the data associated with any file.
• The general pasteboard offers a terrific way to work with shared data, but if you have application-specific needs for cross-communication, there’s no reason you can’t use a custom pasteboard to share information. Just be aware that pasteboard data will not persist across reboots.
• The Documents folder belongs to the user and not to you. Remember that and provide respectful management of that directory.
• The documents interaction controller supercedes a lot of the reasons many developers used custom URL schemes. Use the controller to provide the app-to-app interaction your users demand, and don’t be afraid of introducing annotation support to help ease transition between apps.
• Don’t offer an “Open In” menu option unless there are onboard apps ready to back up that button. The solution you read about in this chapter is crude, but it’s better than dealing with angry, frustrated, or confused users through customer support. Consider providing an alert, backed by this method, which explains when there are no other apps available.