
10. Location
Location is meaningful. Where you compute is fast becoming just as important as how you compute and what you compute. iOS is constantly on the go, traveling with its users throughout the course of the day. Core Location infuses iOS with on-demand geopositioning. MapKit adds interactive in-application mapping enabling users to view and manipulate annotated maps. With Core Location and MapKit, you can develop applications that help users meet up with friends, search for local resources, or provide location-based streams of personal information. This chapter introduces these location-aware frameworks and shows you how you can integrate them into your iOS applications.
Authorizing Core Location
Apple requires users to both enable and authorize Core Location. These are two separate settings, leading to two separate checks that your application must perform. Users enable global location services in Settings > Privacy > Location (see Figure 10-1).

Figure 10-1. Users can enable and disable Location Services across their device in Settings > Privacy > Location. Wi-Fi is not needed on GPS-enabled devices.
Testing for Location Services
Test whether location services have been enabled by checking the locationServicesEnabled class method. This returns a Boolean value indicating whether the user has globally opted out of location services:
// Check for location services
if (![CLLocationManager locationServicesEnabled])
{
NSLog(@"User has disabled location services");
// Display instructions on enabling location services
return;
}
Users authorize location services on an app-by-app basis, as shown in Figure 10-2. This prompt appears the first time an application accesses location services. Users authorize or deny access by tapping Don’t Allow or OK.

Figure 10-2. Users authorize location services on an app-by-app basis. This prompt is displayed just once, and the user’s choice is stored to Settings > General > Privacy > Application Name.
Should users deny access, an application has no recourse other than to instruct them on how to manually restore it. Specifically, tell your users to amend their authorization choices in Settings > Privacy > Location Services.
You can guard against this possibility in two ways. First, you can test authorization status at launch using the authorizationStatus class method. When “not determined,” the user has not yet been prompted to decide. You may want to display some sort of precheck instructions, explaining why they should tap OK:
if ([CLLocationManager authorizationStatus] ==
kCLAuthorizationStatusNotDetermined)
{
// Perform any instructions, e.g. tell user that the
// app is about to request permission
}
Second, you can update your Info.plist to add a short one-sentence description of how location services will be used. Assign your text to the NSLocationUsageDescription key. You see this key used in Figure 10-2. The custom description (App Demonstrates Location Capabilities to Users) enables the prompt to better explain why the user should grant access. Similar keys exist for other privileged services, including access to the photo library, calendar, contacts, and reminders.
Resetting Location and Privacy
When testing, you may want to try various situations—that is, the user has granted access, the user has denied access, the user grants access and then revokes it, and so on. You need to use two separate Settings panes to produce these scenarios.
To switch the current authorization from on to off or vice versa, visit Settings > Privacy > Location (see Figure 10-3). Scroll down the screen. There you can find a list of applications that have requested location access. A toggle appears next to each application name.

Figure 10-3. Toggle privacy settings on a per-application basis in Settings > Privacy > Location. Scroll down to find the list of applications.
To restore privacy settings to their original pristine condition, that is, before the authorization prompt has yet displayed, go to Settings > General > Reset. Tap Reset Location & Privacy and then Reset Warnings (see Figure 10-4). This option restores privacy to its original pristine conditions—that is, the user will be prompted again for permission when the app is next launched. Its use is especially convenient for developers testing apps.
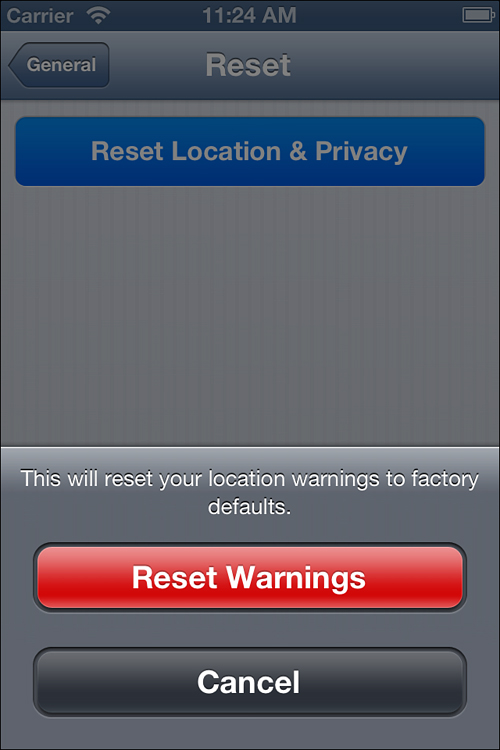
Figure 10-4. Resetting Location & Privacy enables applications to reprompt users for permission to access location information.
Checking User Permissions
The same authorization status check that enables you to know whether the user has yet to be prompted also enables you to test whether an app has been granted or denied permission. If granted, you can begin Core Location updates:
// Check user permissions
if ([CLLocationManager authorizationStatus] ==
kCLAuthorizationStatusDenied)
{
NSLog(@"User has denied location services");
return;
}
if ([CLLocationManager authorizationStatus] ==
kCLAuthorizationStatusAuthorized)
{
// The app need not query the user. It is already
// authorized.
}
manager = [[CLLocationManager alloc] init];
[manager startUpdatingLocation];
Note
Increase GPS accuracy by ensuring the unit’s date, time, and time zone are set correctly in Settings > General > Date & Time. Choose Set Automatically.
Testing Core Location Features
The CLLocationManager class offers several class methods that test whether Core Location features are enabled. These methods include the following:
• authorizationStatus specifies whether users have authorized location services for the application. If the user has agreed to allow the app to use location, this value returns YES.
• locationServicesEnabled indicates whether location services are enabled on the device at all. Users can enable and disable services entirely from Settings > Location Services or can enable/disable services on an application-by-application basis.
• significantLocationChangeMonitoringAvailable lets your app know whether the device can provide low-power/low-accuracy updates that occur when the primary cell tower association changes on the device. Significant location change monitoring offers a great way to roughly track vehicular travel and spot nearby attractions using little juice.
• headingAvailable establishes whether the location manager can provide heading events using an onboard compass.
• regionMonitoringAvailable specifies whether region monitoring is available on the current device; regionMonitoringEnabled indicates whether the user has enabled or overridden the feature. Region monitoring lets applications define geographical regions to track movement into and out from set areas. Applications can use this to associate actions with real-world location. For example, if you enter a region near your grocery store, applications can notify you to pick up an extra quart of milk. This is called geofencing.
Always test whether Core Location features are available before attempting to use them. Some of these limitations are device-specific (for example, you cannot use GPS on first-generation iPhones), whereas others are set by the user. If your user denies access to some of these, your application will be limited to whatever features (if any) remain authorized. Your app behavior in such situations will be tested during the App Store approval process.
Note
Use the CLLocationCoordinate2DIsValid() function to test whether a coordinate provides a valid latitude/longitude pair. The latitude needs to fall between –90 and 90 degrees and its longitude between –180 and 180 degrees.
Recipe: Core Location in a Nutshell
Core Location is easy to use, as demonstrated by the following steps. They walk you through a process of setting up your program to request location data that’s representative of normal use. These steps and Recipe 10-1 provide just one example of using Core Location’s services, showing how you might pinpoint a user’s location:
1. Add the Core Location framework to your project, and optionally edit your Info.plist to add a location usage description key.
2. Check whether the user has enabled Core Location by testing the CLLocationManager class’s locationServicesEnabled class value. Users have the option to switch off Core Location from General > Location Services in the Settings application.
3. Allocate a location manager. Set the manager’s delegate to your primary view controller or application delegate. Optionally, set its wanted distance filter and accuracy. The distance filter specifies a minimum distance in meters. The device must move at least this distance before it can register a new update. If you set the distance for 5 meters, for example, you will not receive new events until the device has moved that far. If you plan to test by walking, you probably want to reduce that number.
The accuracy property specifies the degree of precision that you’re requesting. To be clear, the location manager does not guarantee any actual accuracy. Setting the requested accuracy asks the manager to (attempt to) retrieve at least that level. When you do not need precision, the manager will deliver its results using whatever technology is available.
When you do need precision, the desiredAccuracy property informs the manager of that need. You’ll find a high level of accuracy especially important for walking and running applications. A lower accuracy level may work for driving in a car or for locating users within large geographical boundaries like cities, states, and countries.
4. Start locating. Tell the location manager to start updating the location. Delegate callbacks let you know when a new location has been found. This can take many seconds or up to a minute to occur.
5. Handle the location event delegate callbacks. You’ll deal with two types of callbacks: successes that return CLLocation data (locationManager:didUpdateLocations:, which replaces locationManager:didUpdateTo-Location:fromLocation: in iOS 6) and failures that do not (locationManager:didFailWithError:). Add these delegate methods to your code to catch location updates. In Recipe 10-1, the successful location logs an information overview (description) that includes the current latitude and longitude results.
Depending on your requested accuracy, you may receive three or four location callbacks based on the various location methods used and the requested accuracy, so take this nonlinearity into account.
6. Start moving and wait. Callbacks arrive asynchronously, as location data becomes available. The location information returned to your application includes positioning information along with accuracy measures that you can use to evaluate precision.
When possible, test your Core Location applications on the device and not in the simulator. Although the simulator can now support a variety of location scenarios, on-device testing will provide you with the best results. Deploying Recipe 10-1 to the device allows you to test results as you walk or drive around with your iOS unit. If testing while driving, it’s best if you’re the passenger and not the driver.
Recipe 10-1. Using Core Location to Retrieve Latitude and Longitude
- (void)locationManager:(CLLocationManager *)manager
didFailWithError:(NSError *)error
{
if ([CLLocationManager authorizationStatus] ==
kCLAuthorizationStatusDenied)
{
[self doLog:@"User has denied location services"];
return;
}
[self doLog:@"Location manager error: %@",
error.localizedFailureReason];
return;
}
- (void)locationManager:(CLLocationManager *)manager
didUpdateLocations:(NSArray *) locations
{
[self doLog:@"%@
",
[[locations lastObject] description]];
}
- (void) startCL
{
// Test for location services
if (![CLLocationManager locationServicesEnabled])
{
[self doLog:@"User has disabled location services"];
return;
}
// Test for authorization
if ([CLLocationManager authorizationStatus] ==
kCLAuthorizationStatusDenied)
{
[self doLog:@"User has denied location services"];
return;
}
manager = [[CLLocationManager alloc] init];
manager.delegate = self;
manager.desiredAccuracy = kCLLocationAccuracyBest;
manager.distanceFilter = 5.0f; // in meters
[manager startUpdatingLocation];
}
Get This Recipe’s Code
To find this recipe’s full sample project, point your browser to https://github.com/erica/iOS-6-Advanced-Cookbook and go to the folder for Chapter 10.
Location Properties
Each CLLocation instance returned by the updated location callback contains a number of properties that describe the device as it travels. Location objects can combine their various properties into a single text result, as used in Recipe 10-1, via the description instance method. Alternatively, you can pull out each value on a property-by-property basis. Location properties include the following:
• altitude—This property returns the currently detected altitude. It returns a floating-point number in meters above sea level. Speaking as a resident of the Mile High City, I can assure you the accuracy of this value is minimal at best. Use these results with caution.
• coordinate—Recover the device’s detected geoposition through the coordinate property. A coordinate is a structure with two fields, latitude and longitude, both of which store a floating-point value. Positive values for latitude lie north of the equator; negative ones south of the equator. Positive longitudes lie east of the meridian; negative longitudes west of the meridian.
• course—Use the course value to determine the general direction in which the device is heading. This value, which is 0 degrees for North, 90 degrees for East, 180 degrees for South, and 270 degrees for West, roughly approximates the direction of travel. For better accuracy, use headings (CLHeading instances) rather than courses. Headings provide access to magnetic and true North readings via the magnetometer.
• horizontalAccuracy—This property indicates the accuracy (that is, the uncertainty or measurement error) of the current coordinates in meters. Think of the coordinates that are returned as the center of a circle and the horizontal accuracy as its radius. The true device location falls somewhere in that circle. The smaller the circle, the more accurate the location. The larger the circle, the less accurate it is. Negative accuracy values indicate a measurement failure.
• verticalAccuracy—This property offers an altitude equivalent for horizontal accuracy. It returns the accuracy related to the true value of the altitude, which may (in theory) vary between the altitude minus that amount to the altitude plus that amount. In practice, altitude readings are extremely inaccurate, and the vertical accuracy typically bears little relationship to reality.
• speed—This value returns the speed of the device in meters per second.
• timestamp—This property identifies the time at which the location measurement took place. It returns an NSDate instance set to the time when the location was determined by Core Location.
Tracking Speed
The built-in speed property returned by each CLLocation instance enables you to track the device’s velocity over time. It reports this value in meters-per-second. You can easily compute KPH by multiplying that value by 3.6. For miles per hour, multiply by 2.23693629:
- (void)locationManager:(CLLocationManager *)manager
didUpdateLocations: (NSArray *) locations
{
CLLocation *newLocation = [locations lastObject];
// If a speed is detected, log that data in miles per hour
if (newLocation.speed > 0.0f)
{
NSString *speedFeedback = [NSString stringWithFormat:
@"Speed is %0.1f MPH, %0.1f KPH",
2.23693629 * newLocation.speed,
3.6 * newLocation.speed];
NSLog(@"%@", speedFeedback);
}
}
Recipe: Geofencing
A CLRegion object defines a geographical area centered on a given point, with some radius. Regions enable you to register for events whenever a user crosses its boundaries. Create new regions by calling initCircularRegionWithCenter:radius:identifier:. You can then pass that region to a location manager instance via startMonitoringForRegion:. Call this method for each region you want to monitor. Each identifier must be unique; otherwise, the new region will overwrite any old one.
Upon crossing a region boundary, the location manager delegate receives either the locationManager:didEnterRegion: or locationManager:didExitRegion: callback. If your app is not running, the system will relaunch it when registered boundaries are crossed, and the UIApplicationLaunchOptionsLocationKey will appear in the launch options dictionary. The first successful location lock that falls within the boundary triggers the callback.
This means that boundary-crossing signals are not real time and not 100% reliable. You may encounter situations in which a user crosses into the region and out of it again without registering a callback because no location was found during that time. In other words, use this feature with due caution.
Recipe 10-2 demonstrates several basic tasks you might need to do. The listMonitoredRegions method lists all the regions currently monitored by your application. Each app can register up to 20 regions at a time. These regions persist beyond each run, so the results may reflect regions added previously.
The second method clearMonitoredRegions halts monitoring. It stops ongoing monitoring for each region associated with the application. It iterates through the items in the location manager’s monitoredRegions property, requesting a stop for each region it finds. By clearing these regions, you ensure that the app will not relaunch when the device enters any of the previously monitored areas.
The third method is markAndMonitor. This method sets a fence at the current location using a radius of 50 meters. This range is easiest to test using an automobile, although you’d be better testing this feature as a passenger rather than a driver. The method generates its region name based on the number of existing regions. You must ensure that region names won’t conflict with existing registrations.
The final two methods implement callbacks for entering and leaving regions. Here, they’re minimally implemented—simply logging updates. An app that cares about region monitoring naturally offers more robust and interesting implementations.
Recipe 10-2. Using Core Location to Geofence
// List all regions registered to the current location manager
- (void) listMonitoredRegions
{
for (CLRegion *eachRegion in [manager monitoredRegions])
[self doLog:@"Region: %@", eachRegion];
}
// Remove all region monitors
- (void) clearMonitoredRegions
{
for (CLRegion *eachRegion in [manager monitoredRegions])
{
[self doLog:@"Stopping monitor for %@", eachRegion];
[manager stopMonitoringForRegion:eachRegion];
}
}
// Create a new region monitor at the current location
- (void) markAndMonitor
{
if (!mostRecentLocation)
{
[self doLog:@"No location. Sorry"];
return;
}
[self doLog:@"Setting Geofence"];
NSString *geofenceName = [NSString stringWithFormat:
@"Region #%d", manager.monitoredRegions.count + 1];
CLRegion *region = [[CLRegion alloc]
initCircularRegionWithCenter:
mostRecentLocation.coordinate
radius:50.0f identifier:geofenceName];
[manager startMonitoringForRegion:region];
}
// Callback for entering region
- (void) locationManager:(CLLocationManager *)manager
didEnterRegion:(CLRegion *)aRegion
{
[self doLog:@"Entered region %@", aRegion.identifier];
}
// Callback for departing region
- (void) locationManager:(CLLocationManager *)manager
didExitRegion:(CLRegion *)aRegion
{
[self doLog:@"Leaving region %@", aRegion.identifier];
}
Get This Recipe’s Code
To find this recipe’s full sample project, point your browser to https://github.com/erica/iOS-6-Advanced-Cookbook and go to the folder for Chapter 10.
Recipe: Keeping Track of “North” by Using Heading Values
The onboard location manager can return a computed course value that indicates the current direction of travel—that is, North, South, Southeast, and so on. These values take the form of a floating-point number between 0 and 360, with 0 degrees indicating North, 90 degrees being East, and so forth. This computed value is derived from tracking a user’s location over time. Newer units have a better way to determine a user’s course. Recent devices provide an onboard magnetometer, which can return both magnetic North and true North values.
Not every iOS device supports headings; although at this point, most modern units do. A magnetometer was first released on the iPhone 3GS. Test each device for this ability before subscribing to heading callbacks. If the location manager can generate heading events, the headingAvailable property returns YES. Use this result to control your startUpdatingHeading requests:
if (CLLocationManager.headingAvailable)
[manager startUpdatingHeading];
Cocoa Touch enables you to filter heading callbacks just as you do with distance ones. Set the location manager’s headingFilter property to a minimal angular change, specified as a floating-point number. For example, if you don’t want to receive feedback until the device has rotated at least 5 degrees, set the property to 5.0. All heading values use degrees, between 0.0 and 360.0. To convert a heading value to radians, divide by 180.0 and multiply it by Pi.
Heading callbacks return a CLHeading object. You can query the heading for two properties: magneticHeading and trueHeading. The former returns the relative location of magnetic North, the latter true North. True North always points to the geographic North Pole. Magnetic North corresponds to the pole of the Earth’s geomagnetic field, which changes over time. The iPhone uses a computed offset (called a declination) to determine the difference between these two.
On an enabled device, magnetic heading updates are available even if the user has switched off location updates in the Settings application. What’s more, users are not prompted to give permission to use heading data. Magnetic heading information cannot compromise user privacy so it remains freely available to your applications.
You can use the trueHeading property only with location detection. The iPhone requires a device’s location to compute the declination needed to determine true North. Declinations vary by geoposition. The declination for Los Angeles is different from Perth’s, which is different from Moscow’s, and London’s, and so forth. Some locations cannot use magnetometer readings. Certain anomalous regions, such as Michipicoten Island in Lake Superior and Grants, New Mexico, offer iron deposits and lava flows that interfere with normal magnetic compass use. Metallic and magnetic sources, such as your computer, car, or refrigerator, may also affect the magnetometer. Several “metal detector” applications in App Store leverage this quirk.
The headingAccuracy property provides an error value. This number indicates a plus or minus range that the actual heading falls within. A smaller error bar indicates a more accurate reading. A negative value represents an error in reading the heading.
You can retrieve raw magnetic values along the X, Y, and Z axes using the x, y, and z CLHeading properties. These values are measured in microteslas and normalized into a range that Apple states is –128 to 128. (The actual range is more likely to be –128 to 127 based on standard bit math.) Each axis value represents an offset from the magnetic field lines tracked by the device’s built-in magnetometer.
Recipe 10-3 uses CLHeading data to rotate a small image view with an arrow pointer. The rotation ensures that the arrow always points North. Figure 10-5 shows the interface in action.

Figure 10-5. The iPhone’s built-in magnetometer and the code from Recipe 10-4 ensure that this arrow always points North.
Recipe 10-3. Detecting the Direction of North
// Allow calibration
- (BOOL)locationManagerShouldDisplayHeadingCalibration:
(CLLocationManager *)manager
{
return YES;
}
// Respond to heading updates
- (void)locationManager:(CLLocationManager *)manager
didUpdateHeading:(CLHeading *)newHeading
{
CGFloat heading = -M_PI * newHeading.magneticHeading / 180.0f;
imageView.transform = CGAffineTransformMakeRotation(heading);
}
- (void) startCL
{
if (![CLLocationManager locationServicesEnabled])
{
[self doLog:@"User has disabled location services"];
return;
}
if ([CLLocationManager authorizationStatus] == kCLAuthorizationStatusDenied)
{
[self doLog:@"User has denied location services"];
return;
}
manager = [[CLLocationManager alloc] init];
manager.delegate = self;
if ([CLLocationManager headingAvailable])
[manager startUpdatingHeading];
else
imageView.alpha = 0.0f;
}
To find this recipe’s full sample project, point your browser to https://github.com/erica/iOS-6-Advanced-Cookbook and go to the folder for Chapter 10.
Recipe: Forward and Reverse Geocoding
The phrase reverse geocoding means transforming latitude and longitude information into human-recognizable address information; forward geocoding takes a user-readable address and converts it to latitude and longitude values. MapKit offers both forward and reverse geocoder routines as part of its CLGeocoder class.
The CLPlacemark class stores all this information. Its location property contains the latitude and longitude coordinate values. Its real-world properties (country, postalCode, locality, and so on) store the human-readable elements. This one class can be fully populated in either direction—from a real-world address or a coordinate.
Recipe 10-4 demonstrates how to perform both forward and reverse geocoding, using CLGeocoder’s block-based encoding approach. The user’s device must have network access to perform geocoding.
For forward geocoding, supply the address string. For reverse, create a CLLocation instance and pass that. The completion block is passed an array of matching placemarks. If that array is nil, an error explains why.
Apple enumerates several rules for using this class. First, perform only one geocoding request at a time. Second, always reuse existing geocoded results when possible, rather than recalculate already known details. For real-world updates, do not send more than one request per minute, and do not send any request until the user has moved at least some significant distance. Finally, perform geocoding only when there is a user around to see the results (that is, when the application is not suspended or running in the background).
The CLPlacemark object also offers individual properties with the same information outside the dictionary structure. These properties include the following:
• subThoroughfare stores the street number (for example, the “1600” for 1600 Pennsylvania Avenue).
• thoroughfare contains the street name (for example, Pennsylvania Avenue).
• sublocality, when available, refers to the local neighborhood name or a landmark (for example, White House).
• subAdministrativeArea is typically the local county, parish, or other administrative area.
• locality stores the city (for example, Washington, DC).
• administrativeArea corresponds to the state, such as Maryland or Virginia.
• postalCode is the postal or ZIP code (for example, 20500).
• country is self-explanatory, storing the country name, such as the United States.
• ISOcountryCode provides an abbreviated country name, such as “US.”
The addressDictionary stores an AddressBook framework-style version of the location. Additional properties include inlandWater and ocean, which describe any local lakes or oceans associated with the placemark and, charmingly, areasOf-Interest local to the placemark, such as national parks or attractions.
Recipe 10-4. Recovering Address Information from Coordinates and Descriptions
- (void) reverseGeocode: (id) sender
{
// Starting location
CLLocation *location = [[CLLocation alloc]
initWithLatitude:37.33168400
longitude:-122.03075800];
CLGeocoder *geocoder = [[CLGeocoder alloc] init];
[geocoder reverseGeocodeLocation:location
completionHandler:^(NSArray *placemarks, NSError *error)
{
if (!placemarks)
{
[self doLog:@"Error retrieving placemarks: %@",
error.localizedFailureReason];
return;
}
[self doLog:@"Placemarks from Location: %f, %f",
location.coordinate.latitude,
location.coordinate.longitude];
for (CLPlacemark *placemark in placemarks)
{
[self doLog:@"%@", placemark.description];
}
}];
}
- (void) geocode: (id) sender
{
// Retrieve coordinates from an address string
CLGeocoder *geocoder = [[CLGeocoder alloc] init];
NSString *address = @"1 Infinite Loop, Cupertino, CA 95014";
[geocoder geocodeAddressString:address completionHandler:
^(NSArray *placemarks, NSError *error)
{
if (!placemarks)
{
[self doLog:@"Error retrieving placemarks: %@",
error.localizedFailureReason];
return;
}
[self doLog:@"Placemarks from Description (%@):",
address];
for (CLPlacemark *placemark in placemarks)
{
[self doLog:@"%@", placemark.description];
}
}];
}
Get This Recipe’s Code
To find this recipe’s full sample project, point your browser to https://github.com/erica/iOS-6-Advanced-Cookbook and go to the folder for Chapter 10.
Recipe: Viewing a Location
The MKMapView class presents users with interactive maps built on the coordinates and scale you provide. The following code snippet sets a map’s region to a Core Location coordinate, showing 0.1 degrees of latitude and longitude around 1 Infinite Loop. In the United States, a region with that range corresponds to the size of a relatively small city or large town, approximately 5 by 7 miles. Figure 10-6 (left) shows that 0.1 degree-by-0.1 degree range on a map view:
// 1 Infinite Loop
CLLocation *location = [[CLLocation alloc]
initWithLatitude:37.33168400 longitude:-122.03075800];
mapView.region = MKCoordinateRegionMake(
location.coordinate, MKCoordinateSpanMake(0.1f, 0.1f));
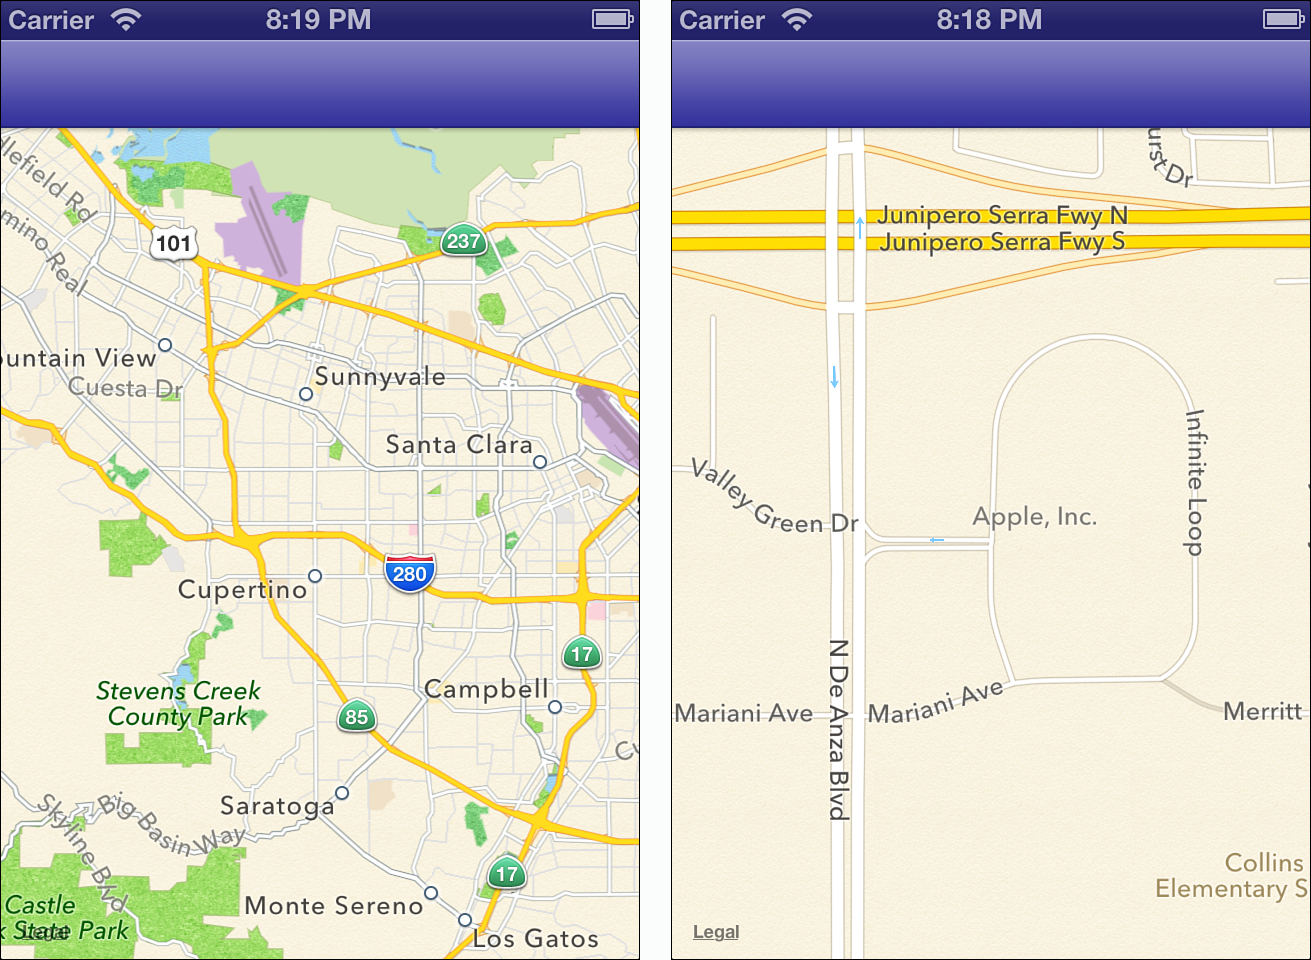
Figure 10-6. A coordinate region of one-tenth of a degree latitude by one-tenth of a degree longitude covers an area the size of a smallish city or large town, approximately 5 to 7 miles on a side (left). Shrinking that region down to 0.005 degrees on a side produces a street-level display (right).
Region size changes occur due to the curvature of the earth. At the equator, 1 degree of longitude corresponds to approximately 69 miles (~111 kilometers). This shrinks to 0 at the poles. Latitude is not affected by position. One degree of latitude is always approximately 69 miles (~111 km).
To view map data on a neighborhood level, cut the coordinate span down to 0.01 by 0.01. For a street-by-street level, you can use a smaller span, say one-half of that, 0.005 degrees latitude by 0.005 degrees longitude. Figure 10-6 (right) shows an Infinite Loop at this range.
You can avoid dealing with latitude and longitude degrees and create regions by specifying distance in meters. This snippet sets the view region to a 500-by-500 meter square around the central coordinate. That roughly approximates the 0.005 by 0.005 degree lat/lon span, showing a street-by-street presentation:
mapView.region = MKCoordinateRegionMakeWithDistance(
location.coordinate, 500.0f, 500.0f);
Finding the Best Location Match
Recipe 10-5 performs an on-demand location search using a timed approach. When the user taps the Find Me button, the code starts a 10-second timer. During this search, it attempts to find the best possible location. It uses the horizontal accuracy returned by each location hit to choose and retain the most accurate geoposition. When the time ends, the view controller zooms in its map view, revealing the detected location.
Recipe 10-5 displays the current user location both during and after the search. It does this by setting the showsUserLocation property to YES. When enabled, this property produces a pulsing pushpin that initially appears at the center of the map view at the device location. That location is detected with Core Location and updates according to user movement. You can test this in Simulator using the Debug > Location options.
Whenever this property is enabled, the map view tasks Core Location with finding the device’s current location. So long as this property remains set to YES, the map continues to track and periodically updates the user location. A pulsing circle that surrounds the pushpin indicates the most recent search accuracy. Keep in mind that the map makes no effort to place the user location into the visible portion of the map view; you need to take care of that yourself.
After the location is set, the Recipe 10-5 permits the user to start interacting with the map. Enabling the zoomEnabled property means users can pinch, drag, and otherwise interact with and explore the displayed map. This recipe waits until the full search completes before allowing this interaction, ensuring that the user location remains centered until control returns to the user.
Upon finishing the search, the recipe stops requesting location callbacks by calling stopUpdatingLocation. At the same time, it permits the map view to continue tracking the user, leaving the showsUserLocation property set to YES.
After unsubscribing to updates, the view controller instance sets its location manager delegate to nil. This assignment prevents any outstanding callbacks from reaching the controller after the timer finishes. Otherwise, the user and the outstanding callbacks might compete for control of the screen.
Recipe 10-5. Presenting User Location Within a Map
- (void)locationManager:(CLLocationManager *)manager
didFailWithError:(NSError *)error
{
NSLog(@"Location manager error: %@",
error.localizedDescription);
}
- (void)locationManager:(CLLocationManager *)manager
didUpdateLocations: (NSArray *) locations
{
CLLocation *newLocation = [locations lastObject];
// Keep track of the best location found
if (!bestLocation)
bestLocation = newLocation;
else if (newLocation.horizontalAccuracy <
bestLocation.horizontalAccuracy)
bestLocation = newLocation;
mapView.region = MKCoordinateRegionMake(
bestLocation.coordinate,
MKCoordinateSpanMake(0.1f, 0.1f));
mapView.showsUserLocation = YES;
mapView.zoomEnabled = NO;
}
// Search for n seconds to get the best location during that time
- (void) tick: (NSTimer *) timer
{
if (++timespent == MAX_TIME)
{
// Invalidate the timer
[timer invalidate];
// Stop the location task
[manager stopUpdatingLocation];
manager.delegate = nil;
// Restore the find me button
self.navigationItem.rightBarButtonItem =
BARBUTTON(@"Find Me", @selector(findme));
if (!bestLocation)
{
// no location found
self.title = @"";
return;
}
// Note the accuracy in the title bar
self.title = [NSString stringWithFormat:@"%0.1f meters",
bestLocation.horizontalAccuracy];
// Update the map and allow user interaction
[mapView setRegion:
MKCoordinateRegionMakeWithDistance(
bestLocation.coordinate, 500.0f, 500.0f)
animated:YES];
mapView.showsUserLocation = YES;
mapView.zoomEnabled = YES;
}
else
self.title =
[NSString stringWithFormat:@"%d secs remaining",
MAX_TIME - timespent];
}
// Perform user-request for location
- (void) findme
{
// disable right button
self.navigationItem.rightBarButtonItem = nil;
// Search for the best location
timespent = 0;
bestLocation = nil;
manager.delegate = self;
[manager startUpdatingLocation];
[NSTimer scheduledTimerWithTimeInterval:1.0f
target:self selector:@selector(tick:)
userInfo:nil repeats:YES];
}
- (void) loadView
{
self.view = [[UIView alloc] init];
// Add a map view
mapView = [[MKMapView alloc] initWithFrame:self.view.bounds];
[self.view addSubview:mapView];
if (!CLLocationManager.locationServicesEnabled)
{
NSLog(@"User has opted out of location services");
return;
}
else
{
// User generally allows location calls
manager = [[CLLocationManager alloc] init];
manager.desiredAccuracy = kCLLocationAccuracyBest;
self.navigationItem.rightBarButtonItem =
BARBUTTON(@"Find Me", @selector(findme));
}
}
Get This Recipe’s Code
To find this recipe’s full sample project, point your browser to https://github.com/erica/iOS-6-Advanced-Cookbook and go to the folder for Chapter 10.
Recipe: User Location Annotations
Recipe 10-5 provided a way to visually track a location event as it focused over time. Recipe 10-6 kicks this idea up a notch to track a device as it moves over time. Instead of sampling locations over time and picking the best result, it employs an easier approach while achieving similar results. Recipe 10-6 hands responsibility for user location to the map view and its userLocation property.
To enable this, you establish the showsUserLocation property and set the map view’s tracking mode to follow the user:
mapView = [[MKMapView alloc] init];
mapView.showsUserLocation = YES;
mapView.userTrackingMode = MKUserTrackingModeFollow;
Recipe 10–6 checks the user location once every few seconds. It updates the map view to reflect that location in several ways. First, it keeps the map centered on the user’s current position. Second, it adds a custom annotation to the user pin to display the current coordinates. Finally, it attempts to find a human-readable place mark to associate with it. If it finds one, it displays that placemark in a text view at the bottom of the screen, as shown in Figure 10-7.

Figure 10-7. Maps can provide their own user location information without tasking Core Location directly.
Annotations are pop-up views that attach to locations on the map. They offer a title and a subtitle, which you can set as wanted. Figure 10-7 shows the annotation built by Recipe 10-6. The MKUserLocation class provides direct access to the user location pin and its associated annotation. The annotation offers two readable and writable properties called title and subtitle. Set these properties as wanted. Recipe 10-6 sets the title to Location Coordinates and the subtitle to a string containing the latitude and longitude.
This class greatly simplifies annotation editing, but in this case you are limited to working with the map view’s user location property. The more general case for annotations proves more complicated. It is detailed in Recipe 10-7, which follows after this section.
Recipe 10-6. Tracking the Device Through the MapView
// Search for n seconds to get the best location during that time
- (void) tick: (NSTimer *) timer
{
self.title = @"Searching...";
if (mapView.userLocation)
{
// Check for valid coordinate
CLLocationCoordinate2D coord =
mapView.userLocation.location.coordinate;
if (!coord.latitude && !coord.longitude) return;
// Update titles
self.title = @"Found!";
[mapView setRegion:MKCoordinateRegionMake(coord,
MKCoordinateSpanMake(0.005f, 0.005f)) animated:NO];
mapView.userLocation.title = @"Location Coordinates";
mapView.userLocation.subtitle = [NSString stringWithFormat:
@"%f, %f", coord.latitude, coord.longitude];
// Attempt to retrieve placemarks
CLGeocoder *geocoder = [[CLGeocoder alloc] init];
[geocoder reverseGeocodeLocation:
mapView.userLocation.location
completionHandler:^(
NSArray *placemarks, NSError *error)
{
if (!placemarks)
{
NSLog(@"Error retrieving placemarks: %@",
error.localizedFailureReason);
return;
}
NSMutableString *marks = [NSMutableString string];
for (CLPlacemark *placemark in placemarks)
{
[marks appendFormat:@"
%@", placemark.description];
textView.alpha = 0.75f;
textView.text = marks;
}
}];
}
}
- (void) loadView
{
self.view = [[UIView alloc] init];
// Add map
mapView = [[MKMapView alloc] init];
mapView.showsUserLocation = YES;
mapView.userTrackingMode = MKUserTrackingModeFollow;
[self.view addSubview:mapView];
if (!CLLocationManager.locationServicesEnabled)
{
NSLog(@"User has opted out of location services");
return;
}
else
{
[NSTimer scheduledTimerWithTimeInterval:5.0f target:self
selector:@selector(tick:) userInfo:nil repeats:YES];
}
}
To find this recipe’s full sample project, point your browser to https://github.com/erica/iOS-6-Advanced-Cookbook and go to the folder for Chapter 10.
Recipe: Creating Map Annotations
Cocoa Touch defines an MKAnnotation protocol. You must design your own classes that conform to this protocol, which demands a coordinate property and title and subtitle instance methods. Listing 10-1 demonstrates how to do this. It builds a simple Map-Annotation class, providing the coordinate, title, and subtitle features demanded by the protocol. The extra tag integer is not required by the protocol and is added solely for convenience.
Listing 10-1. Building a Map Annotation Object
@interface MapAnnotation : NSObject <MKAnnotation>
- (id) initWithCoordinate: (CLLocationCoordinate2D) aCoordinate;
@property (nonatomic, readonly) CLLocationCoordinate2D coordinate;
@property (nonatomic, copy) NSString *title;
@property (nonatomic, copy) NSString *subtitle;
@property (nonatomic, assign) NSUInteger tag;
@end
@implementation MapAnnotation
- (id) initWithCoordinate: (CLLocationCoordinate2D) aCoordinate
{
if (self = [super init])
coordinate = aCoordinate;
return self;
}
@end
Creating, Adding, and Removing Annotations
To use annotations, you create them and add them to a map view. You can do so by adding a single annotation at a time:
anAnnotation = [[MapAnnotation alloc] initWithCoordinate:coord];
[mapView addAnnotation:anAnnotation];
Alternatively, you can build an array of annotations and add them all at once:
[annotations addObject:annotation];
[mapView addAnnotations:annotations];
Delete annotations from a map by performing removeAnnotation: to remove just one annotation or removeAnnotations: to remove all items in an array.
If you need to return a map view to a no-annotations state, remove all its existing annotations. This call recovers the array of existing annotations via the annotations property. It then removes these from the map:
[mapView removeAnnotations:mapView.annotations];
This removes the automated user location and any other programmatic annotations, so to clear just the application annotations, you might want to test each annotation to ensure it’s not of the MKUserLocation class:
- (void) clear
{
NSArray *annotations =
[NSArray arrayWithArray:mapView.annotations];
for (id annotation in annotations)
if (![annotation isKindOfClass:[MKUserLocation class]])
[mapView removeAnnotation:annotation];
}
Annotation Views
Annotation objects are not views. The MapAnnotation class in Listing 10-1 does not create any onscreen elements. It is an abstract class that describes an annotation. It’s the map view’s job to convert that annotation description into an actual onscreen view when required. Those views belong to the MKAnnotationView class. You can retrieve the annotation view for an existing annotation by querying the map. Supply the annotation and request the matching view. If the annotation is not currently rendered on the map view, the following call returns nil:
annotationView = [mapView viewForAnnotation:annotation];
MKPinAnnotationView is a handy MKAnnotationView subclass you may want to use. These are the pins that you can drop onto maps. When tapped, they display a callout view.
Customizing Annotation Views
After adding annotations, via addAnnotation: or addAnnotations:, the map view starts building the annotation views that correspond to those annotations. When it finishes, its delegate, which must declare the MKMapViewDelegate protocol, receives a callback. The delegate is notified with mapView:didAddAnnotationViews: after the views are built and added to the map. This callback provides your application with an opportunity to customize those annotation views.
An array of annotation views is passed as the second parameter to that callback. You can iterate through this array to set features like the view’s image or to customize its accessory buttons. Listing 10-2 shows how you might prepare each of these annotation views for use based on their annotations.
Listing 10-2. Preparing Annotation Views for Use
- (void)mapView:(MKMapView *)mapView
didAddAnnotationViews:(NSArray *)views
{
// Initialize each view
for (MKPinAnnotationView *mkaview in views)
{
// Only update custom items
if (![mkaview isKindOfClass:
[MKPinAnnotationView class]])
continue;
// Set the color to purple
MapAnnotation *annotation = mkaview.annotation;
mkaview.pinColor = MKPinAnnotationColorPurple;
// Add buttons to each one
UIButton *button = [UIButton
buttonWithType:UIButtonTypeDetailDisclosure];
mkaview.rightCalloutAccessoryView = button;
}
}
This example sets a pin color and displays a button, which allows the application to respond to user interactions with annotation views. You are not limited to the built-in annotation protocol, which was minimally satisfied with the class defined in Listing 10-1. Design your annotation class with any instance variables and methods you like for more control over how you query the annotations to prepare your annotation views.
Each annotation view provides direct access to its annotation via its annotation property. Use that annotation data to build the exact view you need. Here are some of the annotation view properties you’ll want to customize in your MapKit applications.
Each MKPinAnnotation View uses a color. You set this color via the pinColor property. MapKit provides three color choices: red (MKPinAnnotationColorRed), green (MKPinAnnotationColorGreen), and purple (MKPinAnnotationColorPurple). According to Apple’s human-interface guidelines, red pins indicate destination points, places that the user may want to explore or navigate to. Green pins are starting points, places from which the user can begin a journey. Purple pins are user-specified. When you encourage users to add new data into the map, use purple to indicate that the user has defined them. As you saw in previous recipes, a map view-defined light-blue pin indicates the current user location.
Each annotation view offers two slots, on the left and right of the callout bubble. The right-CalloutAccessoryView and leftCalloutAccessoryView properties allow you to add buttons or any other custom subview to your callout. Listing 10-2 adds a detail disclosure right callout. You are not limited to buttons, however. You might add image views or other standard Cocoa Touch views as needed.
The canShowCallout property controls whether tapping a button produces a callout view. Enabled by default, you can set this property to NO if you do not want user taps to open callouts.
You can offset the callouts (normally, they appear directly above the pin in question) by changing the calloutOffset property to a new CGPoint. You can also change the position for the annotation view itself by adjusting its centerOffset property. With pin annotations, the view’s art is set by default, but you can create custom annotation art by assigning a UIImage to the view’s image property. Combine custom art with the center offset to produce the exact map look you want.
Responding to Annotation Button Taps
MapKit simplifies button tap management. Whenever you set a callout accessory view property to a control, MapKit takes over the control callback. You do not need to add a target and action. MapKit handles that for you. All you have to do is implement the mapView:annotationView:calloutAccessoryControlTapped: delegate callback, as demonstrated in Recipe 10-7.
Recipe 10-7 enables users to add pins to the current map by tapping a Tag button, which sets the pin at the center of the map. Whenever the user adjusts the map, the map view delegate receives a mapView:regionDidChangeAnimated: callback. The callback pulls the coordinate of the map center via its centerCoordinate property and stores it as the current coordinate.
When the user taps the disclosure button on an accessory view, the application calculates the distance from that pin to the current user location and displays it (in meters) at the top of the screen. Figure 10-8 shows what this might look like, if used near Apple’s Infinite Loop headquarters.

Figure 10-8. These custom annotation views report the time and location when the user sets the pin. Tapping on the accessory view calculates the distance from the pin to the current user location, displaying it at in the title bar.
Recipe 10-7. Creating an Annotated, Interactive Map
// Test this using a single set location rather than zooming
// around highways
// Update current location when the user interacts with map
- (void)mapView:(MKMapView *)aMapView
regionDidChangeAnimated:(BOOL)animated
{
current = [[CLLocation alloc]
initWithLatitude:mapView.centerCoordinate.latitude
longitude:mapView.centerCoordinate.longitude];
}
- (void)mapView:(MKMapView *)aMapView
annotationView:(MKAnnotationView *)view
calloutAccessoryControlTapped:(UIControl *)control
{
// Calculate coordinates and distance
CLLocationCoordinate2D viewCoord = view.annotation.coordinate;
CLLocation *annotationLocation =
[[CLLocation alloc] initWithLatitude:viewCoord.latitude
longitude:viewCoord.longitude];
CLLocation *userLocation = mapView.userLocation.location;
float distance = [userLocation
distanceFromLocation:annotationLocation];
// Set the title
self.title = [NSString stringWithFormat:@"%0f meters", distance];
}
// Set colors and add buttons
- (void)mapView:(MKMapView *)mapView
didAddAnnotationViews:(NSArray *)views
{
// Initialize each view
for (MKPinAnnotationView *mkaview in views)
{
if (![mkaview isKindOfClass:[MKPinAnnotationView class]])
continue;
// Set the color to purple
mkaview.pinColor = MKPinAnnotationColorPurple;
// Add buttons to each one
UIButton *button = [UIButton buttonWithType:
UIButtonTypeDetailDisclosure];
mkaview.rightCalloutAccessoryView = button;
}
}
- (void) tag
{
// Create a new annotation
MapAnnotation *annotation =
[[MapAnnotation alloc] initWithCoordinate:current.coordinate];
// Label it with time and place
NSString *locString = [NSString stringWithFormat:@"%f, %f",
current.coordinate.latitude, current.coordinate.longitude];
NSDateFormatter *formatter = [[NSDateFormatter alloc] init];
formatter.timeStyle = NSDateFormatterLongStyle;
annotation.title = [formatter stringFromDate:[NSDate date]];
annotation.subtitle = locString;
// Add it
[mapView addAnnotation:annotation];
}
// Clear all user annotations
- (void) clear
{
NSArray *annotations = [NSArray arrayWithArray:mapView.annotations];
for (id annotation in annotations)
if (![annotation isKindOfClass:[MKUserLocation class]])
[mapView removeAnnotation:annotation];
}
- (void) loadView
{
self.view = [[UIView alloc] init];
// Add map
mapView = [[MKMapView alloc] init];
mapView.showsUserLocation = YES;
mapView.userTrackingMode = MKUserTrackingModeFollow;
[self.view addSubview:mapView];
if (!CLLocationManager.locationServicesEnabled)
{
NSLog(@"User has opted out of location services");
return;
}
else
{
mapView.delegate = self;
self.navigationItem.rightBarButtonItem =
BARBUTTON(@"Tag", @selector(tag));
self.navigationItem.leftBarButtonItem =
BARBUTTON(@"Clear", @selector(clear));
}
}
Get This Recipe’s Code
To find this recipe’s full sample project, point your browser to https://github.com/erica/iOS-6-Advanced-Cookbook and go to the folder for Chapter 10.
Summary
Core Location and MapKit go hand in hand, offering ways to locate a device’s position and present related location information in a coherent map-based presentation. In this chapter, you discovered how to use Core Location to obtain real-time latitude and longitude coordinates and how to reverse geocode those coordinates into real address information. You read about working with speed and course headings both in their native and computed forms. You learned how to set up a map, adjust its region, and add a user location and custom annotations. Here are a few final thoughts for you before you navigate away from this chapter:
• Know your audience and how they will be using your application before deciding how you will approach your location needs. Some Core Location features work better for driving, others for walking and biking.
• Test, test, test, test, test, test. Core Location applications must be exhaustively tested and tuned in the field as well as at Xcode for best results in the App Store. Retrieving location data is not an exact science. Build the required slack into your application.
• “Oh, didn’t I see you at -104.28393 West today?” Addresses are a lot more meaningful to most people than coordinates. Use reverse geocoding to produce human-readable information, and use forward geocoding to translate from addresses to coordinates.
• Postal codes/ZIP codes are especially API-friendly. Even if you do not plan to use a map presentation in your application, ZIP codes are ready for traditional GUI integration. A reverse-geocoded ZIP code can help retrieve nearby retail information, such as addresses, phone numbers, and information about nearby parks and attractions.
• Well-designed annotation views help bring meaningful interactivity into a map view. Don’t be afraid to use buttons, images, and other custom elements that expand a map’s utility.