
12. StoreKit
StoreKit offers in-app purchasing that integrates into your software. With StoreKit, end users can use their iTunes credentials to buy unlockable features, media subscriptions, or consumable assets, such as fish food or sunlight, from within an application. They make these purchases after initially procuring and installing the application from the App Store. This chapter introduces StoreKit and shows you how to use the StoreKit API to create purchasing options for users. In this chapter, you read about getting started with StoreKit. You learn how to set up products at iTunes Connect and localize their descriptions. You see what it takes to create test users and how to work your way through various development/deployment hurdles. This chapter teaches you how to solicit purchase requests from users and how to hand over those requests to the store for payment. By the time you finish this chapter, you’ll have learned about the basic StoreKit picture, from product creation to sales.
Getting Started with StoreKit
When your application demands a more complex purchase model than buy-once use-always, consider StoreKit. StoreKit offers developers a way to sell products from within an application to create additional revenue streams. There are many reasons to use StoreKit. You might support a subscription model, provide extra game levels on demand, or introduce other unlockable features.
With StoreKit, you choose the items you want to sell and you set their price. StoreKit and iTunes take care of the details. They provide the infrastructure that brings that storefront into your application through a series of API calls and delegate callbacks.
Fulfillment
On purchase, users do not download new code. All StoreKit-based applications ship with their features already built in. For example, StoreKit purchases might enable users to access parts of your application that you initially set as off limits. They can also download or unlock new data sets (which now can be hosted by Apple) or authorize access to subscription-based web feeds or upgrade items in-game for more power or longer play. StoreKit provides the way users can pay to access to these features, enabling them to go live after purchase.
StoreKit Limitations
You cannot use in-app purchasing to sell “hard” assets (such as T-shirts) or intermediate currency (such as store credit for a Web site). And, yes, real gambling is forbidden as well. Any goods sold via in-app purchase must be delivered digitally to your application. Your purchasable items must not include pornography, hate speech, or defamation.
The StoreKit Development Paradox
Unfortunately, StoreKit presents a paradox, which is this: Although you can easily add IAP features to applications that are already for sale at the App Store, you cannot fully develop and test your in-application purchasing for new apps until you have already submitted your application to iTunes. And you cannot fully submit your application to iTunes knowing that you’re not done developing it. So, what’s a developer to do? How do you properly develop new applications for StoreKit?
There is, fortunately, a solution. This approach is shown in Figure 12-1. To work around the StoreKit paradox, you upload a fully working but not fully fleshed-out application to iTunes Connect. You do this with the full understanding that you’ll be replacing your binary at some point in the future.
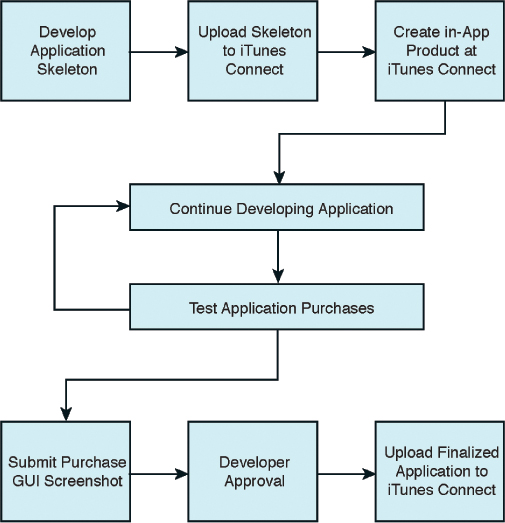
Figure 12-1. The StoreKit development process for new apps.
Apple describes this placeholder as an approvable app, one that can be submitted to the App Store review process and be approved for sale. Should the application be rejected, your in-app items will stop working. You must have an app either already approved or in active review to develop IAP items for it.
Apple explains it this way in its technical note TN2259; the emphatic capitals are original to the note:
DO NOT upload the development binary to iTunes Connect until the application is ready for App Review approval. If the binary is present in iTunes Connect and it is not fully functional, App Review will review the binary and likely reject the development binary. Testing In App Purchase will fail if you or App Review reject your most recent binary in iTunes Connect. The workaround in this case is to upload a binary without In App Purchase features that can get approved by App Review. Once the binary is approved, resume testing the binary with In App Purchase features.
Note
When submitting your application for testing, roll back your availability date in the iTunes Connect Pricing tab. This prevents your not-ready-for-prime-time app from inadvertently appearing for sale on the App Store until you’re ready. Reset that date when you’re ready to go live.
Developing and Testing
For new apps, after you submit your application and define at least one in-application purchase item at iTunes Connect, you can begin to fully develop and test your application and its purchases. (For existing apps, you can create that in-app purchase item without submitting an approvable skeleton.)
Use the sandbox version of StoreKit along with test user accounts to buy new items without charging a credit card. The sandbox StoreKit enables you to test your application features before, during, and after payment.
Submission
When you finish development and are ready to submit a final version to the App Store, you complete the StoreKit development process at iTunes Connect:
• You upload a screenshot showing the GUI for your application purchase.
• If you uploaded a placeholder app, and it has not yet been through the review process, you self-reject it. (If it has been approved, just upload a new version instead.)
• You upload the new fully working version of your application for review that contains the in-app purchase support.
• At iTunes Connect, you submit the in-app purchase for review.
The following sections walk you through many of the process details. You read about the StoreKit process specifics and learn how to add StoreKit to your application.
Creating Test Accounts
Test accounts play a key role in the StoreKit development scenario. Create one or more new user accounts before you begin developing new StoreKit-enabled applications. These accounts enable you to log in to iTunes to test your application payments without charging money.
Here’s how you add a new user. Log in to iTunes Connect, and choose Manage Users > Test User. Click Add New User. iTunes Connect presents the form shown in Figure 12-2. When filling out this form, keep the following points in mind:

Figure 12-2. Add new test users in iTunes Connect by filling out this form.
• Each e-mail address must be unique, but it doesn’t need to be real. So long as the address does not conflict with any other one in the system, you’ll be fine. As you might guess, other developers have already taken the easy-to-type addresses, such as abc.com, abcd.com, and so on.
• Names do not have to be real. Birthdates do not have to be real. Consider using a basic alphabetical naming system such as “a Sadun,” “b Sadun,” “c Sadun,” and so forth. Everyone was born on January 1st.
• Apple keeps changing its password rules. Generally, passwords must be at least eight characters and include one uppercase character, one lowercase character, and a numeral. Your password cannot contain three consecutive identical characters, and it cannot be so simple that Apple flags it as needing to be “complex.” As you’d imagine, this can be a pain when it comes to typing items over and over. A single easy-to-remember disposable password can be used for all your test accounts (for example, AlphaBeta1). You may want to invest in a typing utility such as Type2Phone (houdah.com). This app enables you to type over a Bluetooth connection from your computer to your phone, simplifying repetitive text entry.
• The secret question/answer fields are meaningless in this context, but they cannot be left empty. You cannot enter the same string for both fields, and the question field must be at least six characters. Consider using a question/answer pair such as “aaaaaa” and “bbbbbb” to simplify account creation.
• Selecting an iTunes Store is required. This store sets the region for your testing. If you plan to use multiple language support for various stores, make sure you create a test account in each affected region.
• You can delete user accounts and add new ones on-the-fly. If you run out of users who haven’t yet purchased any items, just create new users as needed.
• You never want to sign into your fake user “account” in the Settings application. If you try to do so, the iOS device forces you to consent to its standard user agreement and then tries to extract a valid credit card from you. Use Settings to log out of an account but avoid it for logging in to one.
• Get into the habit of logging out of your accounts in Settings each time you test your application.
• Test accounts are disposable. When an account has purchased an item, feel free to move onto the next one, so your testing starts fresh again. There is no practical upper limit to test accounts, and you can create as many as you need to perform the testing your application demands.
Creating New In-App Purchase Items
Each in-application purchase item must be registered at iTunes Connect. To create a new purchase, navigate to Manage Your Apps, and select any application that is either approved or in-review. Click Manage In-App Purchases, and then click Create New.
iTunes Connect prompts you to select an in-app purchase type. You can choose from the following:
• Consumable—Create a purchase that is used up by the user during the normal use of the app, such as a power boost, extra bullets, or fish food. Consumables may expire, and they naturally decrease over time during use.
• Nonconsumable—Create a one-time purchase item, such as a specialty rifle, access to additional levels or a full-featured interface, or other unlockables. Nonconsumables do not expire or decrease with use.
• Auto-Renewable subscriptions—These enable users to purchase content for a set period of time, which auto-charges the user at the end of each time period until the user opts out of the service. Auto-Renewable subscriptions are automatically propagated to all devices registered to the same Apple ID account.
• Free subscriptions—Used for putting free content into Newstand apps.
• Nonrenewing subscriptions—Offer time-limited access such as 1-year access to a film archive.
Select the kind of in-app purchase you want to create and then fill out the details for the new purchase item. You can start by entering basic details about the purchase, setting its pricing and availability, and entering a screenshot for review.
Filling Out the Details Section
The details section consists of a reference name, a product ID, and a list of languages. Figure 12-3 shows what this screen looks like. The reference name should describe the purchase in an easily understood manner. The Product ID provides unique identifier for looking up the product in the App Store database.

Figure 12-3. Set up the purchase details by creating a unique product ID.
Reference Name
The reference name is used to provide a name for iTunes Connect’s search results and in the application’s Top In-App Purchase section in the App Store. So, enter a meaningful name (for example, “Unlock Sky Master Level 3 Purchase”) that helps you and others know what the item is and how it is used in your application.
Product ID
The product ID is a unique identifier, similar to the application identifier used for your app. As a rule, I use my application ID and append a purchase name to that such as com.sadun.scanner.optionalDisclosure. You need this identifier to query the store and retrieve details about this purchase. The same rules apply to the product ID as to application IDs. You cannot use an identifier more than once. You cannot “remove” it from the App Store. When registered, it’s registered forever. If you delete it before approval, you cannot re-create it.
You need to add one or more localized language descriptions of the purchase as well.
Adding Localized Descriptions
Each purchasable item must describe itself to your application. Keep in mind that your application is the primary consumer for this information. In the localized description, you need to specify a display name (the name of the product being purchased) and description (an explanation to the user that describes what the purchase is and does).
These latter two elements are localized to specific languages. You can create data for any or all languages so long as you define at least one. You cannot submit a new purchase item without creating one or more name/description pairs. For developers who are primarily targeting the U.S. store, a single English entry should cover their needs. Although, you may consider revisiting this with the help of professional translators at a later time.
If your application is sold worldwide, you’ll likely want to mirror the existing localizations you use with your app descriptions and in-app features. If your iTunes store marketing material provides a Japanese localization, for example, and your application offers a Japanese language version, you need to create a Japanese-localized in-app purchase description as well. If you do not, you can still use in-app purchases, but the language will default to whatever localizations you have provided.
Note
Always use native speakers to localize, edit, and proof text. Google Translate is not a substitution for proper localization. Translation bureaus like Traducto (traductoapp.com) offer both translation and proofing at various skill levels including native speakers and professional translators.
Entering Product Information
When entering the localized product information data (see Figure 12-4), keep some points in mind:
• Your application is the consumer for this information. The text you type in iTunes Connect helps create the purchase GUI that your application presents to the user.
• The user’s language settings select the localization. If a localization is not available, it defaults to one of the other descriptions provided.
• If you plan to use a simple alert sheet with a Buy/Cancel choice, keep your wording tight. Limit your verbosity. If you use a more complex view, consider that as well.

Figure 12-4. Add each language separately.
No matter how you create your GUI, remember that your description must convey the action of purchasing and a description of the item purchased—for example, “When purchased, this option unlocks this application’s detail screens. These screens reveal even more data about the scanned MDNS services.” A shorter description, such as “Extra detail screens” or “Unlock more details,” doesn’t explain to users how the purchase works and what they can expect to receive.
Note
You can edit item display details during review at iTunes Connect. You must submit new changes for review after the purchased items have been approved.
Filling Out the Pricing Section
The pricing section specifies how a purchase is priced. Leave the Cleared for Sale item checked. The Cleared for Sale check box ensures that your applications, both development and distribution, have programmatic access to the purchase item.
Note
You can change the pricing tier and Cleared for Sale check box at any time during review. You must submit new changes for review after the purchased items have been approved. You cannot edit the identifier or reuse an existing identifier, nor can you change the type of product after creating the purchase item.
Submitting a Purchase GUI Screen Shot
The For Review section appears at the bottom of the item sheet. You do not use this section until you have finished developing and debugging your application. You can leave the state of your product as Waiting for Screenshot until you finish testing it and are ready to upload it for review. When you are at that point, upload a screen shot into the provided field. The screen shot must show the in-app purchase in action, demonstrating the custom GUI you built.
Figure 12-5 displays the submission section. Valid pictures must be at least 640x960 pixels in size. The screen shot highlights how you have developed the purchase feature. Submit an image highlighting the purchase.

Figure 12-5. You must submit a screen shot showing your in-application purchase GUI to Apple when you are ready to have that purchase reviewed.
Submitting In-App Purchases Products for Review
After you finish your sandbox testing and are confident that the application and the in-app purchasing are ready for Apple to review, you submit the purchase for its own review process. Upload your new app, return to your App’s Manage In-App Purchases, select any purchase item, and click Submit for Review.
Building a Storefront GUI
Apple’s StoreKit framework does not provide a built-in GUI for soliciting user purchases. You must create your own. Retrieve localized prices and descriptions from the App Store by creating SKProductsRequest instances. This class asks the store for that information based on the set of identifiers you provide. Each identifier must be registered at iTunes Connect as an in-app purchase item.
Allocate a new products request instance and initialize it with that set. You can add identifiers for items you’ve already established and items you plan on adding in the future. Because each identifier is basically a string, you could create a loop that builds identifiers according to some naming scheme (for example, com.sadun.app.sword1, com.sadun.app.sword2, and so on) to provide for future growth. This snippet searches for a single item:
#define PRODUCT_ID @"com.sadun.moo.baaa"
// Create the product request and start it
SKProductsRequest *productRequest =
[[SKProductsRequest alloc] initWithProductIdentifiers:
[NSSet setWithObject:PRODUCT_ID]];
productRequest.delegate = self;
[productRequest start];
When using a products request, your delegate must declare and implement the SKProductsRequestDelegate protocol. This consists of three simple callbacks. Listing 12-1 shows these callback methods for a simple application. When a response is received, this code looks for a product (only one was requested, per the preceding code snippet) and retrieves its localized price and description.
It then builds a simple alert using the description as the alert text and two buttons (the price and “No Thanks”). This alert functions as a basic purchase GUI. Figure 12-6 shows what this alert might look like.

Figure 12-6. This alert is built from the localized description retrieved from the App Store.
Note
StoreKit will not work if you are not connected to the network in some way. Refer to Chapter 5, “Networking,” to find recipes that help check for network access.
Listing 12-1. Products Request Callback Methods
- (void)request:(SKRequest *)request
didFailWithError:(NSError *)error
{
NSLog(@"Error: Could not contact App Store properly: %@",
error.localizedFailureReason);
}
- (void)requestDidFinish:(SKRequest *)request
{
NSLog(@"Request finished");
}
- (void) alertView: (UIAlertView *) alertView
clickedButtonAtIndex: (NSInteger)answer
{
NSLog(@"User %@ buy", answer ? @"will" : @"will not");
if (!answer) return;
// Ready to purchase – make purchase here
// (see next section)
}
- (void)productsRequest:(SKProductsRequest *)request
didReceiveResponse:(SKProductsResponse *)response
{
// Find a product
SKProduct *product = [[response products] lastObject];
if (!product)
{
NSLog(@"Error: Could not find matching products");
return;
}
// Retrieve the localized price
NSNumberFormatter *numberFormatter =
[[NSNumberFormatter alloc] init];
[numberFormatter setFormatterBehavior:
NSNumberFormatterBehavior10_4];
[numberFormatter setNumberStyle:NSNumberFormatterCurrencyStyle];
[numberFormatter setLocale:product.priceLocale];
NSString *priceString =
[numberFormatter stringFromNumber:product.price];
// Show the information
UIAlertView *alert = [[UIAlertView alloc]
initWithTitle:product.localizedTitle
message:product.localizedDescription
delegate:self
cancelButtonTitle:@"No Thanks"
otherButtonTitles: priceString, nil];
[alert show];
}
Purchasing Items
To purchase items from your application, start by adding a transaction observer. For example, you can do this is in your application delegate’s finished-launching-with-options method or in your primary view controller’s load view or view did load method. Whichever observer you use, make sure that the class declares and implements the SKPaymentTransactionObserver protocol:
[[SKPaymentQueue defaultQueue] addTransactionObserver:someClassInstance];
With an observer in place, you can use the GUI from Listing 12-1 to begin the actual purchase:
// Ready to purchase the item
SKPayment *payment =
[SKPayment paymentWithProduct:product];
[[SKPaymentQueue defaultQueue] addPayment:payment];
StoreKit prompts the user to confirm the in-app purchase, as shown in Figure 12-7, and then takes over the purchase process. Users may need to log in to an account before they can proceed.
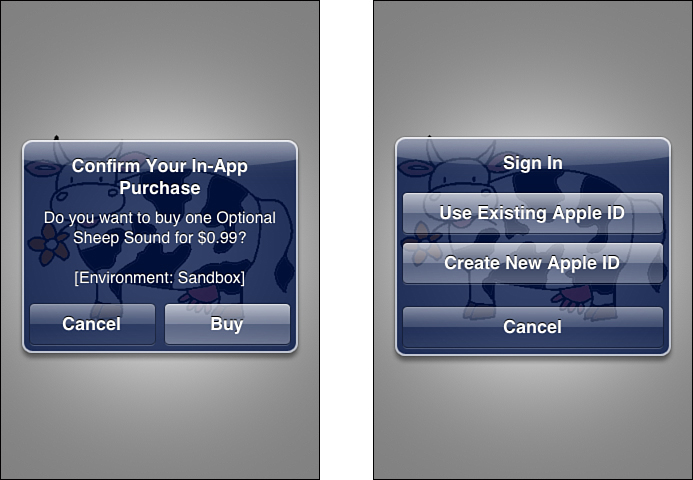
Figure 12-7. Users must confirm the purchase after moving past your user interface into the actual App Store/StoreKit purchasing system. These screen shots were taken during sandbox testing.
Signing Out of Your iTunes Account for Testing
To use the test accounts you set up in iTunes Connect, be sure to sign out of your current, real account. Launch the Settings application, choose the Store preferences, and click Sign Out.
As mentioned earlier, do not attempt to sign in again with your test account credentials. Just quit out of Settings and return to your application. After clicking Buy, you are prompted to sign in to iTunes. At that prompt, choose Use Existing Account, and enter your account details.
Regaining Programmatic Control After a Purchase
The payments transaction observer receives callbacks based on the success or failure of the payment process. Listing 12-2 shows a skeleton for responding to both finished and unfinished payments. After the user finishes the purchase process, the transaction will have succeeded or failed. On success, perform whatever action the user has paid for, whether by downloading data or unlocking features.
Listing 12-2. Responding to Payments
- (void)paymentQueue:(SKPaymentQueue *)queue
removedTransactions:(NSArray *)transactions
{
}
- (void) completedPurchaseTransaction:
(SKPaymentTransaction *) transaction
{
// PERFORM THE SUCCESS ACTION THAT UNLOCKS THE FEATURE HERE
// For example, update user defaults, (preferably) the keychain,
// or local variables. User defaults is *not* secure
[[NSUserDefaults standardUserDefaults] setBool:YES forKey:@"baa"];
[[NSUserDefaults standardUserDefaults] synchronize];
hasBaa = YES;
// Update GUI accordingly
if (purchaseButton)
{
[purchaseButton removeFromSuperview];
purchaseButton = nil;
}
// Provide some feedback to the user that the transaction
// was successful, e.g.
AudioServicesPlaySystemSound(baasound);
// Finish transaction
[[SKPaymentQueue defaultQueue] finishTransaction: transaction];
// Always say thank you.
UIAlertView *okay = [[UIAlertView alloc]
initWithTitle:@"Thank you for your purchase!"
message:nil delegate:nil cancelButtonTitle:nil
otherButtonTitles:@"OK", nil];
[okay show];
}
- (void) handleFailedTransaction: (SKPaymentTransaction *) transaction
{
// Process any transaction error
if (transaction.error.code != SKErrorPaymentCancelled)
{
UIAlertView *okay = [[UIAlertView alloc]
initWithTitle:@"Transaction Error. Try again later."
message:nil delegate:nil cancelButtonTitle:nil
otherButtonTitles:@"OK", nil];
[okay show];
}
// Complete the pending transaction
[[SKPaymentQueue defaultQueue] finishTransaction: transaction];
// Restore the GUI
}
- (void)paymentQueue:(SKPaymentQueue *)queue
updatedTransactions:(NSArray *)transactions
{
for (SKPaymentTransaction *transaction in transactions)
{
switch (transaction.transactionState)
{
case SKPaymentTransactionStatePurchased:
case SKPaymentTransactionStateRestored:
[self completedPurchaseTransaction:transaction];
break;
case SKPaymentTransactionStateFailed:
[self handleFailedTransaction:transaction];
break;
case SKPaymentTransactionStatePurchasing:
[self repurchase];
break;
default: break;
}
}
}
Registering Purchases
You can use any of a number of approaches to register purchases. You can synchronize with a web server, create local files, set user defaults (not recommended for serious business work but fine for learning how IAPs work), or add keychain entries. The solution you choose is left up to you. Just don’t lose track of purchases. After a user buys an unlockable feature, subscription, or data, you must guarantee that your application supplies the promised element or elements.
Security and Piracy
As a rule, you’ll want to store purchases in the keychain. Using the keychain provides the additional benefit that the data stored here can survive an application being deleted and then later reinstalled.
When you use an offsite server to register and authenticate purchases, make sure to echo those settings on the device. Users must use their applications regardless of whether they have network access. A local setting (for example, “Service enabled until 6 June 2011”) enables the application to run and provides proper feedback, even when a subscribed service is inaccessible.
Never assume the user is tied to any specific device. You can track devices across installed applications using identifierForVendor, available in iOS 6 and later.
Restoring Purchases
Purchases may be restored on a device where an application was uninstalled and then reinstalled, or where an application was installed on a second device associated with the same iTunes/Apple ID account. If a customer’s account is used on multiple devices, like a family with a total of five iPhones, iPads, and iPods, a purchase by any of the devices with those account credentials enables all the devices to download that purchase with no additional charge.
StoreKit enables you to restore purchases, which is particularly important for consumable and subscription items where you do not want to allow the user to repurchase an already valid item. For a nonconsumable item, the user can repurchase without cost ad infinitum. For these nonconsumable items, you can simply submit your purchase request. The App Store interface presents a window informing the user that he has already purchased this item, and that he can download it again for free.
To restore purchases associated with an iTunes account, call restoreCompletedTransactions. This works just like adding a payment and involves the same callbacks. To catch a repurchase separately from a purchase, check for SKPaymentTransactionStateRestored as the payment transaction state (refer to Listing 12-2):
- (void) repurchase
{
// Repurchase an already purchased item
[[SKPaymentQueue defaultQueue] restoreCompletedTransactions];
}
That’s because purchase events provide not one, but two possible successful outcomes. The first is a completed purchase. The user has bought the item and the payment has finished processing. The second is the restored purchase described here. Make sure that your payment queue handler looks for both states.
There’s a loophole here. Consider providing a consumable purchase item such as a credit to send a fax. Should the user uninstall the application and then reinstall, any repurchase functionality may restore an asset that has already been used. Applications with consumable products must be designed with more thought for the security infrastructure and demand server-side accounting that keep track of user credits and consumed assets.
Go ahead and restore purchases, but ensure that those purchases properly coordinate with your server database. As you’ll read about in the following section, Apple provides a unique identifier for each purchase with a purchase receipt. A repurchased item retains that original identifier, enabling you to distinguish between new purchases and restored ones.
Purchasing Multiple Items
Users can purchase more than one copy of consumable items and subscriptions. Set the quantity property for a payment to request a multiple purchase. This snippet adds a payment request for three copies of a product, perhaps adding 3 months to a subscription, 3,000 hit points to a character, or so forth:
SKPayment *payment = [SKPayment paymentWithProduct:product];
payment.quantity = 3;
[[SKPaymentQueue defaultQueue] addPayment:payment];
Handling Delays in Registering Purchases
If your purchase connects with a server and you cannot complete the purchase registration process, do not finalize the transaction. Do not call finishTransaction: until you are guaranteed that all establishment work has been done for your customer.
Should you fail to set up your users with their newly purchased items before the application terminates, that’s okay. The transaction remains in the purchase queue until the next time the application launches. You are given another opportunity to try to finish your work.
Validating Receipts
A successful purchase transaction contains a receipt. This receipt, which is sent in raw NSData format, corresponds to an encoded JSON string. It contains a signature and purchase information.
Apple strongly recommends that you validate all receipts with its servers to prevent hacking and ensure that your customers actually purchased the items they are requesting. Listing 12-3 shows how.
You must POST a request to one of Apple’s two servers. The URL you use depends on the deployment of the application. Use buy.itunes.apple.com for production software and sandbox.itunes.apple.com for development.
The request body consists of a JSON dictionary. The dictionary is composed of one key (“receipt-data”) and one value (a Base64-encoded version of the transaction receipt data). I normally use the CocoaDev NSData Base 64 extension (from www.cocoadev.com/index.pl?BaseSixtyFour) to convert NSData objects into Base64-encoded strings. CocoaDev provides many great resources for Mac and iOS developers.
A valid receipt returns a JSON dictionary similar to the following. The receipt includes the transaction identifier, a product ID for the item purchased, the bundle ID for the host application, and a purchase date. Most important, it returns a status:
{"receipt":
{
"item_id":"467440745",
"original_transaction_id":"1000000008472082",
"bvrs":"1.0",
"product_id":"com.sadun.moo.baa",
"purchase_date":"2011-09-23 15:18:22 Etc/GMT",
"quantity":"1", "bid":"com.sadun.Moo",
"original_purchase_date":"2011-09-22 20:48:46 Etc/GMT",
"transaction_id":"1000000008535652"},
"status":0}
A valid receipt always has a 0 status. Any number other than 0 indicates that the receipt is invalid.
Simply checking for the status may not be sufficient for validation. As a rule, you should perform this check from your servers and not from the device. It’s not too difficult to set up a proxy server to intercept calls to the validation server and return JSON {"status":0} to all requests. What’s more, the receipt data sent along with the validation request can be easily deserialized.
Third-party services such as Urban Airship and Beeblex offer safe receipt verification for IAPs. Look for both time-limited tokens and strong encryption. Encryption prevents man-in-the-middle attacks; time-limited tokens prevent replay attacks. Together they make it much less likely that a simple proxy could successfully spoof an IAP receipt and fool your app into providing something for nothing.
Listing 12-3. Checking a Receipt
- (void) checkReceipt: (SKPaymentTransaction *) transaction
{
// Retrieve the receipt data and encode it with Base 64
NSString *receiptData =
[transaction.transactionReceipt base64Encoding];
// Construct a dictionary for the receipt-data
NSDictionary *dictionary =
[NSDictionary dictionaryWithObject:receiptData
forKey:@"receipt-data"];
// Translate to JSON data
NSData *json = [NSJSONSerialization
dataWithJSONObject:dictionary options:0 error:nil];
if (!json)
{
NSLog(@"Error creating JSON receipt representation");
return;
}
// Select target
NSString *urlsting = SANDBOX ?
@"https://sandbox.itunes.apple.com/verifyReceipt" :
@"https://buy.itunes.apple.com/verifyReceipt";
// Create the request
NSMutableURLRequest *urlRequest = [NSMutableURLRequest
requestWithURL:[NSURL URLWithString: urlsting]];
if (!urlRequest)
{
NSLog(@"Error creating the URL request");
return;
}
[urlRequest setHTTPMethod: @"POST"];
[urlRequest setHTTPBody:json];
// Post the request and retrieve the result
NSError *error;
NSURLResponse *response;
NSData *result = [NSURLConnection
sendSynchronousRequest:urlRequest
returningResponse:&response error:&error];
// Check any errors here, look for status information, store
// transaction data, etc.
// Just demonstrate by showing the result data
NSString *resultString = [[NSString alloc]
initWithData:result encoding:NSUTF8StringEncoding];
NSLog(@"Receipt Validation: %@", resultString);
}
Summary
The StoreKit framework offers a great way to monetize your applications. As you read in this chapter, you can set up your own storefront to sell services and features from your application. Here are a few final thoughts:
• Although the entire setup and testing process for new applications may seem a little “Which came first? The chicken or the egg?,” it is demonstrably possible to develop and deploy a StoreKit-based application with a minimum of headaches. It becomes easier the next time you add in-app purchases for an already approved application.
• Always remember that there are two submission steps with IAP. Ensure that both the application and the IAP items are ready for Apple to review.
• Avoid finalizing transactions until your new-purchase setup is completely, utterly, 100% done, even if that means waiting for an application relaunch. At the same time, inform the user that the purchase process is experiencing unexpected delays.
• Your methods can request only product information from in-app items that are registered to the currently running application. You cannot share requests across apps.
• Whenever possible, use off-device receipt validation. Numerous incidents in the past year have shown how easy it is to bypass security.
• Developers use IAP too much, and often without regard for the user experience. Requiring IAP in apps for kids is, in my opinion, evil—it should be strongly discouraged by Apple policy. Further, if your app requires IAP to bypass gameplay segments, your game design needs some serious reconsideration.
• Focus on providing good experiences for your paying users instead of fighting piracy. If your antipiracy protections tick off even one paying customer, you have lost the war.
• Don’t forget to set up the purchase observer. More heads have been banged against desks and hair pulled out over that one step than any other StoreKit issue.