
3. Core Text
Nuanced text layout has been an important part of the computing experience as long as there have been personal computers. Even the earliest consumer operating systems included word processing with attributed text features. Decades ago, interactive document preparation tools offered font selection, text traits such as bolding, underlining, and italics, indentation, and more.
These same elements form a big part of the iOS experience. Developers use attributed strings and the Core Text framework to offer sophisticated text elements with a minimum of development effort. This chapter introduces attributed text processing and explores how you can build text features into your apps. You read about adding attributed strings to common UIKit elements, how to create Core Text-powered views, and how to break beyond lines for freeform text typesetting. Reading this chapter, you can discover the power that Core Text brings to iOS.
Core Text and iOS
Core Text is a Mac and iOS technology that programmatically supports typesetting tasks including attribute specification and layout. Its APIs enable you to define fonts, colors, alignment, word wrapping, and other features that move strings beyond being a simple collection of characters. Originally a Mac OS X 10.5 framework, Core Text has been arriving slowly at the iOS platform over the last few releases. As you’ll discover, even in iOS 6, the process of migration continues.
Attributes
Much of the typesetting story consists of attributes, specifically attributed strings. Attributes are a set of features, like font choice or text color, applied to text within a certain range. Attributed strings, as the name implies, add characteristics to select substrings. An attributed string contains both text information and range-specific attributes applied to that string.
To get a sense of how attributes work and can combine, consider the following string:
This is a sample string that demonstrates how attributes can combine.
In this non-iOS example, constrained by the realities of book publishing, the preceding string uses a bold attribute from its 6th through 16th characters, and italic from the 11th through 23rd characters.
On iOS, the kinds of attributes applied to a string differ from those used when writing a book. For example, you do not add emphasis or bolding. Those are set by changing the font face—for example, from Courier to Courier-Bold or to Courier-BoldOblique. You specify the range where that font face should apply, just as you can specify ranges to set a given stroke color or a text alignment.
Other attributes do work in a similar manner. You can update the color for a range of characters, add a shadow, or change the font size.
C Versus Objective C
The first C-based Core Text features debuted in iOS 3.2. They used a Core Foundation pattern with little in the way of Objective C-friendliness. Here’s an example of what raw Core Text looks like. What follows is a snippet from the iOS 5 Cookbook. It demonstrates how to create a CTParagraphStyleRef that defines a custom alignment and line break mode:
uint8_t theAlignment = [self ctAlignment];
CTParagraphStyleSetting alignSetting = {
kCTParagraphStyleSpecifierAlignment, sizeof(uint8_t),
&theAlignment};
uint8_t theLineBreak = [self ctBreakMode];
CTParagraphStyleSetting wordBreakSetting = {
kCTParagraphStyleSpecifierLineBreakMode,
sizeof(uint8_t),&theLineBreak};
CTParagraphStyleSetting settings[2] = {alignSetting, wordBreakSetting};
CTParagraphStyleRef paraStyle = CTParagraphStyleCreate(settings, 2);
Contrast this with the following iOS 6 code that performs the same task. This snippet creates an NSMutableParagraphStyle instance and customizes its properties with the same alignment and line break mode values used in the preceding example. This code is far simpler because it takes advantage of the new Objective-C class:
NSMutableParagraphStyle *paraStyle =
[[NSMutableParagraphStyle alloc] init];
paraStyle.alignment = [self ctAlignment];
paraStyle.lineBreakMode = [self ctBreakMode];
iOS 6 introduced Objective-C implementations for nearly all of Core Text, enabling you to skip the library’s Core Foundation calls. There are still several notable exceptions, which are explored later in this chapter. That said, iOS is now entering the golden age of customized text. You can add fonts, colors, spacing, and more to nearly everything in UIKit.
UIKit
In iOS 6, UIKit has been updated to become far more text-aware. Many UIKit classes, including text fields, text views, labels, and buttons, enable you to assign attributed (Core Text-style) strings to their attributedText property, just as you assign plain NSStrings to their text properties:
textField.attributedText = myAttributedString;
In addition, iOS now provides a new (and small) vocabulary of UIKit-specific text attributes such as font, color, and shadow. These are used with navigation bars, segmented controls, and bar items (that is, bar-style elements). You set attributes by calling setTitleTextAttributes: (navigation bar) and setTitleTextAttributes:forState: (segmented control and bar items). Pass an attribute dictionary using the following dictionary keys and values:
• UITextAttributeFont—Provides a UIFont instance.
• UITextAttributeTextColor—Provides a UIColor instance.
• UITextAttributeTextShadowColor—Provides a UIColor instance.
• UITextAttributeTextShadowOffset—Provides an NSValue instance wrapping a UIOffset struct. Offsets include two floats, horizontal and vertical. Use UIOffsetMake() to construct the struct from a pair of floating point values.
For example, this snippet sets a segmented control’s text color to light gray for its selected state. Whenever the control is selected, the text color changes from white to gray:
NSDictionary *attributeDictionary =
@{UITextAttributeTextColor : [UIColor lightGrayColor]};
[segmentedControl setTitleTextAttributes:attributeDictionary
forState:UIControlStateSelected];
This UIKit vocabulary will grow over time as Apple continues blending typesetting features into its controls and views.
Attributed Strings
You define traits by working with members of the NSAttributedString class or its mutable cousin NSMutableAttributedString. The mutable version offers far more flexibility, enabling you to layer attributes individually rather adding everything all at once.
To create an attributed string, you allocate it and initialize it with text and an attribute dictionary. The following snippet demonstrates how to build a “Hello World” string that displays with a large, gray font. Figure 3-1 shows the attributed string created here:
NSMutableDictionary *attributes = [NSMutableDictionary dictionary];
attributes[NSFontAttributeName] =
[UIFont fontWithName:@"Futura" size:36.0f];
attributes[NSForegroundColorAttributeName] =
[UIColor grayColor];
attributedString = [[NSAttributedString alloc]
initWithString:@"Hello World" attributes: attributes];
textView.attributedText = attributedString;
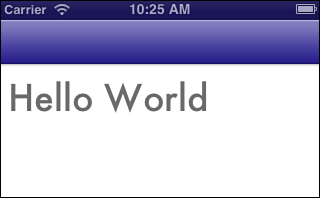
Figure 3-1. Attributed strings store information such as font selection and color.
Typesetting centers on creating attributes dictionaries. You populate the dictionaries using the following keys and pass them to the attributed string. For mutable instances, you specify a character range to apply them to:
• NSFontAttributeName—A UIFont object, used to set the text font.
• NSParagraphStyleAttributeName—An NSParagraphStyle object, used to specify a number of paragraph settings including alignment, line break mode, indentation, and more.
• NSForegroundColorAttributeName and NSBackgroundColorAttributeName—UIColor objects that set the color of the text and the color shown behind the text. NSStrokeColorAttributeName is synonymous with the foreground color in the current iOS release.
• NSStrokeWidthAttributeName—An NSNumber storing a floating point value that defines the stroke width as a percentage of the font point size. Negative numbers both stroke and fill the text. Positive numbers create a “hollow” presentation, stroking the edges of each character glyph, as shown in Figure 3-2:
attributes[NSStrokeWidthAttributeName] = @(3.0);

Figure 3-2. Positive stroke values outline character glyphs but do not fill the interior.
• NSStrikethroughStyleAttributeName and NSUnderlineStyleAttributeName—These keys specify whether an item uses a strike-through or underline. In practice, these are essentially Boolean NSNumber instances, storing either 0 or 1. In theory, they may extend in future iOS releases to additional values, so Apple has defined the attribute values to NSUnderlineStyleNone (0) or NSUnderlineStyleSingle (1).
• NSShadowAttributeName—An NSShadow object, that sets the shadow’s color, offset, and blur radius, as shown in Figure 3-3. This snippet uses a CGSize offset per Apple’s documentation, but surely this will soon update to UIOffset support:
NSShadow *shadow = [[NSShadow alloc] init];
shadow.shadowBlurRadius = 3.0f;
shadow.shadowOffset = CGSizeMake(4.0f, 4.0f);
attributes[NSShadowAttributeName] = shadow;

Figure 3-3. Add shadows on iOS using the new NSShadow class.
• NSLigatureAttributeName—Ligatures refer to the way that individual glyphs (character pictures) can be bound together, such as “f” and “I,” as shown in Figure 3-4. This key references an NSNumber that selects from “use no ligatures” (0), “use the default ligature” (1), or “use all ligatures” (2). iOS 6 does not support a value of 2.
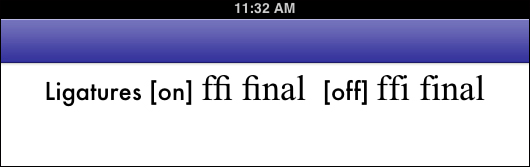
Figure 3-4. Ligatures combine certain letter combinations such as “f” and “i” into a single character glyph. Notice the separate dot on the “i” when ligatures are disabled.
Be aware that UIKit views may not support ligatures. I had to create Figure 3-4 using direct Core Text drawing. The UITextView I initially assigned the attributed string to did not properly render the “fi” ligature.
• NSBaselineOffsetAttributeName—An NSNumber. The floating point number indicates a displacement from the normal text baseline, the point at which letters rest. Some letters such as “j” and “q” fall below the baseline during layout. Negative numbers will likely offset the text above the baseline, positive below it. (As this book was being written, this feature was broken.)
• NSKernAttributeName—An NSNumber. Not used in iOS 6, it eventually indicates whether kerning is enabled (1) or disabled (0). Kerning allows typesetters to adjust the space between letters, so they naturally overlap, such as when placing a capital A next to a capital V, for example, AV.
• NSVerticalGlyphFormAttributeName—An NSNumber. Not used in iOS 6, it will eventually support horizontal (0) and vertical (1) text layout.
Paragraph Styles
Paragraph styles are stored in their own objects, members of the NSParagraphStyle class. Use the mutable version of the class NSMutableParagraphStyle to set style specifics. Assign values to an instance’s properties, making sure to match the required data types. The following snippet creates the presentation shown in Figure 3-5, using an extra large spacing between paragraphs and a generous first line indent:
NSMutableParagraphStyle *paragraphStyle = [[NSMutableParagraphStyle alloc] init];
paragraphStyle.alignment = NSTextAlignmentLeft;
paragraphStyle.lineBreakMode = NSLineBreakByWordWrapping;
paragraphStyle.firstLineHeadIndent = 36.0f;
paragraphStyle.lineSpacing = 8.0f;
paragraphStyle.paragraphSpacing = 24.0f;
attributes[NSParagraphStyleAttributeName] = paragraphStyle;

Figure 3-5. Paragraph style attributes include indentation, paragraph-to-paragraph spacing, alignment, and more.
Most of these values refer to points, such as the spacing between lines or paragraphs, and indentation. If you’re careful, you can control these features on a paragraph-by-paragraph basis; assign new attribute dictionaries for each paragraph.
Make sure to create copies of your paragraph style object for each attribute update. If you do not, as I discovered the hard way, you may create an attributed result all of whose paragraph styles point to the same object. Update one and you update them all. Ouch.
Recipe: Basic Attributed Strings
Recipe 3-1 demonstrates building attributed strings by creating a user-controlled paragraph style and font color. Built to support the interface shown in Figure 3-6, the user selects a justification (from left, center, right, and justified) and a color (black, red, green, and blue) from the top navigation bar. The setupText method in Recipe 3-1 applies those choices as the user selects them, so the display updates in real time. It builds an attributes dictionary and uses that dictionary to create an attributed string, which it then loads into the central text view.
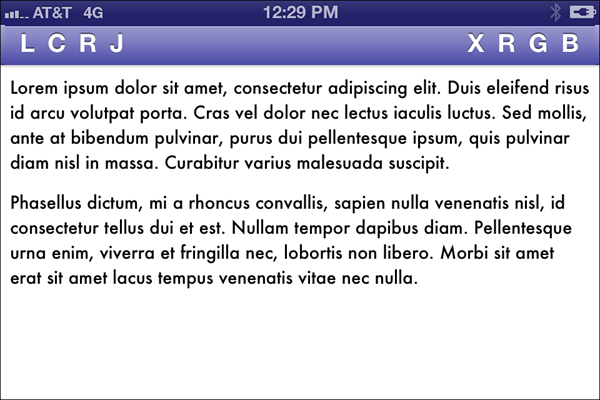
Figure 3-6. This recipe builds a basic interface that enables users to set font coloring and text alignment.
Because this recipe creates a simple NSAttributedString instance, the attributes apply across the entire string. As you’ll see in the next section, using mutable instances helps you build more complex presentations.
Recipe 3-1. Using Basic Attributed Strings with a Text View
- (void) setupText
{
// Establish a new dictionary
NSMutableDictionary *attributes = [NSMutableDictionary dictionary];
// Create the paragraph style
NSMutableParagraphStyle *paragraphStyle =
[[NSMutableParagraphStyle alloc] init];
paragraphStyle.alignment = alignment;
paragraphStyle.paragraphSpacing = 12.0f;
attributes[NSParagraphStyleAttributeName] = paragraphStyle;
// Load up the attributes dictionary
attributes[NSFontAttributeName] =
[UIFont fontWithName:@"Futura" size:14.0f];
attributes[NSForegroundColorAttributeName] = color;
// Build the attributed string
attributedString = [[NSAttributedString alloc]
initWithString:lorem attributes: attributes];
// Display the string
textView.attributedText = attributedString;
}
Get This Recipe’s Code
To find this recipe’s full sample project, point your browser to https://github.com/erica/iOS-6-Advanced-Cookbook and go to the folder for Chapter 3.
Recipe: Mutable Attributed Strings
As the name suggests, the NSMutableAttributedString class offers ways to evolve an already-created attributed string. Among the many methods provided by this class, are ones to replace, delete, insert, and append content:
• Use replaceCharactersInRange:withString: to substitute characters with new ones. New characters inherit whatever attributes were active at the first character (at range.location) of the replaced range. In contrast, the replaceCharactersInRange:withAttributedString: brings along whatever attributes and characters were used in the passed string.
• To remove characters, apply deleteCharactersInRange:.
• The insertAttributedString:atIndex: and appendAttributedString: do exactly what their names suggest. The newly added content provides its own characters and attributes.
The class also enables you to adjust attributes by applying traits to a range, often the selected range for a text view instance:
• setAttributes:range: entirely replaces the attribute dictionary for any characters that fall within the specified range.
• addAttributes:range: layers the attributes in the passed dictionary over any existing attributes in a given range.
• addAttribute:value:range: adds a single attribute to the range.
• removeAttribute:range: removes a single attribute from the characters within the range.
Setting an attribute dictionary is not without danger; it completely wipes any existing attributes, fully replacing them with whatever attributes have been included in the passed dictionary. Any attributes left unspecified may return to iOS defaults. For example, you might attempt to change the color of a selected range and notice that the font unexpectedly snaps back to 12-point Helvetica.
For modifications, use the addAttribute: methods instead. The second and third methods layer new attributes over existing ones, allowing you to replace items in the active attributes with new values. With these methods, you can add attributes that have not yet been specified, or modify existing ones.
The final method enables you to remove single attributes, such as colors, shadows, or font selections, without affecting any other attributes currently in effect.
In real-world use, user-created text selections often cross attribute boundaries. Figure 3-7 offers an example. The words eleifend, risus, and id each display with different font sizes, 36 point, 24 point, and 18 point, respectively. Imagine the user selecting fend ris, and requesting a tint change. To apply this update, the addAttribute:value:range: method must individually process each grouping of uniform traits. In this case, the selection breaks down to fend in a large font, and ris in a small font.

Figure 3-7. Applying traits and crossing range boundaries.
Recipe 3-2 re-creates the addAttribute:value:range: functionality. This recipe is included because it is extremely useful to iterate through attribute ranges, which is a great example. This code showcases how attribute ranges break down, and how you can query these from your apps. The recipe iterates through a text view’s selected range. It queries its attributed string for the attributes found at a certain point, retrieving the full effective range of that attribute dictionary.
In the view’s initial state, that range contains all the text stored to the view, a range that’s normally much larger than whatever selection the user has made. To handle the situation in which an effective attribute range is bigger than the user selection, Recipe 3-2 performs an intersection, returning a range that’s limited to the user selection.
It copies the existing attributes at the current point to a mutable dictionary and sets the new attribute passed to the method. These attributes are then applied back to the attributed string, and the current location moves forward—either to the end of the current effective range, or to the end of the selection.
In Figure 3-7, the fend ris selection contains two attribute ranges based on font size. When run on this example, Recipe 3-2 first tinted the large fend red, and then iterated to tint the remaining ris. In real-world use, selections can prove even more complicated, containing any number of effective ranges to update.
The important points to take away from this recipe are as follows:
• Attributed strings contain both characters and attributes.
• Each range of characters is associated with one set of attributes. You can retrieve a full range by querying for attributes at any character index. These ranges do not overlap.
• Mutable attributed strings enable you to layer new attributes over or remove attributes from parts of your string. Doing so often creates new ranges, so that each range remains limited to one set of attributes.
• You can replace characters at any point in your string; they inherit whatever attributes are active at that range. When you insert or append an attributed string, the added material retains the attributes it was defined with.
Recipe 3-2. Layering Attributes Via Iterated Ranges
- (void) applyAttribute: (id) attributeValue withName: (NSString *) keyName
{
// Replicating this approach through custom code
// [attributedString addAttribute:keyName
// value:attributeValue range:range];
NSRange range = textView.selectedRange;
if (range.location == NSNotFound) return;
// Keep track of attribute range effects
CGFloat fullExtent = range.location + range.length;
CGFloat currentLocation = range.location;
// Iterate through each effective range within the selection
while (currentLocation < fullExtent)
{
// Extract the current effective range
NSRange effectiveRange;
NSDictionary *currentAttributes =
[attributedString attributesAtIndex:currentLocation
effectiveRange:&effectiveRange];
// Limit that range to the current selection
NSRange intersection = NSIntersectionRange(range, effectiveRange);
// Extract and modify the current attributes
NSMutableDictionary *attributes = [NSMutableDictionary
dictionaryWithDictionary:currentAttributes];
attributes[keyName] = attributeValue;
// Apply those attributes back. This uses "set attributes"
// instead of "apply attributes" for demonstration
[attributedString setAttributes:attributes range:intersection];
// Update the current location to move past the effective range
currentLocation = effectiveRange.location + effectiveRange.length;
}
[self setAttrStringFrom:textView.attributedText to:attributedString];
}
Get This Recipe’s Code
To find this recipe’s full sample project, point your browser to https://github.com/erica/iOS-6-Advanced-Cookbook and go to the folder for Chapter 3.
The Mystery of Responder Styles
Introduced in iOS 6, a trio of responder methods enables objects to apply styles to selected text. The methods are defined in NSObject but meant for UIResponder use. The three methods are toggleBoldface:, toggleItalics:, and toggleUnderline:, and they’re a bit curious, as you’ll see. They apply attributes to whatever text has been selected in the view.
These methods seem to be limited to text views and text fields. You enable them by setting the allowsEditingTextAttributes property to YES. The standard iOS 6 contextual text menus update to include new BIU options, as shown in Figure 3-8. The view handles the rest of the implementation details, and there’s nothing further you need to do programmatically. You can access the results via the text view or the text field’s attributedText property.
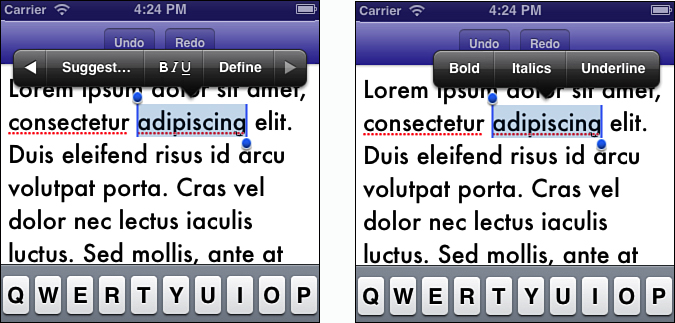
Figure 3-8. The iOS contextual menu updates to include BIU options after enabling allowsEditingTextAttributes in text views and text fields.
This new feature is puzzling on a number of levels. To start, UIFont instances do not offer direct access to any of these three attributes: bold, italics, or underline.
The underline attribute ties into a fairly complex Core Text system, of which only a single line (NSUnderlineStyleSingle) is currently exposed in string attributes (NSUnderlineStyleAttributeName). Other native Core Text underlining styles include double lines, tick lines, and a variety of patterns, such as the ones used in Figure 3-8 to accentuate possible misspellings.
The bold and italic traits represent font family variations. Managing these requires a trip to C-based APIs, as shown in Listing 3-1. The listing details how you can retrieve a font descriptor from a family name such as Trebuchet MS and a traits dictionary. You use that descriptor to extract a trait-specific font name such as TrebuchetMS-Italic, or Trebuchet-BoldItalic, and then build a UIFont instance with that name.
Adding to the mystery is that text view delegates do not receive updates to their contents when users apply these toggles. Regular delegate callbacks such as textViewDidChange: aren’t sent. If you want to monitor changes, and update Undo/Redo capabilities (as shown in Figure 3-8), you can add a timer to poll for items on the undo manager’s stack.
The final bit of the mystery is this: Text views do not store mutable attributed string instances. Therefore, whatever mechanism Apple uses to update view contents with attribution updates changes and replaces the text.
This mystery probably adds up to a fundamental redesign that wasn’t finished in time for a full iOS 6 debut. What it promises is exciting. For now, you’re left with whatever made the cut in iOS 6. For the most part, it’s a vast improvement over the Core Foundation text calls like the ones used in Listing 3-1.
Listing 3-1. Returning a Font from Its Traits
// Handle bold and italics traits
- (UIFont *) fontWithTraits
{
// Core font elements
NSString *familyName = self.font.familyName;
CGFloat newFontSize = self.font.pointSize;
// Return core font
if (!self.bold && !self.italic)
return [UIFont fontWithName:familyName size:newFontSize];
// Create traits value
NSUInteger appliedTraits = 0;
if (self.bold) appliedTraits = kCTFontBoldTrait;
if (self.italic) appliedTraits =
appliedTraits | kCTFontItalicTrait;
NSNumber *traitsValue = @(appliedTraits);
// Build dictionary from family name and traits
NSDictionary *traitDictionary =
@{(NSString *)kCTFontSymbolicTrait:traitsValue};
NSDictionary *dict =
@{
(NSString *)kCTFontFamilyNameAttribute:familyName,
(NSString *)kCTFontTraitsAttribute:traitDictionary,
};
// Extract font descriptor
CFDictionaryRef dictRef = CFBridgingRetain(dict);
CTFontDescriptorRef desc =
CTFontDescriptorCreateWithAttributes(dictRef);
CFRelease(dictRef);
// If this failed, return core font
if (!desc)
return [UIFont fontWithName:familyName size:newFontSize];
// Otherwise, extract the new font name e.g. whatever-bold
CTFontRef ctFont = CTFontCreateWithFontDescriptor(
desc, self.font.pointSize, NULL);
NSString *newFontName = CFBridgingRelease(
CTFontCopyName(ctFont, kCTFontPostScriptNameKey));
// Create font with trait-name
return [UIFont fontWithName:newFontName size:newFontSize];
}
Recipe: Attribute Stacks
During the writing of the iOS 5 version of this cookbook, I developed a string helper class. This class hid the C-based Core Foundation lurking behind attributed string creation, adding an Objective C wrapper. It also added properties that defined attributes for new text appended to the string. For example, you could set a new foreground color and added text would adopt that color.
Fast forward to iOS 6. When iOS 6 debuted, it introduced Objective C classes and constants to support attributed strings. About one-half of the reason for the custom class disappeared. But something else happened along the way to my ditching the recipe: Readers and early testers responded strongly to the stored state features. They liked how they could set attributes, pack on text, update the attributes, and pack on more text.
From there grew the notion of an attribute stack, which could provide a saved state feature similar to CGContextSaveGState(). It would enable you to push a set of attributes, such as a new color or font size, and then after adding new text pop back to the previous conditions.
Recipe 3-3 evolves the original wrapper to introduce stack support. Like its inspiration, it exposes properties that can be transformed into an attributes dictionary. However, it introduces functionality to move in the other direction. This implementation retrieves property settings from stored dictionaries, so the object can move back through its saved stack and its properties update to match.
The stack itself is a simple mutable array. Pushing state (via saveContext) duplicates the topmost dictionary and stores it on the stack. Restoring state (via popContext) pops the stack and exports its attributes out to the object properties.
Recipe 3-3 also provides transient attributes. The performTransientAttributeBlock: method automates a save, execute, pop sequence, so any changes do not permanently affect the stored attribute stack. Here’s how this method can operate. Inside the embedded transient blocks, properties set the attributes for newly added text:
string.font = [UIFont fontWithName:@"Arial" size:24.0f];
[string performTransientAttributeBlock:^(){
string.foregroundColor = [UIColor redColor];
string.bold = YES;
[string appendFormat:@"This is red and bold. "];
[string performTransientAttributeBlock:^(){
string.font = [UIFont fontWithName:@"Georgia" size:24.0f];
string.bold = NO;
string.underline = YES;
string.strokeColor = [UIColor greenColor];
string.strokeWidth = 2.0f;
[string appendFormat:
@"This is Green Georgia Outline, Underlined Not Bolded. "];
}];
string.bold = NO;
string.foregroundColor = COOKBOOK_PURPLE_COLOR;
[string appendFormat:@"This is not green *or* bolded.
"];
}];
[string appendFormat:@"Back to the original attributes."];
When the outer block ends, the string returns to a basic 24-point Arial state. No other property updates persist beyond the block’s life. As each block executes synchronously, any commands placed after the block are performed after the block has completely finished. Figure 3-9 shows this code in action.

Figure 3-9. Transient attribute blocks in action.
Recipe 3-3. Building Attributed Strings with an Objective-C Wrapper
{
NSMutableArray *stack;
NSMutableDictionary *top;
}
// Initialize with a new string, a stack, and a current dictionary (top)
- (id) init
{
if (!(self = [super init])) return self;
_string = [[NSMutableAttributedString alloc] init];
stack = [NSMutableArray array];
top = [NSMutableDictionary dictionary];
graphStyle = [[NSMutableParagraphStyle alloc] init];
_font = [UIFont fontWithName:@"Helvetica" size:12.0f];
return self;
}
// Execute a block with temporary traits
- (void) performTransientAttributeBlock: (AttributesBlock) block
{
[self saveContext];
block();
[self popContext];
}
// Transform object properties into an attributes dictionary
- (NSDictionary *) attributes
{
NSMutableDictionary *attributes = [NSMutableDictionary dictionary];
// Font and Para Style
self.font = [self fontWithTraits];
[attributes setObject:self.font forKey:NSFontAttributeName];
[attributes setObject:self.paragraphStyle
forKey:NSParagraphStyleAttributeName];
// Colors
if (self.foregroundColor)
[attributes setObject:self.foregroundColor
forKey:NSForegroundColorAttributeName];
if (self.backgroundColor)
[attributes setObject:self.backgroundColor
forKey:NSBackgroundColorAttributeName];
if (self.strokeColor)
[attributes setObject:self.strokeColor
forKey:NSStrokeColorAttributeName];
// Other Styles
[attributes setObject:@(self.strokeWidth)
forKey:NSStrokeWidthAttributeName];
[attributes setObject:@(self.underline)
forKey:NSUnderlineStyleAttributeName];
[attributes setObject:@(self.strikethrough)
forKey:NSStrikethroughStyleAttributeName];
if (self.shadow)
[attributes setObject:self.shadow
forKey:NSShadowAttributeName];
[attributes setObject:@(self.useLigatures)
forKey:NSLigatureAttributeName];
return attributes;
}
// Expose the current attribute set through properties
- (void) setAttributesFromDictionary: (NSDictionary *) dictionary
{
// Update active properties
graphStyle = dictionary[NSParagraphStyleAttributeName];
// Establish font
_font = dictionary[NSFontAttributeName];
CTFontSymbolicTraits traits =
CTFontGetSymbolicTraits((__bridge CTFontRef)(self.font));
self.bold = (traits & kCTFontBoldTrait) != 0;
self.italic = (traits & kCTFontItalicTrait) != 0;
// Colors
_foregroundColor = dictionary[NSForegroundColorAttributeName];
_backgroundColor = dictionary[NSBackgroundColorAttributeName];
_strokeColor = dictionary[NSStrokeColorAttributeName];
// Other
_strokeWidth = ((NSNumber *)dictionary[
NSStrokeWidthAttributeName]).floatValue;
_underline = ((NSNumber *)dictionary[
NSUnderlineStyleAttributeName]).boolValue;
_strikethrough = ((NSNumber *)dictionary[
NSStrikethroughStyleAttributeName]).boolValue;
_useLigatures = ((NSNumber *)dictionary[
NSLigatureAttributeName]).boolValue;
_shadow = dictionary[NSShadowAttributeName];
}
#pragma mark - Stack Operations -
// Push the top dictionary onto the stack
- (void) saveContext
{
[stack addObject:self.attributes];
top = [NSMutableDictionary dictionaryWithDictionary:top];
// Create a copy of the style, to point to a distinct object
graphStyle = [graphStyle mutableCopy];
top[NSParagraphStyleAttributeName] = graphStyle;
}
// Pop the top dictionary off the stack, and set its attributes
- (BOOL) popContext
{
if (!stack.count) return NO;
// Pop it
top = [stack lastObject];
[stack removeLastObject];
[self setAttributesFromDictionary:top];
return (stack.count > 0);
}
To find this recipe’s full sample project, point your browser to https://github.com/erica/iOS-6-Advanced-Cookbook and go to the folder for Chapter 3.
Recipe: Using Pseudo-HTML to Create Attributed Text
Adding attributes to a string one-by-one, even with the assistance of helper classes, soon becomes tedious. That’s why using HTML, a familiar standard built for text markup, can transform and simplify your layout tasks. It’s easier to produce basic HTML content than to iteratively implement the Core Text calls that create a similar presentation. Consider the following string:
<h1>Using Core Text with Markup</h1>
<p>This is an example <i>of some text that uses <b>HTML styling</b></i>.</p>
ISO-compliant HTML layout for this simple string would require quite a bit of Core Text coding to match the requested markup, but why expend all that effort? If you’re willing to be flexible, you can automate an HTML-like solution that creates Core Text coding for you.
The UIWebView class intrinsically supports typesetting through HTML, and does so in a rigorously standards-supported way. Core Text views, however, can be produced with far lighter weight code, without the memory overhead. For example, you might not want to add a dozen web views to your UITableView cells, but Core Text–backed alternatives could work much better, with little memory overhead.
The challenge lies in transforming an HTML (or HTML-like) annotated string into an attributed string. Recipe 3-4 tackles this problem, offering an enhanced HTML subset that parses its contents into an attributed string.
Note
For a superior HTML solution, check out Oliver Drobnik’s excellent attributed strings extensions library. You can find his repository at https://github.com/Cocoanetics/DTCoreText.
This class brings more to the equation than standard HTML. Its simple scanning and matching approach means that it’s just a matter of minutes to add tags of your own design. I’ve added support for a couple of convenience tags that don’t rely on standard HTML—namely the color and size tags found toward the end of the stringFromMarkup: method. Figure 3-10 juxtaposes the running app with the pseudo markup file that’s driving its presentation.

Figure 3-10. Pseudo-markup and its attributed string presentation.
The class works by scanning for tags enclosed in angle brackets. The tags set text attributes using the same stack-based string class discussed in Recipe 3-3. The code appends each run of text using the current set of string attributes.
Utilities like these ultimately exist to serve individual development needs, not necessarily to support a standard such as HTML. If you can add new tags with little work for your own use, then a custom solution like this recipe may save you a lot of effort in your application development. Don’t feel you must be tied to the standard.
After you build (and rigorously debug, of course) a parser like Recipe 3-4, it can save you a lot of time in future projects. It enables you to reuse Core Text routines without having to bother with a lot of the Core Text overhead.
Recipe 3-4. Pseudo HTML Markup
+ (NSAttributedString *) stringFromMarkup: (NSString *) aString
{
// Core Fonts
UIFont *baseFont = [UIFont fontWithName:@"Palatino" size:14.0f];
UIFont *headerFont = [UIFont fontWithName:@"Palatino" size:14.0f];
// Prepare to scan
NSScanner *scanner = [NSScanner scannerWithString:aString];
[scanner setCharactersToBeSkipped:[
NSCharacterSet newlineCharacterSet]];
// Initialize a string helper
FancyString *string = [FancyString string];
string.font = baseFont;
// Iterate through the string
while (scanner.scanLocation < aString.length)
{
NSString *contentText = nil;
// Scan until the next tag
[scanner scanUpToString:@"<" intoString:&contentText];
// Process entities and append the text
contentText = [contentText
stringByReplacingOccurrencesOfString:@"<"
withString:@"<"];
if (contentText)
[string appendFormat:@"%@", contentText];
// Scan through the tag
NSString *tagText = nil;
[scanner scanUpToString:@">" intoString:&tagText];
if (scanner.scanLocation < aString.length)
scanner.scanLocation += 1;
tagText = [tagText stringByAppendingString:@">"];
// -- PROCESS TAGS --
// Header Tags
if (STRMATCH(tagText, @"</h")) // finish any headline
{
[string popContext];
[string appendFormat:@"
"];
continue;
}
if (STRMATCH(tagText, @"<h"))
{
int hlevel = 0;
if (STRMATCH(tagText, @"<h1>")) hlevel = 1;
else if (STRMATCH(tagText, @"<h2>")) hlevel = 2;
else if (STRMATCH(tagText, @"<h3>")) hlevel = 3;
[string performTransientAttributeBlock:^(){
// add a wee spacer
string.font = [UIFont boldSystemFontOfSize:8.0f];
[string appendFormat:@"
"];
}];
[string saveContext];
string.bold = YES;
string.font = [UIFont fontWithName:headerFont.fontName
size:20.0f + MAX(0, (4 - hlevel)) * 4.0f];
}
// Bold and Italics
if (STRMATCH(tagText, @"<b>")) string.bold = YES;
if (STRMATCH(tagText, @"</b>")) string.bold = NO;
if (STRMATCH(tagText, @"<i>")) string.italic = YES;
if (STRMATCH(tagText, @"</i>")) string.italic = NO;
// Paragraph and line break tags
if (STRMATCH(tagText, @"<br")) [string appendFormat:@"
"];
if (STRMATCH(tagText, @"</p")) [string appendFormat:@"
"];
// Color
if (STRMATCH(tagText, @"<color"))
{
if STRMATCH(tagText, @"blue")
string.foregroundColor = [UIColor blueColor];
if STRMATCH(tagText, @"red")
string.foregroundColor = [UIColor redColor];
if STRMATCH(tagText, @"green")
string.foregroundColor = [UIColor greenColor];
}
if (STRMATCH(tagText, @"</color>"))
string.foregroundColor = nil;
// Size
if (STRMATCH(tagText, @"<size"))
{
// Scan the value for the new font size
NSScanner *newScanner = [NSScanner scannerWithString:tagText];
NSCharacterSet *cs =
[[NSCharacterSet decimalDigitCharacterSet] invertedSet];
[newScanner setCharactersToBeSkipped:cs];
CGFloat fontSize;
[newScanner scanFloat:&fontSize];
[string saveContext];
string.font = [UIFont fontWithName:string.font.fontName
size:fontSize];
}
if (STRMATCH(tagText, @"</size>"))
[string popContext];
}
return string.string;
}
Get This Recipe’s Code
To find this recipe’s full sample project, point your browser to https://github.com/erica/iOS-6-Advanced-Cookbook and go to the folder for Chapter 3.
Drawing with Core Text
Attributed strings extend beyond those UIKit classes that present them, such as text views, labels, refresh controls, and so forth. UIKit offers string drawing extensions that enable you to create custom UIView classes that support attributed strings. You can accomplish this in iOS 6 with almost no work. Listing 3-2 details a custom view that stores an attributed string and draws its contents through a drawRect: method.
Listing 3-2. Attributed String View
@interface ASView : UIView
@property (nonatomic, strong) NSAttributedString *attributedString;
@end
@implementation ASView
- (id) initWithFrame:(CGRect)frame
{
if (self = [super initWithFrame:frame])
self.backgroundColor = [UIColor clearColor];
return self;
}
- (void) drawRect:(CGRect)rect
{
[super drawRect: rect];
[_attributedString drawInRect:self.bounds];
}
@end
Compare Listing 3-2 to Listing 3-3, which shows the same custom view class as built prior to iOS 6 using Core Text calls. The simplicity of the new drawRect: method demonstrates how much attributed text features have integrated themselves into UIKit, hiding Core Text’s C-based API with a robust and usable Objective-C one.
Listing 3-3. Attributed String Core Text View
@interface CTView : UIView
@property (nonatomic, strong) NSAttributedString *attributedString;
@end
@implementation CTView
- (id) initWithFrame:(CGRect)frame
{
if (self = [super initWithFrame:frame])
self.backgroundColor = [UIColor clearColor];
return self;
}
- (void) drawRect:(CGRect)rect
{
[super drawRect: rect];
CGContextRef context = UIGraphicsGetCurrentContext();
// Flip the context
CGContextSetTextMatrix(context, CGAffineTransformIdentity);
CGContextTranslateCTM(context, 0, self.bounds.size.height);
CGContextScaleCTM(context, 1.0, -1.0);
// Slightly inset from the edges of the view
CGMutablePathRef path = CGPathCreateMutable();
CGRect insetRect = CGRectInset(self.frame, 20.0f, 20.0f);
CGPathAddRect(path, NULL, insetRect);
// Build the framesetter
CTFramesetterRef framesetter =
CTFramesetterCreateWithAttributedString(
(__bridge CFAttributedStringRef)_attributedString);
// Draw the text
CTFrameRef destFrame = CTFramesetterCreateFrame(
framesetter, CFRangeMake(0, _attributedString.length),
path, NULL);
CTFrameDraw(destFrame, context);
// Clean up
CFRelease(framesetter);
CFRelease(path);
CFRelease(destFrame);
}
@end
The drawRect: method in Listing 3-3 uses raw Core Text to perform all the tasks hidden by the UIKit string drawing call in Listing 3-2. It starts by flipping its context. This enables the text to start drawing from the top-left corner, which is the standard in UIKit but not in raw Core Text. It then creates an inset rectangle using the view bounds as a starting point and moving in slightly from there. Finally, it establishes a frame setter object, which is responsible for managing the elements that break down into individual characters.
Those elements are called lines, each of which contains a number of character runs. Each run contains a series of text glyphs, which are character images like the pictures for “a” or “b.” Each glyph in a run shares common attributes such as font size or color. Finally, the frame setter uses all this information to build a frame, which can then draw the text to a graphics context.
By changing the path, you can achieve eye-catching visual effects quite cheaply. You’ll see some of this in the recipes later in this chapter. For this example, when you adjust the size of the inset rectangle, you find that the text adapts and re-adjusts its wrapping to match its new boundaries. Other ways to change the shape include adding ellipses and arcs to the path. Core Text ably handles nonrectangular paths. Figure 3-11 shows the result of changing Listing 3-3 from using a rectangular frame (CGPathAddRect()) to an elliptical one (CGPathAddEllipseInRect()).

Figure 3-11. Core Text automatically handles the change from a rectangular path to an elliptical one.
Creating Image Cut-Outs
Adding images to your Core Text layout involves two key steps. First, draw those images before flipping your context coordinate system. The UIImage drawing routines assume an origin at the top-left corner. Second, modify your text path so that the frame setter does draw text where your images are supposed to go.
Listing 3-4 creates a manual layout that inserts two images. You can see the typesetting created by this code in Figure 3-12. The text wraps around the images, respecting the path cut-outs built in the drawRect: method. This example uses a ragged-right, left-aligned paragraph style, which explains the various gaps to the left of each image.

Figure 3-12. Cut out areas of a Core Graphics path to provide room for figures. The Core Text typesetter accommodates those gaps.
Listing 3-4. Adding Images to Core Text Flow
// Flip a rectangle within an outer coordinate system
CGRect CGRectFlipVertical(CGRect innerRect, CGRect outerRect)
{
CGRect rect = innerRect;
rect.origin.y = outerRect.origin.y + outerRect.size.height –
(rect.origin.y + rect.size.height);
return rect;
}
- (void) drawRect: (CGRect) rect
{
NSAttributedString *string = [self string];
[super drawRect: rect];
CGContextRef context = UIGraphicsGetCurrentContext();
CGRect aRect = CGRectInset(self.bounds, 10.0f, 10.0f);
// Draw the background
[[UIColor whiteColor] set];
CGContextFillRect(context, self.bounds);
// Perform the image drawing in the normal context geometry
CGRect imageRect1 =
CGRectMake(150.0f, 500.0f, 200.0f, 300.0f);
[[UIImage imageNamed:@"Default.png"]
drawInRect:CGRectInset(imageRect2, 10.0f, 10.0f)];
// Draw the Bear (public domain)
CGRect imageRect2 =
CGRectMake(500.0f, 100.0f, 187.5f, 150.0f);
[[UIImage imageNamed:@"Bear.jpg"]
drawInRect:CGRectInset(imageRect1, 10.0f, 10.0f)];
// Flip the context for the Core Text layout
CGContextSetTextMatrix(context, CGAffineTransformIdentity);
CGContextTranslateCTM(context, 0, self.frame.size.height);
CGContextScaleCTM(context, 1.0, -1.0);
// Start the path
CGMutablePathRef path = CGPathCreateMutable();
CGPathAddRect(path, NULL, aRect);
// Cut out the two image areas
CGPathAddRect(path, NULL,
CGRectFlipVertical(imageRect1, self.bounds));
CGPathAddRect(path, NULL,
CGRectFlipVertical(imageRect2, self.bounds));
// Create framesetter
CTFramesetterRef framesetter =
CTFramesetterCreateWithAttributedString(
(__bridge CFAttributedStringRef)string);
// Draw the text
CTFrameRef theFrame = CTFramesetterCreateFrame(framesetter,
CFRangeMake(0, string.length), path, NULL);
CTFrameDraw(theFrame, context);
// Clean up
CFRelease(path);
CFRelease(theFrame);
CFRelease(framesetter);
}
Recipe: Drawing Core Text onto a Scroll View
Although UIKit support for string drawing simplifies text layout, CoreText is still important to know and use for more complicated but not uncommon cases. Listing 3-4 demonstrated how to lay text around images. Recipe 3-5 shows how to build a Core Text-powered scrolling text view.
Custom Core Text rendering can be extended to scroll views if you work carefully. Recipe 3-5 adapts Listing 3-3’s Core Text drawing to draw attributed text onto a custom scroll view. The updates include a method to calculate the scroll view’s content size each time the view geometry changes, typically from reorienting the iPhone, and math that takes that large content size into account when drawing.
The updateContentSize method works by requesting a suggested frame size. The method passes the source text, the view width, and a dummy height (that is, max float). This lets the frame setter calculate how much vertical height that text will occupy for a fixed width, allowing it to ignore any height constraints. This method uses the returned frame to set up the scroll view’s content size.
In the drawRect: method, Recipe 3-5’s math has to compensate for the fact that the drawing is taking place within the scroll view’s large content view, not its frame. Both the context flip and the destination rectangle use the content size.
Finally, in the initWithFrame: method, the scroll view’s content mode is set to redraw. This forces the view to refresh whenever its bounds change.
Recipe 3-5. Core Text and Scroll Views
@interface CTView : UIScrollView <UIScrollViewDelegate>
@property (nonatomic, strong) NSAttributedString *attributedString;
@end
@implementation CTView
- (id) initWithFrame:(CGRect)frame
{
if (self = [super initWithFrame:frame])
{
self.backgroundColor = [UIColor clearColor];
self.contentMode = UIViewContentModeRedraw;
self.delegate = self;
}
return self;
}
// Calculates the content size
- (void) updateContentSize
{
CTFramesetterRef framesetter =
CTFramesetterCreateWithAttributedString(
(__bridge CFAttributedStringRef)_attributedString);
CFRange destRange = CFRangeMake(0, 0);
CFRange sourceRange = CFRangeMake(0, _attributedString.length);
CGSize frameSize = CTFramesetterSuggestFrameSizeWithConstraints(
framesetter, sourceRange, NULL,
CGSizeMake(self.frame.size.width, CGFLOAT_MAX), &destRange);
self.contentSize = CGSizeMake(self.bounds.size.width, frameSize.height);
CFRelease(framesetter);
}
// This is a scroll-view specific drawRect
- (void) drawRect:(CGRect)rect
{
[super drawRect: rect];
CGContextRef context = UIGraphicsGetCurrentContext();
// Flip the context
CGContextSetTextMatrix(context, CGAffineTransformIdentity);
CGContextTranslateCTM(context, 0, self.contentSize.height);
CGContextScaleCTM(context, 1.0, -1.0);
CGMutablePathRef path = CGPathCreateMutable();
CGRect destRect = (CGRect){.size = self.contentSize};
CGPathAddRect(path, NULL, destRect);
// Create framesetter
CTFramesetterRef framesetter =
CTFramesetterCreateWithAttributedString(
(__bridge CFAttributedStringRef)_attributedString);
// Draw the text
CTFrameRef theFrame = CTFramesetterCreateFrame(framesetter,
CFRangeMake(0, _attributedString.length), path, NULL);
CTFrameDraw(theFrame, context);
// Clean up
CFRelease(path);
CFRelease(theFrame);
CFRelease(framesetter);
}
@end
Get This Recipe’s Code
To find this recipe’s full sample project, point your browser to https://github.com/erica/iOS-6-Advanced-Cookbook and go to the folder for Chapter 3
Recipe: Exploring Fonts
These days, iOS ships with a fairly rugged collection of fonts, which you can easily explore to your heart’s content. The range of fonts may vary by device and operating system, so it’s always best to check on-device to see what fonts are available.
Recipe 3-6 iterates through UIFont’s collection of font families and their members to build a report, which it embeds in a text view (see Figure 3-13). Created using the helper class from Recipe 3-3, this recipe builds out examples by transiently applying each font to the string’s attributes.
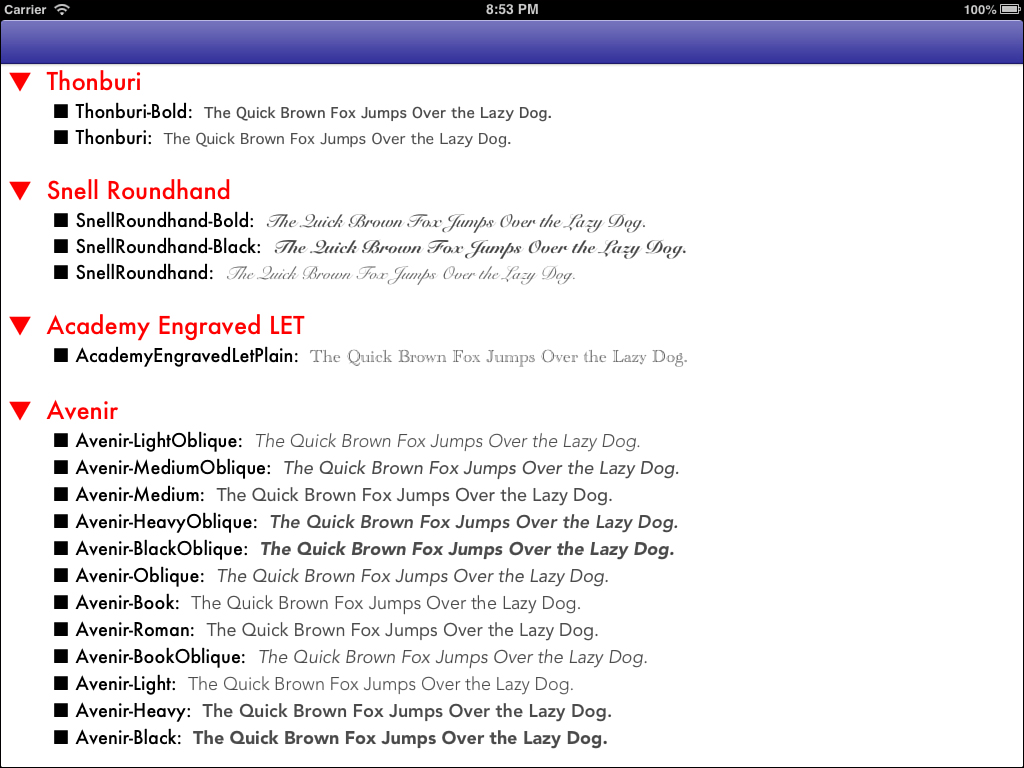
Figure 3-13. Attributed strings help you review your onboard fonts.
Use this survey app to discover new font names and preview what they look like.
Note
This recipe disables the call to fontWithTraits in the helper class. This ensures each font is used exactly without respect to the helper’s bold and italics properties.
Recipe 3-6. Creating a Font List
string = [FancyString string];
string.ignoreTraits = YES;
UIFont *headerFont = [UIFont fontWithName:@"Futura" size:24.0f];
UIFont *familyFont = [UIFont fontWithName:@"Futura" size:18.0f];
for (NSString *familyName in [UIFont familyNames])
{
string.font = headerFont;
string.foregroundColor = [UIColor redColor];
// u25BC is a downward-pointing triangle
[string appendFormat:@"u25BC %@
", familyName];
string.foregroundColor = nil;
string.font = familyFont;
for (NSString *fontName in [UIFont fontNamesForFamilyName:familyName])
{
// u25A0 is a square
[string appendFormat:@" u25A0 %@: ", fontName];
[string performTransientAttributeBlock:^(){
string.font = [UIFont fontWithName:fontName size:18.0f];
string.foregroundColor = [UIColor darkGrayColor];
[string appendFormat:quickBrownDogString];
}];
}
[string appendFormat:@"
"];
}
textView.attributedText = string.string;
Get This Recipe’s Code
To find this recipe’s full sample project, point your browser to https://github.com/erica/iOS-6-Advanced-Cookbook and go to the folder for Chapter 3.
Adding Custom Fonts to Your App
You are never limited to the device’s repertoire of onboard fonts now that iOS supports custom font integration into applications. This recipe demonstrates how you can add your own fonts into an application for your use. Figure 3-14 shows a screenshot using the Pirulen font along with some basic Lorem Ipsum text.
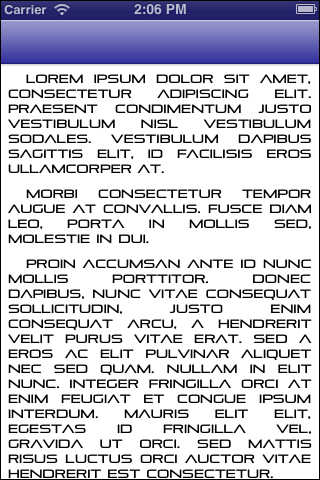
Figure 3-14. Adding custom fonts to your applications enables you to stylize your applications with a unique textual finish.
Add the TrueType font to your Xcode project. Then edit your application’s Info.plist file to declare UIAppFonts (aka “Fonts provided by application”). This is an array of filenames that you add to. Figure 3-15 defines a single font entry, namely pirulen.ttf.

Figure 3-15. Edit the Info.plist to add custom fonts.
To use the new font, create fonts as you normally would. Make sure to spell and capitalize the font name exactly:
// This call to UIFont uses a custom font name
textView.font = [UIFont fontWithName:@"pirulen"
size:IS_IPAD ? 28.0f : 12.0f];
Recipe: Splitting Core Text into Pages
As you saw in Recipe 3-4, producing attributed strings from markup helps you separate presentation from implementation. It’s a flexible approach that lets you edit your source material without affecting your code base. The problem comes when you deal with text that ranges beyond a single page. For those cases, you want to split the text into sections on a page-by-page basis.
Recipe 3-7 shows how you might do that. It uses a Core Text frame setter to return an array of recommended page breaks based on a given point-based page size. You can use this hand-in-hand with pseudo-HTML markup and a page view controller to produce the book shown in Figure 3-16. This book reads in text, converts it from marked-up source into an attributed string, and then breaks it into pages for display in the paged controller.

Figure 3-16. Core Text frame setters enable you to break attributed strings into sections that fit a given page size.
Recipe 3-7’s page splitter method powers the interface shown in Figure 3-16. This method uses Core Text to iterate through an attributed string, collecting range information on a page-by-page basis. The Core Text CTFramesetterSuggestFrameSizeWithConstraints method takes a starting range and a destination size, producing a destination range that fits its attributed string. Although this recipe doesn’t use any control attributes, you may want to explore these for your own implementations. Apple’s technical Q&A QA1698 (http://developer.apple.com/library/ios/#qa/qa1698) offers some pointers.
Recipe 3-7. Multipage Core Text
- (NSArray *) findPageSplitsForString: (NSAttributedString *)theString
withPageSize: (CGSize) pageSize
{
NSInteger stringLength = theString.length;
NSMutableArray *pages = [NSMutableArray array];
CTFramesetterRef frameSetter =
CTFramesetterCreateWithAttributedString(
(__bridge CFAttributedStringRef) theString);
CFRange baseRange = {0,0};
CFRange targetRange = {0,0};
do {
CTFramesetterSuggestFrameSizeWithConstraints(
frameSetter, baseRange, NULL, pageSize, &targetRange);
NSRange destRange = {baseRange.location, targetRange.length};
[pages addObject:[NSValue valueWithRange:destRange]];
baseRange.location += targetRange.length;
} while(baseRange.location < stringLength);
CFRelease(frameSetter);
return pages;
}
Get This Recipe’s Code
To find this recipe’s full sample project, point your browser to https://github.com/erica/iOS-6-Advanced-Cookbook and go to the folder for Chapter 3
Recipe: Drawing Attributed Text into a PDF
The Core Text and attributed listings you’ve seen so far drew text into views, rendering them in drawRect updates. Recipe 3-8 transfers that drawing away from views and into PDFs. It builds a new PDF file, adding content page-by-page, using the same page layout method introduced in Recipe 3-7.
Drawing to a PDF context is similar to drawing to an image context, the difference is in the call to begin a new PDF page. Recipe 3-8 builds its multipage PDF document and stores it to the path passed in the method call.
- (void) dumpToPDFFile: (NSString *) pdfPath
{
// This is an arbitrary page size. Adjust as desired.
CGRect theBounds = CGRectMake(0.0f, 0.0f, 480.0f, 640.0f);
CGRect insetRect = CGRectInset(theBounds, 0.0f, 10.0f);
NSArray *pageSplits = [self findPageSplitsForString:string
withPageSize:insetRect.size];
int offset = 0;
UIGraphicsBeginPDFContextToFile(pdfPath, theBounds, nil);
for (NSValue *pageStart in pageSplits)
{
UIGraphicsBeginPDFPage();
NSRange offsetRange = {offset, pageStart.rangeValue.length};
NSAttributedString *subString =
[string attributedSubstringFromRange:offsetRange];
offset += offsetRange.length;
[subString drawInRect:insetRect];
}
UIGraphicsEndPDFContext();
}
- (void) createPDF
{
NSString *path = [[NSBundle mainBundle]
pathForResource:@"data" ofType:@"txt"];
NSString *markup = [NSString stringWithContentsOfFile:path
encoding:NSUTF8StringEncoding error:nil];
string = [MarkupHelper stringFromMarkup:markup];
NSString *destPath = [NSHomeDirectory()
stringByAppendingPathComponent:@"Documents/results.pdf"];
[self dumpToPDFFile:destPath];
// Display the PDF in QuickLook
QLPreviewController *controller =
[[QLPreviewController alloc] init];
controller.dataSource = self;
[self.navigationController pushViewController:controller animated:YES];
}
To find this recipe’s full sample project, point your browser to https://github.com/erica/iOS-6-Advanced-Cookbook and go to the folder for Chapter 3.
Recipe: Big Phone Text
On the Macintosh, Address Book’s big text display is one of my favorite desktop features. It enlarges text to provide an easy-to-read display of short information, information that you might read even from across the room. So why not use the same make-it-big-and-readable philosophy on your iPhone, iPad, or iPod touch, as shown in Figure 3-17? Big text that is unaffected by device rotation with high-contrast display can be a real asset to many applications.
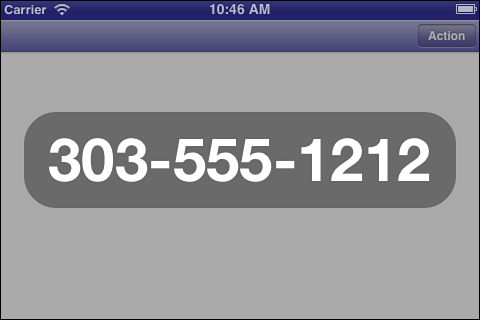
Figure 3-17. High-contrast large text displays can help users show off short snippets of information in a highly readable manner.
That’s because big text isn’t just about phone numbers. You might display names, level unlock codes, or e-mail addresses, as well as those phone numbers, making it easier to visually transfer information to someone using another iOS device, a physical notepad, a game console, a computer, or even a third-party smartphone. The motivating features here are that the text is short in length, big in size, and easy to read.
Having an algorithmic tool to display otherwise hard-to-read text is a great software feature, and one whose inspiration I proudly stole from Address Book to create this final recipe’s reusable Objective-C class. Recipe 3-9’s BigTextView class is meant to overlay the key device window and will not respond to device orientation, ensuring that text doesn’t start moving as the user reorients the device, especially when showing the information to someone else.
The current implementation dismisses the view with a double-tap to prevent any premature dismissal during typical handling.
Recipe 3-9. Big Text. Really Big Text.
// Center a rectangle inside a parent
CGRect rectCenteredInRect(CGRect rect, CGRect mainRect)
{
return CGRectOffset(rect,
CGRectGetMidX(mainRect)-CGRectGetMidX(rect),
CGRectGetMidY(mainRect)-CGRectGetMidY(rect));
}
// Big Text View
@implementation BigTextView
{
NSString *baseString;
}
- (id) initWithString: (NSString *) theString
{
if (self = [super initWithFrame:CGRectZero])
{
baseString = theString;
// Require a double-tap to dismiss
UITapGestureRecognizer *tapRecognizer =
[[UITapGestureRecognizer alloc] initWithTarget:self
action:@selector(dismiss)];
tapRecognizer.numberOfTapsRequired = 2;
[self addGestureRecognizer:tapRecognizer];
}
return self;
}
- (void) dismiss
{
[self removeFromSuperview];
}
+ (void) bigTextWithString:(NSString *)theString
{
BigTextView *theView =
[[BigTextView alloc] initWithString:theString];
// Create a dark, translucent backdrop
theView.backgroundColor =
[[UIColor darkGrayColor] colorWithAlphaComponent:0.5f];
// Constrain the view to stretch to its parent size
UIWindow* window = [[UIApplication sharedApplication] keyWindow];
[window addSubview:theView];
PREPCONSTRAINTS(theView);
STRETCH_VIEW(window, theView);
return;
}
// Draw out the message
- (void) drawRect:(CGRect)rect
{
[super drawRect:rect];
CGContextRef context = UIGraphicsGetCurrentContext();
// Create a geometry with width greater than height
CGRect orientedRect = self.bounds;
if (orientedRect.size.height > orientedRect.size.width)
orientedRect.size = CGSizeMake(
orientedRect.size.height, orientedRect.size.width);
// Rotate 90 deg to write text horizontally
// along window's vertical axis
CGContextRotateCTM(context, -M_PI_2);
CGContextTranslateCTM(context, -self.frame.size.height, 0.0f);
// Draw a light gray rounded-corner backsplash
[[[UIColor darkGrayColor] colorWithAlphaComponent:0.75f] set];
CGRect insetRect = CGRectInset(orientedRect,
orientedRect.size.width * 0.05f,
orientedRect.size.height * 0.35f);
[[UIBezierPath bezierPathWithRoundedRect:insetRect
cornerRadius:32.0f] fill];
CGContextFillPath(context);
// Inset again for the text
insetRect = CGRectInset(insetRect,
insetRect.size.width * 0.05f,
insetRect.size.height * 0.05f);
// Iterate until finding a set of font
// traits that fits this rectangle
UIFont *textFont;
NSString *fontFace = @"HelveticaNeue-Bold";
CGSize fullSize = CGSizeMake(CGFLOAT_MAX, CGFLOAT_MAX);
for (CGFloat fontSize = 18; fontSize < 300; fontSize++ )
{
// Search until the font size is too big
textFont = [UIFont fontWithName:fontFace size: fontSize];
CGSize textSize = [baseString sizeWithFont:textFont
constrainedToSize:fullSize];
if (textSize.width > insetRect.size.width)
{
// Ease back on font size to prior level
textFont = [UIFont fontWithName:fontFace
size: fontSize - 1];
break;
}
}
// Establish a frame that just encloses the text at the maximum size
CGSize textSize = [baseString sizeWithFont:textFont
constrainedToSize:fullSize];
CGRect textFrame = (CGRect){.size = textSize};
CGRect centerRect = rectCenteredInRect(textFrame, insetRect);
// Draw the string in white
[[UIColor whiteColor] set];
[baseString drawInRect:centerRect withFont:textFont];
}
@end
Get This Recipe’s Code
To find this recipe’s full sample project, point your browser to https://github.com/erica/iOS-6-Advanced-Cookbook and go to the folder for Chapter 3.
Summary
This chapter introduced many ways to creatively use text in your iOS applications. In this chapter, you read about attributed strings and building solutions using Core Text. Here are a few further thoughts before you move to the next chapter:
• With the proper utility classes, attributed strings are amazingly simple to use. They offer an easy way to create aesthetically pleasing presentations with little coding. Now that UIKit supports attributed strings for so many classes, it’s time to jump off the plain NSString bandwagon and enter the powerful world of attributes.
• Some typesetting features seem to have missed the iOS 6 cut-off. Although iOS 6 is wonderful for text, iOS 7 should be amazing. This chapter detailed a number of places (such as adding traits to fonts) where iOS 6 didn’t quite move development completely out from Core Text. Responder features such as bolding and italics offer a tantalizing taste of where iOS is heading.
• Serious work requires serious typesetting. Don’t be afraid to use Core Text for laying out complicated pages that mix text with images. You’ve seen examples that demonstrate how to create flexible paths. Use them to build all kinds of mind-blowing layouts.
• If you plan to use custom typesetting with page view controllers, schedule time to work out the math and layout—especially if you intend to let users adjust font sizes, and particularly when moving from portrait to landscape layouts. There’s a good reason Apple has an entire team working on iBooks.
• iOS ships with an excellent and robust set of fonts, but you aren’t limited to that set. Feel free to license and bundle the fonts you need, so long as they’re iOS-compatible.
• Are you looking for the recipe that lays out text along a Bezier path? It’s in the next chapter. Chapter 4, “Geometry,” creates a better match to the underlying problem, which is more about math than Core Text. You’ll find it there.