
4. Geometry
Although UIKit requires less applied math than, say, Core Animation or Open GL, geometry plays an important role when working with Bezier paths and view transforms. Why do you need geometry? It helps you manipulate views in nonstandard ways, including laying out text along custom paths and performing path-follow types of animation. If your eyes glaze over at the mention of Bezier curves, convex hulls, and splines, this chapter helps demystify these terms, enabling you to add some powerful customization options to your toolbox.
Recipe: Retrieving Points from Bezier Paths
In mathematics, Bezier curves refer to a parameterized smoothed curve, created by control points applied to a line segment. In UIKit, Bezier paths define shapes built from straight and curved line segments, which may include Bezier curves and circle arcs. Members of the UIBezierPath class store sequences of segments, which may be open or closed, continuous or noncontinuous. Paths can include the following:
• Straight lines, created by moveToPoint: and addLineToPoint: calls.
• Cubic Bezier curve segments created by calling addCurveToPoint:controlPoint1:controlPoint2:.
• Quadratic Bezier curve segments built by addQuadCurveToPoint:controlPoint: calls.
• Arcs added with calls to addArcToCenter:radius:startAngle:endAngle:clockwise:.
Class methods enable you to build rectangles, ovals, rounded rectangles, and arcs, offering single-call access to common path styles. When working with free-form drawing, you often create paths interactively, responding to user touches along the way.
Although Bezier paths offer a lot of utility for working with drawn paths, they do not directly offer a way to retrieve an array of their points. Recipe 4-1 does this by collecting an array of source points. It uses the CGPathApply function to iterate a Bezier path’s elements, supplying a custom function (getPointsFromBezier()) called on each element.
This function retrieves the element type (such as move-to-point, add-line-to-point, add-curve-to-point, add-quad-curve-to-point, or close-subpath) and uses that information to pull out the points that make up the path. This ability to move to and from path and point representation offers a way for you to take advantage of both worlds.
Path objects provide core-level access to drawing features such as filling and stroking. You can set a path’s line width and dash style. This makes it easy to incorporate paths into a view’s drawRect: implementation. A simple call to [myPath stroke] performs all the drawing you need to show a path’s outline.
Moving from a path to points lets you apply math functions to your custom drawing. You can smooth the path, find its bounding box, apply a point thinning function, and so forth. The points offer concrete access to the data that makes up the path.
Throughout this chapter, you can find routines that move in both directions: from path objects to point arrays, and back. Recipe 4-1 makes this possible by providing a property (points) that returns an array of points extracted from a Bezier path, and a class method (pathwithPoints:) that establishes a Bezier path from an array of points.
Recipe 4-1. Extracting Bezier Path Points
#define POINT(_INDEX_)
[(NSValue *)[points objectAtIndex:_INDEX_] CGPointValue]
#define VALUE(_INDEX_)
[NSValue valueWithCGPoint:points[_INDEX_]]
void getPointsFromBezier(void *info, const CGPathElement *element)
{
NSMutableArray *bezierPoints = (__bridge NSMutableArray *)info;
CGPathElementType type = element->type;
CGPoint *points = element->points;
if (type != kCGPathElementCloseSubpath)
{
if ((type == kCGPathElementAddLineToPoint) ||
(type == kCGPathElementMoveToPoint))
[bezierPoints addObject:VALUE(0)];
else if (type == kCGPathElementAddQuadCurveToPoint)
[bezierPoints addObject:VALUE(1)];
else if (type == kCGPathElementAddCurveToPoint)
[bezierPoints addObject:VALUE(2)];
}
}
- (NSArray *)points
{
NSMutableArray *points = [NSMutableArray array];
CGPathApply(self.CGPath, (__bridge void *)points, getPointsFromBezier);
return points;
}
+ (UIBezierPath *) pathWithPoints: (NSArray *) points
{
UIBezierPath *path = [UIBezierPath bezierPath];
if (points.count == 0) return path;
[path moveToPoint:POINT(0)];
for (int i = 1; i < points.count; i++)
[path addLineToPoint:POINT(i)];
return path;
}
Get This Recipe’s Code
To find this recipe’s full sample project, point your browser to https://github.com/erica/iOS-6-Cookbook and go to the folder for Chapter 4.
Recipe: Thinning Points
The points created in Recipe 4-1 are built from touch events. Every time users move their finger, a new point joins the underlying Bezier path. Paths clutter quickly, as you see in Figure 4-1 (left). This screen shot shows the touch points captured during a user interaction. Each small circle represents a touch event as the user strokes the screen.

Figure 4-1. Thinning enables you to remove collinear points to reduce the number of items used to build a curve. This is important if you are storing the strokes or supporting undo/redo. It enables you to simultaneously reduce your app’s memory overhead and increase its performance and responsiveness.
Many of these points are collinear, representing redundant elements. Figure 4-1 (right) shows a thinned representation of the same path, with numerous items removed. This version eliminates points that fail to inflect the line, so you see several long straight segments without any circles. The math that creates this streamlined version tests for alignment and removes points that aren’t playing a role in defining the shape.
Consider Figure 4-2. It shows three points: A, P, and B. The angle formed between the AP and PB line segments is nearly flat, almost but not quite 180 degrees. Eliminating point P in this sequence produces a line segment (AB) that’s close to the original (APB) but with one fewer point. This creates a simpler representation with a minimal loss of fidelity. As you can see in Figure 4-1, the before-and-after versions are nearly identical despite a 4–5x reduction in data points.

Figure 4-2. The angle formed between the AP and PB line segments is nearly flat.
Recipe 4-2 details the thinning algorithm. It iterates through the path’s points, using Recipe 4-1’s point retrieval. It examines each point (point P in Figure 4-2), looking one point back (to point A) and one point forward (to point B). It creates the two vectors, AP and BP, and calculates their dot product.
Dot products are algebraic operations that multiply the elements of two vectors. The result is directly related to the cosine of the angle between the two vectors. Recipe 4-2 compares the cosine value to a test value, which ranges between –1 (cosine of Pi, or 180 degrees) to –0.865 (cosine of 150 degrees). This corresponds to a tolerance, which you supply as a function parameter. It ranges between 0 (no tolerance, the angle must be exactly 180) to 1 (highest tolerance, allowing angles up to 150 degrees).
As the tolerance moves toward 1, the algorithm enables greater divergence from strict collinearity. Using this check, the function eliminates collinear and nearly collinear points, returning a greatly thinned Bezier path.
There’s a trade-off here of memory savings versus the accuracy of the depiction. This is similar to JPEG image compression. Small compression gives you a small memory savings, with an almost imperceptible decrease in image quality. Pushed too far, your space savings create an unrecognizable blob of an image. As a developer, you decide what level you can use without degrading the user experience. Use smaller values for more precise representations and larger values for less accurate but more memory-limited representations.
Recipe 4-2. Thinning Bezier Path Points
#define POINT(_INDEX_)
[(NSValue *)[points objectAtIndex:_INDEX_] CGPointValue]
// Return dot product of two vectors normalized
static float dotproduct (CGPoint v1, CGPoint v2)
{
float dot = (v1.x * v2.x) + (v1.y * v2.y);
float a = ABS(sqrt(v1.x * v1.x + v1.y * v1.y)); // magnitude a
float b = ABS(sqrt(v2.x * v2.x + v2.y * v2.y)); // magnitude b
dot /= (a * b);
return dot;
}
// Pass a tolerance within 0 to 1.
// 0 tolerance uses the tightest checking for colinearity
// As the values loosen, colinearity will be allowed for angles
// further from 180 degrees, up to 150 degrees at a tolerance of 1
UIBezierPath *thinPath(UIBezierPath *path, CGFloat tolerance)
{
// Retrieve the points
NSArray *points = path.points;
if (points.count < 3) return path;
// Create a new output path
UIBezierPath *newPath = [UIBezierPath bezierPath];
CGPoint p1 = POINT(0);
[newPath moveToPoint:p1];
CGPoint mostRecent = p1;
int count = 1;
// -1 = 180 degrees, -0.985 = 170 degrees,
// -0.865 = 150 degrees
CGFloat checkValue = -1.0f + .135 * tolerance;
// Add only those points that are inflections
for (int i = 1; i < (points.count - 1); i++)
{
CGPoint p2 = POINT(i);
CGPoint p3 = POINT(i+1);
// Cast vectors around p2 origin
CGPoint v1 = CGPointMake(p1.x - p2.x, p1.y - p2.y);
CGPoint v2 = CGPointMake(p3.x - p2.x, p3.y - p2.y);
float dot = dotproduct(v1, v2);
// Colinear items need to be as close as possible to 180 degrees
// That means as close to -1 as possible
if (dot < checkValue) continue;
p1 = p2;
mostRecent = POINT(i);
[newPath addLineToPoint:mostRecent];
count++;
}
// Add final point
CGPoint finalPoint = POINT(points.count - 1);
if (!CGPointEqualToPoint(finalPoint, mostRecent))
[newPath addLineToPoint:finalPoint];
return newPath;
}
Get This Recipe’s Code
To find this recipe’s full sample project, point your browser to https://github.com/erica/iOS-6-Cookbook and go to the folder for Chapter 4.
Recipe: Smoothing Drawings
Depending on the device in use and the amount of simultaneous processing involved, capturing user gestures may produce results that are rougher than wanted. Figure 4-3 shows the kind of angularity that derives from granular input. Touch events are often limited by CPU demands and are subject to any system events. Using a real-time smoothing algorithm can offset those limitations by interpolating between points using basic splining.
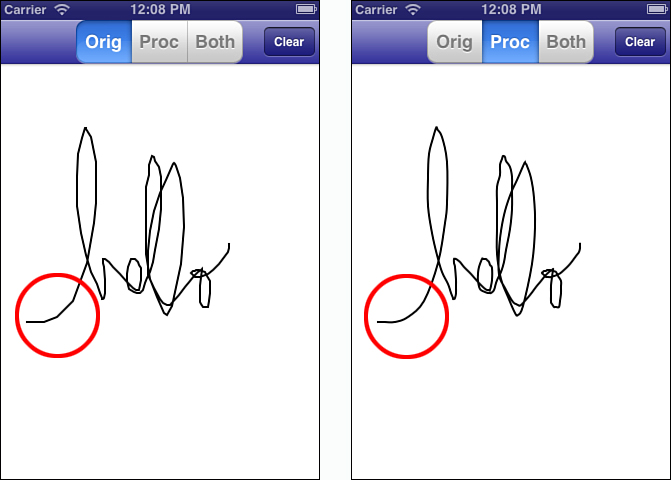
Figure 4-3. Catmull-Rom smoothing can be applied in real time to improve arcs between touch events. The images shown here are based on an identical gesture input, with and without smoothing applied.
Catmull-Rom splines offer one of the simplest approaches to create continuous curves between key points. This algorithm ensures that each initial point you provide remains part of the final curve, so the resulting path retains the original path’s shape. You choose the number of points to interpolate between each of your reference points. The trade-off lies between processing power and greater smoothing. The more points you add, the more CPU resources you consume. As you can see when using the sample code that accompanies this chapter, a little smoothing goes a long way. That said, newer iOS devices are so responsive that it’s hard to draw a particularly jaggy line in the first place.
Catmull-Rom interpolates to create smoothed representations. Recipe 4-3 implements this algorithm using four points at a time to calculate intermediate values between the second and third points in each sequence. It uses a granularity you specify, to create extra items between those points. To create the results shown in Figure 4-3, the sample code used a granularity of 4. Recipe 4-3 provides an example of just one kind of real-time geometric processing you might add to your applications.
Recipe 4-3. Catmull-Rom Splining
#define POINT(_INDEX_)
[(NSValue *)[points objectAtIndex:_INDEX_] CGPointValue]
// Return a smoothed path using the supplied granularity
UIBezierPath *smoothedPath(UIBezierPath *path, NSInteger granularity)
{
NSMutableArray *points = [path.points mutableCopy];
if (points.count < 4) return [path copy];
[points insertObject:[points objectAtIndex:0] atIndex:0];
[points addObject:[points lastObject]];
UIBezierPath *smoothedPath = [UIBezierPath bezierPath];
// Copy traits
smoothedPath.lineWidth = path.lineWidth;
// Draw out the first 3 points (0..2)
[smoothedPath moveToPoint:POINT(0)];
for (int index = 1; index < 3; index++)
[smoothedPath addLineToPoint:POINT(index)];
for (int index = 4; index < points.count; index++)
{
CGPoint p0 = POINT(index - 3);
CGPoint p1 = POINT(index - 2);
CGPoint p2 = POINT(index - 1);
CGPoint p3 = POINT(index);
// now add n points starting at p1 + dx/dy up
// until p2 using Catmull-Rom splines
for (int i = 1; i < granularity; i++)
{
float t = (float) i * (1.0f / (float) granularity);
float tt = t * t;
float ttt = tt * t;
CGPoint pi; // intermediate point
pi.x = 0.5 * (2*p1.x+(p2.x-p0.x)*t +
(2*p0.x-5*p1.x+4*p2.x-p3.x)*tt +
(3*p1.x-p0.x-3*p2.x+p3.x)*ttt);
pi.y = 0.5 * (2*p1.y+(p2.y-p0.y)*t +
(2*p0.y-5*p1.y+4*p2.y-p3.y)*tt +
(3*p1.y-p0.y-3*p2.y+p3.y)*ttt);
[smoothedPath addLineToPoint:pi];
}
// Now add p2
[smoothedPath addLineToPoint:p2];
}
// finish by adding the last point
[smoothedPath addLineToPoint:POINT(points.count - 1)];
return smoothedPath;
}
To find this recipe’s full sample project, point your browser to https://github.com/erica/iOS-6-Cookbook and go to the folder for Chapter 4.
Recipe: Velocity-Based Stroking
Velocity-based thickness can add a sense of realism to interactive drawings by mimicking ink-flow. The faster the pen moves, the less ink it can lay down. Slower movements place more ink, creating thicker areas. Figure 4-4 shows how the same tracing looks with and without velocity-based thickness adjustment. Tying line thickness to user velocity is most commonly used when capturing signatures or creating “pen-and-ink” style interfaces.
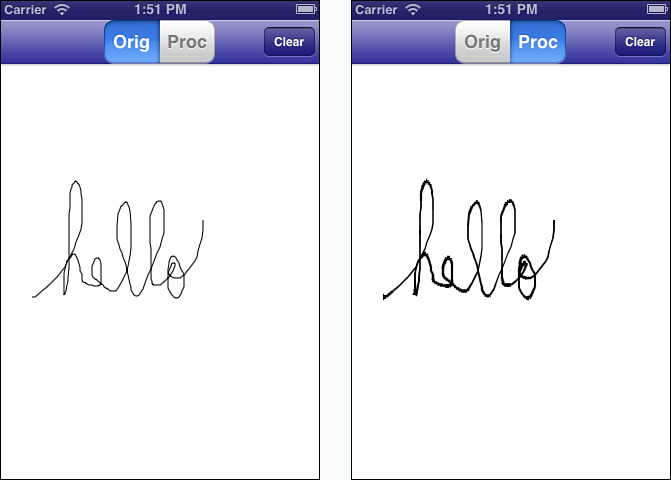
Figure 4-4. A user-created tracing with (right) and without (left) velocity-based thickness adjustment.
Recipe 4-4 uses point velocities captured during drawing. A custom class called FlowPath store dates along with point positions. The time offset and the distance traveled combine to determine what stroke width to apply.
To dampen change a little bit, this approach, which was inspired by any number of superior solutions around the Internet, uses a weighting factor. This limits the degree acceleration that can affect the current velocity, taking an average of the current and previous velocities before calculating the new stroke width.
This is a recipe you want to tweak and adjust to produce the best possible visual design. It offers all the basics you need to start but leaves the “perfect stroke” as an exercise for the reader. Be aware that this routine uses uniform stroke widths for each path length. A more thorough implementation might smooth the path using splines and adjust that width along each interpolation segment.
Recipe 4-4. Velocity-Based Stroking
#define POINT(_INDEX_)
[(NSValue *)[points objectAtIndex:_INDEX_] CGPointValue]
// Calculate the velocity between two point events
- (CGFloat) velocityFrom:(int) j to:(int) i
{
CGFloat dPos = distance(POINT(j), POINT(i));
CGFloat dTime = (DATE(j) - DATE(i));
return dPos / dTime;
}
// Return a stroke width based on velocity
// Feel free to tweak this all you like
- (CGFloat) strokeWidth: (CGFloat) velocity
{
CGFloat multiplier = 2.0f;
CGFloat base = 5.0f;
CGFloat adjusted = base - (log2f(velocity) / multiplier);
adjusted = MIN(MAX(adjusted, 0.4), base);
return multiplier * adjusted * _lineWidth;
}
// Create a Bezier path from p0 to p1 for drawing
UIBezierPath *bPath(CGPoint p0, CGPoint p1)
{
UIBezierPath *path = [UIBezierPath bezierPath];
[path moveToPoint:p0];
[path addLineToPoint:p1];
return path;
}
// Stroke the custom FlowPath
- (void) stroke
{
if (points.count < 2) return;
// Store the most recent velocity
CGFloat lastVelocity = [self velocityFrom:1 to:0];
// Adjustable weighting for slight filtering
CGFloat weight = 0.5f;
UIBezierPath *path;
for (int i = 1; i < points.count; i++)
{
// Adjust the velocity so it doesn't change too much
// at any given time
CGFloat velocity = [self velocityFrom:i to:i-1];
velocity = weight*velocity + (1.0f - weight)*lastVelocity;
lastVelocity = velocity;
CGFloat strokeWidth = [self strokeWidth:velocity];
// Stroke each segment
path = bPath(POINT(i - 1), POINT(i));
path.lineWidth = strokeWidth;
[path stroke];
}
}
Get This Recipe’s Code
To find this recipe’s full sample project, point your browser to https://github.com/erica/iOS-6-Cookbook and go to the folder for Chapter 4.
Recipe: Bounding Bezier Paths
Bezier paths produce irregular shapes. Because of that, you may need to retrieve a path’s bounding box (the minimal rectangle that encloses the path) or convex hull (the smallest convex shape that encloses the path) to do intersection testing or provide a visual backdrop. Figure 4-5 shows the bounding box and convex hull for a sketched face.
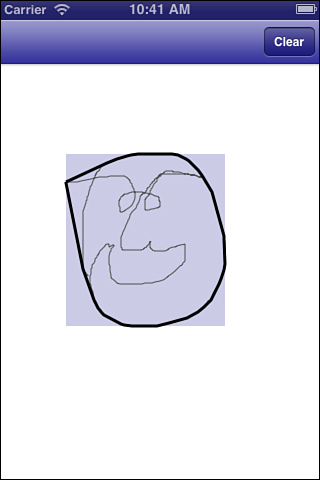
Figure 4-5. A UIBezierPath drawing of a human face. The light, outer rectangle marks the path’s bounding box. The inner, heavy outline is the path’s convex hull.
The Bezier path’s built-in bounds property corresponds to the curve’s bounding box. Recipe 4-5 shows how to create a path’s convex hull. It works by sorting the points geometrically along the X-axis and then along the Y-axis. The recipe calculates the bottom hull and then the top hull, testing each point to determine if it falls within the object (to the left for the lower hull, to the right for the upper hull) or outside (right for lower, left for upper). If the point falls outside, the method extends the hull to accommodate.
After calculating the bounding points, the convex hull method builds a new UIBezierPath instance to store them and returns that object.
Recipe 4-5. Bounding Boxes and Convex Hulls
#define POINT(_INDEX_)
[(NSValue *)[points objectAtIndex:_INDEX_] CGPointValue]
@implementation UIBezierPath (Bounding)
// Create a zero-sized rectangle at a point
static CGRect pointRect(CGPoint point)
{
return (CGRect){.origin=point};
}
// Return an array of sorted points along X and then Y
- (NSArray *) sortedPoints
{
NSArray *sorted = [self.points sortedArrayUsingComparator:
^NSComparisonResult(id item1, id item2)
{
NSValue *v1 = (NSValue *) item1;
NSValue *v2 = (NSValue *) item2;
CGPoint p1 = v1.CGPointValue;
CGPoint p2 = v2.CGPointValue;
if (p1.x == p2.x)
return [@(p1.y) compare:@(p2.y)];
else
return [@(p1.x) compare:@(p2.x)];
}];
return sorted;
}
// Test a point's half-plane
static float halfPlane(CGPoint p1, CGPoint p2, CGPoint testPoint)
{
return (p2.x-p1.x)*(testPoint.y-p1.y) - (testPoint.x-p1.x)*(p2.y-p1.y);
}
// Return a path's convex hull
- (UIBezierPath *) convexHull
{
/*
minmin = top left, min x, min y
minmax = bottom left, min x, max y
maxmin = top right, max x, min y
maxmax = bottom right, max x, max y
*/
NSMutableArray *output = [NSMutableArray array];
NSInteger bottom = 0;
NSInteger top = -1;
NSInteger i;
// Pre-sort the points
NSArray *points = self.sortedPoints;
NSInteger lastIndex = points.count - 1;
// Location of top-left corner
NSInteger minmin = 0;
CGFloat xmin = POINT(0).x;
// Locate minmax, bottom left
for (i = 1; i <= lastIndex; i++)
if (POINT(i).x != xmin)
break;
NSInteger minmax = i - 1;
// If the bottom left is the final item
// check whether to add both minmin & minmax
if (minmax == lastIndex)
{
output[++top] = points[minmin];
if (POINT(minmax).y != POINT(minmin).y)
{
// add the second point, and close the path
output[++top] = points[minmax];
output[++top] = points[minmin];
}
for (int i = top + 1; i < output.count; i++)
[output removeObjectAtIndex:i];
return [UIBezierPath pathWithPoints:output];
}
// Search for top right, max x, min y by moving
// back from max x, max y at final index
NSInteger maxmin = lastIndex;
CGFloat xmax = POINT(lastIndex).x;
for (i = lastIndex - 1; i >= 0; i--)
if (POINT(i).x != xmax)
break;
maxmin = i + 1;
// Compute Lower Hull
output[++top] = points[minmin]; // top left
i = minmax; // bottom left
while (++i < maxmin) // top right
{
// Test against TopLeft-TopRight
if ((halfPlane(POINT(minmin),
POINT(maxmin), POINT(i)) >= 0) &&
(i < maxmin))
continue;
while (top > 0)
{
// Find points that extend the hull and add them
if (halfPlane([output[top - 1] CGPointValue],
[output[top] CGPointValue], POINT(i)) > 0)
break;
else
top--;
}
output[++top] = points[i];
}
// Ensure the hull is continuous when going from lower to upper
NSInteger maxmax = lastIndex;
if (maxmax != maxmin)
output[++top] = points[maxmax];
// Compute Upper Hull
bottom = top;
i = maxmin;
while (--i >= minmax)
{
if ((halfPlane(POINT(maxmax),
POINT(minmax), POINT(i)) >= 0) &&
(i > minmax))
continue;
while (top > bottom)
{
// Add points that extend the hull
if (halfPlane([output[top - 1] CGPointValue],
[output[top] CGPointValue], POINT(i)) > 0)
break;
else
top--;
}
output[++top] = points[i];
}
// Again ensure continuity at the end
if (minmax != minmin)
output[++top] = points[minmin];
NSMutableArray *results = [NSMutableArray array];
for (int i = 0; i <= top; i++)
[results addObject:output[i]];
return [UIBezierPath pathWithPoints:results];
}
@end
To find this recipe’s full sample project, point your browser to https://github.com/erica/iOS-6-Cookbook and go to the folder for Chapter 4.
Recipe: Fitting Paths
UIKit Bezier paths provide an easy way to use vector graphics in your application. Their geometric representations enable you to scale and place art without regard to pixels. Recipe 4-6 details the work involved in drawing a path into a custom rectangle, as demonstrated in Figure 4-6. This picture’s custom line drawing is projected into a small inset box in real time as it’s being drawn.

Figure 4-6. The larger Bezier path drawn by the user is projected into the small darker box.
The recipe works by calculating a path’s bounding box and fitting that size into a destination rectangle supplied as a method parameter. This is simply a matter of checking the horizontal and vertical scaling factors. The smaller scale wins, and the results are offset to center the scaled path within the destination rectangle.
This recipe projects each point from the original rectangle to the destination one using simple geometry. It calculates the point’s vector from the initial origin, scales it, and then casts that vector from the destination origin. This solution works well for point-based UIBezierPath instances but runs up short when faced with path objects that support arcs and lines. Read on to discover a more general solution that handles both point and curve-based paths.
Recipe 4-6. Fitting Paths into Custom Rectangles
// Determine the scale that allows a size to fit into
// a destination rectangle
CGFloat AspectScaleFit(CGSize sourceSize, CGRect destRect)
{
CGSize destSize = destRect.size;
CGFloat scaleW = destSize.width / sourceSize.width;
CGFloat scaleH = destSize.height / sourceSize.height;
return MIN(scaleW, scaleH);
}
// Create a rectangle that will fit an item while preserving
// its original aspect
CGRect AspectFitRect(CGSize sourceSize, CGRect destRect)
{
CGSize destSize = destRect.size;
CGFloat destScale = AspectScaleFit(sourceSize, destRect);
CGFloat newWidth = sourceSize.width * destScale;
CGFloat newHeight = sourceSize.height * destScale;
float dWidth = ((destSize.width - newWidth) / 2.0f);
float dHeight = ((destSize.height - newHeight) / 2.0f);
CGRect rect = CGRectMake(destRect.origin.x + dWidth,
destRect.origin.y + dHeight, newWidth, newHeight);
return rect;
}
// Add two points
CGPoint PointAddPoint(CGPoint p1, CGPoint p2)
{
return CGPointMake(p1.x + p2.x, p1.y + p2.y);
}
// Subtract a point from a point
CGPoint PointSubtractPoint(CGPoint p1, CGPoint p2)
{
return CGPointMake(p1.x - p2.x, p1.y - p2.y);
}
// Project a point from a native rectangle into a destination
// rectangle
NSValue *adjustPoint(CGPoint p, CGRect native, CGRect dest)
{
CGFloat scaleX = dest.size.width / native.size.width;
CGFloat scaleY = dest.size.height / native.size.height;
CGPoint point = PointSubtractPoint(p, native.origin);
point.x *= scaleX;
point.y *= scaleY;
CGPoint destPoint = PointAddPoint(point, dest.origin);
return [NSValue valueWithCGPoint:destPoint];
}
// Fit a path into a rectangle
- (UIBezierPath *) fitInRect: (CGRect) destRect
{
// Calculate an aspect-preserving destination rectangle
NSArray *points = self.points;
CGRect bounding = self.bounds;
CGRect fitRect = AspectFitRect(bounding.size, destRect);
// Project each point from the original to the
// destination rectangle
NSMutableArray *adjustedPoints = [NSMutableArray array];
for (int i = 0; i < points.count; i++)
[adjustedPoints addObject:adjustPoint(
POINT(i), bounding, fitRect)];
return [UIBezierPath pathWithPoints:adjustedPoints];
}
Get This Recipe’s Code
To find this recipe’s full sample project, point your browser to https://github.com/erica/iOS-6-Cookbook and go to the folder for Chapter 4.
Working with Curves
UIBezierPath aren’t just points and straight lines as you’ve seen so far. Instances can be constructed from complex elements, including cubic and quadratic curves. Each element has a type, which describes the role the element plays in the path, and from zero to three parameters, which are used to construct the element. A path-closing element uses no parameters. A cubic Bezier curve element has three: an end-point and two control points.
Listing 4-1 expands the concepts from Recipe 4-1 to retrieve path elements instead of points. Each element is represented as an array consisting of an element type followed by its parameters. The bezierElements method returns that array.
It’s easy enough to go the other direction as well. The listing’s pathWithElements: class method takes this element array to return the original path constructed from these elements. As with Recipe 4-1, this pair of methods enables you to retrieve path elements as points, evaluate and adjust them, and then reconstruct a proper path with the updated items.
// Construct an array of Bezier Elements
void getBezierElements(void *info, const CGPathElement *element)
{
NSMutableArray *bezierElements = (__bridge NSMutableArray *)info;
CGPathElementType type = element->type;
CGPoint *points = element->points;
switch (type)
{
case kCGPathElementCloseSubpath:
[bezierElements addObject:@[@(type)]];
break;
case kCGPathElementMoveToPoint:
case kCGPathElementAddLineToPoint:
[bezierElements addObject:@[@(type), VALUE(0)]];
break;
case kCGPathElementAddQuadCurveToPoint:
[bezierElements addObject:
@[@(type), VALUE(0), VALUE(1)]];
break;
case kCGPathElementAddCurveToPoint:
[bezierElements addObject:
@[@(type), VALUE(0), VALUE(1), VALUE(2)]];
break;
}
}
// Retrieve the element array
- (NSArray *) bezierElements
{
NSMutableArray *elements = [NSMutableArray array];
CGPathApply(self.CGPath,
(__bridge void *)elements, getBezierElements);
return elements;
}
// Construct a path from its elements
+ (UIBezierPath *) pathWithElements: (NSArray *) elements
{
UIBezierPath *path = [UIBezierPath bezierPath];
if (elements.count == 0) return path;
for (NSArray *points in elements)
{
if (!points.count) continue;
CGPathElementType elementType = [points[0] integerValue];
switch (elementType)
{
case kCGPathElementCloseSubpath:
[path closePath];
break;
case kCGPathElementMoveToPoint:
if (points.count == 2)
[path moveToPoint:POINT(1)];
break;
case kCGPathElementAddLineToPoint:
if (points.count == 2)
[path addLineToPoint:POINT(1)];
break;
case kCGPathElementAddQuadCurveToPoint:
if (points.count == 3)
[path addQuadCurveToPoint:POINT(2)
controlPoint:POINT(1)];
break;
case kCGPathElementAddCurveToPoint:
if (points.count == 4)
[path addCurveToPoint:POINT(3)
controlPoint1:POINT(1) controlPoint2:POINT(2)];
break;
}
}
return path;
}
Fitting Elements
After you have access to elements, you can adjust system-supplied paths such as rounded rectangles, ellipses, and so forth, just as easily as you would point-based paths. Listing 4-2 updates the concepts from Recipe 4-2 to enable projection of the points and control points for a general Bezier path case. Figure 4-7 shows how a path constructed of quadratic and cubic Bezier paths can be moved and resized to a destination rectangle.

Figure 4-7. UIBezierPaths can be constructed of quadratic and cubic curves and lines. This path, which consists of a rounded rectangle and several random cubic Bezier curves, is projected into a custom rectangle using element recovery from the original path.
The listing works by iterating through the element arrays. It adjusts each point (destination and control points) from its original geometry, projecting it into the destination rectangle. The adjusted elements are then passed to the reconstruction class method from Listing 4-1 to return an updated Bezier path.
Listing 4-2. Fitting Element-Based Bezier Paths
// Project a Bezier Path into a custom rectangle
- (UIBezierPath *) fitElementsInRect: (CGRect) destRect
{
CGRect bounding = self.bounds;
CGRect fitRect = AspectFitRect(bounding.size, destRect);
NSArray *elements = self.bezierElements;
NSMutableArray *adjustedElements = [NSMutableArray array];
for (NSArray *points in elements)
{
if (!points.count) continue;
NSMutableArray *outArray = [NSMutableArray array];
[outArray addObject:points[0]]; // NSNumber, type
for (int i = 1; i < points.count; i++)
[outArray addObject:adjustPoint(
POINT(i), bounding, fitRect)];
[adjustedElements addObject:outArray];
}
return [UIBezierPath pathWithElements:adjustedElements];
}
Recipe: Moving Items Along a Bezier Path
Animation represents a common use for Bezier paths. For example, you might move a view along a custom path drawn by the user. The rectangle in Figure 4-8 moves along its path, orienting itself to the path as it goes. Recipe 4-7 supports this behavior by returning a point and a slope when given an offset.
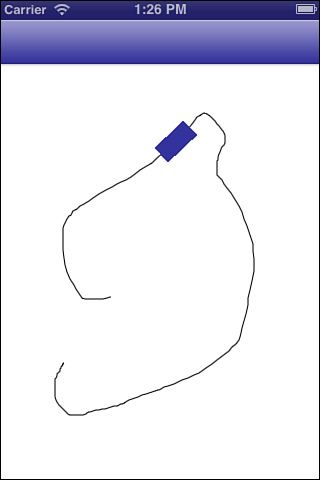
Figure 4-8. The user’s tracing provides a path for the rectangle to move along. It adjusts its rotation to match that of the path.
The offset may vary between 0 and 1 and represents the percentage of progress along the path. A 0% progress returns the start point; 100% returns the end point. To determine the points between, this recipe calculates the total distance along the path (length) and builds an array from its component points, precalculating their progress in the pointPercentArray method.
A simple search and interpolation enables the pointAtPercent:slope: method to return a point that is exactly, for example, 67.25% along the path. The method identifies the points just before and just after that item. This allows it to return a slope (dy/dx) defined by those points, providing a basis for calculating the rotation angle for the animated object. To calculate the angle, provide the slope to an arctan function. Apply the rotation using affine transforms.
Recipe 4-7. Retrieving Points and Slopes from Bezier Paths
// Return distance between two points
static float distance (CGPoint p1, CGPoint p2)
{
float dx = p2.x - p1.x;
float dy = p2.y - p1.y;
return sqrt(dx*dx + dy*dy);
}
// Return the length of a Bezier path
- (CGFloat) length
{
NSArray *points = self.points;
float totalPointLength = 0.0f;
for (int i = 1; i < points.count; i++)
totalPointLength += distance(POINT(i), POINT(i-1));
return totalPointLength;
}
- (NSArray *) pointPercentArray
{
// Use total length to calculate the percent of path
// consumed at each control point
NSArray *points = self.points;
int pointCount = points.count;
float totalPointLength = self.length;
float distanceTravelled = 0.0f;
NSMutableArray *pointPercentArray = [NSMutableArray array];
[pointPercentArray addObject:@(0.0)];
for (int i = 1; i < pointCount; i++)
{
distanceTravelled += distance(POINT(i), POINT(i-1));
[pointPercentArray addObject:
@(distanceTravelled / totalPointLength)];
}
// Add a final item just to stop with. Probably not needed.
[pointPercentArray addObject:[NSNumber numberWithFloat:1.1f]]; // 110%
return pointPercentArray;
}
// Return a point and its slope at a given offset
- (CGPoint) pointAtPercent: (CGFloat) percent withSlope: (CGPoint *) slope
{
NSArray *points = self.points;
NSArray *percentArray = self.pointPercentArray;
CFIndex lastPointIndex = points.count - 1;
if (!points.count)
return CGPointZero;
// Check for 0% and 100%
if (percent <= 0.0f) return POINT(0);
if (percent >= 1.0f) return POINT(lastPointIndex);
// Find a corresponding pair of points in the path
CFIndex index = 1;
while ((index < percentArray.count) &&
(percent >
((NSNumber *)percentArray[index]).floatValue))
index++;
// Calculate the intermediate distance between the two points
CGPoint point1 = POINT(index -1);
CGPoint point2 = POINT(index);
float percent1 =
[[percentArray objectAtIndex:index - 1] floatValue];
float percent2 =
[[percentArray objectAtIndex:index] floatValue];
float percentOffset =
(percent - percent1) / (percent2 - percent1);
float dx = point2.x - point1.x;
float dy = point2.y - point1.y;
// Store dy, dx for retrieving arctan
if (slope) *slope = CGPointMake(dx, dy);
// Calculate new point
CGFloat newX = point1.x + (percentOffset * dx);
CGFloat newY = point1.y + (percentOffset * dy);
CGPoint targetPoint = CGPointMake(newX, newY);
return targetPoint;
}
Get This Recipe’s Code
To find this recipe’s full sample project, point your browser to https://github.com/erica/iOS-6-Cookbook and go to the folder for Chapter 4.
Recipe: Drawing Attributed Text Along a Bezier Path
The interpolation and slope math returned by Recipe 4-7 is not limited to animation. These methods can set text along a Bezier path (see Figure 4-9). Recipe 4-8’s text layout routine respects string attributes, so you can mix and match fonts, colors, and sizes while adhering to the underlying path geometry.
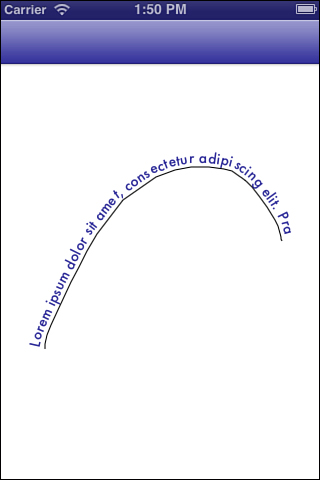
Figure 4-9. Recipe 4-8 carefully typesets its path along a user-drawn path, wobbles and all.
The recipe calculates the rendered size of each character in the attributed string, determining the bounding height and width. Knowing this size enables the recipe to determine how much of the path each character (or glyph) consumes:
- (CGSize) renderedSize
{
CGRect bounding = [self boundingRectWithSize:CGSizeMake(
CGFLOAT_MAX, CGFLOAT_MAX) options:0 context:nil];
return bounding.size;
}
It calculates where the glyph center would appear, if laid out on a line and uses that distance as a percentage of the path’s length. Recipe 4-7’s point and slope function returns the position and angle for placement.
The method performs this placement by translating and rotating the context. This enables the string to render using NSAttributedString’s drawAtPoint: method. A graphics stack pops the context back to its original state after drawing each glyph.
After consuming the entire path, the routine stops adding text, clipping any remaining characters from view. If you want to ensure that the entire string appears, use the bounding rect routines (boundingRectWithSize: and sizeWithFont:) to calculate which fonts fit a given size.
Recipe 4-8. Laying Out Text Along a Bezier Path
- (void) drawAttributedString: (NSAttributedString *) string
withOptions: (StringRenderingOptions) renderingOptions
{
if (!string) return;
NSArray *points = self.points;
int pointCount = points.count;
if (pointCount < 2) return;
// Please do not send over anything with a new line
NSAttributedString *baseString = string.versionWithoutNewLines;
// Keep a running tab of how far the glyphs have travelled to
// be able to calculate the percent along the point path
float glyphDistance = 0.0f;
// Should the renderer squeeze/stretch the text to fit?
BOOL fitText = (renderingOptions & RenderStringToFit) != 0;
float lineLength = fitText ? baseString.renderedWidth : self.length;
// Optionally force close path
BOOL closePath = (renderingOptions & RenderStringClosePath) != 0;
if (closePath) [self addLineToPoint:POINT(0)];
// Establish the context
CGContextRef context = UIGraphicsGetCurrentContext();
CGContextSaveGState(context);
// Set the initial positions -- skip?
CGPoint textPosition = CGPointMake(0.0f, 0.0f);
CGContextSetTextPosition(context, textPosition.x, textPosition.y);
for (int loc = 0; loc < baseString.length; loc++)
{
// Retrieve item
NSRange range = NSMakeRange(loc, 1);
NSAttributedString *item = [baseString attributedSubstringFromRange:range];
// Calculate the percent travel
CGFloat glyphWidth = item.renderedWidth;
glyphDistance += glyphWidth;
CGFloat percentConsumed = glyphDistance / lineLength;
if (percentConsumed > 1.0f) break; // stop when all consumed
// Find a corresponding pair of points in the path
CGPoint slope;
CGPoint targetPoint = [self pointAtPercent:percentConsumed withSlope:&slope];
// Set the x and y offset
CGContextTranslateCTM(context, targetPoint.x, targetPoint.y);
CGPoint positionForThisGlyph = CGPointMake(textPosition.x, textPosition.y);
// Rotate
float angle = atan(slope.y / slope.x);
if (slope.x < 0) angle += M_PI; // going left, update the angle
CGContextRotateCTM(context, angle);
// Place the glyph
positionForThisGlyph.x -= glyphWidth;
if ((renderingOptions & RenderStringOutsidePath) != 0)
{
positionForThisGlyph.y -= item.renderedHeight;
}
else if ((renderingOptions & RenderStringInsidePath) != 0)
{
// no op
}
else // over path or default
{
positionForThisGlyph.y -= item.renderedHeight / 2.0f;
}
// Draw the glyph
[item drawAtPoint:positionForThisGlyph]; // was textPosition
// Reset context transforms
CGContextRotateCTM(context, -angle);
CGContextTranslateCTM(context, -targetPoint.x, -targetPoint.y);
}
CGContextRestoreGState(context);
}
Get This Recipe’s Code
To find this recipe’s full sample project, point your browser to https://github.com/erica/iOS-6-Cookbook and go to the folder for Chapter 4.
Recipe: View Transforms
Affine transforms represent one of the most-used and most-feared features in UIKit. Tied into direct interaction, you often run across them when working with gesture recognizers, animation, and any kind of view scaling and rotation. Much of the transform’s frustration factor ties into the opaqueness of the underlying structure and the lack of easy human-relatable methods. Simple tweaks can transform (if you pardon the pun) the CGAffineTransform structure into friendlier Objective-C-based properties and methods.
Basic Transforms
Affine transforms enable you scale, rotate, and translate UIView objects in your apps. You generally create a transform and apply it to your view using one of the following patterns. You either create and apply a new transform using one of the “make” functions
float angle = theta * (PI / 100);
CGAffineTransform transform = CGAffineTransformMakeRotation(angle);
myView.transform = transform;
or you layer a new change onto an existing transform using one of the “action” functions: rotate, scale, or translate.
CGAffineTransform transform = CGAffineTransformRotate(myView.transform, angle);
myView.transform = transform;
Creating a new transform resets whatever changes have already been applied to a view. If your view was already scaled larger through a transform, for example, the first of these two samples would override that scaling and replace it with rotation. Figure 4-10 shows before and after for this scenario. The outer, larger, scaled view is replaced by the unscaled, smaller, rotated view. (The red circle marks the top-right corner of the view.)
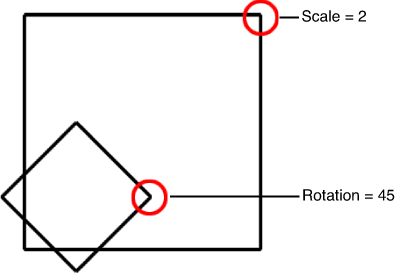
Figure 4-10. Setting a transform replaces whatever view transform had previously been set.
In the second example (see Figure 4-11), the transform is layered on so it adds to, rather than replaces, the scaling. In this case, the scaled view rotates but the scaling remains unaffected.
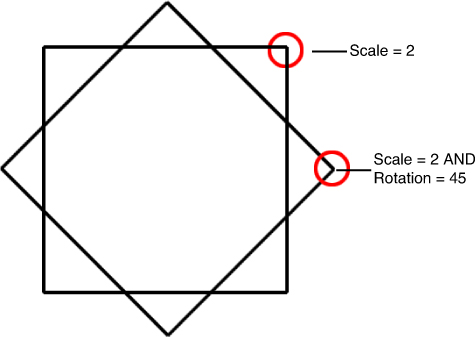
Figure 4-11. Appending transforms preserve previous settings.
Under the Hood
Every transform is represented by an underlying transformation matrix, which is set up as follows.
This matrix corresponds to a simple C structure:
struct CGAffineTransform {
CGFloat a;
CGFloat b;
CGFloat c;
CGFloat d;
CGFloat tx;
CGFloat ty;
};
typedef struct CGAffineTransform CGAffineTransform;
The UIKit framework defines a variety of helper functions specific to graphics and drawing operations. These include several affine-specific utilities. You can print out a view’s transform via UIKit’s NSStringFromCGAffineTransform() function. Its inverse is CGAffineTransformFromString(). Here’s what the transform values look like for the scaled (by a factor of 1.5) and rotated (by a factor of Pi/4) view previously discussed:
2012-08-31 09:43:20.837 HelloWorld[41450:c07]
[1.06066, 1.06066, -1.06066, 1.06066, 0, 0]
These raw numbers aren’t especially helpful. Specifically, this representation does not tell you exactly how much the view has been scaled or rotated. Fortunately, there’s a way around that.
Retrieving Transform Values
You can easily calculate specific transform values from the affine structure’s a, b, c, d, tx, and ty entries. Here are five methods that return a view’s scale (in X and Y), rotation, and translation (in X and Y). The last two of these methods are admittedly trivial but are included for completeness:
- (CGFloat) xscale
{
CGAffineTransform t = self.transform;
return sqrt(t.a * t.a + t.c * t.c);
}
- (CGFloat) yscale
{
CGAffineTransform t = self.transform;
return sqrt(t.b * t.b + t.d * t.d);
}
- (CGFloat) rotation
{
CGAffineTransform t = self.transform;
return atan2f(t.b, t.a);
}
- (CGFloat) tx
{
CGAffineTransform t = self.transform;
return t.tx;
}
- (CGFloat) ty
{
CGAffineTransform t = self.transform;
return t.ty;
}
Using these methods, you can determine exactly how much your view’s been rotated or scaled. That’s particularly helpful when you have been using gesture recognizers to interactively stretch, shrink, and rotate views with combined transforms. These methods can help when set bounds on scaling. For example, you might want to limit a view’s scale to just twice its normal size or keep it from shrinking below one-half the original size. Checking the current scale lets you do that.
Setting Transform Values
With the right math, it’s just as easy to set transform values such as rotation and x-translation as it is to retrieve them. Every transform can be calculated from its components:
CGAffineTransform makeTransform(CGFloat xScale, CGFloat yScale,
CGFloat theta, CGFloat tx, CGFloat ty)
{
CGAffineTransform transform = CGAffineTransformIdentity;
transform.a = xScale * cos(theta);
transform.b = yScale * sin(theta);
transform.c = xScale * -sin(theta);
transform.d = yScale * cos(theta);
transform.tx = tx;
transform.ty = ty;
return transform;
}
Say you want to set a view’s y-scale independently. Here’s how you might do that using the view properties defined earlier in this write-up:
- (void) setYscale: (CGFloat) yScale
{
self.transform = makeTransform(self.xscale, yScale,
self.rotation, self.tx, self.ty);
}
Keep in mind that rotating a view that’s scaled in just one direction may produce distortion. Figure 4-12 shows two images. The first represents a view with a natural 1:1.5 aspect, (The view is 100 points in width, 150 points in height.) It’s been rotated about 45 degrees or so to the right. The second image is a view with a natural 1:1 aspect (100 by 100 points). It’s been scaled in Y by 1.5 and then rotated the same 45-or-so-degrees. Notice the distortion. The top-to-bottom Y scaling remains 1.5 (along the top-left corner to right-bottom-corner axis) so the view skews to accommodate.
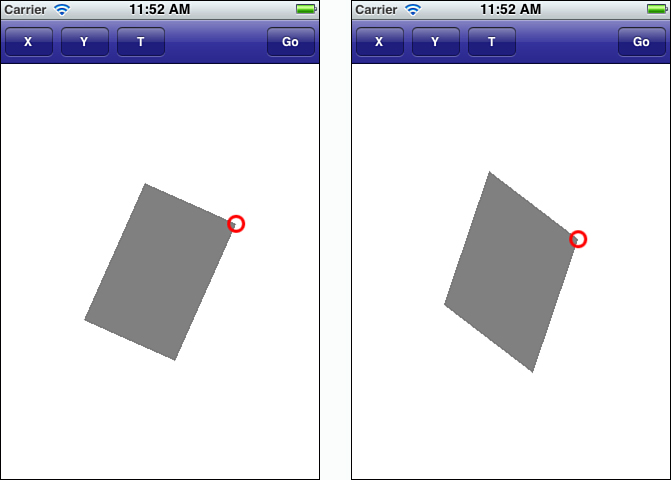
Figure 4-12. Unbalanced scaling may produce skewed views.
Retrieving View Point Locations
In addition to asking, “What is the view’s current rotation?” and “By how much is it scaled?,” developers perform math that relates a view’s post-transform geometry. To do this, you need to specify where frame elements appear onscreen.
A view’s center remains meaningful during the transition from pretransform to post-transform without incident. The value may change, especially after scaling, but the property is valid regardless of whatever transform has been applied. This center property always refers to the geometric center of the view’s frame within the parent’s coordinate system.
The frame is not so resilient. After rotation, a view’s origin may be completely decoupled from the view. Look at Figure 4-13. It shows a rotated view on top of its original frame (the smallest of the outlines) and the updated frame (the largest gray outline). The circles indicate the view’s top-right corner before and after rotation.

Figure 4-13. A view’s frame changes during rotation and may no longer be meaningful. The gray outer rectangle corresponds to the rotated view’s frame.
After the transform is applied, the frame updates to the minimum bounding box that encloses the view. Its new origin (the top-left corner of the outside box) has essentially nothing to do with the updated view origin (the top-left corner of the inner box). iOS does not provide a way to retrieve that adjusted point.
Recipe 4-9 defines view methods that perform that math for you. They return a transformed view’s corners: top left, top right, bottom left, and bottom right. These coordinates are defined in the parent view; so if you want to add a new view on top of the top circle, you place its center at theView.transformedTopRight.
Recipe 4-9. Transformed View Access
// Coordinate utilities
- (CGPoint) offsetPointToParentCoordinates: (CGPoint) aPoint
{
return CGPointMake(aPoint.x + self.center.x,
aPoint.y + self.center.y);
}
- (CGPoint) pointInViewCenterTerms: (CGPoint) aPoint
{
return CGPointMake(aPoint.x - self.center.x,
aPoint.y - self.center.y);
}
- (CGPoint) pointInTransformedView: (CGPoint) aPoint
{
CGPoint offsetItem = [self pointInViewCenterTerms:aPoint];
CGPoint updatedItem = CGPointApplyAffineTransform(
offsetItem, self.transform);
CGPoint finalItem =
[self offsetPointToParentCoordinates:updatedItem];
return finalItem;
}
- (CGRect) originalFrame
{
CGAffineTransform currentTransform = self.transform;
self.transform = CGAffineTransformIdentity;
CGRect originalFrame = self.frame;
self.transform = currentTransform;
return originalFrame;
}
// These four methods return the positions of view elements
// with respect to the current transform
- (CGPoint) transformedTopLeft
{
CGRect frame = self.originalFrame;
CGPoint point = frame.origin;
return [self pointInTransformedView:point];
}
- (CGPoint) transformedTopRight
{
CGRect frame = self.originalFrame;
CGPoint point = frame.origin;
point.x += frame.size.width;
return [self pointInTransformedView:point];
}
- (CGPoint) transformedBottomRight
{
CGRect frame = self.originalFrame;
CGPoint point = frame.origin;
point.x += frame.size.width;
point.y += frame.size.height;
return [self pointInTransformedView:point];
}
- (CGPoint) transformedBottomLeft
{
CGRect frame = self.originalFrame;
CGPoint point = frame.origin;
point.y += frame.size.height;
return [self pointInTransformedView:point];
}
Get This Recipe’s Code
To find this recipe’s full sample project, point your browser to https://github.com/erica/iOS-6-Cookbook and go to the folder for Chapter 4.
Recipe: Testing for View Intersection
Recipe 4-10 checks whether two transformed views intersect. The code also works with views that have not been transformed so that you can use it with any two views; although, it’s a bit pointless to do so. (You can use the CGRectIntersectsRect() function for simple untransformed frames.) This custom intersection method works best for views whose frames do not represent their underlying geometry, like the one shown in Figure 4-13.
The intersectsView: method applies an axis separation algorithm for convex polygons. For each edge of each view, it tests whether all the points in one view fall on one side of the edge, and whether all the points of the other view fall on the other side. This test is based on the half plane function, which returns a value indicating whether a point is on the left or right side of an edge.
As soon as it finds an edge that satisfies this condition, the intersectsView : method returns NO. The views cannot geometrically intersect if there’s a line that separates all the points in one object from all the points in the other.
If all eight tests fail (four edges on the first view, four edges on the second), the method concludes that the two views do intersect. It returns YES.
Recipe 4-10. Retrieving Transform Values
// The following three methods move points into and out of the
// transform coordinate system whose origin is at the view center
- (CGPoint) offsetPointToParentCoordinates: (CGPoint) aPoint
{
return CGPointMake(aPoint.x + self.center.x,
aPoint.y + self.center.y);
}
- (CGPoint) pointInViewCenterTerms: (CGPoint) aPoint
{
return CGPointMake(aPoint.x - self.center.x, aPoint.y - self.center.y);
}
- (CGPoint) pointInTransformedView: (CGPoint) aPoint
{
CGPoint offsetItem = [self pointInViewCenterTerms:aPoint];
CGPoint updatedItem = CGPointApplyAffineTransform(
offsetItem, self.transform);
CGPoint finalItem =
[self offsetPointToParentCoordinates:updatedItem];
return finalItem;
}
// Return the original frame without transform
- (CGRect) originalFrame
{
CGAffineTransform currentTransform = self.transform;
self.transform = CGAffineTransformIdentity;
CGRect originalFrame = self.frame;
self.transform = currentTransform;
return originalFrame;
}
// These four methods return the positions of view elements
// with respect to the current transform
- (CGPoint) transformedTopLeft
{
CGRect frame = self.originalFrame;
CGPoint point = frame.origin;
return [self pointInTransformedView:point];
}
- (CGPoint) transformedTopRight
{
CGRect frame = self.originalFrame;
CGPoint point = frame.origin;
point.x += frame.size.width;
return [self pointInTransformedView:point];
}
- (CGPoint) transformedBottomRight
{
CGRect frame = self.originalFrame;
CGPoint point = frame.origin;
point.x += frame.size.width;
point.y += frame.size.height;
return [self pointInTransformedView:point];
}
- (CGPoint) transformedBottomLeft
{
CGRect frame = self.originalFrame;
CGPoint point = frame.origin;
point.y += frame.size.height;
return [self pointInTransformedView:point];
}
// Determine if two views intersect, with respect to any
// active transforms
// After extending a line, determine which side of the half
// plane defined by that line, a point will appear
BOOL halfPlane(CGPoint p1, CGPoint p2, CGPoint testPoint)
{
CGPoint base = CGPointMake(p2.x - p1.x, p2.y - p1.y);
CGPoint orthog = CGPointMake(-base.y, base.x);
return (((orthog.x * (testPoint.x - p1.x)) +
(orthog.y * (testPoint.y - p1.y))) >= 0);
}
// Utility test for testing view points against a proposed line
BOOL intersectionTest(CGPoint p1, CGPoint p2, UIView *aView)
{
BOOL tlTest = halfPlane(p1, p2, aView.transformedTopLeft);
BOOL trTest = halfPlane(p1, p2, aView.transformedTopRight);
if (tlTest != trTest) return YES;
BOOL brTest = halfPlane(p1, p2, aView.transformedBottomRight);
if (tlTest != brTest) return YES;
BOOL blTest = halfPlane(p1, p2, aView.transformedBottomLeft);
if (tlTest != blTest) return YES;
return NO;
}
// Determine whether the view intersects a second view
// with respect to their transforms
- (BOOL) intersectsView: (UIView *) aView
{
if (!CGRectIntersectsRect(self.frame, aView.frame)) return NO;
CGPoint A = self.transformedTopLeft;
CGPoint B = self.transformedTopRight;
CGPoint C = self.transformedBottomRight;
CGPoint D = self.transformedBottomLeft;
if (!intersectionTest(A, B, aView))
{
BOOL test = halfPlane(A, B, aView.transformedTopLeft);
BOOL t1 = halfPlane(A, B, C);
BOOL t2 = halfPlane(A, B, D);
if ((t1 != test) && (t2 != test)) return NO;
}
if (!intersectionTest(B, C, aView))
{
BOOL test = halfPlane(B, C, aView.transformedTopLeft);
BOOL t1 = halfPlane(B, C, A);
BOOL t2 = halfPlane(B, C, D);
if ((t1 != test) && (t2 != test)) return NO;
}
if (!intersectionTest(C, D, aView))
{
BOOL test = halfPlane(C, D, aView.transformedTopLeft);
BOOL t1 = halfPlane(C, D, A);
BOOL t2 = halfPlane(C, D, B);
if ((t1 != test) && (t2 != test)) return NO;
}
if (!intersectionTest(D, A, aView))
{
BOOL test = halfPlane(D, A, aView.transformedTopLeft);
BOOL t1 = halfPlane(D, A, B);
BOOL t2 = halfPlane(D, A, C);
if ((t1 != test) && (t2 != test)) return NO;
}
A = aView.transformedTopLeft;
B = aView.transformedTopRight;
C = aView.transformedBottomRight;
D = aView.transformedBottomLeft;
if (!intersectionTest(A, B, self))
{
BOOL test = halfPlane(A, B, self.transformedTopLeft);
BOOL t1 = halfPlane(A, B, C);
BOOL t2 = halfPlane(A, B, D);
if ((t1 != test) && (t2 != test)) return NO;
}
if (!intersectionTest(B, C, self))
{
BOOL test = halfPlane(B, C, self.transformedTopLeft);
BOOL t1 = halfPlane(B, C, A);
BOOL t2 = halfPlane(B, C, D);
if ((t1 != test) && (t2 != test)) return NO;
}
if (!intersectionTest(C, D, self))
{
BOOL test = halfPlane(C, D, self.transformedTopLeft);
BOOL t1 = halfPlane(C, D, A);
BOOL t2 = halfPlane(C, D, B);
if ((t1 != test) && (t2 != test)) return NO;
}
if (!intersectionTest(D, A, self))
{
BOOL test = halfPlane(D, A, self.transformedTopLeft);
BOOL t1 = halfPlane(D, A, B);
BOOL t2 = halfPlane(D, A, C);
if ((t1 != test) && (t2 != test)) return NO;
}
return YES;
}
Get This Recipe’s Code
To find this recipe’s full sample project, point your browser to https://github.com/erica/iOS-6-Cookbook and go to the folder for Chapter 4.
Summary
This chapter surveyed a variety of practical geometric recipes related to paths and views. There was, admittedly, a lot of math mixed in with those solutions. Before moving to the next chapter, here are a few final thoughts to take with you:
• A great deal of this chapter is concerned with exposing properties normally hidden from you by the UIKit API. Just because a class expresses itself in a way that makes sense to its developers (transform, A, B, C, D, tx, ty, and so on) does not mean that it is semantically the best fit to its users (rotation, scale, translation, and points). If you can expose the underlying math, feel free to express those classes through categories using terminology that better fits the way people use them.
• Many of the Bezier path examples used in this chapter are based on user tracings on the screen. These recipes aren’t limited to that. You can just as easily use these routines with programmatically created paths or ones drawn using third-party tools such as PixelCut’s PaintCode ($99, http://paintcodeapp.com).