
7. Cameras
Cameras kick images up to the next level. They enable you to integrate live feeds and user-directed snapshots into your applications and provide raw data sourced from the real world. In this chapter, you read about image capture. You discover how to take pictures using Apple-sourced classes and how to roll your own from scratch. You learn about controlling image metadata and how to integrate live feeds with advanced filtering. This chapter focuses on image capture from a hardware point of view. Whether you’re switching on the camera flash LED or detecting faces, this chapter introduces the ins and outs of iOS image capture technology.
Recipe: Snapping Photos
iOS offers a variety of system-supplied view controllers that enable developers to offer system features with a minimum of programming. The iOS image picker controller is one of these. It enables users to snap photos with a device’s built-in camera. Because cameras are not available on all iOS units (specifically, older iPod touch and iPad devices), begin by checking whether the system running the application supports camera usage:
if ([UIImagePickerController isSourceTypeAvailable:
UIImagePickerControllerSourceTypeCamera]) ...
The rule is this: Never offer camera-based features for devices without cameras. Although iOS 6 was deployed only to camera-ready devices, Apple has not committed to this as policy. As unlikely as it sounds, it could introduce new models without cameras. Until Apple says otherwise, assume the possibility exists for a noncamera system, even under modern iOS releases. Further, assume this method can accurately report state for camera-enabled devices whose source has been disabled through some future system setting.
Setting Up the Picker
You instantiate a camera version of the image picker the way you create a picture selection one. Just change the source type to from library or camera roll to camera. As with other modes, you can allow or disallow image editing as part of the photo-capture process by setting the allowsEditing property.
Although the setup is the same, the user experience differs slightly (see Figure 7-1). The camera picker offers a preview that displays after the user taps the camera icon to snap a photo. This preview enables users to Retake the photo or Use the photo as is. Once they tap Use, control passes to the next phase. If you’ve enabled image editing, the user does so next. If not, control moves to the standard “did finish picking” method in the delegate.
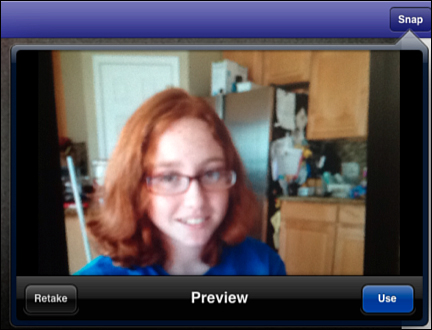
Figure 7-1. The camera version of the image picker controller offers a distinct user experience for snapping photos.
Most modern devices offer more than one camera. The iPhone 3GS, the last remaining iOS 6 dinosaur, does not. Assign the cameraDevice property to select which camera you want to use. The rear camera is always the default.
The isCameraDeviceAvailable: class method queries whether a camera device is available. This snippet checks to see if the front camera is available, and if so selects it:
if ([UIImagePickerController isCameraDeviceAvailable:
UIImagePickerControllerCameraDeviceFront])
picker.cameraDevice = UIImagePickerControllerCameraDeviceFront;
Here are a few more points about the camera or cameras that you can access through the UIImagePickerController class:
• You can query the device’s capability to use flash using the isFlashAvailableForCameraDevice: class method. Supply either the front or back device constant. This method returns YES for available flash, or otherwise NO.
• When a camera supports flash, you can set the cameraFlashMode property directly to auto (UIImagePickerControllerCameraFlashModeAuto, which is the default), to always used (UIImagePickerControllerCameraFlashModeOn), or always off (UIImagePickerControllerCameraFlashModeOff). Selecting “off” disables the flash regardless of ambient light conditions.
• Choose between photo and video capture by setting the cameraCaptureMode property. The picker defaults to photo capture mode. You can test what modes are available for a device using availableCaptureModesForCameraDevice:. This returns an array of NSNumber objects, each of which encodes a valid capture mode, either photo (UIImagePickerControllerCameraCaptureModePhoto) or video (UIImagePickerControllerCameraCaptureModeVideo).
Displaying Images
When working with photos, keep image size in mind. Snapped pictures, especially those from high-resolution cameras, can be quite large compared to screen sizes, even in the age of Retina displays. Those captured from front-facing video cameras use lower-quality sensors and are smaller.
Content modes provide a view solution for displaying large images. They allow image views to scale their embedded images to available screen space. Consider using one of the following modes:
• The UIViewContentModeScaleAspectFit mode ensures that the entire image is shown with the aspect ratio retained. The image may be padded with empty rectangles on the sides or the top and bottom to preserve that aspect.
• The UIViewContentModeScaleAspectFill mode displays as much of the image as possible, while filling the entire view. Some content may be clipped so that the entire view’s bounds are filled.
Saving Images to the Photo Album
Save a snapped image (or any UIImage instance, actually) to the photo album by calling UIImageWriteToSavedPhotosAlbum(). This function takes four arguments. The first is the image to save. The second and third arguments specify a callback target and selector, typically your primary view controller and image:didFinishSavingWithError:contextInfo:. The fourth argument is an optional context pointer. Whatever selector you use, it must take three arguments: an image, an error, and a pointer to the passed context information.
Recipe 7-1 uses this function to demonstrate how to snap a new image, allow user edits, and then save it to the photo album. Users will be asked to permit access to their photo library on this call. Should they deny access, the attempt will fail.
You can customize the iOS access alert by adding an NSPhotoLibraryUsageDescription key to your project’s Info.plist file. This entry describes the reason your app wants to access the photo library and is displayed in the dialog box that requests access.
// "Finished saving" callback method
- (void)image:(UIImage *)image
didFinishSavingWithError: (NSError *)error
contextInfo:(void *)contextInfo;
{
// Handle the end of the image write process
if (!error)
NSLog(@"Image written to photo album");
else
NSLog(@"Error writing to photo album: %@", error.localizedFailureReason);
}
// Save the returned image
- (void)imagePickerController:(UIImagePickerController *)picker
didFinishPickingMediaWithInfo:(NSDictionary *)info
{
// Use the edited image if available
UIImage __autoreleasing *image =
info[UIImagePickerControllerEditedImage];
// If not, grab the original image
if (!image) image = info[UIImagePickerControllerOriginalImage];
NSURL *assetURL = info[UIImagePickerControllerReferenceURL];
if (!image && !assetURL)
{
NSLog(@"Cannot retrieve an image from selected item. Giving up.");
}
else if (!image)
{
NSLog(@"Retrieving from Assets Library");
[self loadImageFromAssetURL:assetURL into:&image];
}
if (image)
{
// Save the image
UIImageWriteToSavedPhotosAlbum(image, self,
@selector(image:didFinishSavingWithError:contextInfo:), NULL);
imageView.image = image;
}
[self performDismiss];
}
- (void) loadView
{
self.view = [[UIView alloc] init];
// Only present the "Snap" option for camera-ready devices
if ([UIImagePickerController isSourceTypeAvailable:
UIImagePickerControllerSourceTypeCamera])
self.navigationItem.rightBarButtonItem =
SYSBARBUTTON(UIBarButtonSystemItemCamera, @selector(snapImage)));
}
Get This Recipe’s Code
To find this recipe’s full sample project, point your browser to https://github.com/erica/iOS-6-Cookbook and go to the folder for Chapter 7.
Recipe: Enabling a Flashlight
The iPhone 4 was the first iOS device to offer a built-in LED camera flash. Since then the flash has migrated to several newer units. It’s simple to control that LED from your application using the torch mode. Recipe 7-2 demonstrates this functionality, enabling users to toggle the light on and off. As you would expect, powering the “torch” is not especially battery-friendly for long use but isn’t particularly harmful for short durations.
This recipe begins by surveying the available onboard camera devices. This number may range from 0 (no onboard cameras) through 2 (for current generation devices). Each camera may or may not support onboard flash. The fifth-generation iPod touch does; the third-generation iPad does not. To discover whether a unit provides a torch-ready LED flash, turn to AVFoundation. This framework, which powers many recipes in this chapter, offers programmatic interfaces for testing and interacting with audio-visual capture.
Recipe 7-2 queries the current unit to recover a list of all onboard capture devices (that is, cameras). It checks to see if each capture device offers a torch (namely, an LED flash that can provide general illumination) and whether that torch supports being switched on.
Upon finding any compliant capture device, it stores that information to a local instance variable and the app reveals a simple switch, which calls back to the toggleLightSwitch method. If it cannot find a torch-ready device, the recipe’s supportsTorchMode method returns NO and the app basically shuts down.
The toggleLightSwitch method handles the work of switching the light on and off. This method demonstrates the basic flow for this process. Before setting capture device properties—these include focus, exposure, or the flash’s on/off state—you must acquire an exclusive lock. The code locks the camera device, updates its torch mode to either on or off, and then unlocks it.
As a rule, always release the device lock as soon as you’re done making your updates. Holding onto a lock can affect other applications, which may be trying to access the same hardware. Use this lock/modify/unlock process to apply updates to capture device settings.
In addition to torch mode, you can check whether a unit supports basic camera flash (hasFlash), white balance adjustment (isWhiteBalanceModeSupported:), exposure adjustment (isExposureModeSupported:), and autofocus modes (isFocusModeSupported:). Tests and updates for these other features follow the same flow you see in Recipe 7-2.
Recipe 7-2. Controlling Torch Mode
@implementation TestBedViewController
{
UISwitch *lightSwitch;
AVCaptureDevice *device;
}
- (void) toggleLightSwitch
{
// Lock the device
if ([device lockForConfiguration:nil])
{
// Toggle the light on or off
device.torchMode = (lightSwitch.isOn) ?
AVCaptureTorchModeOn : AVCaptureTorchModeOff;
// Unlock and proceed
[device unlockForConfiguration];
}
}
- (BOOL) supportsTorchMode
{
// Survey all the onboard capture devices
NSArray *devices = [AVCaptureDevice devices];
for (AVCaptureDevice *aDevice in devices)
{
if ((aDevice.hasTorch) &&
[aDevice isTorchModeSupported:AVCaptureTorchModeOn])
{
device = aDevice;
return YES;
}
}
// No torch-ready camera found. Return NO.
return NO;
}
- (void) loadView
{
self.view = [[UIView alloc] init];
self.view.backgroundColor = [UIColor whiteColor];
// Initially hide the light switch
lightSwitch = [[UISwitch alloc] init];
[self.view addSubview:lightSwitch];
lightSwitch.alpha = 0.0f; // Alternatively, setHidden:
// Only reveal the switch for torch-ready units
if ([self supportsTorchMode])
lightSwitch.alpha = 1.0f;
else
self.title = @"Flash/Torch not available";
}
@end
Get This Recipe’s Code
To find this recipe’s full sample project, point your browser to https://github.com/erica/iOS-6-Cookbook and go to the folder for Chapter 7.
Recipe: Accessing the AVFoundation Camera
AVFoundation enables you to access to camera buffer without using the cumbersome image picker. It’s faster and more responsive than the picker but does not offer that friendly built-in interface. For example, you might want to build an application that evaluates the contents of the camera for augmented reality or that allows users to play with a video feed.
AVFoundation enables you to retrieve both a live preview as well as raw image buffer data from the camera, providing valuable tools in your development arsenal. To start with AVFoundation, you need to build an Xcode project that uses quite a number of frameworks.
Here are frameworks you should consider adding and the roles they play in your application. Only the first three are required. You may want to add all of them. The extra frameworks are commonly used with AVFoundation video feeds and image capture:
• AVFoundation—Manage and play audio-visual media in your iOS applications: <AVFoundation/AVFoundation.h>.
• CoreVideo—Play and process movies with frame-by-frame control: <CoreVideo/CoreVideo.h>.
• CoreMedia—Handle time-based AV assets: <CoreMedia/CoreMedia.h>.
• CoreImage—Use pixel-accurate near-real-time image processing: <CoreImage/CoreImage.h>.
• ImageIO—Add and edit image metadata including GPS and EXIF support: <ImageIO/ImageIO.h>.
• QuartzCore—Add 2D graphics rendering support and access to view layers: <QuartzCore/QuartzCore.h>.
Requiring Cameras
If your application is built around a live camera feed, it should not install on any device that doesn’t offer a built-in camera. You can mandate this by editing the Info.plist file, adding items to a UIRequiredDeviceCapabilities array. Add still-camera to assert that a camera, any camera, is available. You can narrow down device models and capabilities by specifying there must be an auto-focus-camera, a front-facing-camera, camera-flash, and video-camera as well. Required items are discussed further in Chapter 1, “Device-Specific Development.”
Querying and Retrieving Cameras
iOS devices may offer zero, one, or two cameras. For multicamera devices, you can allow your user to select which camera to use, switching between the front and back. Listing 7-1 shows how to retrieve the number of cameras, to check whether the front and back cameras are available on a given device, and how to return AVCaptureDevice instances for each.
+ (int) numberOfCameras
{
return [AVCaptureDevice devicesWithMediaType:AVMediaTypeVideo].count;
}
+ (BOOL) backCameraAvailable
{
NSArray *videoDevices =
[AVCaptureDevice devicesWithMediaType:AVMediaTypeVideo];
for (AVCaptureDevice *device in videoDevices)
if (device.position == AVCaptureDevicePositionBack) return YES;
return NO;
}
+ (BOOL) frontCameraAvailable
{
NSArray *videoDevices =
[AVCaptureDevice devicesWithMediaType:AVMediaTypeVideo];
for (AVCaptureDevice *device in videoDevices)
if (device.position == AVCaptureDevicePositionFront) return YES;
return NO;
}
+ (AVCaptureDevice *)backCamera
{
NSArray *videoDevices =
[AVCaptureDevice devicesWithMediaType:AVMediaTypeVideo];
for (AVCaptureDevice *device in videoDevices)
if (device.position == AVCaptureDevicePositionBack)
return device;
// Return whatever is available if there's no back camera
return [AVCaptureDevice defaultDeviceWithMediaType:AVMediaTypeVideo];
}
+ (AVCaptureDevice *)frontCamera
{
NSArray *videoDevices =
[AVCaptureDevice devicesWithMediaType:AVMediaTypeVideo];
for (AVCaptureDevice *device in videoDevices)
if (device.position == AVCaptureDevicePositionFront)
return device;
// Return whatever device is available if there's no back camera
return [AVCaptureDevice defaultDeviceWithMediaType:AVMediaTypeVideo];
}
Establishing a Camera Session
After you select a device to work with and retrieve its AVCaptureDevice instance, you can establish a new camera session. Listing 7-2 shows the steps involved. A session includes creating a capture input, which grabs data from the selected camera, and a capture output, which sends buffer data to its delegate.
Listing 7-2. Creating a Session
// Create the capture input
AVCaptureDeviceInput *captureInput =
[AVCaptureDeviceInput deviceInputWithDevice:device error:&error];
if (!captureInput)
{
NSLog(@"Error establishing device input: %@", error);
return;
}
// Create capture output.
char *queueName = "com.sadun.tasks.grabFrames";
dispatch_queue_t queue = dispatch_queue_create(queueName, NULL);
AVCaptureVideoDataOutput *captureOutput =
[[AVCaptureVideoDataOutput alloc] init];
captureOutput.alwaysDiscardsLateVideoFrames = YES;
[captureOutput setSampleBufferDelegate:self queue:queue];
// Establish settings
NSDictionary *settings = [NSDictionary
dictionaryWithObject:
[NSNumber numberWithUnsignedInt:kCVPixelFormatType_32BGRA]
forKey:(NSString *)kCVPixelBufferPixelFormatTypeKey];
[captureOutput setVideoSettings:settings];
// Create a session
_session = [[AVCaptureSession alloc] init];
[_session addInput:captureInput];
[_session addOutput:captureOutput];
After a camera session is created, you can start it and stop it by sending startRunning and stopRunning method calls, as shown here:
[session startRunning];
When running, a session sends regular buffer updates to its delegate. Here is where you can catch the raw data and convert it into a form that’s better suited for image processing work. This method stores a CIImage instance as a retained property. Assuming you implement the capture routine in a helper class, you can retrieve this data from your application on demand. Listing 7-3 shows how you can capture output.
- (void)captureOutput:(AVCaptureOutput *)captureOutput
didOutputSampleBuffer:(CMSampleBufferRef)sampleBuffer
fromConnection:(AVCaptureConnection *)connection
{
@autoreleasepool
{
// Transfer into a Core Video image buffer
CVImageBufferRef imageBuffer =
CMSampleBufferGetImageBuffer(sampleBuffer);
// Create a Core Image result
CFDictionaryRef attachments =
CMCopyDictionaryOfAttachments(kCFAllocatorDefault,
sampleBuffer, kCMAttachmentMode_ShouldPropagate);
self.ciImage = [[CIImage alloc]
initWithCVPixelBuffer:imageBuffer
options:(__bridge_transfer NSDictionary *)attachments];
}
}
Core Image’s CIImage class is similar to UIImage and can be converted back and forth as needed. You can initialize a UIImage instance with a Core Image instance as follows:
UIImage *newImage = [UIImage imageWithCIImage:self.ciImage];
return newImage;
Note
At the time this book was being written, the imageWithCIImage: method was not properly operational. The workaround methods in the sample code that accompanies this chapter were added because of that.
The capture-output delegate method uses the Core Image version for several reasons. First, it’s the natural API recipient for Core Video pixel buffers. Converting to a CIImage takes only a single call. Second, it enables you to integrate your captured image with Core Image filtering and feature detection such as face detection. You’ll likely want to add filters outside the capture routine because these can slow down processing; you don’t want to add filtering or detection to every frame you capture.
Switching Cameras
After you establish a session, you can switch cameras without stopping or tearing down that session. Enter configuration mode, make your changes, and then commit the configuration updates, as shown in Listing 7-4. If your session is stopped, you may want to restart it so that it’s clear to the user that the cameras have actually switched.
Listing 7-4. Selecting from Available Cameras
- (void) switchCameras
{
if (![CameraImageHelper numberOfCameras] > 1) return;
_isUsingFrontCamera = !_isUsingFrontCamera;
AVCaptureDevice *newDevice = _isUsingFrontCamera ?
[CameraImageHelper frontCamera] : [CameraImageHelper backCamera];
[session beginConfiguration];
// Remove existing inputs
for (AVCaptureInput *input in [session inputs])
[_session removeInput:input];
// Change the input
AVCaptureDeviceInput *captureInput =
[AVCaptureDeviceInput deviceInputWithDevice: newDevice error:nil];
[_session addInput:captureInput];
[_session commitConfiguration];
}
Camera Previews
AVFoundation’s AVCaptureVideoPreviewLayer offers a live image preview layer that you can embed into views. Preview layers are both simple to use and powerful in their effect. Listing 7-5 shows how to create a new preview layer and insert it into a view, matching the view’s frame. The video gravity here defaults to resize-aspect, which preserves the video’s aspect ratio while fitting it within a given layer’s bounds.
You can retrieve the preview layer from a view by searching for a layer of the right class.
Listing 7-5. Embedding and Retrieving Previews
- (void) embedPreviewInView: (UIView *) aView
{
if (!_session) return;
AVCaptureVideoPreviewLayer *preview =
[AVCaptureVideoPreviewLayer layerWithSession: session];
preview.frame = aView.bounds;
preview.videoGravity = AVLayerVideoGravityResizeAspect;
[aView.layer addSublayer: preview];
}
- (AVCaptureVideoPreviewLayer *) previewInView: (UIView *) view
{
for (CALayer *layer in view.layer.sublayers)
if ([layer isKindOfClass:[AVCaptureVideoPreviewLayer class]])
return (AVCaptureVideoPreviewLayer *)layer;
return nil;
}
Laying Out a Camera Preview
One of the core challenges of working with live camera previews is keeping the video pointing up regardless of the device orientation. Although the camera connection does handle some orientation issues, it’s easiest to work directly with the preview layer and transform it to the proper orientation. Listing 7-6 shows how this is done.
Listing 7-6. Adding Camera Previews
- (void) layoutPreviewInView: (UIView *) aView
{
AVCaptureVideoPreviewLayer *layer =
[self previewInView:aView];
if (!layer) return;
UIDeviceOrientation orientation =
[UIDevice currentDevice].orientation;
CATransform3D transform = CATransform3DIdentity;
if (orientation == UIDeviceOrientationPortrait) ;
else if (orientation == UIDeviceOrientationLandscapeLeft)
transform = CATransform3DMakeRotation(-M_PI_2, 0.0f, 0.0f, 1.0f);
else if (orientation == UIDeviceOrientationLandscapeRight)
transform = CATransform3DMakeRotation(M_PI_2, 0.0f, 0.0f, 1.0f);
else if (orientation == UIDeviceOrientationPortraitUpsideDown)
transform = CATransform3DMakeRotation(M_PI, 0.0f, 0.0f, 1.0f);
layer.transform = transform;
layer.frame = aView.frame;
}
Camera Image Helper
Recipe 7-3 combines all the methods described in this section into a simple helper class. This class offers all the basic features needed to query for cameras, establish a session, create a preview, and retrieve an image. To use this class, create a new instance, start running a session, and maybe embed a preview into one of your main views. Make sure to lay out your preview again any time you autorotate the interface, so the preview will remain properly oriented.
Recipe 7-3. Helper Class for Cameras
@interface CameraImageHelper : NSObject
<AVCaptureVideoDataOutputSampleBufferDelegate>
@property (nonatomic, strong) AVCaptureSession *session;
@property (nonatomic, strong) CIImage *ciImage;
@property (nonatomic, readonly) UIImage *currentImage;
@property (nonatomic, readonly) BOOL isUsingFrontCamera;
+ (int) numberOfCameras;
+ (BOOL) backCameraAvailable;
+ (BOOL) frontCameraAvailable;
+ (AVCaptureDevice *)backCamera;
+ (AVCaptureDevice *)frontCamera;
+ (id) helperWithCamera: (NSUInteger) whichCamera;
- (void) startRunningSession;
- (void) stopRunningSession;
- (void) switchCameras;
- (void) embedPreviewInView: (UIView *) aView;
- (AVCaptureVideoPreviewLayer *) previewInView: (UIView *) view;
- (void) layoutPreviewInView: (UIView *) aView;
@end
Get This Recipe’s Code
To find this recipe’s full sample project, point your browser to https://github.com/erica/iOS-6-Advanced-Cookbook and go to the folder for Chapter 7.
Recipe: EXIF
Exchangeable Image File Format (EXIF) was created by the Japan Electronic Industries Development Association (JEIDA). It offers a standardized set of image annotations that include camera settings (such as shutter speed and metering mode), date and time information, and an image preview. Other metadata standards include International Press Telecommunications Council (IPTC) and Adobe’s Extensible Metadata Platform (XMP).
Orientation is the only meta-information currently exposed directly through the UIImage class. This information is accessible through its imageOrientation property; as you see in the next section, it bears a correspondence with EXIF orientation, but the value uses a different numbering system.
ImageIO
The ImageIO framework was first introduced to iOS in iOS 4. ImageIO specializes (as the name suggests) in reading and writing image data. Using “image sources” instead of standard file access enables you to access image metadata properties. These properties include basic values such as the image’s width and height, as well as more nuanced information such as the camera’s shutter speed and focal length that were used to capture the image. Readers of the last edition of this Cookbook asked me to add a recipe showing how to read and update EXIF and location (GPS) metadata. Recipe 7-4 addresses this by implementing a custom MetaImage class.
This class encapsulates a standard UIImage, augmenting it with a metadata properties dictionary. The properties derive from the image, exposing those values for reading and writing. To create that transparency, the properties must be initialized somewhere. So in this class, when you build instances by providing an image, the class generates the base categories for that data. Similarly, when created from a file, it reads whatever metadata has been stored with that image.
Querying Metadata
Listing 7-7 demonstrates how to query metadata for both UIImage and stored file sources. The first of these two functions reads in the image properties dictionary from the file at a given path. It creates an image source using a file URL and then copies the properties from that source. The properties return as a mutable dictionary.
The second function starts with an image instance rather than a file. Because image sources must work with data, the method converts the UIImage instance to JPEG data, which was chosen as the most common use case. This time, the image source is generated from the image data, but the rest of the work is otherwise identical. The function copies the source’s properties and returns them as a mutable dictionary.
Data returned from the UIImage function is, expectedly, sparse. Generated pictures cannot offer details regarding white balance, focal planes, and metering. The metadata for a UIImage instance includes its depth, orientation, pixel dimensions, and color model.
Listing 7-7. Retrieving Image Metadata
// Read image properties at a file path
NSMutableDictionary *imagePropertiesDictionaryForFilePath(
NSString *path)
{
CFDictionaryRef options = (__bridge CFDictionaryRef)@{
};
CFURLRef url = (__bridge CFURLRef) [NSURL fileURLWithPath:path];
CGImageSourceRef imageSource =
CGImageSourceCreateWithURL(url, options);
if (imageSource == NULL)
{
NSLog(@"Error: Could not establish
image source for file at path: %@", path);
return nil;
}
CFDictionaryRef imagePropertiesDictionary =
CGImageSourceCopyPropertiesAtIndex(imageSource, 0, NULL);
CFRelease(imageSource);
return [NSMutableDictionary dictionaryWithDictionary:
(__bridge_transfer NSDictionary *)
imagePropertiesDictionary];
}
// Read the properties for an image instance
NSMutableDictionary *imagePropertiesFromImage(UIImage *image)
{
CFDictionaryRef options = (__bridge CFDictionaryRef)@{
};
NSData *data = UIImageJPEGRepresentation(image, 1.0f);
CGImageSourceRef imageSource =
CGImageSourceCreateWithData(
(__bridge CFDataRef) data, options);
if (imageSource == NULL)
{
NSLog(@"Error: Could not establish image source");
return nil;
}
CFDictionaryRef imagePropertiesDictionary =
CGImageSourceCopyPropertiesAtIndex(imageSource, 0, NULL);
CFRelease(imageSource);
return [NSMutableDictionary dictionaryWithDictionary:
(__bridge_transfer NSDictionary *)
imagePropertiesDictionary];
}
Wrapping UIImage
Although Listing 7-7 showed how to import and retrieve metadata, Recipe 7-4 details how the MetaImage wrapper implementation exports that data back to file. Its writeToPath: method builds a new file using an image destination, storing both the image and metadata.
This implementation first writes this data to a temporary file and then moves it into place. You’ll probably want to tweak these details to match your normal practices. As with Listing 7-7, this wrapper method calls ImageIO’s Core Foundation-style C function library, which is why there’s so much ARC-style bridging in use.
In this implementation, two class properties (gps and exif) expose subdictionaries embedded into the primary metadata. Established by the wrapper class as mutable instances, they enable you to directly update dictionary values in preparation for writing metadata to an enhanced image file. Here’s an example of how you might load an image, adjust its metadata, and store it to file.
MetaImage *mi = [MetaImage newImage:image];
mi.exif[@"UserComment"] = @"This is a test comment";
[mi writeToPath:destPath];
Both dictionary properties use standard keys. These keys are declared in the ImageIO framework and are based off industry standards. Refer to Apple’s CGImageProperties reference for details. This document defines the image characteristics used by the framework, specifies the key constants you use to address them, and summarizes how they’re typically used.
Recipe 7-4. Exposing Image Metadata
- (BOOL) writeToPath: (NSString *) path
{
// Prepare to write to temporary path
NSString *temporaryPath =
[NSTemporaryDirectory() stringByAppendingPathComponent:
[path lastPathComponent]];
if ([[NSFileManager defaultManager]
fileExistsAtPath:temporaryPath])
{
if (![[NSFileManager defaultManager]
removeItemAtPath:temporaryPath error:nil])
{
NSLog(@"Could not establish temporary writing file");
return NO;
}
}
// Where to write to
NSURL *temporaryURL = [NSURL fileURLWithPath:temporaryPath];
CFURLRef url = (__bridge CFURLRef) temporaryURL;
// What to write
CGImageRef imageRef = self.image.CGImage;
// Metadata
NSDictionary *properties = [NSDictionary
dictionaryWithDictionary:self.properties];
CFDictionaryRef propertiesRef =
(__bridge CFDictionaryRef) properties;
// UTI – See Chapter 2
NSString *uti = preferredUTIForExtension(path.pathExtension);
if (!uti) uti = @"public.image";
CFStringRef utiRef = (__bridge CFStringRef) uti;
// Create image destination
CGImageDestinationRef imageDestination =
CGImageDestinationCreateWithURL(url, utiRef, 1, NULL);
// Save data
CGImageDestinationAddImage(imageDestination, imageRef, propertiesRef);
CGImageDestinationFinalize(imageDestination);
// Clean up
CFRelease(imageDestination);
// Move file into place
NSURL *destURL = [NSURL fileURLWithPath:path];
BOOL success;
NSError *error;
// Remove previous file
if ([[NSFileManager defaultManager] fileExistsAtPath:path])
{
success = [[NSFileManager defaultManager]
removeItemAtPath:path error:&error];
if (!success)
{
NSLog(@"Error: Could not overwrite file properly.
Original not removed.");
return NO;
}
}
success = [[NSFileManager defaultManager]
moveItemAtURL: temporaryURL toURL:destURL error:&error];
if (!success)
{
NSLog(@"Error: could not move new file into place: %@",
error.localizedFailureReason);
return NO;
}
return YES;
}
To find this recipe’s full sample project, point your browser to https://github.com/erica/iOS-6-Advanced-Cookbook and go to the folder for Chapter 7.
Image Orientations
Geometry represents the most difficult portion of working with AVFoundation camera feeds. Unlike using image pickers, which automatically handle these matters for you, you must deal with raw image buffers. The camera you use (front or back) and the orientation of the device influence how the image data is oriented, as shown in Table 7-1.
Table 7-1. Mapping Device Orientation to Image Orientation
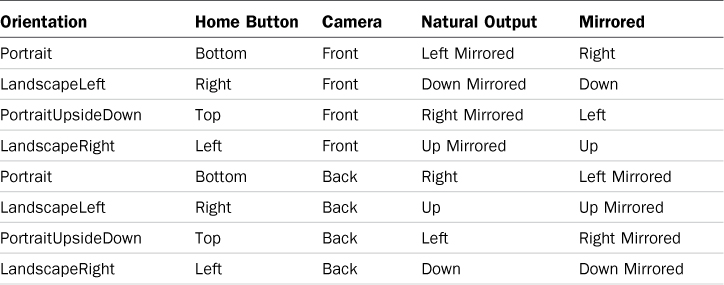
The Natural Output column in Table 7-1 specifies the orientation produced by each device orientation and camera combination. For example, a device held in portrait, using the front camera, results in left-mirrored output. The most “natural” setup for an iPhone is created by holding the camera landscape left—that is, with the Home button to the right and using the back camera. This creates an up-oriented image.
The orientation equivalents in Table 7-2 tell iOS how to map EXIF-values to UIImage settings. You use this data to restore images to their proper presentation. Examine the first F in the table. This F is standing up and its leaves point to the right. An image with this orientation has raw data matching this orientation. Pixel data starts at the top left and moves left to right, row after row, eventually to the bottom right.
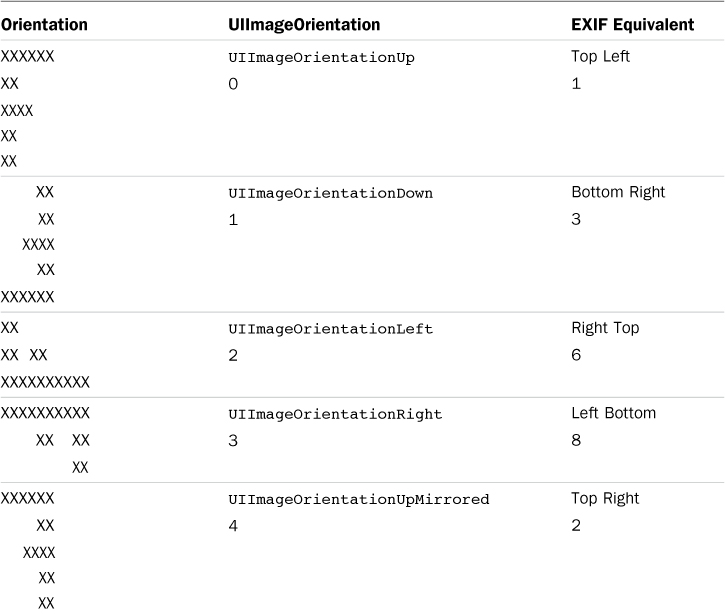
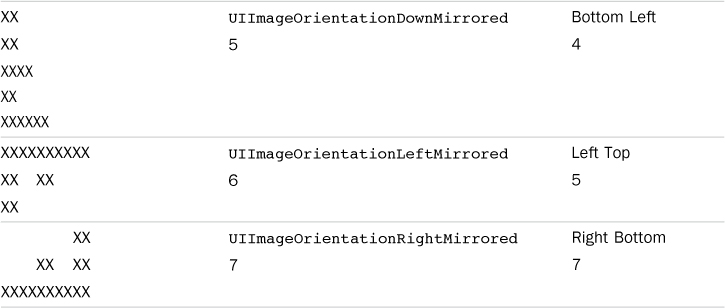
When users snap photos using other orientations or use a front camera instead of a back camera, the data is stored as it’s captured from the camera’s sensors. The top-left corner of the picture may not appear at pixel 0 of the image data. For example, say a user snaps a photo using the front camera, with the Home button at the right. Table 7-1 indicates the output will be down-mirrored. This is UI orientation 5, EXIF orientation 4. The raw picture data will not only be upside down, but it will also be mirrored.
Knowing how the underlying data representation (sideways, mirrored, upside down, and so on) maps to the intended representation (always with the image starting at the top left) is critical for image processing, especially for automatic detection routines. The last column in Table 7-2 shows the EXIF orientation equivalent for each UIImageOrientation. This conversion enables you to work with Core Image. CI uses EXIF not UIImage orientation.
The following functions allow you to convert between the EXIF and UIImage orientation schemes:
NSUInteger exifOrientationFromUIOrientation(
UIImageOrientation uiorientation)
{
if (uiorientation > 7) return 1;
int orientations[8] = {1, 3, 6, 8, 2, 4, 5, 7};
return orientations[uiorientation];
}
UIImageOrientation imageOrientationFromEXIFOrientation(
NSUInteger exiforientation)
{
if ((exiforientation < 1) || (exiforientation > 8))
return UIImageOrientationUp;
int orientations[8] = {0, 4, 1, 5, 6, 2, 7, 3};
return orientations[exiforientation];
}
Recipe: Core Image Filtering
Core Image (CI) filters enable you to process images quickly. Recipe 7-5 introduces CI filtering by applying a simple monochrome filter to images captured from the onboard camera. This filter is not applied to a live video feed but rather to individual images. A monochrome filter transforms an RGB image to a single channel and then applies a single color, which you specify as an input to the filter.
This recipe is powered by a CADisplayLink. Each time it fires, the snap method grabs the current ciImage from its helper (refer to Recipe 7-3). If the user has enabled filtering (using a simple bar button toggle), the code creates a new filter, sets the image as its input, adjusts the output color to red, and then retrieves and displays the output image.
You can adjust the display link’s frame interval to trade off between smooth presentation and processing overhead. This is a critical factor, especially when using high-resolution cameras. Increase the frame interval to expand the number of frames that must pass before the display link calls snap again.
Recipe 7-5. Adding a Simple Core Image Filter
@implementation TestBedViewController
// Switch between cameras
- (void) switch: (id) sender
{
[helper switchCameras];
}
// Enable/disable the filter
- (void) toggleFilter: (id) sender
{
useFilter = !useFilter;
}
// Grab an image, optionally applying the filter,
// and display the results
- (void) snap
{
// Orientation needed for CI image workaround
UIImageOrientation orientation =
currentImageOrientation(helper.isUsingFrontCamera, NO);
if (useFilter) // monochrome - red
{
CIFilter *filter =
[CIFilter filterWithName:@"CIColorMonochrome"];
[filter setValue:helper.ciImage forKey:@"inputImage"];
[filter setDefaults];
[filter setValue:@1 forKey:@"inputIntensity"];
[filter setValue:[CIColor colorWithRed:1.0f
green:0.0f blue:0.0f] forKey:@"inputColor"];
CIImage *outputImage = [filter valueForKey:kCIOutputImageKey];
// Apply workaround to transform ciImage to UIImage
if (outputImage)
imageView.image = [UIImage imageWithCIImage:outputImage
orientation:orientation];
else NSLog(@"Missing image");
}
if (!useFilter) // no filter
{
// Convert using ciImage workaround
imageView.image = [UIImage imageWithCIImage:helper.ciImage
orientation:orientation];
}
}
- (void) viewWillAppear:(BOOL)animated
{
[super viewWillAppear:animated];
// Establish the preview session
helper = [CameraImageHelper helperWithCamera:kCameraBack];
[helper startRunningSession];
displayLink = [CADisplayLink displayLinkWithTarget:self
selector:@selector(snap)];
[displayLink addToRunLoop:[NSRunLoop currentRunLoop]
forMode:NSRunLoopCommonModes];
}
@end
Get This Recipe’s Code
To find this recipe’s full sample project, point your browser to https://github.com/erica/iOS-6-Advanced-Cookbook and go to the folder for Chapter 7.
Recipe: Core Image Face Detection
Face detection was introduced in iOS 5 as one of iOS’s splashier features. It’s something that is both easy to implement and quite hard to get right, and that all comes down to basic geometry. Retrieving the feature set involves creating a new face-type detector and querying it for the detected features. This works by returning an array of zero or more CIFaceFeature objects, corresponding to the number of faces found in the scene.
- (NSArray *) featuresInImage
{
NSDictionary *detectorOptions = [NSDictionary
dictionaryWithObject:CIDetectorAccuracyLow
forKey:CIDetectorAccuracy];
CIDetector *detector = [CIDetector
detectorOfType:CIDetectorTypeFace context:nil
options:detectorOptions];
NSUInteger orientation = detectorEXIF(helper.isUsingFrontCamera, NO);
NSDictionary *imageOptions =
[NSDictionary dictionaryWithObject:
[NSNumber numberWithInt:orientation]
forKey:CIDetectorImageOrientation];
return [detector featuresInImage:ciImage options:imageOptions];
}
Several issues make this a particularly hard task. The detector depends on knowing the proper orientation to interpret the CI image passed to it. It cannot detect faces that are sideways or upside down. That’s why this method includes a call to a detectorEXIF function. The problem is that, at least at the time this book was written, the required detector orientation doesn’t always match the real-world image orientation, causing workarounds like this:
NSUInteger detectorEXIF(BOOL isUsingFrontCamera, BOOL shouldMirrorFlip)
{
if (isUsingFrontCamera || deviceIsLandscape())
return currentEXIFOrientation(isUsingFrontCamera,
shouldMirrorFlip);
// Only back camera portrait or upside down here.
// Detection happens but the geometry is messed.
int orientation = currentEXIFOrientation(!isUsingFrontCamera,
shouldMirrorFlip);
return orientation;
}
As you can tell, this is hacky, buggy, and a disaster waiting to happen.
The second problem lies in the geometry. Apple has not provided APIs that map coordinates into images while respecting the image orientation information. The coordinate (0,0) may refer to the top left, bottom left, top right, or bottom right. What’s more, mirroring means the coordinate may be offset from the left side or the right, from the bottom or the top. The math is left up to you. Enter Listing 7-8. These methods help you convert point and rectangle results from their raw data coordinates into normalized image coordinates.
The ExifOrientation enumeration used here is not built in to iOS. It is defined to match the natural EXIF values shown in Listing 7-8. Notice that there are no cases for kRightTop and kLeftBottom. These are the two EXIF orientations not currently supported by the Core Image detector. Should Apple update its implementation, you need to add cases to support both.
Listing 7-8. Converting Geometry from EXIF to Image Coordinates
CGPoint pointInEXIF(ExifOrientation exif, CGPoint aPoint, CGRect rect)
{
switch(exif)
{
case kTopLeft:
return CGPointMake(aPoint.x,
rect.size.height - aPoint.y);
case kTopRight:
return CGPointMake(rect.size.width - aPoint.x,
rect.size.height - aPoint.y);
case kBottomRight:
return CGPointMake(rect.size.width - aPoint.x,
aPoint.y);
case kBottomLeft:
return CGPointMake(aPoint.x, aPoint.y);
case kLeftTop:
return CGPointMake(aPoint.y, aPoint.x);
case kRightBottom:
return CGPointMake(rect.size.width - aPoint.y,
rect.size.height - aPoint.x);
default:
return aPoint;
}
}
CGSize sizeInEXIF(ExifOrientation exif, CGSize aSize)
{
switch(exif)
{
case kTopLeft:
case kTopRight:
case kBottomRight:
case kBottomLeft:
return aSize;
case kLeftTop:
case kRightBottom:
return CGSizeMake(aSize.height, aSize.width);
}
}
CGRect rectInEXIF(ExifOrientation exif, CGRect inner, CGRect outer)
{
CGRect rect;
rect.origin = pointInEXIF(exif, inner.origin, outer);
rect.size = sizeInEXIF(exif, inner.size);
switch(exif)
{
case kTopLeft:
rect = CGRectOffset(rect, 0.0f, -inner.size.height);
break;
case kTopRight:
rect = CGRectOffset(rect, -inner.size.width,
-inner.size.height);
break;
case kBottomRight:
rect = CGRectOffset(rect, -inner.size.width, 0.0f);
break;
case kBottomLeft:
break;
case kLeftTop:
break;
case kRightBottom:
rect = CGRectOffset(rect, -inner.size.width,
-inner.size.height);
break;
default:
break;
}
return rect;
}
Recipe 7-6 demonstrates how to perform facial detection in your application. This method retrieves detected features, outlines the detected face bounds with a shaded rectangle, and highlights three specific features (left eye, right eye, and mouth) with circles. Figure 7-2 shows the detection in action.
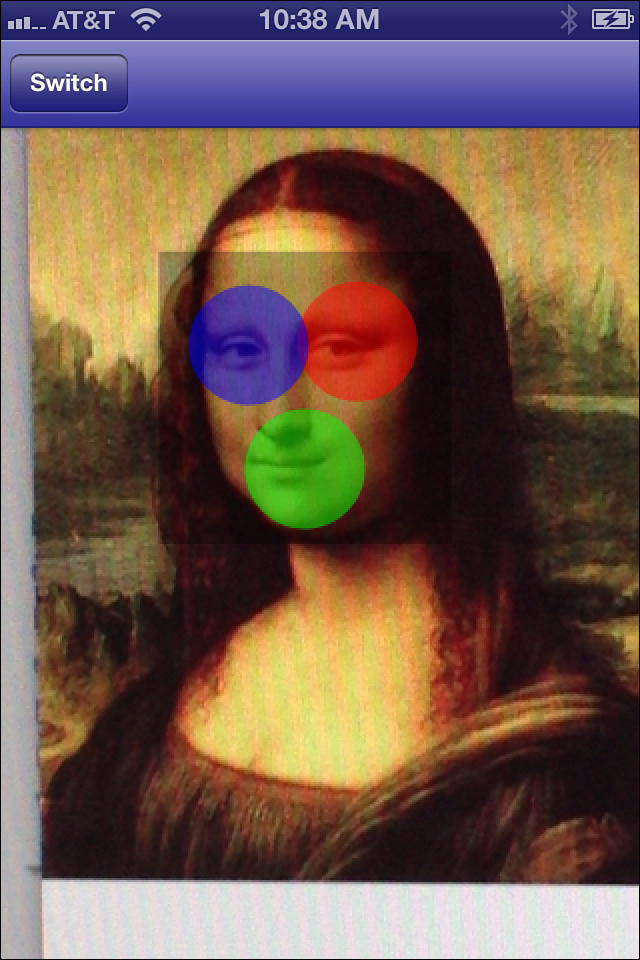
Figure 7-2. Automatically detecting faces and their features.
Each member of the CIFaceFeature array returned by the detection can report several features of geometric interest. These include the rectangular bounds around the face and positions for the left and right eyes and the mouth. These subfeatures are not always created, so you should first test whether positions are available before using them. Recipe 7-6 demonstrates both test and use.
Recipe 7-6 also handles several workarounds due to Core Image’s portrait EXIF eccentricities. Should Apple update the way Core Image detects faces, adjust the code accordingly for the two remaining orientations.
- (void) snap
{
ciImage = helper.ciImage;
UIImage *baseImage = [UIImage imageWithCIImage:ciImage];
CGRect imageRect = (CGRect){.size = baseImage.size};
NSDictionary *detectorOptions = [NSDictionary
dictionaryWithObject:CIDetectorAccuracyLow
forKey:CIDetectorAccuracy];
CIDetector *detector = [CIDetector
detectorOfType:CIDetectorTypeFace
context:nil options:detectorOptions];
ExifOrientation detectOrientation =
detectorEXIF(helper.isUsingFrontCamera, NO);
NSDictionary *imageOptions = [NSDictionary
dictionaryWithObject:[NSNumber numberWithInt:detectOrientation]
forKey:CIDetectorImageOrientation];
NSArray *features =
[detector featuresInImage:ciImage options:imageOptions];
UIGraphicsBeginImageContext(baseImage.size);
[baseImage drawInRect:imageRect];
for (CIFaceFeature *feature in features)
{
CGRect rect = rectInEXIF(detectOrientation,
feature.bounds, imageRect);
if (deviceIsPortrait() && helper.isUsingFrontCamera) // workaround
{
rect.origin = CGPointFlipHorizontal(rect.origin, imageRect);
rect.origin =
CGPointOffset(rect.origin, -rect.size.width, 0.0f);
}
[[[UIColor blackColor] colorWithAlphaComponent:0.3f] set];
UIBezierPath *path = [UIBezierPath bezierPathWithRect:rect];
[path fill];
if (feature.hasLeftEyePosition)
{
[[[UIColor redColor] colorWithAlphaComponent:0.5f] set];
CGPoint position = feature.leftEyePosition;
CGPoint pt = pointInEXIF(detectOrientation, position,
imageRect);
if (deviceIsPortrait() && helper.isUsingFrontCamera)
pt = CGPointFlipHorizontal(pt, imageRect); // workaround
UIBezierPath *path = [UIBezierPath bezierPathWithArcCenter:pt
radius:30.0f startAngle:0.0f endAngle:2 * M_PI
clockwise:YES];
[path fill];
}
if (feature.hasRightEyePosition)
{
[[[UIColor blueColor] colorWithAlphaComponent:0.5f] set];
CGPoint position = feature.rightEyePosition;
CGPoint pt = pointInEXIF(detectOrientation, position,
imageRect);
if (deviceIsPortrait() && helper.isUsingFrontCamera)
pt = CGPointFlipHorizontal(pt, imageRect); // workaround
UIBezierPath *path = [UIBezierPath bezierPathWithArcCenter:pt
radius:30.0f startAngle:0.0f endAngle:2 * M_PI
clockwise:YES];
[path fill];
}
if (feature.hasMouthPosition)
{
[[[UIColor greenColor] colorWithAlphaComponent:0.5f] set];
CGPoint position = feature.mouthPosition;
CGPoint pt = pointInEXIF(detectOrientation, position,
imageRect);
if (deviceIsPortrait() && helper.isUsingFrontCamera)
pt = CGPointFlipHorizontal(pt, imageRect); // workaround
UIBezierPath *path = [UIBezierPath bezierPathWithArcCenter:pt
radius:30.0f startAngle:0.0f endAngle:2 * M_PI
clockwise:YES];
[path fill];
}
}
imageView.image = UIGraphicsGetImageFromCurrentImageContext();
UIGraphicsEndImageContext();
}
Get This Recipe’s Code
To find this recipe’s full sample project, point your browser to https://github.com/erica/iOS-6-Advanced-Cookbook and go to the folder for Chapter 7.
Recipe: Sampling a Live Feed
You can use bitmap access to create real-time responses for the user. Recipe 7-7 samples the center of each image to retrieve a prevailing color. It works by extracting a 128-by-128-pixel swatch and performing some basic statistical image processing on it. The navigation bar’s color continuously updates to display this most popular color from the center of the sampled feed.
This method converts each pixel from RGB to HSB, enabling the algorithm to retrieve a characteristic hue. It increases the histogram bucket for the hue and accumulates the saturation and brightness—that accumulation will eventually be divided by the number of samples in that bucket to create an average saturation and brightness for a given hue.
The most popular hue in the sample wins. The hue with the greatest hit count (that is, the mode) forms the basis of the new color, with the average saturation and brightness rounding out the creation. That color is assigned to tint the navigation bar.
Recipe 7-7. Analyzing Bitmap Samples
#define SAMPLE_LENGTH 128
- (void) pickColor
{
// Retrieve the center 128x128 sample as bits
UIImage *currentImage = helper.currentImage;
CGRect sampleRect =
CGRectMake(0.0f, 0.0f, SAMPLE_LENGTH, SAMPLE_LENGTH);
sampleRect = CGRectCenteredInRect(sampleRect,
(CGRect){.size = currentImage.size});
UIImage *sampleImage =
[currentImage subImageWithBounds:sampleRect];
NSData *bitData = sampleImage.bytes;
Byte *bits = (Byte *)bitData.bytes;
// Create the histogram and average sampling buckets
int bucket[360];
CGFloat sat[360], bri[360];
for (int i = 0; i < 360; i++)
{
bucket[i] = 0; // histogram sample
sat[i] = 0.0f; // average saturation
bri[i] = 0.0f; // average brightness
}
// Iterate over each sample pixel, accumulating hsb info
for (int y = 0; y < SAMPLE_LENGTH; y++)
for (int x = 0; x < SAMPLE_LENGTH; x++)
{
CGFloat r = ((CGFloat)bits[redOffset(x, y,
SAMPLE_LENGTH)] / 255.0f);
CGFloat g = ((CGFloat)bits[greenOffset(x, y,
SAMPLE_LENGTH)] / 255.0f);
CGFloat b = ((CGFloat)bits[blueOffset(x, y,
SAMPLE_LENGTH)] / 255.0f);
// Convert from RGB to HSV
CGFloat h, s, v;
rgbtohsb(r, g, b, &h, &s, &v);
int hue = (hue > 359.0f) ? 0 : (int) h;
// Collect metrics on a per-hue basis
bucket[hue]++;
sat[hue] += s;
bri[hue] += v;
}
// Retrieve the hue mode
int max = -1;
int maxVal = -1;
for (int i = 0; i < 360; i++)
{
if (bucket[i] > maxVal)
{
max = i;
maxVal = bucket[i];
}
}
// Create a color based on the mode hue, average sat & bri
float h = max / 360.0f;
float s = sat[max]/maxVal;
float br = bri[max]/maxVal;
CGFloat red, green, blue;
hsbtorgb((CGFloat) max, s, br, &red, &green, &blue);
UIColor *hueColor = [UIColor colorWithHue:h saturation:s
brightness:br alpha:1.0f];
// Display the selected hue
self.navigationController.navigationBar.tintColor = hueColor;
free(bits);
}
Get This Recipe’s Code
To find this recipe’s full sample project, point your browser to https://github.com/erica/iOS-6-Advanced-Cookbook and go to the folder for Chapter 7.
Converting to HSB
Recipe 7-8 depends on converting its colors to HSB from RGB using the function in Listing 7-9. This function is adapted from the author’s Ph.D. advisor Jim Foley’s seminal textbook on computer graphics, Computer Graphics: Principles and Practice in C (2nd Edition) (Addison-Wesley Professional, ISBN-13: 9780201848403).
Listing 7-9. Converting Between RGB and HSB
void rgbtohsb(CGFloat r, CGFloat g, CGFloat b, CGFloat *pH,
CGFloat *pS, CGFloat *pV)
{
CGFloat h,s,v;
// From Foley and Van Dam
CGFloat max = MAX(r, MAX(g, b));
CGFloat min = MIN(r, MIN(g, b));
// Brightness
v = max;
// Saturation
s = (max != 0.0f) ? ((max - min) / max) : 0.0f;
if (s == 0.0f) {
// No saturation, so undefined hue
h = 0.0f;
} else {
// Determine hue distances from...
CGFloat rc = (max - r) / (max - min); // from red
CGFloat gc = (max - g) / (max - min); // from green
CGFloat bc = (max - b) / (max - min); // from blue
if (r == max) h = bc – gc; // between yellow & magenta
else if (g == max) h = 2 + rc – bc; // between cyan & yellow
else h = 4 + gc – rc; // between magenta & cyan
h *= 60.0f; // Convert to degrees
if (h < 0.0f) h += 360.0f; // Make non-negative
}
if (pH) *pH = h;
if (pS) *pS = s;
if (pV) *pV = v;
}
Summary
This chapter introduced code-level ways to work with image capture hardware on iOS devices. You read how to survey onboard equipment and how to tweak the settings. You discovered how the AVFoundation framework offers direct access to feeds without using a standard image picker. You also explored how you can sample and process the data exposed by those feeds. Here are a few final thoughts to take away from this chapter:
• The OpenCV computer vision library has been widely ported to iOS. Consider making use of its features directly rather than reinventing the wheel. You might also want to explore Accelerate and Core Image.
• I probably spent more time working through the fussy details of the AVFoundation wrapper class than on any other examples in this Cookbook series. Just getting orientation conversions alone took hours. If you do find errors, please contact me so that I can fix the details on the sample code repository and in any future printings.
• Feeds from the newest iOS devices can be huge due to the high quality of the built-in cameras. The front camera generally offers a lower-resolution data feed than the back camera. Don’t be afraid to subsample and use only those parts of the image that help your application.